
Choose your operating system:
Windows
macOS
Linux
In the Unreal Editor, you can change any Level Viewport to a specialized Cinematic Viewport . The Cinematic Viewport enables additional functionality, behavior, and display modes that can assist you with cinematic content creation. This guide gives an overview of how to enable the Cinematic Viewport and its features.
Prerequisites
-
You have a project that is using Sequencer. You can use one of the provided Cinematic Samples if you don't already have one.
-
Sequencer is currently open in your Level.
Enabling the Cinematic Viewport
To enable the Cinematic Viewport mode, select the Viewport Perspective menu and enable Cinematic Viewport .
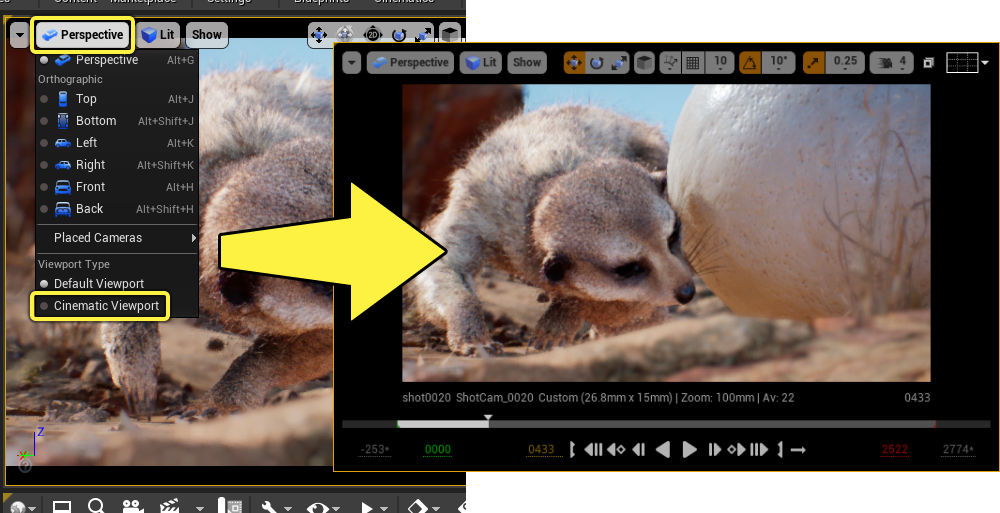
Overview
Once the Cinematic Viewport is enabled and Sequencer is opened, your viewport should now be displaying new cinematic elements.

Film Overlays
The Film Overlays menu contains visual guides for the viewport that you can enable to assist with your framing and composition. There are two main categories of overlays, Composition and Frame overlays.

Composition Overlays
|
Name |
Description |
|---|---|
|
Disabled |
The default view mode, which does not display any overlay. |
|
Grid (3x3) |
Displays a 3x3 grid on the viewport, allowing for framing based on Rule of Thirds .
|
|
Grid (2x2) |
Displays a 2x2 grid on the viewport.
|
|
Crosshair |
Displays a central reticle, useful for emulating photography reticles.
|
|
Rabatment |
Displays a rabatment overlay on the viewport, allowing for framing based on Rabatment of the Rectangle .
|


Composition overlay lines can also be tinted to any color or alpha value you want. Clicking the color bar next to Tint will open the Color Picker where you can select the color and transparency of the lines.
Frame Overlays
Frame Overlays are guidelines used to emulate Safe Areas or Letterboxing when framing your image.
|
Name |
Description |
|---|---|
|
Action Safe |
Displays the "Action" safe guidelines. By default it appears to appear at 95% of the screen space margins and is colored red .
|
|
Title Safe |
Displays the "Title" safe guidelines. By default it appears at 90% of the screen space margins and is colored yellow .
|
|
Custom Safe |
Displays a custom safe guideline. By default it appears at 85% of the screen space margins and is colored green .
|
|
Letterbox Mask |
Displays a letterbox overlay, showing what the target aspect ratio will crop out of the original image. By default the letterbox aspect ratio is 2.35:1 .
You will need to ensure that the Constrain Aspect Ratio property is enabled on your Camera's Properties in order for the letterboxing to be accurate for your camera's sensor size. |


Each safe region entry has a percentage field next to it, which corresponds to the screen size of the guideline. A value of 100% will make the guidelines reach the outer edges of the screen, and 0% will cause the guidelines to reach the centerpoint of the screen. The guideline ranges are clamped between 1% and 99% in order to remain fully visible.

You can input different letterbox aspect ratios next to the Letterbox Mask entry. Doing this will change the shape of the letterbox to conform to the input aspect ratio.

Both the safe and letterbox guidelines can be tinted to any color by clicking the color bar under their properties. Doing this will open the Color Picker where you can select the color and transparency of the guidelines.

Playback Preview and Controls
When the Cinematic Viewport is enabled, new controls and displays will appear at the bottom of the viewport.

The upper region of this area displays information about the current shot, camera, and timing.

-
The name of the current Sequence and current Camera .
-
The current camera's Filmback Properties .
-
The current Time of the sequence or Master Sequence .
A time bar is also displayed and can be interacted with by utilizing similar Playhead interactions from Sequencer. The displayed time bar synchronizes with the time bar in Sequencer.

The bottom region displays time and playback controls.

-
The start times of the Working Range and Playback Range .
-
The current time of the active sequence.
-
Playback Controls . These can be clicked to play, pause, and perform other playback functions.
-
The end time of the Playback Range and Working Range .
In the bottom region, the time displays can be interacted with by clicking them and typing in different values, or by clicking and dragging left and right to scrub their values.

Allow Cinematic Control
When working on cinematic content in Unreal Engine, you may want to use Multiple Viewports in order to preview your scene from different perspectives in conjunction with the main cinematic view. You can use the Allow Cinematic Control option to choose which viewport should display the cinematic when Sequencer has camera control.

Allow Cinematic Control can only be enabled or disabled on viewports using the Perspective view mode.
By default, Unreal Engine's primary viewport has Allow Cinematic Control enabled.

In situations where you have more than one viewport set to the Perspective viewport, you can choose which viewports will have the full cinematic control by enabling or disabling Allow Cinematic Control in the viewport options menu. In most cases, you will want to enable Allow Cinematic Control for at least one viewport, and leave it disabled for all others.
