Adjust the picture quality of your render with Movie Render Queue's Image Settings
Choose your operating system:
Windows
macOS
Linux
The Render Settings in Movie Render Queue are used to customize how your sequences are rendered. These include additional rendering processes such as anti-aliasing, custom console commands, output format, rendering mode, and more.
This guide covers the settings interface, the list of settings that can be added, and the ability to save your settings as presets.
Prerequisites
-
You have completed the prerequisite steps from the Movie Render Queue page.
Opening Render Settings
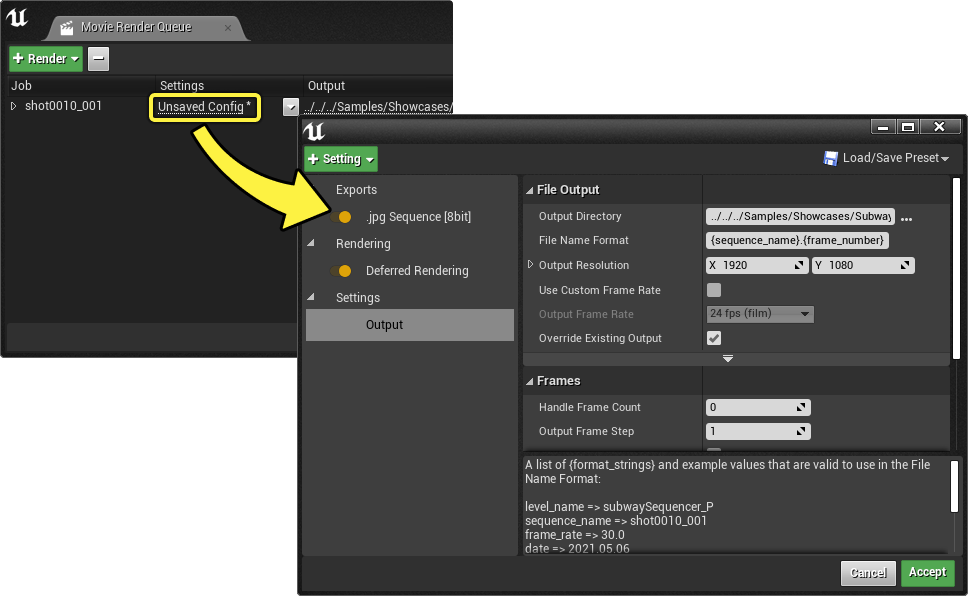
You can open the Render Settings window by clicking the Settings entry for your job.
Interface Overview
There are three main areas of the Render Settings window:

-
Toolbar : The toolbar contains a menu for adding additional settings and loading or saving the current setting list to a preset.
-
Settings List : The Settings List shows the current settings to apply to the job, and includes toggles to enable or disable them. Each setting is categorized into either Exports , Rendering , or Settings .
-
Settings Details : Shows the properties for the selected setting from the Settings List .
Settings List
Clicking the + Setting button will reveal the list of different settings you can add to your job. They are categorized into three groups; Settings , Exports , and Rendering .

Settings
The Settings category contains options for render quality options, console variables, and miscellaneous render options.
|
Name |
Description |
|---|---|
|
The Output setting controls your output file's directory, file name, frame rate, and output resolution. Your file name and directory path can be customized using {token} format strings. Output is a required setting and cannot be deleted from the settings window. |
|
|
Anti-aliasing controls the number of samples used to produce the final render. There are two types of sampling that produce the render: Spatial and Temporal . |
|
|
Burn In enables adding custom watermarks to your render, which contain information about the render and shot. You can choose whether the Burn In is added to the final image, or is rendered to a separate layer. |
|
|
The Camera setting contains settings for the shutter timing and you can specify an overscan percentage to render extra pixels around the edges of your images. |
|
|
The Color Output setting overrides Unreal's default color space settings with a custom OpenColorIO (OCIO) configuration. You can also use it to disable the Tone Curve portion of post-processing even if not using an OCIO-based workflow. |
|
|
Console Variables enables console commands to be designated when the render begins. This is useful when trying to apply quality settings that are too computationally expensive for real-time preview in the Editor. The variables will be reverted upon the render completing. |
|
|
Debug Options contain options for debugging certain render behaviors. Typically you do not need to use these options unless you're troubleshooting issues within your renders. |
|
|
Game Overrides change several common game-related settings, such as Game Mode and Cinematic Quality settings. This is useful if the game's normal mode displays UI elements or loading screens that you do not want to capture. |
|
|
The High Resolution settings enable the use of tiled renders to produce larger images without being constrained by maximum texture sizes or memory limits on GPUs. |
Visit Image Settings for a more comprehensive look at these options.

Image Settings
Adjust the picture quality of your render with Movie Render Queue's Image Settings
Exports
The Exports category controls what image, audio, and video format you want to output your sequence to.
|
Name |
Description |
|---|---|
|
The Command Line Encoder can be used to create your own output format from third party software, such as FFmpeg. This setting requires an encoder executable and settings to be enabled in your Project Settings. |
|
|
The Final Cut Pro XML format will output an XML file that can be read by Final Cut Pro and other video editing software that support this format. This is not supported in shipping builds. |
|
|
.bmp Sequence [8bit] |
Outputs the movie as a sequence of .bmp images. Pixel values are clamped in the [0-1] range, meaning that no HDR values are preserved. This applies sRGB encoding curve. |
|
Outputs the movie as a sequence of .exr images. HDR values are preserved but if the Tone Curve is enabled, linear values are scaled to approximately the [0-1] range with only the brightest highlights going above one. Disabling the Tone Curve writes linear values in the [0-100] range or more depending on the intensity of lights and other bright objects. No sRGB encoding curve is applied to .exr targets. |
|
|
.jpg Sequence [8bit] |
Outputs the movie as a sequence of .jpg images. Applies sRGB encoding curve. |
|
.png Sequence [8bit] |
Outputs the movie as a sequence of .png images. Applies sRGB encoding curve. Transparency is supported by enabling Enable Alpha Channel Support in Post Processing project setting. |
|
Outputs a .wav audio file alongside any other output formats you have selected. |
|
|
Outputs a .mov file using Apple ProRes, which is Apple's high-quality, lossy video compression codec. This requires the Apple ProRes Media plugin to be enabled. |
|
|
Outputs a movie file using Avid DNx, which is a high-definition lossy video codec. This requires the Avid DNxHR/DNxMXF Media plugin to be enabled. |
More than one export item can be specified for any given sequence. For example, you may choose to export your sequence as both a .jpg image sequence and .wav audio file to combine in your video editing software.
Visit the Export Formats page for a more comprehensive look at these options.

Export Formats
Output your render using a variety of formats in Movie Render Queue.
Output your render using a variety of formats in Movie Render Queue.
Rendering
The Rendering category contains options for outputting different view-mode images and render passes.
|
Name |
Description |
|---|---|
|
Deferred Rendering |
Outputs the final image for the sequence, matching what you see in the viewport. |
|
Deferred Rendering (Detail Lighting) |
Outputs using a special shader variation which only displays lighting combined with normal maps. Can be useful to show off the geometry of a Level. |
|
Deferred Rendering (Lighting Only) |
Similar to Detail Lighting but without normal maps affecting the lighting. |
|
Path Tracer |
Displays path-tracing data as it is calculated for each frame. Not all rendering features are supported by the Path Tracer at this time. |
|
Deferred Rendering (Reflections Only) |
Outputs using a special shader variation which makes everything in the world reflective. |
|
Deferred Rendering (Unlit) |
Outputs using a special shader variation which displays only base color, with no lighting information. |
|
UI Renderer |
Includes any UMG widgets that have been added to the viewport in the output render. This is an experimental feature. |
|
Object Ids (Limited) |
The Object Ids render pass outputs an image where components in the scene are assigned an ID. IDs can be grouped individually, or based on other factors such as material, folder, or Actor name. This requires the Movie Render Queue Additional Passes plugin to be enabled. Object Ids are not supported in shipping builds. |
Visit the Render Passes Page for a more comprehensive look at these options.

Render Passes
Learn about the different render pass layers in Movie Render Queue.
Learn about the different render pass layers in Movie Render Queue.
Presets
By default, render settings are temporarily set for your editor session and will be lost once the session is closed. You can save your settings as Presets to allow for project-wide sharing or for different settings to be used for different sequences.
There are two types of presets that can be saved and reused: Master and Shot .
Master
Master presets are meant to be applied to the top-level job in order to propagate their settings to the camera cuts beneath them.
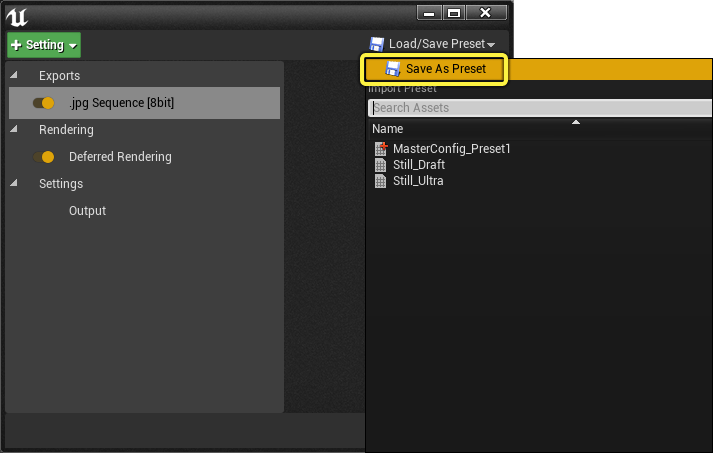
To save your current settings as a master config, click Load/Save Preset and select Save As Preset . You will then be prompted to save a Movie Pipeline Master Config Asset .
You can then apply this preset to a job in your queue by clicking the dropdown menu in the settings field and selecting the saved Movie Pipeline Master Config Asset .

Shot
Shot presets allow for overriding render settings per camera in your render. These may be useful if certain shots in your cinematic sequence require different settings from those that are being applied from the Master.
To save and use Shot presets, expand a job in your render queue to view its child cameras. Each camera has its own settings field that can be overwritten. Click one of the Edit fields to open the settings window for that camera.

You can add settings by clicking the + Setting button and selecting a setting from the list.
You cannot add Export category settings or change the output directory for shot settings, as settings at this level cannot conflict with required settings from the Master.
To save your current settings as a shot preset, click Load/Save Preset and select Save As Preset . You will then be prompted to save a Movie Pipeline Shot Config Asset .

Similar to applying a Master preset, you can apply this preset to a specific shot in your queue by clicking the dropdown menu in the settings field and selecting the saved Movie Pipeline Shot Config Asset .

Master and Shot Config Assets are different asset types and cannot be used interchangeably.
Editing Presets
When you have assigned a preset in the Settings column, it will change to match that preset's name. If you click a preset you will be taken to the configuration editor where you can edit the configuration.
These edits do not change the preset asset , they are only modifying a temporary copy of that preset.
If you would like to modify the presets directly, you have two options:
-
You can open the editor through the Movie Render Queue UI and choose Save as Preset and overwrite the preset that already exists.
-
You can open and edit them directly by double-clicking them in the Content Browser. This will bring up an editor from which you can add settings, edit their values and save the changes using the asset's Save buttons.
![edit render preset asset]()
