Choose your operating system:
Windows
macOS
Linux
You can add a variety of settings to jobs in the Movie Render Queue. These include additional rendering settings like anti-aliasing, color output adjustments, console commands, and more.
Prerequisites
-
You have completed the prerequisite steps from the Movie Render Queue page.
You can choose which settings you want to add by clicking the + Setting dropdown menu in the Movie Render Queue's window and selecting an item under the Settings category.
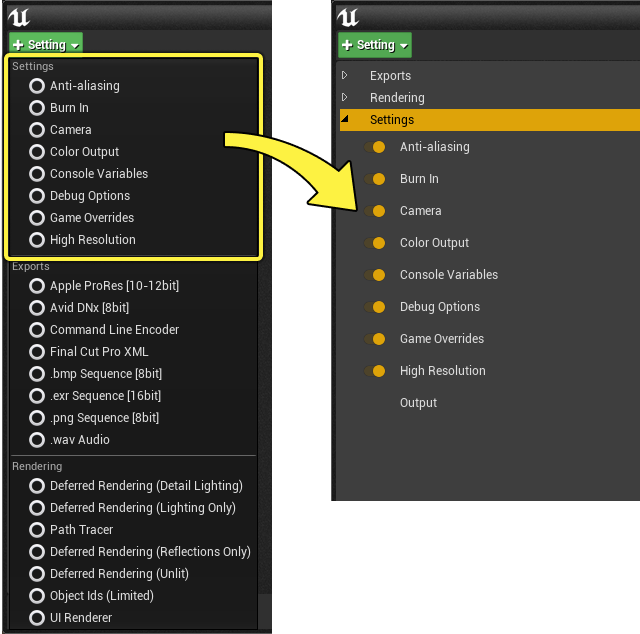
Once added, you can enable and disable them using the toggle switch, and you can select them to customize their properties.
|
Name |
Description |
|---|---|
|
The Output setting controls your output file's directory, file name, frame rate, and output resolution. Your file name and directory path can be customized using {token} format strings. Output is a required setting and cannot be deleted from the settings window. |
|
|
Anti-aliasing controls the number of samples used to produce the final render. There are two types of sampling that produce the render: Spatial and Temporal . |
|
|
Burn In enables adding custom watermarks to your render, which contain information about the render and shot. You can choose whether the Burn In is added to the final image, or is rendered to a separate layer. |
|
|
The Camera setting contains settings for the shutter timing and you can specify an overscan percentage to render extra pixels around the edges of your images. |
|
|
The Color Output setting overrides Unreal's default color space settings with a custom OpenColorIO (OCIO) configuration. You can also use it to disable the Tone Curve portion of post-processing even if not using an OCIO-based workflow. |
|
|
Console Variables enables console commands to be designated when the render begins. This is useful when trying to apply quality settings that are too computationally expensive for real-time preview in the Editor. The variables will be reverted upon the render completing. |
|
|
Debug Options contain options for debugging certain render behaviors. Typically you do not need to use these options unless you're troubleshooting issues within your renders. |
|
|
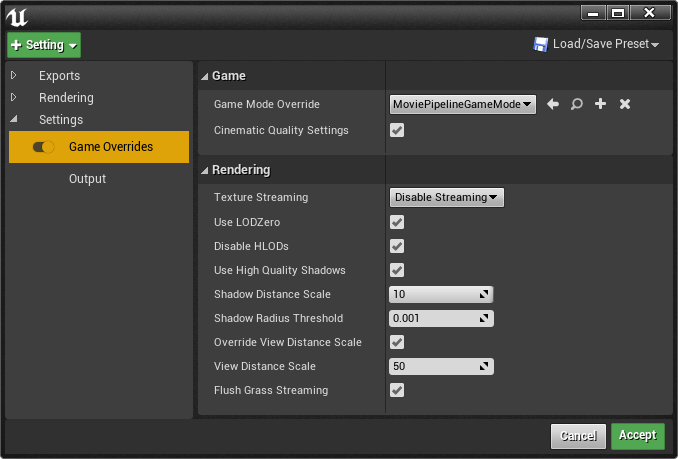
Game Overrides change several common game-related settings, such as Game Mode and Cinematic Quality settings. This is useful if the game's normal mode displays UI elements or loading screens that you do not want to capture. |
|
|
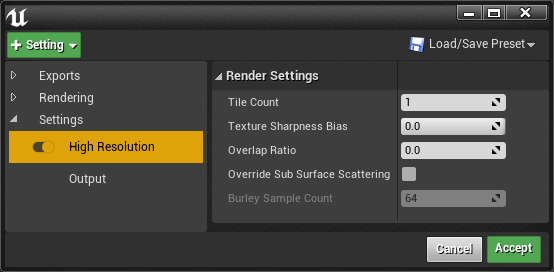
The High Resolution settings enable the use of tiled renders to produce larger images without being constrained by maximum texture sizes or memory limits on GPUs. |
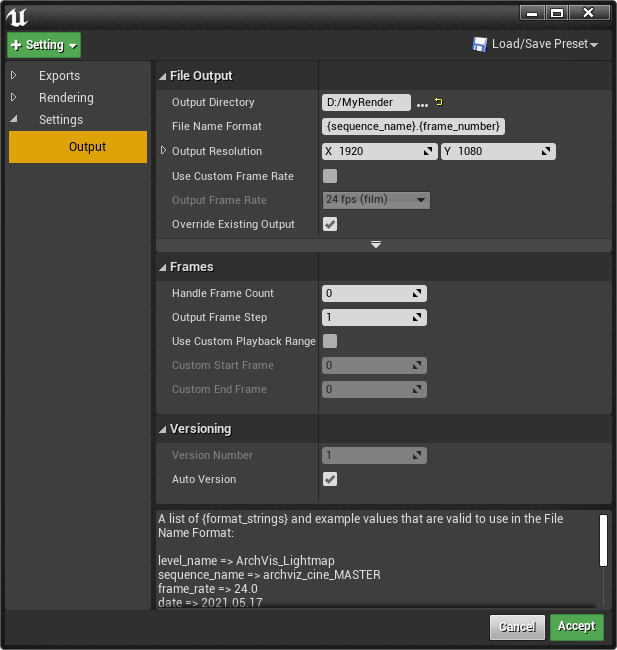
Output
Output contains settings related to the sequence's resolution and file formatting. Output is a required setting and cannot be deleted from the settings window.
|
Property |
Description |
|---|---|
|
Output Directory |
Designates the file directory where the export saves. |
|
File Name Format |
Determines the file name format given to the export. You can use format string tokens to allow for custom naming. Slashes (/) can also be used here to designate subfolders relative to the Output Directory . |
|
Output Resolution |
Determines the export resolution. |
|
Use Custom Frame Rate |
Enables you to use a custom frame rate different from the one in the Level Sequence. |
|
Output Frame Rate |
Determines the new framerate if you enabled Use Custom Frame Rate . |
|
Override Existing Output |
Enables you to automatically overwrite any files with the same file name. If disabled, an integer, such as 1, will be appended to the file name. |
|
Zero Pad Frame Numbers |
Determines how many numbers to pad the output frame numbers. For example a value of 2 will output _01, and a value of 4 will output _0001 for your file name suffix. |
|
Frame Number Offset |
Adds a specified number to the frame numbers when writing to the disk during rendering. This allows you to offset issues regarding negative numbers for labeling frames, which confuses most software. So, instead of writing -2, -1, 0, 1 to the disk, you can write out 98, 99, 100, 101 by setting the Frame Number Offset to 100. |
|
Handle Frame Count |
Determines the number of frame handles to include for each shot. This will expand each shot section by the given number of frames on both sides and render them. |
|
Output Frame Step |
The amount of frames to skip for every frame. For example, setting the value to 2 sets the rendering to every other frame. For the frames that are skipped, the game will still tick to make the results between rendering every frame and every stepped frame more consistent. Some image quality differences will be visible (due to a different temporal history). This feature is experimental. |
|
Use Custom Playback Range |
Enables you to designate a custom playback range different from the sequence. |
|
Custom Start Frame |
Determines the frame start if you enabled Custom Playback Range. Start frame is Inclusive. |
|
Custom End Frame |
Determines the frame end if you enabled Custom Playback Range. End frame is Exclusive, so a Start Time of 0 and an End Time of 1 will render only one frame (frame 0). |
|
Auto Version |
If enabled, Movie Render Queue will check the most recent version number from the last render in the output directory, increment it by 1, then use that value for the next render's version number. |
|
Version Number |
If Auto Version is disabled, the value in this field will be used as the version number for the render output if using the {version} token. |
Format String Information
The File Name Format property allows for using custom tokens, known as Format Strings to allow for customizing a file name format. When a token is specified in the file name format, it will be replaced with the intended name when the files are being rendered and saved.

The following tokens are available for you to use:
|
Token Name |
Description |
|
|---|---|---|
|
{level_name} |
The name of the level the render is occurring in. |
|
|
{sequence_name} |
The Level Sequence Asset name. |
|
|
{frame_rate} |
The frame rate of the sequence, or the overridden frame rate if Use Custom Frame Rate is enabled. |
|
|
{date} |
Today's date, formatted by {year}.{month}.{day}. |
|
|
{year} |
The current year when the render begins. |
|
|
{month} |
The current month when the render begins. |
|
|
{day} |
The current day when the render begins. |
|
|
{time} |
The current time when the render begins, formatted by {hours}.{minutes}.{seconds}. Uses a 24 hour clock scale. |
|
|
{frame_number} |
The frame number of the sequence being rendered. This token will be stripped for any video output, as it is meant only for image sequence files. |
|
|
{frame_number_shot} |
The frame number of the shot being rendered. This token will be stripped for any video output, as it is meant only for image sequence files. |
|
|
{frame_number_rel} |
The frame number of the sequence being rendered, relative to 0 regardless of the frame start number. Useful if you have sequences that begin in negative regions. This token will be stripped for any video output, as it is meant only for image sequence files. If using time dilation, this value will be used for {frame_number} as well. |
|
|
{frame_number_shot_rel} |
The frame number of the shot being rendered, relative to 0 regardless of the frame start number. Useful if you have sequences that begin in negative regions. This token will be stripped for any video output, as it is meant only for image sequence files. If using time dilation, this value will be used for {frame_number_shot} as well. |
|
|
{camera_name} |
The currently active camera actor name in Sequencer. |
|
|
{shot_name} |
The name of the Shot Section in the Level Sequence, otherwise falls back to sequence asset names. |
|
|
{render_pass} |
Will be replaced with the name of the Render Pass the image is for during rendering. Automatically inserted if rendering multiple render passes to ensure final images have unique names. |
|
|
{output_resolution} |
The full output resolution, formatted by {width}_{height}. |
|
|
{output_width} |
The output resolution's width. |
|
|
{output_height} |
The output resolution's height. |
|
|
{version} |
The version number defined by either Auto Version or Version Number . |
|
|
These tokens become available to use as you add settings to your list. |
||
|
{ts_count} |
The Temporal Sample count of your Anti-aliasing setting, if Anti-Aliasing is being used. |
|
|
{ss_count} |
The Spatial Sample count of your Anti-aliasing setting, if Anti-Aliasing is being used. |
|
|
{shutter_timing} |
The Shutter Timing property of your Camera setting, if Camera is being used. |
|
|
{overscan_percentage} |
The Overscan Percentage property of your Camera setting, if Camera is being used. |
|
|
{tile_count} |
The Tile Count property of your High Resolution setting, if High Resolution is being used. |
|
|
{overlap_percent} |
The Overlap Ratio property of your High Resolution setting, if High Resolution is being used. |
|
Anti-Aliasing
Anti-Aliasing controls the number of samples used to produce a final frame. The Movie Render Queue adds the ability to combine multiple renders together to produce a final frame. This significantly increases the quality of anti-aliasing, motion blur, and can decrease noise from ray tracing. There are two types of sampling that produce the final frame: Temporal and Spatial .
Temporal sampling takes the time the camera shutter is open (based on the camera/post-processing Motion Blur Amount setting) and slices the frame into corresponding time slices. The engine then evaluates at the center of each time slice while using the standard engine motion blur to interpolate between each time slice. This enables rotational motion blur by representing the motion blur as many small directional motion blurs.
Because the engine is ticked (and by extension time passes in the world) these are called temporal samples. For each temporal sample, there are as many renders accumulated according to the Spatial Sample Count variable. Using too many temporal samples will create too small of a delta time for the engine to handle and will result in warnings after a render.
Spatial sampling takes each sample that is going to be rendered and renders it multiple times, each time jittering the camera a little bit. This is useful for renders where you have a very short motion blur duration and still need more samples to increase anti-aliasing or reduce noise.
Any combination of spatial and temporal sampling produces the same pattern of offsets used for anti-aliasing. This means that it is generally more efficient to put your samples into temporal sampling instead of spatial, since non-moving objects will receive the same anti-aliasing, and moving objects will be blurred, hiding the aliasing.
Increasing the Temporal Sample count will result in smoother, radial motion blur.


You can use Spatial and Temporal sampling with TAA to experiment with anti-aliasing results, though it is not recommended in most cases. If TAA is enabled then there is a limit on how many unique positions are chosen for anti-aliasing. This limit is defined by r.TemporalAASamples , which defaults to 8. If TAA is enabled and you have more than 8 samples, you should enable Override Anti-Aliasing and set it to None to disable TAA, or increase r.TemporalAASamples to match the sample count resulting from Spatial Count x Temporal Count .
If you use a Temporal Sample Count higher than 1, the sequence will be evaluated on either side of the frame. This means that you will need to extend your tracks in Sequencer to cover the time one frame before the start of your sequence, otherwise there will be no data to sample. Sections will be auto-expanded to cover the timespan evaluated by the first temporal sample. Some track types, like animation or audio, cannot automatically be expanded and will be skipped. You will be notified post render which sections need to be expanded by hand.
|
Name |
Description |
|---|---|
|
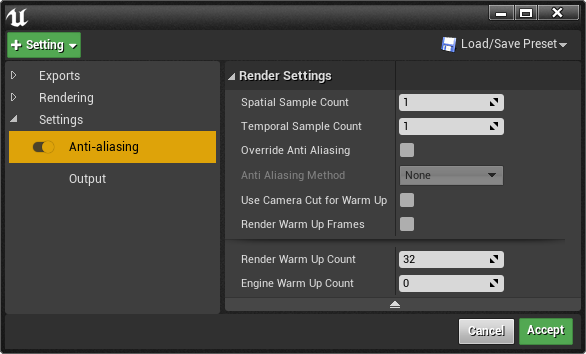
Spatial Sample Count |
Determines how many accumulated renders are in each Temporal Sample. |
|
Temporal Sample Count |
Determines how many time intervals each frame is divided into. |
|
Override Anti-Aliasing |
Enables you to choose a different anti-aliasing method using the Anti-Aliasing Method property. |
|
Anti Aliasing Method |
When Override Anti-Aliasing is enabled, this field will select the desired anti-aliasing method.
|
|
Use Camera Cut for Warm Up |
When enabled, the system will determine the amount of warmup frames based on the Camera Cut section before the start time. This feature will cause these frames to be evaluated during warmup which enables you to have characters animate from their reference pose with cloth, or have particles/cloth appear to continue motion from the previous shot.
|
|
Render Warm Up Frames |
If enabled, Movie Render Queue will submit each Engine Warm Up frame to the GPU to be rendered. This can be useful if your content must be rendered to properly warm up, such as GPU particles or virtual texturing. If disabled Engine Warm Up frames will tick the game thread but not submit renders to the GPU. |
|
Render Warm Up Count |
Controls the number of samples used to build the temporal history before rendering begins. When a camera cut or shot occurs, the temporal history used by TAA is cleared to prevent "ghosts" from the previous camera angle appearing. To allow anti-aliasing on the first frame, this history must be rebuilt. All samples are taken at the same time without ticking the engine between them. This happens immediately before rendering starts regardless of the number of Engine Warm Up Count frames or whether or not Render Warm Up Frames is enabled. |
|
Engine Warm Up Count |
Indicates the number of frames to run the engine for before rendering begins. These frames are not submitted to the GPU unless Render Warm Up Frames is enabled. Typically the warmup is useful when you need time for cloth physics, particles, or other dynamics to settle into the right position before rendering starts. |

Burn In
Burn In allows for adding custom watermarks to your render, typically these would be timecode related. You can choose whether the burn in is applied to the final image, or rendered to a separate layer

The Burn In image has the following display format:

-
Job name.
-
Date and Time when render begins.
-
The Level name.
-
The author of the render, defined by the Job Details.
-
The source control changelist and branch the current render was made on.
-
The current frame and time of the Master sequence.
-
Focal Length, f-stop, and focal distance in milimeters of the current camera.
-
The current frame and time of the shot sequence.
Camera
The Camera setting changes how motion blur is presented and allows for overscanning.

|
Name |
Description |
|---|---|
|
Shutter Timing |
Shutter Timing controls the bias of the motion blur angle to either be before, during, or after a frame.
|
|
Overscan Percentage |
Increasing this value will enable rendering additional pixels beyond the output resolution based on a percentage multiplied against the Output Resolution. The camera Field of view is also inflated proportionally to this percentage so that the original image within the non-overscanned region is maintained. This property is meant to be used primarily with the EXR output format, as it encodes the region information into a format unique to EXR. It will work with other formats but the final output resolution will be larger than expected and the framing of the shot will have changed. |
Color Output
The Color Output setting overrides the default color space settings with a custom Open Color IO (OCIO) configuration.

Set the Is Enabled field to true to enable OCIO color conversion and disable the Tone Curve automatically. You can then set the Configuration Source to an OCIO configuration created in the content browser, and you can use the Source Color Space and Destination Color Space settings to convert from one color space to another. If you are doing post production work (stencil layers, object ids, etc.) you will want to use an OCIO based workflow as most post production workflows require you to be in Linear space. Checking Disable Tone Curve will have the engine output in Linear space when combined with .exr image sequences.
The Disable Tone Curve setting enables you to manually disable the use of filmic tone curve even if you have not enabled OCIO. This option will be greyed out if Is Enabled is set to true. Disabling the tone curve makes it possible to output .exr files that store the linear data that comes from the Post Processing pipeline that will not be rescaled down to the [0-~1] range as is normally done for display.
For more information about OCIO configurations, visit the Color Management with OpenColorIO page.
Console Variables
The Console Variables setting will change any console variables that you designate when the render begins. This is useful when trying to increase ray tracing sample counts or apply other quality settings that are too expensive for real-time preview in the Editor.

Any console variables in the Console Variables list will be set to your designated value when your movie render starts. The original value before the render starts is saved, and when the render finishes, the console variable will be restored to the original value. Each entry in the list is a key-value pair consisting of the name of the console variable and the value you want to set it to.
The Start Console Command and End Console Commands list will execute the provided console command before the render starts, and after the render ends. This can be used for running console commands that are not variables, such as executing Custom Events .
Debug Options
Contains options for debugging certain render behaviors.
|
Name |
Description |
|---|---|
|
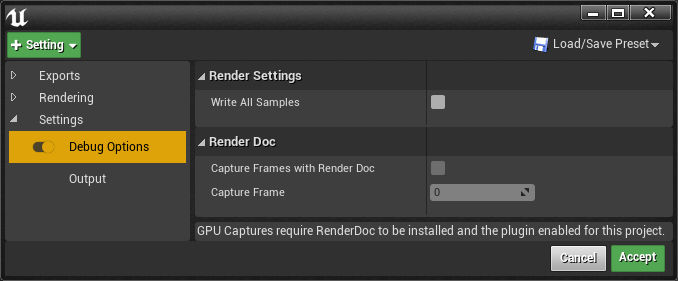
Write All Samples |
Enabling this will write every single render sample produced by the GPU to disk alongside the output so you can inspect the results of individual temporal or spatial sub-sample renders without accumulation. |
|
Capture Frames with Render Doc |
Enable this to specify a frame number on the Capture Frame property. Requires RenderDoc . |
|
Capture Frame |
Specify a sequence frame number to capture and it will automatically trigger RenderDoc on that frame and write the capture to disk where you can inspect visual issues. |
Game Overrides
This overrides several common game-related settings, such as Game Mode and Cinematic Quality settings. This is useful if the game's normal mode displays UI elements or loading screens that you do not want captured.
|
Property |
Description |
|---|---|
|
Game Mode Override |
Overrides the map's default game mode with another game mode. This is useful if the game's normal mode displays a UI or loading screen you do not want captured. By default the empty MoviePipelineGameMode is used which hides the player. |
|
Cinematic Quality Settings |
Automatically applies the Cinematic quality setting in the Engine Scalability Settings . |
|
Texture Streaming |
Determines what methods should be used to load textures in each frame. |
|
Use LODZero |
Enables the highest quality settings for meshes and particle systems, regardless of distance. |
|
Disable HLODs |
Disables Hierarchal LODS to use real meshes, regardless of distance. |
|
Use High Quality Shadows |
Enables some common shadow related settings to increase quality in renders. |
|
Shadow Distance Scale |
Multiplies the distance at which a shadow is visible on an object. Higher values mean shadows are visible for more distant objects. |
|
Shadow Radius Threshold |
Overrides the minimum on-screen size required for an object to cast shadows. Smaller values mean smaller objects will cast shadows. |
|
Override View Distance Scale |
Overrides the View Distance Scale for objects. Useful when the Max Draw Distance is already set to a certain value to improve in-game performance. |
|
View Distance Scale |
Sets the value for the scale if you override the default View Distance Scale. |
High Resolution
The High Resolution settings enable you to use tiled renders to produce larger images than would be normally possible due to maximum texture sizes or memory limits on GPUs. Under High Resolution, you can adjust the Tile Count, Overlap Ratio, and Texture Sharpness Bias.
|
Property |
Description |
|---|---|
|
Tile Count |
Sets the number of tiles the image breaks into while rendering. Uses square formatting, so a 7680x4320 Output Resolution with Tile Count set to 2 will render four total 2x2 tiles at 1920x1080 each. |
|
Texture Sharpness Bias |
Biases the texture mip mapping to pick a higher resolution texture when it might normally not. A more negative number means the bias is more likely to select a higher detailed mipmap than it normally would, but, if the value is too high, it can cause a grainy image. The bias has no effect on textures that are already displaying their highest quality mipmap. |
|
Overlap Ratio |
Controls how much each tile overlaps each other. A value of 0.1 will cause a 10% overlap between the images that are blended together. This is particularly useful for Depth of Field, which normally produces a different result near the edges of images. Using this property makes rendering more time consuming, but can reduce seams between tiles. |
|
Override Sub Surface Scattering |
Some sub-surface scattering methods rely on Temporal Anti Aliasing for image history. Because TAA is not supported in high resolution tiling this option allows you to increase the number of samples to overcome the lack of image history. |
|
Burley Sample Count |
Number of samples to use for Burley sub-surface scattering. |
This example image shows how tiles are combined to create a final image, when the Tile Count is set to 2 and Overlap Ratio is set to .25 (25%). The Overlap Ratio area is being visualized on the tiled image in yellow.


Currently, High Resolution does not support temporal anti-aliasing and some rendering features which rely on-screen space effects. This includes screen space reflections, convolution bloom, lens flares and motion blur on very fast moving objects.