Choose your operating system:
Windows
macOS
Linux
When creating cinematics for gameplay purposes, there may be times when you want to animate an object in Sequencer that is dynamically spawned at runtime. For example, you can create and animate an object that moves along a path within Sequencer but that object is something which can be defined by the player that is spawned during gameplay. With the help of Blueprint Visual Scripting , you can expose binding identifiers from a Level Sequence using the Get Sequence Bindings node and override any of those bindings with your own settings.
In this example, we animate and move an Empty Actor along a path, allowing the player to change the object to different effects with the press of a button.

For this how-to guide, we are using the Blueprint Third Person Template project with Starter Content enabled.
Steps
-
From the Place Actors panel in the Basic tab, drag an Empty Actor into the Level.
![DynamicAnim_01.png]()
We will animate this Empty Actor inside Sequencer and override the Sequence Bindings to change the Actor to different particle effects.
-
From the Main Toolbar, click the Cinematics button, then select Add Level Sequence and give the Sequence any name.
![DynamicAnim_02.png]()
-
Select the Empty Actor in the Level, then add the Empty Actor to Sequencer.
![DynamicAnim_03.png]()
-
Click the Track button on the Empty Actor and select Transform .
![DynamicAnim_04.png]()
-
Add a keyframe for the Transform track to initialize the Empty Actors current location in the Level.
![DynamicAnim_05.png]()
-
Scrub the Timeline ahead to frame 75 , then move the Empty Actor up in the Level and add a keyframe for the new position.
![DynamicAnim_06.png]()
-
Right-click and copy the first keyframe in Sequencer, then move to frame 150 and right-click and Paste the Transform key.
![DynamicAnim_07.png]()
Copying the first key and pasting it at the end will give us a smooth sequence that we can loop.
-
In the Details panel for the Level Sequence, enable Auto Play and set Loop to Loop Indefinitely .
![DynamicAnim_08.png]()
-
From the Main Toolbar, click the Blueprints button then select Open Level Blueprint .
![DynamicAnim_09.png]()
-
In the Level Blueprint , right-click and add an F keyboard event connected to a Flip Flop node.
![DynamicAnim_10.png]()
-
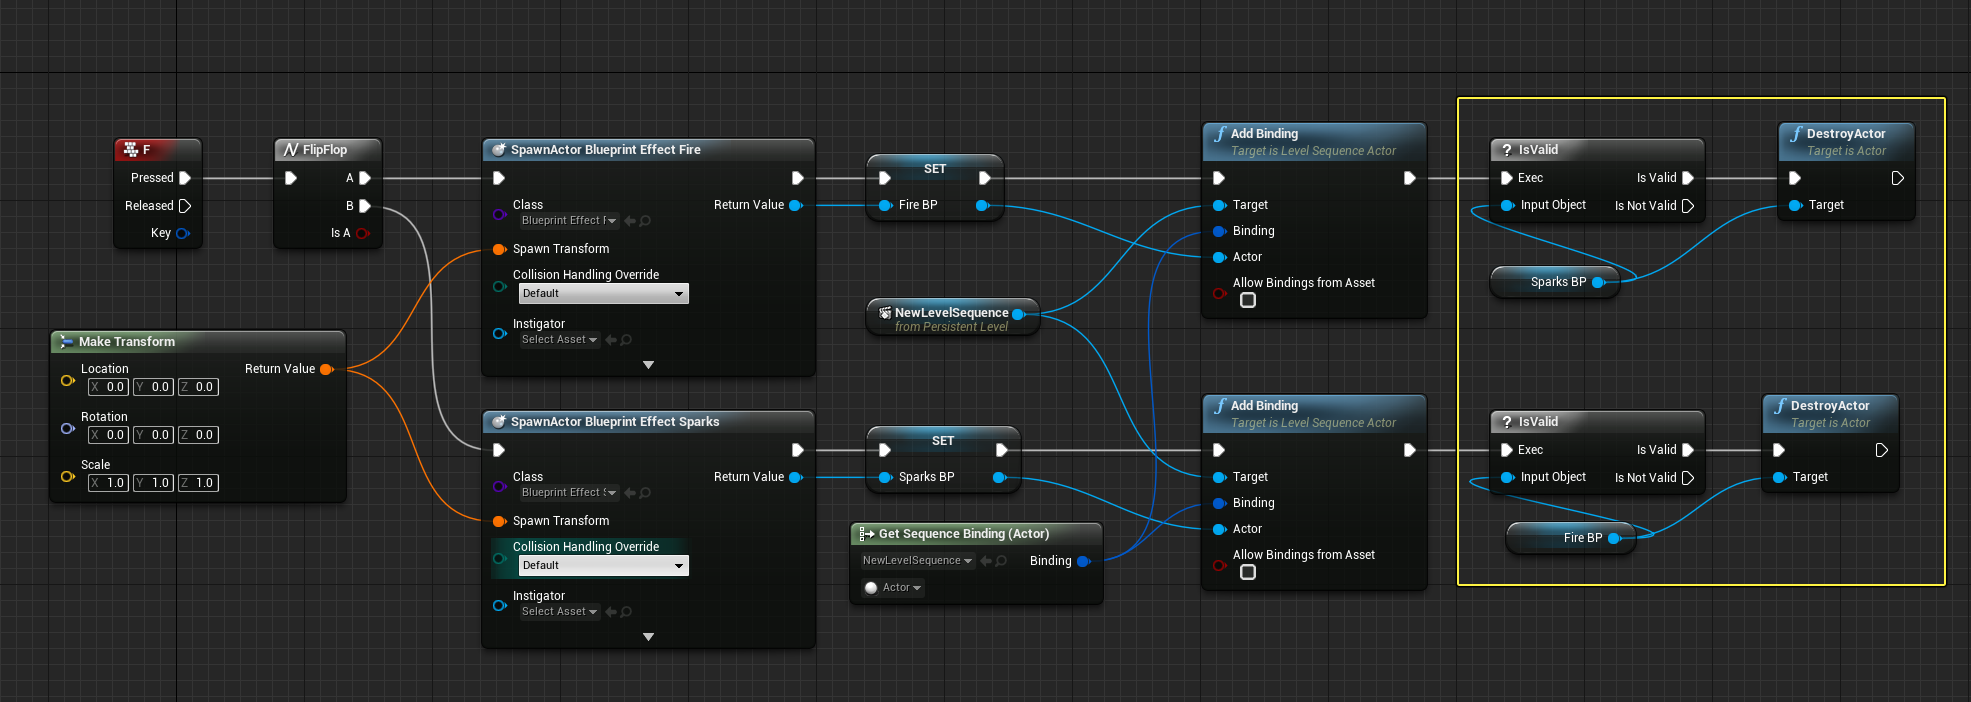
Add two Spawn Actor from Class nodes (one using Blueprint Effect Fire and the other using Blueprint Effect Sparks ) and connect to a Make Transform node as shown.
![DynamicAnim_11.png]()
-
Right-click on the SpawnActor Blueprint Effect Fire node's Return Value and select Promote to Variable and call it Fire BP .
![DynamicAnim_12.png]()
-
Promote the Return Value for the SpawnActor Blueprint Effect Sparks to Sparks BP .
-
Add a reference to your Level Sequence, then off it, use the Add Binding node.
![DynamicAnim_13.png]()
-
Create another Add Binding node and connect each as shown below, feeding the Fire BP and Sparks BP as the Actor .
![DynamicAnim_14.png]()
-
Right-click and use the Get Sequence Binding node (setting the options highlighted below) and connect to both Add Binding nodes.
![DynamicAnim_15.png]()
On the Get Sequence Binding node, you can specify the Level Sequence you want to target and the Binding you want to override. In our example, we only have one track listed in our Level Sequence (our Empty Actor) that we can override. Objects that are added to your Level Sequence that can be overridden will be displayed in the drop-down menu.
-
Bring in the Sparks BP and Fire BP variables and use an IsValid node and Destroy Actor if the object is valid.
![DynamicAnim_16.png]()
Click image for full view.
Our script is complete and will spawn either the fire or sparks effect, override the Empty Actor in our Level Sequence then destroy the other particle effect (if it is valid).
-
Play in the Editor, then press the F key to cycle between our spawned Actors.


End Result
When we play in the Editor and press the F key, our Empty Actor is replaced by our spawned fire or spark effect and continues to use the animation we applied to the Empty Actor.
Not only can you add bindings, you can:
-
Remove Binding to remove the specified Actor from the specified binding.
-
Reset Binding to reset the specified binding back to its default settings.
-
Reset Bindings to reset all overridden bindings back to the default settings.
-
Set Binding to override the specified binding with the specified Actors.
