Choose your operating system:
Windows
macOS
Linux
When you want more control over the way your objects are animated, the Curve Editor can be used to modify and fine-tune your keyframes. Using the Curve Editor's graph, you can create new keyframes, edit tangents, and use various built-in tools to adjust your animation curves.
The Curve Editor is used in other tools across the Unreal Editor, such as Niagara Visual Effects , Curve Assets , and Animation Curves . This guide provides an overview of how to use the Curve Editor within Sequencer, however, many of the features and functions shown will still be compatible within other areas of the editor as well.
Prerequisites
-
You have an understanding of Keyframing in Sequencer .
Curve Editor Overview
The Curve Editor can be opened from Sequencer by clicking the Curve Editor button in the Sequencer Toolbar .

Once the Curve Editor is opened, you will see the following view:

Toolbar
The Curve Editor Toolbar contains various commands, tools, and options. These can be found listed in the table below.

|
Name |
Icon |
Description |
|---|---|---|
|
Save |
|
Saves the current sequence and any subscenes or shots. |
|
View Modes |
|
Opens a dropdown menu for the Curve Editor View Modes . |
|
Zoom to Fit |
|
Frames and zooms in on the selected keyframes. If no keyframes are selected, then all viewable keyframes within the Graph view will be framed. You can also use the F hotkey for this command. |
|
Focus Playhead |
|
Focuses the graph view on the Playhead without changing zoom level. You can also use the A hotkey for this command. |
|
Zoom to Playback Range |
|
Focuses the graph view so that all keyframes are visible, including the start and end frames of the sequence. |
|
Curve Options |
|
Opens a menu where you can set certain view and behavior preferences of the Curve Editor. Tangent Visibility controls how Tangents are drawn in the graph.
Auto Frame Curves will cause automatic framing and zooming of all visible keyframes on a curve when it is selected from the Outliner . Enabling Curve Tooltips will display a tooltip for a curve's name, time, and value when hovering your cursor over it in the Graph .
|
|
Time and Value Fields |
|
These property fields display the Time and Value of the selected keyframe. You can edit these properties directly by typing in new values. |
|
Selection Mode |
|
Enables normal keyframe and tangent selection and editing. You can also use the Q hotkey for this command. |
|
Transform Mode |
|
Enables the Transform Tool for editing keyframes. You can also use the Ctrl + T hotkey for this command. |
|
Retime Mode |
|
Enables the Retime Tool , which activates a lattice manipulation mode for adjusting keyframe times. You can also use the Ctrl + E hotkey to enable this command. |
|
Multi Select Mode |
|
Enables the Multi Select Tool , which activates a scaling mode for selected groups of keyframes based on an adjustable pivot. You can also use the Ctrl + M hotkey to enable this command. |
|
Time Snapping |
|
Enables keyframe snapping on horizontal (time) increments in the graph. The snap increments are based on Sequencer's Frames Per Second if you are using the Curve Editor from Sequencer. Otherwise, you can click the nearby dropdown menu to select a custom time-based snapping increment.
|
|
Value Snapping |
|
Enables keyframe snapping on vertical (value) increments in the graph. You can select the nearby dropdown menu to select a custom value-based snapping increment, as well as adjust the display of the graph lines.
|
|
Lock Axis |
|
Opens a dropdown menu for selecting which axis to lock keyframe movements to.
|
|
Cubic (Auto) Tangent |
|
Sets the selected keyframes to interpolate automatically, causing the curve's tangents to adjust based on the location of neighboring keyframes in the graph.
|
|
Cubic (User) Tangent |
|
Sets the selected keyframes to use user-defined tangent angles. Whenever you adjust a tangent angle, the keyframe will automatically switch to this mode.
|
|
Cubic (Break) Tangent |
|
Sets the selected keyframes tangents to use broken tangent angles, allowing for keyframes that have different incoming and outgoing tangent angles.
|
|
Linear Tangent |
|
Sets the selected keyframes to use linear tangent angles. This causes the incoming and outgoing tangents to always face their respective neighbors, resulting in abrupt changes when reaching each keyframe.
|
|
Constant Tangent |
|
Sets the selected keyframe to use stepped tangent angles, causing keyframes to maintain their value until reaching the next keyframe.
|
|
Weighted Tangents |
|
Sets the selected keyframe to use weighted tangent angles, causing tangents to use user-defined lengths which determines the influence that tangent angle exerts over its neighboring keyframe tangents.
|
|
Pre Infinity Settings |
|
Opens a dropdown menu for selecting the Pre-Infinity behavior of the selected keyframe or curve. |
|
Post Infinity Settings |
|
Opens a dropdown menu for selecting the Post-Infinity behavior of the selected keyframe or curve. |
|
Flatten Tangent |
|
Flattens the tangents of the selected keyframes horizontally.
|
|
Straighten Tangent |
|
When using Broken Tangents on a keyframe, selecting this will straighten the tangent angles, but not unbreak them. The angles will straighten along an average angle between the two broken tangents. |
|
Filter Tool |
|
Opens the Filter Tool window, where you can bake , simplify , and perform other curve functions. |


Outliner
The Curve Editor Outliner contains header information for all animatable tracks added to your sequence, as well as a track filter and playback controls.

Selecting entries from the list will automatically filter and frame the Graph View to only display curves from that selection and any children.

You can also use the search bar to search for entries to narrow down the list. Any returned results will also include children tracks.

Contents displayed in the outliner are determined by what tracks you have selected from Sequencer. Selecting tracks in the Sequencer window will cause only the selected tracks to appear in the Curve Editor Outliner. Deselecting all tracks in Sequencer will cause all contents to appear in the Curve Editor.

You can disable this selection matching and filtering behavior by disabling Synchronize Curve Editor Selection and Isolate Curve Editor to Selection in the Sequencer Editor Preferences window.
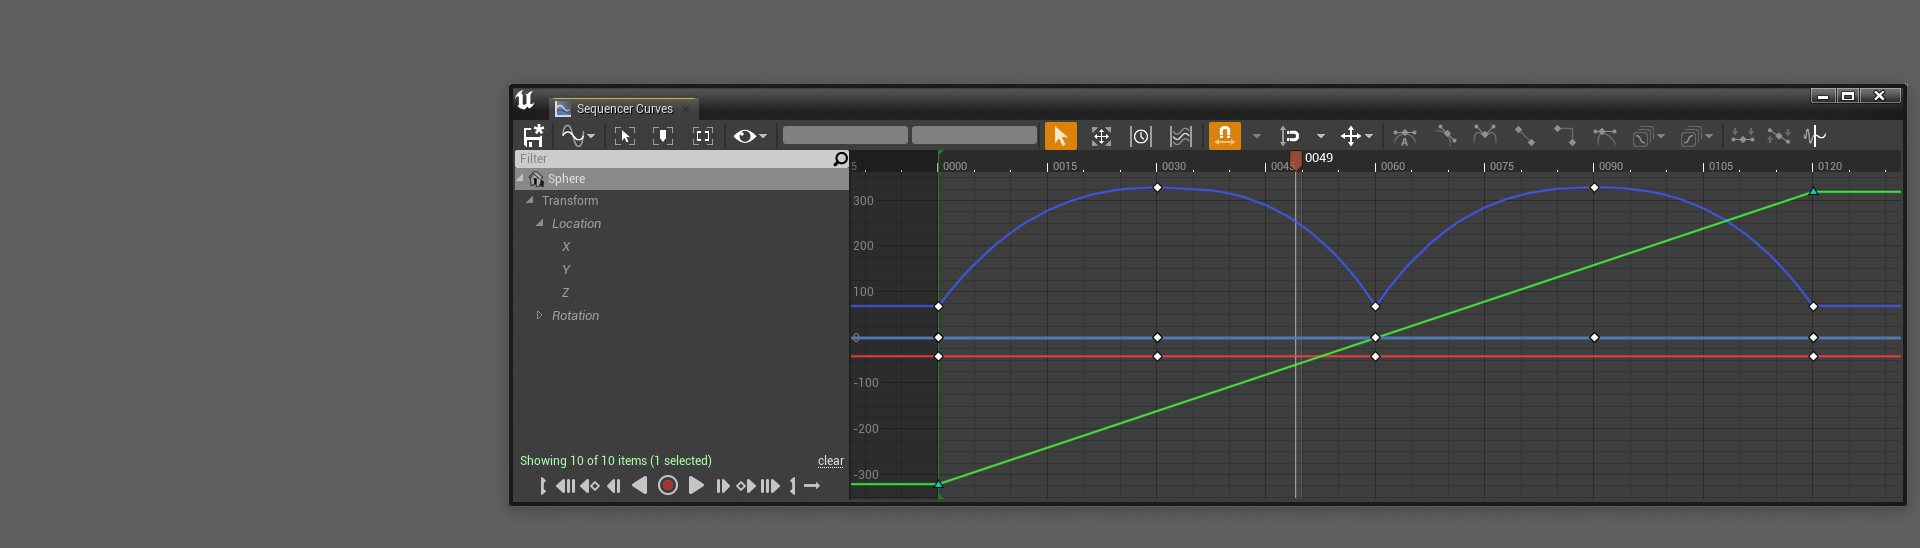
Graph
The Curve Editor Graph contains a two-dimensional display of your keyframes, and the interpolated curves generated. The graph plots both Time and Value on the Horizontal and Vertical axes, respectively, and keyframes are positioned in the graph according to those properties.

Graph Navigation
There are several ways to navigate within the graph, as well as different View Modes you can use for representing curve data.
Panning
Use RMB to pan the graph view freely.

Holding Shift + RMB will pan along either the horizontal or vertical axis, depending on the initial direction of your cursor.

Holding Alt + MMB will pan only along the horizontal axis.
Zooming
Scrolling the mouse wheel will zoom the graph relative to the Playhead .
Holding Alt + RMB will smoothly zoom the graph according to your cursor movement. The zoom pivot is relative to your cursor position upon pressing RMB .
Holding Alt + Shift + RMB will freely zoom the graph according to your cursor movement, which enables scaling time and value axes separately. Moving your cursor up and down will scale the value axis, and moving it left and right will scale the time axis.

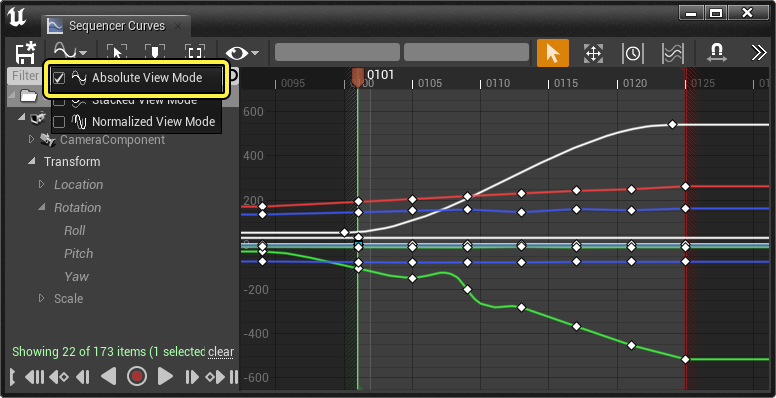
View Modes
The View Modes menu contains different options to visualize your curves.

Absolute View Mode is the default view mode, in which all curves and keyframes are displayed at their exact values in the graph. This mode functions similarly to most animation curve editors.
Stacked View Mode will separate each curve into its own group, and stack them in the graph. Each group's value range is normalized between -1 and 1 .

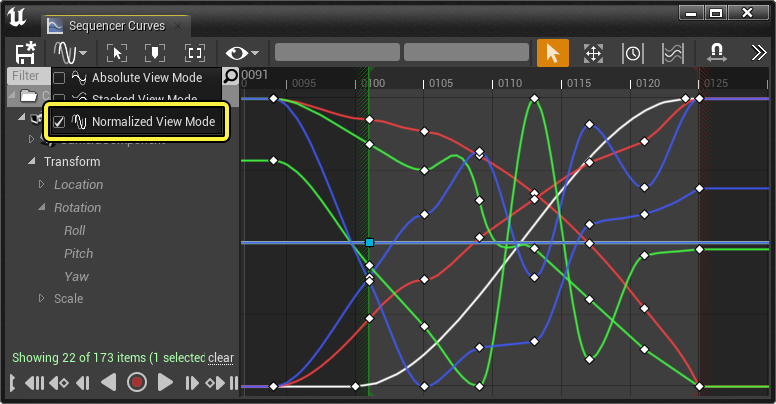
Normalized View Mode will display all curve and keyframe values overlapping along a normalized value range of -1 and 1 . This view can be useful if you are wanting to universally scale curve amounts proportionally.
Curve Editing
The Curve Editor is primarily used for editing your keyframes and tangents . You can add, remove, or change keyframe locations which affect the curve. You can also edit a keyframe's tangent, and control the incoming and outgoing curve vectors of a keyframe, which also affects the curve. There are also a variety of features and behaviors to help with your editing.
Editing Keyframes
Keyframes can be moved by using LMB and dragging them around the graph. Depending on your Snap settings, it should be possible to move a keyframe anywhere along the time and value axes. You can also use MMB to move selected keyframes relative to your cursor position. This provides an easier way for manipulating keyframes without needing selection accuracy.

Holding Shift and dragging a keyframe will cause it to lock on either the horizontal or vertical axes as it moves, depending on the initial direction of your cursor.

Keyframes can be added along a curve by clicking MMB when your cursor is hovered over a curve segment.

Clicking a curve segment will select all keyframes for that curve. With these selected, you can move entire curves by dragging a keyframe or by using MMB to move the curve relative to your cursor.

Copy and Paste
Keyframes can be cut (Ctrl + X), copied (Ctrl + C), and pasted (Ctrl + V) on the same curve and across different curves. There are also certain rules and contexts that determine the paste behavior.
When copying and pasting keys, they will paste at their original value and relative to the Playhead . Pasting multiple keys will cause the starting (left-most) keyframe to be placed at the playhead , and all other keys relative to that point.

Depending on which curve you have selected and filtered in the Outliner , the paste operation will occur on all curves within the current view.

If multiple curves are within the current view and you want to paste on only one of them, you can click the curve segment, which will select all keyframes for that curve, and press Ctrl + V .
Editing Tangents
When selecting your keyframes, they will display their tangent information. Tangents are lines that control the incoming and outgoing direction of the curve as it reaches the keyframe. You can select either side of the tangent handle and edit them to control the curve trajectory from that keyframe.

Depending on your Tangent Visibility settings in the Curve Options menu, your tangents may be displayed differently. Ensure this is set to Selected Keys for the default behavior.

To edit a Tangent, first select a keyframe, then select the tangent handle and drag it around in the graph. Similar to moving keyframes, you can also use the MMB to move the tangent relative to your cursor position.

Multiple tangents can be adjusted at the same time by multi-selecting them and using MMB to edit them.

If multiple keyframes are selected, clicking a single tangent will select all tangent handles of the same side.

Holding the Shift key while moving your tangents will snap them to the nearest 45 degree increment.

Various tangent modes are located in the toolbar , and can be used to change the tangent angle of the selected keyframe. Reference the Toolbar section in this document to view their behaviors.

Weighted Tangents
With a keyframe selected, clicking the Weighted Tangents toolbar button will enable weighted tangent angles. This causes tangents to have user-defined lengths which determines the influence that tangent angle exerts over its neighboring keyframe tangents.
Once Weighted Tangents is enabled, you can stretch the tangent to increase its influence on the curve, or shrink it to decrease its influence.

Storing Curves
Curves can be temporarily saved and stored, which is useful when making experimental changes to your curves as these curves can be reverted to their stored state. While a curve is stored, it will display an after-image on the graph for your reference.

To store a curve, right-click a part of the curve segment and select Store Curves .

After a curve is stored, you can make any edits you want to the curve. Keyframes and tangents can be added, edited, or removed. To revert your curve back to the original stored version, right-click the curve segment and select Apply 1 Stored Curves .
When storing single curves, you can apply them to any single curve in the graph, or multiple curves at the same time.

Multiple curves can also be stored and applied at the same time. To do this, you will need to ensure you have selected the curves you want to store from the outliner in order to filter them in your view. Once you have the curves in your graph, right-click any empty area of the graph and select Store Curves . You can then apply these curves to any other matching channel curves of the same type.
In this example, Rotation X, Y, Z curves are being stored, then applied to Location X, Y, Z curves by right-clicking in the graph and selecting Apply 3 Stored Curves .

Stored curves are lost whenever you close the Sequencer window.
Pre and Post Infinity
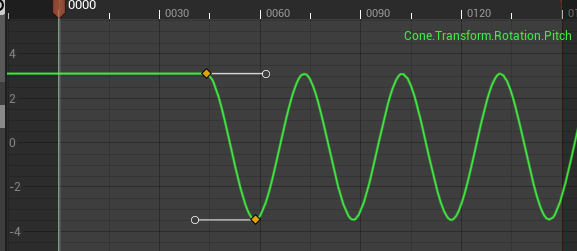
Curves also contain rules for how they should behave in the timeframes before and after their keyframe segments. This is known as Pre and Post Infinity , and can be useful in order to extend the animation on a curve without needing to create additional keyframes. Pre-Infinity affects the curve region before the first keyframe, and Post-Infinity affects the curve region after the last keyframe.
You can access the Pre and Post Infinity settings for your curves by clicking the Pre or Post Infinity buttons in the Toolbar , or by right-clicking a curve segment and selecting Pre-Extrap and Post-Extrap . Both methods require you have a keyframe selected from the curve you want to adjust .

You can choose from the following infinity types:
|
Name |
Description |
|---|---|
|
Constant |
This is the default value for all new curves, and will cause the curve to retain its value leading up to the first key, and after the final key.
|
|
Cycle |
The curve will repeat, using the absolute values of the keyframes for each loop segment.
|
|
Cycle with Offset |
Similar to Cycle , the curve will repeat, however each loop segment's value will be set relative to the previous, causing the curve to compound for each loop.
|
|
Linear |
The curve will project the first and last keyframe's tangent angle outward.
|
|
Oscillate (Ping Pong) |
Similar to Cycle , the curve will repeat, however each loop segment will mirror the previous, going backward and forward for each loop.
|


For looping-based infinity modes, such as Cycle and Oscillate, the loop length is defined by the number of keyframes used. Therefore, it will adjust as you add or adjust the length of your keyframe segments.

Curve Tools
When editing curves, Selection Mode is the default behavior for interacting with keyframes. There are also a variety of other tools you can enable to assist in scaling, transforming, and warping your keyframes.

Transform Tool
The Transform Tool enables a lattice interface when you select your keyframes. You can use the various controls on this lattice to adjust your keyframes' times and values.
To activate the Transform Tool, click the Transform Tool button in the toolbar, then select multiple keyframes.

Various points on the lattice can be manipulated, which scales the entire selection relative to the center point. You can drag the Corners , Edges , and Central areas to adjust the curve.
The pivot point of the transform can also be dragged and changed. It will snap to the edges, corners, and center of the lattice, when moving close to those points.

When the Transform Tool is active, you can also use the Tool Options properties to set explicit values for the lattice. These properties affect specific areas of the lattice and display in absolute Seconds .
|
Name |
Description |
|---|---|
|
Upper / Lower Bound |
These properties control the locations of the upper and lower bounds of the lattice.
|
|
Left / Right Bound |
These properties control the locations of the left and right bounds of the lattice.
|
|
Scale Center X / Y |
These properties control the location of the scale pivot point.
|


Retime Tool
The Retime Tool enables a one-dimensional lattice tool, with which you can specify arbitrary anchor points along the time graph in order to retime your keyframes relative to those points.
To enable the Retime Tool, click the Retime Tool button in the toolbar. This will cause two vertical green lines to appear, which are Retime Anchors .

Drag either of the Retime Anchors to retime your keys. When you select one, it will show its influence between its adjacent anchors, which is a linear falloff.

Double-click in the graph to add new anchor points, and click the Delete (X) button below the anchor lines to remove anchors.
Multi Select Tool
The Multi Select Tool enables a pivot-based scaling tool, with which you can scale your curve along either the value or time axes relative to a set pivot point.
To enable the Multi Select Tool, click the Multi Select Tool button in the toolbar, then select multiple keyframes.

Dragging either the vertical or horizontal handles will stretch the selected keyframes along the time or value axes. The horizontal handle corresponds to the XScale property, and the vertical handle corresponds to YScale .
The Pivot Type property controls the placement of the scale pivot point, which is denoted with a crosshair overlay on the graph. You can select the following options from it:
-
Average , which will place the pivot at the average location between all selected keyframe points and values.
-
Bound Center , which will place the pivot at the center point of the bounding box of all selected keyframes.
-
First Key , which will place the pivot at the location of the left-most selected keyframe.
-
Last Key , which will place the pivot at the location of the right-most selected keyframe.
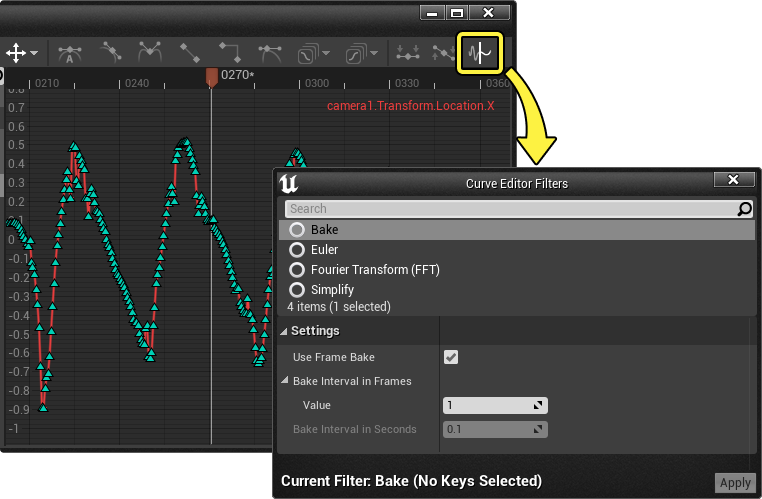
Filter Tool
The Filter Tool contains various filters and commands with which you can Bake , Smooth , and perform other operations to your curves. To open the Filter Tool window, click the Filter Tool button in the toolbar.
When performing filter commands, the commands will only apply to the keyframes and curves you have selected in the graph.
Bake
Baking causes new linear keyframes to be created along your curve selection at a specified interval when clicking Apply .

When baking a curve section, only the section between your keyframe selections will be baked. In the above example you can see curve sections outside of the selection are not being baked.
Bake has the following properties:
|
Name |
Description |
|---|---|
|
Use Frame Bake |
If this is enabled, then keyframes will be baked according to the Frames Per Second value of the sequence. |
|
Bake Interval in Frames |
The interval to bake keyframes relative to the framerate of the sequence. A value of 1 will bake every frame, and higher number values will skip that number of frames. |
|
Bake Interval in Seconds |
If Use Frame Bake is disabled, then this will be the seconds-based interval to bake keyframes. |
Euler
The Euler filter is used to correct rotational frame jumps. Typically these can occur when working with imported raw motion capture data.

Fourier Transform (FFT)
The Fourier Transform filter is used to smooth keyframes with a lot of divergences or noise between them. The smoothing effect is achieved without deleting keyframes, and is based on intelligent low or high pass smoothing with frequency parameters. Typically you would use this if you are cleaning up raw imported motion capture animation, or smoothing a noisy curve with many keyframes.

Select Fourier Transform (FFT) in the filters window to view its properties.

|
Name |
Description |
|---|---|
|
Cutoff Frequency |
This property controls the strength of the filtering effect. If Type is set to Lowpass , then you will need to set this value lower in order to produce a smoother result. If Type is set to Highpass , then you will need to set this value higher. |
|
Type |
Which types of frequencies are to be allowed through. If Lowpass is specified, then low frequency noise will be ignored and filtering will only occur on high frequency noise. |
|
Response |
The type of Fourier filter to use.
|
|
Order |
The number of samples to use when filtering in the time domain, which affects how steep the roll-off is for the filter. |
In this example, a Butterworth filter type is being used to remove high frequency noise along a curve when clicking Apply .
Simplify
The Simplify filter removes redundant keyframes based on a tolerance amount, while still maintaining the overall curve. The higher the Tolerance value, the more the filtered curve is allowed to deviate from the original, which causes more keyframes to be removed.
Clicking Apply will perform the Simplify command on all selected keyframes.