Choose your operating system:
Windows
macOS
Linux
Tracks and content in Sequencer are animated by creating Keyframes (also referred to as Keys ) with defined properties at specific points along the timeline. When the playhead reaches a key in the timeline, the properties are updated to the values defined at those points. Properties can either gradually change, or interpolate, between keyframes, or change immediately to the specified value upon reaching the keyframe.
Keyframes and track states reside within grouped containers, called Sections . Sections are time ranges in which the track is being evaluated by Sequencer. They can either have an infinite or finite length, and also can be moved, trimmed, or blended.
This guide provides an overview of animation keyframing in Sequencer, and how sections enhance the animation feature set.
Prerequisites
Keyframes
Similar to most animation software, objects are animated in Sequencer by creating keyframes within the timeline. Keyframes enable the animation of an object's position, color and other attributes. Most Actor properties can be animated in Sequencer, and therefore also be keyframed.

Creation
There are a variety of ways to create keyframes in Sequencer. In most cases when a keyframe is created, it will be created at the location of the Playhead . If the playhead is at the same location as an existing keyframe when placing a new keyframe, it will be overwritten with the new keyframe.
|
Keyframe Creation Method |
Image |
|---|---|
|
Clicking the Add Key button on a track. |
|
|
Clicking the Add Key button next to a property in the selected Actor's Details panel. The Actor or track does not need to be added to Sequencer for this to work. If it isn't added, it will automatically be added to Sequencer and keyframed. |
|
|
Pressing Enter on your keyboard will place keys on the selected tracks. If you have an Actor track selected, pressing Enter will create keyframes on all keyable child tracks. |
|
|
Adjusting the property value displayed along the property track will add a new keyframe if the track already contains keyframes. You can either drag the property left and right to scrub its value, or click it and manually type a new value. |
|
|
Clicking the middle mouse button along the track's timeline will create a keyframe at the playhead's position. The keyframe value will match the value at the playhead's position. |
|
|
Pressing S with an Actor selected creates a Transform Track (if one does not already exist) and creates a keyframe with its current Location , Rotation and Scale properties. This command also works if your window focus is on the viewport, mirroring Maya's keyframing hotkeys. It also will automatically add any Actor to Sequencer, if they currently are not being referenced inside your sequence. |
|
|
Pressing Shift + W with an Actor selected creates a Transform track (if one does not already exist) and keyframes the Location property only. |
|
|
Pressing Shift + E with an Actor selected creates a Transform track (if one does not already exist) and keyframes the Rotation property only. |
|
|
Pressing Shift + R with an Actor selected creates a Transform track (if one does not already exist) and keyframes the Scale property only. |
|


Auto Key
Keyframes can also be set up to be created automatically whenever you change an Actor's properties, which is known as Auto Keying . To use Auto Key, you must enable the Auto Key button in the Sequencer Toolbar .
Once enabled, modifying Actor properties will cause new keyframes to be created.

The track you are auto keying must already have keyframes present in order to automatically create new keyframes. An empty track will not be auto keyed.
You can also open the Keyframe Options Menu to change the number of keyframes that are automatically created when channel keyframes are being auto keyed. Channel keyframes are property types made up of several properties, such as Vectors or Transform .

|
Auto Key Option |
Description |
|---|---|
|
Key All |
All channels and groups will be keyframed when a value is changed. For example, in transform, if you only edit the X-Location property of an Actor, then keyframes will be set on the full XYZ Location channels as well as all channels in Scale and Rotation . |
|
Key Group |
All axes within a channel will be keyframed when a value is changed. For example, in transform, if you only edit just the X-Location property of an Actor, then keyframes will be set on the full XYZ Location channels. |
|
Key Changed |
Only the axis that changes will be keyed. For example, in transform, if you only edit the X-Location property of an Actor, then only the X-Location channel will be keyframed. |
Duplication and Copy Paste
Keyframes can be created by duplication and copy / paste methods. You can duplicate a keyframe by right-clicking it and selecting Duplicate or by pressing Ctrl+W . Doing this will create a duplicate keyframe at the same location as the original.
You can also duplicate a keyframe by holding Alt and dragging a key, or group of selected keys along the timeline.
Keyframes can be copied and pasted using standard Cut / Copy / Paste commands. You can either right-click a keyframe and select one of these commands, or use the Ctrl + X , Ctrl + C, Ctrl + V hotkeys on a selected keyframe or group of keyframes. When keyframes are pasted, the left-most keyframe will paste at the same location as the playhead, and the keyframe group (if multiple keys were copied) will be placed relative to that location.
Selection and Movement
Keyframes are selected by clicking them individually or by dragging a marquee selection around a group of keyframes. Keyframes from other tracks can be included in your selection when using marquee selection, and are highlighted when included within the marquee selection box.

You can change the time of a keyframe by dragging it left and right. Multiple selected keys can also be moved relative to each other.

By default, the timeline Playhead will automatically snap to a selected keyframe, and will continuously snap to the keyframe while dragging it along the timeline. You can change this behavior by disabling both the Snap to the Pressed Key and Snap to the Dragged Key settings in the Snapping toolbar menu.
Use Ctrl + ] and Ctrl + [ to select all keyframes to the left or right of the playhead's location.
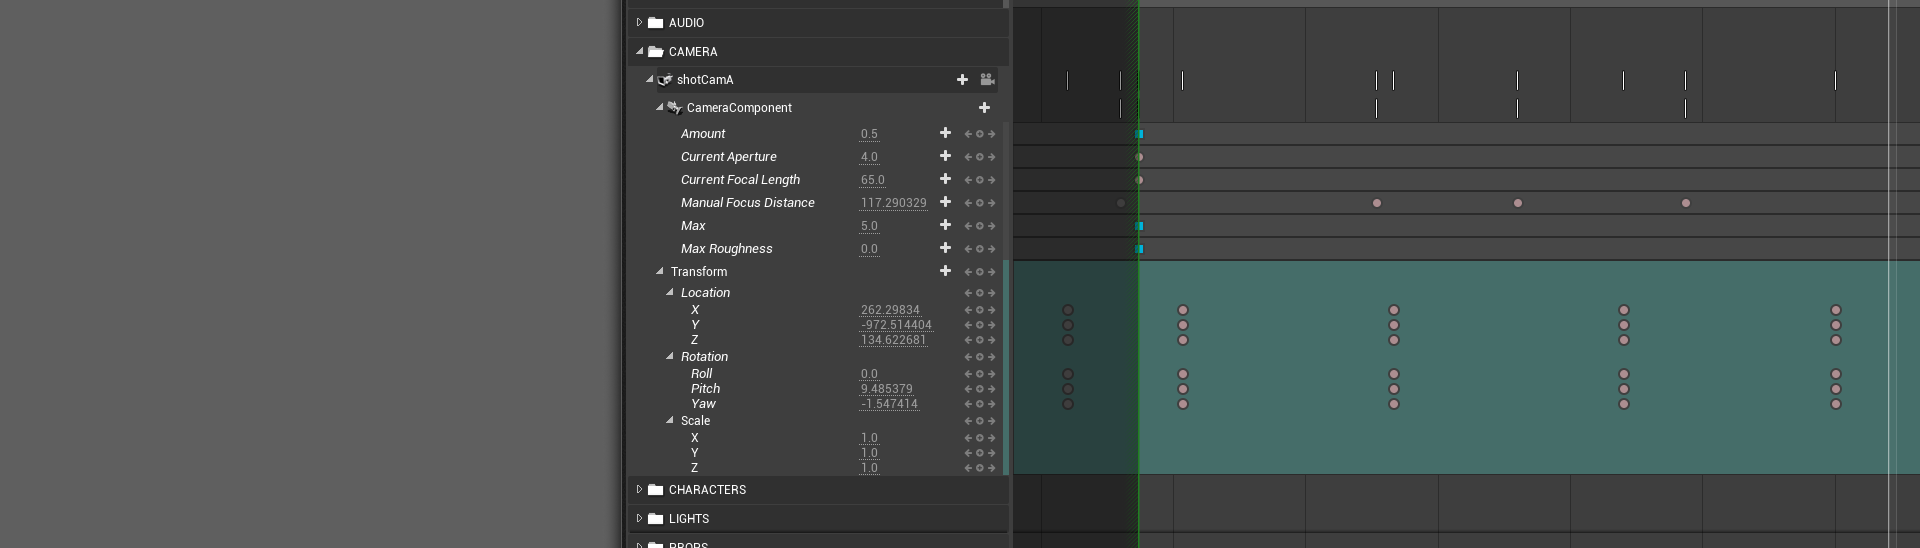
Combined Display
Keyframes and section start times are displayed as white lines on parent header tracks. These can be useful when determining which tracks have keyframes without needing to expand the tracks. This behavior can be disabled by unchecking the Combined Keyframes option from the View Options toolbar menu.

Interpolation
Keyframes can either Interpolate or not Interpolate . Keys that interpolate will gradually change the values of the property they are animating over time, while keyframes that don't interpolate will retain their value until the next keyframe is reached. An example of non-interpolating keyframes would be when keyframes created on an Event Track , Boolean Track , or Enum Track

-
Non-Interpolating Keyframes : These keyframes are displayed using a white diamond shape.
-
Interpolating Keyframes : These keyframes are displayed using a red circle , or other colored shape if using different tangents.
Keyframes that interpolate can have their tangents adjusted. Tangents are properties on the keyframe that control the speed and easing angle of the interpolation between keyframes. Depending on the tangent type chosen, the keyframe icon will display differently to denote its tangent property

There are five main types of tangents you can select:
|
Tangent Name |
Keyframe Icon |
Description |
|---|---|---|
|
Cubic (Auto) |
|
The Cubic (Auto) tangent type is the default tangent type. It attempts to maintain a smooth curve between keyframes and eases both the start and end keyframes. It will automatically adjust whenever keyframes are added or moved. |
|
Cubic (User) |
|
Cubic (User) is similar to Cubic (Auto), but it will lock the tangent from any further automatic edits when keyframes are added or moved. Cubic (Auto) keyframes will convert to Cubic (User) when manual tangent edits occur within the Curve Editor . |
|
Cubic (Break) |
|
Cubic (User) is similar to Cubic (Auto), but its tangents are broken , allowing for different incoming and outgoing angles to be specified from the Curve Editor . |
|
Linear |
|
Linear tangents cause keyframes to have no smoothing or easing between them, causing abrupt starts and stops when reaching each keyframe. |
|
Constant |
|
Constant tangents function similarly to non-interpolating keyframes by maintaining their current value until the next keyframe is reached. |


You can convert an existing keyframe's tangent type by right-clicking it and selecting a tangent type from the Key Interpolation menu category.

Hotkeys can also be used to change a selected keyframe's tangent. Pressing 1 , 2 , 3 , 4 , or 5 on your keyboard will change the tangent to Cubic (Auto) , Cubic (User) , Cubic (Break) , Linear , or Constant , respectively.

The default tangent for newly created keyframes can be changed by clicking the Keyframe Options button in the Sequencer toolbar and selecting a tangent type from the Default Key Interpolation menu category.

Properties
Right-clicking a keyframe and navigating to the Properties menu will display the keyframe's current Property Values and Time . Depending on the Property Track being animated, the Properties menu display will vary according to the property.
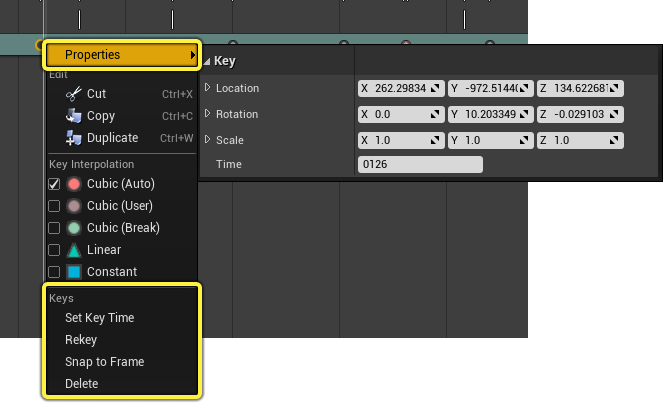
There are also keyframe-specific commands you can use to edit your keyframe time.
|
Name |
Description |
|---|---|
|
Set Key Time |
Selecting this will cause a new window to appear from which you can specify a new time for the keyframe.
|
|
Rekey |
Snaps the keyframe to the Playhead .
|
|
Snap to Frame |
Snaps all selected keyframes to their nearest frame, as defined in the Frames Per Second toolbar menu.
|
|
Delete |
Deletes the selected keyframe. |


Sections
In the context of keyframes and keyframing actor properties, Sections are the groups that contain keyframes. They function similar to animation layers found in other animation tools, but with some differences. While layers usually do not consider time ranges for their keyframes, Sections do, which enable features such as offsetting whole chunks of keyframe data easily, without needing to select and move every keyframe individually. All keyframes reside within sections, either infinite or finite in length.

Additionally, while keyframes occupy only single frames within the timeline, sections occupy a range of time. As such, any animatable track that produces its content from ranges of time is using Sections. This includes tracks such as the Animation Track , Subscenes Track , or Audio Track .

Creation
A section with infinite length is created automatically whenever a keyframable track is created. You can more see this section by right-clicking an empty space of the section, navigating to the Properties menu and unlocking the Section Range Start and Section Range End properties. This will convert the section to a finite length, in order to view and manipulate it.

Additional sections can be added by clicking the Section (+) button on the track. You can choose which Blend Type to use for this new section. Additional sections created after the initial one will be created with finite range.

Interaction and Display
Finite sections can be moved and resized by dragging them or their edges. You can move them between tracks as well by dragging them up and down in the timeline.

Use Alt + ] and Alt +[ to trim or loop sections to the current playhead time. If you select the main header track beforehand, then all child sections will trim or loop to the playhead.
You can also time scale sections, which will scale the keyframes proportionally to the scale amount. Hold Ctrl and drag the edge of a section to timescale a section. Time scaling is denoted by a clock icon beside your cursor when holding Ctrl and hovering over the left or right edge of a section.

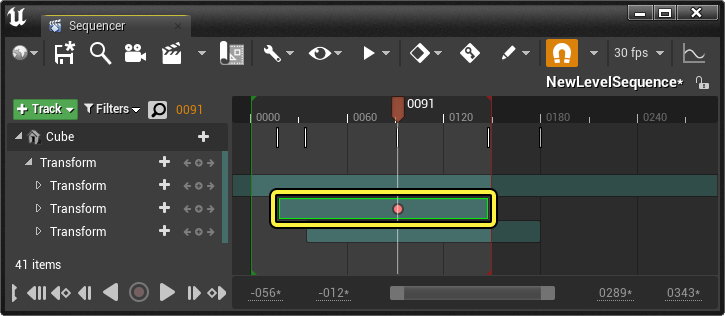
When multiple sections exist on a property, only one of them can receive keyframes (when keyframing by pressing S or Enter ). This section is displayed with a green outline around its border to denote that it is the section designated to receive new keyframes. Typically, the most recently created section will be the one receiving keyframes.
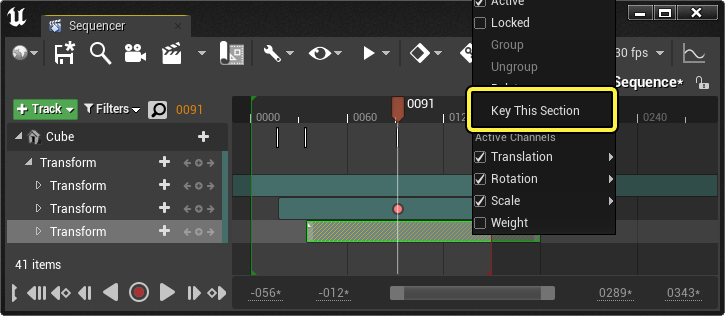
You can change which section will receive keyframes by right-clicking a section and selecting Key This Section .
Data and Evaluation Range
Even without keyframes, Sequencer sections provide a static evaluation of an Actor's properties. This can be useful if you want to set properties on Actors and have Sequencer store them, without needing to set keyframes. This can be done by ensuring your playhead is on the section range for that property (if it is finite), then change the property. You should see the property change between its default level value and the sequencer section when playing or scrubbing over the section boundaries.

You can also blend sections by dragging the top corner edge of a section, which enables the ability to blend any property from its current value to that section's value.

Blending
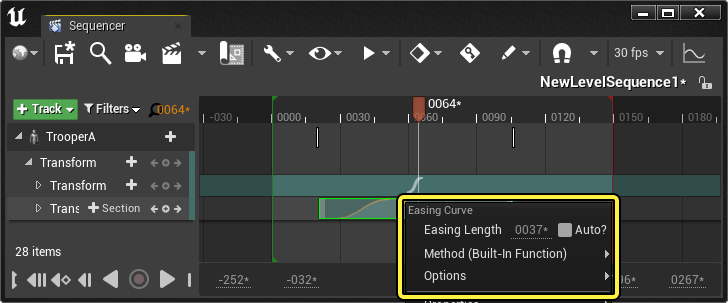
You can adjust the start and end blend curves of a section by selecting and moving the blend curve handle located on the upper portion of a section's edge. A curve symbol will appear above the cursor to aid your selection accuracy.

Right-clicking a blend curve will reveal the additional context menu commands.
|
Name |
Description |
|---|---|
|
Easing Length |
The length of the blend curve. Enabling Auto will cause the blend curve to return to the default behavior and support automatic length calculation when sections are intersecting.
|
|
Method |
Method controls the type of curves to apply to the blend, and enables custom external blends based on functions. |
|
Options |
The Options menu will display a list of curve shapes that you can apply to your blend curve. Selecting one of these will replace your current curve shape with the selected curve.
|


Sections can also blend between other sections by dragging them on top of each other. Doing this will blend the resulting keyframe values for the duration of the overlapping region.
Sections that overlap show keyframes from only a single section. You can adjust which section's keys are showing by using the Order context menu commands to re-order section displays forward or backward.

Blend Types
When creating sections or viewing the Blend Type menu, there are different blending modes to apply to your sections. These modes affect how your sections interact with each other, or the value that results from animating a property.

The following blend types can be chosen:
|
Name |
Description |
|---|---|
|
Absolute |
Sets the property to the absolute value defined by the section or keyframe. If multiple absolute sections are set up to animate the same value, then the value will blend equally between them. |
|
Additive |
Adds the amount defined by the section or keyframe to the current properties. These values stack additively with other sections. |
|
Relative |
Applies this value as a sum total of all other additives and the initial value before animation. |
|
Additive from Base |
The first keyframe of this section will be equal to the current value of the property it is animating at that time. Subsequent keyframes will animate the property relative to that initial point. |
When hovering your cursor over a section with a blend type other than Absolute , it will display the blend type name on the section bar.

Properties
Right-clicking a section and navigating to the Properties menu will show the section properties.

|
Name |
Description |
|---|---|
|
Section Range Start |
The start time of the section. If this region is Locked, then the start time is infinite, and no value is shown. |
|
Section Range End |
The end time of the section. If this region is Locked, then the end time is infinite, and no value is shown. |
|
When Finished |
Determines what the property should do when the section finishes.
|
|
Timecode Source |
The timecode information for the section, if timecode is being used. You can also specify delta frames here to control offset information. |
|
Is Active |
Activates the selected section. This is similar to Muting Tracks , but is used for sections instead of tracks. |
|
Is Locked |
Locks the selected section. This is similar to Locking Tracks , but for sections instead of tracks. |
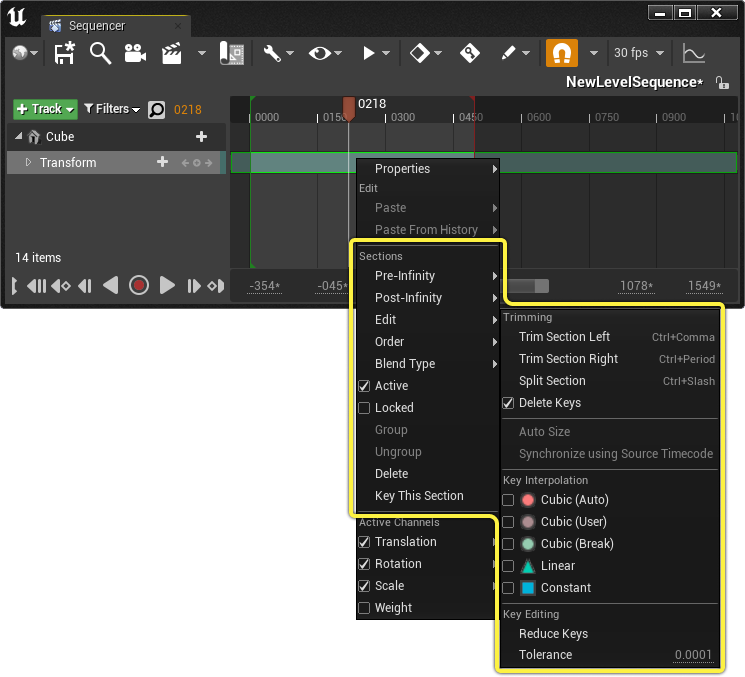
Right-clicking a section and navigating to the Sections category reveals section-specific properties and commands.
|
Name |
Description |
|---|---|
|
Pre/Post-Infinity |
If the section contains keyframes, this menu will display options for selecting what the animation should be doing before the first keyframe (Pre-Infinity), or after the last keyframe (Post-Infinity). These settings affect the animation for the entirety of the section.
|
|
Order |
When sections with keyframes overlap, keyframes from only one section will display on the timeline. The Order menu contains the following controls for sorting which sections are in front or behind. |
|
Blend Type |
Sets the Blend Type for the selected section. |
|
Active |
Activates the selected section. This is similar to Muting Tracks , but is used for sections instead of tracks. |
|
Locked |
Locks the selected section. This is similar to Locking Tracks , but for sections instead of tracks. |
|
Group |
Links two or more sections together so that when one of the sections moves, they all move together.
|
|
Ungroup |
Ungroups the selected section. |
|
Delete |
Deletes the selected section. |
|
Key This Section |
Specifies this section to receive keyframes when keyframing. |
|
Trim Section Left/Right |
Trims the selected section's start or end time to the playhead position. You can also use the Ctrl + , and Ctrl + . hotkeys. This command only trims sections and does not add section time like the Alt + ] and [ commands. |
|
Split Section |
Divides the selected section into two parts at the playhead position. If the section contains keyframes, then bracketing keyframes will be created at the split point in order to maintain continuous animation up to the split. You can also use the Ctrl + / hotkey.
|
|
Delete Keys |
Deletes keyframes when they fall outside the section range when using the Trim Section Left/Right commands. |
|
Auto Size |
Sets the section's start and end times to match to the starting and ending keyframes. This command is not clickable if the section range is infinite, or if there are no keyframes in the section. |
|
Synchronize using Source Timecode |
Synchronizes multiple selected sections using the source timecode. The first selected section will be used as the source timecode, and subsequent selected sections will be adjusted according to their source timecode as relative to the first section. |
|
Key Interpolation |
Sets all keyframes in this section to use a specific Tangent Type . |
|
Reduce Keys |
Automatically reduces keyframes in the selected section based on the Tolerance value. |
|
Tolerance |
Sets how aggressive the automatic removal of keyframes should be when reducing keyframes. Higher values will cause more keyframes to be removed. |

