


Learn about the tools and options within Sequencer's Toolbar.
Choose your operating system:
Windows
macOS
Linux
See Also
This page outlines the user interface, tools, and options contained within Sequencer.
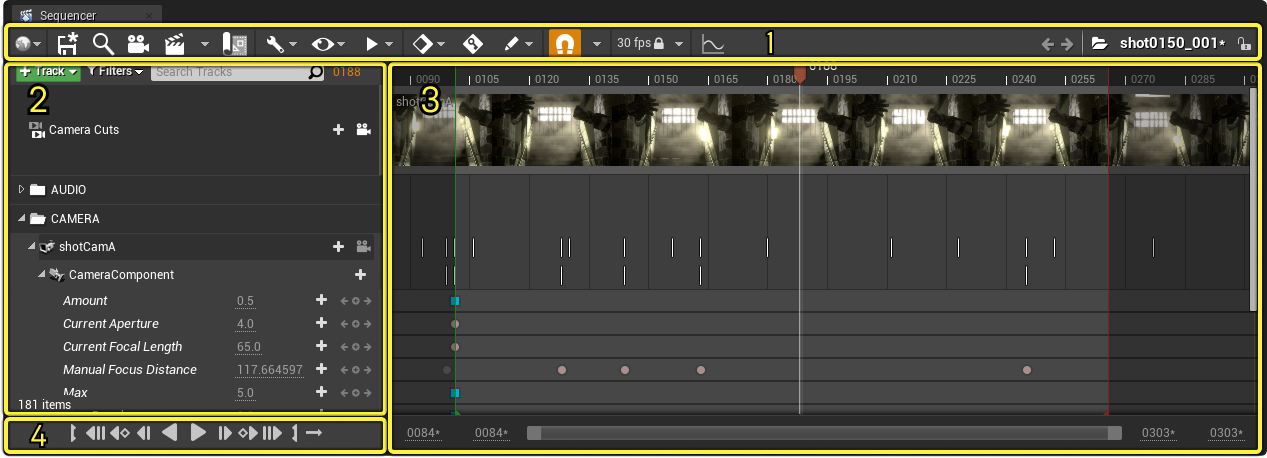
Toolbar
The Sequencer Toolbar contains various commands, tools, and options.

|
Name |
Icon |
Description |
|---|---|---|
|
|
Lists information on the current world context, Level Sequence Actor, and playback realm. It contains options for specifying whether you want your sequence to autobind to Play In Editor (PIE), Simulation, or other runtime sessions. |
|
|
Save |
|
Saves the current sequence and any subscenes or shots. |
|
Find in Content Browser |
|
Locates the current sequence's Level Sequence asset in the Content Browser. |
|
|
Creates a new Cine Camera Actor . A new Camera Cut Track will also be created and will reference this camera if one had not already been created. |
|
|
|
Opens the Render Movie Settings dialog, or the Movie Render Queue if its plugin is enabled. |
|
|
|
Opens the Director Blueprint for this sequence, from which Event Track logic can be accessed. |
|
|
|
Lists various sequence editor actions such as saving, import/export, baking, and selection editing. |
|
|
|
Lists various sequence view options. |
|
|
|
Lists various playback options such as playrate, start/end times, and playhead behavior. |
|
|
|
Lists settings for Auto Key transform keyframing behavior, and what default tangents are created. |
|
|
|
Enables Autokey mode, where keyframes are automatically created whenever a property or transform changes. |
|
|
|
Lists settings for how edits from the Details panel are interpreted by Sequencer when using Auto Key. |
|
|
|
Enables snapping. The dropdown menu next to this lists options for setting snapping rules for keyframes, sections, and the timeline. |
|
|
|
Lists settings for various Frames Per Second (FPS) targets at runtime. Also contains options to enable the runtime to lock to the chosen frame rate. |
|
|
|
Opens the Curve Editor which is used for fine tuning of animation keyframes and tangents. |
|
|
|
Displays the current sequence name, and is used to navigate master sequences and shots. |
|
|
Lock |
|
Locks the entire sequence to prevent editing. |
A comprehensive reference for the Sequencer Toolbar can be found on the Sequencer Toolbar Reference page.

Sequencer Toolbar Reference
Learn about the tools and options within Sequencer's Toolbar.
Outliner
The outliner contains header information for all tracks added to your sequence, as well as tools to add, filter, and search for tracks.

Visit the Tracks page for more information.
Timeline
The timeline area contains the entire playable region of your sequence including animations, keyframes, and timeline controls.
The playback range of your sequence is contained within Start (Green) and End (Red) markers.

Timeline Navigation
Panning and zooming are used to navigate within the timeline.
Panning
You can pan your view vertically by dragging the right-side scrollbar up and down.

You can also pan and zoom horizontally using the Range Slider at the bottom of the timeline.
Dragging the middle area of the slider pans, while dragging the left/right margins will zoom your view.

The Range Slider is enabled by default and can be disabled from the View Options dropdown in the Sequencer toolbar.
Holding RMB and dragging along the timeline enables panning horizontally and vertically.

Scrolling will pan the timeline up and down, while holding Shift and scrolling will pan the timeline left and right.

Zooming
You can zoom in the timeline by holding CTRL and scrolling.

By holding ALT + Shift and click-drag RMB left and right you can free-form zoom.

By holding CTRL and dragging along the time bar to the right, you can define a zoom region. Holding CTRL and dragging the time bar to the left resets the zoom back to full.

The zoom pivot is relative to the playhead by default and can be changed by locating the Zoom Position preference in the Editor Preferences and Project Settings .
If your zoom and timeline framing have overextended, you can reset your zoom and timeline framing by pressing the Home key, which also resets the bounds of the range slider.

Playhead
The playhead displays the current time in the sequence and is one of the main controls for timeline interactions.
During playback it will move across the timeline at the specified playrate and can be stopped in place by pausing.

You can drag the playhead to change the current time in the sequence, and preview changes in the viewport.
This is commonly referred to as "scrubbing".

You can fast forward the playhead to other areas of the timeline by holding Shift and double-clicking a region of the timebar.

The current time of the playhead is displayed and can be manipulated from the sequence outliner. You can press CTRL + T to focus selection to this field and type in a new time value.

You can also right-click the playhead or anywhere on the time bar to reveal additional options.

|
Name |
Description |
Hotkey |
|---|---|---|
|
Set Start Time |
Changes the start time of the sequence to the current position of your cursor. If using the hotkey it will set to the playhead instead. |
[ |
|
Set End Time |
Changes the end time of the sequence to your cursor. If using the hotkey it will set to the playhead instead. |
] |
|
Set Selection Start |
Sets the start point of a custom timeline selection range to your cursor. |
i |
|
Set Selection End |
Sets the end point of a custom timeline selection range to your cursor. |
o |
|
Clear Selection Range |
Removes the selection range. |
|
|
Add Mark |
Creates a Custom Timeline Mark at the current playhead time. |
m |
|
Delete All Marks |
Removes all custom marks from the sequence. |
Selection Ranges
Selection ranges are custom regions you can define in a sequence to assist with timeline selection and playback.
To create a selection range, right- click a point in the timeline bar and set a Start and End Selection Range .

The selection range handles can be adjusted similarly to the start and end times of the sequence.

You can also set the playback of the sequence to loop within the section range.

Selection ranges can also be used to select keyframes and sections within them by clicking the Actions toolbar button and selecting Select Keys in Selection Range or Select Sections in Selection Range .

To remove a selection range, right-click the timeline bar and select Clear Selection Range .
Custom Marks
Custom marks are points you can add to call attention to areas or provide annotation for your sequence.

To create a mark, right-click a point in the timeline bar and select Add Mark .
To edit a mark, right-click it to view its details. Here you can customize its properties such as Label , Color and Frame Number .

Marks within Subscenes , Shots , or Template Sequences can be viewed from the parent sequence if you enable Show Marked Frames Globally from the View Options menu.

Marks can also function as Determinism Fences . Determinism Fences force the engine to evaluate on the same frame as the mark, even if normal engine ticking would have skipped over it during playback. They are useful for resolving issues related to events or keyframes being skipped when a sequence or sub sequence is being played.

Playback Controls
The playback controls can be found in the bottom-left corner of Sequencer and function similarly to standard media playback applications.
Buttons for toggling playing, pausing, and other playback-related functions are found here.

|
Icon |
Description |
|---|---|
|
|
Sets the start time of the sequence to the current location of the playhead. |
|
|
Jumps to the start of the sequence. |
|
|
Jumps to the previous keyframe in the selected track. |
|
|
Jumps to the previous frame. |
|
|
Plays or pauses the sequence in reverse from the current position of the playhead. |
|
|
Plays or pauses the sequence from the position of the playhead. |
|
|
Jumps to the next frame. |
|
|
Jumps to the next keyframe in the selected track. |
|
|
Jumps to the end of the sequence. |
|
|
Sets the end time of the sequence to the current location of the playhead. |
|
|
Toggles between looping and no looping. Selection range looping is added if selection ranges are being used in the timeline. |


