
Choose your operating system:
Windows
macOS
Linux
In large-scale cinematic productions, it may be necessary to have multiple artists working on the same sequence or even shot at the same time. The Subscenes Track enables this type of workflow by allowing additional sequence assets to be contained within the same sequence. Subscenes can also be used to organize your scene so that repetitive tracks and content are partitioned away into their respective disciplines' subscene.
This document provides an overview of how to create and use the Subscenes Track.
Prerequisites
Creation
To create a Subscenes Track, click the Add (+) Track button in Sequencer and select Subscenes Track .

From there you can add sequences by either clicking Add (+) Sequence and selecting a sequence from the menu, or by dragging a Level Sequence from the Content Browser onto the Subscenes Track.
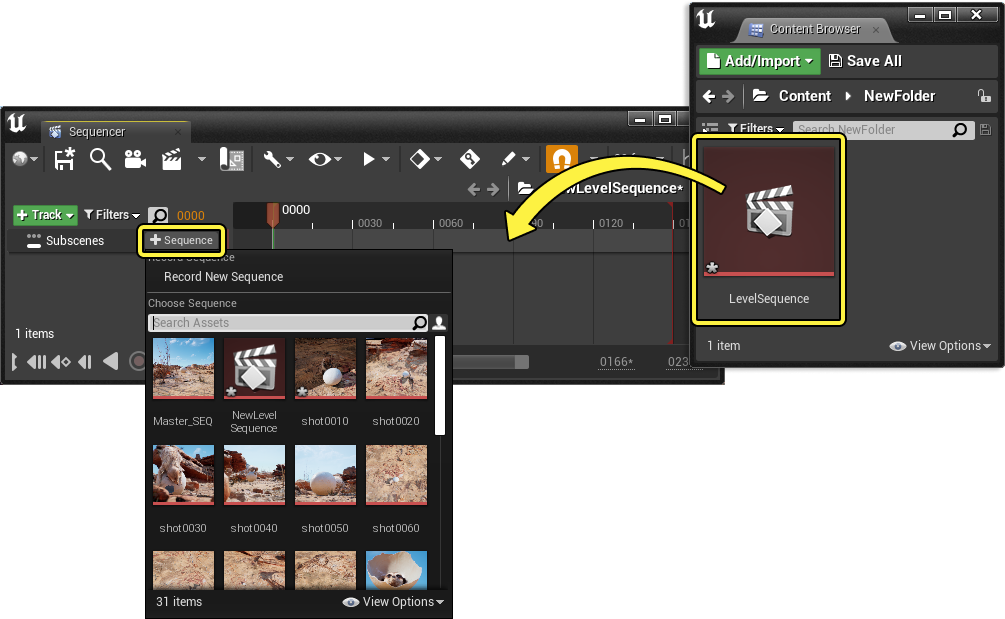
Once added, a subscene section will display the name of its corresponding Level Sequence and the number of tracks contained within it.
Working in the Subscene
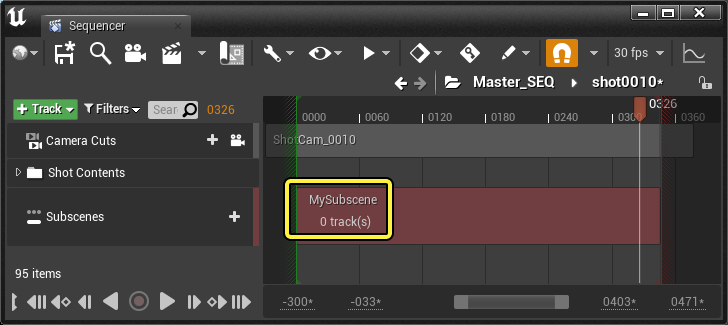
Once a subscene is added to a sequence, it can be opened by double-clicking its section. When you open a subscene in this way, it will be displayed within the context of the parent sequence. This means it continues to evaluate tracks from the parent in order to provide the full scene context, even though the current Sequencer view only shows the subscene.

When viewing subscenes from the parent sequence context, start and end times will be displayed for both the base subsequence, and the trimmed subscene. In this example, you can see a subscene with both the Start and End times being trimmed in the parent sequence, and how that information is displayed in the subscene.
-
The trimmed area. This is the region that will be played from the parent sequence.
-
The full playable sequence area. This area has been trimmed, and will not play in its entirety.
Conversely, you can also trim the Start and End times within a subscene and observe the trimmed region from the parent sequence.

This context view can be enabled or disabled by toggling Evaluate Sub Sequences In Isolation from Sequencer's Playback Menu .
When working within subscenes, you can add tracks, keyframes and other content as with any other sequence, and can preview the results alongside the contents in the parent sequence. As such, subscenes are not only useful for limiting file conflicts, but also for compartmentalizing Sequencer content within different subscenes.

Unlike Shots , multiple subscenes that are stacked in Sequencer will not overwrite the bottom ones. All subscenes will evaluate when played at the same time.
Collaboration
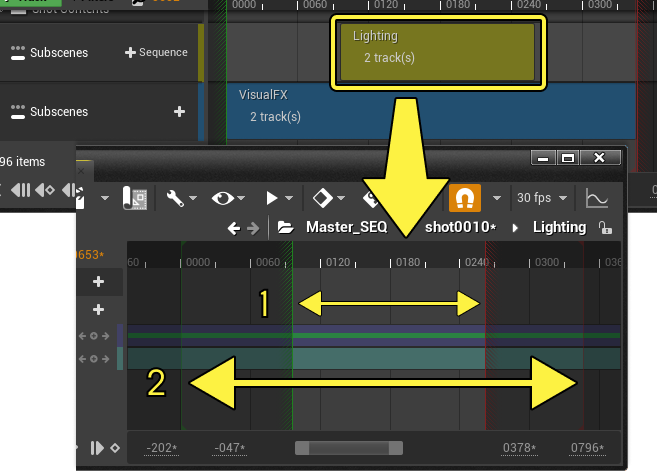
As subscenes affect a different Level Sequence from the main sequence, multiple artists can work on a single cinematic at the same time without any file conflicts occuring. In this example, you can see two different subscenes being used to contain content from both the Visual Effects and Lighting disciplines.

Hierarchical Bias
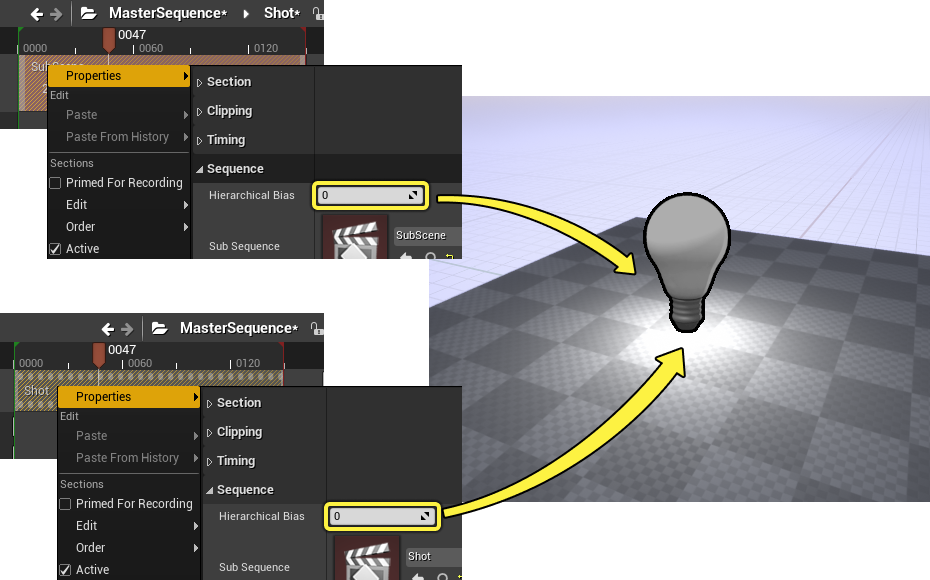
Due to the nature of the Master Sequence, Shot, and Subsequence systems, there may be cases where the same Actor is being referenced by both the shot and the master, which can cause conflicts. Hierarchical Bias can be used to arbitrate which reference of that Actor should be prioritized to evaluate over other sources. This property is found when right-clicking Shots or Subscenes , navigating to the Properties menu, and locating Hierarchical Bias .
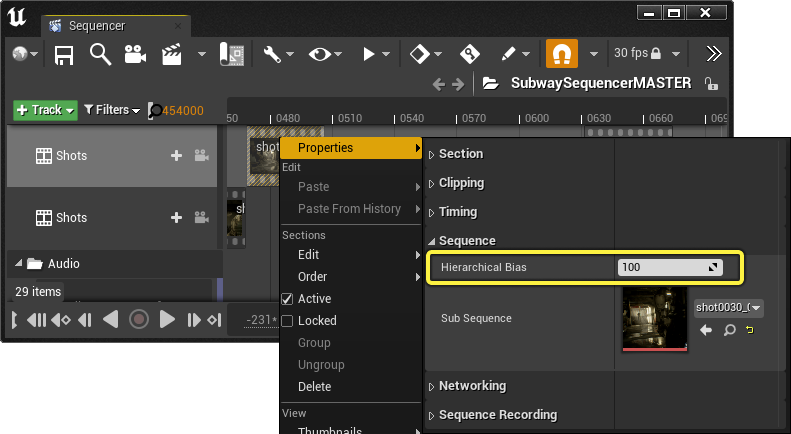
Increasing the bias number on a source will cause that source to "win", decreasing the number will cause it to "lose", and having equal bias between sources will cause all sources to evaluate together and blend (if possible).
The default value for Hierarchical Bias on the top-level (master) sequence is 0 , while for subsequences it is 100 . This causes shot sources to take precedence over master sources. Bias also compounds for each subseqeunce layer added, so if a shot sequence contained a child subscene, then it would have a total bias of 200 (100 + 100), causing the deepest level of influence to "win'' by default.
This effect is demonstrated in the image below, where:

-
The root sequence, which has a default bias of 0, and cumulative bias of 0 .
-
The first child sequence, which has a default bias of 100, and cumulative bias of 100 .
-
The second child sequence, which has a default bias of 100, and cumulative bias of 200 .
Bias Example
The following example demonstrates how to utilize Hierarchical Bias values in your sequences.
A Light Actor is placed in a Level, and is referenced by three different sequences:
-
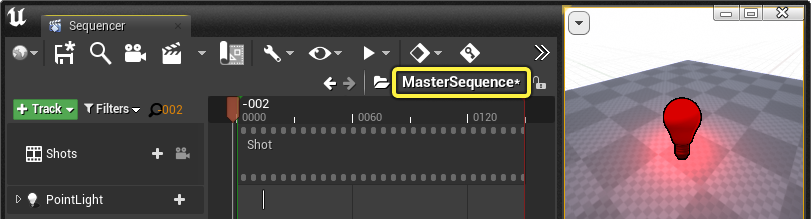
The Master Sequence references this light, and its color is keyframed to red .
![master sequence hierarchical bias]()
-
Within the Master Sequence is a Shot , and its color is keyframed to green .
![shot hierarchical bias]()
-
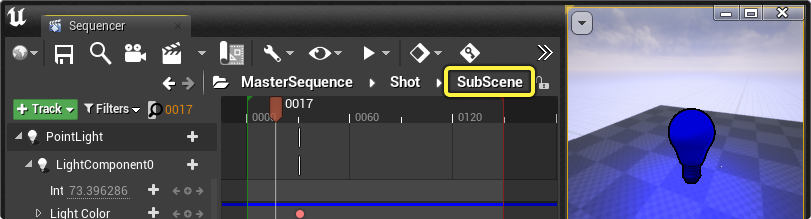
Within the Shot, is a Subscene , and its color is keyframed to blue .
![subsequence hierarchical bias]()

By default, the Subscene , and blue light take priority, because it has the largest cumulative bias. For reference, each sequence's bias value is listed below:
-
Master Sequence = 0
-
First child sequence = 100
-
Second child sequence = 200 (100 + 100)

If you right-click the subscene section and lower its hierarchical bias to -50 , then that will cause the Shot , and green light to take priority. This is because the subscene's cumulative bias is now smaller than its parent, causing the green light to have the largest bias.
At this point, each sequence's bias value would be:
-
Root Sequence = 0
-
First child sequence = 100
-
Second child sequence = 50 (100 - 50)

Setting all the bias values to 0 will cause all sequences to evaluate together and the results will be blended. In this example, the red, green, and blue light color values are combined, becoming white .
At this point, each sequence's bias value would be:
-
Root Sequence = 0
-
First child sequence = 0
-
Second child sequence = 0 (0 + 0)
Section Editing
Each subscene section functions similar to most Sections , meaning they can be moved, trimmed or edited.

To differentiate your subscenes from one another, you can change the color that is displayed on all sections in a track by clicking the color bar on the track header. This will open the Color Picker from which you can select a new color for this track.

Properties
Right-clicking a subscene section and navigating to the Properties menu will reveal the following properties:

|
Name |
Description |
|---|---|
|
Time Scale |
Controls the playback rate of the subscene. A value of 1 will result in a normal playback speed, larger numbers will play faster, and smaller numbers will play slower. |
|
Hierarchical Bias |
Controls the Hierarchical Bias of the subscene. Larger numbers will cause this subscene to take priority over other sources when referencing the same Actors. |
|
Sub Sequence |
The sequence asset that is played by this subscene. |
|
Network Mask |
The network realm that this subscene is hosted on. This can be set to Client , Server , or Both . It is important to set this appropriately depending on your sequence's content. For example, if a subscene contains only audio, then it should usually be set to Client only as audio is not played over the server. |