Choose your operating system:
Windows
macOS
Linux
Animation Layer Editing allows you to modify any existing Animation Sequences inside Unreal Engine 4 as part of Additive Layer Tracks . With Animation Layer Editing you can take an existing animation and adjust it to produce a different take on that animation, or you can create a separate, new animation with its own motion you provide based off the original.
This page will show you how to use the Animation Layer Editing tools to take an Idle animation and repurpose it into a Reload animation.
For this guide, we created a New Project using the Blueprint First Person template with Starter Content enabled.
Steps
-
Inside the Content/FirstPerson/Animation folder, duplicate the FirstPerson_Idle animation and name it FirstPerson_Reload .
![LayerAnimation_01.png]()
-
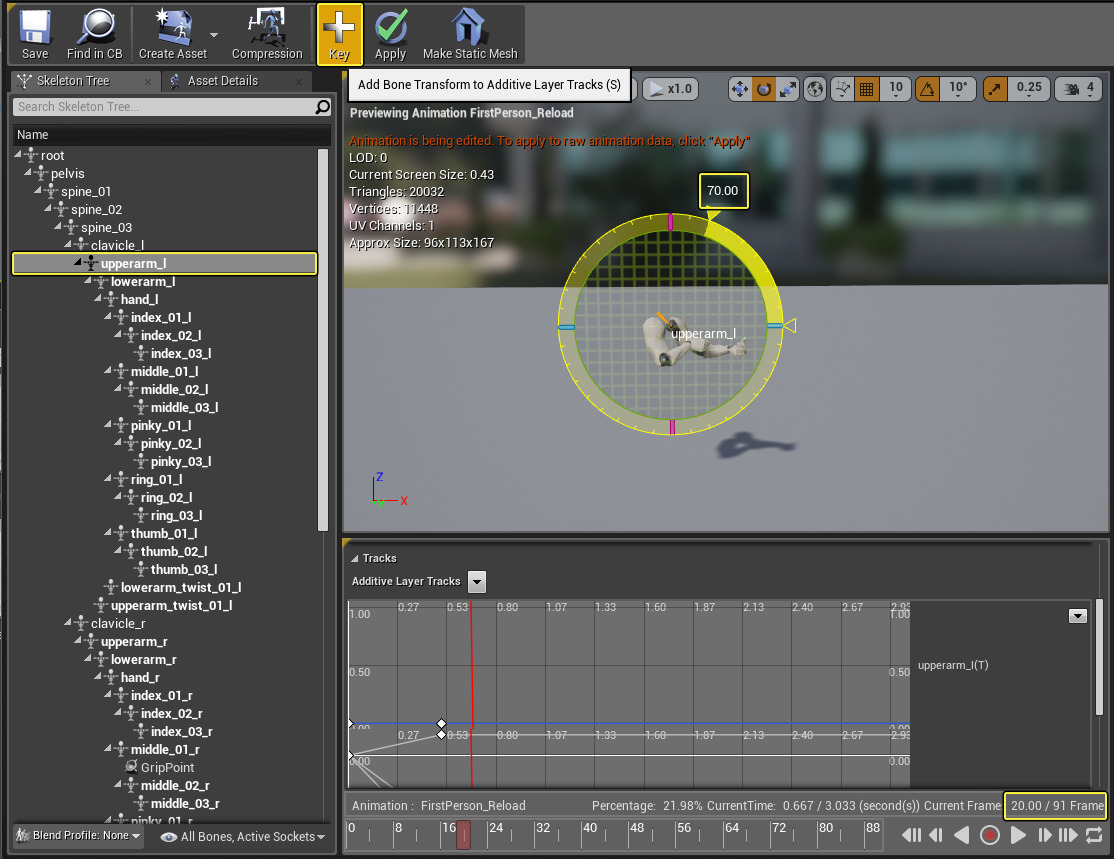
Inside FirstPerson_Reload , pause the animation at frame 0, click the upperarm_l bone in the Skeleton Tree , then click the Key button.
![LayerAnimation_02.png]()
This will add Transform , Rotation and Scale keys for the current position of the upperarm_l to the Additive Layer Tracks section.
![LayerAnimation_03.png]()
-
Move the timeline ahead to frame 15 .
![LayerAnimation_04.png]()
-
Rotate the upperarm_l bone -70 degrees, then press the Key button.
![LayerAnimation_05.png]()
This will add a key for the bone's rotation when the animation is at frame 15.
-
Move the timeline ahead to frame 20 , rotate the upperarm_l bone 70 degrees to its default position and press the Key button.
![LayerAnimation_06.png]()
Over the course of 20 frames, the arm will move down then back up to its default position.
-
Right-click on the timeline marker and Remove from frame 20 to frame 92 .
![LayerAnimation_07.png]()
This will remove the rest of the frames from the animation, keeping only our reloading motion.
-
In the Content Browser , Right-click on the FirstPerson_Reload animation and select Create AnimMontage .
![LayerAnimation_08.png]()
We are going to use this to play our new reload animation when the player presses the designated key during gameplay.
-
Open the new AnimMontage, then change the slot to use the DefaultGroup.Arms slot.
![LayerAnimation_09.png]()
Below, the Animation Blueprint assigned to the template character is set up to use a Slot Node to play any Anim Montages assigned to the "Arms" slot.
![LayerAnimation_13.png]()
This is currently being used to handle the playing of the firing weapon animation which we will also use for our reload motion.
-
Inside the Content/FirstPersonBP/Blueprints folder, open the FirstPersonCharacter Blueprint.
![LayerAnimation_10.png]()
This is the Character Blueprint assigned to the template and is our playable character.
-
Locate the Spawn Projectile script and Ctrl select the Mesh2P , Get Anim Instance and Montage Play nodes shown below.
![LayerAnimation_11.png]()
These nodes get the animation instance assigned to the Skeletal Mesh and signals the playing of an Animation Montage, in this case, the fire weapon montage. We are going to use this same script but instead call our reload Animation Montage when the key we specify is pressed.
-
Right-click and copy the selected nodes, then paste them in an empty space in the graph.
-
Right-click and add a R Key Event and connect them as shown to the pasted nodes, setting Montage to Play to your reload montage.
![LayerAnimation_12.png]()
-
Compile and Play in the Editor .
End Result
When playing in the editor, pressing the R key will drop the character's hand off screen before bringing it back up to the gun, simulating a reload motion.
You can continue to modify this animation by moving to a frame on the timeline and selecting the Bone you want to modify and keying it, then moving the timeline forward some and moving the Bone to a new location and keying it again. The Bone will move from your first key to your second key along the curve created as the timeline progresses. You can modify as many Bones as you wish for more precision than our example, but the process of keying is the same.
FAQ
What happens if you export the animation?
-
When you export, it will be whichever baked version of the animation is available. If you apply all the curves, it will export with curves.
What happens if you re-import the animation?
-
Reimporting the animation, it will overwrite the source data and apply the curves. If you do not want the curves, you can remove them.
Can I temporarily disable or remove tracks?
-
Yes, you can do both from the Track Options menu located in the upper right corner of the track window.
![AnimEdit25.png]()
Is there a way to see the difference of my edited animation versus its source?
-
Inside the Show menu options, you can enable the Source Animation and (or) Baked Animation for display in the viewport. The Source Animation can be seen as a white skeleton, while the Baked Animation can be seen as a blue skeleton as shown in the image below.
![LE_SourceBakedAnim.png]()
Just make sure that you have enabled the display of Bones from the Show -> Bone Hiearchy menu.
Can Animation Layer Editing be used to create root motion?
-
-
Select your Root Bone and key it, then scrub the timeline forward and move the Root Bone and re-key it.
![LE_ThirdPersonAnim.png]()
Above we have enabled the Source and Baked Animation preview where the white skeleton is the source animation.
-


