Choose your operating system:
Windows
macOS
Linux
This feature is currently experimental and is in development, therefore some features may not work as expected.
Animation Modifiers (Anim Modifier) are a type of native or Blueprint Class that enable users to apply a sequence of actions to an Animation Sequence or Skeleton asset. An example of this includes (but is not limited to) creating automatic foot sync markers by pin-pointing on which frames the right or left foot is place on the ground. Using this information, Animation Sync Markers can be added to frames where a foot bone is at its lowest point (or touching the floor).
Above an Anim Modifier is used to generate auto foot sync markers.
Accessing and applying Anim Modifiers is performed in either the Animation Editor or Skeleton Editor under the Animation Data tab. When applying an Anim Modifier to a Skeleton, the modifier is applied to all Animation Sequences that are based on the Skeleton. When applying the modifier to an Animation Sequence, it is only applied to the sequence itself and no other sequences.
Creating an Anim Modifier
To get started, you will need to create an Anim Modifier Blueprint class:
-
In your project's Content Browser , click the Add New button and select Blueprint Class .
![Create_01.png]()
-
In the Pick Parent Class window, expand All Classes and search for and select Animation Modifier , click Select then give it a name.
![Create_02.png]()
-
Double-click the new Animation Modifier Blueprint to open it up in the Blueprint Editor.
![Create_03.png]()
With your Anim Modifier created, you can now use Blueprint Script and functions contained with the Animation Blueprint Library to access and manipulate animation data.
Animation Blueprint Library
Right-click in the graph of the Anim Modifier Blueprint to see the context menu and list of functions available, particularly under the Animation Blueprint Library.

In the image above, functions related to Marker Syncing are expanded which enable you to synchronize animations using marker data.
Before working with the various functions available for accessing data, you will want to implement the OnApply and OnRevert events. The OnApply Event enables the user to change, add or remove data from the animation while the OnRevert enables the user to remove previously applied user changes (or return the sequence to its original state). Each event returns the Animation Sequence in which to feed the Animation Blueprint Library operations.

In the image above, when the Anim Modifier is applied, a new Notify track is created with the defined name while reverting the Anim Modifier, the track is removed.
Implementing an Anim Modifier
Implementing an Anim Modifier can be done inside a Skeleton asset (to add to the Anim Modifier to all animations associated with the Skeleton) or in a single Animation Sequence.
-
Inside the Skeleton Editor or Animation Editor , go to Window menu option and select Animation Data Modifiers .
![Implement_01.png]()
-
In the Animation Data Modifiers tab, select Add Modifier and select your desired Anim Modifier Blueprint .
![Implement_02.png]()
-
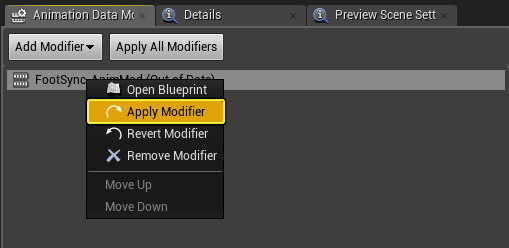
Right-click on your Anim Modifier Blueprint then click Apply Modifier to apply the Anim Modifier and any changes (or Revert Modifier to remove changes).
![Implement_03.png]()
Your Anim Modifier will be listed as Out of Date until you apply it.
Below is an example of an Anim Modifier that has been applied to a Skeleton asset, indicated by the Skeleton icon.
![SkeletonModifier.png]()
Any properties that you have set as Instance Editable will be available to edit in the Animation Data Modifiers tab.

In the image above, we define properties that can be used to drive automatic foot syncing.
Exposing Properties
Inside your Anim Modifier Blueprint, you will want to expose parameters using Instance Editable that you can manipulate within the Animation Tab in the Animation Tools

In the image above, we use a structure variable containing information that we can set for the name of a bone as well as provide an offset.
Inside our Animation Sequence when we implement our Anim Modifier and apply it, we can see our exposed parameters.

In the image above, we enter the names of the bones that we want to include in our Anim Modifier in which to gather animation data (such as Bone Transform) from.
Animation Blueprint Library Reference
While there are several different nodes available within the Animation Blueprint Library, this section lists some of the more commonly used types within Anim Modifiers.
Add/Remove Notify and Curve Tracks

These nodes enable you to dynamically add Notify or Curve Tracks to the specified Animation Sequence. Once Notify or Curve Tracks have been added, you can add various types of keys or events to those tracks. For example, you may want to Add Float Curve Keys to a Curve Track, Add Animation Notify Events or Add Animation Sync Markers to a Notify Track.

Get Bone Pose

To get Bone Transform data you can use the Get Bone Pose for Frame or Get Bone Pose for Time nodes which will return the Bone Transform for the provided Animation Sequence with the specified Bone Name. Alternatively, you can use the Get Bone Poses for Frame or Get Bone Poses for Time to collect Bone Transforms for a specified array of Bone Names.
When getting Bone Transforms the transform data will be in local space. If you need it to be in component space, you will need to manually convert the transforms.
Helper Nodes

The Animation Blueprint Library nodes include several helper nodes including nodes for converting frame and time information ( Get Time at Frame or Get Frame at Time ). Another node that is useful for getting information is the Find Bone Path to Root which will take an Animation Sequence and a Bone Name (typically the Root Bone) and output a list of Bone Names in a chain.


