Choose your operating system:
Windows
macOS
Linux
An Animation montage (or montage for short) provides a way for you to control an animation asset directly through Blueprint or C++ code. With an Animation Montage, you can combine several different animation sequences into a single asset that you can break up into sections for playback either individually or in combination. You can also fire off events within a montage that can perform a variety of local or replicated tasks, such as playing sound cues or particle effects, changing player values like ammunition count, or even replicating root motion in networked games (provided root motion is enabled on the animation).
Example Montage
The following animation sequence of a character reloading a shotgun demonstrates a practical use case for montages:
In the video above, the character reaches for a clip, reloads, then returns to an idle pose. While this is perfectly fine to use as a reload animation, a montage provides much more control. For example, suppose you wanted the character to reload a variable amount of bullets instead always reloading the same amount. By splitting this animation up into three parts (grabbing a clip, reloading, and returning to idle) and combining those parts in a montage, you could section them off and selectively play any or all of those sections.
Below is an example montage used to handle the reloading of a shotgun. It is sectioned into three parts: Start , Loop , and End .

With Blueprint or C++, we can define that when the player presses a button, the animation begins playing at the Start section. The looping middle section, called Loop , immediately follows the Start section, and is set to repeat indefinitely within the montage. If the player releases the reload button, or they've filled the shotgun with bullets, the animation stops looping and can be set to jump to the End section to transition out of the animation, as seen in the video below.
The reload motion is a little bit faster than the baked sequence; however, you can adjust the play rate of our looping animation if you want. This gives you the ability to control when you want to stop the reloading motion and return the character to an idle pose. A similar example is when a character jumps in the air, loops an animation of being in the air or falling, then has a landing sequence. The amount of time in the air could vary, and we want to be able to move out of that portion of the montage at any point.
Some additional uses for montages include:
-
You can play an animation from the Event Graph of an Animation Blueprint .
-
You can chain together a complex sequence of animations that you want to think of as a single animation.
-
You can loop only a specific portion of one or more animations, based on code or a Blueprint script.
-
You can manage event-based switching of multiple animations, based on code or a Blueprint script.
-
You can assign complex animation sequences to named slots, that can be switched between using code or Blueprint.
-
You can create precise switching between various AnimSequences, based on code or a Blueprint script.
Montage UI
After creating a montage and opening it inside the Animation Editor , you can use the Asset Editor panel to define how your montage functions.

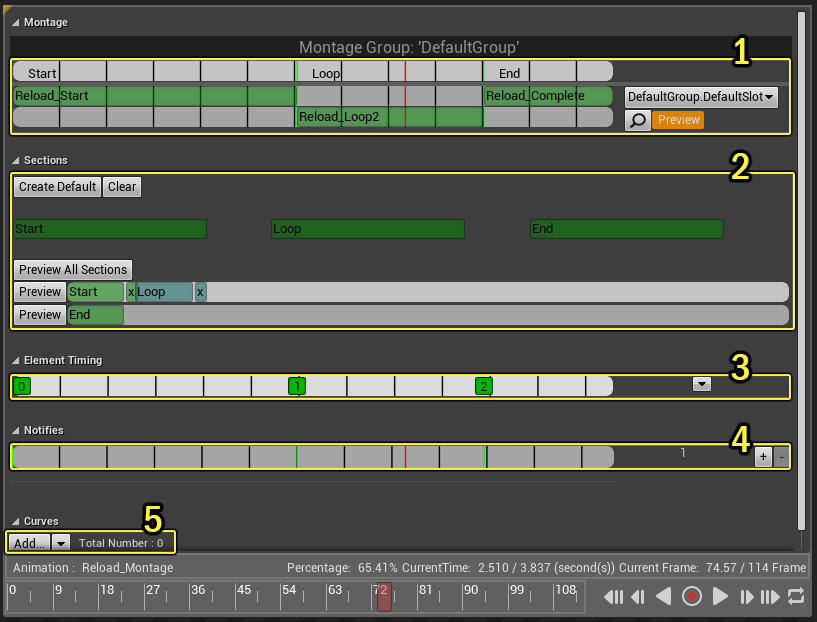
The Asset Editor panel of a montage is broken up into the following primary areas:
-
Montage
-
Sections
-
Element Timing
-
Notifies
-
Curves
Montage Area
The Montage area of the panel contains the following:

-
Sections �Shows any sections that have been created within the montage.
-
Slot �Shows the animations that have been added to the current slot.
-
Group/Slot �Shows the currently selected Anim Group and slot.
Sections
Creating sections provides a way to break a slot into multiple portions of animation. Each section has a name and location in the slot's timeline. Using the name, you can either jump directly to a particular section, or queue it up to play next when the current section is complete. In Blueprint , you can query the current section, jump to a section, or set the next section that will play.
Another way to think of sections is like songs in a music playlist, with slots being the album. You may be currently playing a section (song), but you can queue up or jump to another section within the slot (album) when the current section finishes, or just jump to the one you want to play right now.
Slot
Within a montage, a slot is a single track that can hold any number of animations. You can pick any name for a slot and then use that name to blend to the animations within. Going back to the reload montage example, we could have different versions of the reload for when characters are standing and when they are prone. In this case, we could place animations for each character pose in separate slots in our montage (below), and use the Slot node in the AnimGraph of our Animation Blueprint to determine which set of animations to use based on whether the character is standing or prone.

Above we use the DefaultProne slot for when our character is reloading while standing, and the Prone slot for when our character is reloading while prone.
When multiple slots are assigned, you can click the Preview button for the slot you want to preview in the Editor.
For the best results when using multiple slots, try to ensure that the timing of animations involved from end-to-end is the same length.
Groups / Slots
Anim Groups are a collection of slots, and for each group you can only play a single montage. If you want to play another montage at the same time, you can create a new group for it. Anim Groups and slots are centralized within the Anim Slot Manager tab, which you can open by clicking the AnimSlot Manager ( magnifying glass ) icon. You can use the dropdown menu to choose between valid slots. When creating a new montage, Slot nodes start out with a single Default Slot so that they are immediately functional.
Sections
The Sections area is where you can establish relationships between the sections you define in the Montage area.

-
Create Default / Clear �Click the Create Default button to create the default associations between all sections, stringing them together one after another. Click the Clear button to remove all associations.
-
Section Buttons �In this area, there is a button for each of the sections you define in the Montage area that are available for Section Association.
-
Section Association Tracks �In this area, you can visualize the relationships between animation sections by clicking Preview All Sections , or see individual tracks by clicking Preview for that track.
Looping
Sections can be set up to loop indefinitely, which is extremely useful for any action that you need to repeat. By associating the same section more than once in a Section Association Track, you cause that association track to run in a loop. This is shown by the section turning blue.
As an example, consider the animation in which a character is reloading a shotgun, one shell at a time. You can loop the section in which the character inserts a shell. Then by using Notifies , you can create Notify events in the Blueprint that increment the ammo count each time the animation plays through. Once that count reaches a set number (representing full ammo), you can then switch to an animation of the character closing the receiver and returning to an idle pose.
Element Timing
The Element Timing track takes information from the Montage and Notifies areas to help with the timing of different sections.

Each node in the track is given a number denoting the trigger order of that object within the montage, and is color coded as follows:
-
Red �This denotes Notifies, Notify States and Notify State ending markers.
-
Light Blue �This denotes Branching Points.
-
Green �This denotes a montage section.
Clicking the dropdown button on the Element Timing track presents you with options for showing/hiding additional information.
Notifies Area

Animation Notifies (or Notifies for short) are a way to set up events to occur at specific points in the animation. For example, in the image above we have placed Notifies in our reload montage to play the sounds for grabbing a clip each time the reload animation plays. We also call a custom event called SpawnClip that we can use to spawn a mesh in the world that represents an ammo clip. Finally, we use a Branch event during the looping portion, to determine if we should exit the loop and move on to the End section of our animation where the character returns to an idle pose.
Curves

You can use Animation Curves to change the value of a Material parameter or a Morph Target while an animation is playing. The workflow requires that you designate the asset you want to modify (either a Material or a Morph Target), name the curve accordingly, and then adjust keyframe values across the duration of an animation.
Playing Montages
Montage assets can be played in different ways, based on what you need. If you want a skeletal mesh to play the montage automatically, you can assign it as the Anim to Play for the skeletal mesh. However, if you only want your montage to play when specific criteria are met, you can create a Blueprint script that calls for the montage, or sections within the montage, to play using the Play Montage node. You can also tell Montages to play through C++ code based on your defined criteria.
See the Using Animation Montages page for more information.
Child Montages
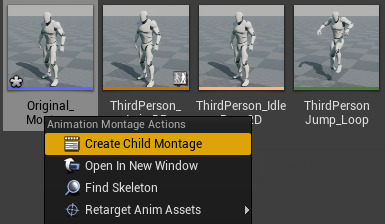
With Child Montages you can create animation variants without affecting gameplay, and without needing to recreate and maintain Notifies (or other details) across multiple assets. An example use case for this might be varying the auto-attack animations on units in a real-time strategy (RTS) game, or changing a character's idle animation in a role-playing game (RPG) based on what kind of weapons the character is holding. A child animation montage can be created from an existing animation montage by right-clicking on an animation montage in the Content Browser and selecting the Create Child Montage option.

The new montage will have the same name as the original, but with "_Child" added to the end.

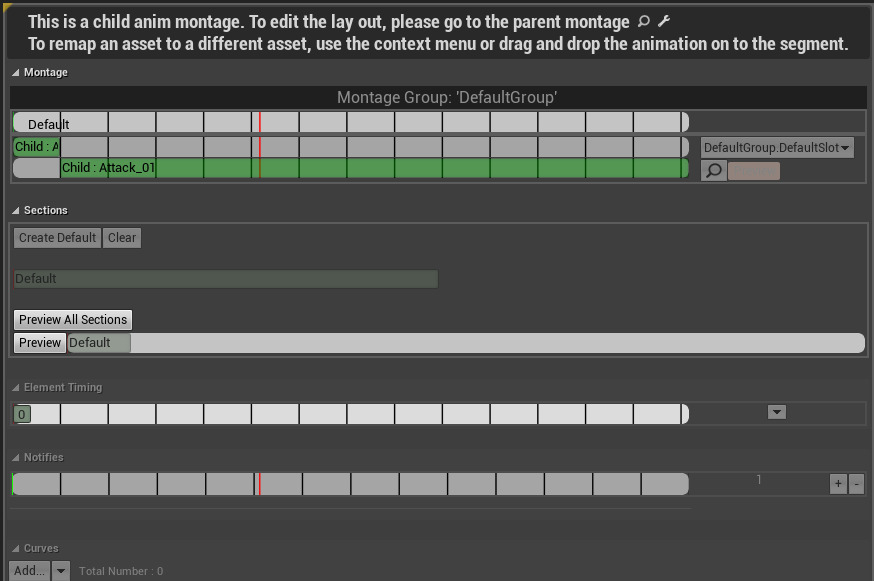
When opening a child montage, all elements within the montage will be grayed out, and text will appear at the top indicating that it is a child.

You can right-click the Anim Segment in the Slot Track and override it with a new animation.

In the Slot Track , it is possible to substitute any animation for any other, even if they are of different lengths. Unreal Engine will automatically adjust the play rate, start time, and end time of the replacement animation so that it uses the same portion and runs at the same time as the original. Animations that have not been changed from the parent will be shown in green, and animations that have been overridden will be shown in yellow.

Above we have replaced our attack animation with a different attack animation.
Child montages cannot be used as parents for other child montages.