Choose your operating system:
Windows
macOS
Linux
Whenever you open a Skeletal Mesh asset inside the Content Browser (or from the Editor Toolbar ), the Skeletal Mesh Editor will open. This editor allows you to make changes to the polygonal mesh by setting up Materials for the Skeletal Mesh, adding clothing elements, setting up LODs and testing out any Morph Targets applied to the mesh. This editor includes windows that can be found in some of the other Animation Tools such as the Toolbar/Viewport (and others that are hidden by default) but most of your mesh work will be done in the Asset Details and Morph Target Preview windows.
Please refer to each section below for a breakdown of the Skeletal Mesh Editor user interface:

1. Toolbar
The Toolbar inside the Skeletal Mesh Editor provides you with options for saving any changes to your animation or locating it in the Content Browser. It also allows you to create a Static Mesh out of the preview's current pose. On the far right of the Toolbar is the Editor Toolbar which allows you to switch between the different Animation Tools in Unreal Engine 4.
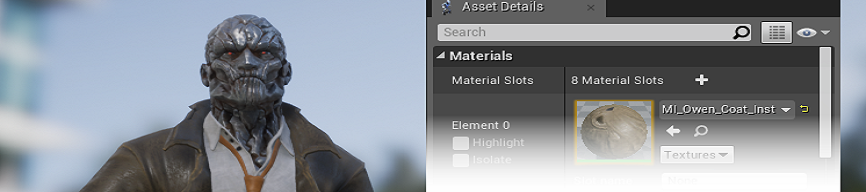
2. Asset Details
The Asset Details panel shows specific properties pertaining to the Skeletal Mesh, such as the Materials applied to the surface, as well as skinning and LOD options. You can also assign and adjust APEX clothing or define and associate a Physics Asset for the Skeletal Mesh which is needed for creating rag-doll type motions.
3. Viewport
The Viewport window allows you to preview the changes that you make to the Mesh in the Asset Details panel or to preview any Morph Target settings. From the Viewport, you can also assign a preview animation for the Skeletal Mesh to use, change lighting modes, show or hide the bones of your skeleton, adjust animation playback speeds, even set your Skeletal Mesh to automatically rotate around on a turntable allowing you view it from all angles.
4. Morph Target Preview
The Morph Target Preview tab lets you preview any Morph Targets (or Blend Shapes) available for the current Skeletal Mesh.
Also located in this section is a tab for Preview Settings which enable the ability to define the viewport settings such as the Animation Mode or Animation to use as a preview, switch Skeletal Meshes that are used for the preview, as well as viewport lighting and Post Process settings applied so you can preview your settings with various lighting applied.