Choose your operating system:
Windows
macOS
Linux


This guide provides an overview of UE4 from the viewpoint of a Unity user, and aims to help you translate your existing Unity experience into the world of UE4.
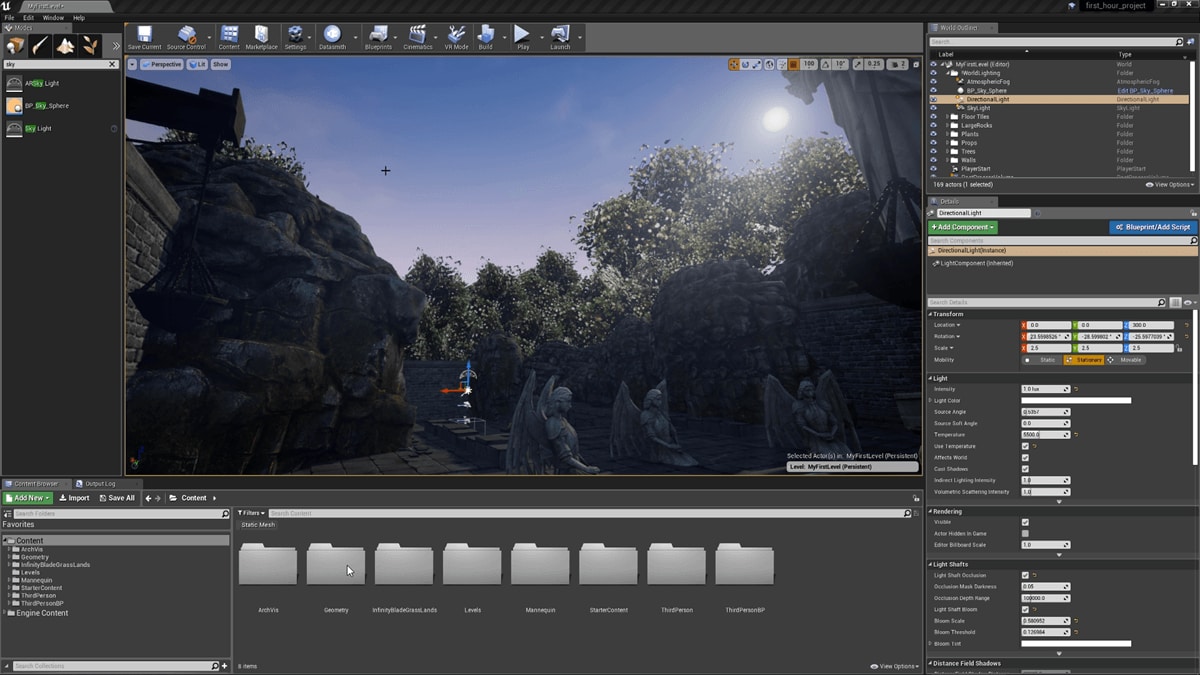
The Editor
Below are pictures of the Unity Editor and Unreal Editor, color-coded to indicate common functionality. Each block is labeled to show the equivalent UE4 terminology. Unreal Editor's layout is fully customizable by dragging and dropping tabs around.


Editing Assets
In Unity, the Inspector tab is used to edit selected assets in your Project. In UE4, the Details panel exposes properties of selected objects, while larger editing tasks lead to a dedicated window or tab. New tabbed windows will open for each edited asset, similar to a web browser. Of course, you can freely drag the tabs around or float them as standalone windows.


Quick Glossary
The following section contains common Unity terms on the left and their UE4 equivalents (or rough equivalent) on the right. UE4 keywords link directly to more in-depth information inside Unreal Engine's Online Documentation.
|
Category |
Unity |
UE4 |
|---|---|---|
|
Gameplay Types |
Component |
|
|
GameObject |
||
|
Prefab |
||
|
Editor UI |
Hierarchy Panel |
|
|
Inspector |
||
|
Project Browser |
||
|
Scene View |
||
|
Meshes |
Mesh |
|
|
Skinned Mesh |
||
|
Materials |
Shader |
|
|
Material |
||
|
Effects |
Particle Effect |
|
|
Shuriken |
||
|
Game UI |
UI |
|
|
Animation |
Animation |
|
|
Mecanim |
||
|
2D |
Sprite Editor |
|
|
Programming |
C# |
|
|
Script |
||
|
Physics |
Raycast |
|
|
Rigid Body |
||
|
Runtime Platforms |
iOS Player, Web Player |
Projects and Files
So what are all these directories and files?
Just like Unity projects, Unreal projects always exist in their own directory and have their own project file. You can Double-click on .uproject files to load your game into the Unreal Editor, or Right-click for additional options. Project folders have various sub-folders that contain your game's content and source as well as various configuration files and binaries. The most important are the Content and Source sub-folders.
Where do I put my assets?
In UE4, each project has a Content folder. Similar to a Unity project's Assets folder, this is where your game assets are stored. To import assets into your game, simply drop files into your project's Content directory and they will be automatically imported and appear in the Content Browser . The assets in the editor will update automatically as you make changes to the files using an external program.


What common file formats are supported?
Unity supports a wide array of file formats. UE4 supports the most common file types:
|
Asset Type |
Supported Formats |
|---|---|
|
3D |
.fbx, .obj |
|
Texture |
.png, .jpeg, .bmp ,.tga, .dds, .exr, .psd, .hdr |
|
Sound |
.wav |
|
Fonts |
.ttf, .otf |
|
Videos |
.mov, .mp4, .wmv |
How is my Scene stored?
In Unity, you place GameObjects in a scene and save that as a Scene asset file. Unreal has a Map file that is similar to a Unity Scene. Map files store data about your Level and the objects in it, as well as lighting data and certain level-specific settings.
How do I change my project's settings?
All project settings can be found from the main menu under Edit / Project Settings . Like Unity's project settings, these allow you to specify information about your project (such as project name and icons), configure game input bindings, and define how the engine behaves when running your project. You can learn more about individual project settings here . Unity also has what is called "player settings". In Unreal, these are "platform settings", and can be found under the "Platforms" category in your project settings.
Where do my source files go?
In Unity, you are accustomed to placing C# source files in your assets folder.
UE4 works differently. For projects that have C++ code, you will find a Source sub-folder under the project directory that has various files, including C++ source (.cpp) and header (.h) files, as well as some build scripts (.Build.cs, .Target.cs) However, Blueprint-only projects will not have a Source folder.
The easiest way to get started with C++ in UE4 is to use the editor to Add Code to Project (in the main File menu), or to simply create a new C++ project from scratch from one of the many templates. You can find C++ classes right in the Content Browser and can open the files in Visual Studio or Xcode by Double-clicking on their icons.
From GameObjects to Actors
Where is my GameObject?
In Unity, a GameObject is a "thing" that can be placed in the world. The UE4 equivalent is an Actor. In the Unreal Editor, you can drag a new Empty Actor into the viewport from the Placement panel:
You could build a game out of Empty Actors, but UE4 also includes special types of Actors with built-in features, such as a Pawn (for players or AI objects), or Character (for animated creatures.) Just like Empty Actors, you can drop these special types of Actors down, then add or customize their properties and components. You will learn more about it later, but for now try to remember that UE4 has a Gameplay Framework that works with these special Actors.
Actors in UE4 are a bit different than GameObjects in Unity. In Unity, GameObject is C# class which you cannot directly extend. In UE4, Actor is a C++ class which you can extend and customize using inheritance. We will talk about this more later on!
Where are my components?
In Unity, you add components to a GameObject to give it functionality.
In UE4, you add components to Actors. After you have dropped an Empty Actor in your level, click the Add Component button (in the Details panel) and choose a component to add. Here, we are creating a torch by dropping an empty Actor, then adding a mesh component for the base, followed by a light source and then a particle system to create its flame.
In Unity, a GameObject hold a flat list of components, but in UE4 an Actor actually contains a Hierarchy of components attached to one another. You can see this in the example above, where the Light and Particle are attached to the Mesh. This has some important implications discussed later in Complex Actors and GameObjects .
From Unity Prefabs to UE4 Blueprint Classes
Unity's workflow is based on prefabs. In Unity you build a set of GameObjects with components, then create a prefab from them. You can then place instances of the prefab in your world, or instantiate them at runtime.
UE4's corresponding workflow is based on Blueprint Classes. In UE4, you build an Actor with components, select it, and click the Blueprint / Add Script button (in the Details panel). Then, choose a place to save your Blueprint Class, and click Create Blueprint to save your new Blueprint Class!
Your new Blueprint Classes can be found in the Content Browser . You can Double-click to edit them directly, or you can drag and drop them into any level.
Where are Script Component and MonoBehaviour?
In Unity, you have Script Components that you drop on GameObjects to add C# scripting. You create a class that inherits from MonoBehaviour to define what that component does.
UE4 has something similar. You can create whole new Component classes of your own and drop those onto any Actor. You can create Component classes using either Blueprint Scripting or C++.
So how do you create your own component class in UE4? In the Details panel's Add Component drop-down, you see you can create new components, or choose existing ones:

In Unity, when creating a new MonoBehaviour, you will be given a skeleton class file with a Start() function and an Update() function.
In UE4, you will also be given a skeleton class with a InitializeComponent() function and a TickComponent() function, which perform functions similar to Start and Update.
If you create a Blueprint Script Component you will be given these same functions as visual nodes:

Scriptable Actor Blueprint Classes
Here is a cool feature in UE4: Your new Actor Blueprint Class can have its own Blueprint Visual Scripting! This allows you to add logic to an entire object, not only an individual component. Combined with inheritance (explained below), this gives you a lot of flexibility when designing your game.
In addition to Blueprint Classes supporting visual scripting, UE4 also supports C++ Classes implemented with code. Here is a side-by-side comparison of Unity and UE4 code, followed by an equivalent UE4 Blueprint.
|
Unity C# |
UE4 C++ |
|---|---|
|
` |
` |
|
UE4 Blueprint |
|---|
|
|

UE4 Blueprint Classes Can Be Extended
Unity prefabs and UE4 Blueprint Classes can be instantiated in your game similarly. However, Unity has complications related to nesting prefabs within other prefabs, which limit their role as extensible building blocks.
In UE4, you can create a new Blueprint Class which extends an existing Blueprint Class and augments it with new properties, components, and visual scripting functionality.
For example, in UE4 you can create a Blueprint Class named Monster which implements basic monster functionality such as chasing people. You can then create further Blueprint Classes which extend it, such as Dragon (a type of Monster which adds fire-breathing features), Grue (a Monster which is likely to eat you when it is dark), and for example 8 others. These subclasses of Monster all inherit the basic functionality from Monster, and add new capabilities on top.
In Unity, you would implement this by creating many different GameObject prefabs: one for Dragon, one for Grue, and so on. Now, say you want to add some new functionality to all monsters, such as the ability to speak using your new Speak Component. In Unity, you have to go and update all 10 prefabs to individually copy and paste the new functionality into it.
In UE4, you can simply modify the Monster Blueprint Class to add this new ability to speak. That's all! Dragon, Grue, and the 8 other subclasses of Monster automatically inherit the new speaking functionality, and you do not need to touch them.
But there is more! Everything we have said here about Blueprint Classes also applies to C++ Classes, and everything is equally true of Actors and Components. These systems are designed to support large-scale development of extensible functionality, and can scale to projects with 10's or 100's of developers.
Using Blueprint Scripting, C++, or Both
Blueprint Visual Scripting is ideal for simple in-game logic flow and sequencing of actions. It is a great system for designers, artists, and visually-oriented programmers, because it is easy to access and control in-game objects visually. You can even create small standalone-game using just Blueprints; see the Tappy Chicken sample for a full-fledged example.
C++ programming is for larger-scale tasks, such as building gameplay systems, complex AI, and new engine features. If you already have some C++ experience, check out the Introduction to C++ Programming in UE4 page.
Most projects will use a mix of Blueprints and C++. Many developers prototype game functionality using Blueprints, because it is so easy and fun, and later move some or all of it to C++ for performance and engineering rigor.
Blueprint Classes Can Extend C++ Classes
Much of the magic of UE4 game development comes from the interplay between programmers implementing new features in C++, with designers and artists utilizing them in Blueprints and then asking for more! Here's how a team might structure a UE4-based shooter game implementing pickups using a mix of C++ Classes systems programming, and Blueprint Classes for behavior and appearance:

Transform Components
In Unity each GameObject has a Transform component, which gives the GameObject a position, rotation, and scale in the world.
Similarly in UE4, Actors have a Root Component , which can be any subclass of Scene Component. A Scene Component gives the Actor a location, rotation, and scale in the world which is applied hierarchically to all components underneath it. Many of the components that you will use are subclassed from Scene Component, because it is really useful to have a position!
Even if you place an Empty Actor, UE4 will create a "Default Scene Root" for that Actor, which is just a plain Scene Component. If you drop a new Scene component in of your own, it will replace the Default Scene Root.
Compound Objects
In Unity, you create compound objects by constructing a hierarchy of GameObjects and parenting their transforms together:

In UE4, you create compound game objects by nesting components hierarchically:

As you can see from the diagram, nested hierarchies can be created by attaching Scene Components to one another, since they have a transform - similar to parenting transforms in Unity. Actor Components (the base-class for all components) can only be attached directly to the Actor itself.
Do I build everything out of Components?
Its really up to you, but most often you will use a combination of custom component types along with Actor classes that use those components. We mentioned this earlier, but UE4 has many special types of Actors that guarantee a certain level of capability and always include certain components. For example, a Character always contains a Character Movement Component .
There are several sub-classed Actor types you will quickly encounter in the engine and are useful in almost every type of game. Here is a list of our most common built-in Actors:
-
Pawn - A type of Actor representing a controllable game object, typically the player's avatar. Pawns are moved by Players and AI alike through an owning Controller.
-
Character - A more specialized version of Pawn designed for biped avatars that handle a lot of the complexity of those kinds of game objects.
-
Controller - Possesses and controls a Pawn. By separating the Pawn from the controller, you can write AI Controllers that can manipulate a pawn using the same interface the player would.
-
Player Controller - A more specialized Controller designed for getting input from a player's Gamepad, Touch, or Mouse/Keyboard, and using that input to drive the Pawn or Character they possess.
So is everything an Actor?
Not everything. Actors are most common class used for gameplay in UE4 and the only type that can be Spawned into the World . So everything you place in your level will be an Actor.
The other important type to know about is Object . Object is actually the base class of all Unreal classes, including Actor and many others. This is a much lower-level construct than Actor, but still has features that you will expect from a Unreal class, such as Reflection and Serialization . Object is a very basic class we use when we need to define a new type that just does not fit the mold of an Actor . For example, Actor Component is the base class for all Components, and derives from Object instead of Actor .
What is this Gameplay Framework thing in UE4?
Okay, so this is where things get a little crazy (in sort of an awesome way.) Unity gives you a clean slate to start designing your game, and Unreal does the same. In Unity you can build everything out of basic GameObjects and components, and in Unreal you can build everything out of Actors and components.
However Unreal has this extra layer on top called the Gameplay Framework . This does not really exist in Unity at all. You do not have to use it in Unreal, but it is actually super cool! Basically, if you make use of some basic primitive classes and follow certain established conventions, your game will acquire some awesome features automatically that would be otherwise very difficult to implement or retrofit (such as full multiplayer support!)
Countless awesome games have been designed on top of Unreal's Gameplay Framework, and it is worth taking some time to understand how it works. Yes, you could roll your own version of this. That is totally fine if you want to! But hundreds of awesome Unreal developers have made great use of this framework in UE4 today, so it is worth taking some time to learn.
To use the Gameplay Framework, you really just need to learn the customized built-in Actor classes included with Unreal, such as Pawn , Character , and Player Controller , and eventually learn about how Unreal replication and networking features work. For now, let us get back to the basics though.
How to Write Code in UE4
For MonoDevelop Programmers
For Blueprint scripting, you will only need Unreal Editor -- everything is built in! To write code in C++, download the free version of Visual Studio on Windows, or install Xcode on Mac. When you first create a new project (or add code to an existing project), UE4 will automatically create Visual Studio project files for you. You can open Visual Studio by Double-clicking on a C++ class inside Content Browser , or by clicking the Open Visual Studio button in the main File menu.

One important difference in UE4: You will sometimes have to manually refresh your Visual Studio project files (for example, after downloading a new version of UE4, or when manually making changes to source file locations on disk.) You can do this by clicking Refresh Visual Studio Project in the main menu, or by Right-clicking on the .uproject file in your project's directory and selecting Generate Visual Studio project files .

Writing Event Functions (Start, Update, etc.)
If you are used to working with MonoBehaviors you are used to such methods as Start, Update, and OnDestroy. Here is a comparison between a Unity behavior and its counterpart in UE4 Actors and components.
In Unity, we might have a simple component that looks like this:
public class MyComponent : MonoBehaviour
{
    void Start() {}
    void OnDestroy() {}
    void Update() {}
}
But remember, in UE4 you can write code right on the Actor itself rather than only coding new component types. This is actually very common and useful.
Similar to Unity's Start, OnDestroy, and Update functions, we have a similar set of methods for Actors in UE4:
C++ :
UCLASS()
class AMyActor : public AActor
{
    GENERATED_BODY()

    // Called at start of game.
    void BeginPlay();

    // Called when destroyed.
    void EndPlay(const EEndPlayReason::Type EndPlayReason);

    // Called every frame to update this actor.
    void Tick(float DeltaSeconds);
};
Blueprint :

Components in UE4 contain different functions. Here is a simple example:
C++ :
UCLASS()
class UMyComponent : public UActorComponent
{
    GENERATED_BODY()

    // Called after the owning Actor was created
    void InitializeComponent();

    // Called when the component or the owning Actor is being destroyed
    void UninitializeComponent();

    // Component version of Tick
    void TickComponent(float DeltaTime, enum ELevelTick TickType, FActorComponentTickFunction* ThisTickFunction);
};
Blueprint :

Remember, in UE4 it is important to call the parent class' version of method.
For example, in Unity C# this would be called base.Update(), but in UE4 C++ we will use Super::TickComponent():
void UMyComponent::TickComponent(float DeltaTime, enum ELevelTick TickType, FActorComponentTickFunction* ThisTickFunction)
{
    // Custom tick stuff here
    Super::TickComponent(DeltaTime, TickType, ThisTickFunction);
}
You may have noticed some things begin with "A" and others with "U" in C++. The prefix "A" indicates an Actor sub-class, whereas the prefix "U" indicates an Object sub-class. There are some other prefixes too, for example "F" is used for most plain data structures or non-UObject classes.
Writing Gameplay Code in UE4
Okay, things are going to get a bit deeper from here on out. We will be talking about programming topics that are critical for creating games. Because you know Unity, we will be explaining features with slant toward C# users learning Unreal C++, but you can use Blueprint Scripting for pretty much everything if you want! We have added examples in both C++ and Blueprint where possible.
Let us talk about some of the most common gameplay programming patterns and how you would approach them in Unreal. Many functions in Unity have a comparable function in Unreal that should seem familiar. We will go through the most common functions one by one.
Instantiating GameObject / Spawning Actor
In Unity, we use the Instantiate function to create new instances of objects.
This function takes any UnityEngine.Object type (GameObject, MonoBehaviour, etc.), and makes a copy of it.
public GameObject EnemyPrefab;
public Vector3 SpawnPosition;
public Quaternion SpawnRotation;

void Start()
{
    GameObject NewGO = (GameObject)Instantiate(EnemyPrefab, SpawnPosition, SpawnRotation);
    NewGO.name = "MyNewGameObject";
}
In UE4, there are a couple different functions to instantiate objects, depending on your needs. NewObject is used for creating new UObject types, and SpawnActor is used for spawning AActor types.
First we will briefly talk about UObjects and NewObject. Subclassing UObject in Unreal is much like subclassing ScriptableObject in Unity. They are useful for gameplay classes that do not need to spawn into the world or have attached components like Actors do.
In Unity, if you created your own subclass of ScriptableObject, you may instantiate it like this:
MyScriptableObject NewSO = ScriptableObject.CreateInstance<MyScriptableObject>();And in Unreal, if you created your own UObject derived type, you may instantiate it like this:
UMyObject* NewObj = NewObject<UMyObject>();So what about Actors? Actors are spawned using the SpawnActor method on a World (UWorld in C++) object. How do you get the World object? Some UObjects provide a GetWorld method for you, as an example, all Actors do.
You will notice instead of passing in another Actor, we pass in the "class" of the Actor we want to spawn. In our example, the class can be any subclass of AMyEnemy.
But what if you want to make a "copy" of another object, like what Instantiate allows you to do?
The NewObject and SpawnActor functions can also be given a "template" object to work with. Unreal will make a copy of that object, instead of making one "from scratch". This will copy over all of its UPROPERTYs and components.
AMyActor* CreateCloneOfMyActor(AMyActor* ExistingActor, FVector SpawnLocation, FRotator SpawnRotation)
{
    UWorld* World = ExistingActor->GetWorld();
    FActorSpawnParameters SpawnParams;
    SpawnParams.Template = ExistingActor;
    World->SpawnActor<AMyActor>(ExistingActor->GetClass(), SpawnLocation, SpawnRotation, SpawnParams);
}
You might be wondering what "from scratch" means in this context. Each object class you create has a default template that contain default values for its properties and components. If you do not override these properties and do not provide your own template, Unreal will use these default values to construct your object. To help illustrate this, let us first look at a MonoBehaviour for example:
public class MyComponent : MonoBehaviour
{
    public int MyIntProp = 42;
    public SphereCollider MyCollisionComp = null;

    void Start()
    {
        // Create the collision component if we don't already have one
        if (MyCollisionComp == null)
        {
            MyCollisionComp = gameObject.AddComponent<SphereCollider>();
            MyCollisionComp.center = Vector3.zero;
            MyCollisionComp.radius = 20.0f;
        }
    }
}
In the above example, we have an int property that defaults to 42, and a SphereCollider component that defaults to a radius of 20.
We can achieve the same thing in Unreal using the object's constructor.
UCLASS()
class AMyActor : public AActor
{
    GENERATED_BODY()

    UPROPERTY()
    int32 MyIntProp;

    UPROPERTY()
    USphereComponent* MyCollisionComp;

    AMyActor()
    {
        MyIntProp = 42;

        MyCollisionComp = CreateDefaultSubobject<USphereComponent>(FName(TEXT("CollisionComponent"));
        MyCollisionComp->RelativeLocation = FVector::ZeroVector;
        MyCollisionComp->SphereRadius = 20.0f;
    }
};
In the constructor of AMyActor, we have set the default property values for the class. Note the use of the CreateDefaultSubobject function. We can use it to create components and assign default properties to them. All the subobjects we create using this function act as a default template, so we can modify them in a subclass or Blueprint.
Casting from One Type to Another
In this case, we get a component we know we have, then cast it to a specific type and conditionally do something.
Unity C#:
Collider collider = gameObject.GetComponent<Collider>;
SphereCollider sphereCollider = collider as SphereCollider;
if (sphereCollider != null)
{
        // ...
}
UE4 C++:
UPrimitiveComponent* Primitive = MyActor->GetComponentByClass(UPrimitiveComponent::StaticClass());
USphereComponent* SphereCollider = Cast<USphereComponent>(Primitive);
if (SphereCollider != nullptr)
{
        // ...
}
Destroying GameObject / Actor
|
Unity |
C++ |
Blueprint |
|---|---|---|
|
Destroy(MyGameObject); |
MyActor->Destroy(); |
|

Destroying GameObject / Actor (With 1 Second Delay)
|
Unity |
C++ |
Blueprint |
|---|---|---|
|
Destroy(MyGameObject, 1); |
MyActor->SetLifeSpan(1); |
Click for full view. |

Disabling GameObjects / Actors
|
Unity |
C++ |
Blueprint |
|---|---|---|
|
MyGameObject.SetActive(false); |
// Hides visible components |
Click for full view. |

Accessing the GameObject / Actor from a Component
|
Unity |
C++ |
Blueprint |
|---|---|---|
|
GameObject ParentGO = |
AActor* ParentActor = |
Click for full view. |

Accessing a Component from the GameObject / Actor
Unity
MyComponent MyComp = gameObject.GetComponent<MyComponent>();C++
UMyComponent* MyComp = MyActor->FindComponentByClass<UMyComponent>();Blueprint

Finding GameObjects / Actors
// Find GameObject by name
GameObject MyGO = GameObject.Find("MyNamedGameObject");

// Find Objects by type
MyComponent[] Components = Object.FindObjectsOfType(typeof(MyComponent)) as MyComponent[];
foreach (MyComponent Component in Components)
{
        // ...
}

// Find GameObjects by tag
GameObject[] GameObjects = GameObject.FindGameObjectsWithTag("MyTag");
foreach (GameObject GO in GameObjects)
{
        // ...
}

// Find Actor by name (also works on UObjects)
AActor* MyActor = FindObject<AActor>(nullptr, TEXT("MyNamedActor"));

// Find Actors by type (needs a UWorld object)
for (TActorIterator<AMyActor> It(GetWorld()); It; ++It)
{
        AMyActor* MyActor = *It;
        // ...
}

// Find UObjects by type
for (TObjectIterator<UMyObject> It; It; ++it)
{
    UMyObject* MyObject = *It;
    // ...
}

// Find Actors by tag (also works on ActorComponents, use TObjectIterator instead)
for (TActorIterator<AActor> It(GetWorld()); It; ++It)
{
    AActor* Actor = *It;
    if (Actor->ActorHasTag(FName(TEXT("Mytag"))))
    {
        // ...
    }
}

Adding tags to GameObjects / Actors
MyGameObject.tag = "MyTag";

// Actors can have multiple tags
MyActor.Tags.AddUnique(TEXT("MyTag"));

Adding tags to MonoBehaviours / ActorComponents
// This changes the tag on the GameObject it is attached to
MyComponent.tag = "MyTag";

// Components have their own array of tags
MyComponent.ComponentTags.AddUnique(TEXT("MyTag"));
Comparing tags on GameObjects / Actors and MonoBehaviours / ActorComponents
if (MyGameObject.CompareTag("MyTag"))
{
    // ...
}

// Checks the tag on the GameObject it is attached to
if (MyComponent.CompareTag("MyTag"))
{
    // ...
}

// Checks if an Actor has this tag
if (MyActor->ActorHasTag(FName(TEXT("MyTag"))))
{
    // ...
}

// Checks if an ActorComponent has this tag
if (MyComponent->ComponentHasTag(FName(TEXT("MyTag"))))
{
    // ...
}

Physics: RigidBody vs. Primitive Component
In Unity to give any GameObject physics characteristics, you first give it a RigidBody component. In Unreal, any PrimitiveComponent (UPrimitiveComponent in C++) can be a physical object. Some common Primitive Components are ShapeComponents (Capsule, Sphere, Box), StaticMeshComponent, and SkeletalMeshComponent.
Unlike Unity which separates the responsibilities of collision and visualizations into separate components. Unreal combines the concepts of the potentially physical and the potentially visible into PrimitiveComponent. Any component that would have any geometry in the world, that could either be rendered or interacted with physically sub-classes from PrimitiveComponent.
Layers vs Channels
In Unity, they are called "Layers". UE4 uses Collision Channels, and they work in a similar way. You can read up on them here .
RayCast vs RayTrace
Unity C#:
GameObject FindGOCameraIsLookingAt()
{
    Vector3 Start = Camera.main.transform.position;
    Vector3 Direction = Camera.main.transform.forward;
    float Distance = 100.0f;
    int LayerBitMask = 1 << LayerMask.NameToLayer("Pawn");

    RaycastHit Hit;
    bool bHit = Physics.Raycast(Start, Direction, out Hit, Distance, LayerBitMask);

    if (bHit)
    {
        return Hit.collider.gameObject;
    }

    return null;
}
UE4 C++:
APawn* AMyPlayerController::FindPawnCameraIsLookingAt()
{
    // You can use this to customize various properties about the trace
    FCollisionQueryParams Params;
    // Ignore the player's pawn
    Params.AddIgnoredActor(GetPawn());

    // The hit result gets populated by the line trace
    FHitResult Hit;

    // Raycast out from the camera, only collide with pawns (they are on the ECC_Pawn collision channel)
    FVector Start = PlayerCameraManager->GetCameraLocation();
    FVector End = Start + (PlayerCameraManager->GetCameraRotation().Vector() * 1000.0f);
    bool bHit = GetWorld()->LineTraceSingle(Hit, Start, End, ECC_Pawn, Params);

    if (bHit)
    {
        // Hit.Actor contains a weak pointer to the Actor that the trace hit
        return Cast<APawn>(Hit.Actor.Get());
    }

    return nullptr;
}
UE4 Blueprint:

Click for full view.
Triggers
Unity C#:
public class MyComponent : MonoBehaviour
{
    void Start()
    {
        collider.isTrigger = true;
    }
    void OnTriggerEnter(Collider Other)
    {
        // ...
    }
    void OnTriggerExit(Collider Other)
    {
        // ...
    }
}
UE4 C++:
UCLASS()
class AMyActor : public AActor
{
    GENERATED_BODY()

    // My trigger component
    UPROPERTY()
    UPrimitiveComponent* Trigger;

    AMyActor()
    {
        Trigger = CreateDefaultSubobject<USphereComponent>(TEXT("TriggerCollider"));

        // Both colliders need to have this set to true for events to fire
        Trigger.bGenerateOverlapEvents = true;

        // Set the collision mode for the collider
        // This mode will only enable the collider for raycasts, sweeps, and overlaps
        Trigger.SetCollisionEnabled(ECollisionEnabled::QueryOnly);
    }

    virtual void NotifyActorBeginOverlap(AActor* Other) override;

    virtual void NotifyActorEndOverlap(AActor* Other) override;
};
UE4 Blueprint:

You can read more about setting up collision responses here .
Kinematic Rigidbodies
Unity C#:
public class MyComponent : MonoBehaviour
{
    void Start()
    {
        rigidbody.isKinimatic = true;
        rigidbody.velocity = transform.forward * 10.0f;
    }
}
In UE4, The collision component and rigidbody component are one. The base class for this is UPrimitiveComponent, which has many subclasses (USphereComponent, UCapsuleComponent, etc.) to suit your needs.
UE4 C++:
UCLASS()
class AMyActor : public AActor
{
    GENERATED_BODY()

    UPROPERTY()
    UPrimitiveComponent* PhysicalComp;

    AMyActor()
    {
        PhysicalComp = CreateDefaultSubobject<USphereComponent>(TEXT("CollisionAndPhysics"));
        PhysicalComp->SetSimulatePhysics(false);
        PhysicalComp->SetPhysicsLinearVelocity(GetActorRotation().Vector() * 100.0f);
    }
};
Input events
Unity C#:
public class MyPlayerController : MonoBehaviour
{
    void Update()
    {
        if (Input.GetButtonDown("Fire"))
        {
            // ...
        }
        float Horiz = Input.GetAxis("Horizontal");
        float Vert = Input.GetAxis("Vertical");
        // ...
    }
}
UE4 C++:
UCLASS()
class AMyPlayerController : public APlayerController
{
    GENERATED_BODY()

    void SetupInputComponent()
    {
        Super::SetupInputComponent();

        InputComponent->BindAction("Fire", IE_Pressed, this, &AMyPlayerController::HandleFireInputEvent);
        InputComponent->BindAxis("Horizontal", this, &AMyPlayerController::HandleHorizontalAxisInputEvent);
        InputComponent->BindAxis("Vertical", this, &AMyPlayerController::HandleVerticalAxisInputEvent);
    }

    void HandleFireInputEvent();
    void HandleHorizontalAxisInputEvent(float Value);
    void HandleVerticalAxisInputEvent(float Value);
};
UE4 Blueprint:

This is what your input properties in your Project Settings might look like:

You can read more about how to set up input here .
FAQ
How do I load my last project automatically?
If you are used to Unity automatically loading the last project you were working on, the same is possible in UE4. To enable, check "Always load last project on Startup" when opening a project. You can also toggle the setting at any time from the main Edit menu under Edit/Editor Preferences/Loading and Saving/Startup.
Where do I set Input Bindings for my game?
In Unity, you are used to using the Input Manager settings for Project to setup default bindings. In UE4 it works similarly. You will open your Project Settings then select the Input category. There, you can add various buttons (actions) and analog controls (axes). Give each control a name and default binding. Then, you can get callbacks to your game's Pawn when the input events are triggered. Check out the Input documentation page for the details.
How do I change the starting scene of my project?
You can change the startup map of your project from the project settings tab. From the main menu choose Edit/Project Settings->Maps & Modes to change the starting map.
How do I run my game?
The easiest way to run your game is to click the "Play" button on the the main editor toolbar, which will run the game right inside the editor's process. If you want to run it as a standalone application, click the dropdown arrow next to "Play" and choose "Standalone Game". Finally, if you want to run on a mobile device or in a web browser, you will use the "Launch" button on the toolbar (after installing any prerequisites that are needed for that platform.)
What units are these?
In Unity, the primary unit of measurement is one meter. In UE4, the primary unit of measurement is one centimeter.
So if you move something 1 unit (meter) in unity that is equivalent to moving something 100 units (centimeters) in UE4.
If you want to move something 2 Feet in Unity that would be 0.61units (meter) and in UE4 is 61 units (centimeters).
What is with this coordinate system? Which way is up?
Both Unity and UE4 use a left-handed coordinate system, but the axes are swapped around. In UE4, positive X is "forward", positive Y is "right" and positive Z is "up".
How do I see Log Output from my game?
In the UE4 editor, you can open the "Output Log" from the "Window -> Developer Tools" menu. You can also run your game with the "-log" command-line parameter to summon a dedicated log window alongside your game, which is really useful!
Speaking of Log Output, where is my Debug.Log?
Logging in UE4 is highly customizable. Read up on how to log messages here .
How do I throw exceptions?
In Unity, you are used to throwing exceptions when things go wrong. UE4 does not use exception handling. Instead, use the 'check()' function to trigger a critical assertion error. You can pass in an error message. If you want to report an error but not halt the program, use 'ensure()' instead. This will log an error with a full call stack, but program execution will continue. If you had a debugger attached, both functions will break into the debugger.
Where is the .NET Framework?
Unlike Unity, UE4 does not use the .NET framework. UE4 has its own set of container classes and libraries. Common container comparisons:
|
.Net Framework |
UE4 |
|---|---|
|
String |
|
|
List |
|
|
Dictionary |
|
|
HashSet |
You can learn more about other UE4 containers here .
Does Unreal automatically reload code changes?
Yes! You can leave the editor open while you write code. Simply kick off a compile from Visual Studio after you have finished editing code, and the editor will "hot reload" your changes automatically. You can also click the Compile button on the editor's main toolbar. That can be useful when you have the Visual Studio debugger attached.
Where To Go From Here
Thanks for reading the guide! This was created for the Unreal community with the help of Unreal developers everywhere, and we very much appreciate any feedback and corrections you can offer. We will try to keep improving this document as we learn more about what is most helpful when transitioning to UE4!
We have many additional UE4 learning resources available!
-
Documentation
-
Getting Started - Basics/GettingStarted
-
-
Tutorial Videos - Videos
-
API - API
-
AnswerHub - https://answers.unrealengine.com
-
Forums - https://forums.unrealengine.com
-
Wiki - https://wiki.unrealengine.com
-
Wiki page about learning UE4 coming from Unity
-