Choose your operating system:
Windows
macOS
Linux
The Water system is made up of two key elements: an editable water surface, and a water surface material. These two elements determine how water in your project behaves and interacts with the objects it comes into contact with. This can mean something as simple as how the water material reflects and refracts light onto objects that come into contact with its surface. For gameplay, it can be how a character creates ripples in the water surface while moving through it, or how buoyant an object is as it floats on the surface of the water.
Water Surface Mesh
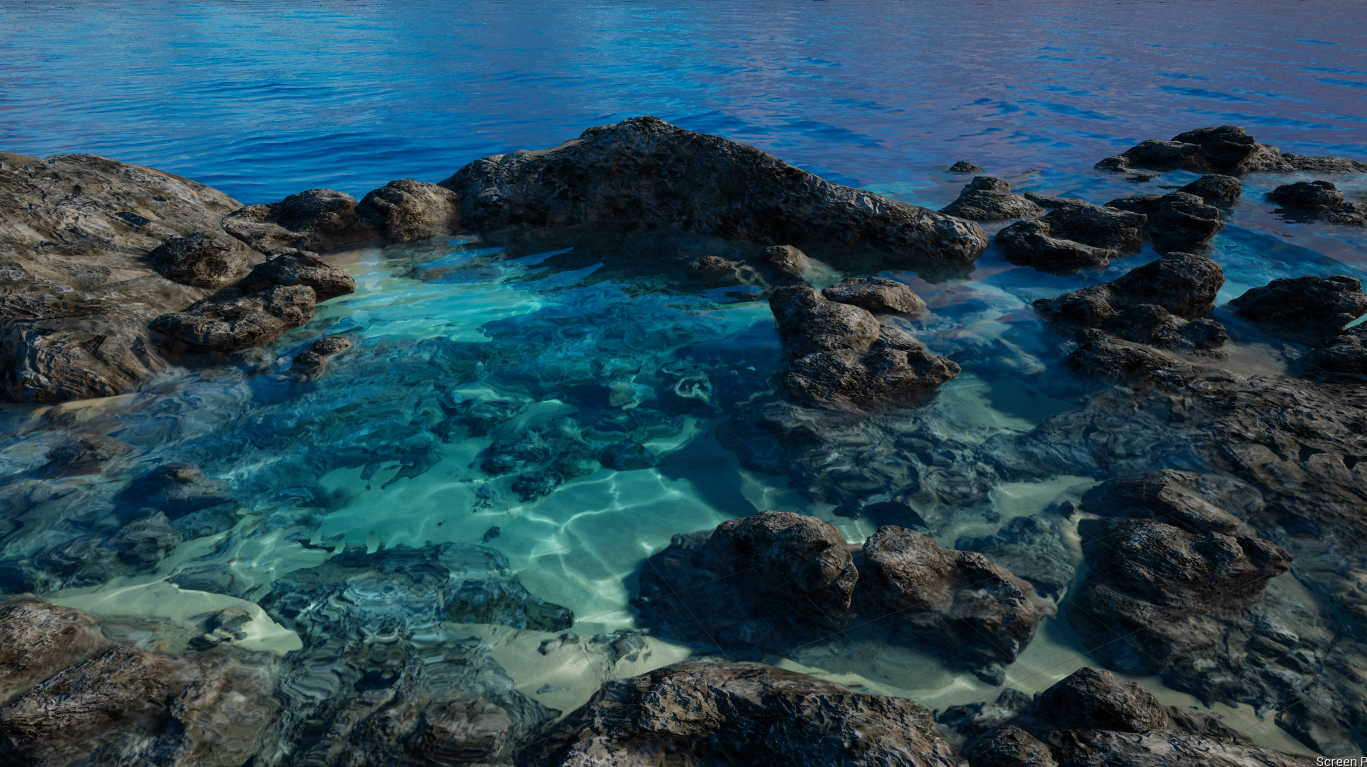
The Water system has its own spline-based meshing system that defines areas within the world that should contain water. It uses a Water Mesh Actor to set properties that apply to all Water Body Actors (rivers, lakes, and oceans) that are placed in the Level. The Water mesh primarily defines the quality and detail of the water surface being rendered.
You must place the Water Mesh Actor in a scene to generate the surface of a Water Body type in the Level. By itself, the Water Mesh Actor doesn't render a surface. Water Bodies use splines to define areas within the Level that represent rivers, lakes, and oceans. The splines define where water mesh tiles are drawn and rendered by the Water Mesh Actor. This is more efficient because it only renders a surface mesh that is visible within the current camera view.
When a Water Mesh Actor is in the scene, dragging and dropping a Water Body into the scene adds or removes tiles that represent the water surface. Because all Water Bodies use the same mesh to render water surfaces, they blend seamlessly together (see below). This also means you can have transitions between different types of water surfaces, such as a rapid river flowing into either a calm lake or a turbulent ocean.
Enable the Water Mesh wireframe view by using the console command
r.Water.WaterMesh.ShowWireframe 1
to see how these transitions between different Water Bodies interact to create a seamless surface.
Water Mesh Actor
The Water Mesh Actor controls the quality of the surface mesh that makes up the tiles of the individual Water Bodies placed in the Level. The individual Water Bodies also have their own hard limit for size in the Level. It also provides additional options specific to the Ocean Water Body.

These settings can significantly impact performance when using highly tessellated surfaces and large extents.
Water Mesh Level Of Detail Scaling and Tessellation
Level of detail (LOD) or the water mesh tiles is handled by traversing a quadtree each frame to generate an optimized set of tiles that are visible on screen. Those tiles are then collapsed for each level of detail when possible, to apply more or less density where it matters most — nearest the current camera view.
Each level of detail is made up of a concentric circle around the camera view based on distance, where each lower level of detail is farther from the camera and contains half the number of vertices as the level that precedes it.
With traditional levels of detail geometry, such as with a Static Mesh, geometry quickly transitions from one level to another based on screen size, which can cause the mesh to have a noticeable transition as one level is switched with another. Because the Water system uses a mesh tile to represent its surface, as the levels of detail transition, they morph into and out of one another, such that four quads morph into a single quad when switching to a lower level of detail, or into 16 when switching to a higher level of detail (see the example below)
|
|
|
|---|---|
|
Example of a 4x4 quad grid morphing into a 2x2 grid, and back again. |
Example of water LOD transition in Fortnite. |


The Water Mesh Actor provides controls to explicitly define the scale for the level of detail and the amount of tessellation for mesh tiles. Each of those properties work independently of one another, but should be configured simultaneously to achieve a good balance between performance and the quality of the water surface.
The size radius of each concentric level of detail is controlled by the LODScale property. It sets the distance from the camera where the tiles should start morphing to lower levels of detail.
The Tessellation Factor sets the amount of quality you want the mesh tile to have for all Water Bodies placed in the level by increasing the number of vertices the tiles have. Lakes and Ocean Water Bodies benefit the most from a greater amount of tessellation, especially when there are waves with large peaks and low valleys.
When setting these properties, it's important to balance the following:
-
High quality up close where the player sees finer detail
-
Lower quality far away where it doesn't necessarily matter to the player
-
Performance cost for tessellation quality
Keep in mind that your water materials can also have fine detail that the water system doesn't need to handle through tessellation.
Enable visualization of water tiles by:
-
Using the Brush Wireframe View Mode in the Level Viewport. This is ideal when you don't have a lot of geometry in the scene, or only have water meshes that are visible.
-
Using console commands to render water meshes as wireframes:
-
r.Water.WaterMesh.ShowWireframe 1displays all water meshes as wireframes. -
r.Water.WaterMesh.ShowWireframeAtBaseHeight 1displays all water meshes at their flat base height position.
-
Water Mesh Tile Size, Extents and Far Distance
The Water Mesh Actor provides options for defining the size of individual tiles that make up the Level's water mesh, defining how many tiles there are along each exist, and handles long distances for oceans where the sky meets the water.

The Tile Size property sets the size of the individual tiles that make up the water mesh. These are measured in the default world units. Increasing/decreasing the Tile Size scales all tiles that make up the water meshes in the Level.
|
|
|
|
|---|---|---|
|
Example Grid of Tile Size |
Water Mesh Tile Size: 2400 (Default Size) |
Water Mesh Tile Size: 1000 |


The Extent in Tiles property sets the number of individual tiles that make up the water mesh. The extents are measured from the center of the water mesh to the edge for the XY-axis.
|
|
|
|
|---|---|---|
|
Example Grid of Tile Extents |
Extent in Tiles: 64 (Default Size) |
Extent in Tiles: 32 |


The Far Distance is used to fill the space between the farthest tile used by the Extent in Tiles property and the horizon. This adds a low-vertex water mesh that creates the illusion of the Ocean Water Body tiles extending an indefinite distance.
|
|
|
|---|---|
|
Example Grid of Far Distance |
Far Distance Water Mesh Enabled |


This far-distance water mesh is located just below the Ocean Water Body base height position, so it limits clipping and avoids any seams that could become visible. It also uses a separate material that should be applied to the Far Distance Material assignment slot of the Water Mesh Actor. The material can be simple, and really only needs to match the color to create a seamless blend from the tiled water mesh.
Use the Far Distance Mesh Extent property to set how far (in world units) the simplified mesh extends.
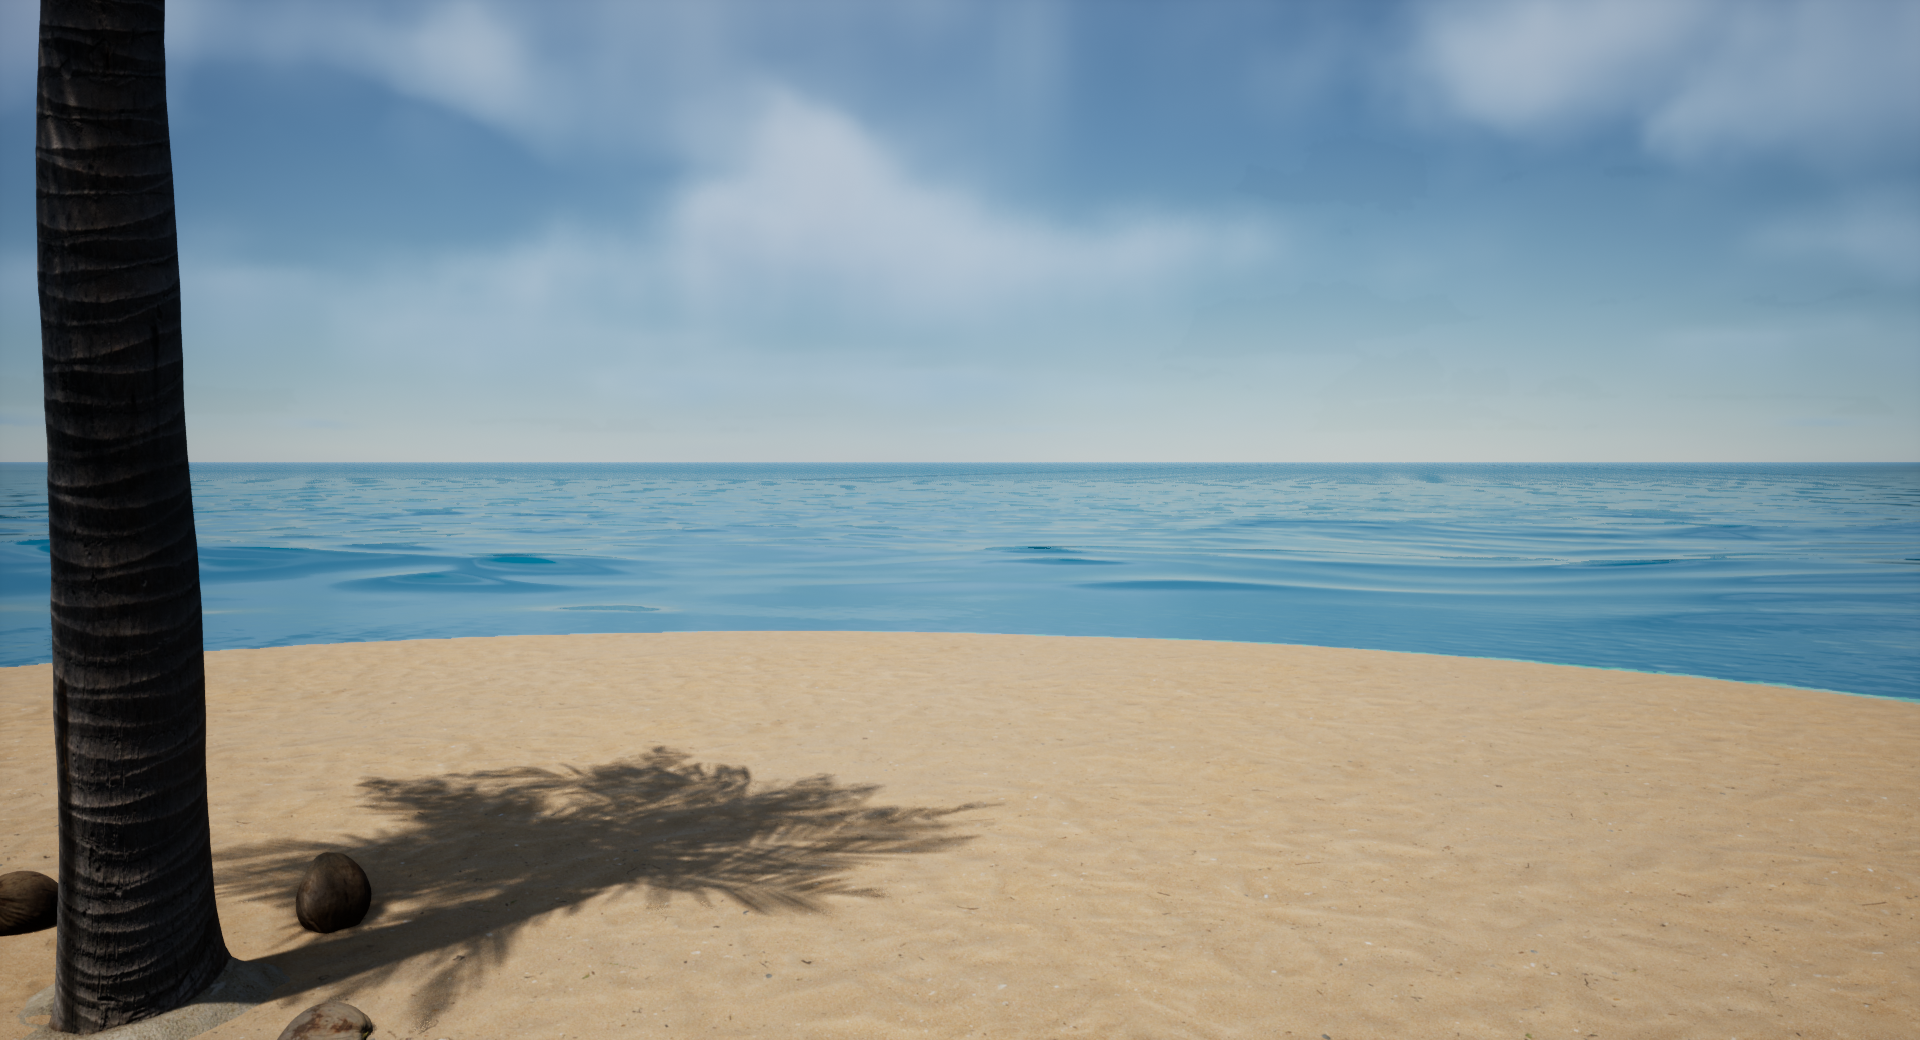
The example scene below, using an Ocean Water Body, shows how the Water Body appears from ground level. Notice how the Water Body doesn't appear to reach the horizon line (left). The Far Distance properties of the Water Mesh Actor fill in this gap while creating a seamless look between the Water Body and the Far Distance Mesh.

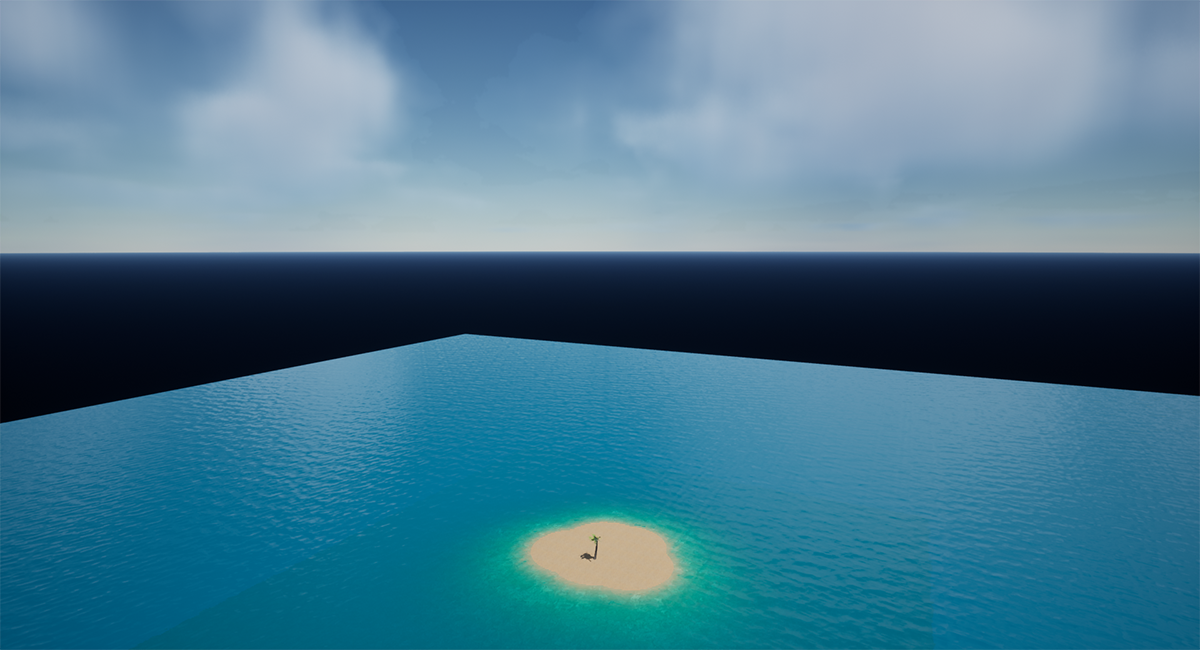
From an aerial perspective, it is clearly visible where the highly tessellated water mesh ends. When using a color-matching Far Distance mesh, it can easily fill the scene and reduce performance impact while seamlessly matching the detailed water mesh.

A simplified Material Instance of the base water material, called
Water_FarMesh
, is available for use in the
Water Content/Materials/WaterSurface
folder of your Content Browser.
Water Materials and Underwater Post Processing
The Water system uses several different types of materials to handle rendering of the water surface and transitions between different types of Water Bodies, such as a river flowing into the ocean. The Water system also uses a Post Process Material to define the look below the surface of the water.
Each Water Body has a set of material assignment slots that can be used to override the preconfigured default water materials.

Water Body Actor Materials
Water Bodies for River, Lake, and Ocean all use the same material (
Water_Material
) as their base. It contains a set of switches and parameters specific to each Water Body type, so that a single source material can be used to drive all types of water being used. A Material Instance is created for each of the Water Body types (River, Lake, and Ocean), and each enables a switch that determines the available parameters that correspond to that Water Body type. This workflow maintains a consistent look and design across each of the Water Body type materials.
In the images below, you can see how parameters for float values, RGBA colors, and switches to enable and disable material paths are defined. Parameters become accessible through child material instances, where the parameters of the parent material can be overridden to change the look of the material.
|
|
|
|---|---|
|
Base Material with Switches and Parameters |
Material Instance using the Override Switches and Parameters |


Click image for full size.
Most material parameters are similar across the Water Body types using their Lake, Ocean, or River materials. The one exception is the River's material. The River material contains specific parameters that other Water Body materials don't have, such as velocity, flow control, density, and more. However, River Water Bodies do not have a parameter for waves, whereas Oceans and Lakes do.
Explore each of the different Water Body type Material Instances by opening the
Water Content/Materials/WaterSurface
folder in the Content Browser.
River Water Body Material Transitions
River Water Bodies allow for water to follow along a spline path from one location to another, and they can originate from lakes, oceans, rivers, or any combination. Unlike lakes and oceans, rivers have a general direction in which the water flows. This can start from a lake and flow into an ocean, another lake, or it can even merge with another river along its route.
Because rivers have a different set of properties from lakes and oceans — namely that they don't generate waves — they use transitional materials to seamlessly blend from River to Lake and River to Ocean transitions. The River Water Body shares the same tile mesh as the Lake and Ocean Water Bodies, making it possible for the transitional material to conform to any other Water Bodies' surface where they come into contact.
The transitional materials are instances of the River Water Body's default material. The only setup required to have a consistent look to the water in your Level is to manually match their color to any other Lake, Ocean, and River Water Body Materials being used.
In the simple example scene below, a landmass is used that contains a Lake Water Body at its center, a Ocean Water Body that surrounds the island, and a River Water Body that connects them. The transition material handles the start of the flow of water out of the lake to the river where it transitions to the ocean. Each Water Body and Transition Material have had their color matched for consistency.

Underwater Post Processing
An important aspect of water, depending on your project, is transitioning from above to below the water's surface. The Water system handles this using post processing.
Water Bodies each have an Underwater Post Process Material assigned, that drives transition through the water's surface using a Post Process Material . Underwater post processing happens automatically when a camera is within the bounds of a given Water Body and is submerged below the water's surface. The Post Process Material also handles transitioning in and out of water by masking out parts of the scene that are not underwater to create a partially underwater view.

Each Water Body's Details panel includes specific settings for the Actor, and provides access to the Post Processing Settings to further adjust the look of being underwater without needing to open and manually configure material properties.

For optimization purposes, the underwater post processing is only active when the camera is under, or slightly above, the water's surface. This is meant to take into account Lakes and Oceans where wave peaks and valleys can cause the camera to become fully or partially submerged. The underwater post process requires that Generate Collision be enabled for this underwater post processing to work.
Also, Water Body tile meshes are able to seamlessly blend using the transitional materials of the River Water Body. However, should the look of the underwater post processing differ significantly between two Water Bodies (such as moving from a clear river to a murky lake), there is a hard transition as the camera moves between the two post processing volumes.
Single Layer Water Material Shading Model
The Single Layer Water shading model is used for all default water materials because it renders a cost-effective translucency method using a single depth layer. This physically-based shading model supports proper light scattering, absorption, reflection and refraction, and shadowing on the surface of water.

All default water materials assigned to Water Bodies use the Single Layer Water shading model. Any shading model can be used with Water Bodies.
For more information on this shading model, see Single Layer Water Shading Model .
Creating Your Own Water Material
It is possible to create your own water material that works well with the Water System, so you don't have to specifically use the default water material assigned to each Water Body.
Keep the following in mind when setting up your own material:
-
Water Bodies support water materials that use any type of shading model.
-
The material requires the Usage Flag for Used with Water to be enabled. Whenever a material is assigned to a different type of Actor, this flag should automatically be enabled and the material will recompile. In instances where it is not, check that this flag is enabled if the material is not rendering correctly.
-
The SingleLayerWater shading model provides translucency and lighting results at lower cost than a traditional translucent material.