
Choose your operating system:
Windows
macOS
Linux
This page describes how Datasmith imports scenes from Autodesk 3ds Max into Unreal Editor. It follows the basic process outlined in the Datasmith Overview and About the Datasmith Import Process , but adds some special translation behavior that is specific to 3ds Max. If you're planning to use Datasmith to import scenes from 3ds Max into Unreal Editor, reading this page can help you understand how your scene is translated, and how you can work with the results in Unreal Editor.


Images courtesy of Litrix.
3ds Max Workflow
Datasmith uses an Export Plugin workflow for 3ds Max. This means that to get your 3ds Max content into Unreal using Datasmith, you need to:
-
Install a plugin for 3ds Max. See Installing the Datasmith Exporter Plugin for 3ds Max .
Epic releases a new version of the Unreal Datasmith Exporter plugin for 3ds Max with every new release of Unreal Engine. If you switch to a different version of Unreal Engine, make sure you download and install the matching version of the plugin.
-
Export your 3ds Max content to a .udatasmith file. See Exporting Datasmith Content from 3ds Max .
-
Enable the Importers > Datasmith Importer Plugin for your Project, if it's not already installed.
-
Use the Datasmith importer available in the Toolbar of the Unreal Editor to import your .udatasmith file. See Importing Datasmith Content into Unreal Engine 4 .
To read more about other types of Datasmith workflows, see Datasmith Supported Software and File Types .
Geometry
This section describes what's special about the way Datasmith converts geometric objects from your 3ds Max scene into Static Mesh Assets and Actors in your Unreal Engine Project.
Meshes and Tessellation
In most cases, Datasmith uses each 3ds Max object's render mesh to create the geometry for the corresponding Static Mesh Asset in Unreal. That means that your Assets in Unreal will typically have exactly the same triangles as you see in 3ds Max renderings.
The exception to this rule is 3ds Max Body Objects , where Datasmith bases the geometry of the Static Mesh Asset on the 3ds Max viewport mesh instead of the render mesh. For these kinds of objects, 3ds Max allows you to customize the granularity of the tessellation that it uses when rendering in a viewport in its Viewport Display Settings > Mesh Quality Presets setting: Coarse , Medium , or Fine :

Datasmith respects the level of tessellation you set here for each Body Object in the scene. For more information on this setting, see the 3ds Max Help .
Instances
When Datasmith detects multiple instances of the same master object in your 3ds Max scene, it only creates one Static Mesh Asset for that object. It then places multiple instances of that Static Mesh into the Level in Unreal. This is typically better for the runtime memory requirements and performance of your Project, and it helps you manage your content by keeping the number of Static Meshes down.
Wherever possible, we recommend taking advantage of this by using instances in 3ds Max for all repeating elements in your scene (such as windows, doors, or chairs).
Pivot Points
In 3ds Max, you can set a custom pivot point for each object in your scene, even when those objects are instances of the same master object. However, in Unreal Engine, all instances of the same geometry need to use the same pivot point. When Datasmith translates your objects to Unreal, it handles those pivot points as follows.
-
If all instances in 3ds Max have the same custom pivot point, Datasmith simply sets this as the pivot location for the Static Mesh Asset it creates. When you rotate any of the Static Mesh Actors that Datasmith creates for this object in the Unreal Engine Level, it will rotate around the location of that custom pivot as you expect.
-
If one or more instances use a different pivot location from the others, Datasmith sets the Static Mesh Asset it creates in Unreal to use the default pivot location of the 3ds Max object. Each time it needs to place this Asset into the Level, instead of creating a Static Mesh Actor, it creates a new, empty parent Actor at the location of the custom pivot for that instance. It then gives this parent Actor a Static Mesh Component that references the Static Mesh asset, and that has a translation offset from the parent Actor that places it where it needs to be in the 3D scene. Datasmith adds the suffix
_pivotto that child Component's name.
For example, the teapot on the left has a custom pivot placed at the top of its lid:

When Datasmith brings the scene into Unreal, it creates a new Actor called
Teapot002
, at the location of that pivot point in the 3D world. This Actor is given a Static Mesh Component named
Teapot002_Pivot
, which refers to the Static Mesh asset for the teapot, and is offset from the parent Actor by exactly the right amount to make it appear at the right place relative to the other geometry in the scene:

You can move, rotate and scale the parent Actor in the Unreal Engine Level, and your model will behave as you expect. All you need to note is that in this case, your model is a Component of the parent Actor, rather than being a Static Mesh Actor itself. For example, in the case above, the teapot on the right is instanced in the Level as a Static Mesh Actor rather than an Actor with a Static Mesh Component.
Datasmith does not support importing instances that have both different pivot points and a non-uniform scale in 3ds Max. If you have instances like this, use the Reset XForm Utility on them before you export.
UV Channels
Datasmith always ensures that every Static Mesh it brings into Unreal has a set of UVs available for Lightmass to use when you build static lighting into lightmap textures. When you import the Datasmith file, the Unreal Engine creates that UV channel automatically, and sets each Static Mesh Asset to use that new channel for baking lightmaps.
However, in some cases you might want to create your own custom lightmap UVs by hand in 3ds Max. This gives you full artistic control over the placement of seams and the relative space assigned to the triangles in your geometry. If so, you need to know how your UVs are brought into Unreal from 3ds Max, and how you can override that behavior.
The Unreal Engine supports up to eight UV channels per Static Mesh. And, every time Datasmith imports a geometry object from 3ds Max into a Static Mesh Asset in the Unreal Engine, it uses two UV channels to generate the lightmap UVs for that Static Mesh. Therefore, Datasmith can preserve up to six pre-existing UV channels from each object that it imports into Unreal from 3ds Max.
However, 3ds Max can have up to 99 UV channels per object. So, Datasmith exports only the six channels with the lowest indices in 3ds Max.
For example, the 3ds Max object below has five UV channels in its modifier list. Each one of these channels has a number between 0 and 99 associated with it. Datasmith imports these five UV channels, resetting their numbers to begin at 0. This results in a set of UV channels numbered 0-4 in Unreal. Finally, the import process creates two additional UV channels, 5 and 6 in this case, for the auto-generated lightmaps.

This table breaks down the way the UV channel numbers are related between 3ds Max and Unreal:
|
3DS Max UV Channel |
Resulting Unreal UV Channel |
|---|---|
|
1 |
0 |
|
2 |
1 |
|
3 |
2 |
|
10 |
3 |
|
99 |
4 |
|
5 UV channel 5 in Unreal is generated during import to create an automatic unwrap of the geometry contained in the Datasmith scene. It is the basis for the lightmap UV generation used by UV channel 6. |
|
|
6 UV channel 6 in Unreal is generated based on UV channel 5 to correctly pad and pack the UV charts based on the Datasmith Import Options used for the Static Mesh Lightmap Resolution values. |
If you want your imported Static Meshes to use pre-existing UV channels that you created in 3ds Max, you have two options:
-
Before you export your scene from 3ds Max, you can use the Datasmith Attributes Modifier to specify the index of the UV channel that you want Unreal Engine to use for lightmaps. For details, see Per-Object Conversion Settings .
-
After you import your scene into Unreal Editor, you can change the index of the UV channel that you want Unreal Engine to use for lightmaps. You can do this:
-
In the Static Mesh Editor. In the Details panel, expand the Advanced controls under the General Settings group, and set the Light Map Coordinate Index to the UV channel you want to use.
-
In Python: Call the following function:
static_mesh.set_editor_property("light_map_coordinate_index", index)
-
Custom Collision Shapes
In some cases, you may want to model custom geometry for your objects in 3ds Max, and use that custom geometry as the collision meshes for the corresponding Static Meshes in Unreal Engine. By doing this, you can make the representations of your scene objects match the volumes of the original scene objects as closely as possible, while minimizing the number of triangles they contain. This can help you improve the behavior and performance of the physics simulation in the game engine.
There are two ways that you can do this with Datasmith:
-
You can assign the Datasmith Attributes Modifier in 3ds Max to one or more objects in your scene, then use that Modifier to specify a different object that you want Unreal Engine to use as their collision mesh. For details, see Per-Object Conversion Settings .
-
You can use the same naming convention as the FBX importer to have Datasmith automatically assign that geometry to its corresponding Static Mesh Asset:
If a convex geometry object exists in the scene that has the same name as another object but with the prefixUCX_, Datasmith will consider thisUCX_object to be the collision representation of the other object. Datasmith only imports the object without the prefix as a Static Mesh Asset. It then assigns the geometry of the object with theUCX_prefix as the collision mesh for that Static Mesh Asset.
Whichever approach you use, the object that you set as a collision mesh can be any completely closed, convex 3D shape. For example, a box could be a convex object. The diagram below illustrates what is convex and what is not:

In addition, ensure that the pivot point of your custom geometry object is at the same location relative to the volume as the pivot point of the original object. For example, in the following image, the pivot points of the chairs on the right are aligned with the bottom surfaces of the objects, and they are in the center of the volumes. Therefore, the pivot point of the simplified geometry volume on the left needs to be aligned in the same position relative to the overall volume.

If you don't keep the pivot point of your collision geometry at the same place relative to the overall volume, the representation of your object in the physics world won't align with the visible extents of the object. This can cause collisions to happen where you're not expecting them.
You can verify that your custom shapes have been imported correctly by turning on collision rendering in the Level Viewport. From the Viewport overlay menus, select Show > Collision . You'll see your custom collision volumes rendered on top of your scene objects. In this example, the spherical model has been assigned a box object as its custom collision volume.
[

Click for full image.
Vertex Colors
If you have associated any vertex colors with your 3ds Max objects, Datasmith preserves those colors when it creates corresponding Static Mesh Assets in the Unreal Engine.
You can also use these vertex colors when you create a custom Material in Unreal Editor by including the
Constants >
Vertex Color
node in your Material Graph.
For example, the image on the left below shows an object in 3ds Max that is set to display its vertex colors. The image on the right shows a simple custom Material that retrieves those vertex colors and passes them directly into the Base Color output.
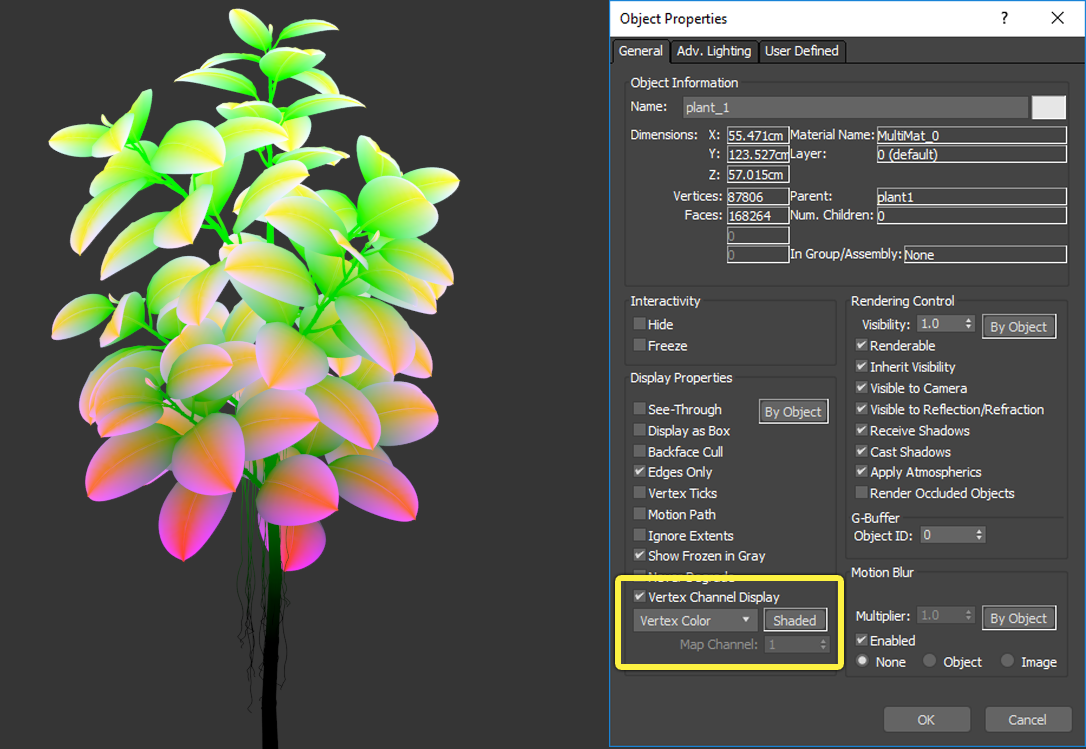
Vertex colors displayed in 3ds Max
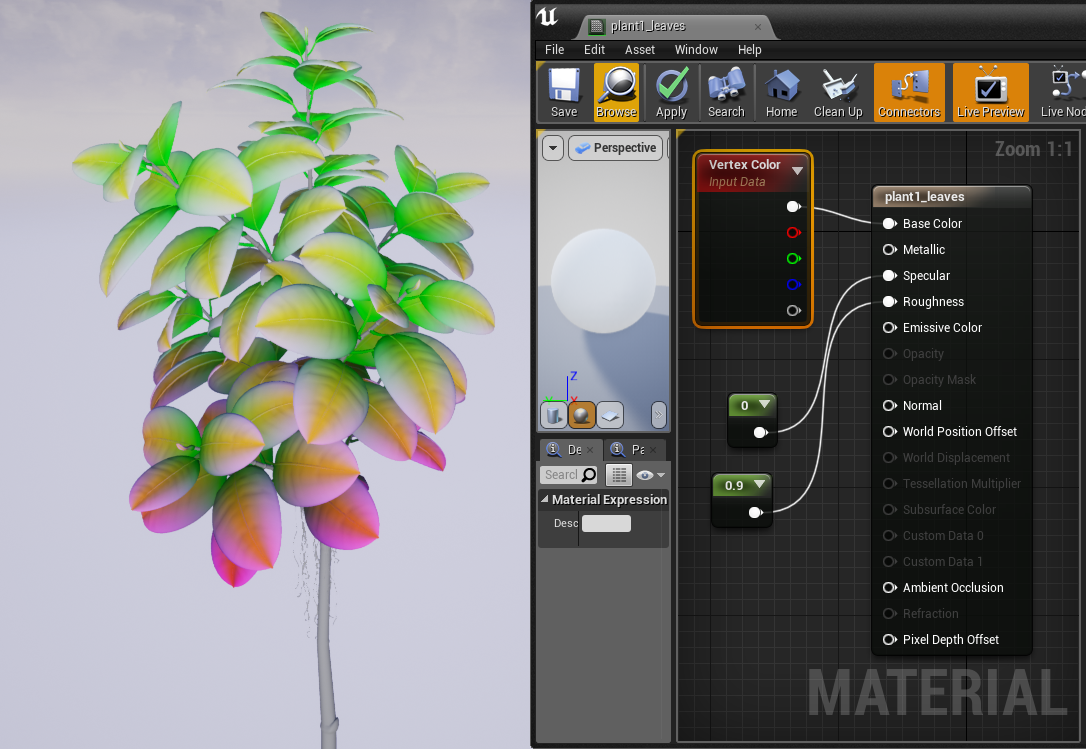
Vertex colors displayed in Unreal Engine
Your own custom Material graphs don't have to simply use the vertex colors to provide the visible color for the surface as shown above. Your Material graph can combine and blend the vertex colors with other surface properties. In addition, you don't have to use vertex colors to pass literal color values at all. Instead, you can use the vertex colors as a mechanism to associate custom data values with the geometry of your source objects and have those values pass through to custom Materials you create in the Unreal Editor to drive special visual effects. For example, you could use vertex colors to assign weights to the branches and leaves of a tree, and use those weights to modulate the effect of a wind animation effect that you apply in a vertex shader.
You can also visualize your vertex colors to ensure that they have been translated correctly by opening your Static Mesh Asset in the Static Mesh Editor, and enabling the Vert Colors toggle button in the Toolbar.

Datasmith does not translate data from other 3ds Max mesh channels, such as Vertex Alpha , Map Channel Color , or Soft Selection Color .
Levels of Detail
Datasmith currently does not import any custom Levels of Detail that you've set up in 3ds Max. You can, however, generate new Levels of Detail automatically in Unreal Editor. For details, see Automatic LOD Generation , or Creating Levels of Detail in Blueprints or Python .
Forest Pack and RailClone Objects
Forest Pack and RailClone are optional third-party plugins for 3ds Max, made by iToo Software , that make it easier to populate a 3ds Max scene with large numbers of geometric objects by scattering them or placing them procedurally. Because of the popularity of these plugins in the design visualization industry, Datasmith offers some special handling for Forest Pack and Railclone objects.
When you use Datasmith to export a scene that contains a Forest Pack or RailClone object, and you import that scene into the Unreal Engine:
-
Datasmith creates a single Actor in the Unreal Engine Level, named according to the name of the object in 3ds Max.
-
Within that Actor, Datasmith creates a Hierarchical Instanced Static Mesh (HISM) Component for each different type of geometry handled by the object. It also creates a single Static Mesh Asset in your Project content for each type of geometry, and sets the HISM Component to refer to this Static Mesh Asset.
For example, this image shows an Actor created from a Forest Pack object selected in the World Outliner (1) , and one of its HISM Components selected in the Details panel (2) . At the bottom, you can also see the Static Mesh Asset assigned to the selected HISM Component in the Static Mesh setting (3) .

Click for full image.The Hierarchical Instanced Static Mesh Component is a very efficient way to render many instances of the same Static Mesh. The Unreal Engine renderer batches all instances managed by the same HISM Component into a single draw call (actually, a single draw call per Material assigned to the Static Mesh Asset). This increases the number of instances that the renderer can handle without affecting GPU performance or frame rate. HISM Components are also the same technology used under the hood to support Unreal Engine's Foliage system.
-
Within each HISM Component, Datasmith adds an instance at the same position and rotation of each instance of that geometry visible in the 3ds Max scene.

With this process, the outcome in Unreal Engine closely matches the original 3ds Max scene, both in the scene hierarchy (one Forest Pack or RailClone object that internally manages all its instances) and in the visual results. For example, the image on the left below shows a scene in 3ds Max with a single Forest Pack object that scatters two different types of objects. The image on the right shows the visual result of importing that scene into Unreal Engine.


You may be using Forest Pack or RailClone to manage objects with complex geometry, such as trees, that you intend to replace in Unreal Engine with simpler geometry that performs more efficiently in realtime.
In this case, you can apply the
Datasmith Attributes
Modifier to the Forest Pack or RailClone object in 3ds Max and set it to export only the bounding box of the geometry. All of the instances managed by the Forest Pack or RailClone Actor will use the simplified bounding volume. For example:

For more information on how to use the
Datasmith Attributes
Modifier, see
Per-Object Conversion Settings
.
After import, you can update all instances in the Unreal Engine Level to use a new Static Mesh Asset by changing the
Static Mesh
setting once on the HISM Component.
Lighting and Rendering Environment
3ds Max offers much more detailed and sophisticated lighting and rendering features than many of the other third-party software that Datasmith supports. This section describes some of the special ways that Datasmith tries to bring this lighting and rendering environment into the Unreal Engine.
Lights
Datasmith maintains a rich set of information about the lights in your 3ds Max scene, with the goal of making the lighting in your Unreal Level as close an approximation as possible to the lighting you set up in 3ds Max.
Datasmith translates a wide variety of 3ds Max light types, including Standard, Photometric, V-Ray, and Corona lights. For each light, it brings into Unreal:
-
Position, orientation, shape and size in 3D space.
-
Light type (for example, point light or spot light).
-
Intensity, units, lamp color, temperature, and filter color.
-
Render shape visibility.
-
IES light profiles.


Top: Point lights with IES profiles and scaled Kelvin temperatures.
Middle: Point lights with IES profiles and scaled light intensity.
Bottom: Spot lights with filter color.
Every lighting system produces somewhat different results. Datasmith brings your light placement, types, and properties through into Unreal Engine as closely as possible, but you will likely need to make adjustments in your Level's lighting after import in order to make the results look the way you expect and to optimize the performance of your Level's lighting at runtime.
A few notable differences between 3ds Max and Unreal when you use Datasmith:
-
Unreal Engine currently does not support instances for lights. For each instanced light in your 3ds Max scene, Datasmith creates a separate Light Actor in your Unreal Engine Level.
-
Standard lights in 3ds Max are unitless, and they allow custom attenuation parameters that Unreal Engine doesn't support.
-
Some V-Ray shapes are not supported, such as Vertical Cylinder, Spheroid, and Custom Mesh lights.
-
Area lights are handled using a special Blueprint class. For details, see About the Datasmith Import Process .
Exposure
Datasmith preserves the intensities of the lights that it brings from 3ds Max to Unreal Engine. However, the light intensities by themselves are not enough to ensure a good rendering of the scene. The Unreal Engine renderer needs to interpret those light intensities in a context in order to determine the luminance of the scene: how bright or dark that scene should appear in the final rendering. Part of this context is provided by the exposure of the camera or view — a set of physical characteristics that govern how sensitive the final image should be to the intensity of light in the scene.
To make sure that the intensities of the lights in your scene produce rendered images in Unreal Engine at the level of apparent brightness you expect, Datasmith also translates several different exposure values from 3ds Max. See the following sections for details:
Physical Camera Exposure Settings
If your 3ds Max scene contains a Physical Camera, Datasmith preserves the exposure and white balance settings for that camera and carries them over to the CineCameraActor that represents that Physical Camera in the Unreal Level.
For each camera, Datasmith sets the WhiteBalance > Temp , Shutter Speed , ISO , and Aperture (f-stop) settings to match the equivalent settings in 3ds Max. It also sets the Exposure > Metering Mode to Manual , which disables auto-exposure.
|
Physical Camera exposure settings in 3ds Max |
CineCameraActor exposure settings in UE4 |
|---|---|
|
|
|


The result is that when you view your Level through this camera, you'll see light levels that closely match the results you get when you render in 3ds Max.


Global Exposure Settings
If your Exposure Control setting in 3ds Max uses either the Physical Camera Exposure Control or VRay Exposure Control , Datasmith now creates a Post Process Volume in the Datasmith Scene that applies those global exposure settings to the whole Unreal Engine Level.
As with Physical Cameras, Datasmith sets the WhiteBalance > Temp , Shutter Speed , ISO , and Aperture (f-stop) settings for the Post Process Volume to match the equivalent settings in 3ds Max. It also sets the Exposure > Metering Mode to Manual , which disables auto-exposure.
You'll find these controls in the Environment and Effects dialog in 3ds Max. To open this dialog, choose Rendering > Exposure Control... from the main menu.
|
Physical Camera Exposure Control in 3ds Max |
VRay Exposure Control in 3ds Max |
PostProcessVolume exposure settings in UE4 |
|---|---|---|
|
|
|
|


The result is that when you view your Level using the default perspective camera in the Unreal Editor Viewport, you'll once again see light intensities that closely match the rendered result from 3ds Max.


In 3ds Max, your global white balance and exposure settings do not have to match the settings assigned to your Physical Cameras. When this is the case, and you render the scene from the point of view of a perspective camera, the rendering uses your global exposure settings rather than the settings assigned to any specific Physical Camera.
The same thing happens after import into Unreal Engine. Viewing the scene through the default camera in the Level Viewport uses the global exposure settings (as in the image above). However, viewing the scene through any
CineCameraActor
uses the exposure settings assigned to the corresponding Physical Camera in 3ds Max.
Auto-Exposure
Unreal Engine has a built-in auto-exposure system that monitors the amount of light that reaches the camera and automatically adjusts the exposure so that the final image will appear at a reasonable level of luminance. This system is active by default in Unreal Engine. Your Project will use this default auto-exposure system anytime Datasmith doesn't find physical cameras or global exposure settings that it can bring in from a 3ds Max scene.
If your 3ds Max scene does contain physical cameras or global exposure settings, and you want to switch back to auto-exposure, you only need to change the value of the Metering Mode setting on your CineCameraActor or PostProcessVolume from Manual to one of the Auto Exposure choices (the default is usually Auto Exposure Histogram ).
-
In the CineCameraActor , you'll find it under Post Process > Lens > Exposure > Metering Mode .
-
In the PostProcessVolume , you'll find this setting under Lens > Exposure > Metering Mode .
See also Eye Adaptation (Auto-Exposure) .
If your scene appears over-exposed or under-exposed while you're using auto-exposure, the lighting in the scene may be too bright or too dim for the auto-exposure system to handle at its default sensitivity. To fix this, select
Edit > Project Settings
from the main menu, and find the
Engine > Rendering
section. Under the
Default Settings
category, make sure that the
Extend default luminance range in Auto Exposure settings
option is enabled.

Click for full image.
Cameras
For every camera that Datasmith finds in your 3ds Max scene, it creates a CineCameraActor in the Datasmith Scene in Unreal Engine, at the same position and rotation in 3D space. Datasmith attempts to preserve the focal properties of that camera. The intent is the result of viewing the Level through that camera is as close as possible to the result of rendering the scene from that camera in 3ds Max.
In addition, if your camera in 3ds Max is set up with a target, Datasmith sets up the CineCameraActor to track that target Actor. As in 3ds Max, when you move the target Actor around in the Unreal Engine Level, the CineCameraActor automatically rotates so that it remains centered on that target Actor.
For example, here the CineCameraActor named PhysCamera001 is set up to look at the PhysCamera001_Target Actor.
![]()
See also Physical Camera Exposure Settings above for details on how Datasmith translates exposure settings for physical cameras.
Materials
For each material in your 3ds Max scene, Datasmith creates a new Material Instance in your Unreal Engine Project. Each of these Material Assets is an instance of a Parent Material that Datasmith also creates in your Project, in the
Materials/Master
folder. Datasmith creates the Material graph for each of these Parent Materials with the goal of producing equivalent results in the Unreal Engine's physically based renderer to the results you see when rendering in 3ds Max.
Not every Instanced Material has its own Parent. Where possible, if two different Material Instances can share the same Material graph, Datasmith attempts to use a single Parent Material for both Material Instances.
Materials with a single shading model and a relatively simple graph should translate very well. For example, Datasmith translates the following 3ds Max material relatively smoothly into the Parent Material's graph:

If you open the Parent Material Assets, you'll notice that their graphs are often a little different from what you started with in 3ds Max, even for simple materials like the one shown above. This is a normal result of converting between shading models: Datasmith attempts to preserve the visual result as closely as possible, even if this sometimes means inserting extra connections or constants into the graph.
That said, 3ds Max supports multiple different shading models for materials, such as V-Ray, Corona, Arnold, Mental Ray, and more. Each shading model is a separate piece of software, with its own unique features that are not always consistent with one another. Sometimes, Datasmith is able to convert these features into similar features offered by the Unreal Engine.
However, Datasmith can't always handle the more esoteric features of these shading models. It may not be able to produce equivalent results in Unreal for materials with complex graphs that mix multiple output shaders together, such as this example:

Click for full image.
In cases like these, you'll need to do some extra work to adjust or replace these Materials in the Unreal Editor after import.
Datasmith does not translate Autodesk Materials or Arnold Materials/Shaders from 3ds Max. These are typically the materials that your scene uses if you imported a Revit scene into 3ds Max. You'll need to replace these materials either in 3ds Max before you export to Datasmith, or in the Unreal Editor after you import your scene.
Conversion Notes and Warnings
After Datasmith finishes exporting your 3ds Max scene, it pops up a window that lists any notes, problems, warnings or errors that it encountered during the process:

The goal of this window is to notify you of any elements in your scene that may not carry through to Unreal exactly as you expect.
-
Some of these lines, such as the lines about missing bitmaps in the image above, indicate problems with your source scene. You may want to fix these problems in 3ds Max before you export to Datasmith again.
-
Others notify you about things in your 3ds Max scene that either Datasmith or the Unreal Engine doesn't support, or things that Datasmith had to convert in a way you might not be expecting.
After you import your Datasmith scene into the Unreal Editor, if you're looking for conversion issues that you may need to clean up, the items listed in the Output Warnings window are a good place to start.