Choose your operating system:
Windows
macOS
Linux
Character Movement provides a locomotion system for humanoid characters to traverse through your world. The Character Movement Component is an Actor Component that provides modes of movement for Character classes, including walking, falling, swimming, and flying. Additionally, the Character Movement Component features robust network gameplay integration and provides a framework to help developers create custom networked movement.
For additional documentation on Network Replication in Unreal, see Networking and Actor Replication
In this How-To Gameplay Guide, you will create a Character class, script it's movement logic, Input, and create an Animation Blueprint which will help determine which state your Character is in, and then play the corresponding animation.

Choose your implementation method:
C++
Creating a New Project
-
Begin by signing into the Epic Games Launcher and creating a New > Games > Blank > Project named CharacterMovement.
![Create new Blueprint project]()
-
To animate your Character, you will require the Animation Starter Pack which is available to download for free from the Epic Games Marketplace . Click the Free button to download and add the Animation Starter Pack to your Epic Games Library .
![Get Animation Starter Pack]()
-
From your Library , search for your Animation Starter Pack and click Add to Project , then from the Select the Project to Add the Asset to menu, search for and select your CharacterMovement project file, then click Add to Project .
![Add Animation Starter Pack to project]()
-
Upon adding the Animation Starter Pack to your project, you will notice its presence in the Content Browser .
![Animation Started Pack in the Content Browser]()


-
Begin by creating a New > Games > Blank > C++ project named CharacterMovement .
![New C++ project]()
-
To animate your Character, You will require an Animation Starter Pack which is available to download for free from the Epic Games Marketplace . Click the Free button to download and add the Animation Starter Pack to your Epic Games Library .
![Get Animation Starter Pack]()
-
From your Library , search for your Animation Starter Pack and click Add to Project , then from the Select the Project to Add the Asset to menu, search for and select your CharacterMovement project file, then click Add to Project .
![Add Animation Starter Pack to project]()
-
Upon adding the animation starter pack to your project, you will notice its presence in the Content Browser .
![Animation Started Pack in the Content Browser]()


Creating the Player Character
A Character class is required for your Player to control. A character is a pawn that comes with a Character Movement Component to provide a locomotion system for humanoid characters to traverse through your world. Follow the steps below to set up your character.
-
Click the Add/Import button to create a new Blueprint Character class named BP_PlayerCharacter.
![Add new Blueprint Character class]()
-
Double-click your BP_PlayerCharacter to open its class defaults , then in the components tab select the Mesh (CharacterMesh0) Skeletal Mesh Component , and navigate to the Details panel .
![Blueprint Character Details]()
Click image to expand.
-
In the Mesh category , select the drop down arrow adjacent to the Skeletal Mesh variable , and from the drop down menu select SK_Mannequin .
![Select Skeletal Mesh]()
-
In the Details panel , navigate to the Transform category , and set the Mesh's Location and Rotation to ( 0 , 0 , -90 ).
![Transform settings]()
-
Your Character's Skeletal Mesh will now be oriented in the direction of the forward facing Arrow Component as shown in the image below.
![Skeletal Mesh orientation]()
-
Navigate to the Components tab to select your Mesh component, then click Add Component and in the drop down menu search for and select SpringArm, then name your Spring Arm Component " SpringArmComp ".
![Add Spring Arm Component]()
-
Navigate to the Details panel , and in the Camera Settings category enable the Use Pawn Control Rotation .
![Camera settings]()
Enabling use Pawn Control rotation will rotate the camera relative to the spring arm.
-
In the Camera category , set the socket offset to ( 0,0,30 ) then navigate to the Transform category and set the SpringArmComp's Location to ( 0,0,50 ).
![Spring Arm Component settings]()
-
With your SpringArmComp selected, click the Add Component button, then in the drop down menu search for and select Camera to add a Camera Component named CameraComp .
![Add Camera Component]()
-
In the Components tab, select the Character Movement Component , then navigate to the Details panel , and in the Character Movement ( Rotation Settings ) category, enable Use Controller Desired Rotation and Orient Rotation To Movement .
![Character Movement Rotation settings]()
-
In the Character Movement:Walking category enable the Ignore Base Rotation variable.
![Enable Ignore Base Rotation]()
Setting Ignore base rotation to true will tell the character to maintain its current world rotation, and ignore any changes in rotation of the base it's standing on.
-
In the Character Movement Nav Movement category, navigate to the Movement Capabilities and select the drop down arrow to reveal additional variable settings, navigate to the Can Crouch Boolean and click to enable it.
![Enable Can Crouch Boolean]()
-
Compile and Save .
![Compile and Save buttons]()


A Character class is required for your Player to control. A character is a pawn that comes with a Character Movement Component to provide a locomotion system for humanoid characters to traverse through your world. Follow the steps below to set up your character.
-
In the C++ Class Wizard , create a new Character class named PlayerCharacter , then navigate to the
PlayerCharacter.hfile and declare the following class definitions:protected: //Spring Arm Component to follow the camera behind the player UPROPERTY(VisibleAnywhere, BlueprintReadWrite) class USpringArmComponent* SpringArmComp; //Player follow camera UPROPERTY(VisibleAnywhere, BlueprintReadWrite) class UCameraComponent* CameraComp; -
Navigate to the
PlayerCharactor.cppfile and add the following class libraries:#include "Camera/CameraComponent.h" #include "GameFramework/SpringArmComponent.h" #include "GameFramework/CharacterMovementComponent.h" -
In the APlayerCharactor::APlayerCharacter constructor method declare the following
// Instantiating your class Components SpringArmComp = CreateDefaultSubobject<USpringArmComponent>(TEXT("SpringArmComp")); CameraComp = CreateDefaultSubobject<UCameraComponent>(TEXT("CameraComp")); //Set the location and rotation of the Character Mesh Transform GetMesh()->SetRelativeLocationAndRotation(FVector(0.0f, 0.0f, -90.0f), FQuat(FRotator(0.0f, -90.0f, 0.0f))); // Attaching your class Components to the default character's Skeletal Mesh Component. SpringArmComp->SetupAttachment(GetMesh()); CameraComp->SetupAttachment(SpringArmComp,USpringArmComponent::SocketName); //Setting class variables of the spring arm SpringArmComp->bUsePawnControlRotation = true; //Setting class variables of the Character movement component GetCharacterMovement()->bOrientRotationToMovement = true; GetCharacterMovement()->bUseControllerDesiredRotation = true; GetCharacterMovement()->bIgnoreBaseRotation = true; -
Compile your code.
-
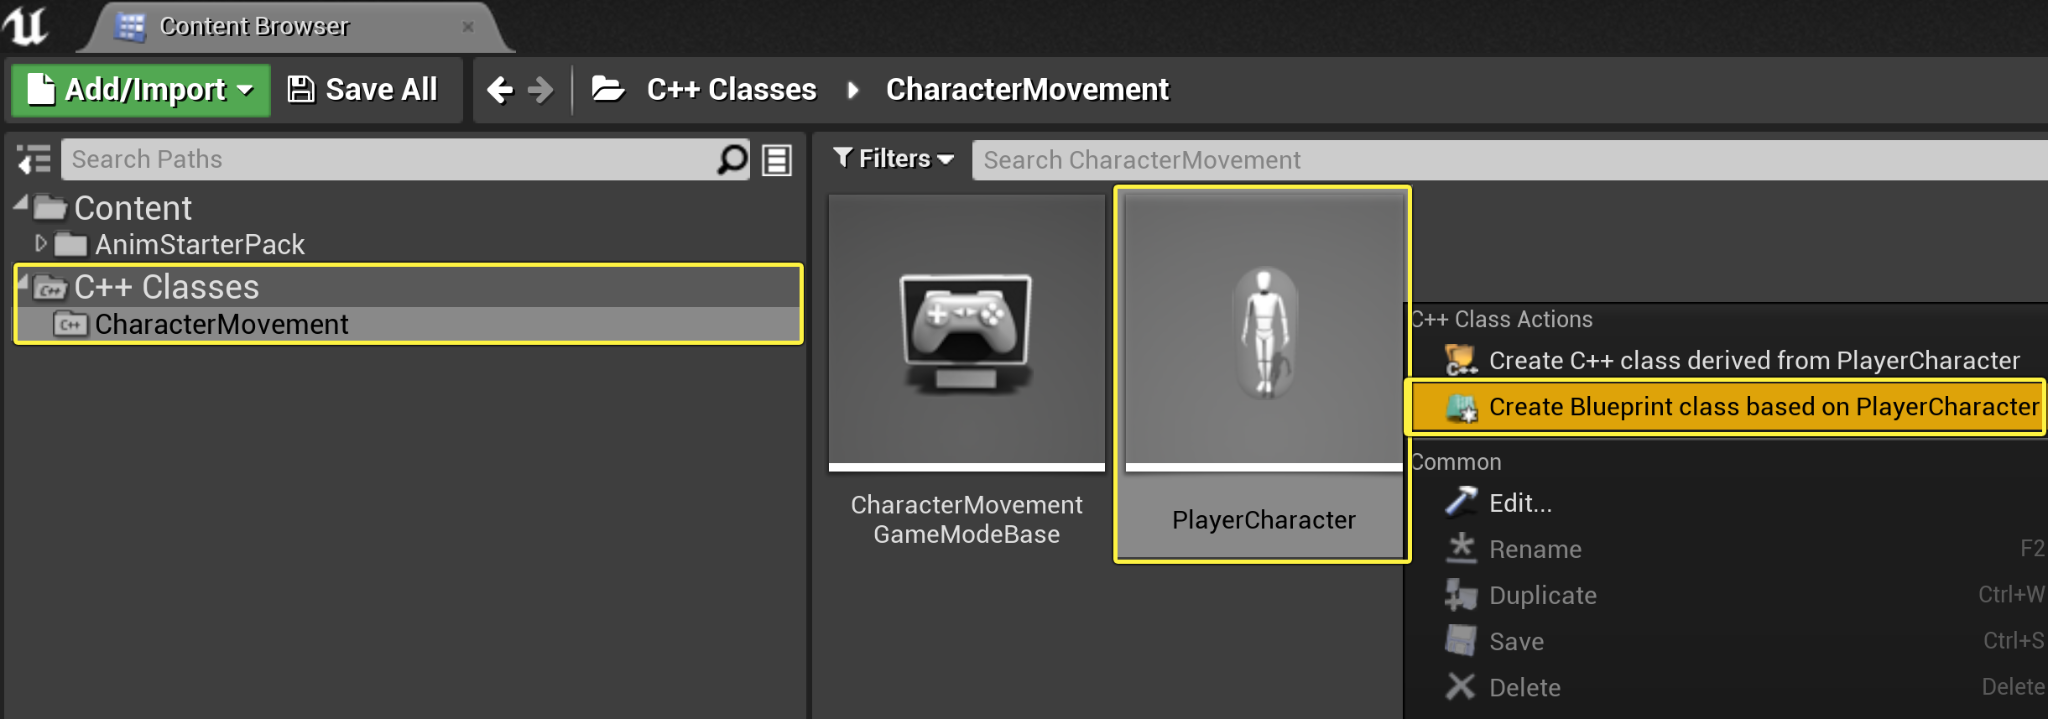
In the Editor , navigate to your C++ Classes folder , then right click on your PlayerCharacter class and in the C++ Class Actions drop down menu select Create Blueprint class based on PlayerCharacter . Name your Blueprint Bp_PlayerCharacter .
![Create Player Character Blueprint class]()
Click image to expand.
-
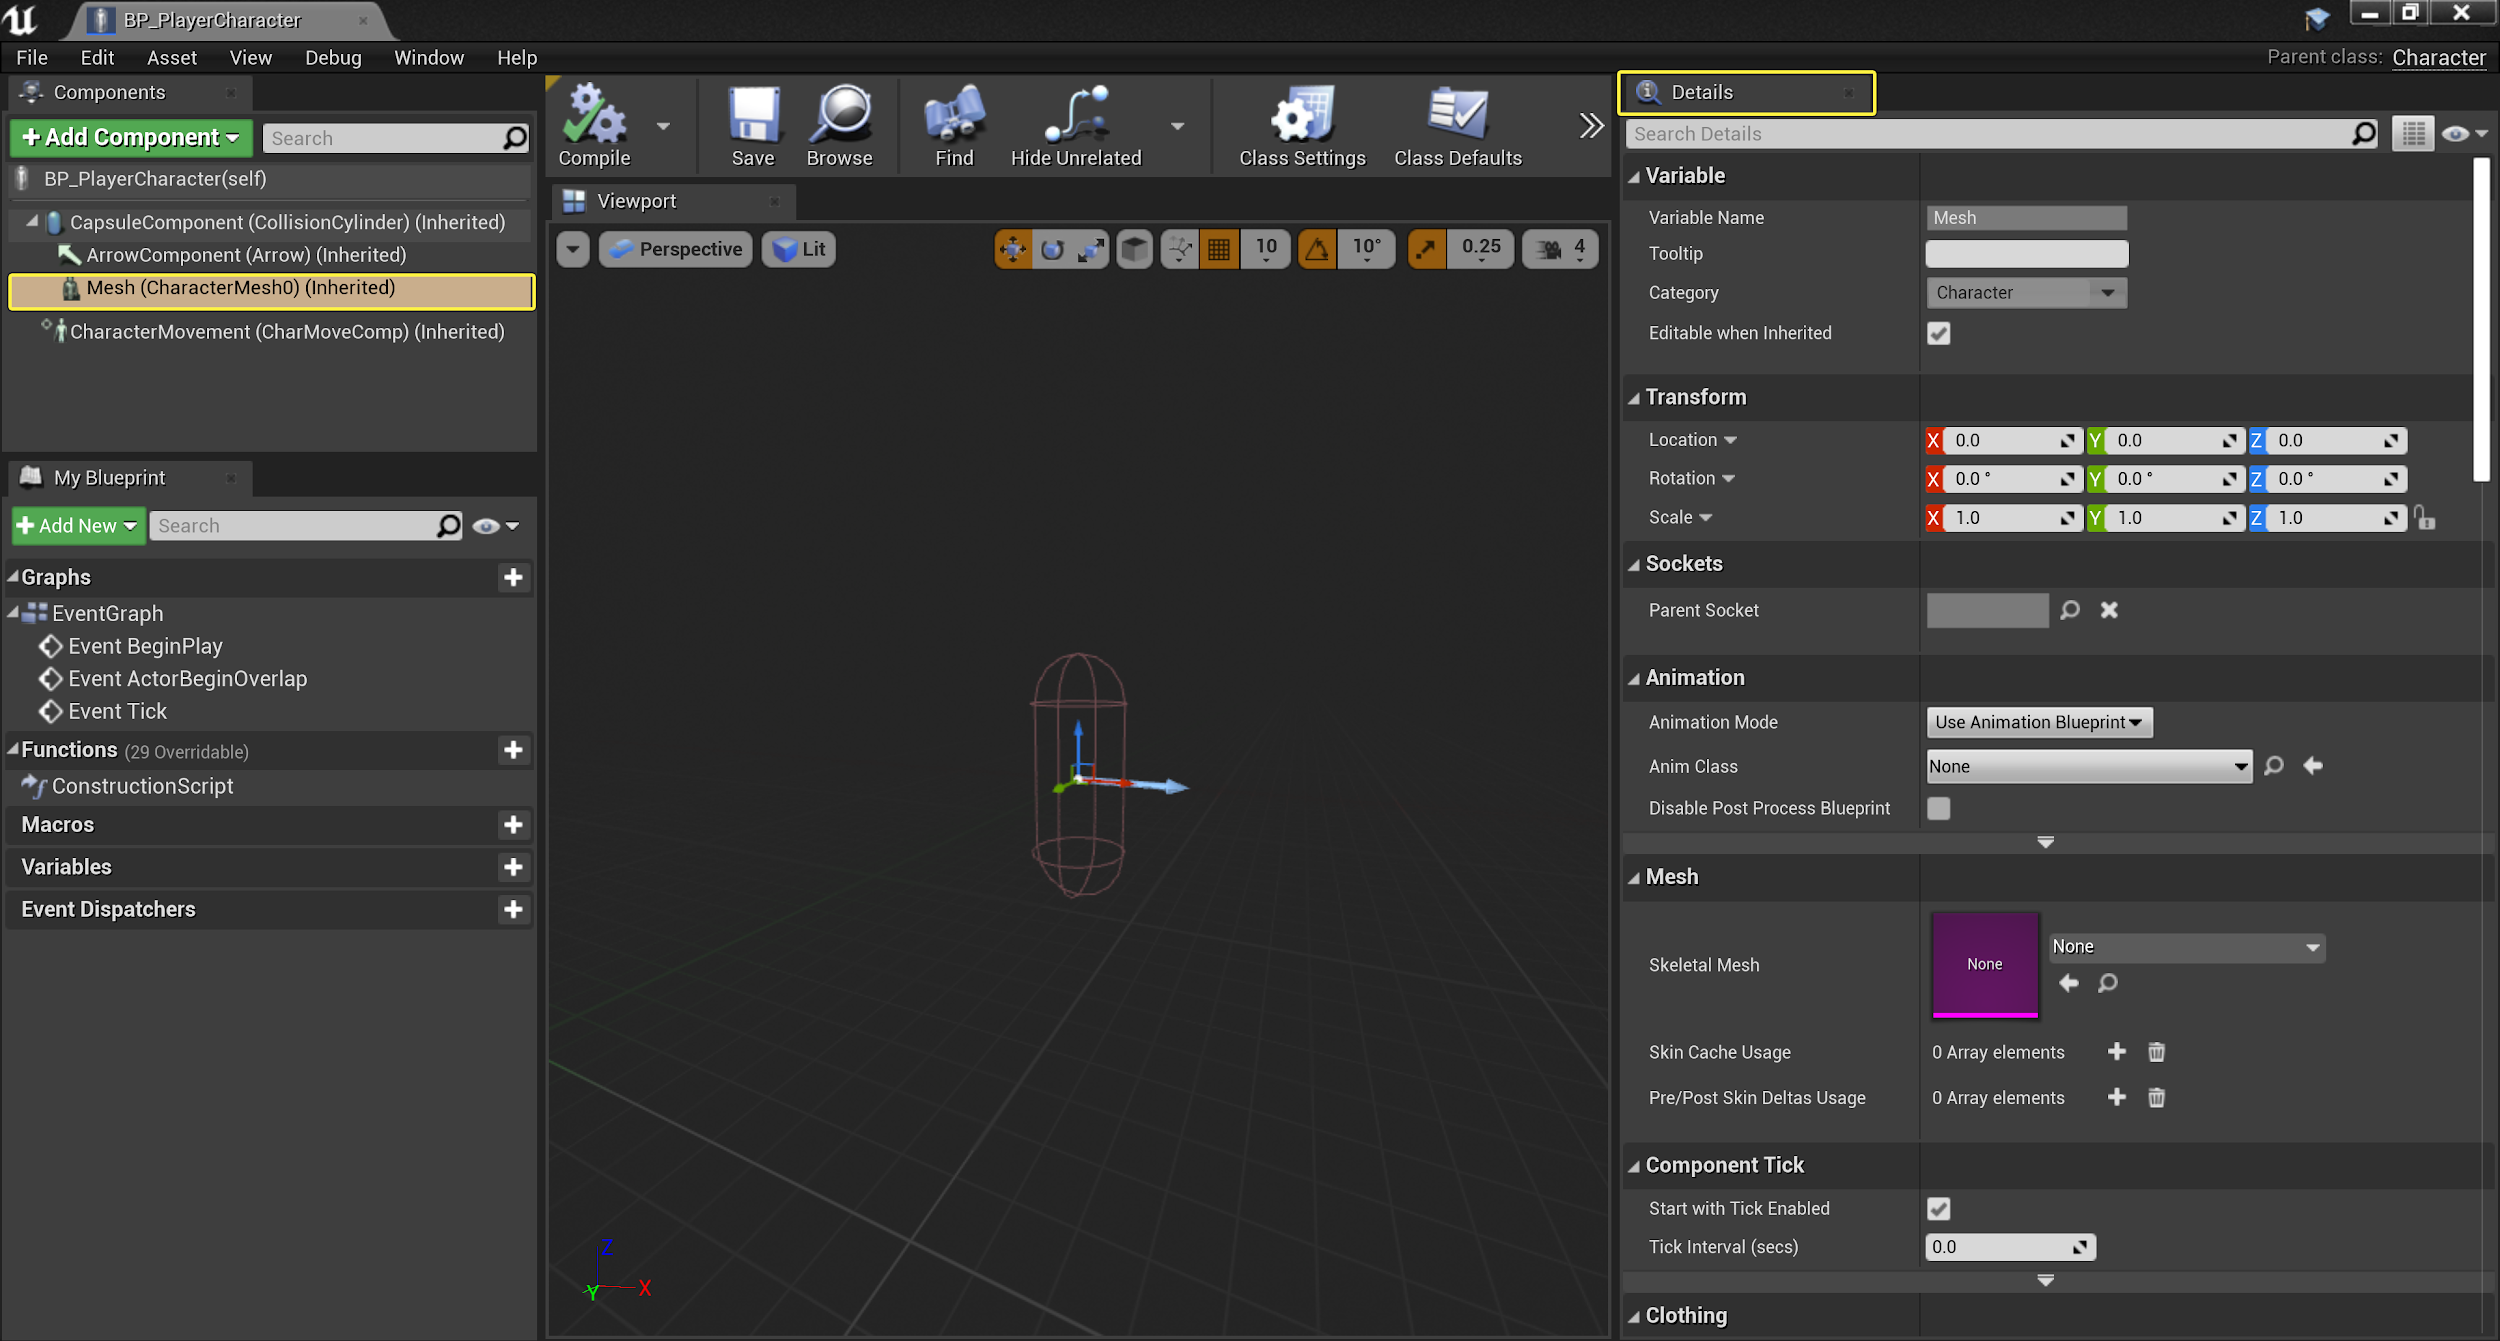
Double-click your BP_PlayerCharacter to open it's class defaults , then in the Components tab select the Mesh (CharacterMesh0) Skeletal Mesh Component , and navigate to the Details panel .
![Blueprint Character Details]()
Click image to expand.
-
In the Mesh category , select the drop down arrow adjacent to the Skeletal Mesh variable , and from the drop down menu select SK_Mannequin .
![Select Skeletal Mesh]()
-
Your Character's Skeletal Mesh will appear oriented in the direction of the forward facing Arrow Component as shown in the image below.
![Skeletal Mesh orientation]()
-
Compile and Save .
![Compile and Save buttons]()


Creating Input Key Mappings and Input Movement Events
You will need to set up some custom logic that will move your character when an Input key; such as W,A,S, or D is pressed.
-
Navigate to Edit > Project Settings > Input , then in the Bindings Category click the + sign next to Action Mappings to add the following:
Action Mapping
Key Value
Jump
Space Bar
Crouch
Left Ctrl
Sprint
Left Shift
![Movement Action Mappings]()
-
In the Bindings Category click the + sign next to Axis Mappings to add the following Axis Mappings .
Axis Mapping
Key Value
Scale
MoveForward
W
1.0
S
-1.0
MoveRight
D
1.0
A
-1.0
Turn
Mouse X
1.0
LookUp
Mouse Y
-1.0
![Input Action Mappings]()
-
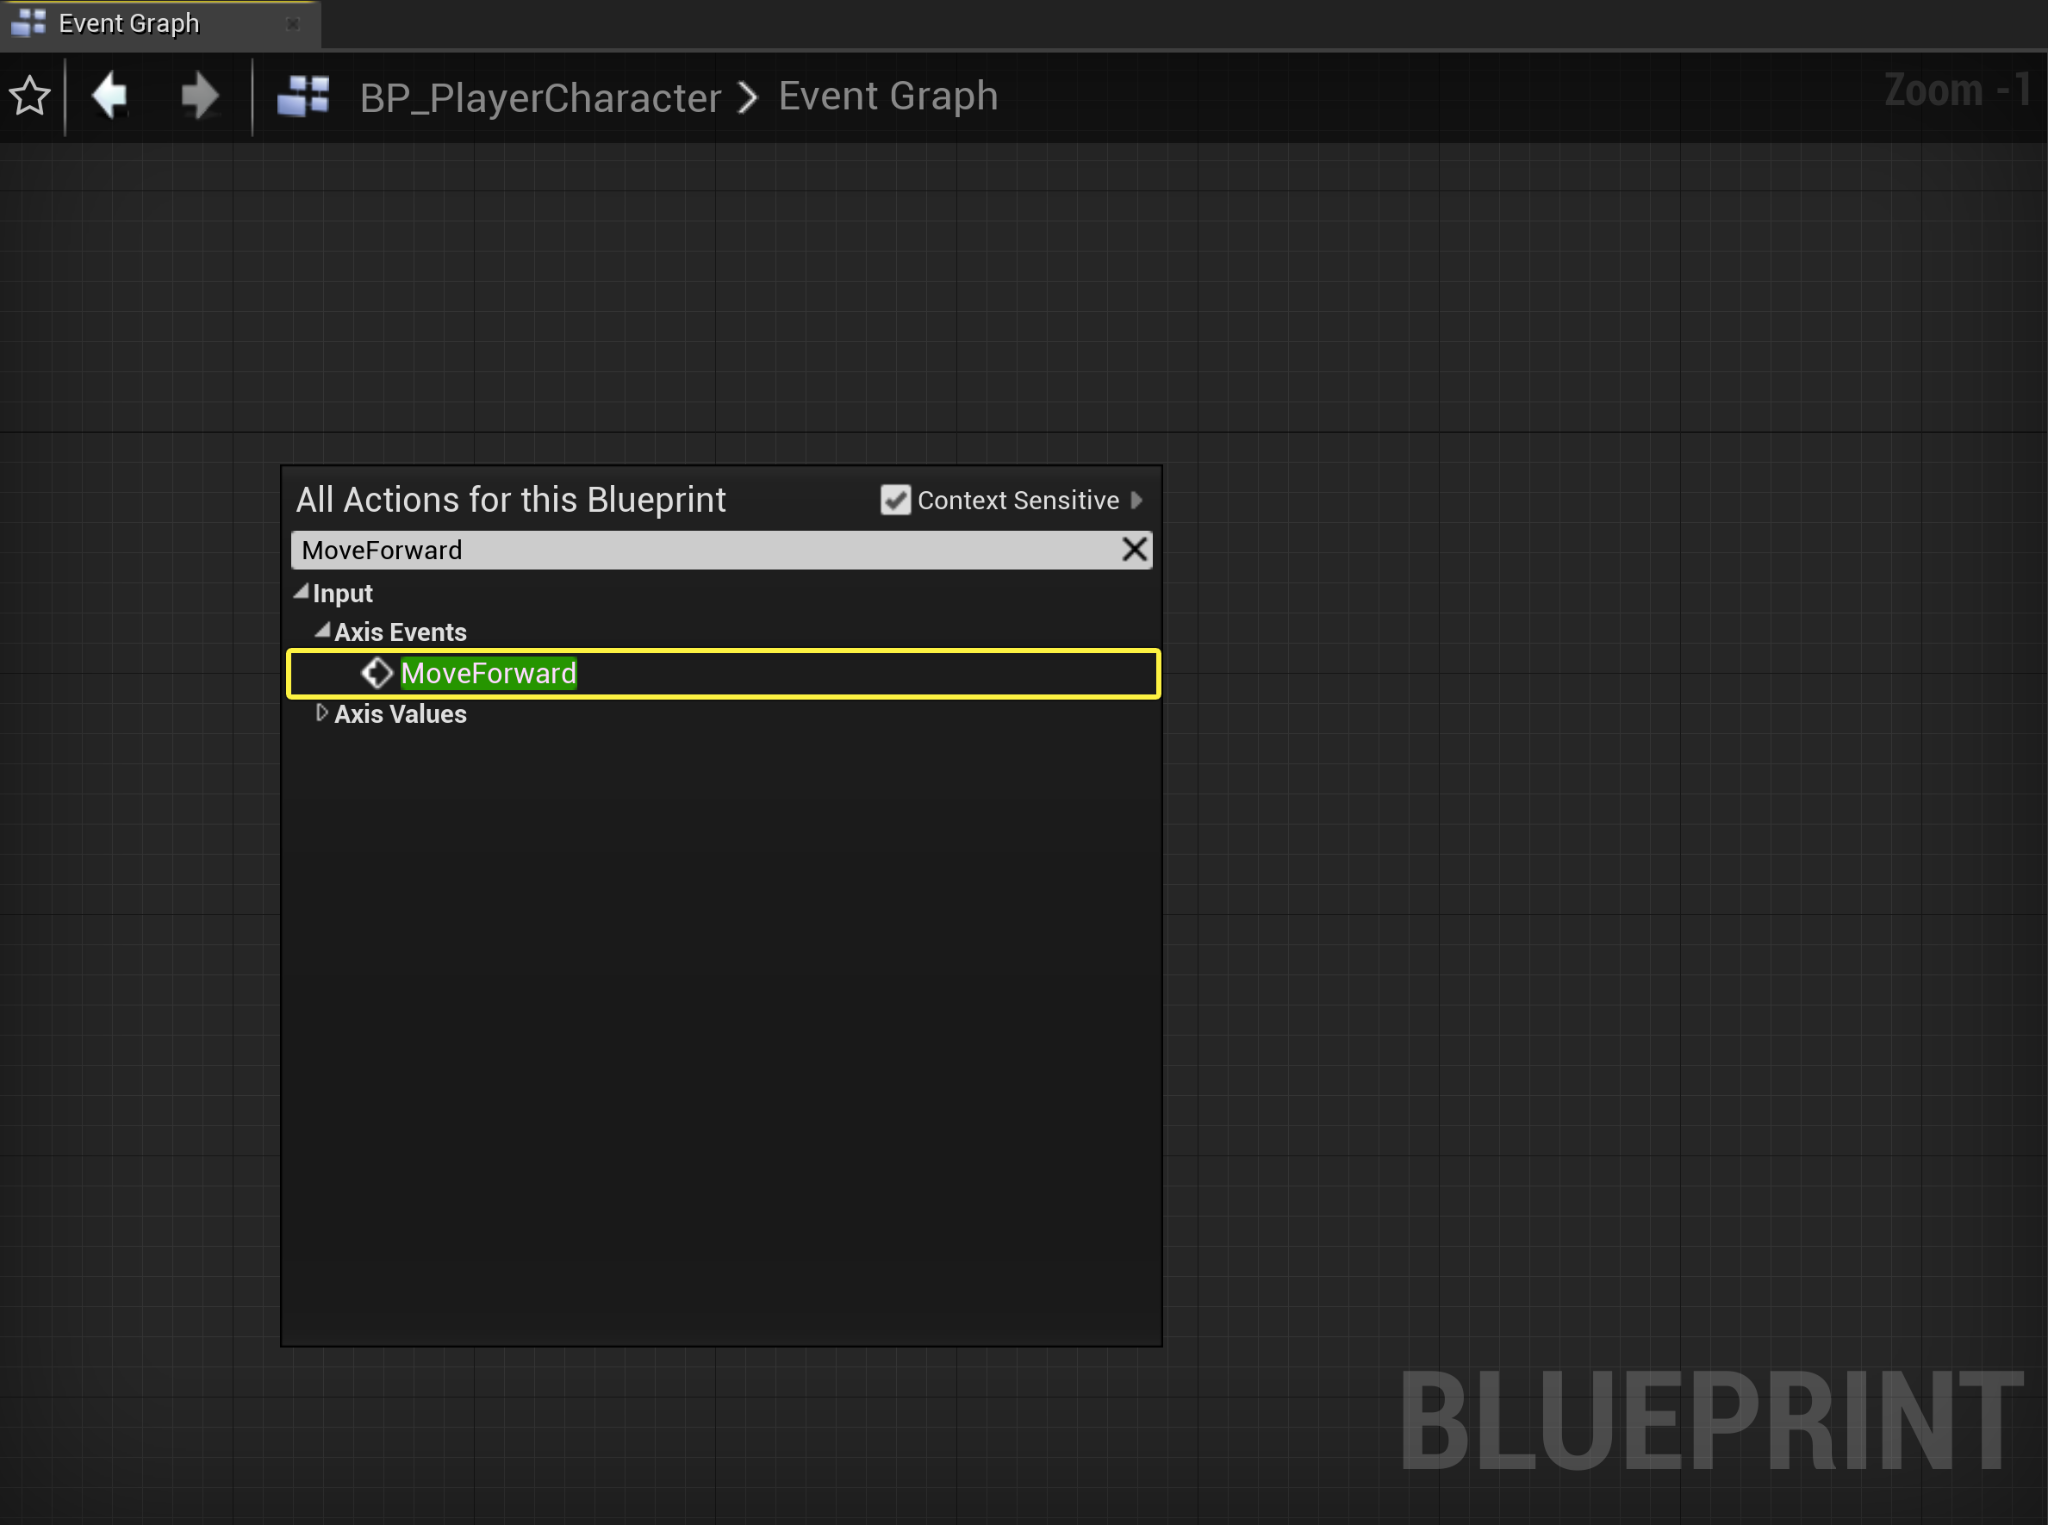
In the Content Browser , double click your BP_PlayerCharacter to open it's class defaults , then right click on the Event Graph and in the drop down menu search for and select MoveForward.
![Move Forward Action]()
Click image to expand.
-
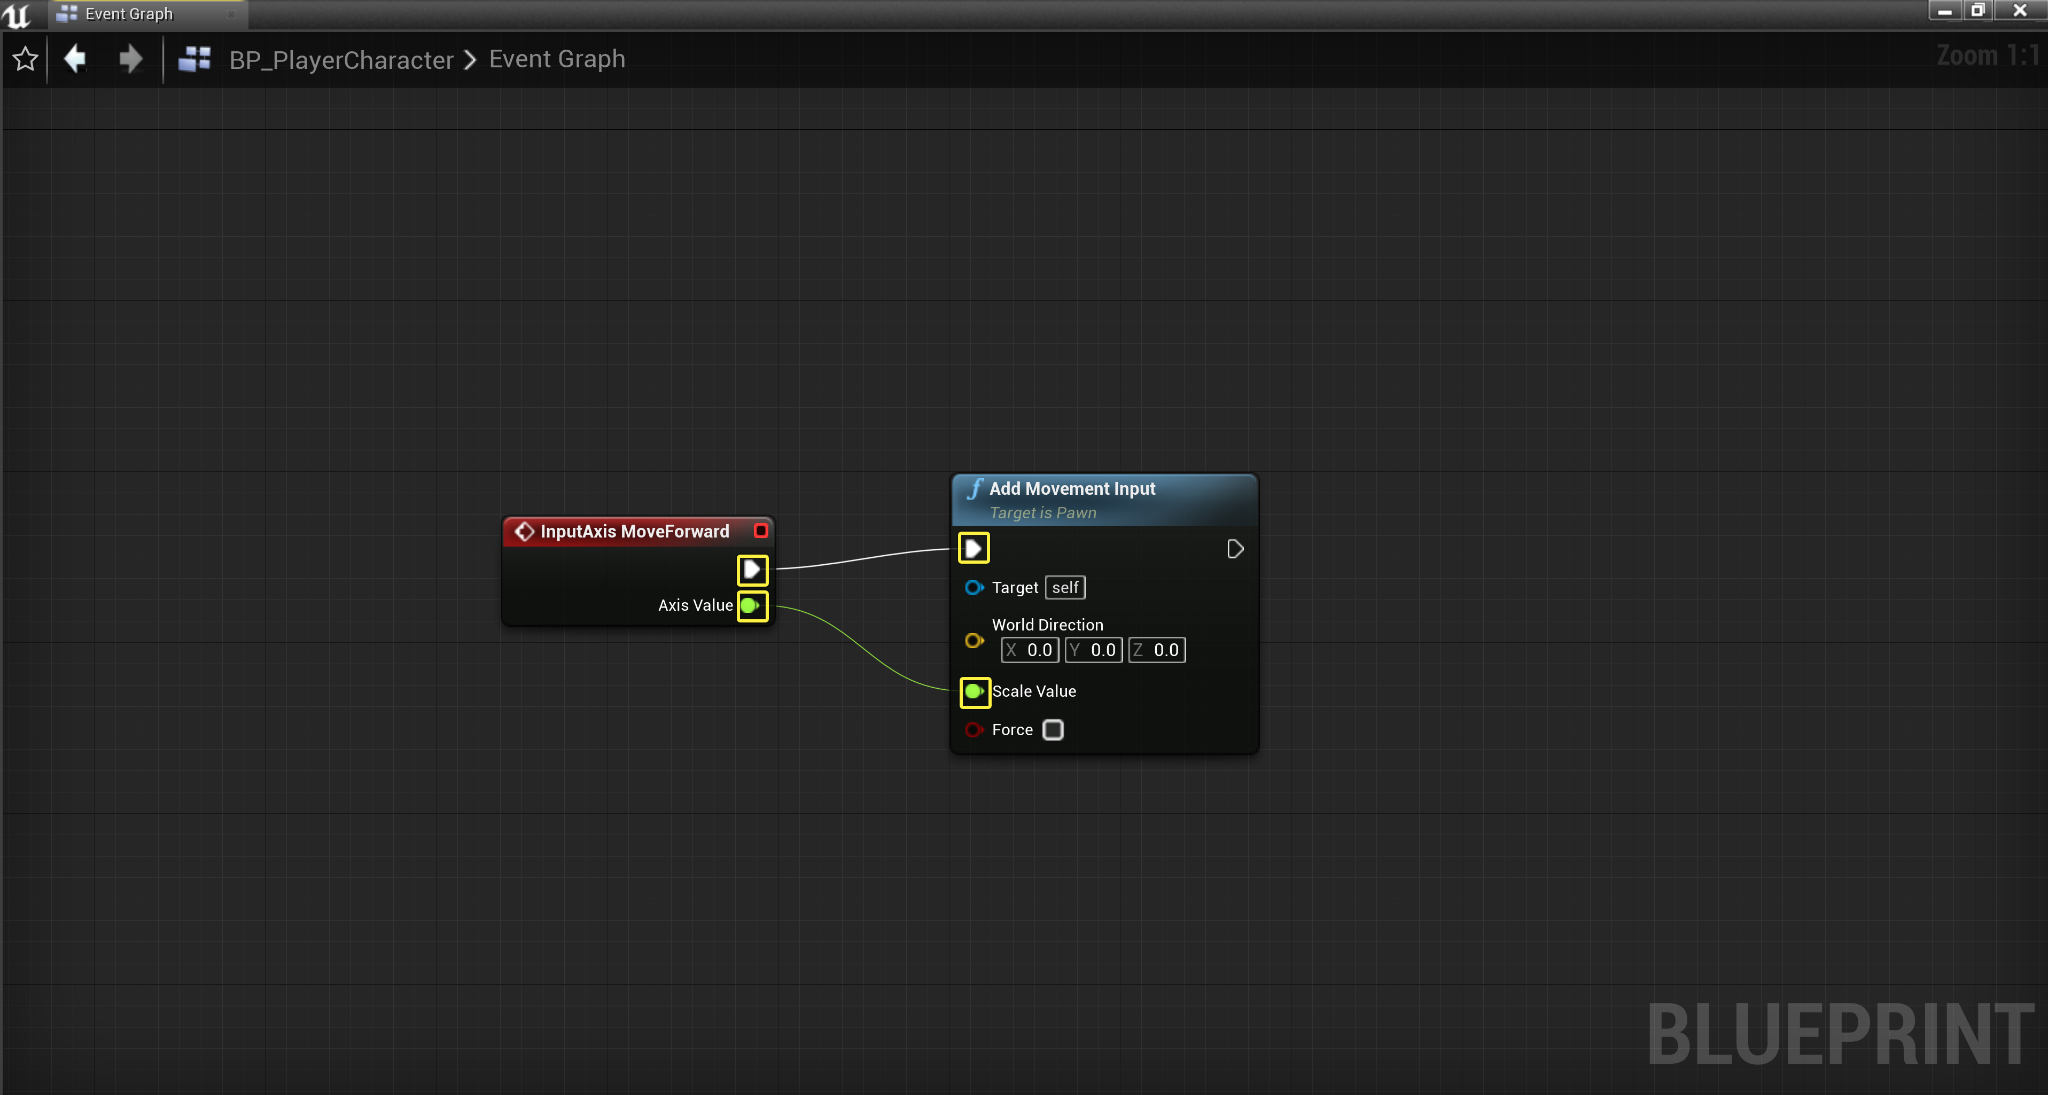
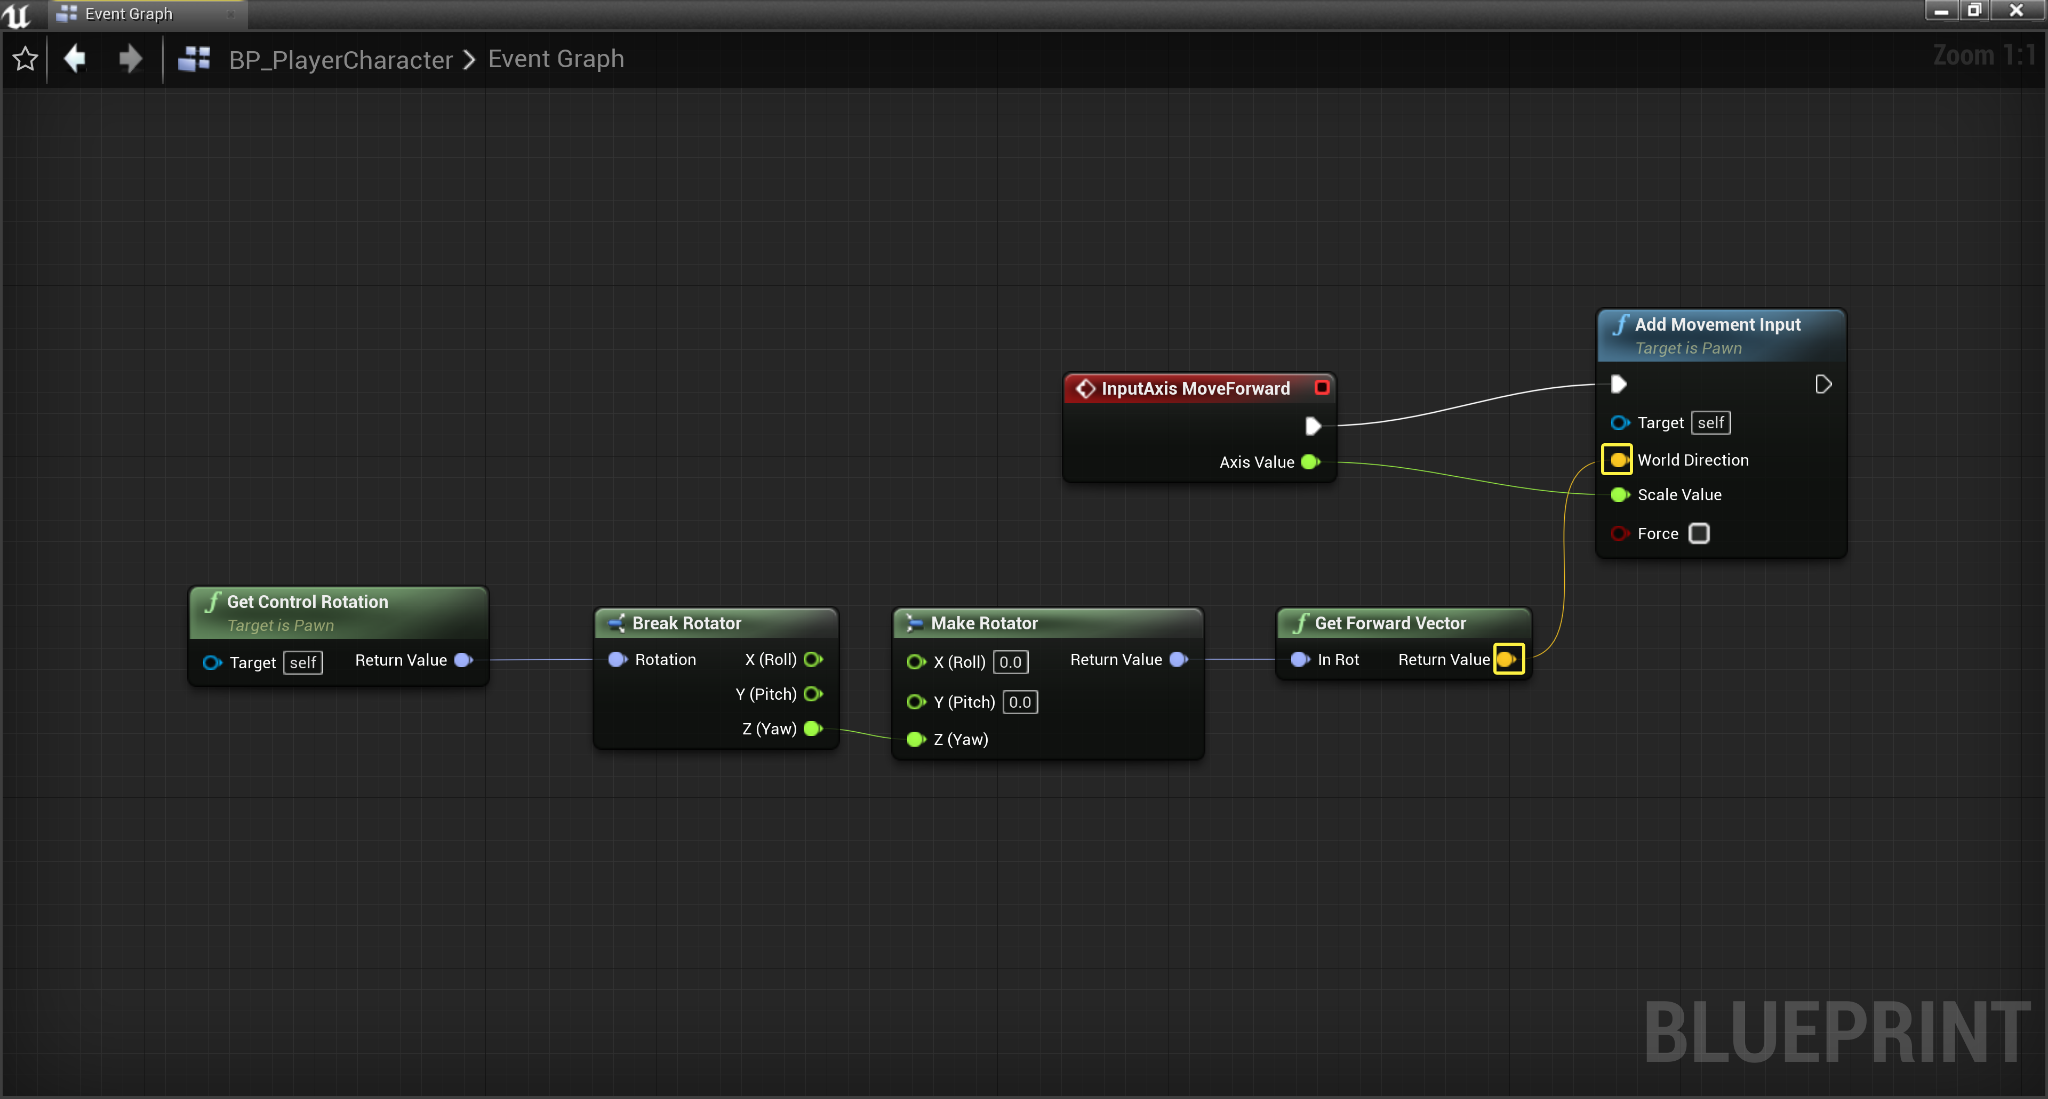
Drag off from the execution pin of your InputAxis MoveForward node and in the drop down menu search for and select for the Add Movement Input node, then connect the Axis Value pin of the InputAxis MoveForward node to the Scale Value pin of the Add Movement Input node.
![Connect Move Forward node]()
Click image to expand.
-
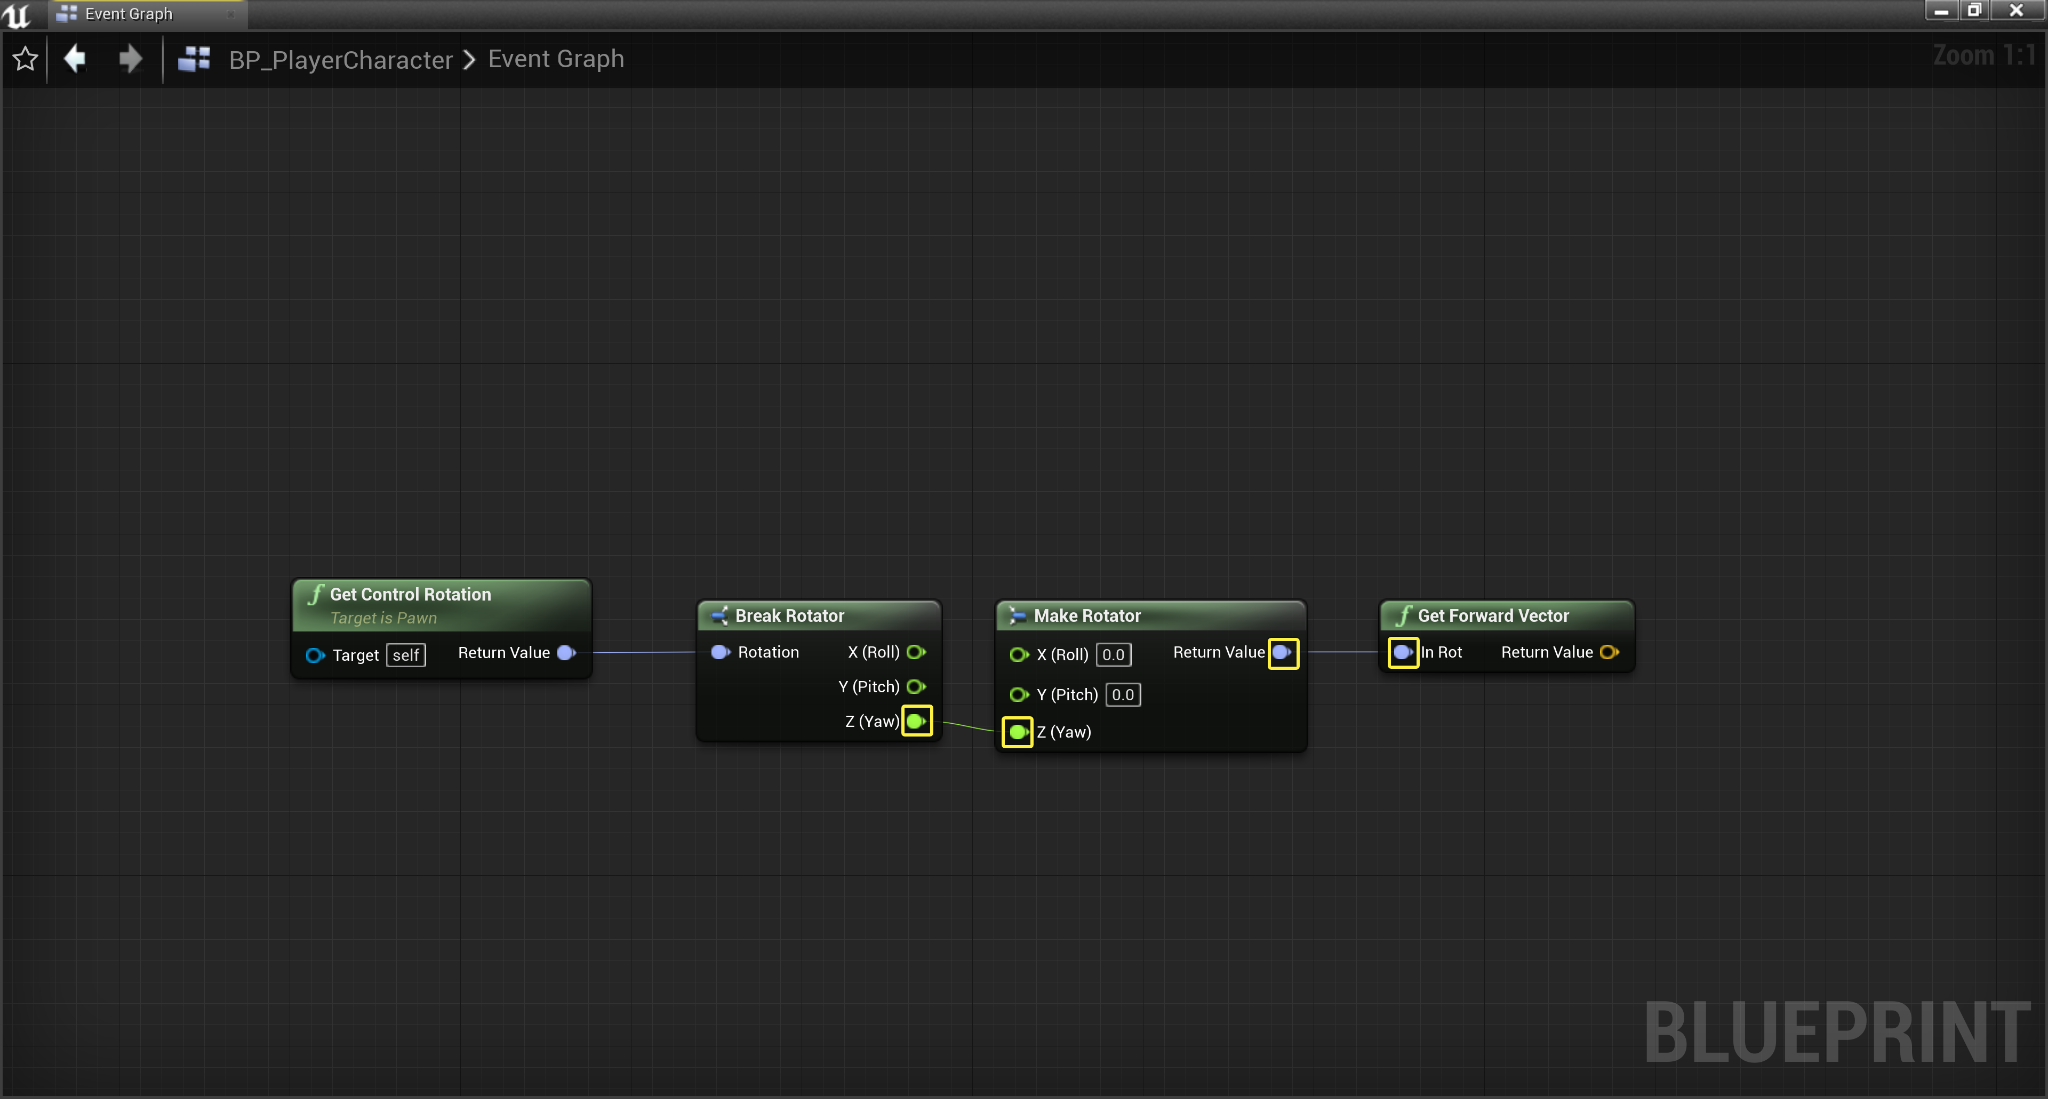
Right click on the Event Graph and in the context menu search for and select Get Control Rotation , then drag off the Rotator return value pin, and in the drop down menu search for and select Break Rotator .
![Get Control Break Rotation]()
Click image to expand.


-
Drag off from the Break Rotator node's Z ( Yaw ) pin, and in the drop down menu search for and select Make Rotator , then drag off from the Make Rotator node's Rotator Return value pin and in the drop down menu search for and select Get Forward Vector .
![Break Rotator Z axis]()
Click image to expand.
-
Drag off from the Get Forward Vector node's Vector Return Value pin and plug it into the Add Movement Input node's World Direction pin.
![Connect Move Forward vector]()
Click image to expand.
-
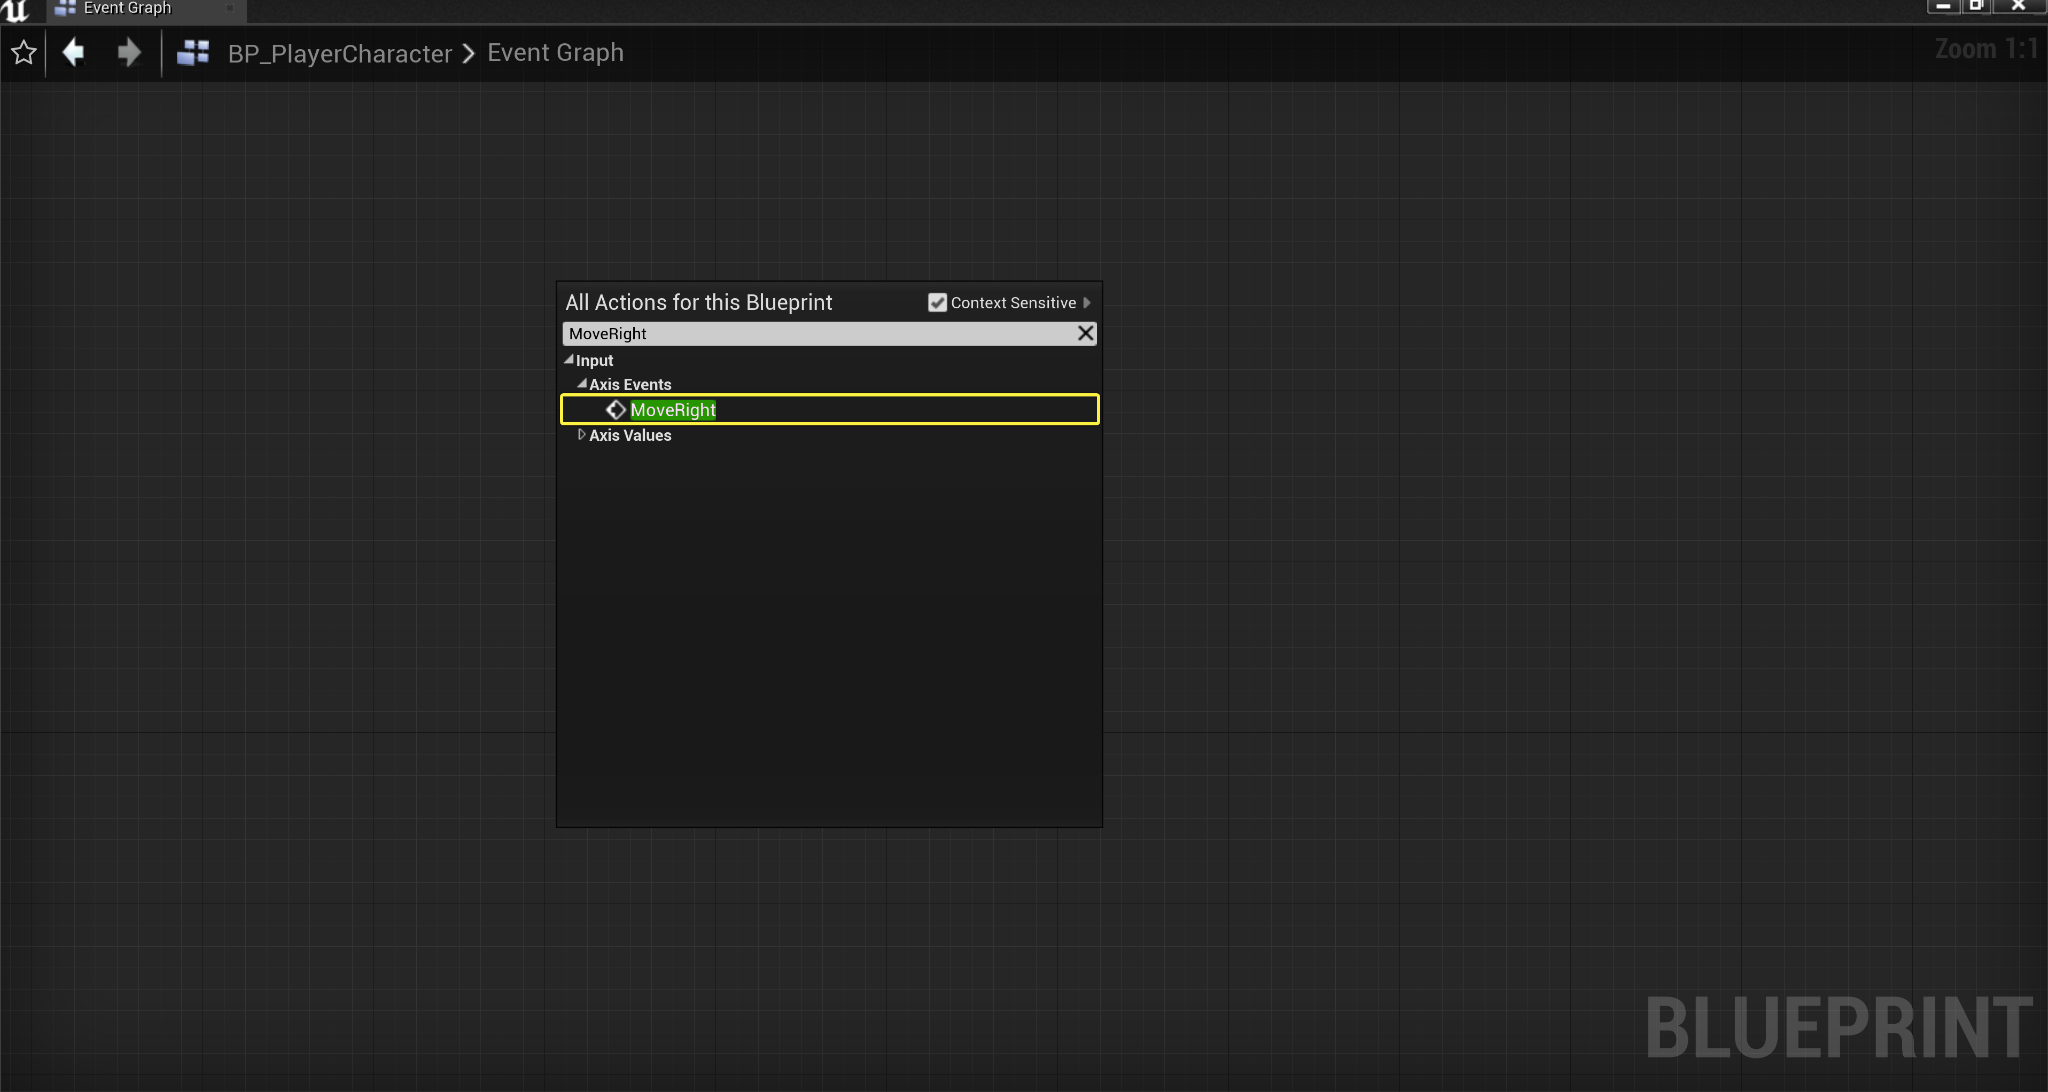
Right-click on the graph again, and search for and select Move Right for your Input Axis Event .
![Add Move Right Input Axis Event]()
Click image to expand.
-
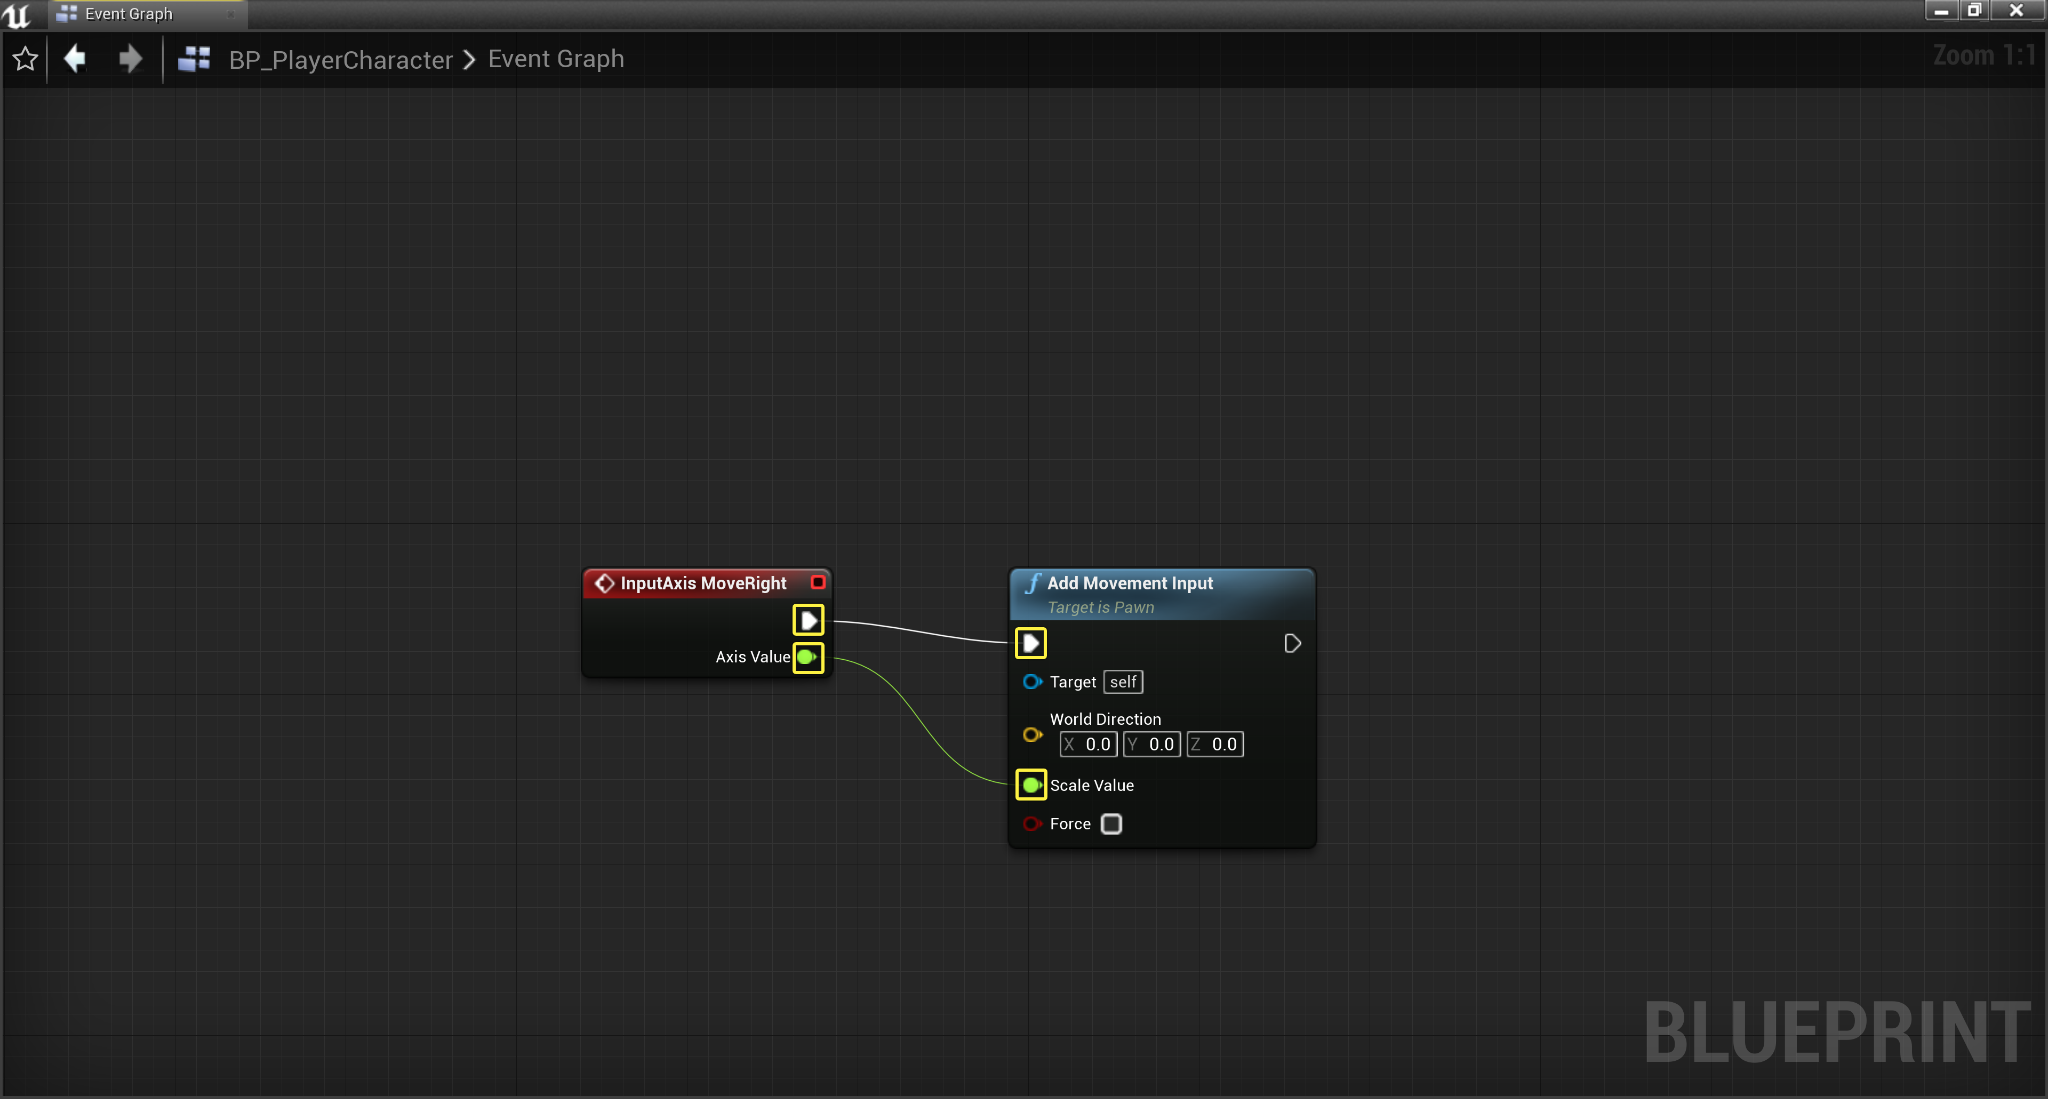
Drag off the execution pin of your InputAxis MoveRight node and in the drop down menu search for and select for the Add Movement Input node, then connect the Axis Value pin of the InputAxis MoveRight node to the Scale Value pin of the Add Movement Input node .
![Connect Move Right execution axis]()
Click image to expand.
-
Drag off from the Make Rotator node's Rotator Return Value pin and in the drop down menu search for and select the Get Right Vector node, then drag off from the Vector Return Value pin and plug it into the Add Movement Input node's World Direction pin.
![Connect Right Rotator input]()
Click image to expand.
-
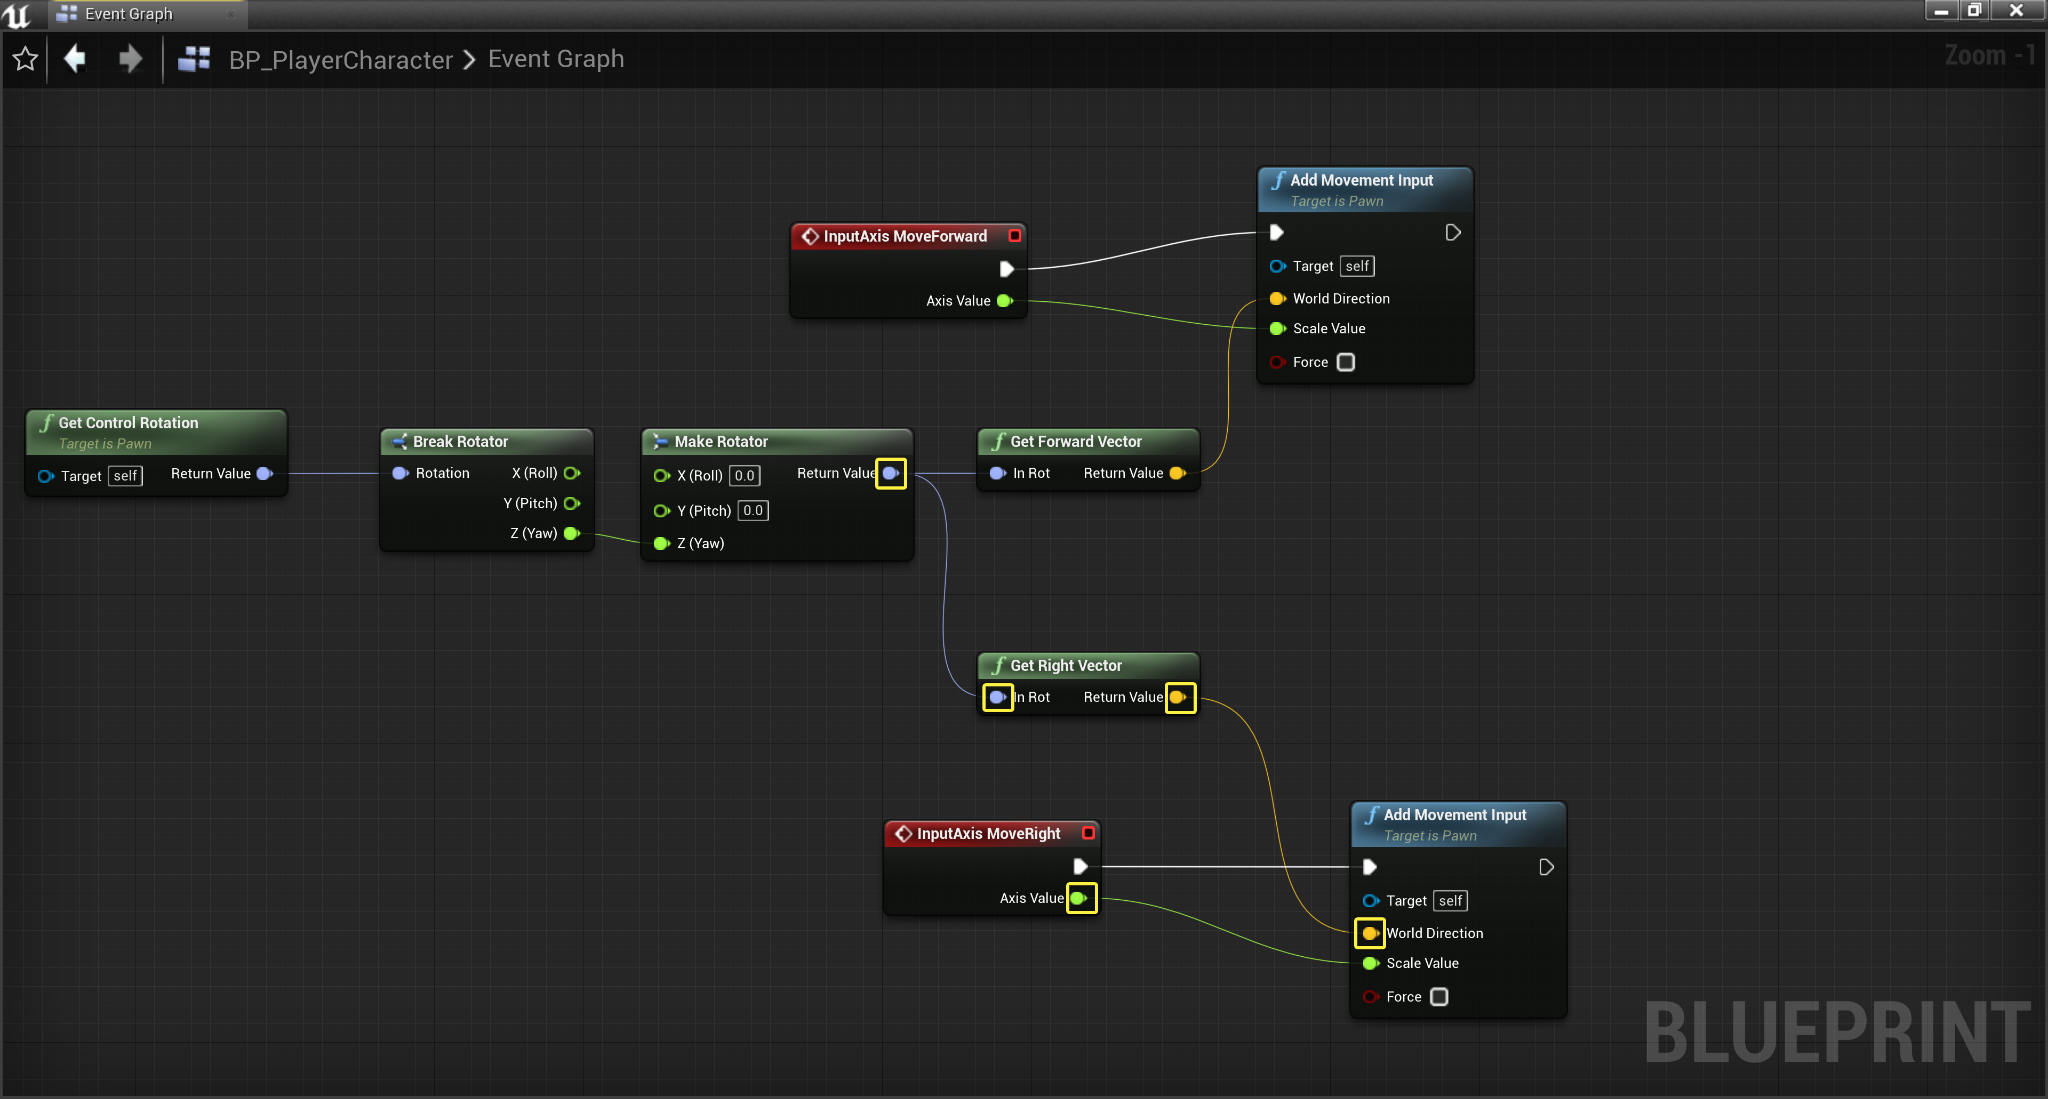
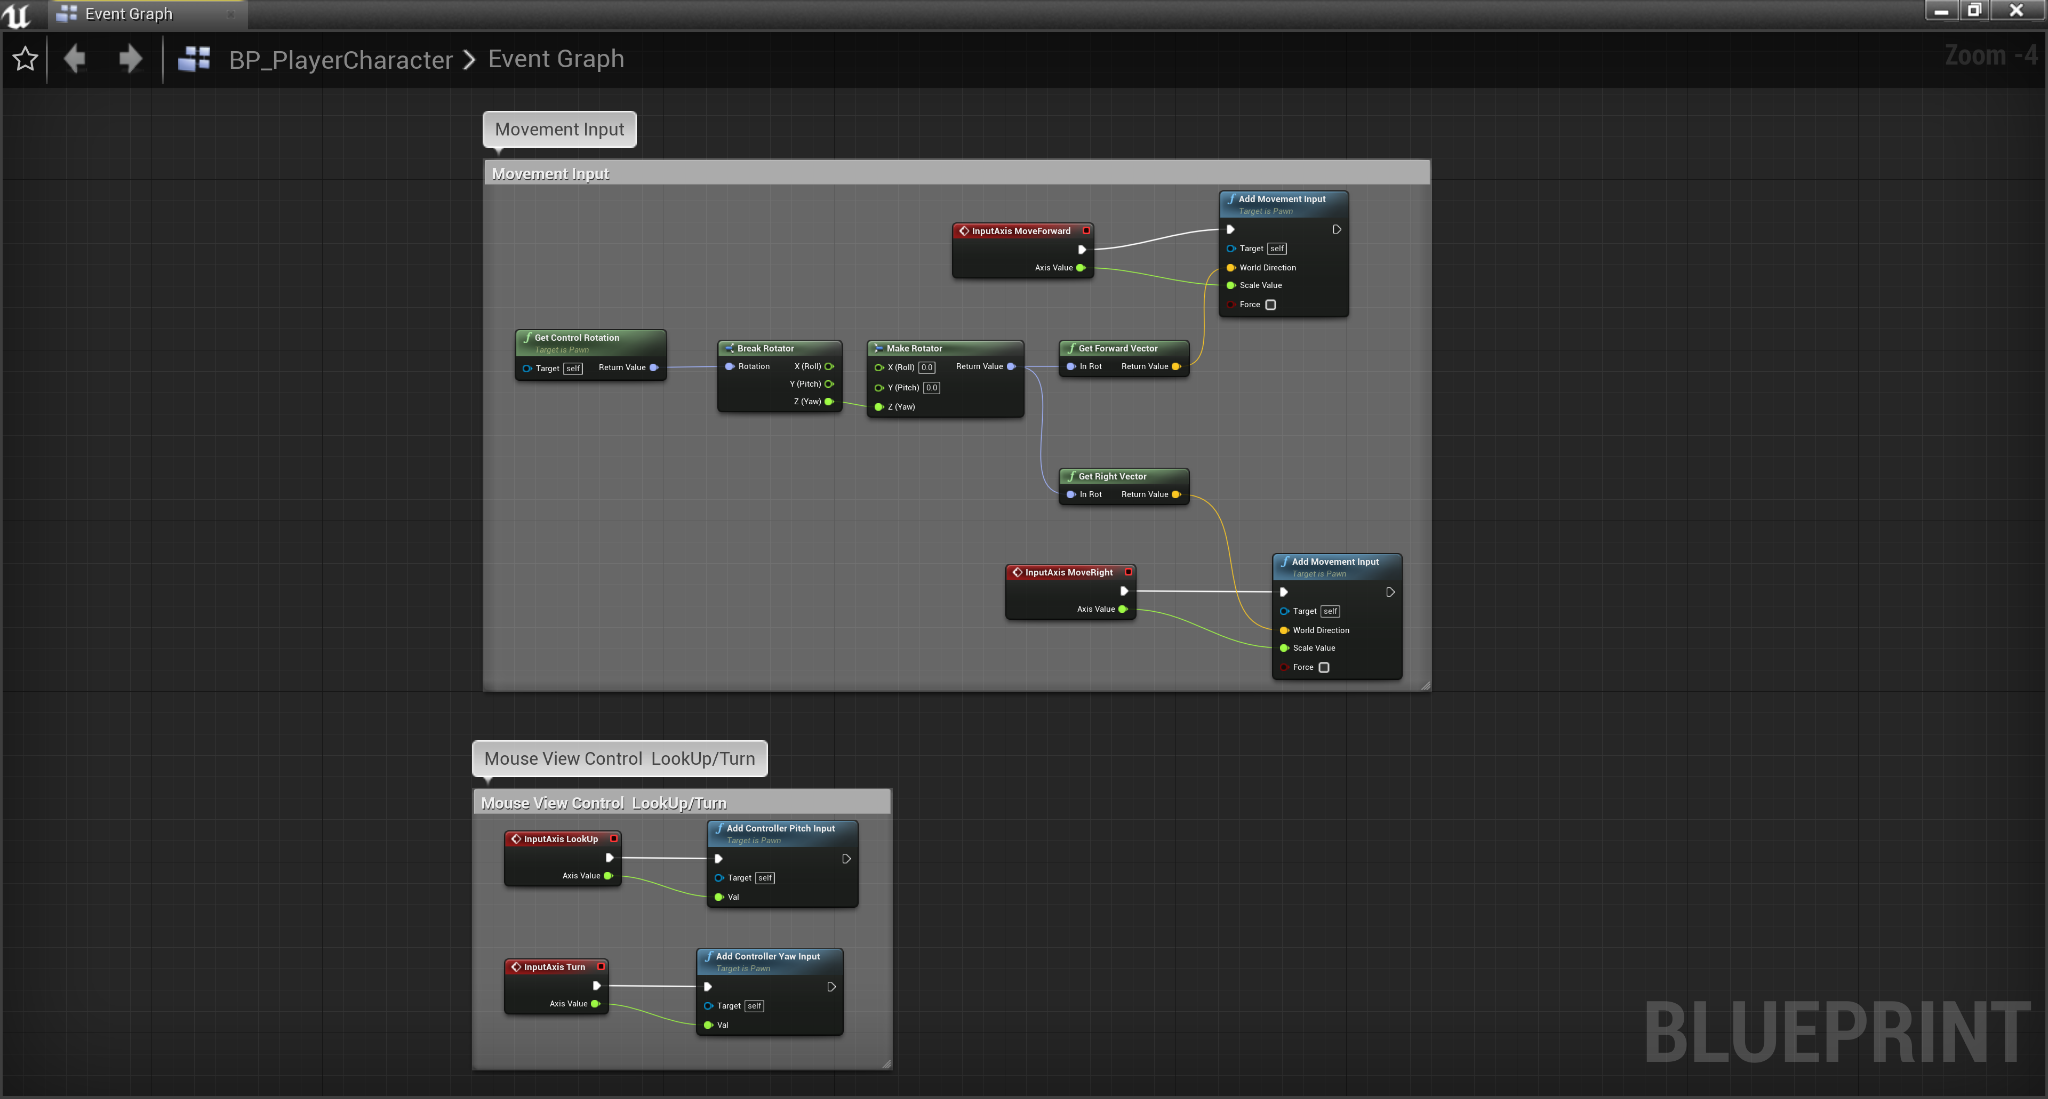
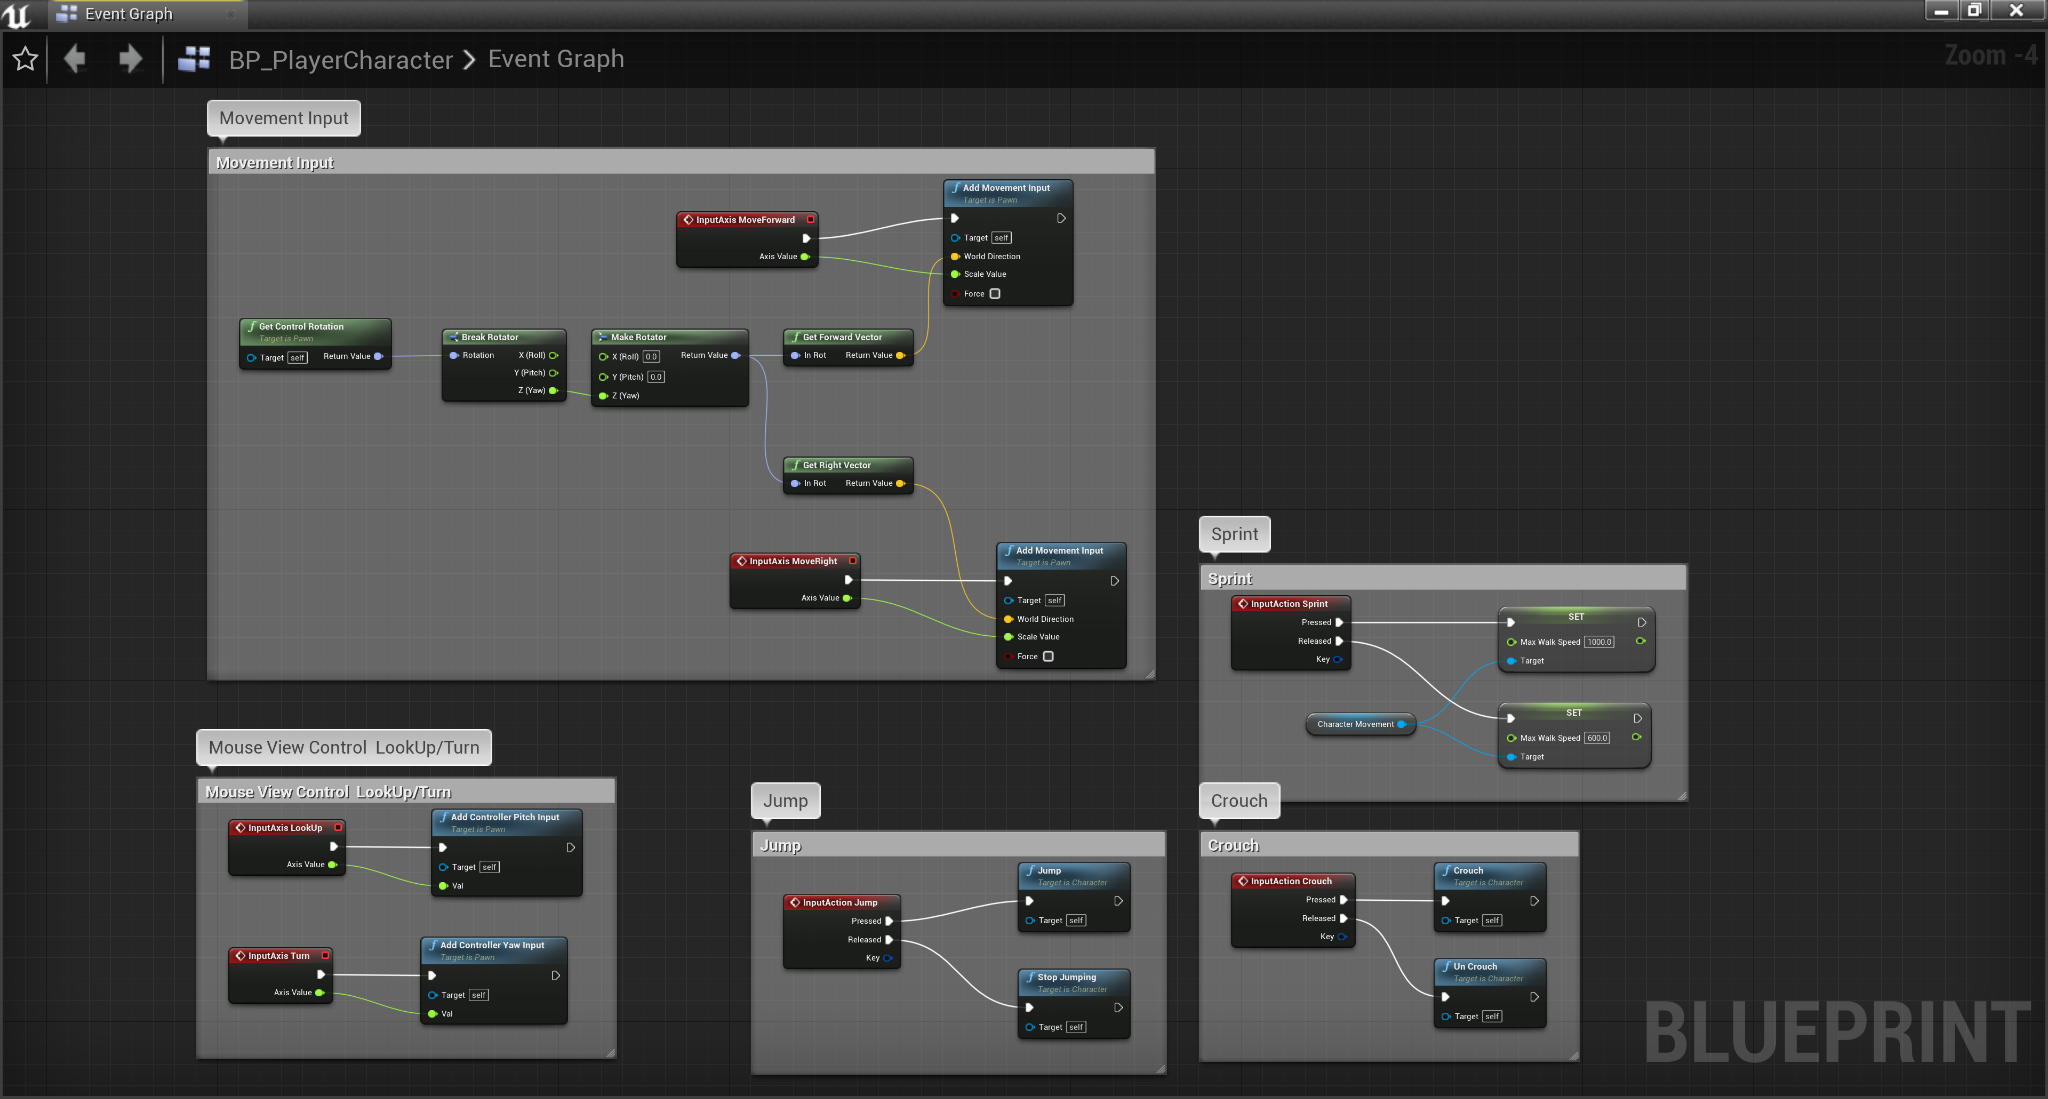
Your completed Movement Input Events Blueprint graph will look as it does below.
![Completed Movement Input Events Bluepring graph]()
Click image to expand.
-
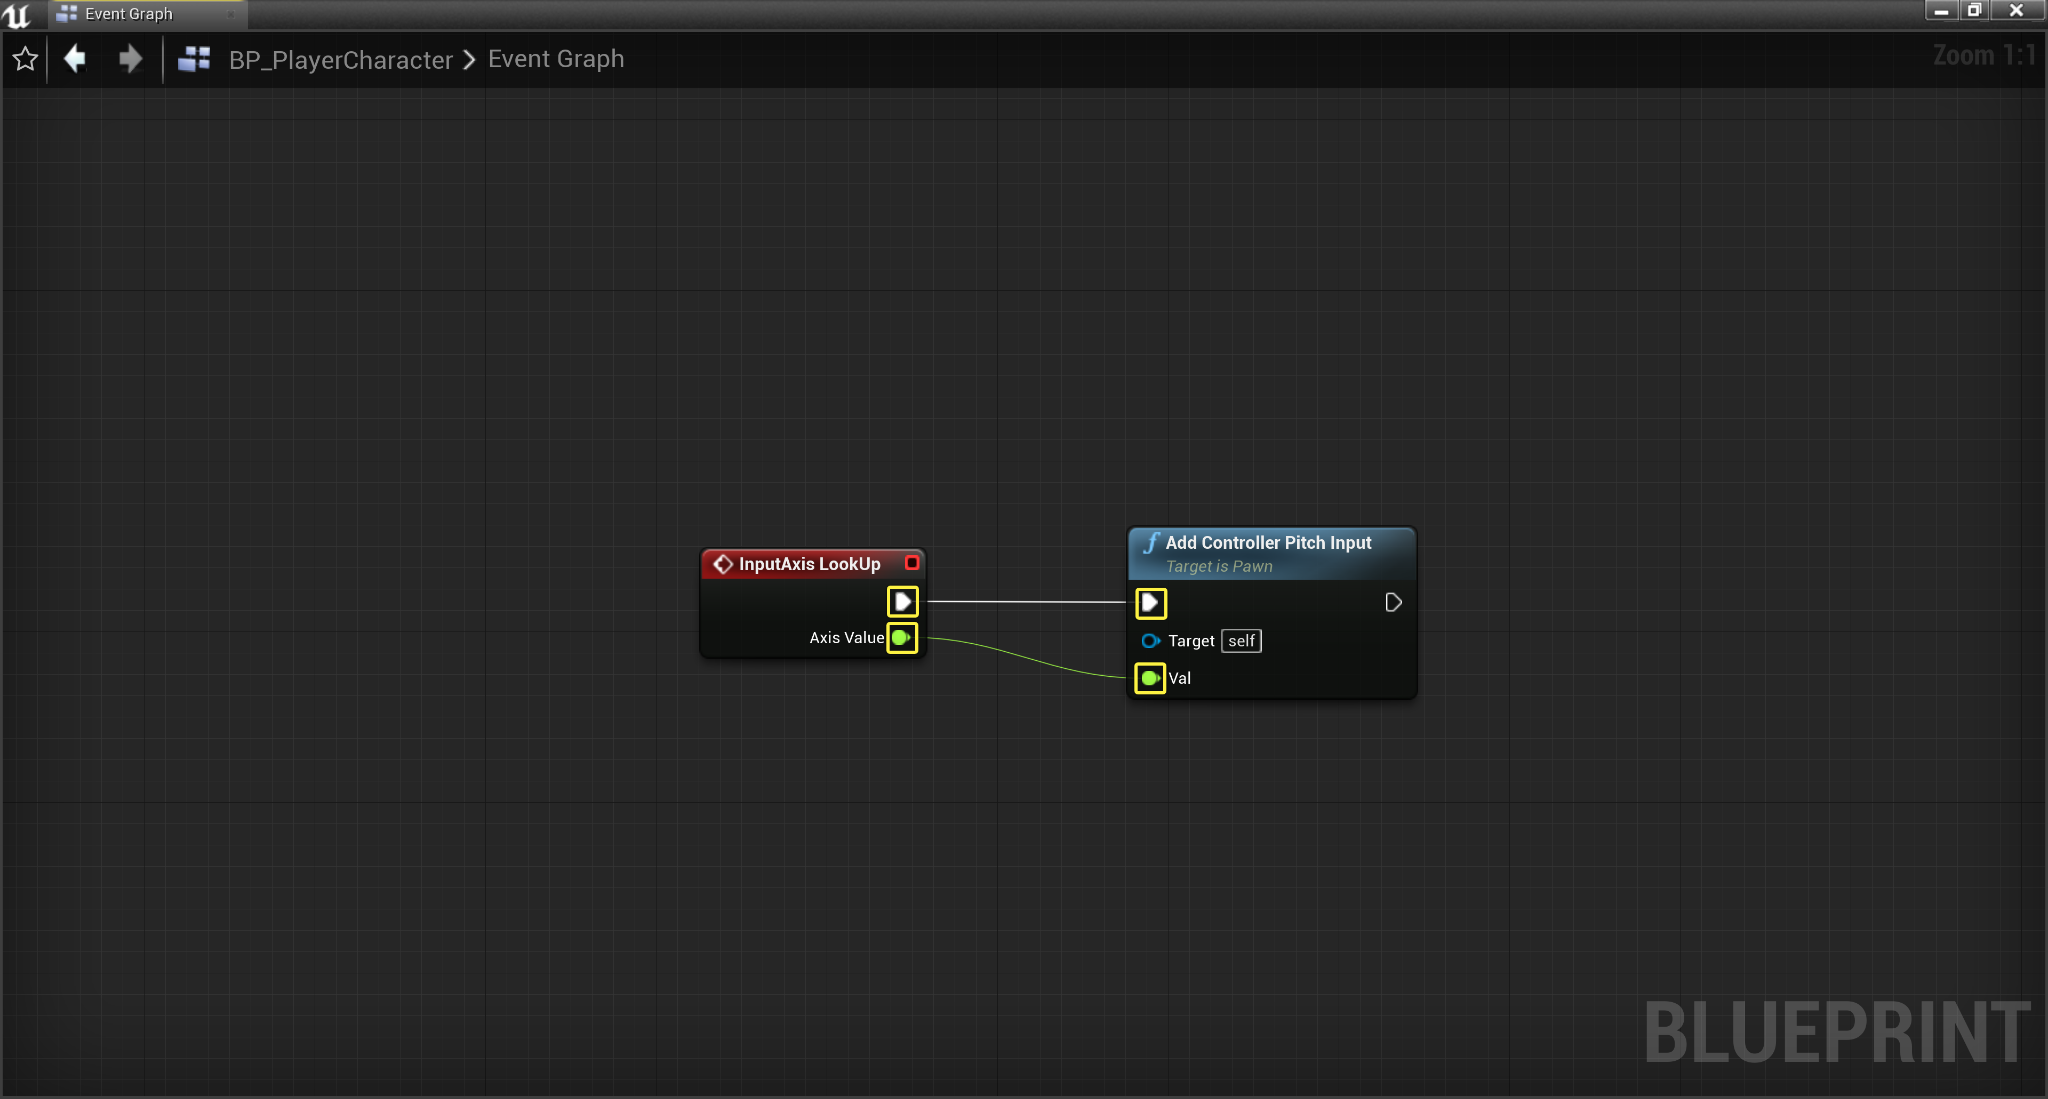
Right-click on the Event Graph , then search for and select for the InputAxis LookUp event node, then right-click, search for and select for the Add Controller Pitch Input node.
![Add Controller Pitch Input]()
Click image to expand.
-
Drag off from the Axis Value pin of the Input Axis LookUp node and connect to the Val pin of the Add Controller Pitch Input node. Drag off from the execution output pin of the InputAxis LookUp node and connect to the execution input pin of the Add Controller Pitch Input node.
![Connect Add Controller Pitch Input]()
Click image to expand.
-
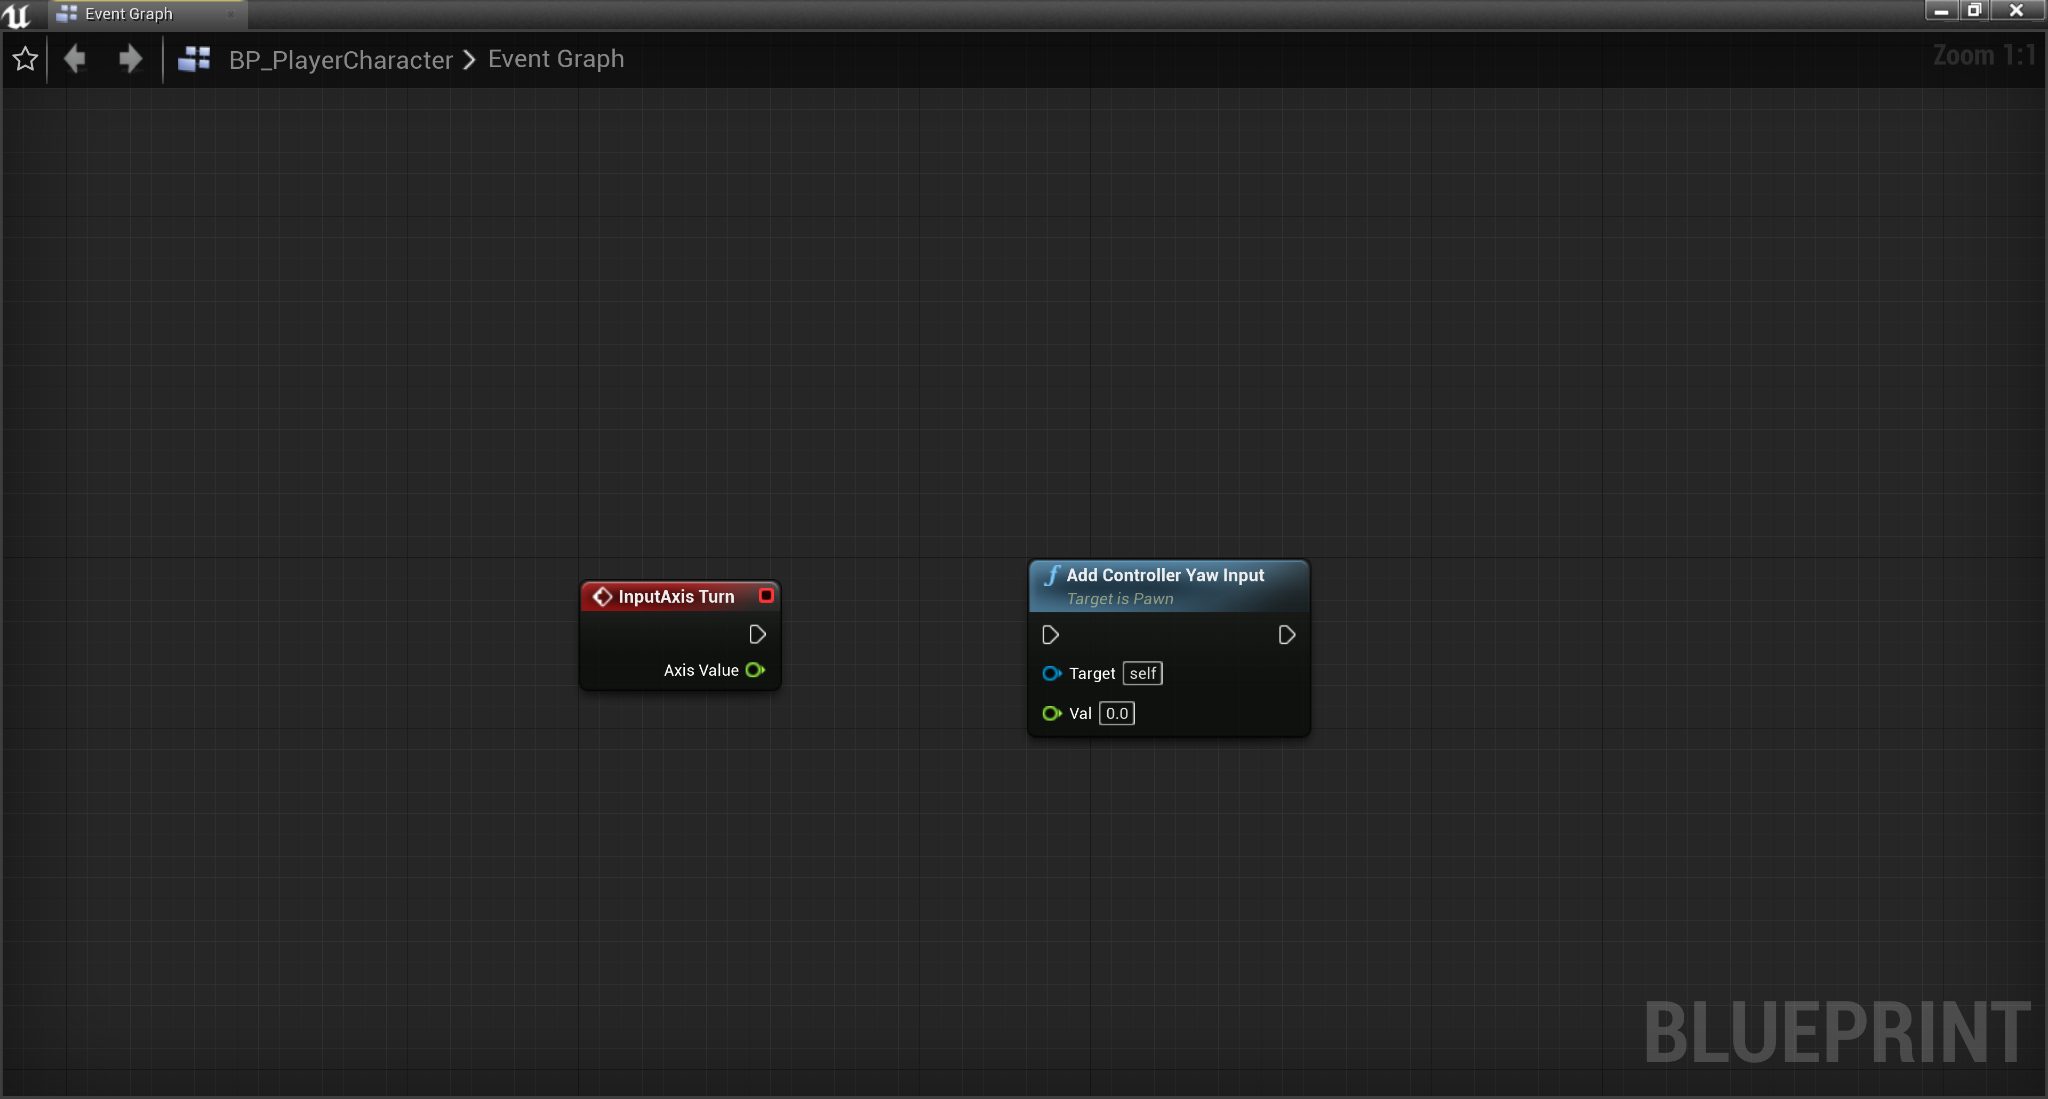
Right-click on the Event Graph , then search for and select for the Input Axis Turn event node, then right-click, search for, and select the Add Controller Yaw Input node.
![Add Controller Yaw Input]()
Click image to expand.
-
Drag off from the Axis Value pin of the Input Axis Turn node and connect to the Val pin of the Add Controller Yaw Input node. Drag off from the execution output pin of the Input Axis Turn node and connect to the execution input pin of the Add Controller Yaw Input node.
![Connect Add Controller Yaw Input]()
Click image to expand.
-
Click Compile and Save.
![Compile and Save buttons]()
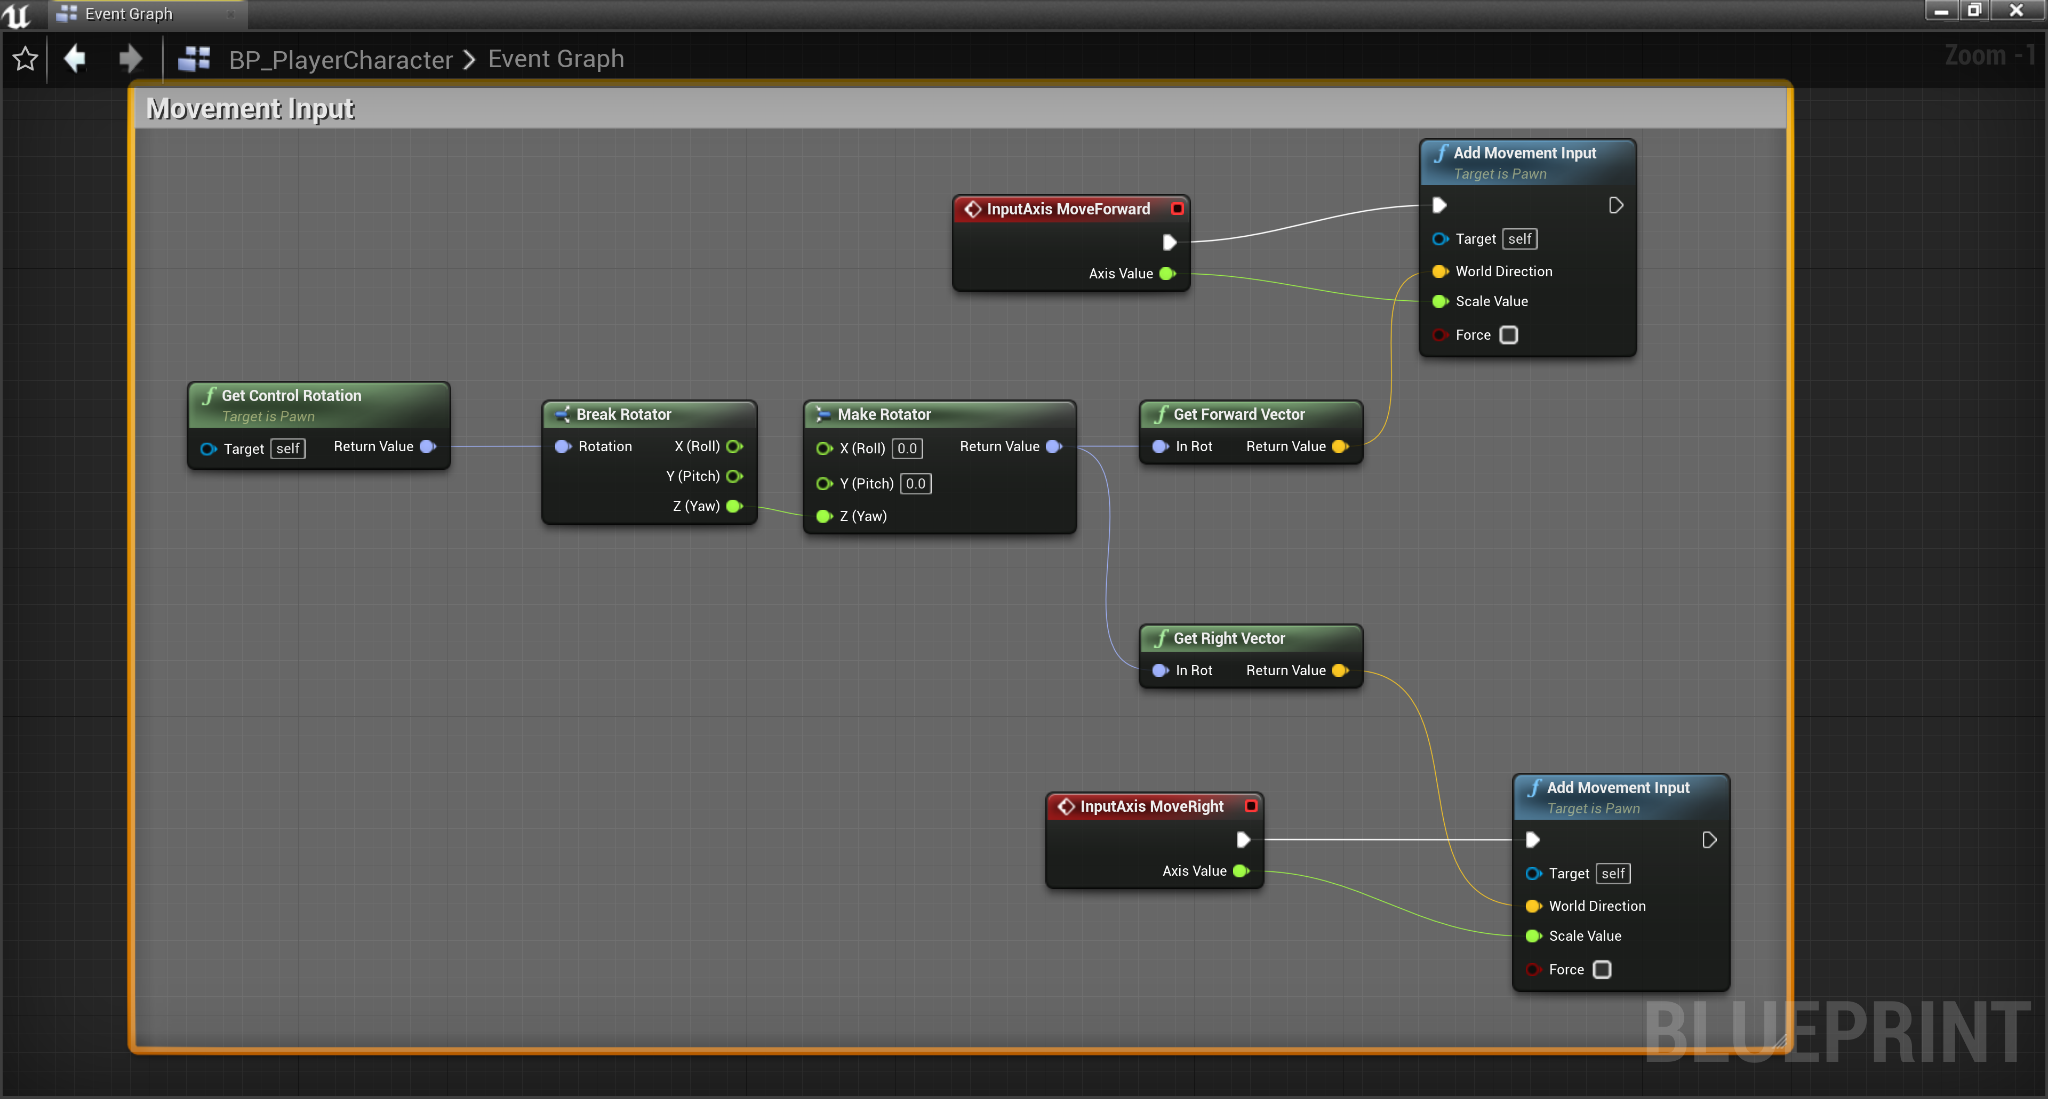


Work-In-Progress Blueprint
At this point in the process, your Blueprint graph should resemble the image shown below.
Click image to expand.
You will need to set up some custom logic that will move your character when an Input key such as W,A,S, or D is pressed.
-
Navigate to Edit > Project Settings > Input , then from the Bindings Category click the + sign next to Action Mappings to add the following Action mappings .
Action Mapping
Key Value
Jump
Space Bar
Crouch
Left Ctrl
Sprint
Left Shift
![Movement Action Mappings]()
-
In the Bindings Category click the + sign next to Axis Mappings to add the following Axis Mappings .
Axis Mapping
Key Value
Scale
MoveForward
W
1.0
S
-1.0
MoveRight
D
1.0
A
-1.0
Turn
Mouse X
1.0
LookUp
Mouse Y
-1.0
![Input Action Mappings]()
-
In your PlayerCharacter.h, declare the following class methods
protected: //Called for forwards/backward input void MoveForward(float InputAxis); //called for left/right side input void MoveRight(float InputAxis); -
In your PlayerCharacter.Cpp, implement the following logic for your APlayerCharacter::MoveForward , and APlayerCharacter::MoveRight class methods.
void APlayerCharacter::MoveForward(float AxisValue) { if ((Controller != nullptr) && (AxisValue != 0.0f)) { // Find out which way is forward const FRotator Rotation = Controller->GetControlRotation(); const FRotator YawRotation(0, Rotation.Yaw, 0); // Get forward vector const FVector Direction = FRotationMatrix(YawRotation).GetUnitAxis(EAxis::X); AddMovementInput(Direction, AxisValue); } } void APlayerCharacter::MoveRight(float AxisValue) { if ((Controller != nullptr) && (AxisValue != 0.0f)) { // Find out which way is right const FRotator Rotation = Controller->GetControlRotation(); const FRotator YawRotation(0, Rotation.Yaw, 0); // Get right vector const FVector Direction = FRotationMatrix(YawRotation).GetUnitAxis(EAxis::Y); // Add movement in that direction AddMovementInput(Direction, AxisValue); } } -
Next, navigate to the APlayerCharacter::SetupPlayerInputComponent method, and implement the following code.
//Called to bind functionality to input void APlayerCharacter::SetupPlayerInputComponent(UInputComponent*) { Super::SetupPlayerInputComponent(PlayerInputComponent); PlayerInputComponent->BindAxis("MoveForward", this, &APlayerCharacter::MoveForward); PlayerInputComponent->BindAxis("MoveRight", this, &APlayerCharacter::MoveRight); PlayerInputComponent->BindAxis("Turn", this, &APawn::AddControllerYawInput); PlayerInputComponent->BindAxis("LookUp", this, &APawn::AddControllerPitchInput); } -
Compile your code


Work-In-Progress Code
PlayerCharacter.h
#include "CoreMinimal.h"
#include "GameFramework/Character.h"
#include "PlayerCharacter.generated.h"
UCLASS()
class CHARACTERMOVEMENT_API APlayerCharacter : public ACharacter
{
GENERATED_BODY()
public:
// Sets default values for this character's properties
APlayerCharacter();
protected:
// Called when the game starts or when spawned
virtual void BeginPlay() override;
//Spring Arm Component to follow the camera behind the player
UPROPERTY(VisibleAnywhere, BlueprintReadWrite)
class USpringArmComponent* SpringArmComp;
//Player follow camera
UPROPERTY(VisibleAnywhere, BlueprintReadWrite)
class UCameraComponent* CameraComp;
//Called for forwards/backward input
void MoveForward(float InputAxis);
//called for left/right side input
void MoveRight(float InputAxis);
public:
// Called every frame
virtual void Tick(float DeltaTime) override;
// Called to bind functionality to input
virtual void SetupPlayerInputComponent(class UInputComponent* PlayerInputComponent) override;
};PlayerCharacter.Cpp
#include "PlayerCharacter.h"
#include "Camera/CameraComponent.h"
#include "GameFramework/SpringArmComponent.h"
#include "GameFramework/CharacterMovementComponent.h"
// Sets default values
APlayerCharacter::APlayerCharacter()
{
// Set this character to call Tick() every frame. You can turn this off to improve performance if you don't need it.
PrimaryActorTick.bCanEverTick = true;
// Instantiating your class Components

SpringArmComp = CreateDefaultSubobject<USpringArmComponent>(TEXT("SpringArmComp"));

CameraComp = CreateDefaultSubobject<UCameraComponent>(TEXT("CameraComp"));

//Set the location and rotation of the Character Mesh Transform

GetMesh()->SetRelativeLocationAndRotation(FVector(0.0f, 0.0f, -90.0f), FQuat(FRotator(0.0f, -90.0f, 0.0f)));

// Attaching your class Components to the default character's Skeletal Mesh Component.

SpringArmComp->SetupAttachment(GetMesh());

CameraComp->SetupAttachment(SpringArmComp,USpringArmComponent::SocketName);

//Setting class variables of the spring arm

SpringArmComp->bUsePawnControlRotation = true;

//Setting class variables of the Character movement component

GetCharacterMovement()->bOrientRotationToMovement = true;

GetCharacterMovement()->bUseControllerDesiredRotation = true;

GetCharacterMovement()->bIgnoreBaseRotation = true;
}
// Called when the game starts or when spawned
void APlayerCharacter::BeginPlay()
{
Super::BeginPlay();
}
void APlayerCharacter::MoveForward(float AxisValue)
{
    if ((Controller != nullptr) && (AxisValue != 0.0f))
    {
        // Find out which way is forward
        const FRotator Rotation = Controller->GetControlRotation();
        const FRotator YawRotation(0, Rotation.Yaw, 0);

        // Get forward vector
        const FVector Direction = FRotationMatrix(YawRotation).GetUnitAxis(EAxis::X);
        AddMovementInput(Direction, AxisValue);
    }
}

void APlayerCharacter::MoveRight(float AxisValue)
{
    if ((Controller != nullptr) && (AxisValue != 0.0f))
    {
        // Find out which way is right
        const FRotator Rotation = Controller->GetControlRotation();
        const FRotator YawRotation(0, Rotation.Yaw, 0);

        // Get right vector
        const FVector Direction = FRotationMatrix(YawRotation).GetUnitAxis(EAxis::Y);

        // Add movement in that direction
        AddMovementInput(Direction, AxisValue);
    }
}
// Called every frame
void APlayerCharacter::Tick(float DeltaTime)
{
Super::Tick(DeltaTime);
}
// Called to bind functionality to input
void APlayerCharacter::SetupPlayerInputComponent(UInputComponent* PlayerInputComponent)
{
Super::SetupPlayerInputComponent(PlayerInputComponent);
PlayerInputComponent->BindAxis("MoveForward",this, &APlayerCharacter::MoveForward);
PlayerInputComponent->BindAxis("MoveRight", this, &APlayerCharacter::MoveRight);
PlayerInputComponent->BindAxis("Turn", this, &APawn::AddControllerYawInput);
PlayerInputComponent->BindAxis("LookUp", this, &APawn::AddControllerPitchInput);
}Creating Input Key Mappings and Input Action Events
Now that you have completed the Blueprint scripting logic for your Move Forward, Move Right, Look Up, and Turn input events, you will need to finish implementing your Action Mappings for your Jump, Crouch, and Sprint input events.
-
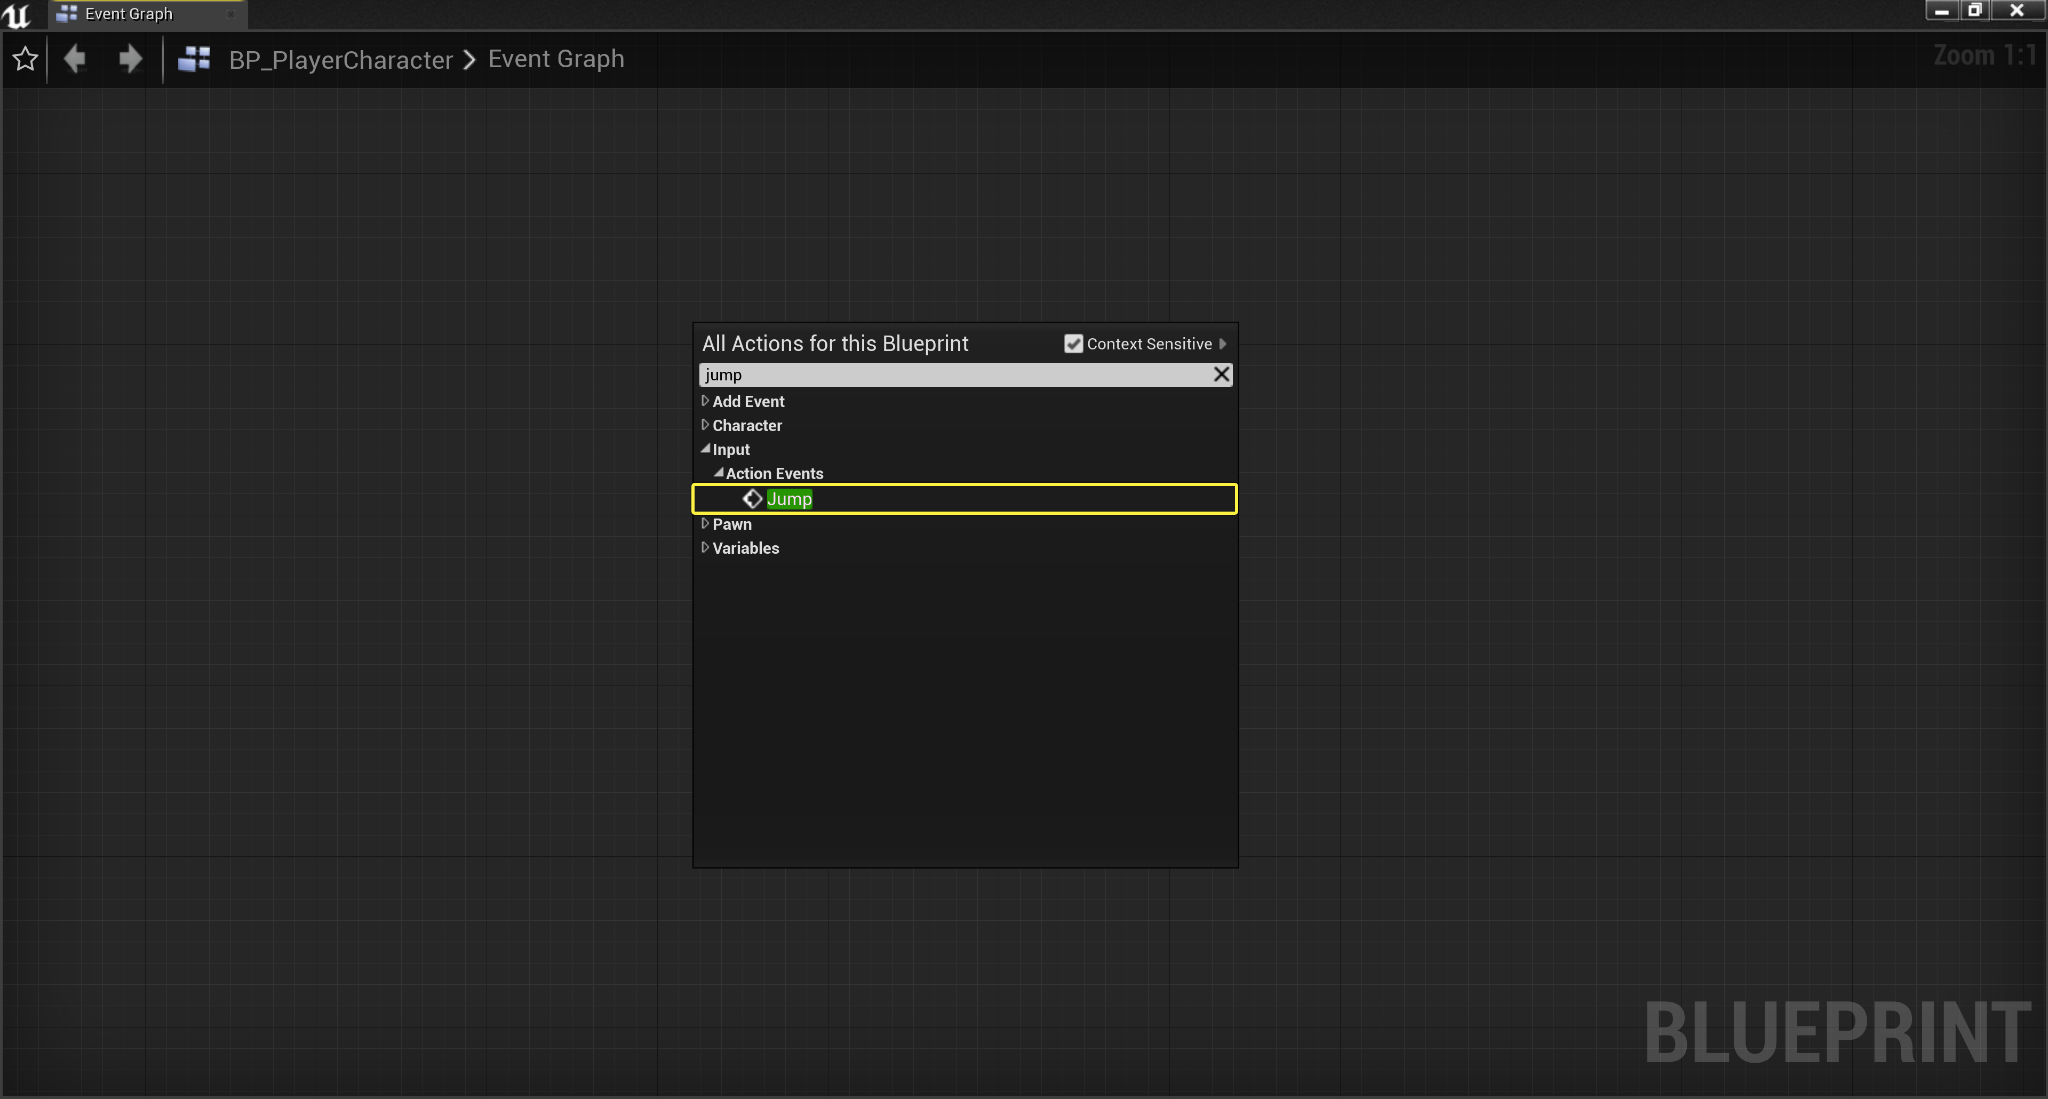
Right click on the Event Graph , then in the All Actions for this Blueprint drop down menu, search for and select your Jump Action Event .
![Add Jump Action Event]()
Click image to expand.
-
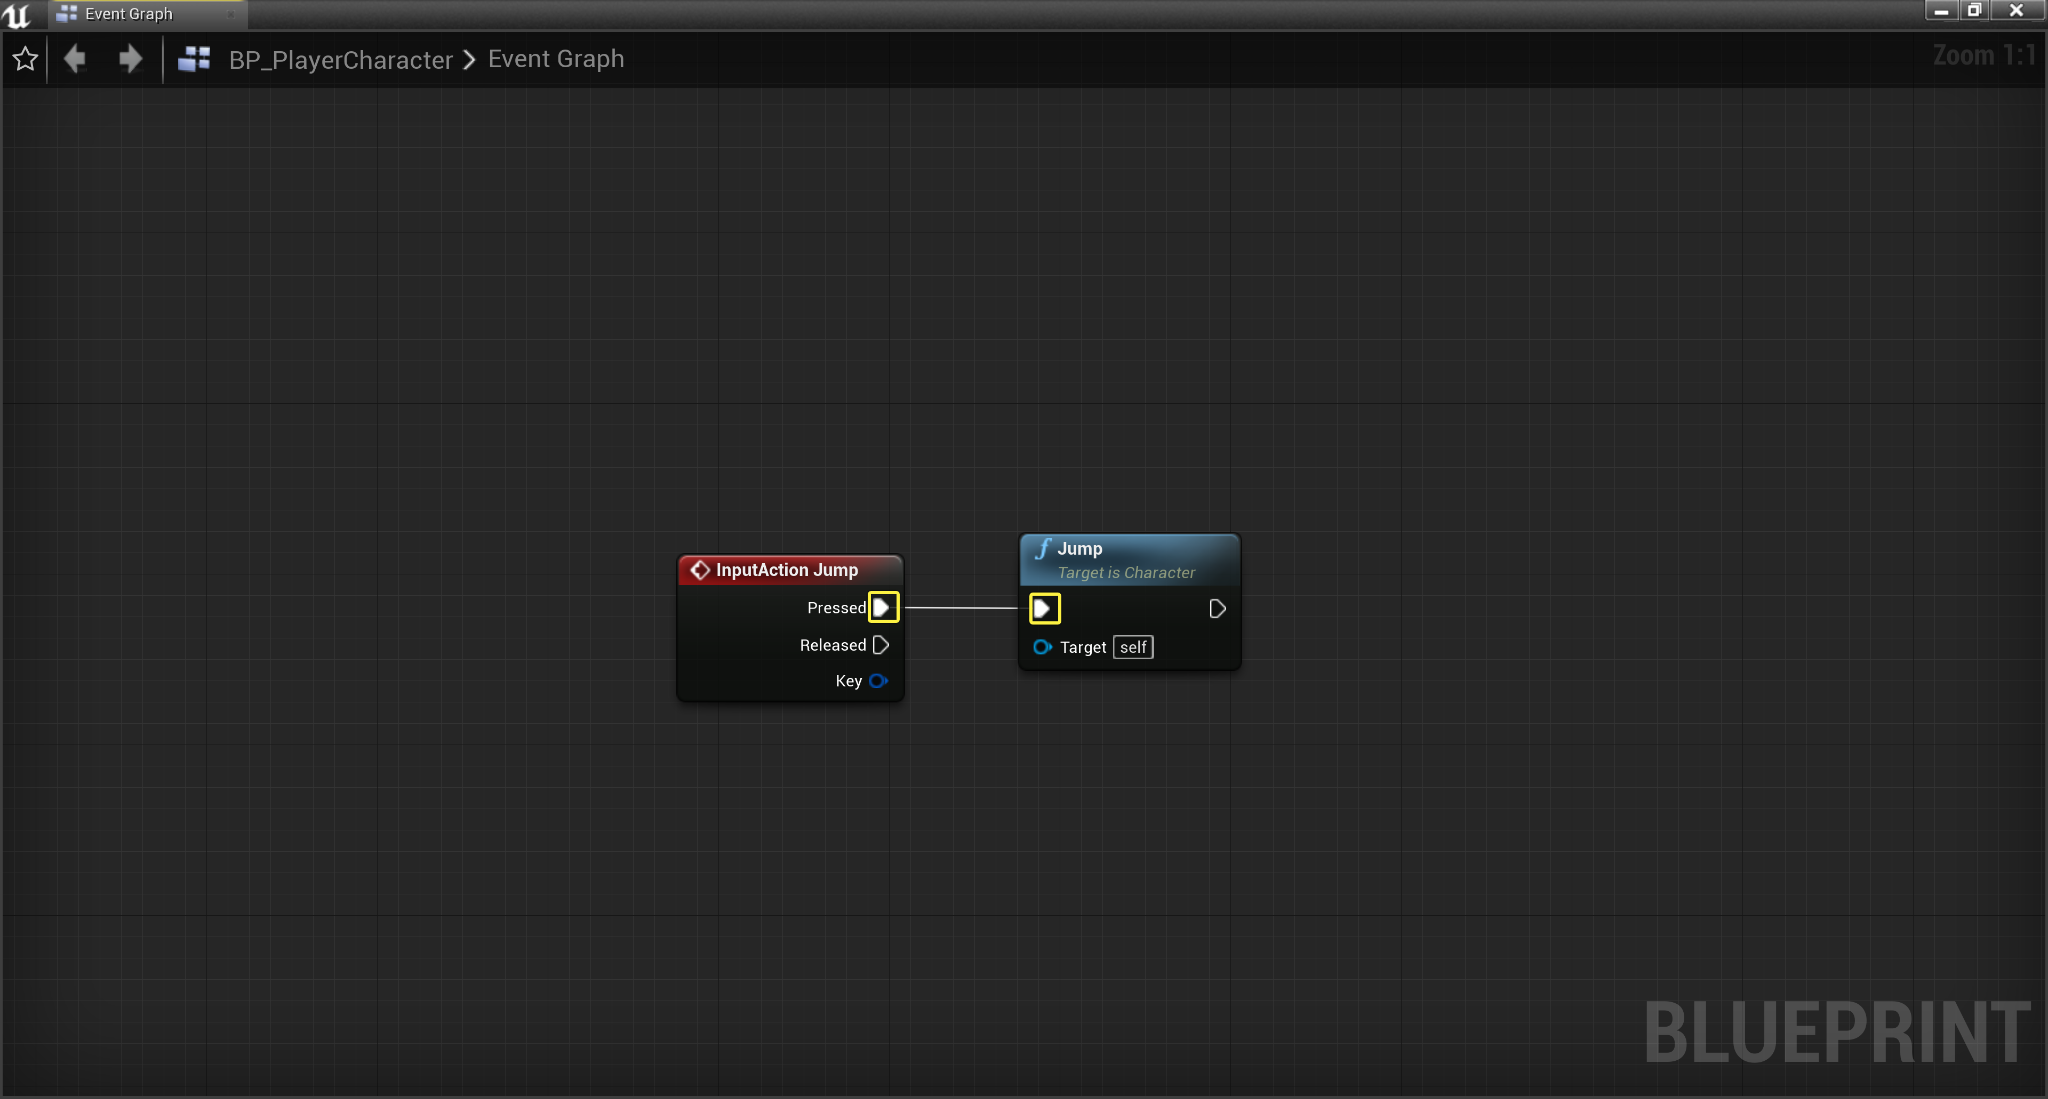
Drag off from your InputAction Jump node's Pressed execution pin , then in the drop down menu, search for and select the Character function Jump .
![Add Jump Character function]()
-
Connect the execution pin of your InputAction Jump node to the execution pin of your Jump node.
![Connect Input Action execution to Jump]()
Click image to expand.
-
Drag off from the InputAction Jump node's Released execution pin , and in the drop down menu, search for and select the Character function Stop Jumping .
![Connect Released execution for Jump]()
Click image to expand.
-
Right click on the Event Graph and in the drop down menu, search for and select the Input Action Sprint .
![Add Input Action Sprint]()
-
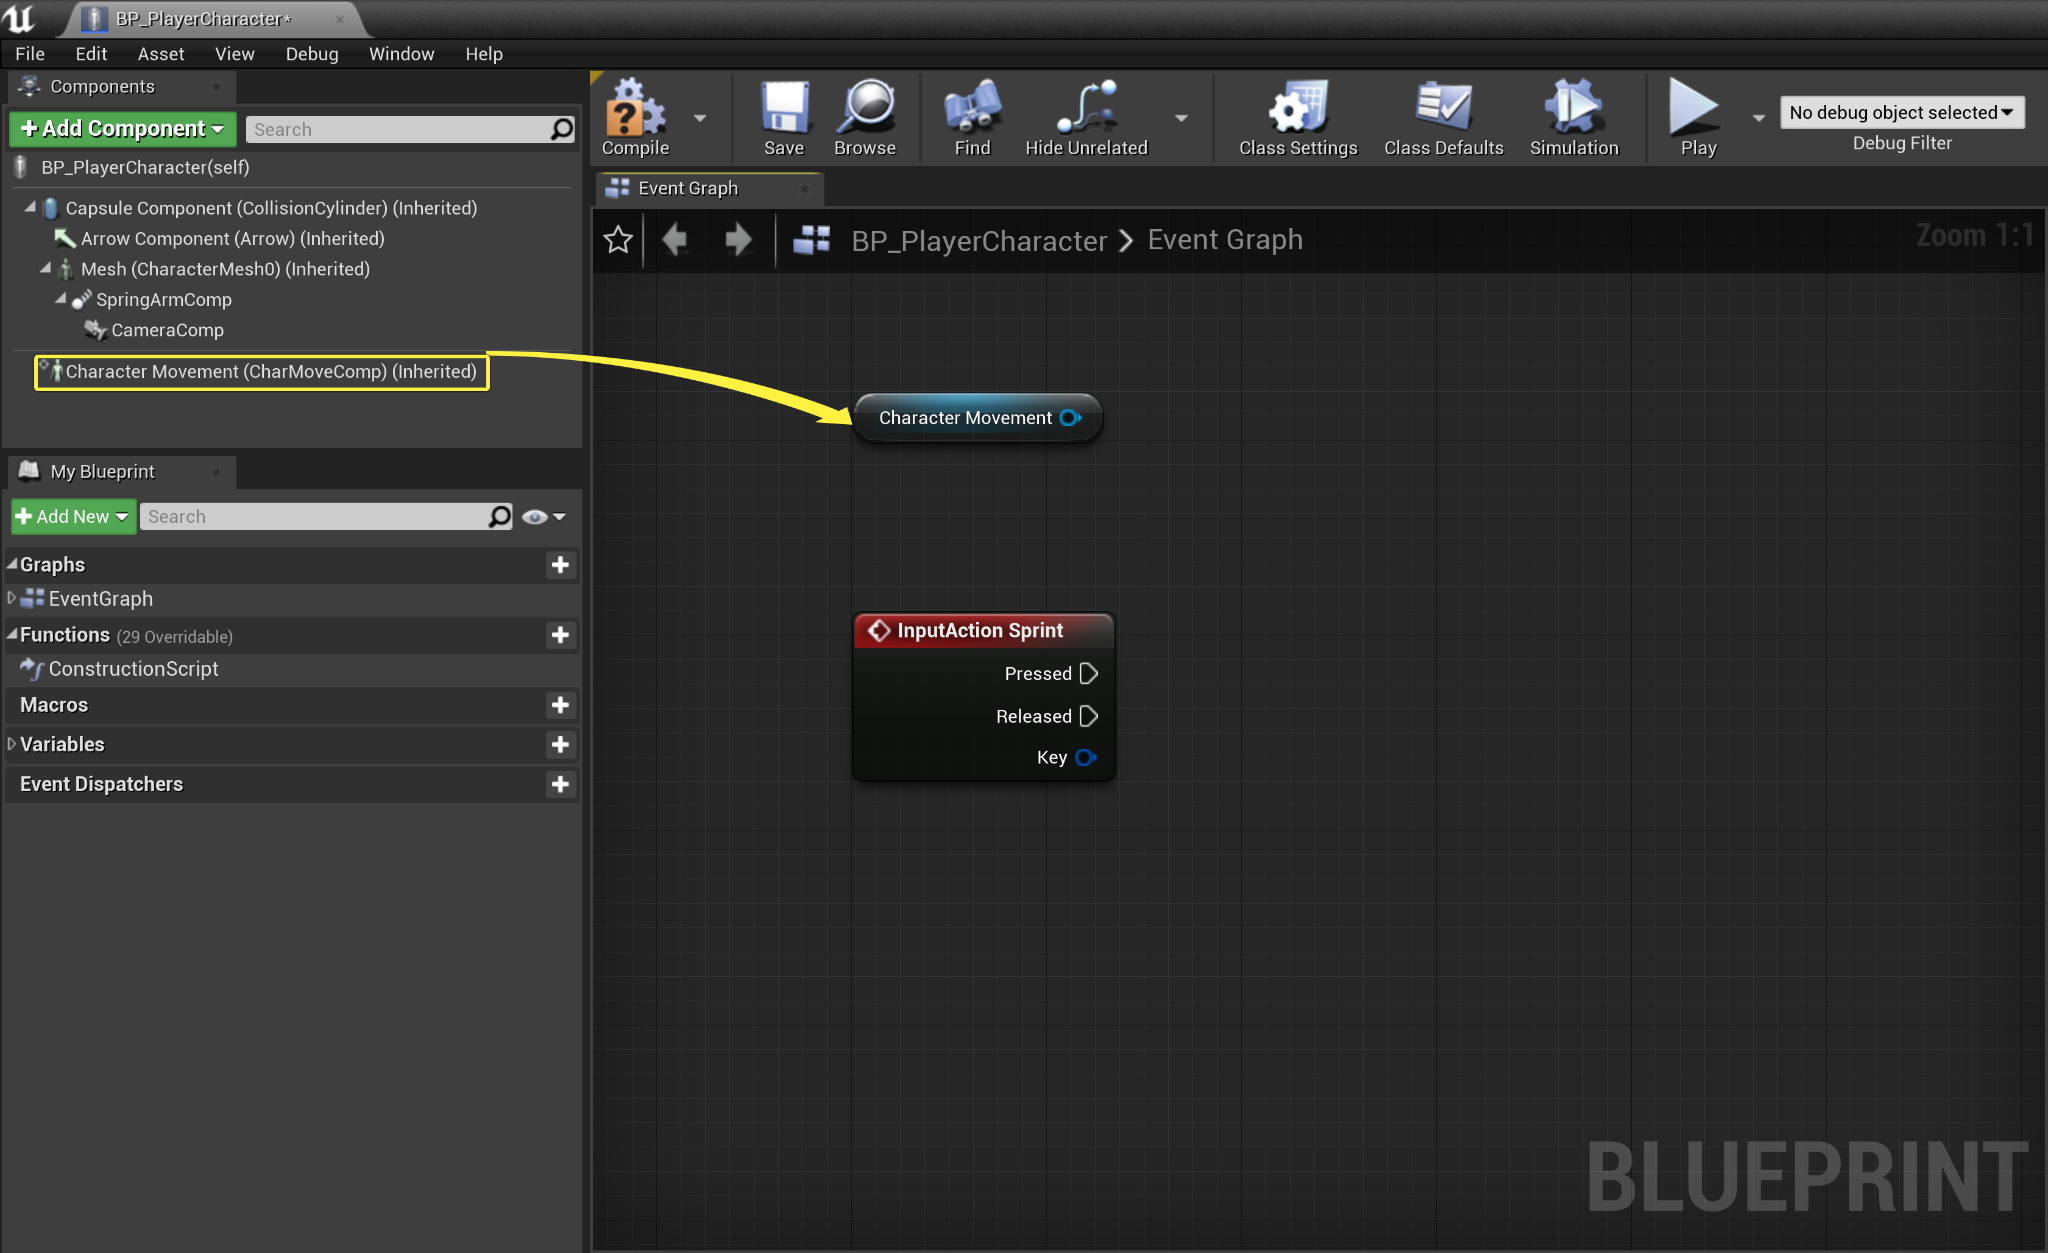
Navigate to the Components tab , then click and drag your Character Movement Component on to the Event Graph .
![Add Character Movement Component to Event Graph]()
Click image to expand.
-
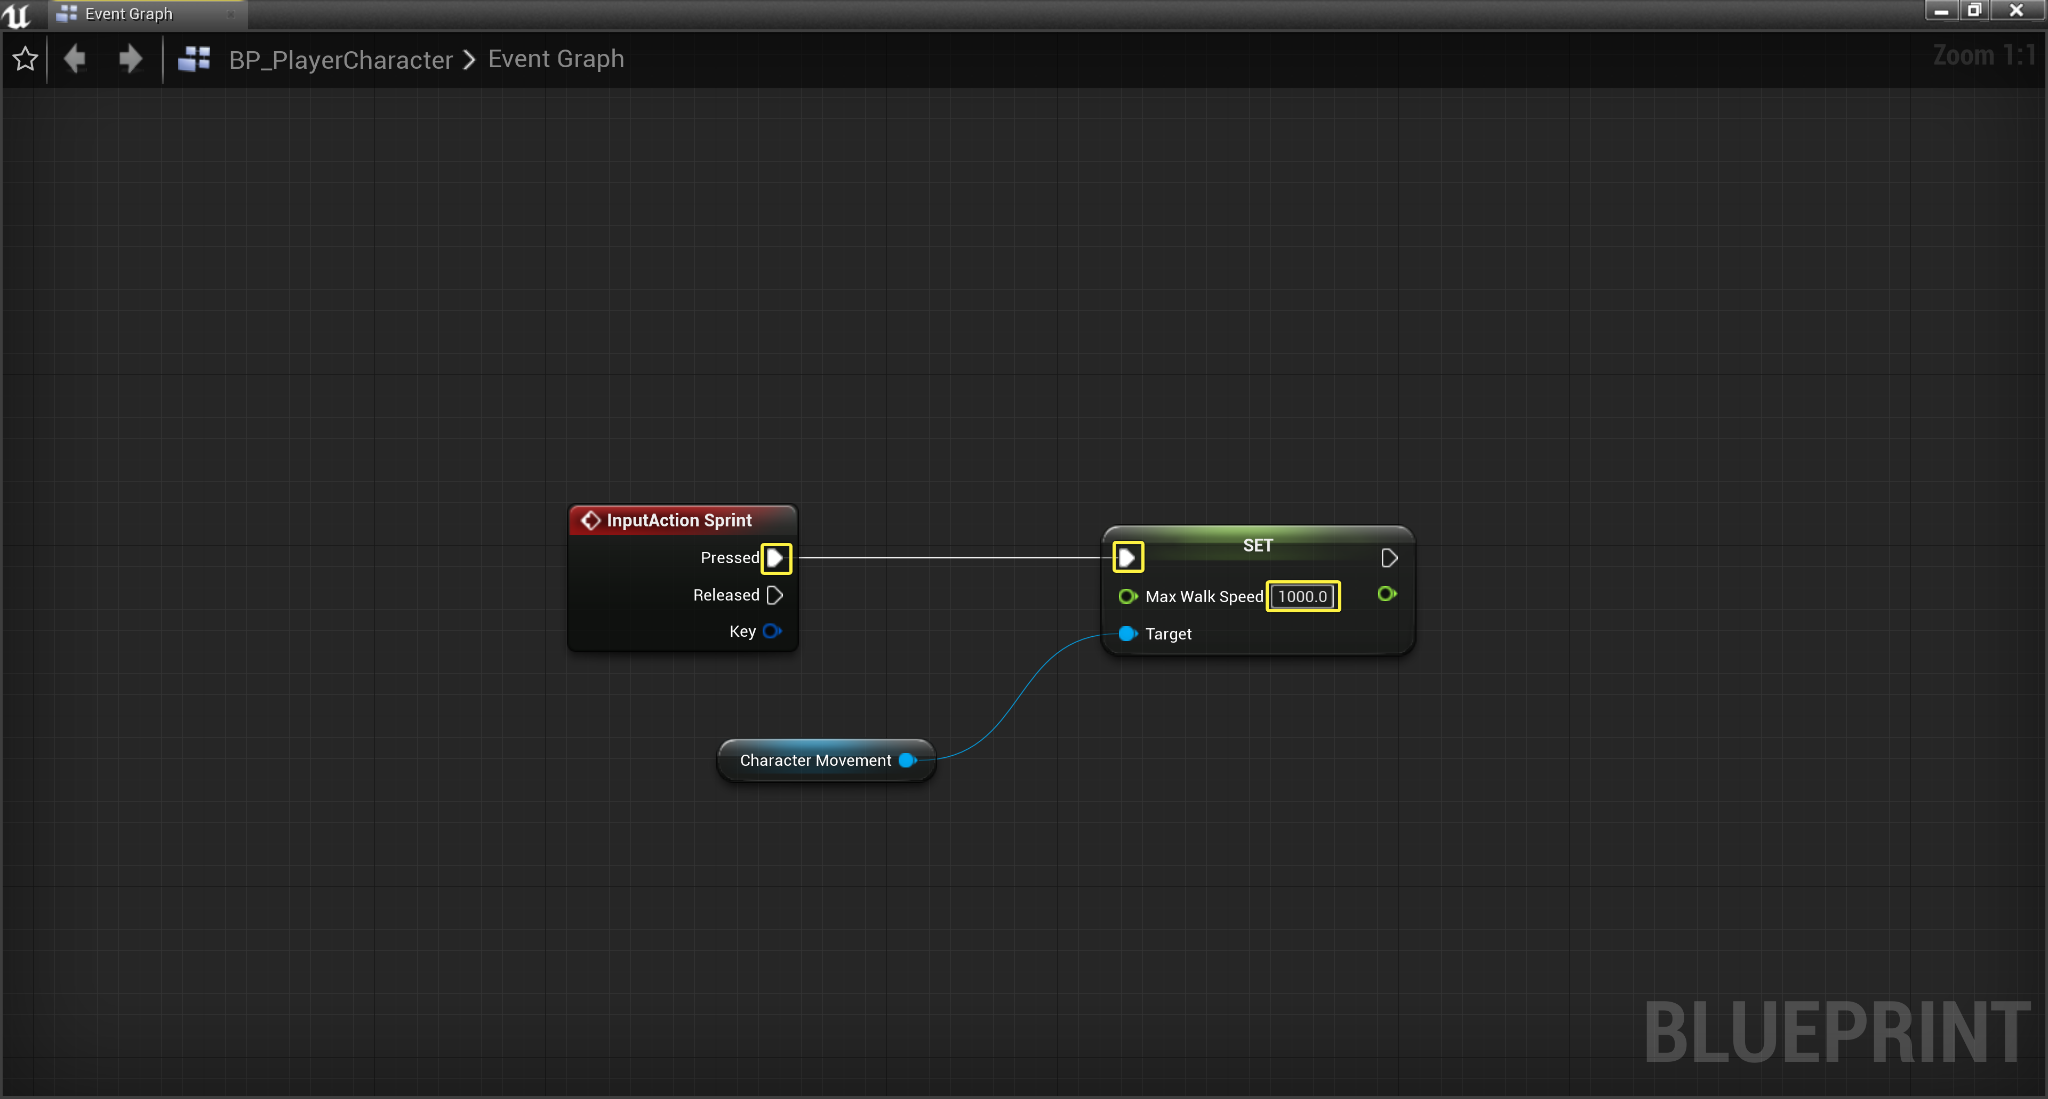
Drag off the Character Movement pin and from the drop down menu, search for and select Set Max Walk Speed . Set the Max Walk Speed float value to 1000 , then connect the Pressed Execution pin of the InputAction Sprint node to the Input Execution pin of the Set Max Walk Speed .
![Set Max Walk Speed and connect Input Action execution for Sprint]()
Click image to expand.
-
Drag off from the Character Movement pin , then search for and select for another set Max Walk Speed node. Set the Max Walk Speed float value to 600 , and then connect the Released execution pin of the InputAction Sprint node to the Set Max Walk Speed execution input pin .
![Connect Released execution for Sprint]()
Click image to expand.
-
Right-click on the Event Graph , and in the drop down menu search for and select your Input Action Crouch .
![Add Input Action Crouch]()
-
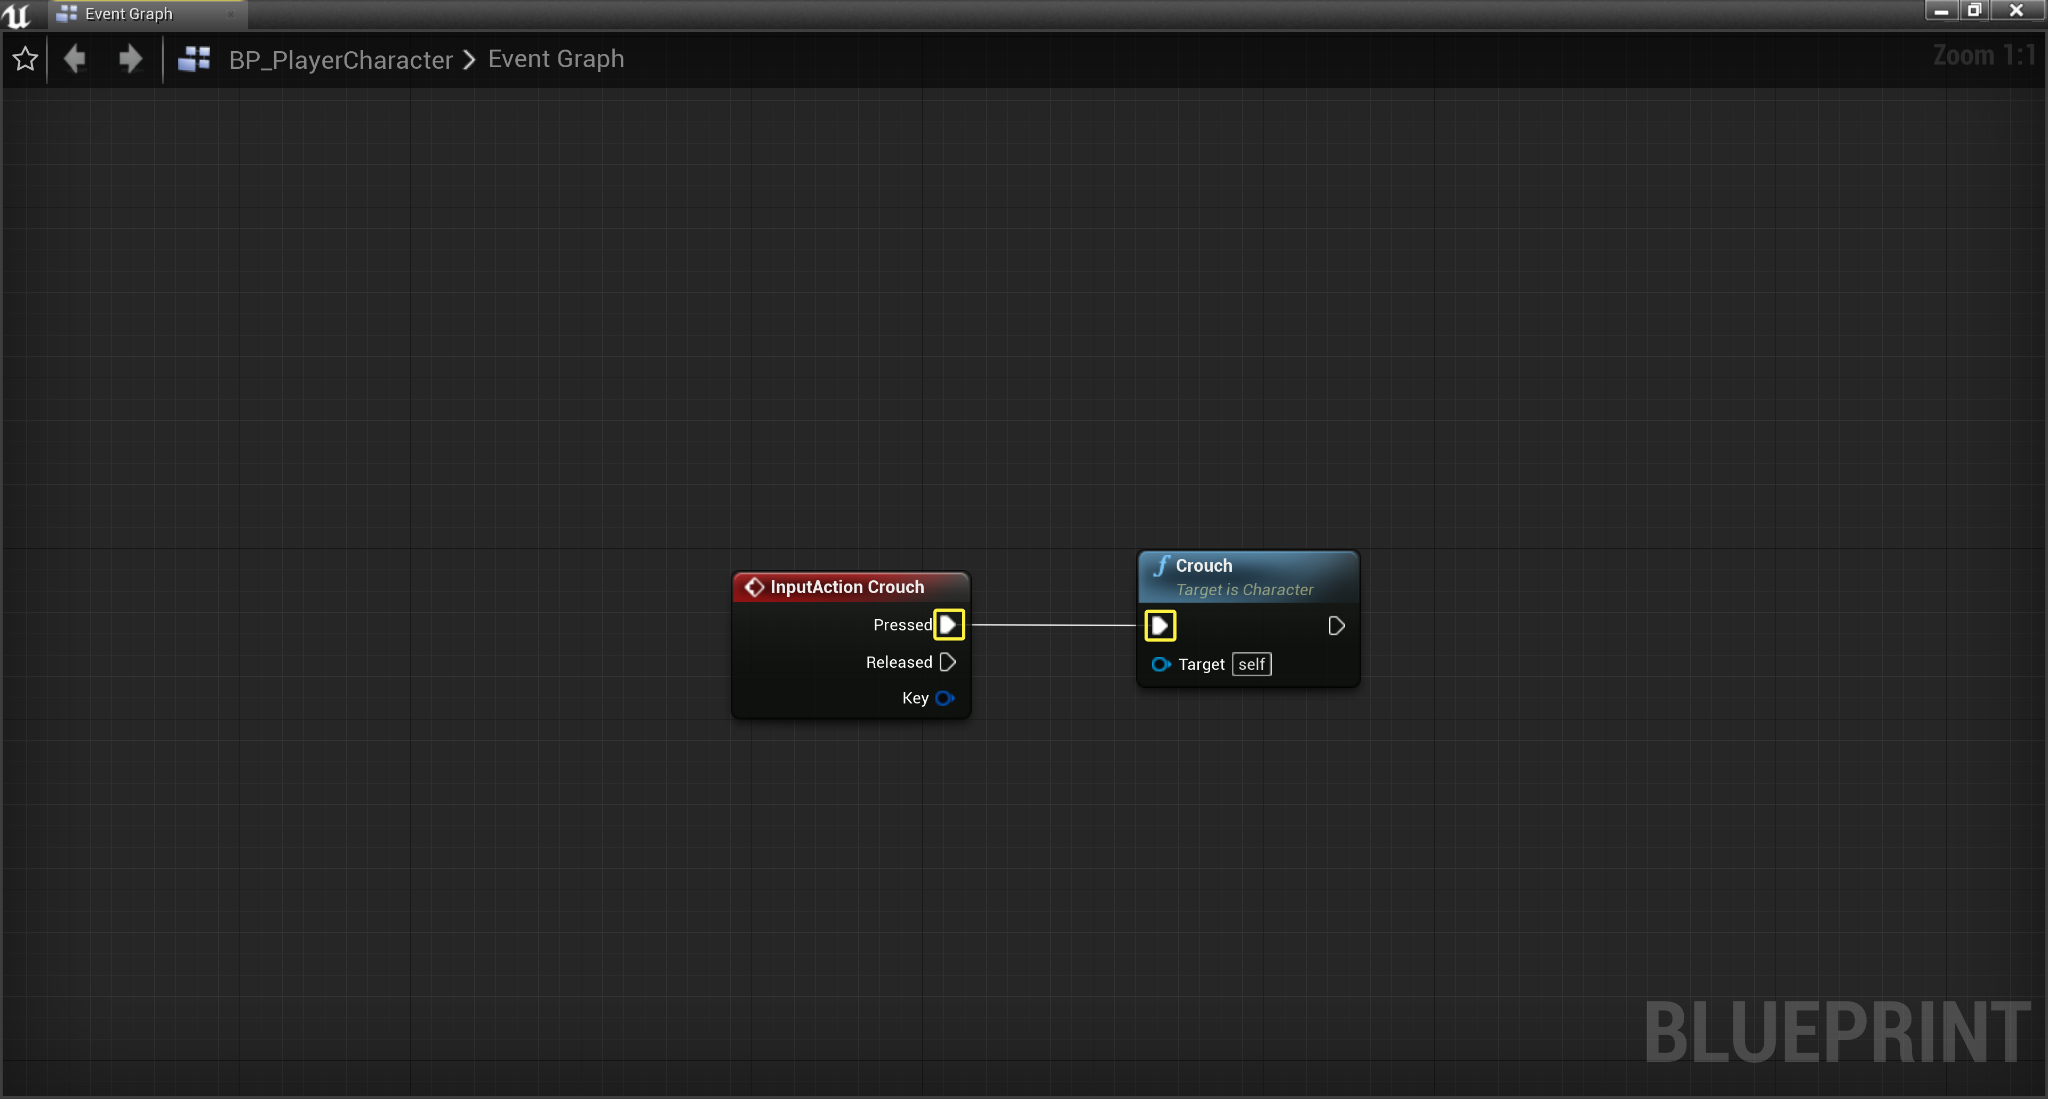
Drag off from the InputAction Crouch node's Pressed execution pin , then in the drop down menu, search for and select the Character class function Crouch .
![Connect Input Action execution to Crouch]()
Click image to expand.
-
Drag off from the InputAction Crouch node's Released execution pin , then in the drop down action menu search for and select the Character class function Un Crouch.
![Connect Released execution for Crouch]()
Click image to expand.
-
Compile and Save your Blueprint.
![Compile and Save buttons]()


Completed Blueprint
Your completed Blueprint should resemble the image shown below.
Click image to expand.
Setting up the Game Mode
The GameMode defines the game's set of rules. These rules include what default pawn the player will spawn as when the game is launched. You will need to set up these rules in order to spawn the Player Character that you have created.
-
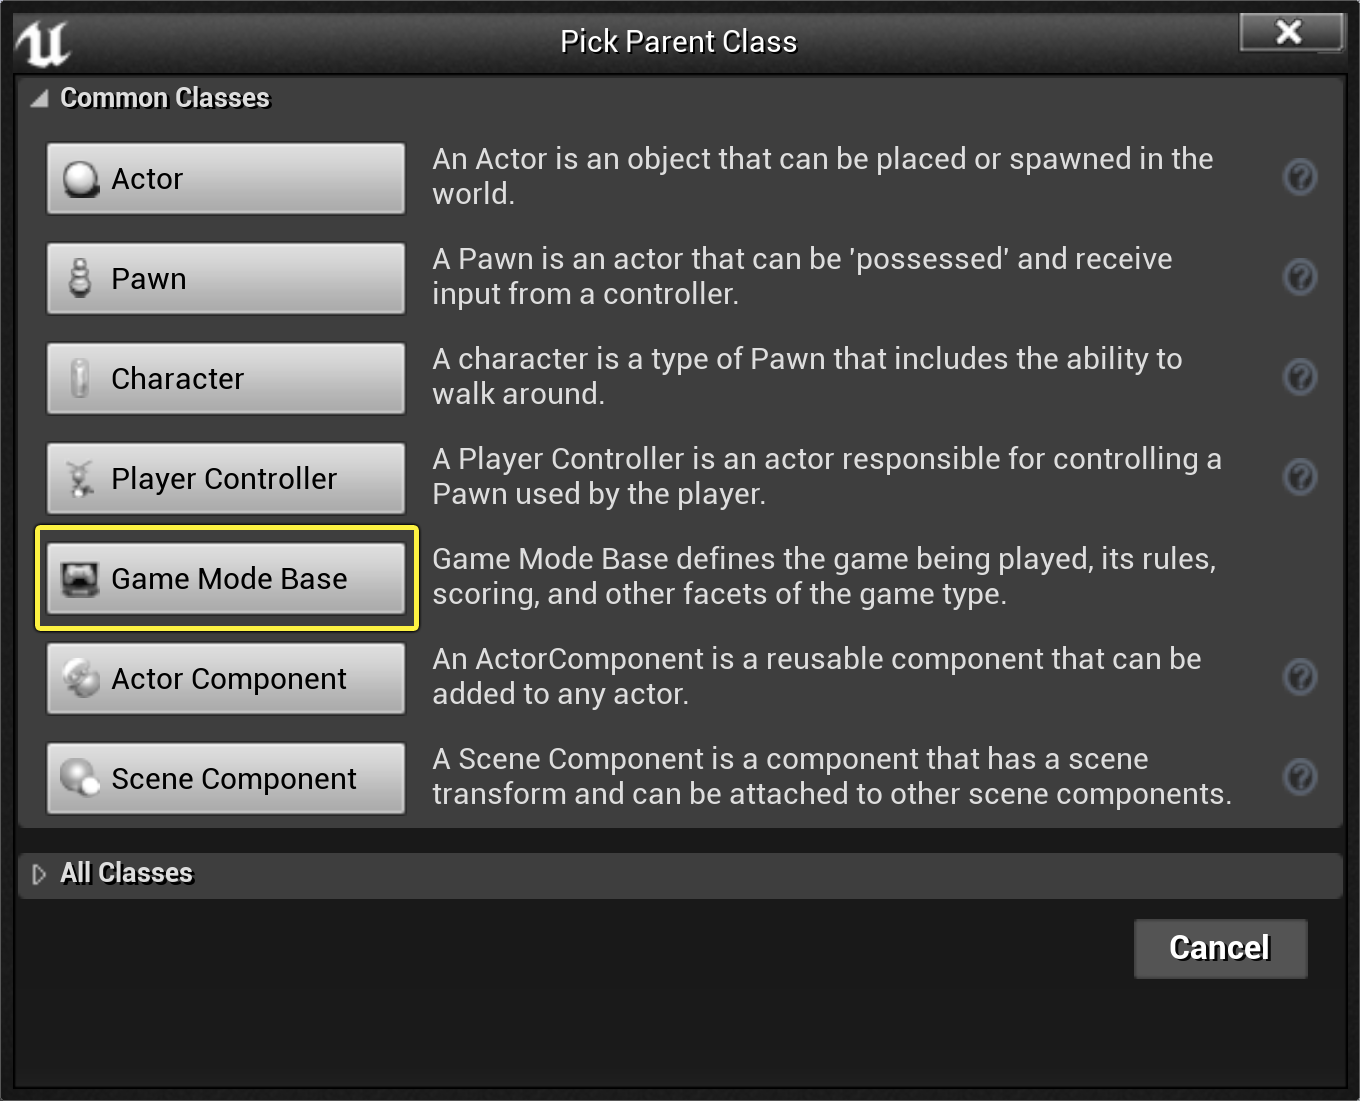
In the Content Browser , click the Add/Import button and create a new Blueprint class, when the Pick a Parent Class menu appears, select Game Mode Base and name your new Gamemode class Bp_GameMode .
![Setting up the Base Game Mode]()
Click image to expand.
-
Double click Bp_GameMode to open it's class defaults, then navigate to the Details panel Classes category , and for the Default Pawn Class select Bp_PlayerCharacter .
![Select Default Pawn Class]()
-
Compile and Save your Blueprint.
![Compile and Save buttons]()
-
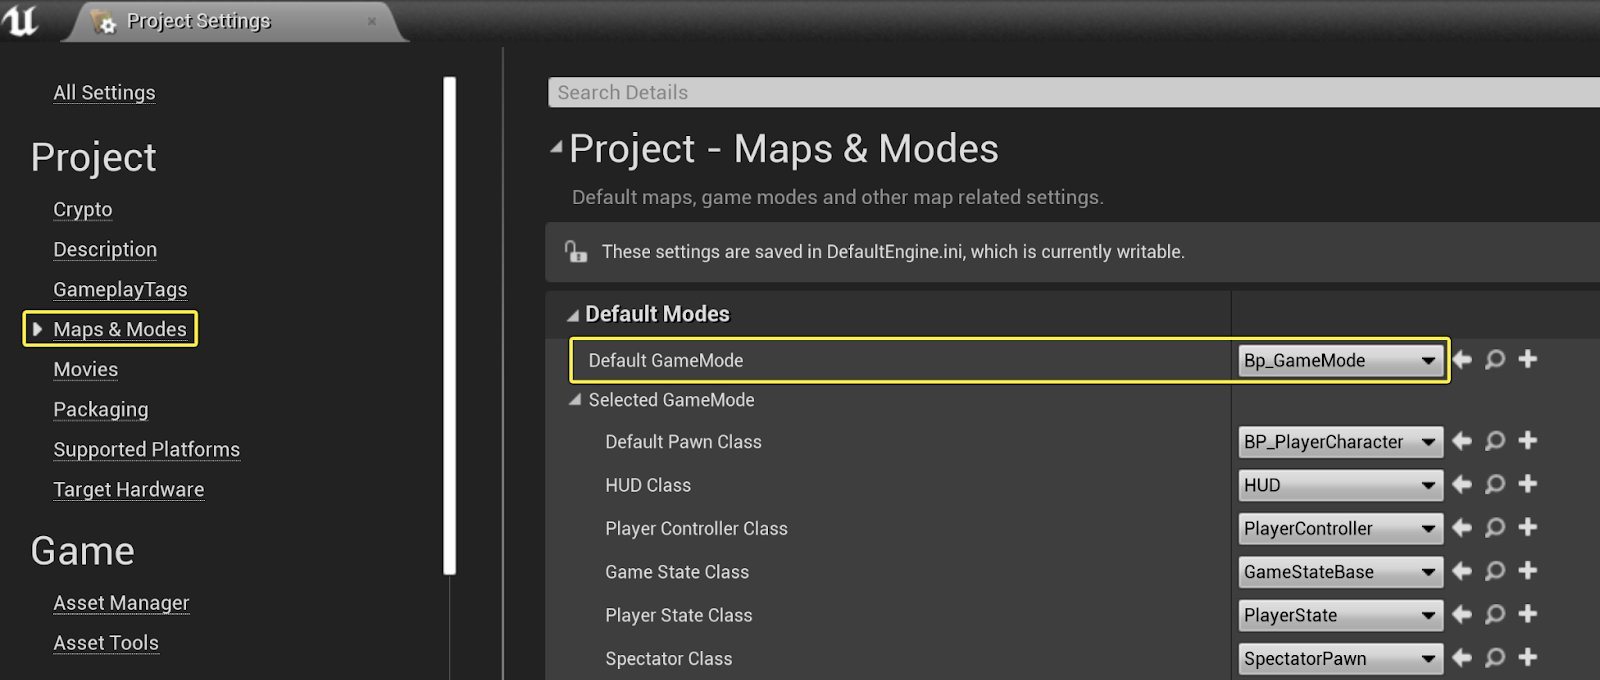
Navigate to Edit > Project Settings > Maps & Modes , and in the Default Modes category , select Bp_GameMode .
![Select Default Game Mode]()
Click image to expand.


The Game Mode defines the game's set of rules. These rules include what default pawn the player will spawn as when the game is launched. You will need to set up these rules in order to spawn the Player Character that you have created.
-
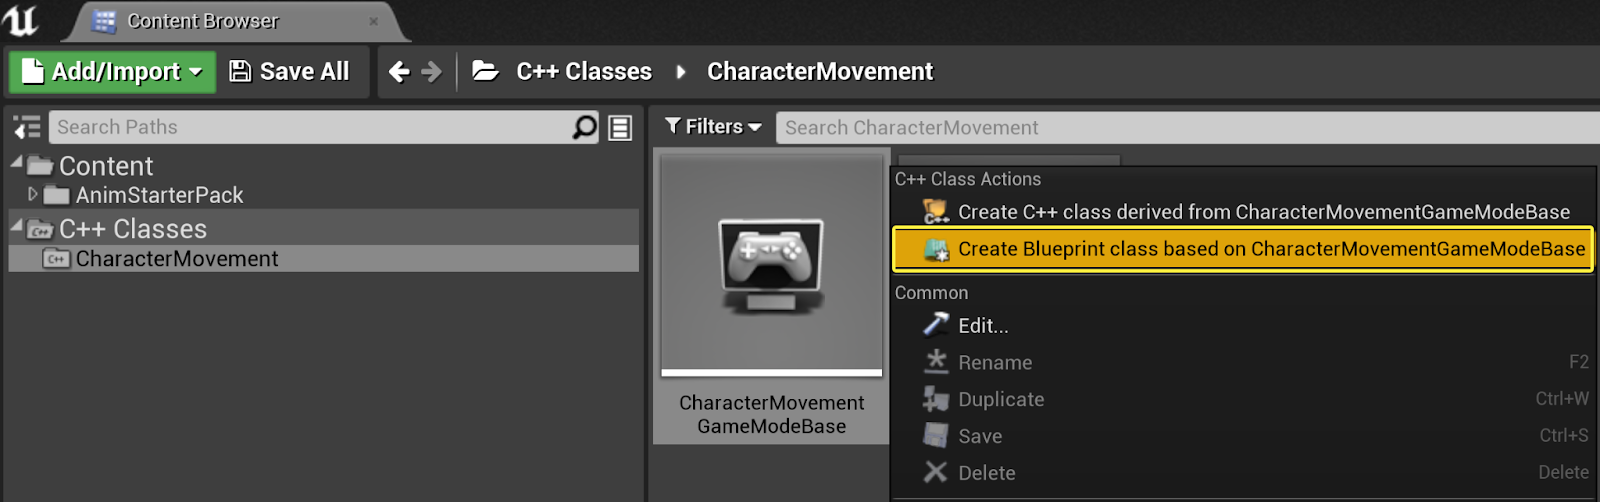
In the Editor navigate to your C++ classes folder. Right click your CharacterMovementGameModeBase and from the C++ Class Actions menu , select Create Blueprint class based on your CharacterMovementGameModeBase, then name your new Gamemode class Bp_GameMode .
![Create C++ Game Mode]()
Click image to expand.
-
Double click Bp_GameMode to open it's class defaults , then navigate to the Details panel Classes category , and for the Default Pawn Class select Bp_PlayerCharacter.
![Select Default Pawn Class]()
-
Compile and Save your Blueprint.
![Compile and Save buttons]()
-
Navigate to Edit > Project Settings > Maps & Modes , and in the Default Modes category , select Bp_GameMode .
![Select Default Game Mode]()
Click image to expand.

Creating the Locomotion Blend Space
Now that you have a character that possesses the input functionality to move in your level, you will need to create Blend Spaces for your movement states (sprinting, jogging, and crouch walking).
Blend Spaces are special assets that allow for blending of animations based on the values of two inputs. You will create your own blend spaces that move between forward and backward and left and right movements based on the character's movement speed or direction.
-
In the Content Browser , click Add/Import > Animation > BlendSpace , when prompted to pick a skeleton, choose the UE4_Mannequin_Skeleton , then name your Blend Space Locomotion_BS .
![Creating the Blend Space]()
-
Double click to open the Locomotion_BS Blend Space. In the Asset Details tab , navigate to the Axis Settings category, then select the arrows adjacent to the Horizontal Axis and the Vertical Axis to see more variable details.
![Asset Details Axis settings]()
-
In the Horizontal Axis settings , change the Name variable to Direction , then set the Minimum Axis Value to -180 , and the Maximum Axis Value to 180 .
![Horizontal Axis settings]()
-
In the Vertical Axis Settings , change the Name variable to Speed , then set the Maximum Axis Value to 1000 .
![Vertical Axis settings]()
-
Compile and Save .
![Compile and Save buttons]()
-
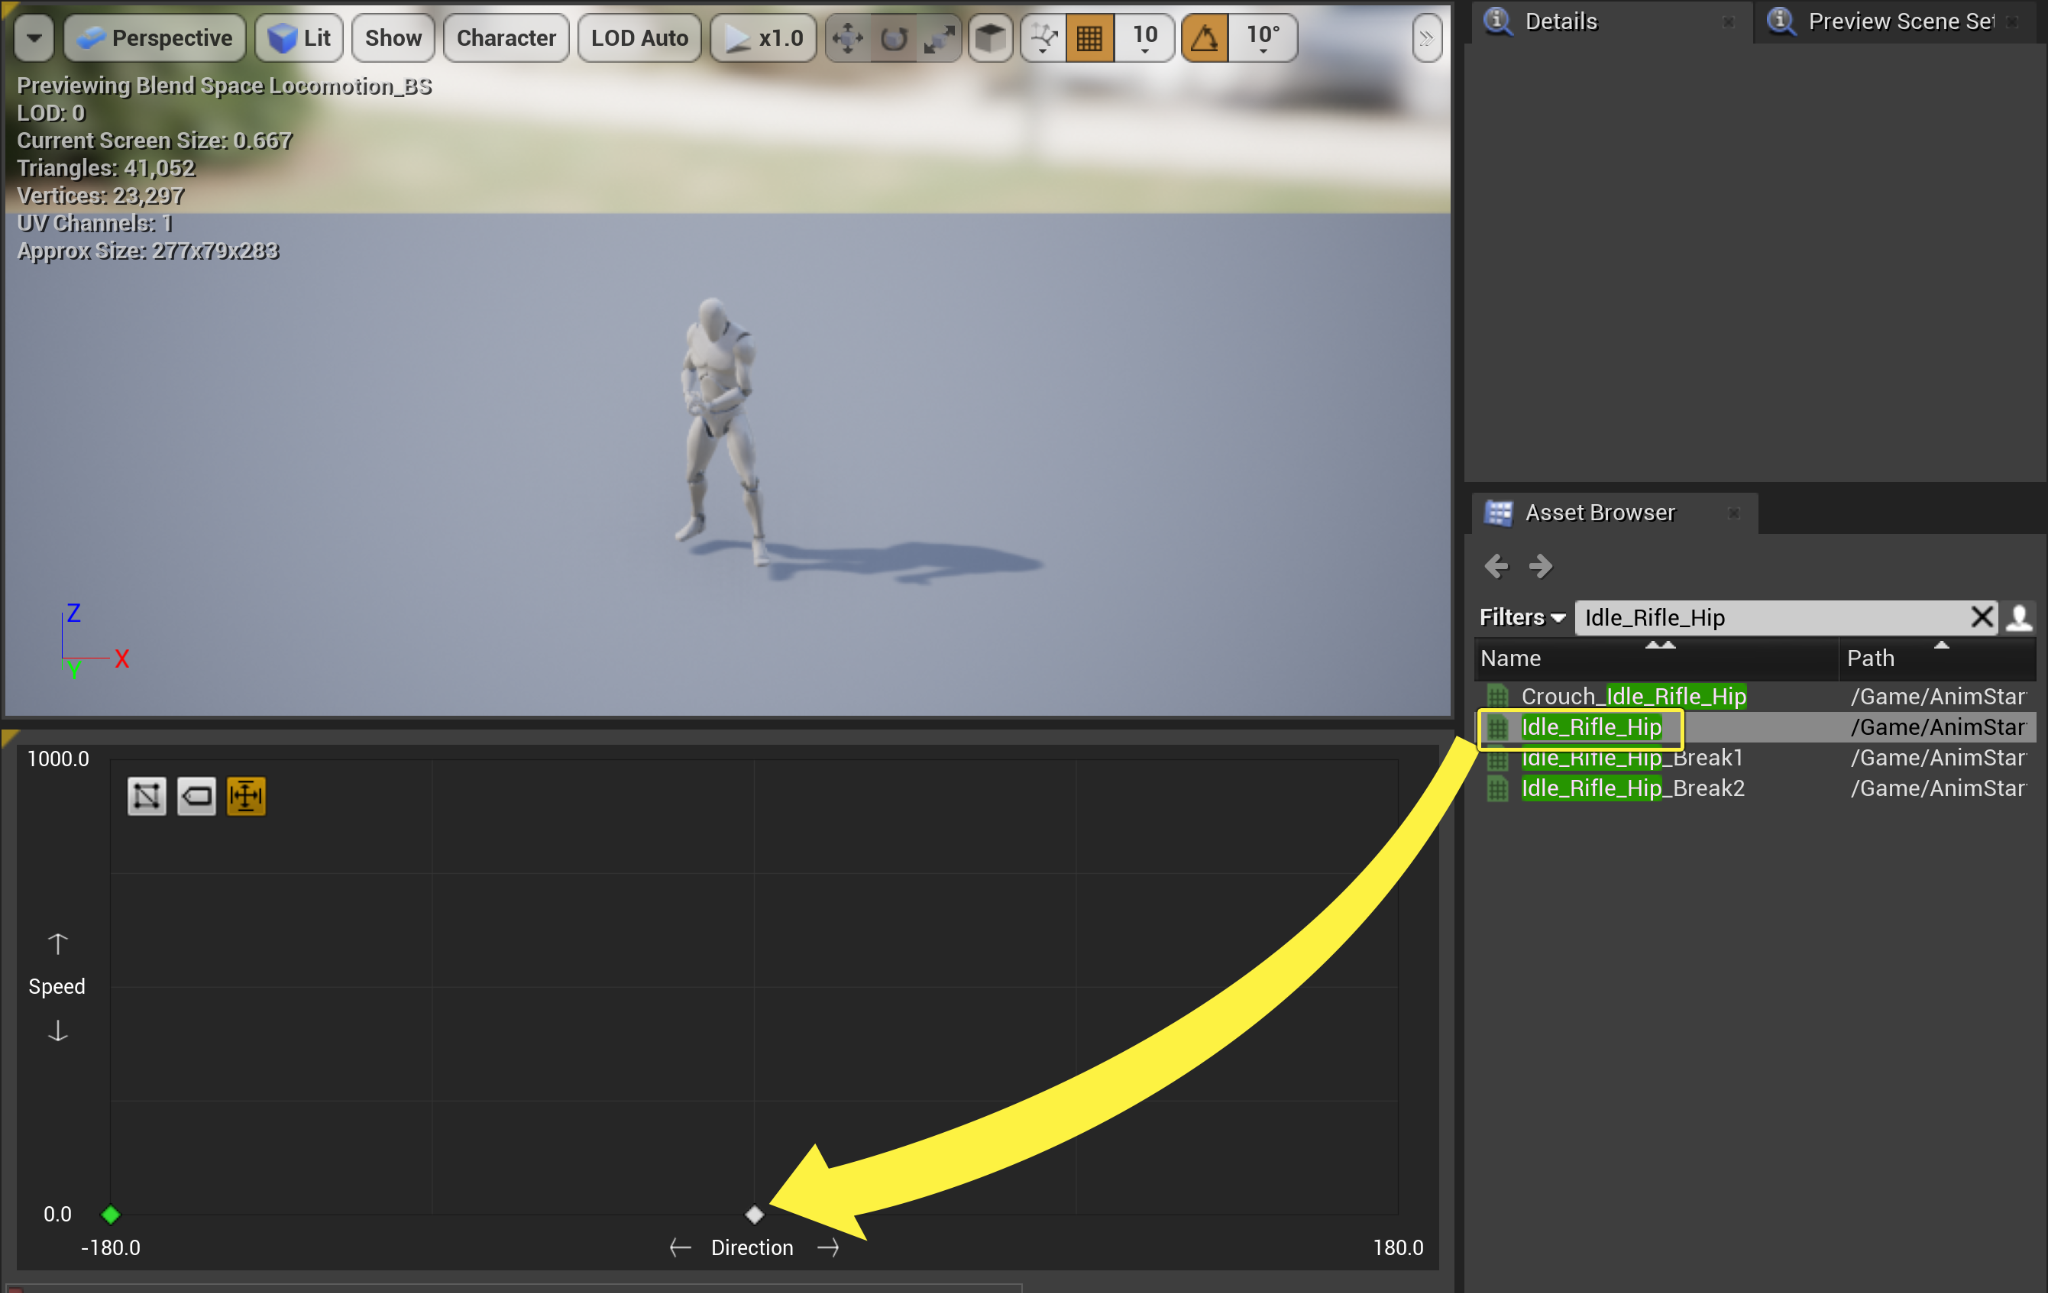
Navigate to the Asset Browser , then within the filters search bar type Idle_Rifle_Hip , then drag and drop the Idle_Rifle_Hip asset into the Blend Space at Direction 0.0 , and Speed 0.0 .
![Add Idle Rifle animation to Blend Space]()
Click image to expand.
-
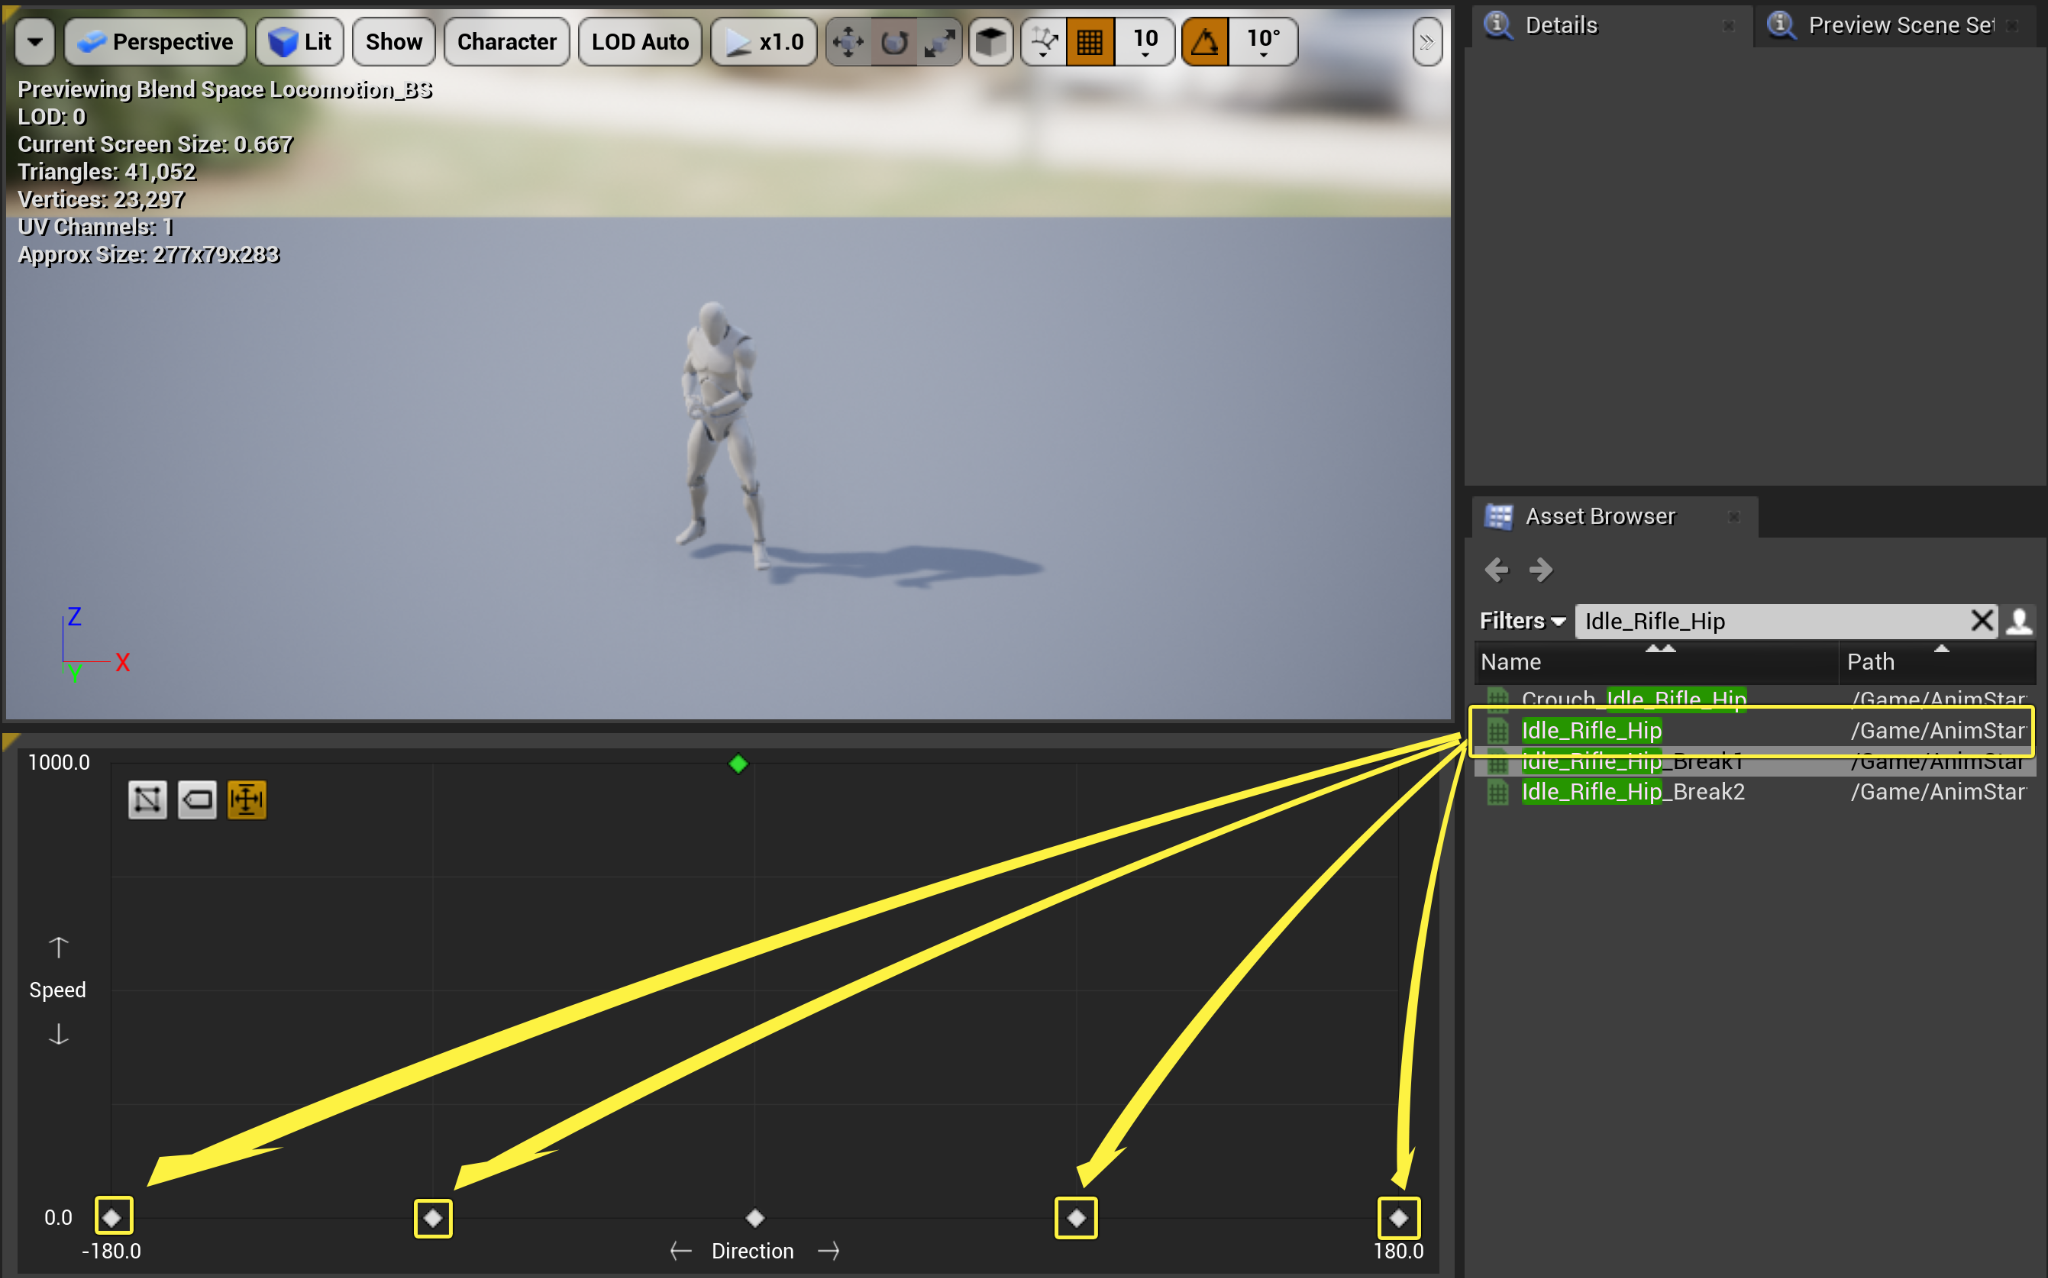
Repeat the previous step, inserting the Idle_Rifle_Hip asset into:
-
Direction 180 , Speed 0 .
-
Direction 90 , Speed 0 .
-
Direction -90 , Speed 0 .
-
Direction -180 , Speed 0 .
![Add Idle Rifle animation to multiple Blend Space points]()
Click image to expand.
-
-
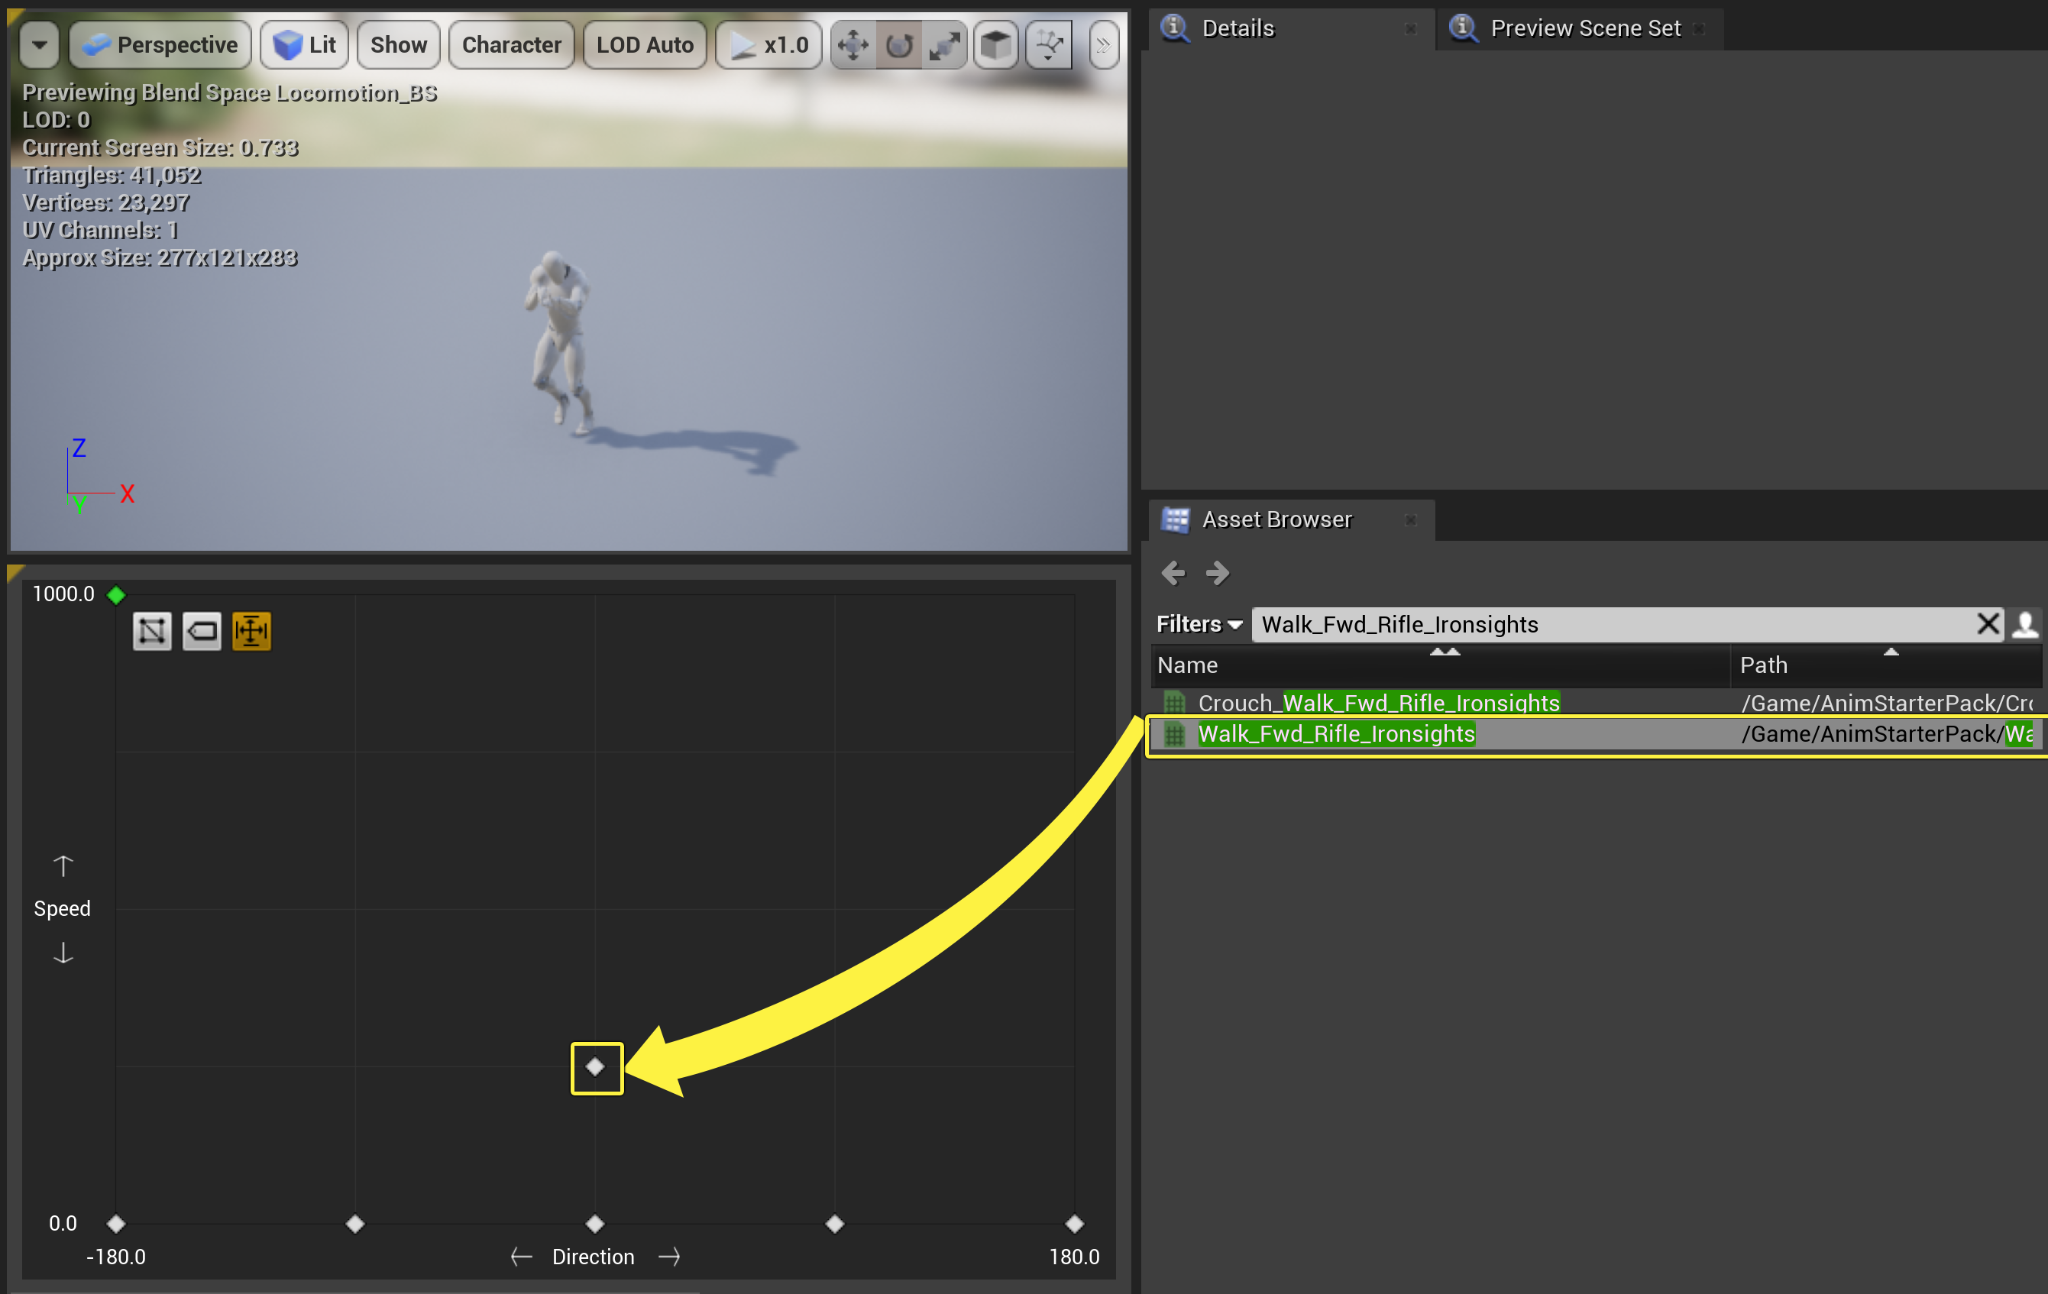
In the Asset Browser tab Filters search bar type Walk_Fwd_Rifle_Ironsights , then drag and drop the Walk_Fwd_Rifle_Ironsights asset into the Blend Space at Direction 0.0 , and Speed 250 .
![Add Walk Forward Rifle animation to Blend Space]()
Click image to expand.
-
Next, in the Asset Browser tab Filters search bar type Walk_Lt_Rifle_Ironsights , then drag and drop the Walk_Lt_Rifle_Ironsights asset into the Blend Space at Direction -90 and Speed 250 .
![Add Walk Left Rifle animation to Blend Space]()
Click image to expand.
-
In the Asset Browser tab Filters search bar type Walk_Rt_Rifle_Ironsights , then drag and drop the Walk_Rt_Rifle_Ironsights asset into the Blend Space at Direction 90 and Speed 250 .
![Add Walk Right Rifle animation to Blend Space]()
Click image to expand.
-
In the Asset Browser tab Filters search bar type Walk_Bwd_Rifle_Ironsights , then drag and drop the**Walk_Bwd_Rifle_Ironsights asset into the Blend Space at Direction 180 and Speed 250 , then drag and drop it again at Direction -180 and Speed 250**.
![Add Walk Backward Rifle animation to Blend Space]()
Click image to expand.
-
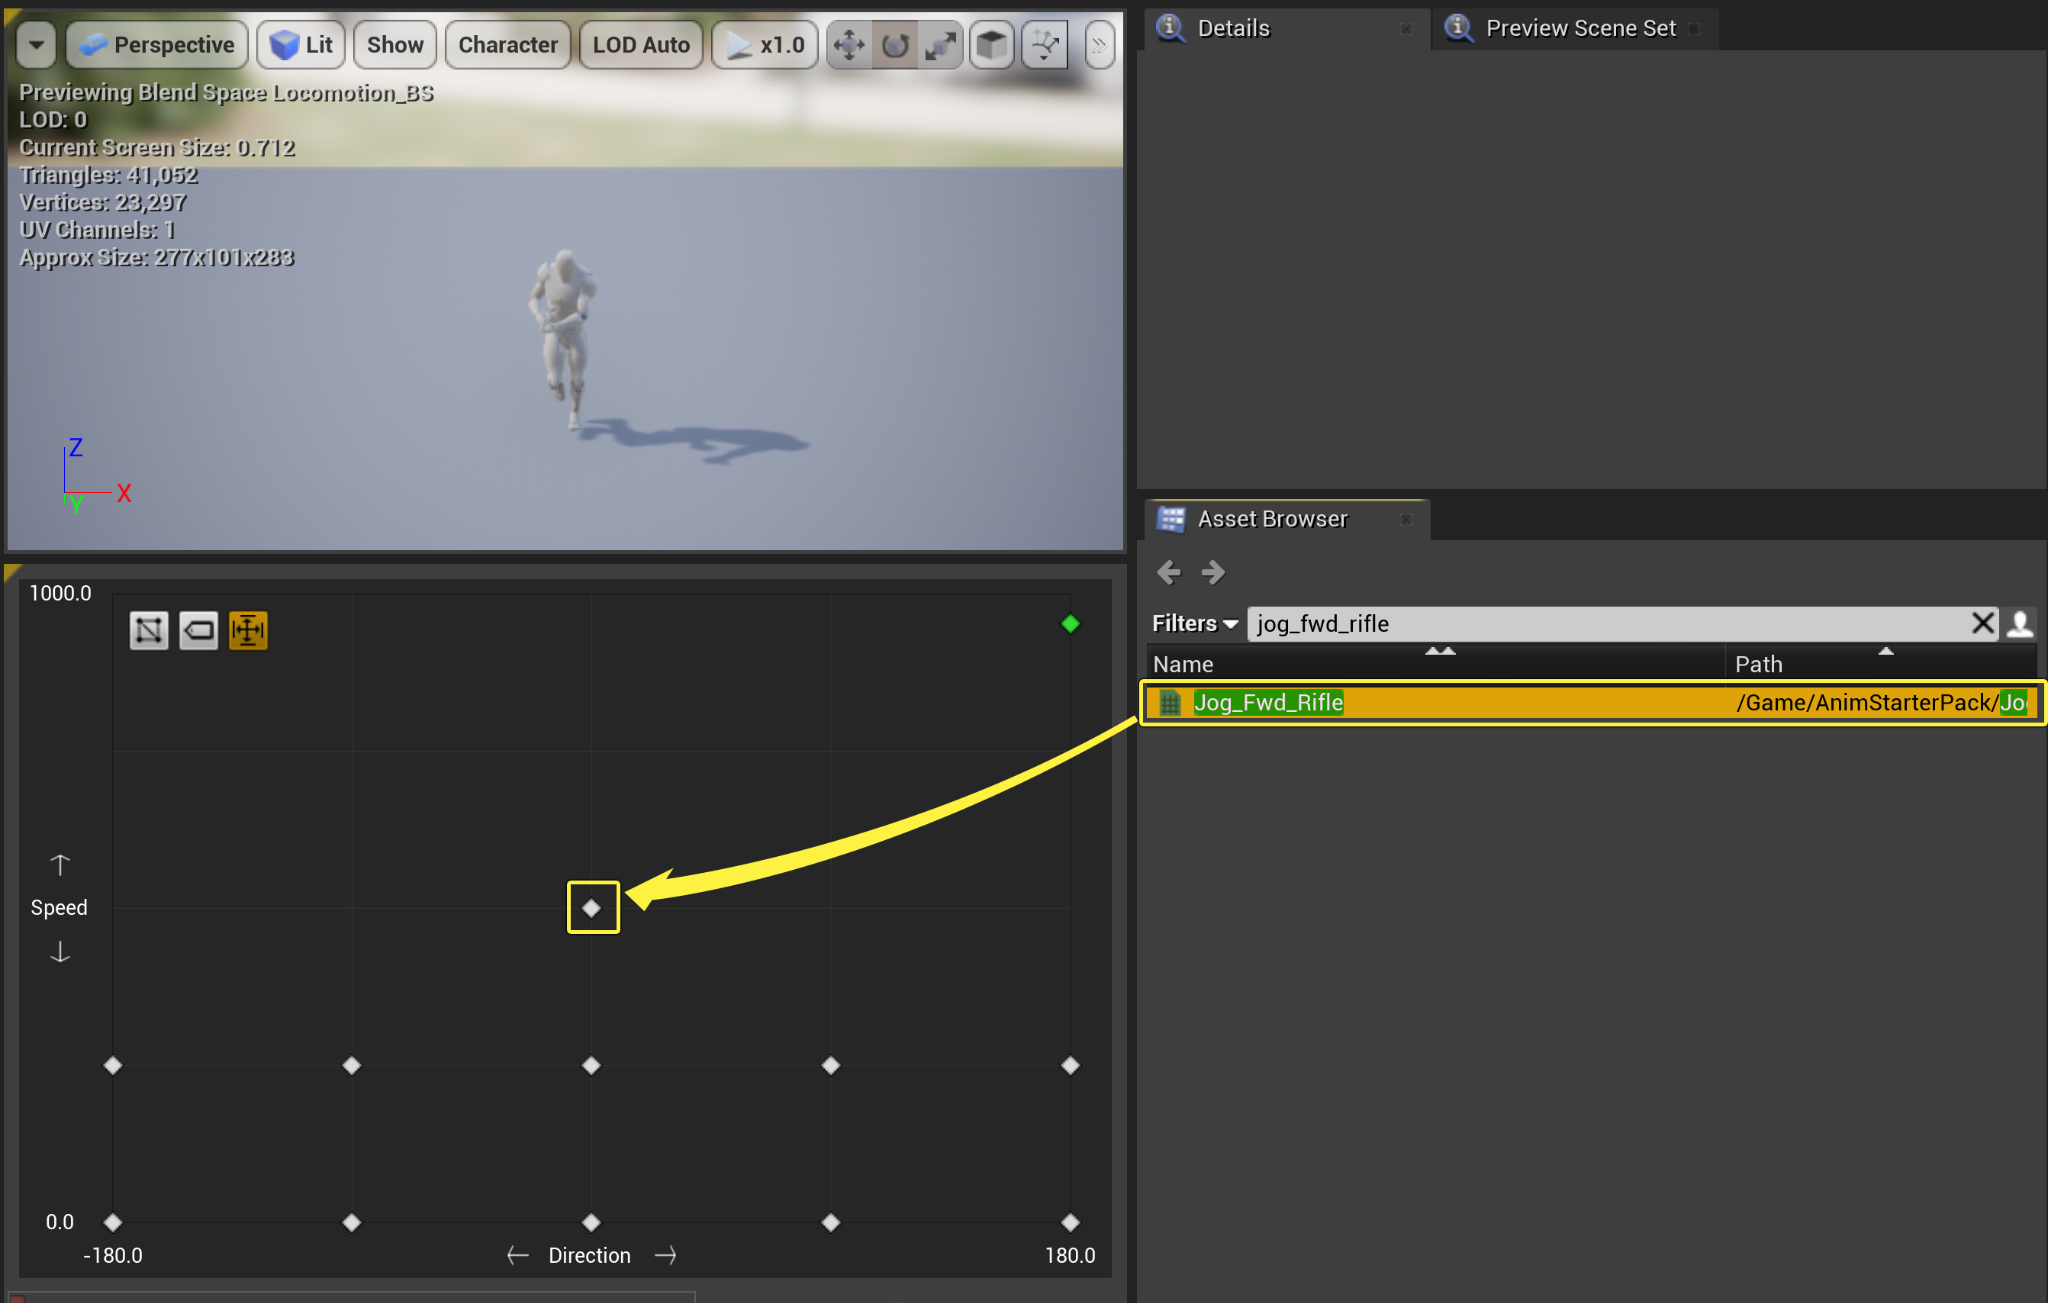
In the Asset Browser tab Filters search bar type Jog_Fwd_Rifle , then drag and drop the Jog_Fwd_Rifle asset into the Blend Space at Direction 0.0 , and Speed 500 .
![Add Jog Forward Rifle animation to Blend Space]()
Click image to expand.
-
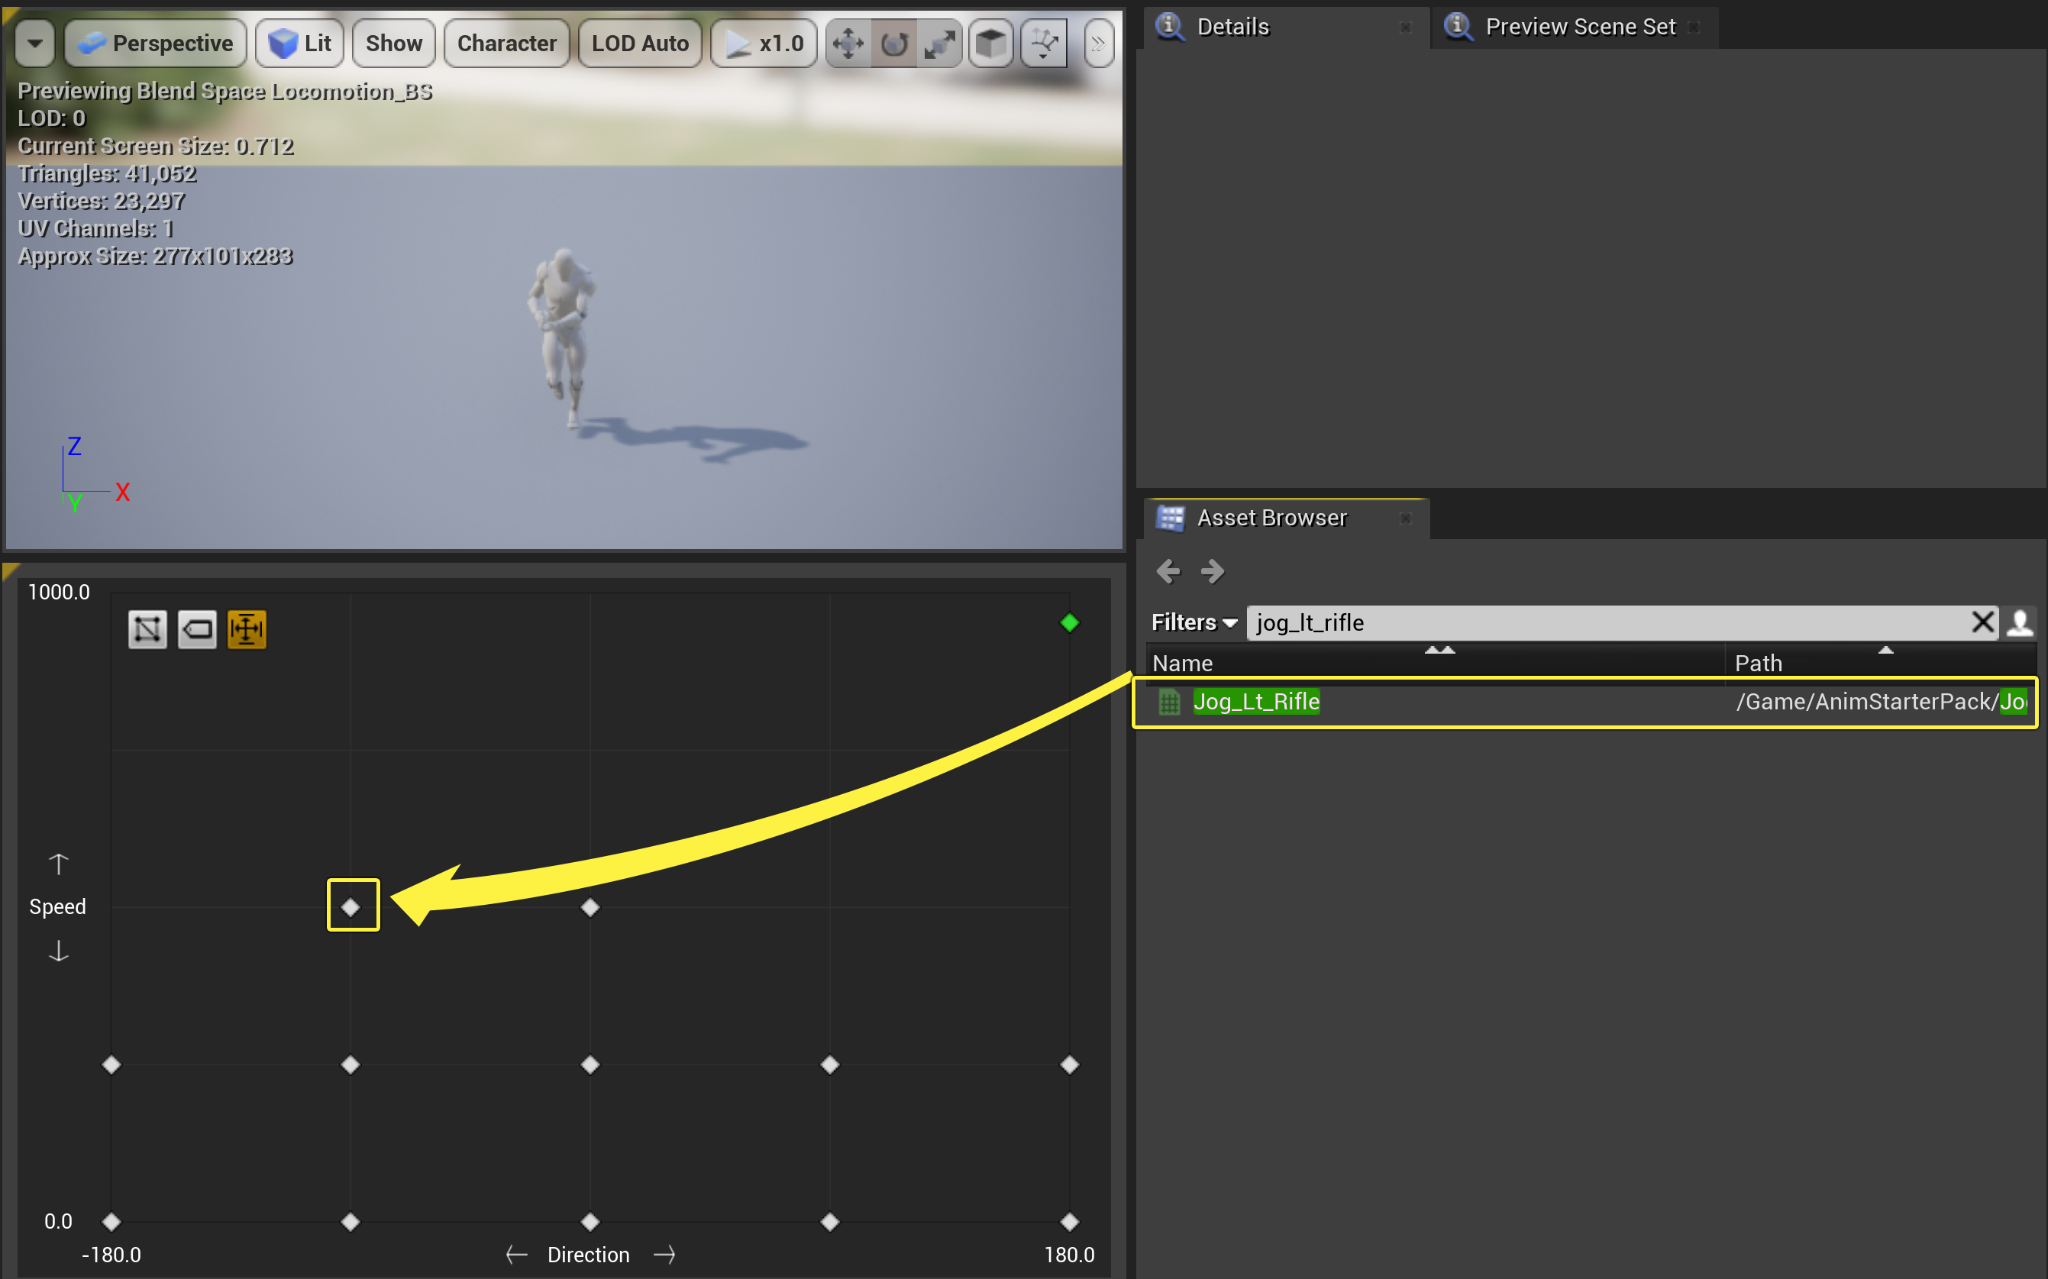
Navigate to the Asset Browser , then within the filters search bar type Jog_Lt_Rifle , then drag and drop the Jog_Lt_Rifle asset into the Blend Space at Direction -90 , and Speed 500 .
![Add Jog Left Rifle animation to Blend Space]()
Click image to expand.
-
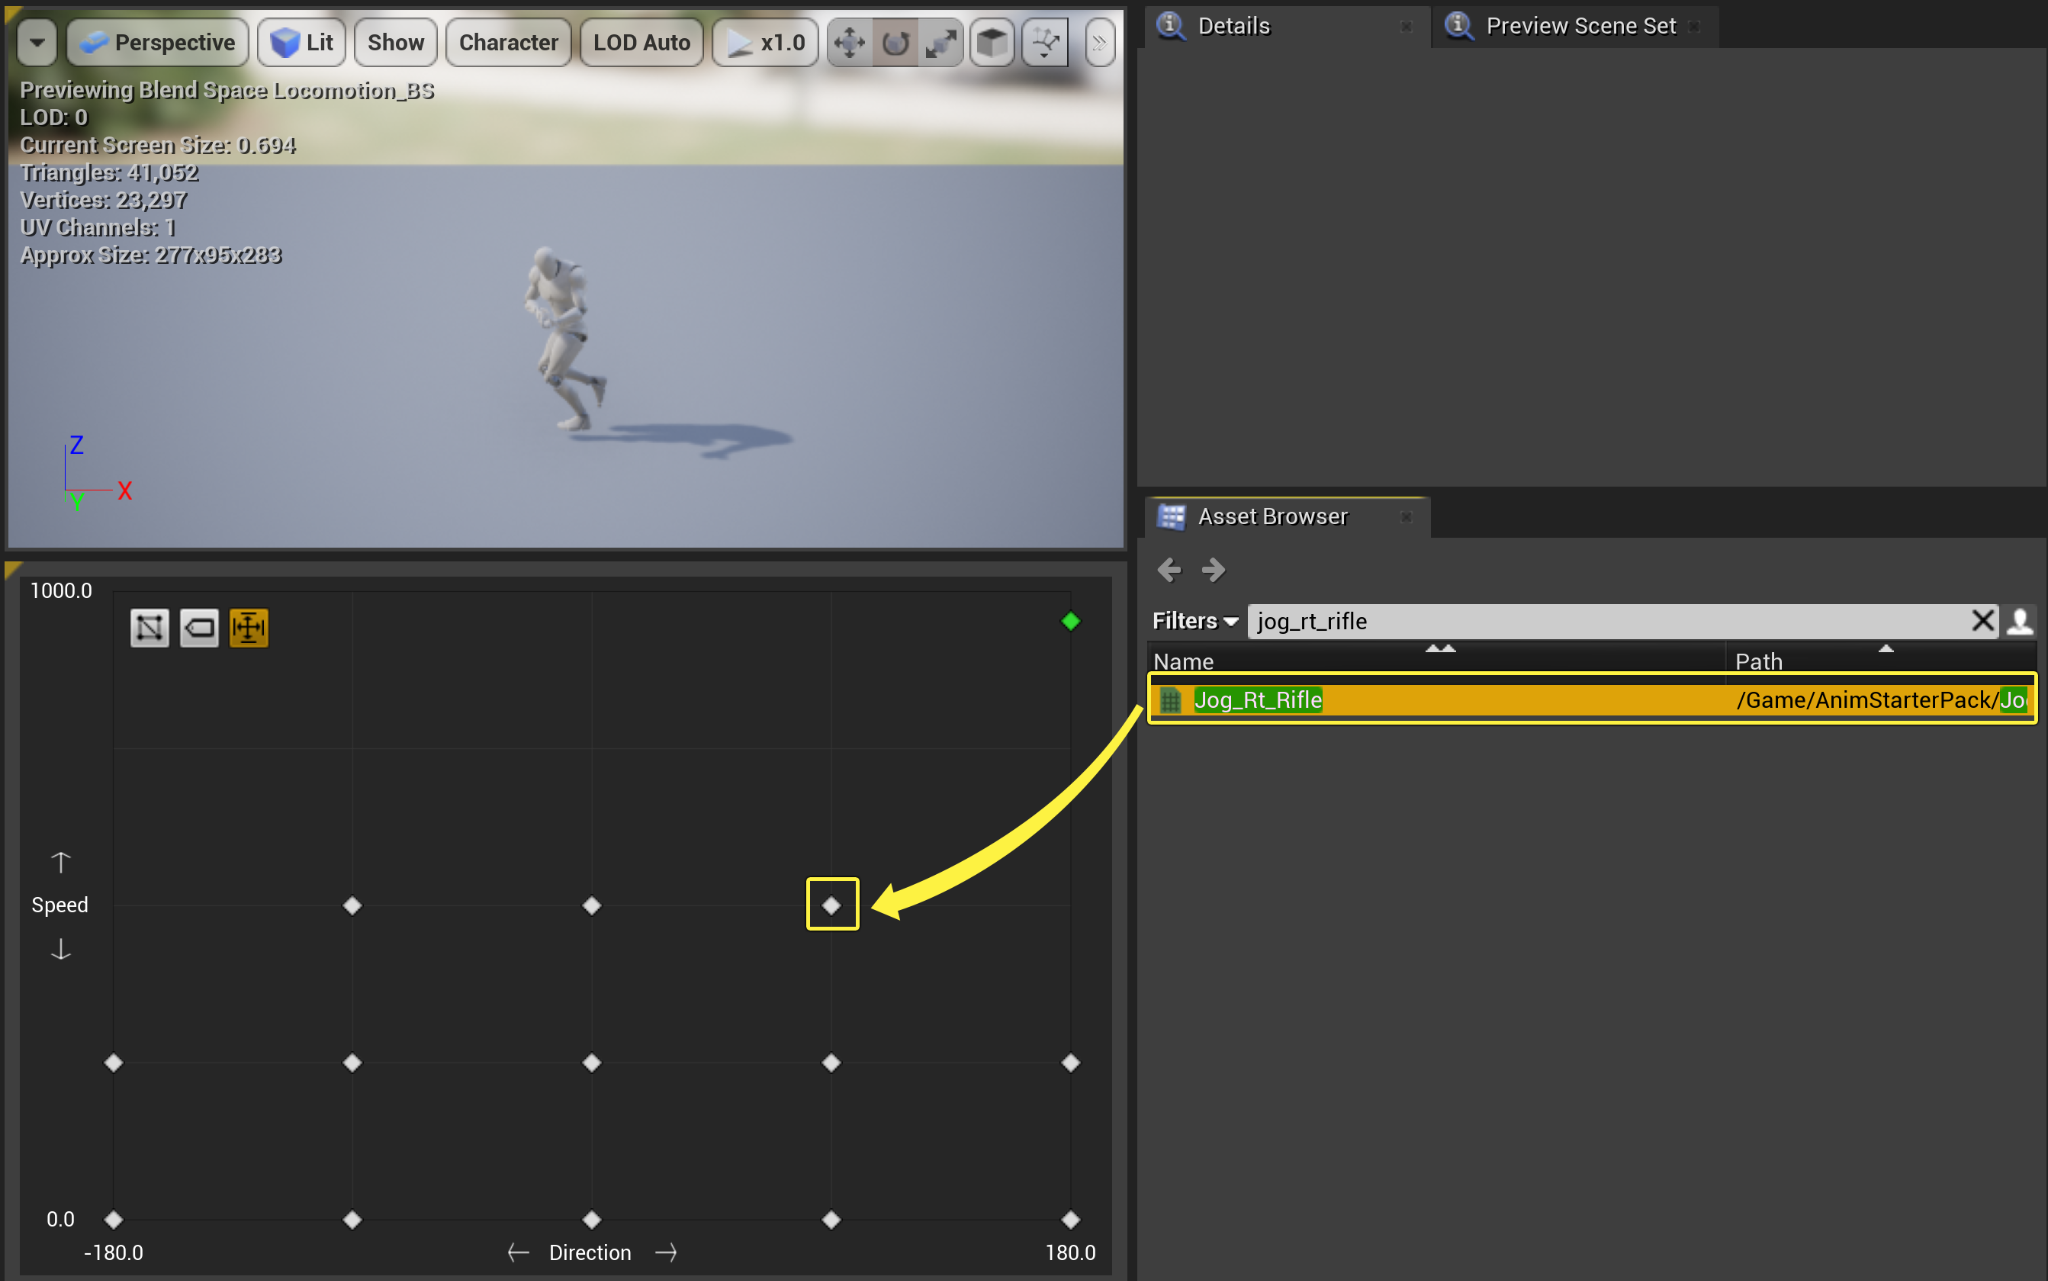
Navigate to the Asset Browser , then within the filters search bar type Jog_Rt_Rifle , then drag and drop the Jog_Rt_Rifle asset into the Blend Space at Direction 90 , and Speed 500 .
![Add Jog Right Rifle animation to Blend Space]()
Click image to expand.
-
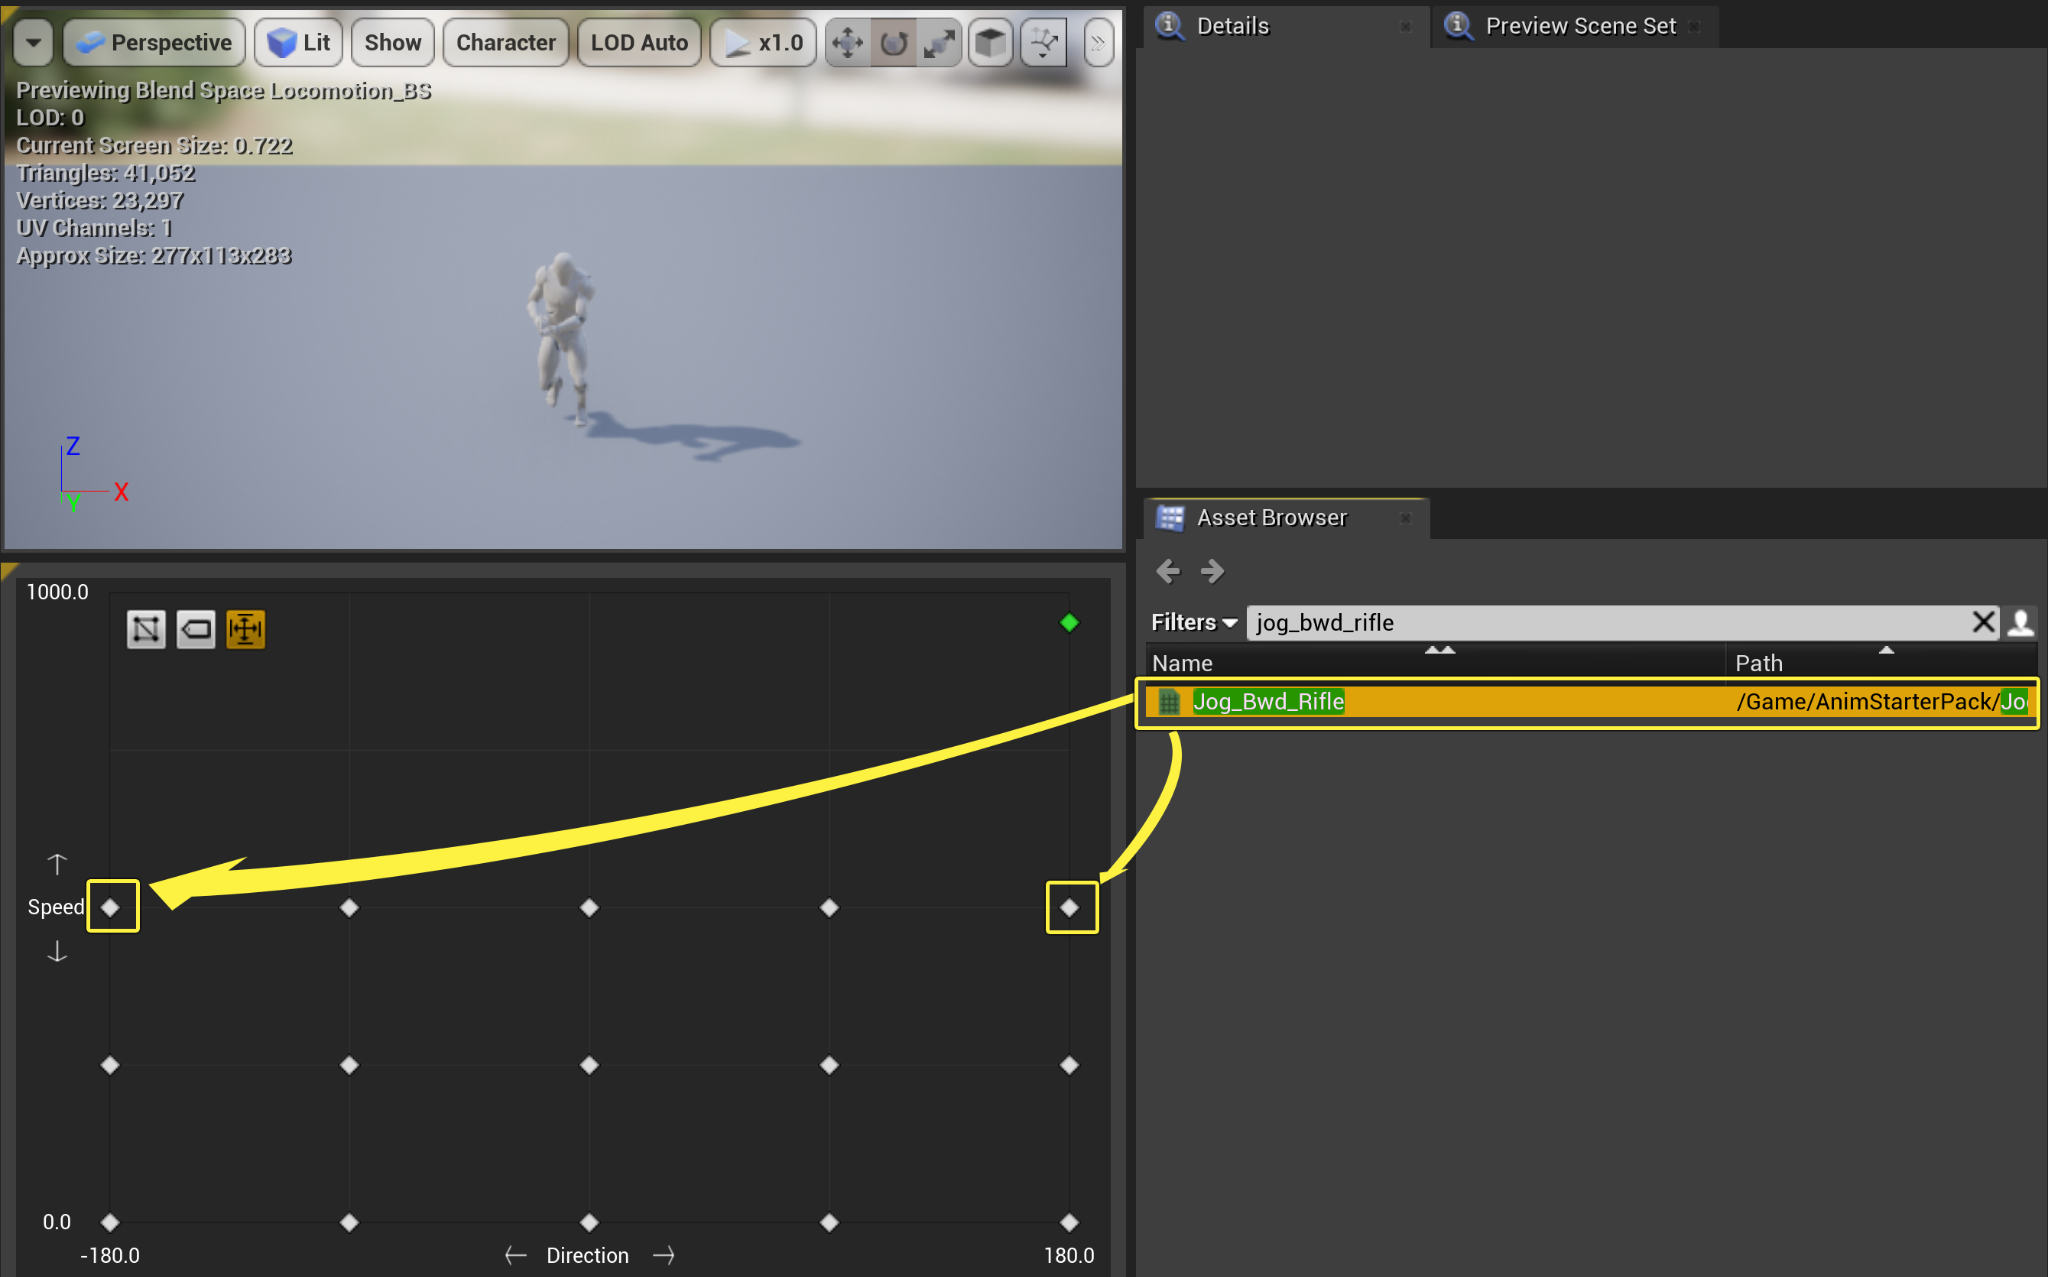
From the asset browser search bar filter type Jog_Bwd_Rifle_Ironsights , then drag and drop an Jog_Bwd_Rifle_Ironsights asset into the Blend Space at Direction 180 and Speed 500 , then drag an additional Jog_Bwd_Rifle_Ironsights at Direction -180 and Speed 500 .
![Add Jog Backward Rifle animation to Blend Space]()
Click image to expand.
-
Complete your Blend Space by navigating to the asset browser, search for and select Sprint_Fwd_Rifle_Ironsights , then drag and drop an Sprint_Fwd_Rifle_Ironsights asset into the Blend Space at Direction 0 and Speed 1000 ,
![Add Sprint Forward Rifle animation to Blend Space]()
Click image to expand.
-
Compile and Save .
![Compile and Save buttons]()


Your completed Locomotion_BS will look as shown in the image below!

Creating the Crouch Locomotion Blend Space
With your Locomotion Blend Space complete, you will now need to create your Crouch Locomotion Blend Space.
-
In the Content Browser , click Add/Import > Animation > BlendSpace , when prompted to pick a skeleton, choose the UE4_Mannequin_Skeleton , then name your Blend Space LocomotionCrouch_BS .
-
Double click to open the Locomotion_BS Blend Space. In the Asset Details tab , navigate to the Axis Settings category, then select the arrows adjacent to the Horizontal Axis and the Vertical Axis to see more variable details.
![Asset Details Axis settings]()
-
In the Horizontal Axis settings , change the Name variable to Direction , then set the Minimum Axis Value to -180 , and the Maximum Axis Value to 180 .
![Crouch Horizontal Axis settings]()
-
In the Vertical Axis Settings , change the Name variable to Speed , then set the Maximum Axis Value to 300.
![Crouch Vertical Axis settings]()
-
Repeat the previous steps from the Creating The Locomotion Blend Space section, and place your assets into the Blend Space at the values below.
Animation Asset Name
Speed
Direction
Crouch_Idle_Rifle_Hip
0
0, 90, -90, 180, -180
Crouch_Walk_Fwd_Rifle_Hip
300
0
Crouch_Walk_Lt_Rifle_Hip
300
-90
Crouch_Walk_Rt_Rifle_Hip
300
90
Crouch_Walk_Bwd_Rifle_Hip
300
180, -180
-
Save and Compile your LocomotionCrouch_BS
![Compile and Save buttons]()


Your completed LocomotionCrouch_BS Blend Space will look as shown in the image below.

Creating the Animation Blueprint
You will require an Animation Blueprint that will determine what character animations to play based on the current actions by the player. Additionally, you will need to set up a State Machine to create a Walk and Crouch state then set up the transitions between each of them.
-
In the Content Browser , click Add/Import > Animation > Animation Blueprint , and when prompted to pick a skeleton, choose the UE4_Mannequin_Skeleton , then name your Animation Blueprint PlayerCharacter_AB .
![Create Animation Blueprint]()
-
Double-click PlayerCharacter_AB to open the Animation Blueprint. In the My Blueprint tab , navigate to the Variables category and select the adjacent + sign to create two boolean variables named Is Crouched and Is Jumping .
![Is Crouched and Is Jumping variables]()
-
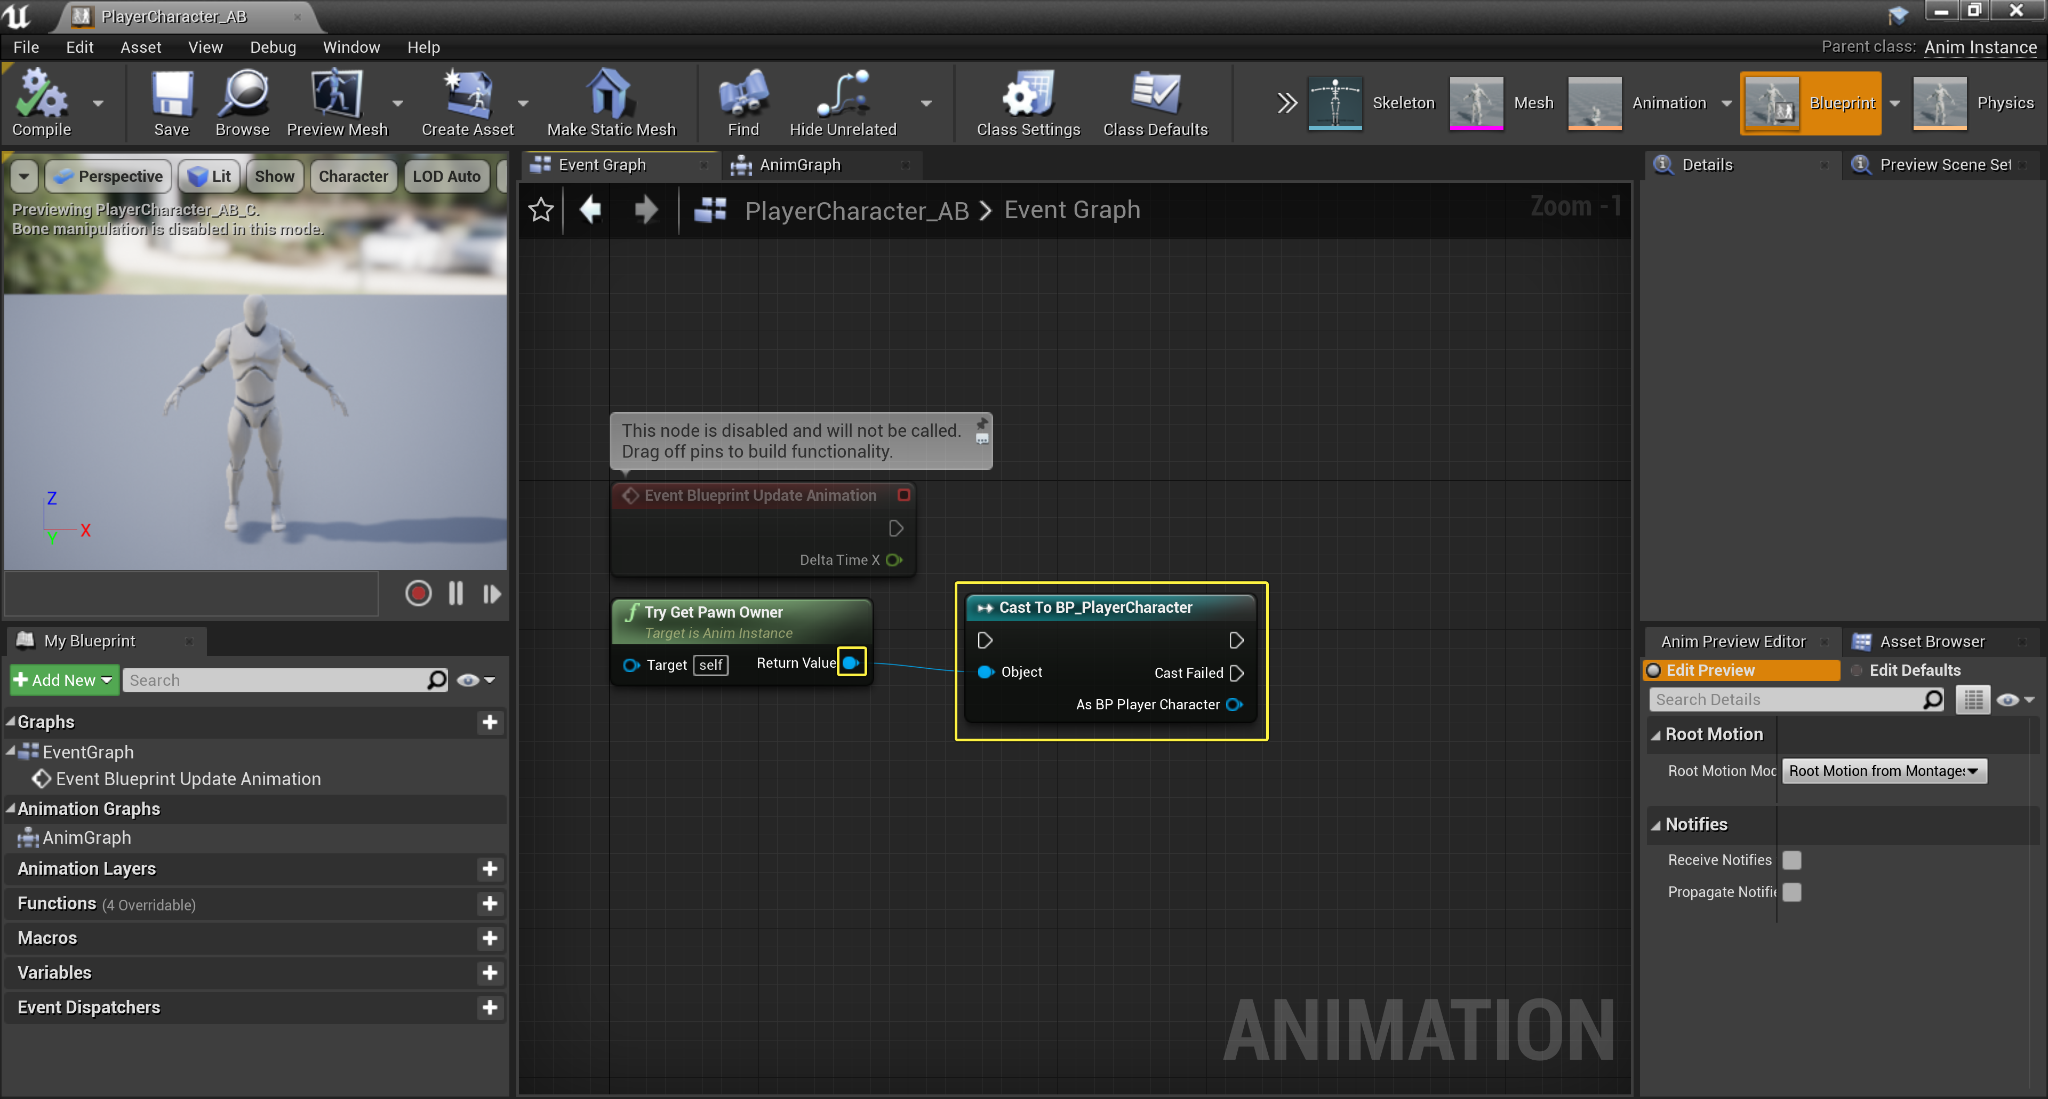
Click the Event Graph tab, then drag off from the Return Value pin of the Try Get Pawn Owner node, then from the drop down menu search for and select Cast to BP_PlayerCharacter.
![Cast to Blueprint Player Character]()
Click image to expand.
-
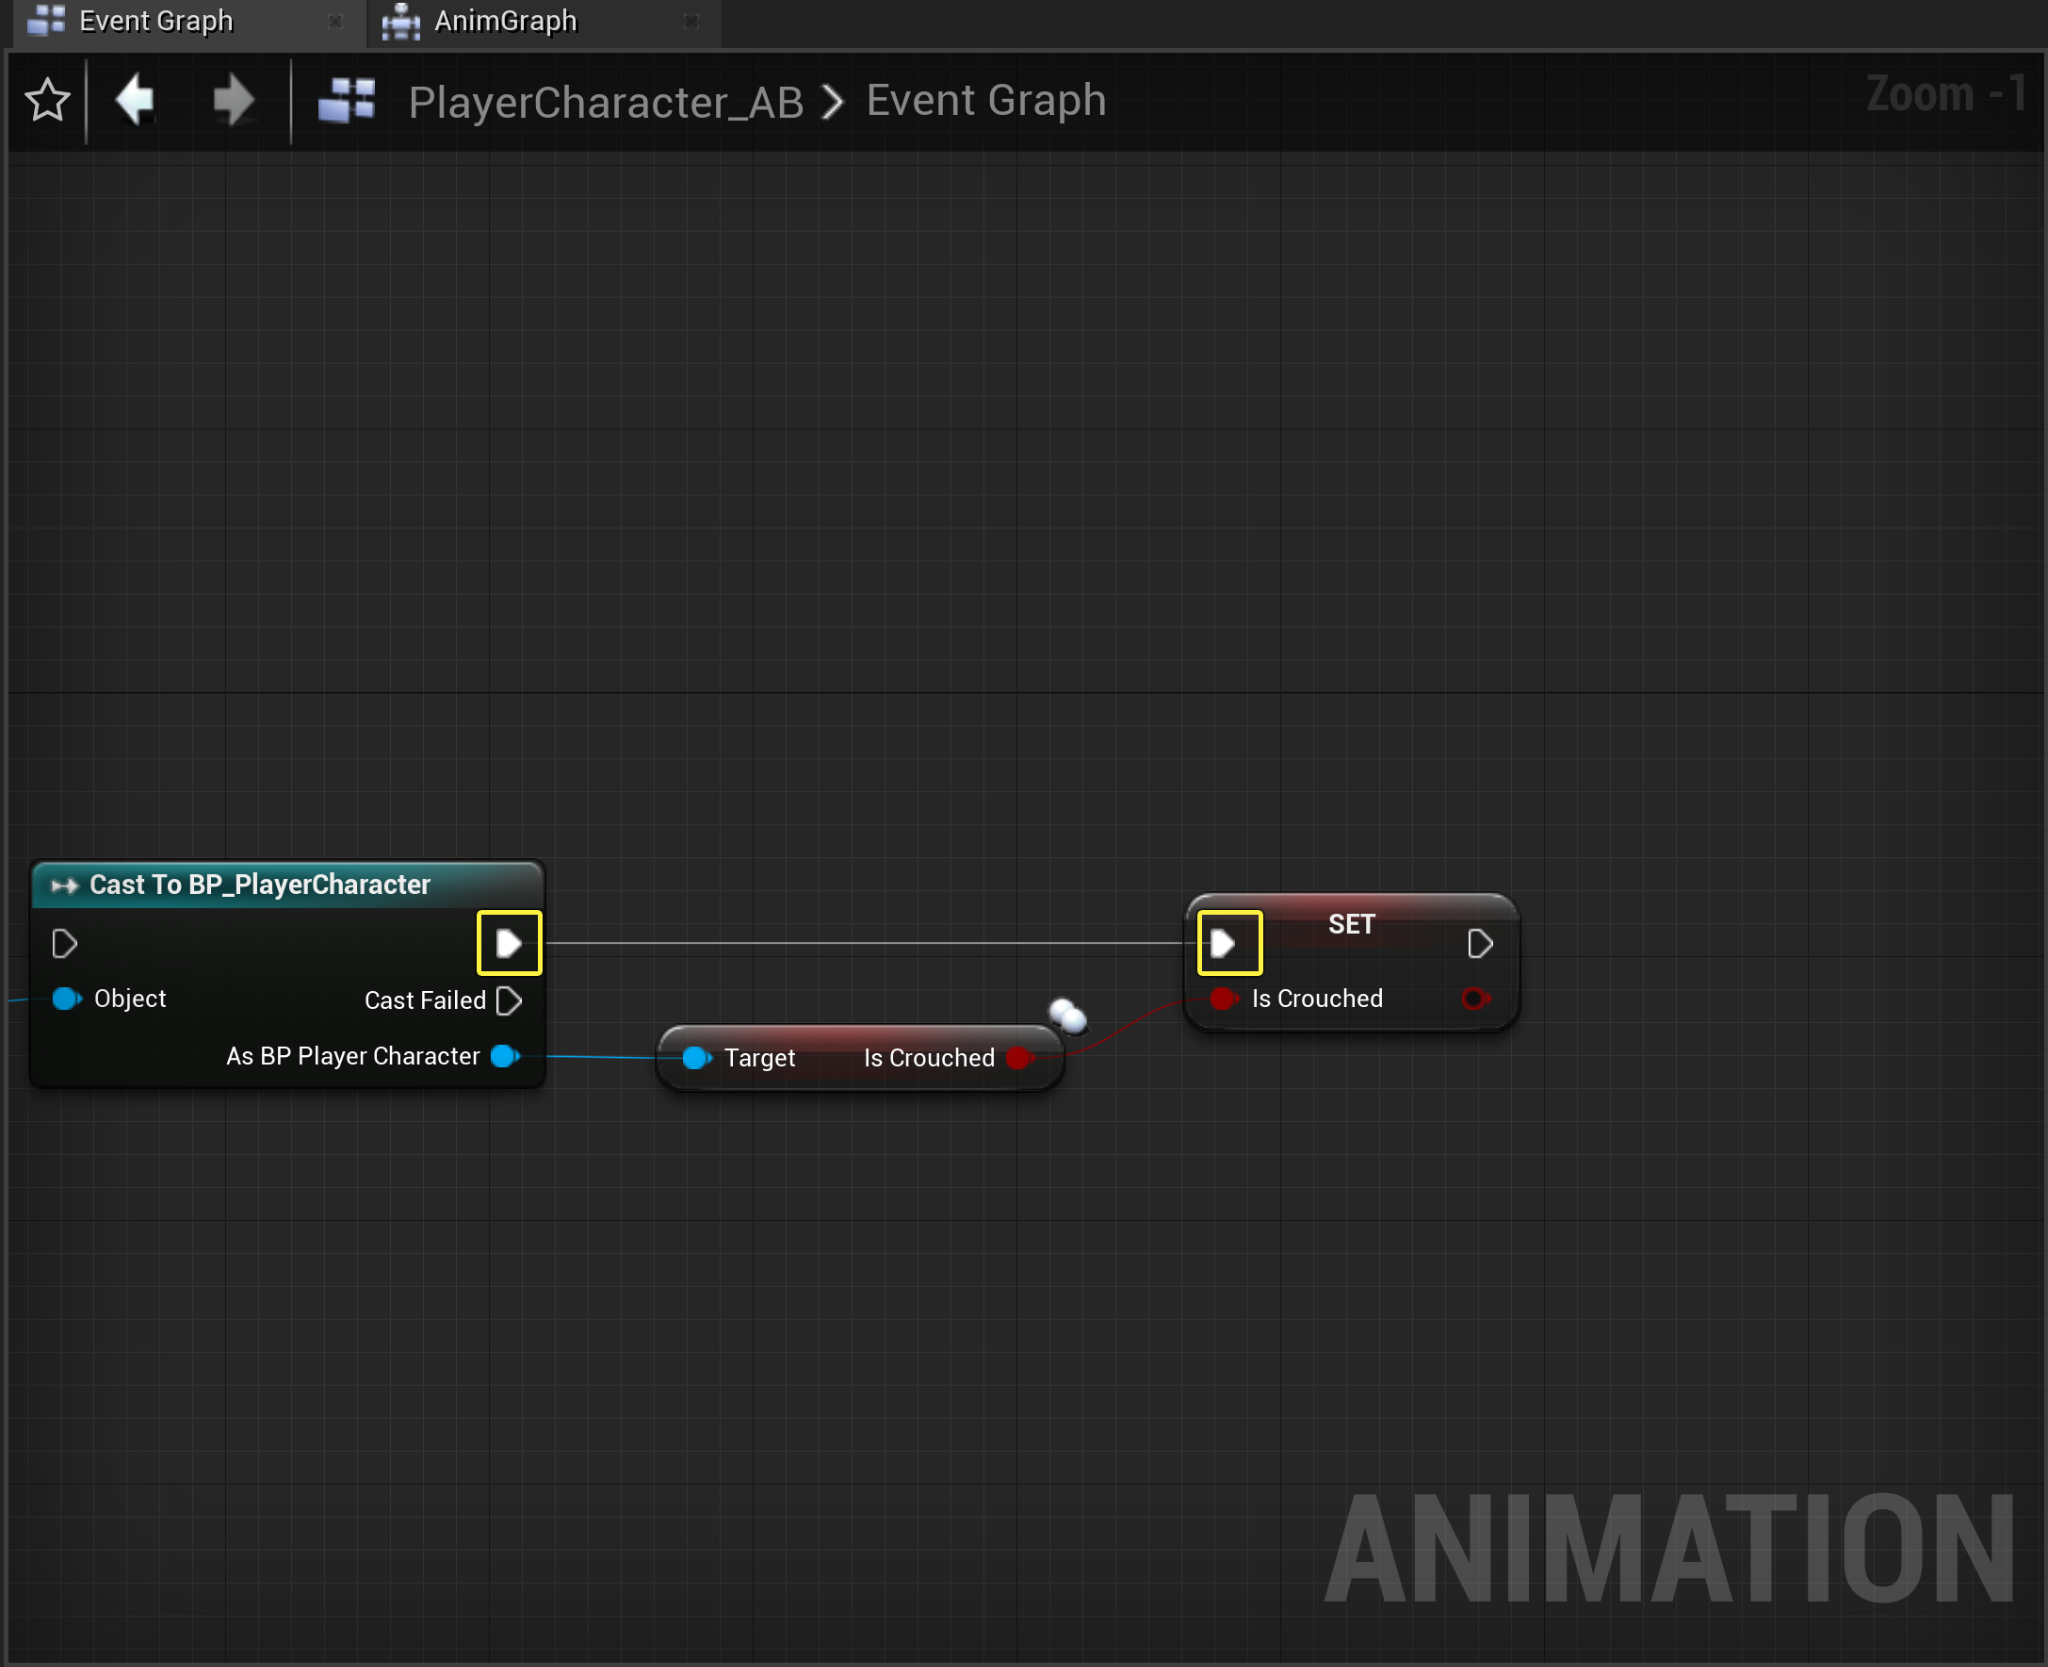
Drag off from the As BP_PlayerCharacter return pin of the Cast to BP_PlayerCharacter node, then search for and select Get Is Crouched .
![Get Is Crouched]()
-
Navigate to the My Blueprint tab , then from the variables category drag and drop the Is Crouched variable on to the return pin of the Get Is Crouched node.
![Connect Is Crouched variable to node]()
Click image to expand.
-
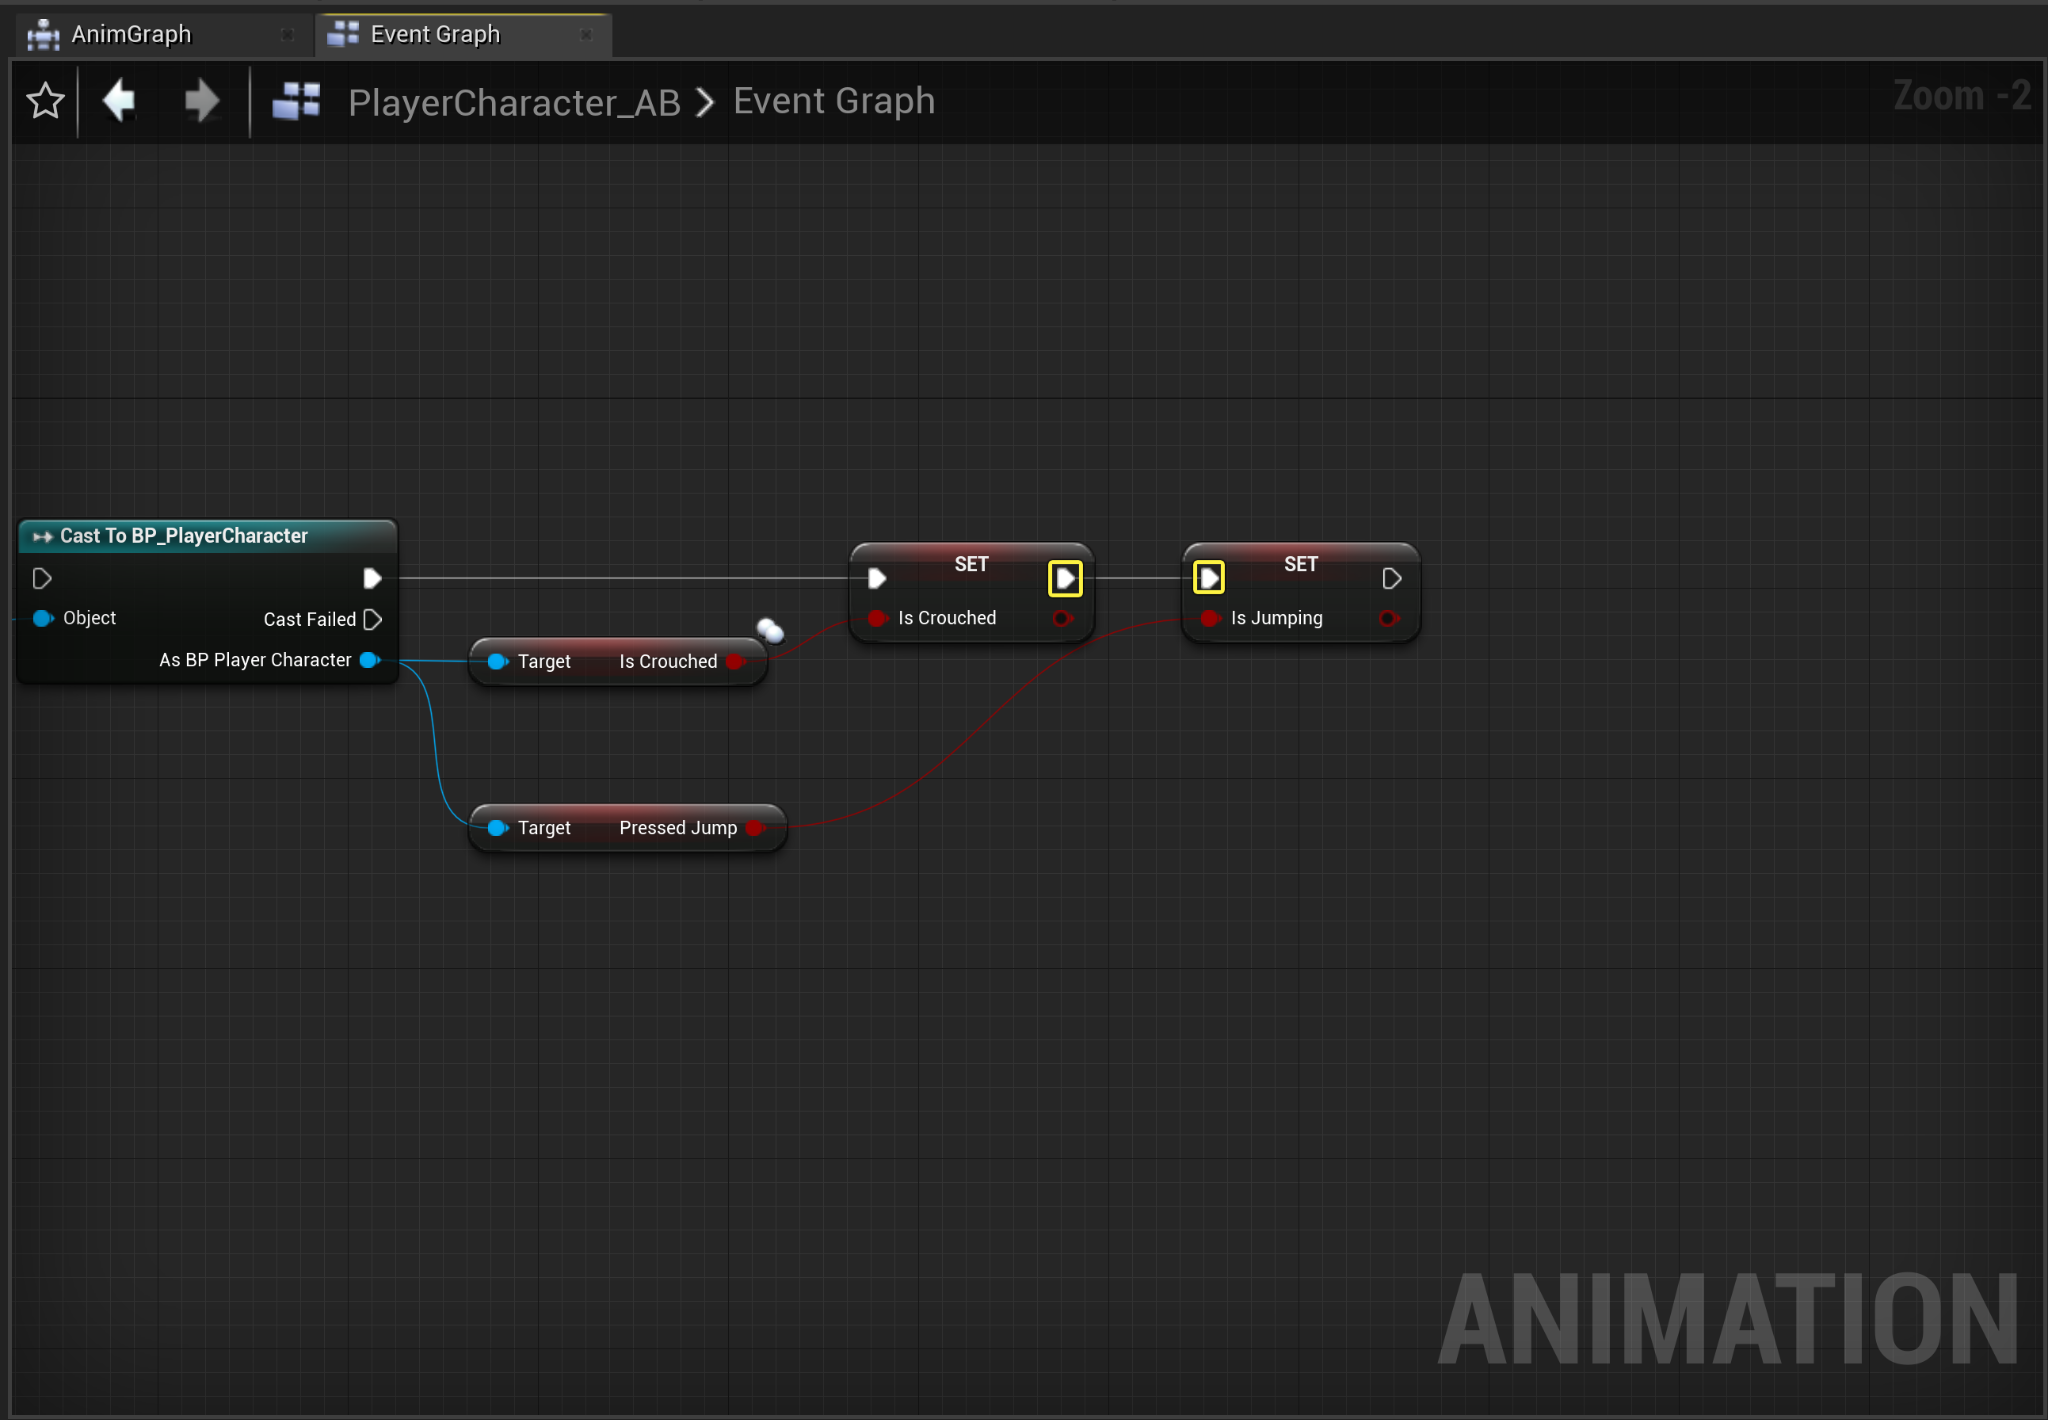
Drag off from the Cast To BP_PlayerCharacter 's Output execution pin , and connect it to the Input execution pin of the Set Is Crouched node.
![Connect to Set Is Crouched]()
Click image to expand.
-
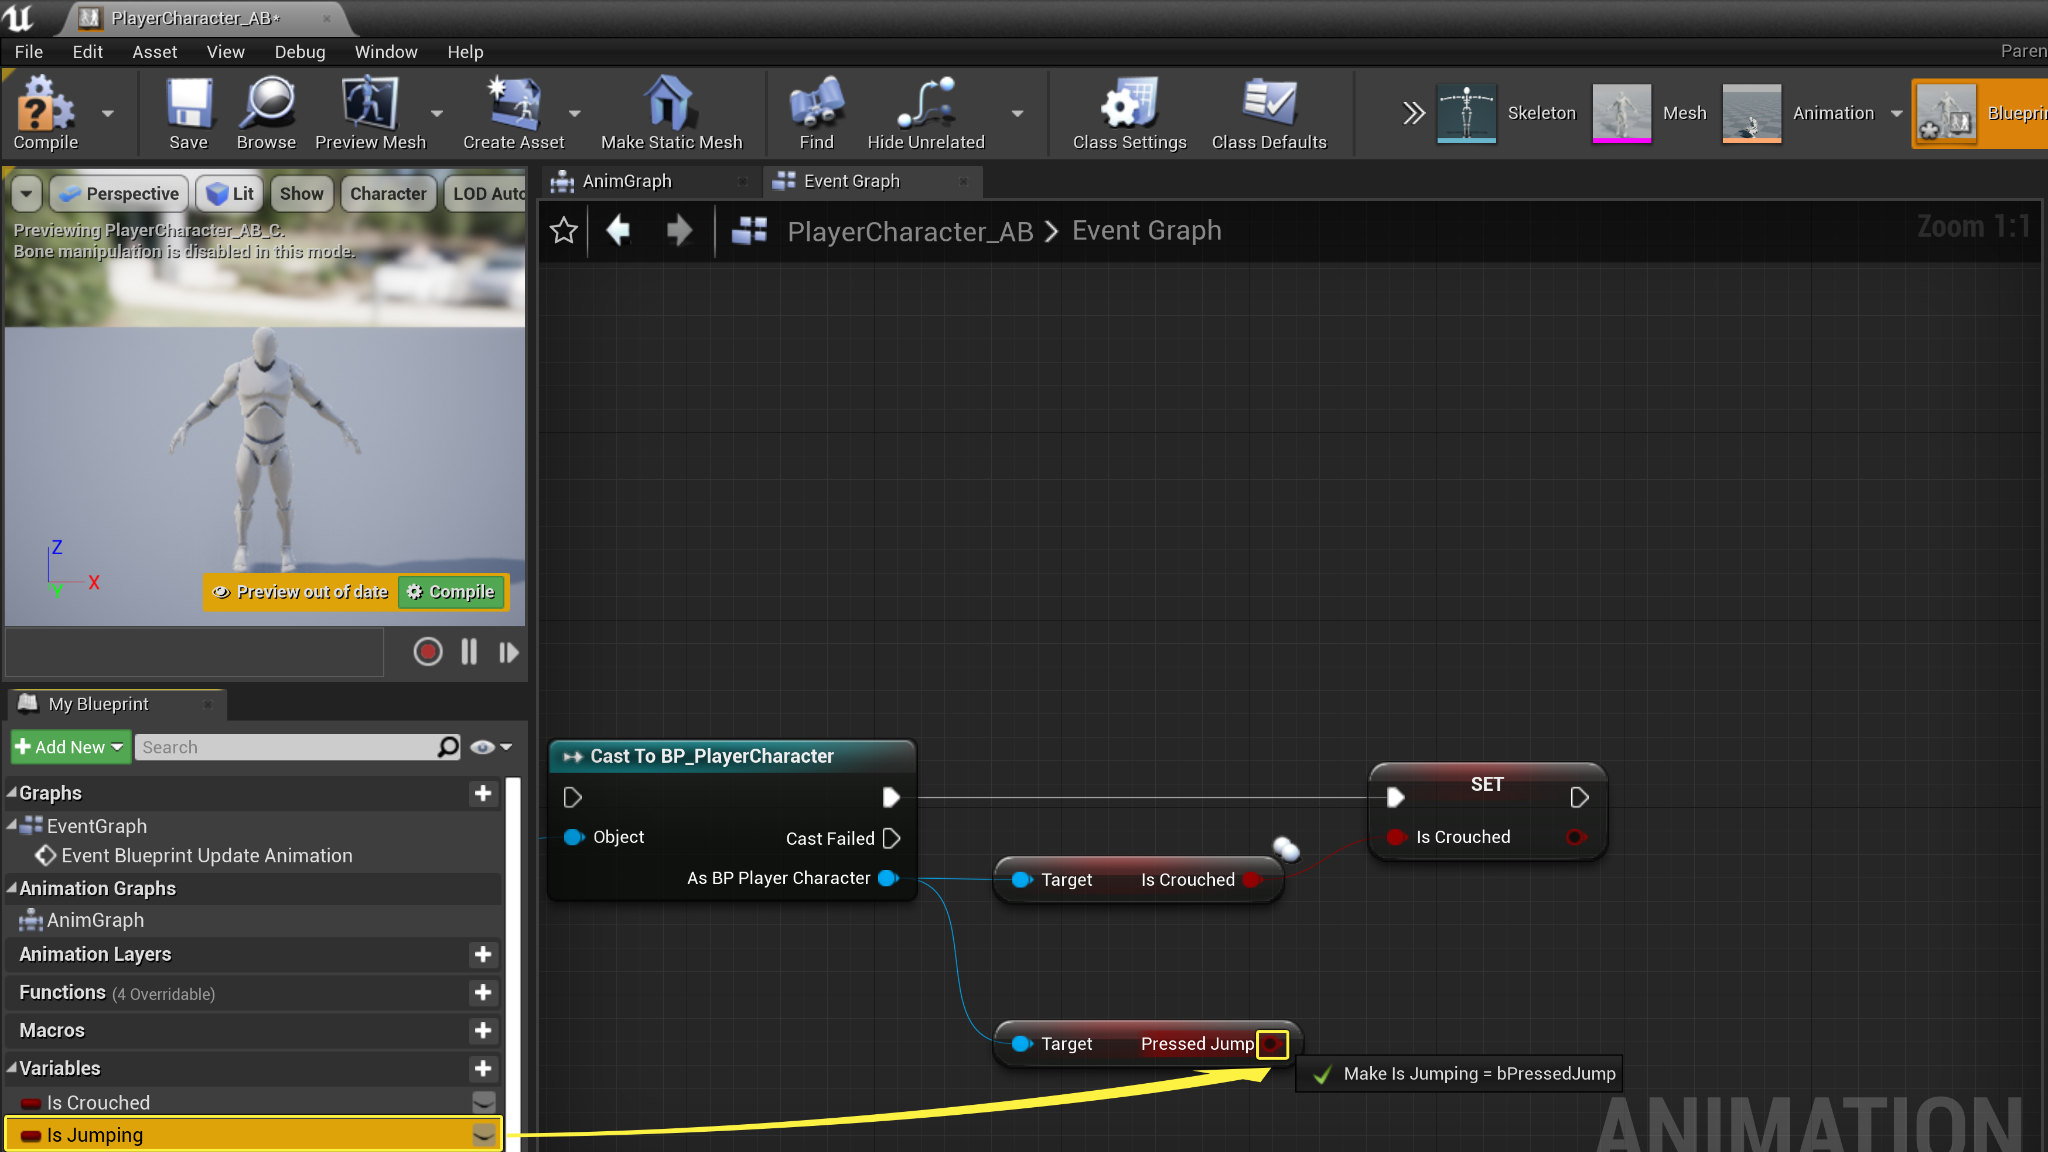
Drag off from the As BP_PlayerCharacter return pin of the Cast to BP_PlayerCharacter node, then from the All Actions drop down menu search for and select Get Pressed Jump.
![Add Get Pressed Jump action]()
-
From the MyBlueprint tab , navigate to the variables category , then drag and drop the Is Jumping variable on to the return pin of the Get Pressed Jump node.
![Connect Is Jumping variable]()
Click image to expand.
-
Drag off from the Set Is Crouched node Output execution pin , and connect it to the Input execution pin of the Set Is Jumping node.
![Connect Set Is Crouched to Set Is Jumping]()
Click image to expand.
-
Compile and Save your PlayerCharacter_AB Animation Blueprint.
![Compile and Save buttons]()
-
From the Variables category select the adjacent + sign to create two float variables named Speed and Direction .
![Create Speed and Direction variables]()
-
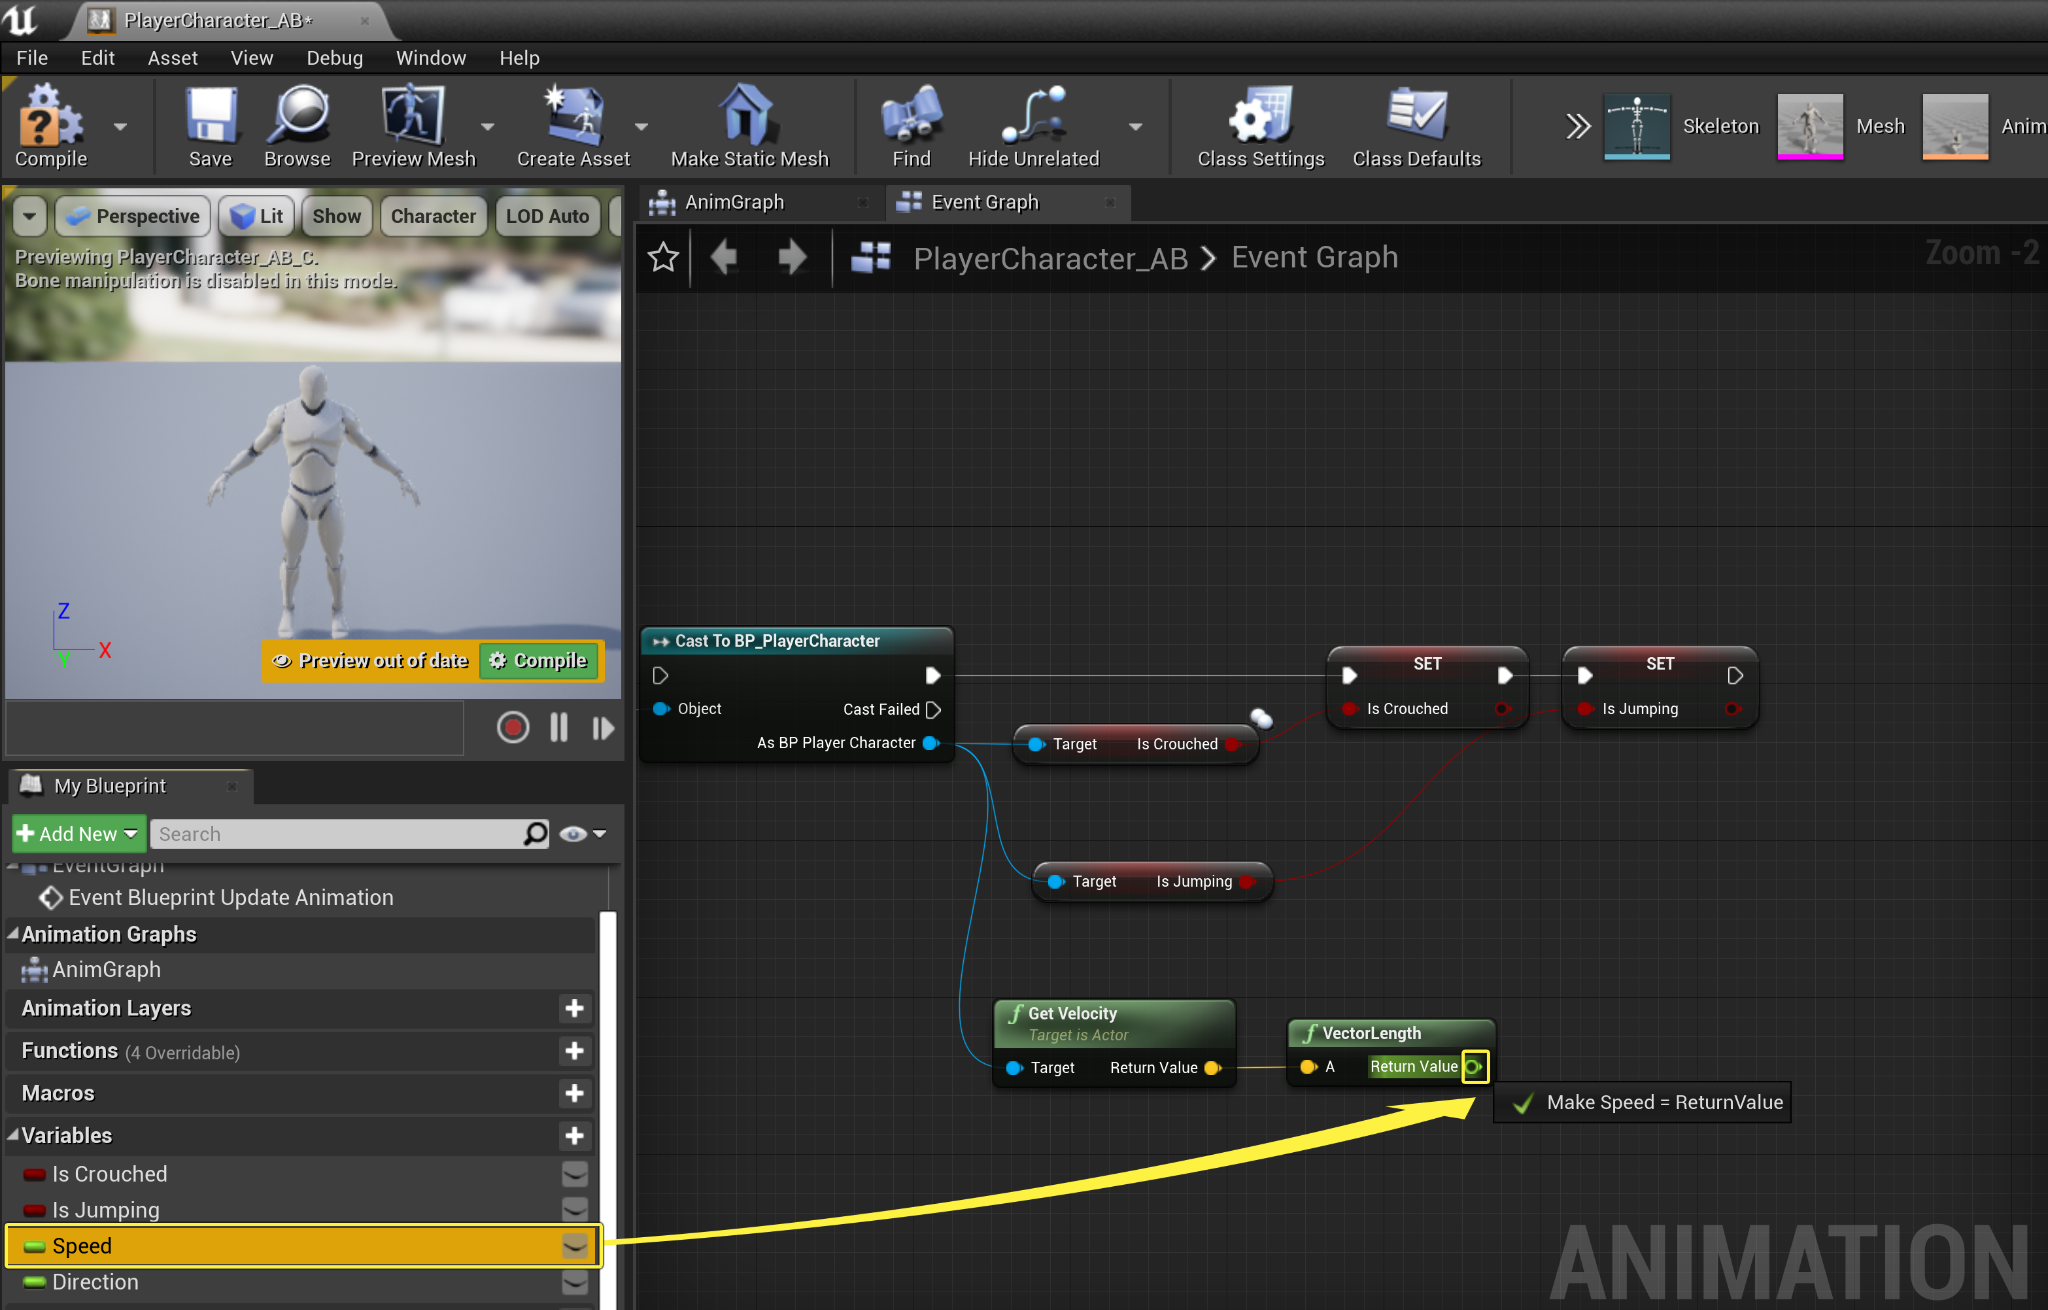
Drag off from the As BP_PlayerCharacter return pin of the Cast to BP_PlayerCharacter node, then click to enable the context sensitive box, and search for and select Get Velocity .
![Context-sensitive Get Velocity node]()
-
Drag off from the Get Velocity node's Return Value pin, and from the Actions drop down menu, search for and select Vector Length.
![Add Vector Length node]()
-
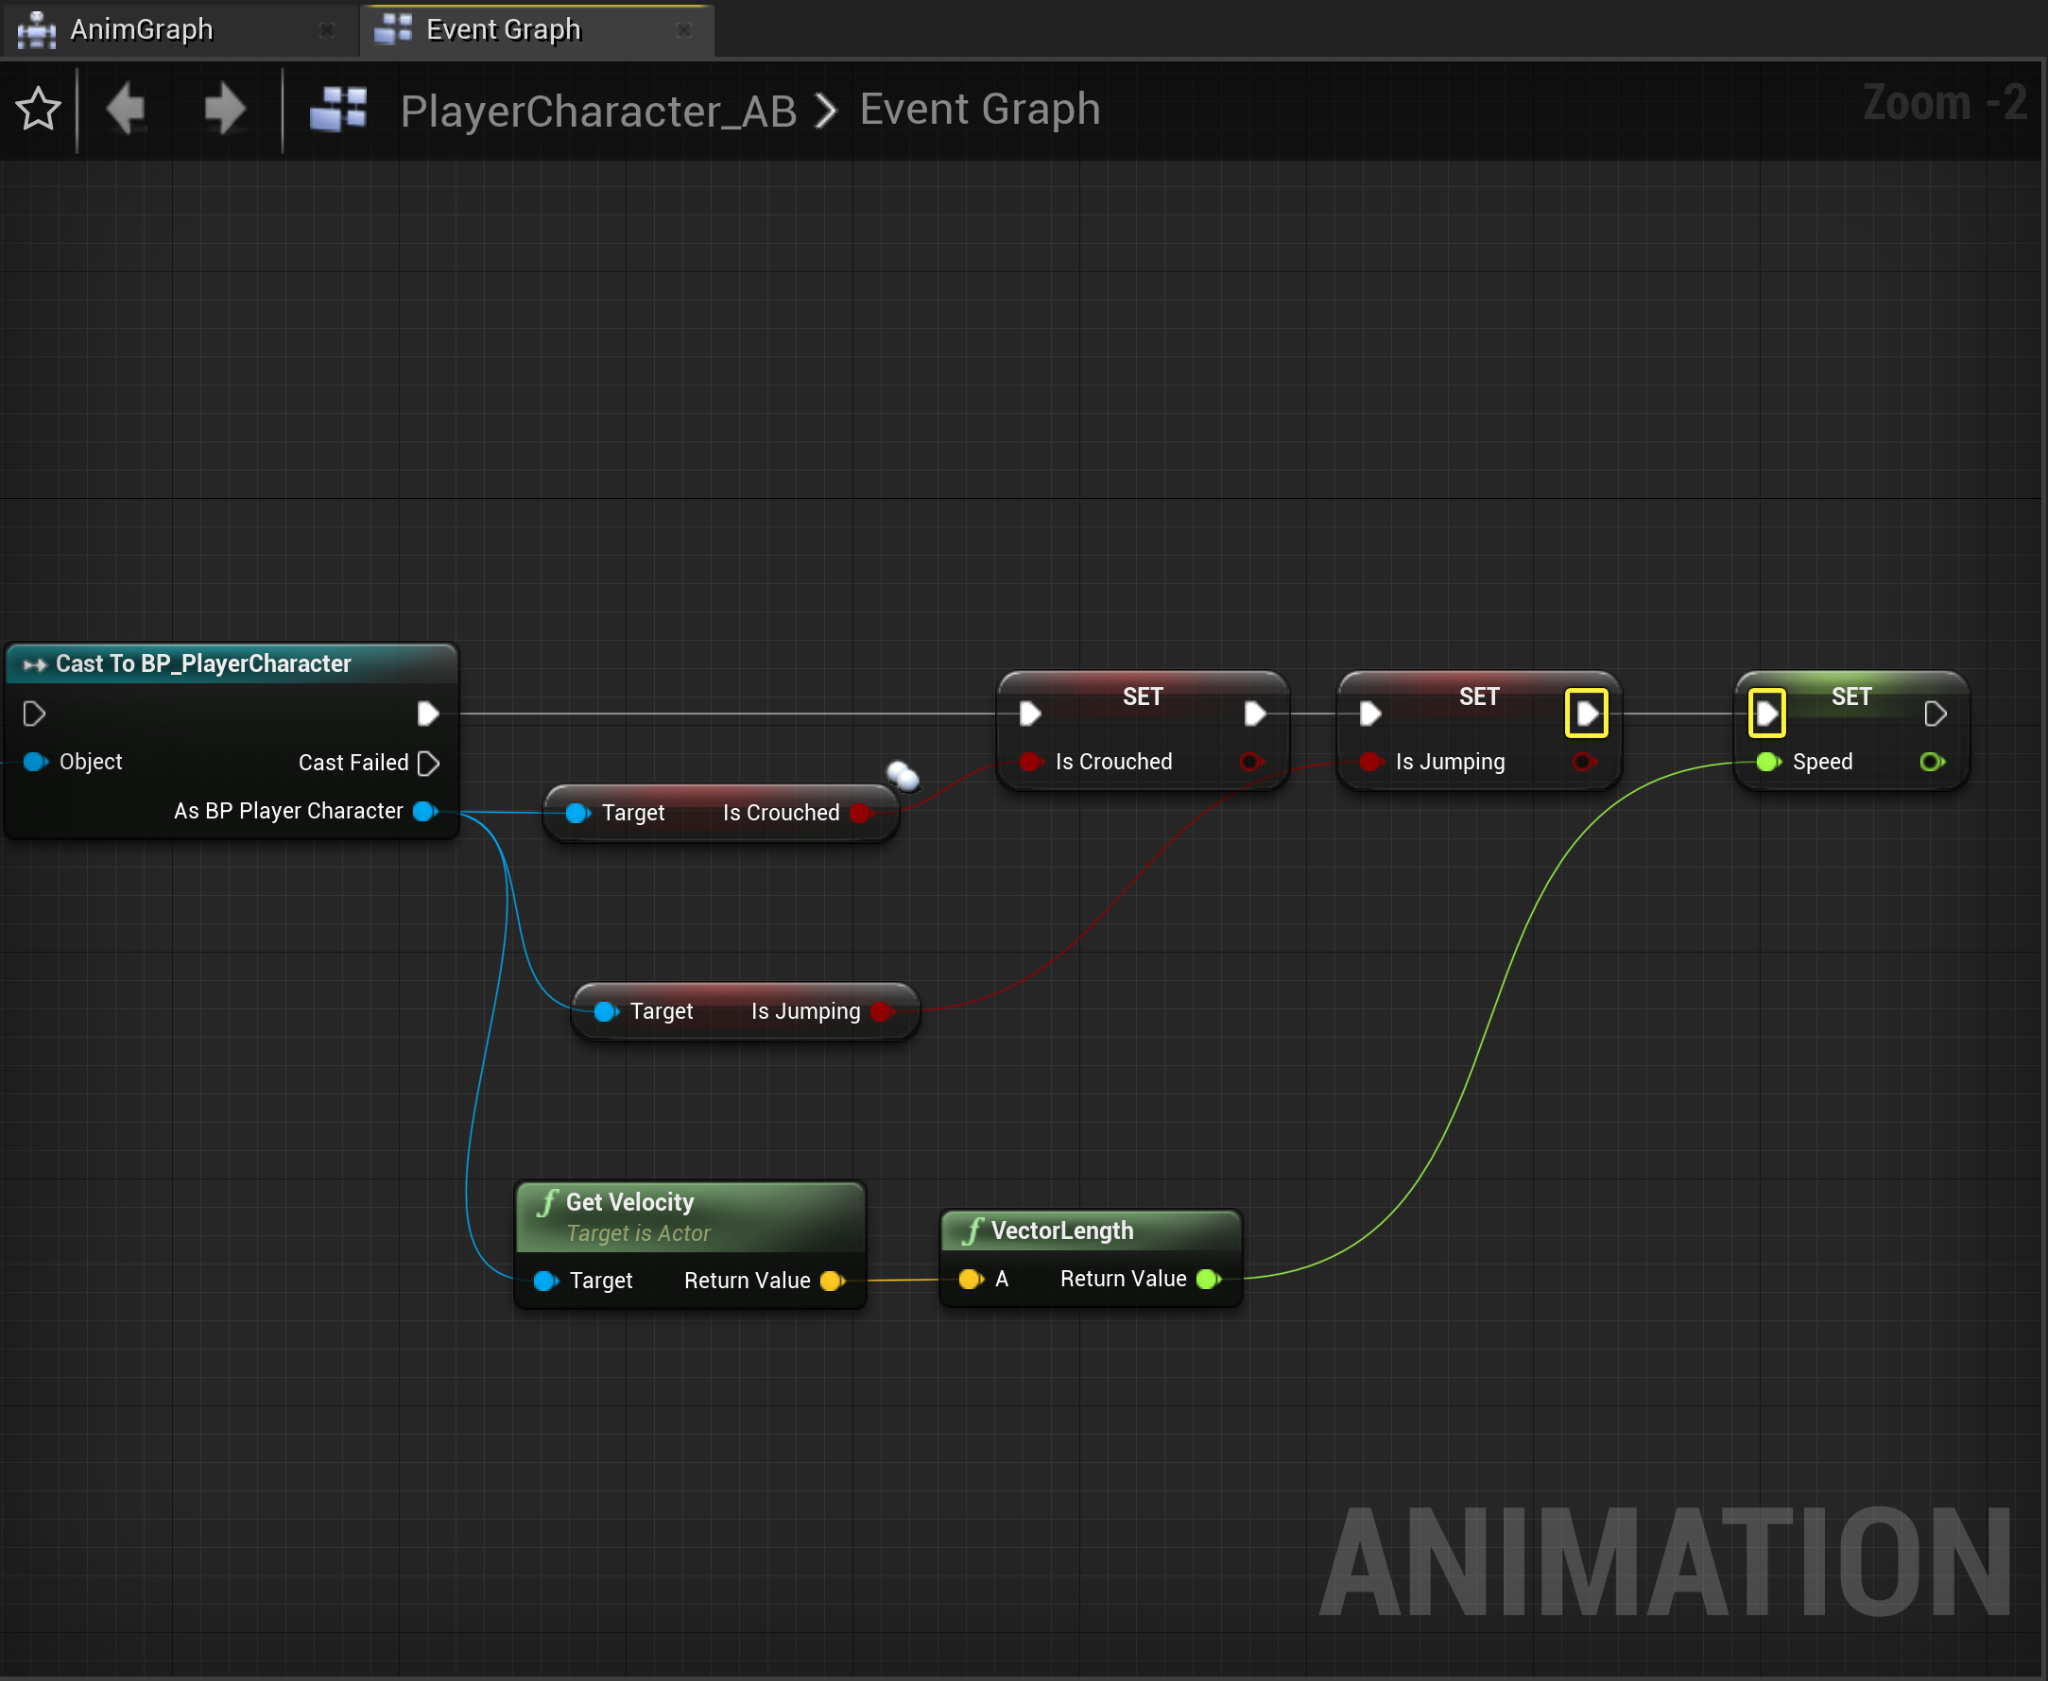
In the My Blueprint tab, drag and drop the Speed variable on to the vector Return Value pin of the Vector Length node.
![Connect Speed variable to Vector Length]()
Click image to expand.
-
Next, connect the Execution output pin of the Set Is Jumping node to the execution input pin of the Set Speed node.
![Connect Set Is Jumping to Set Speed]()
Click image to expand.
-
Drag off from the As BP_PlayerCharacter return pin of the Cast to BP_PlayerCharacter node, then search for and select Get Actor Rotation .
![Add Get Actor Rotation node]()
-
Drag off from the GetActorRotation node's rotator return value pin and from the drop down Actions menu, search for and select Calculate Direction .
![Add Calculate Direction node]()
-
Next, drag off from the vector Return Value pin of the Get Velocity node, and plug it into the Velocity input pin from the Calculate Direction node.
![Connect Get Velocity to Calculate Direction]()
Click image to expand.
-
From the My Blueprint tab, click and drag the Direction variable and drop it onto the float Return Value pin of the Calculate Direction node.
![Connect Direction variable to Calculate Direction node]()
Click image to expand.
-
Next, connect the Execution output pin from the Set Speed node to the execution input pin of the Set Direction node.
![Connect Set Speed to Set Direction]()
Click image to expand.
-
Drag off from the Event Blueprint Update Animation node's execution output pin and connect it to the Cast To BP_PlayerCharacter node.
![Connect Update Animation to Cast to Player Character]()
Click image to expand.
-
Compile and Save your PlayerCharacter_AB Animation Blueprint .
![Compile and Save buttons]()


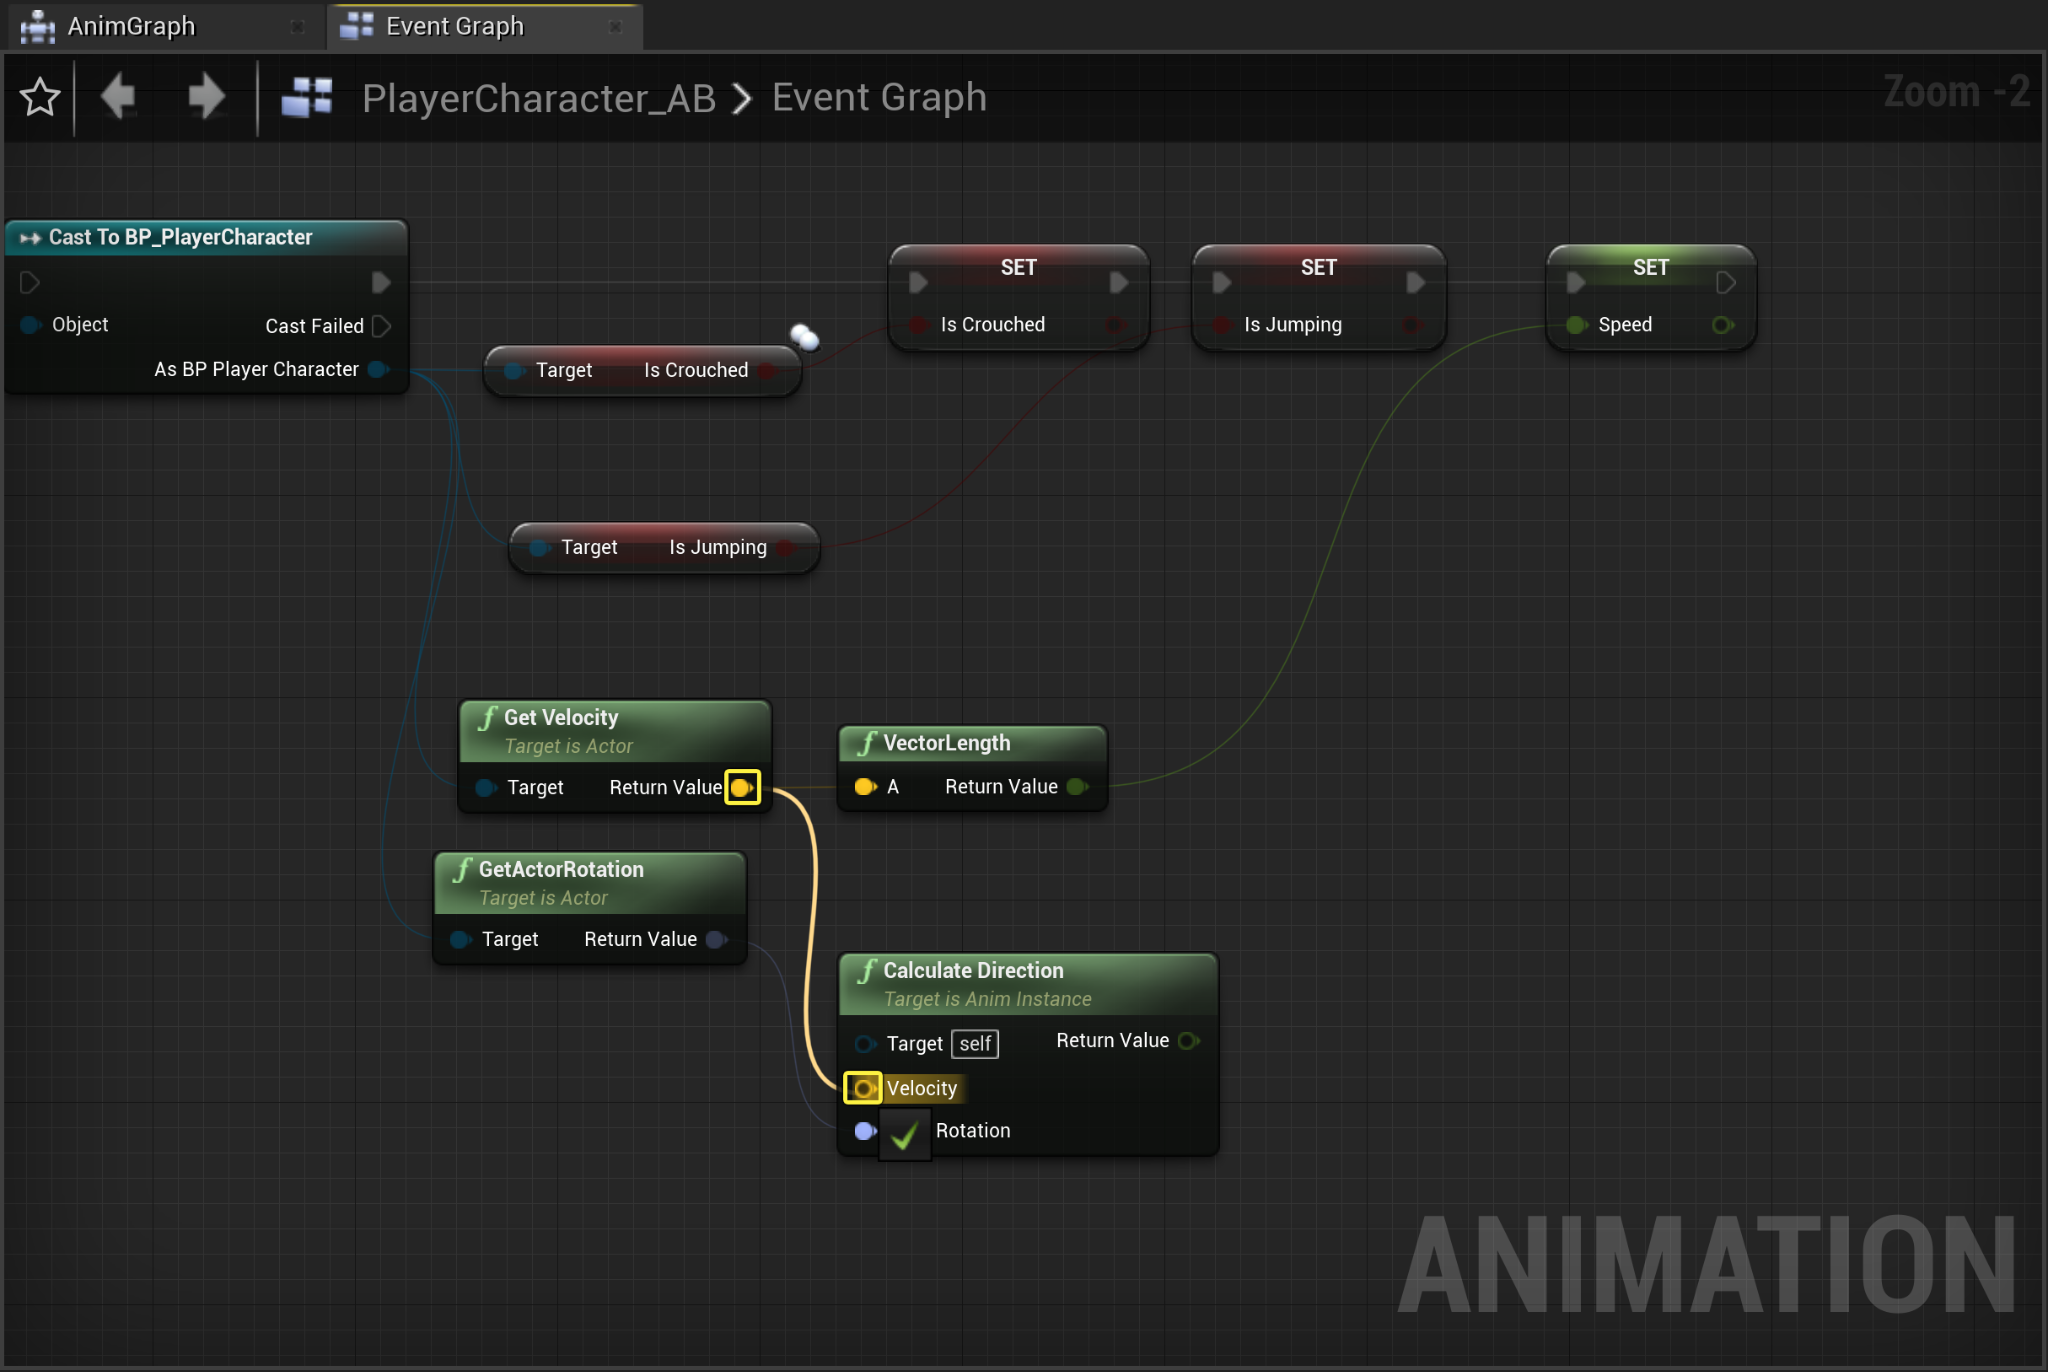

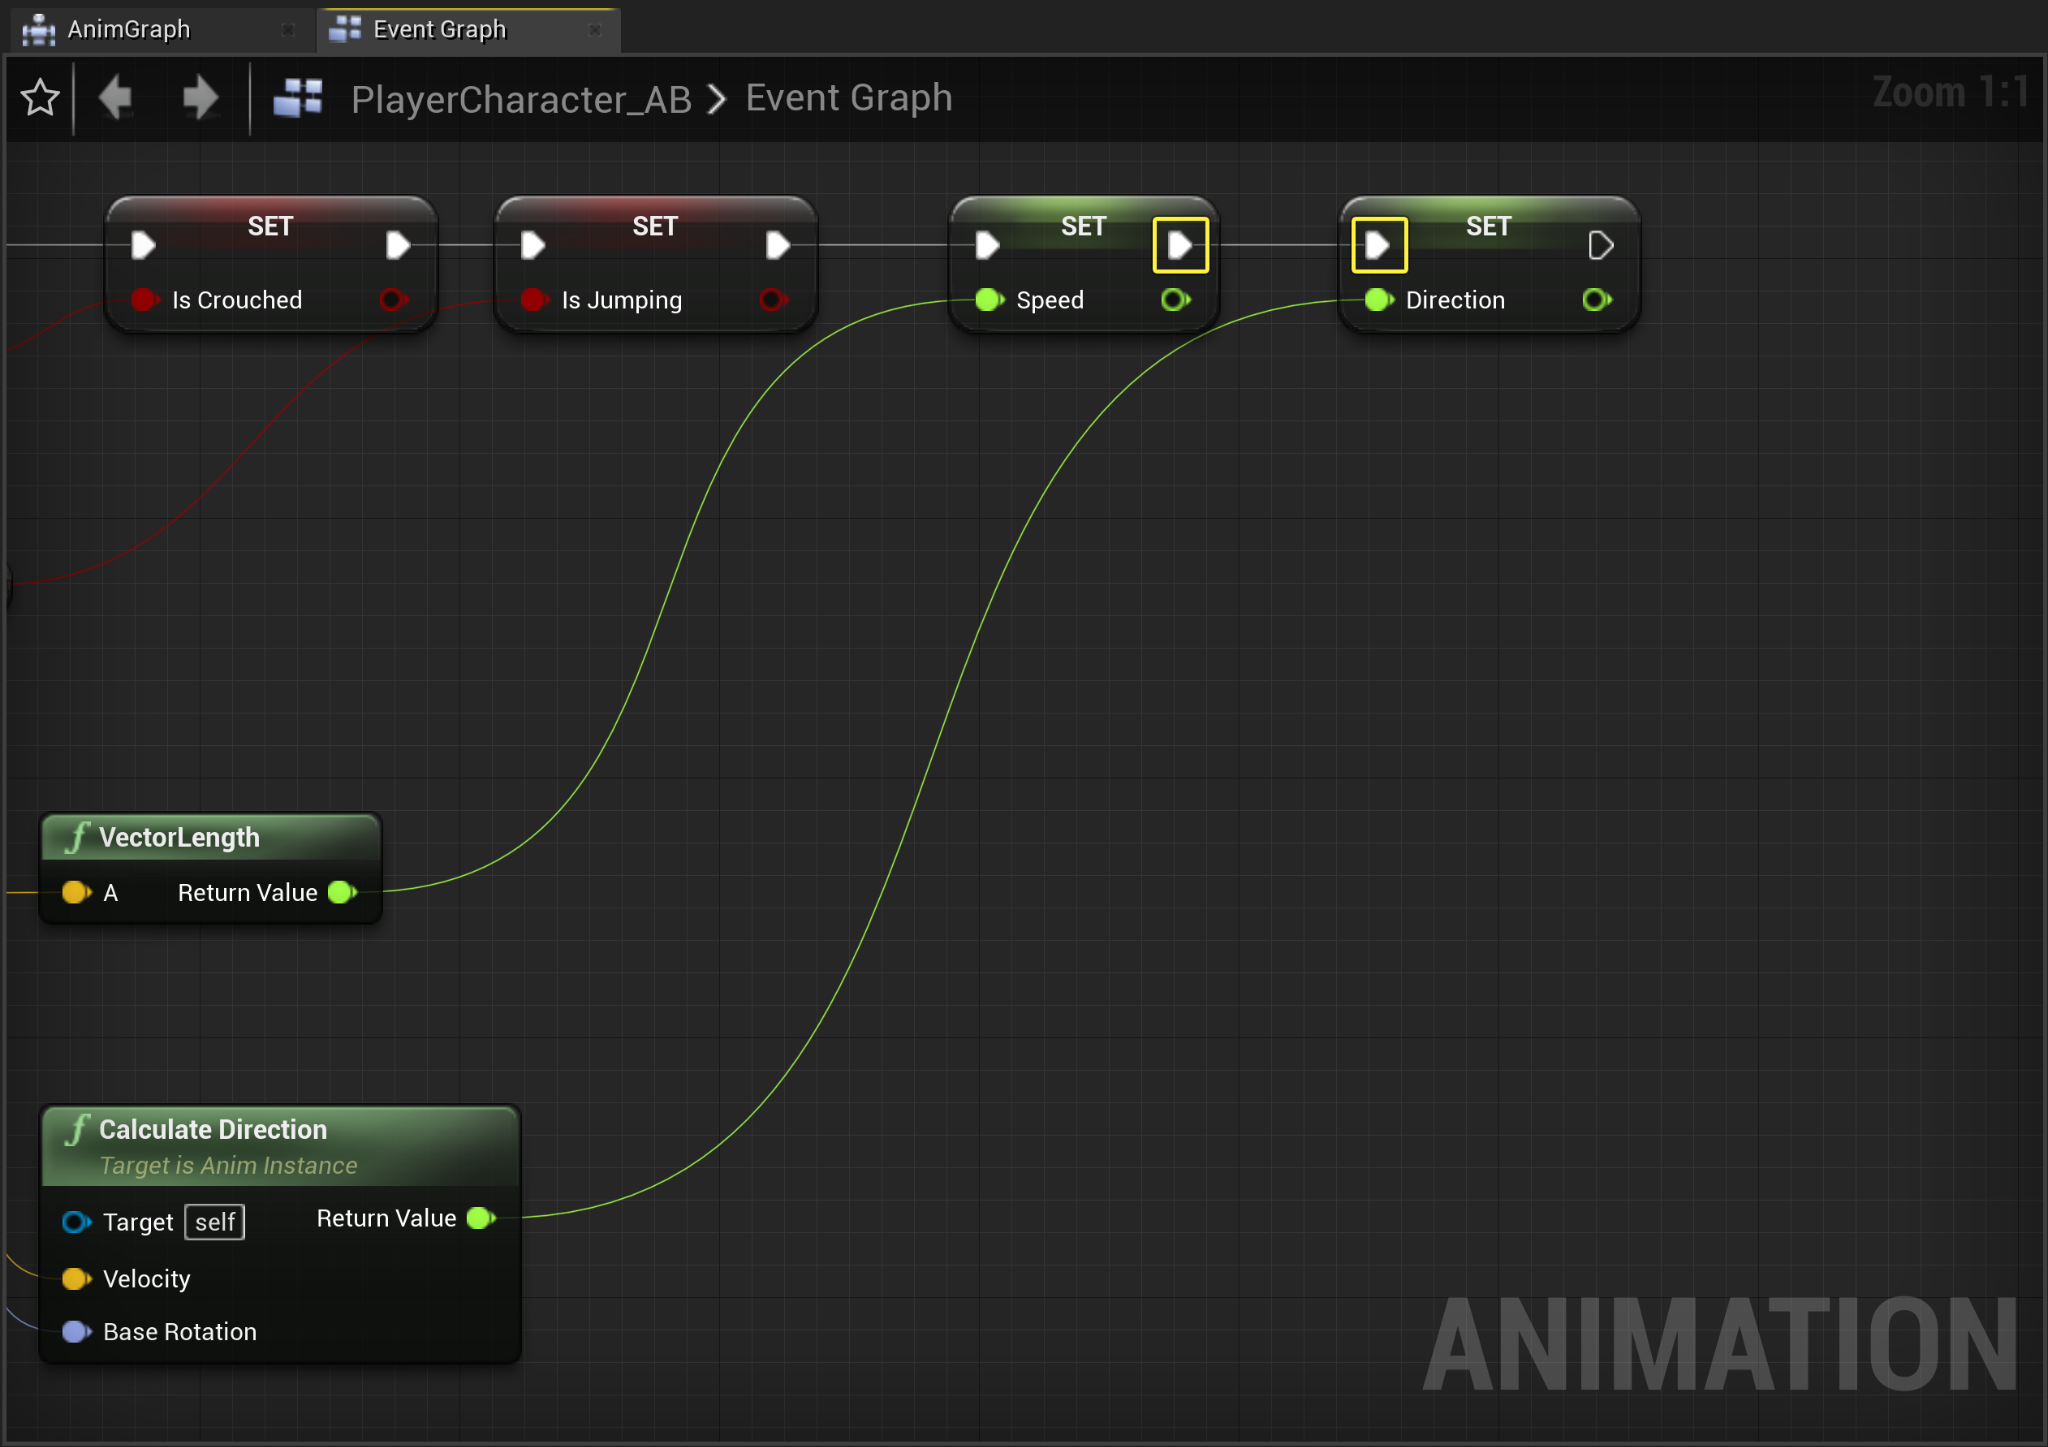

Your completed Animation Event Graph will resemble the image below
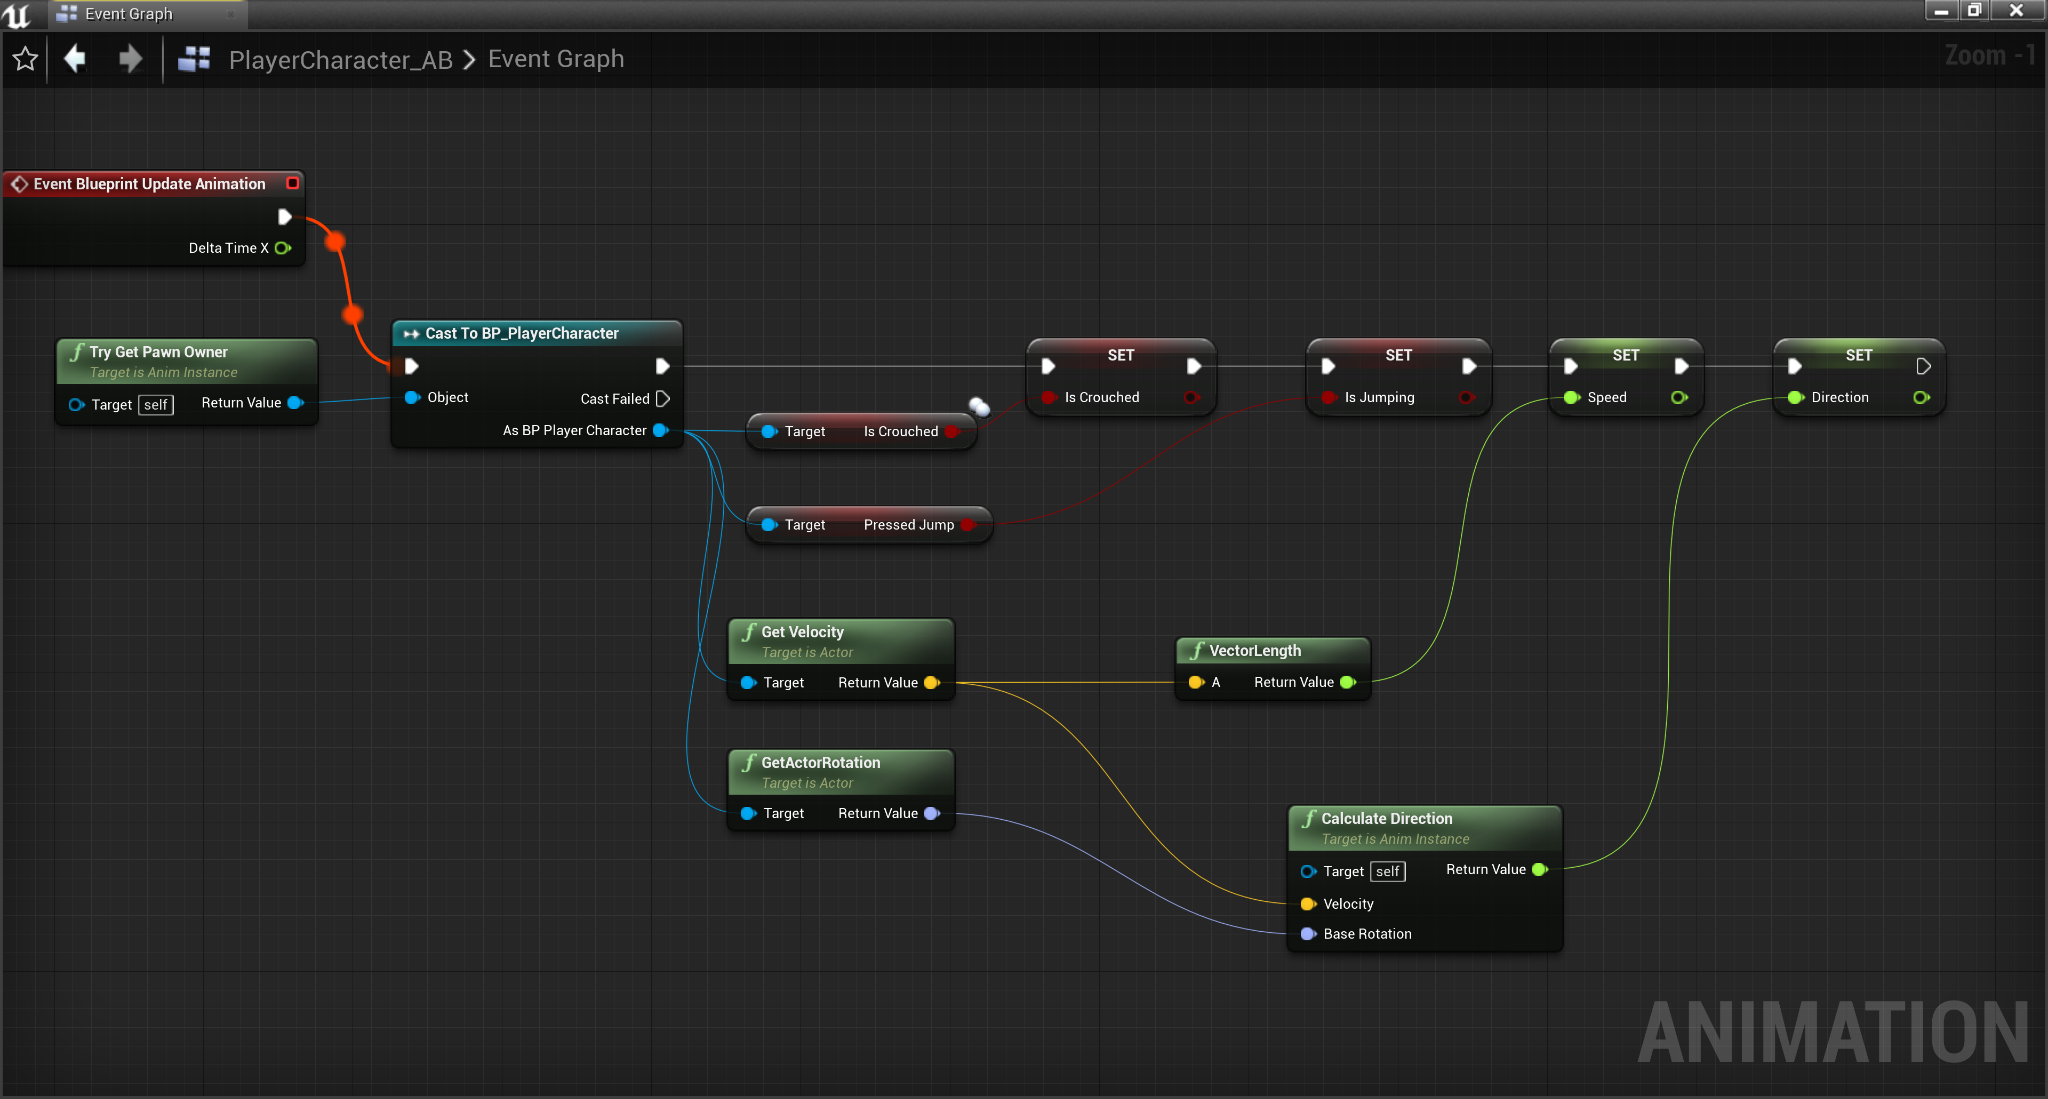
Click image to expand.
Creating the Animation State Machines
State Machines provide a graphical visualization of organizing the animation of a Skeletal Mesh into a series of States . These states are governed by Transition Rules that control how to blend from one state to another. You will use your boolean variables to transition between the different locomotion Blend Spaces that you created in the earlier sections.
-
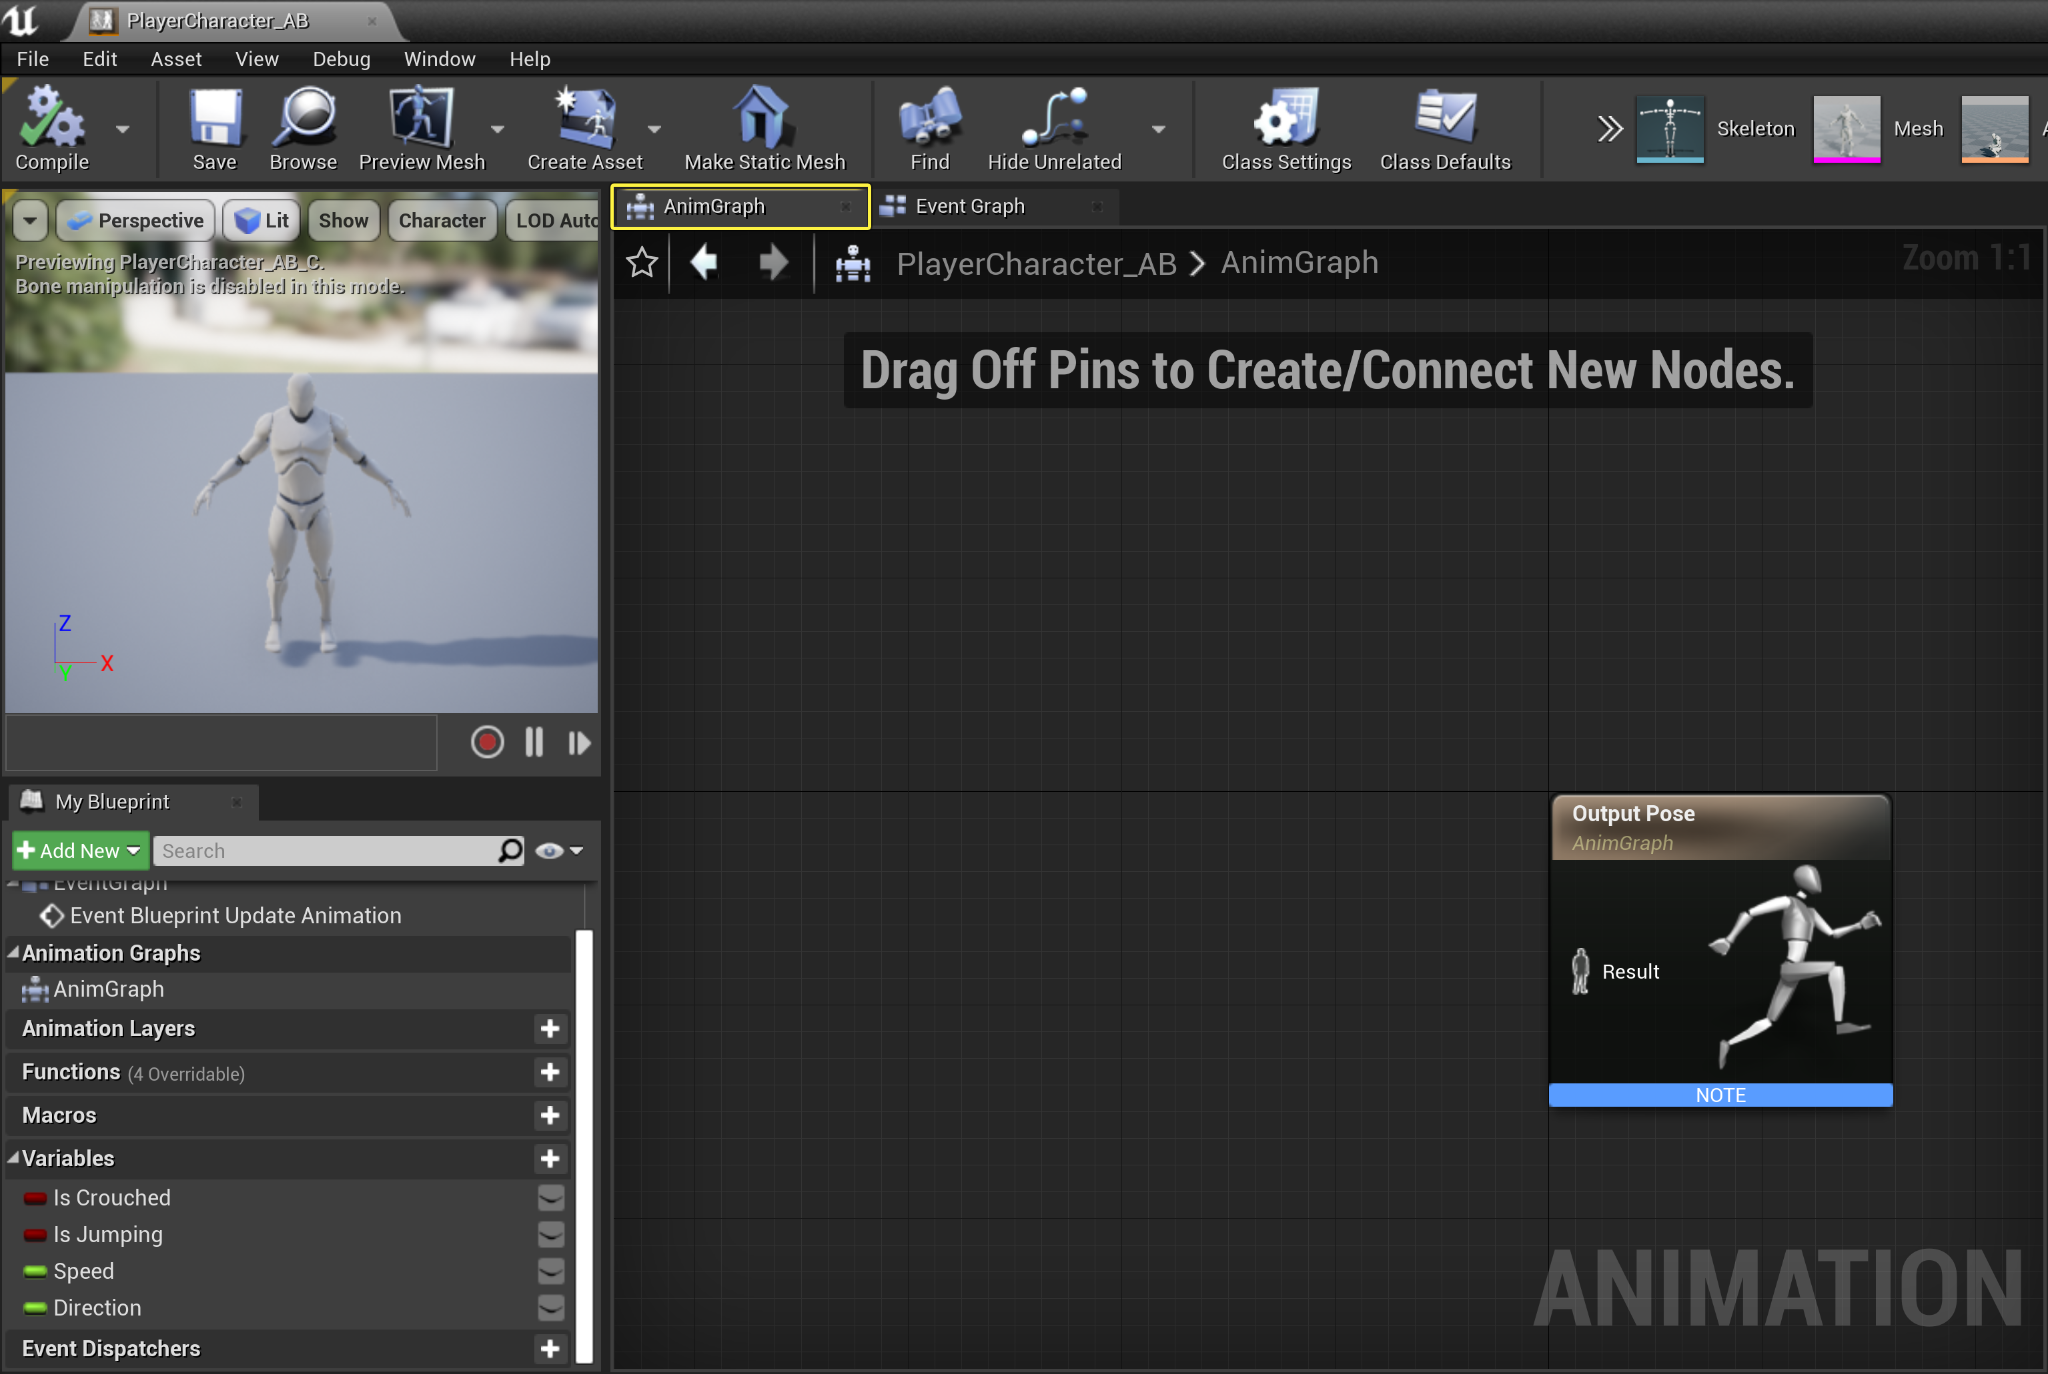
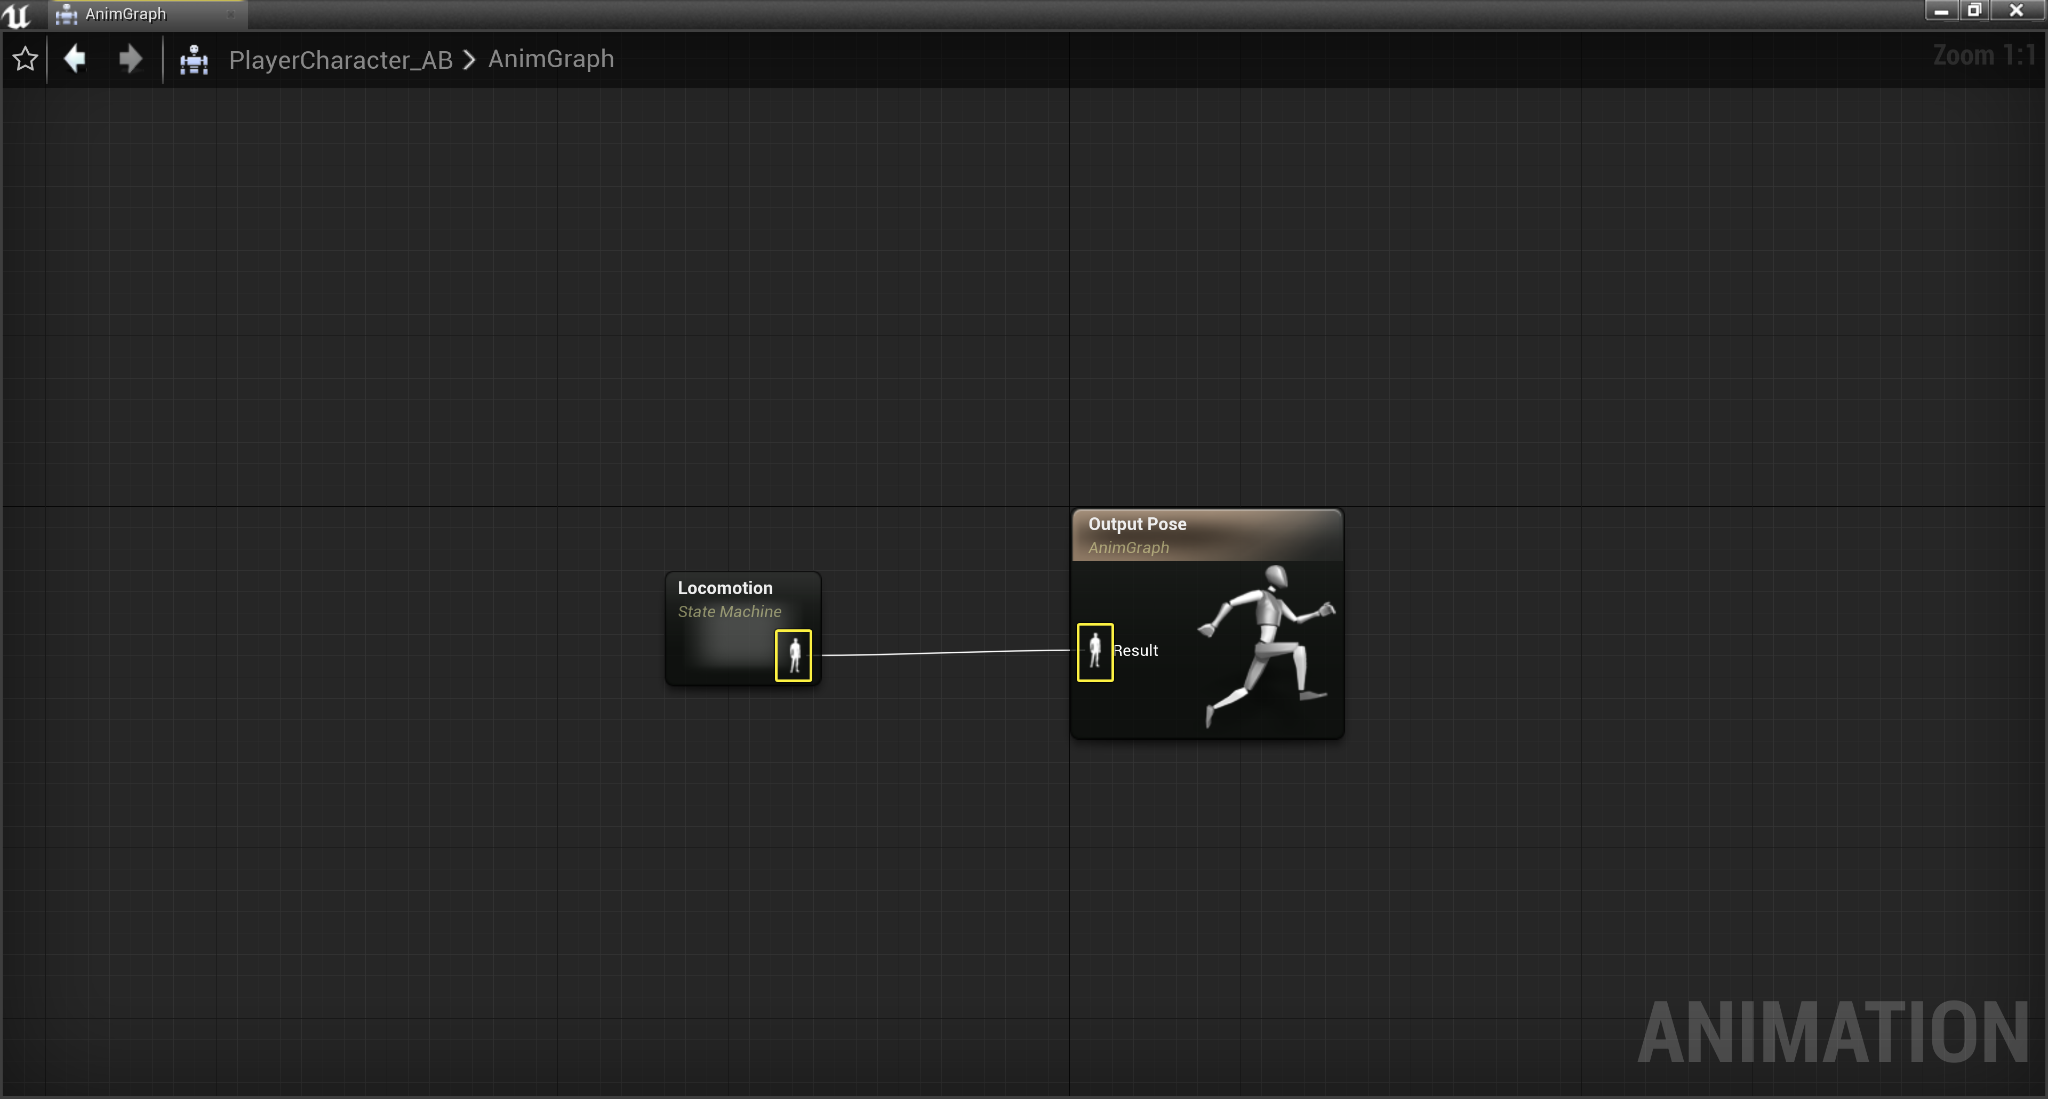
Inside your PlayerCharacter_AB Animation Blueprint, navigate to the Anim Graph .
![Anim Graph]()
Click image to expand.
The AnimGraph is used to evaluate a final pose for the skeletal mesh.
-
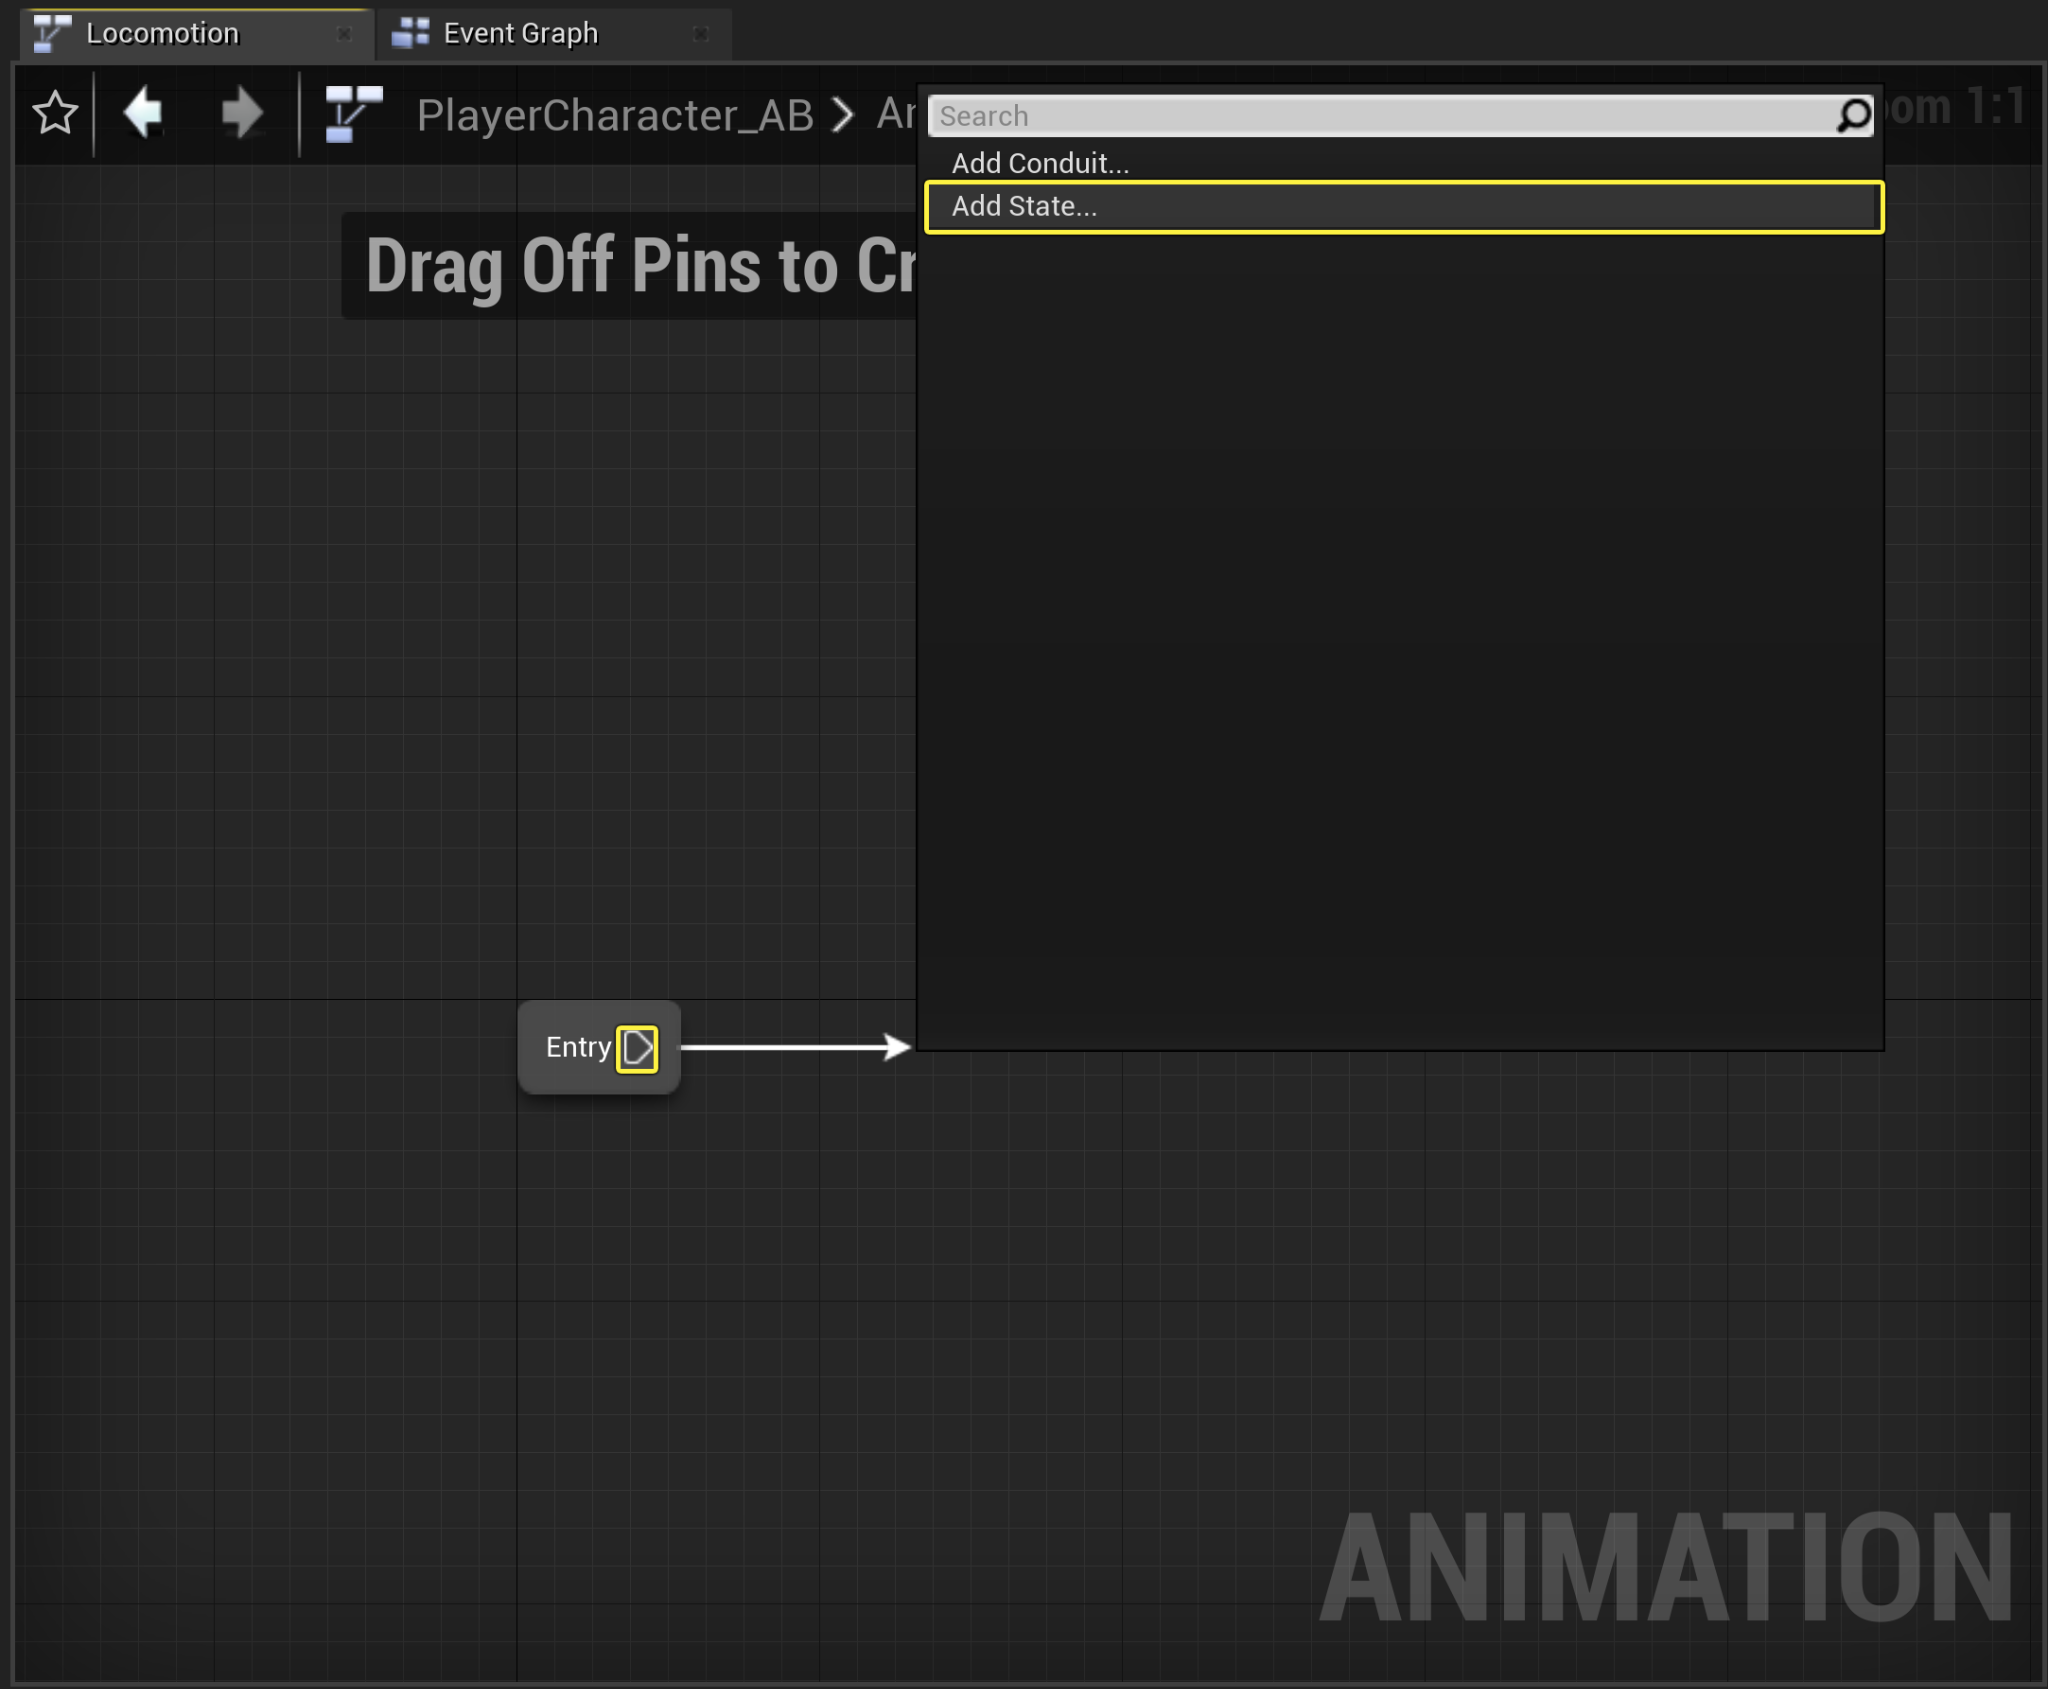
Right-click on the AnimGraph and from the Actions drop down menu, search for and select Add New State Machine .
![Add New State Machine]()
-
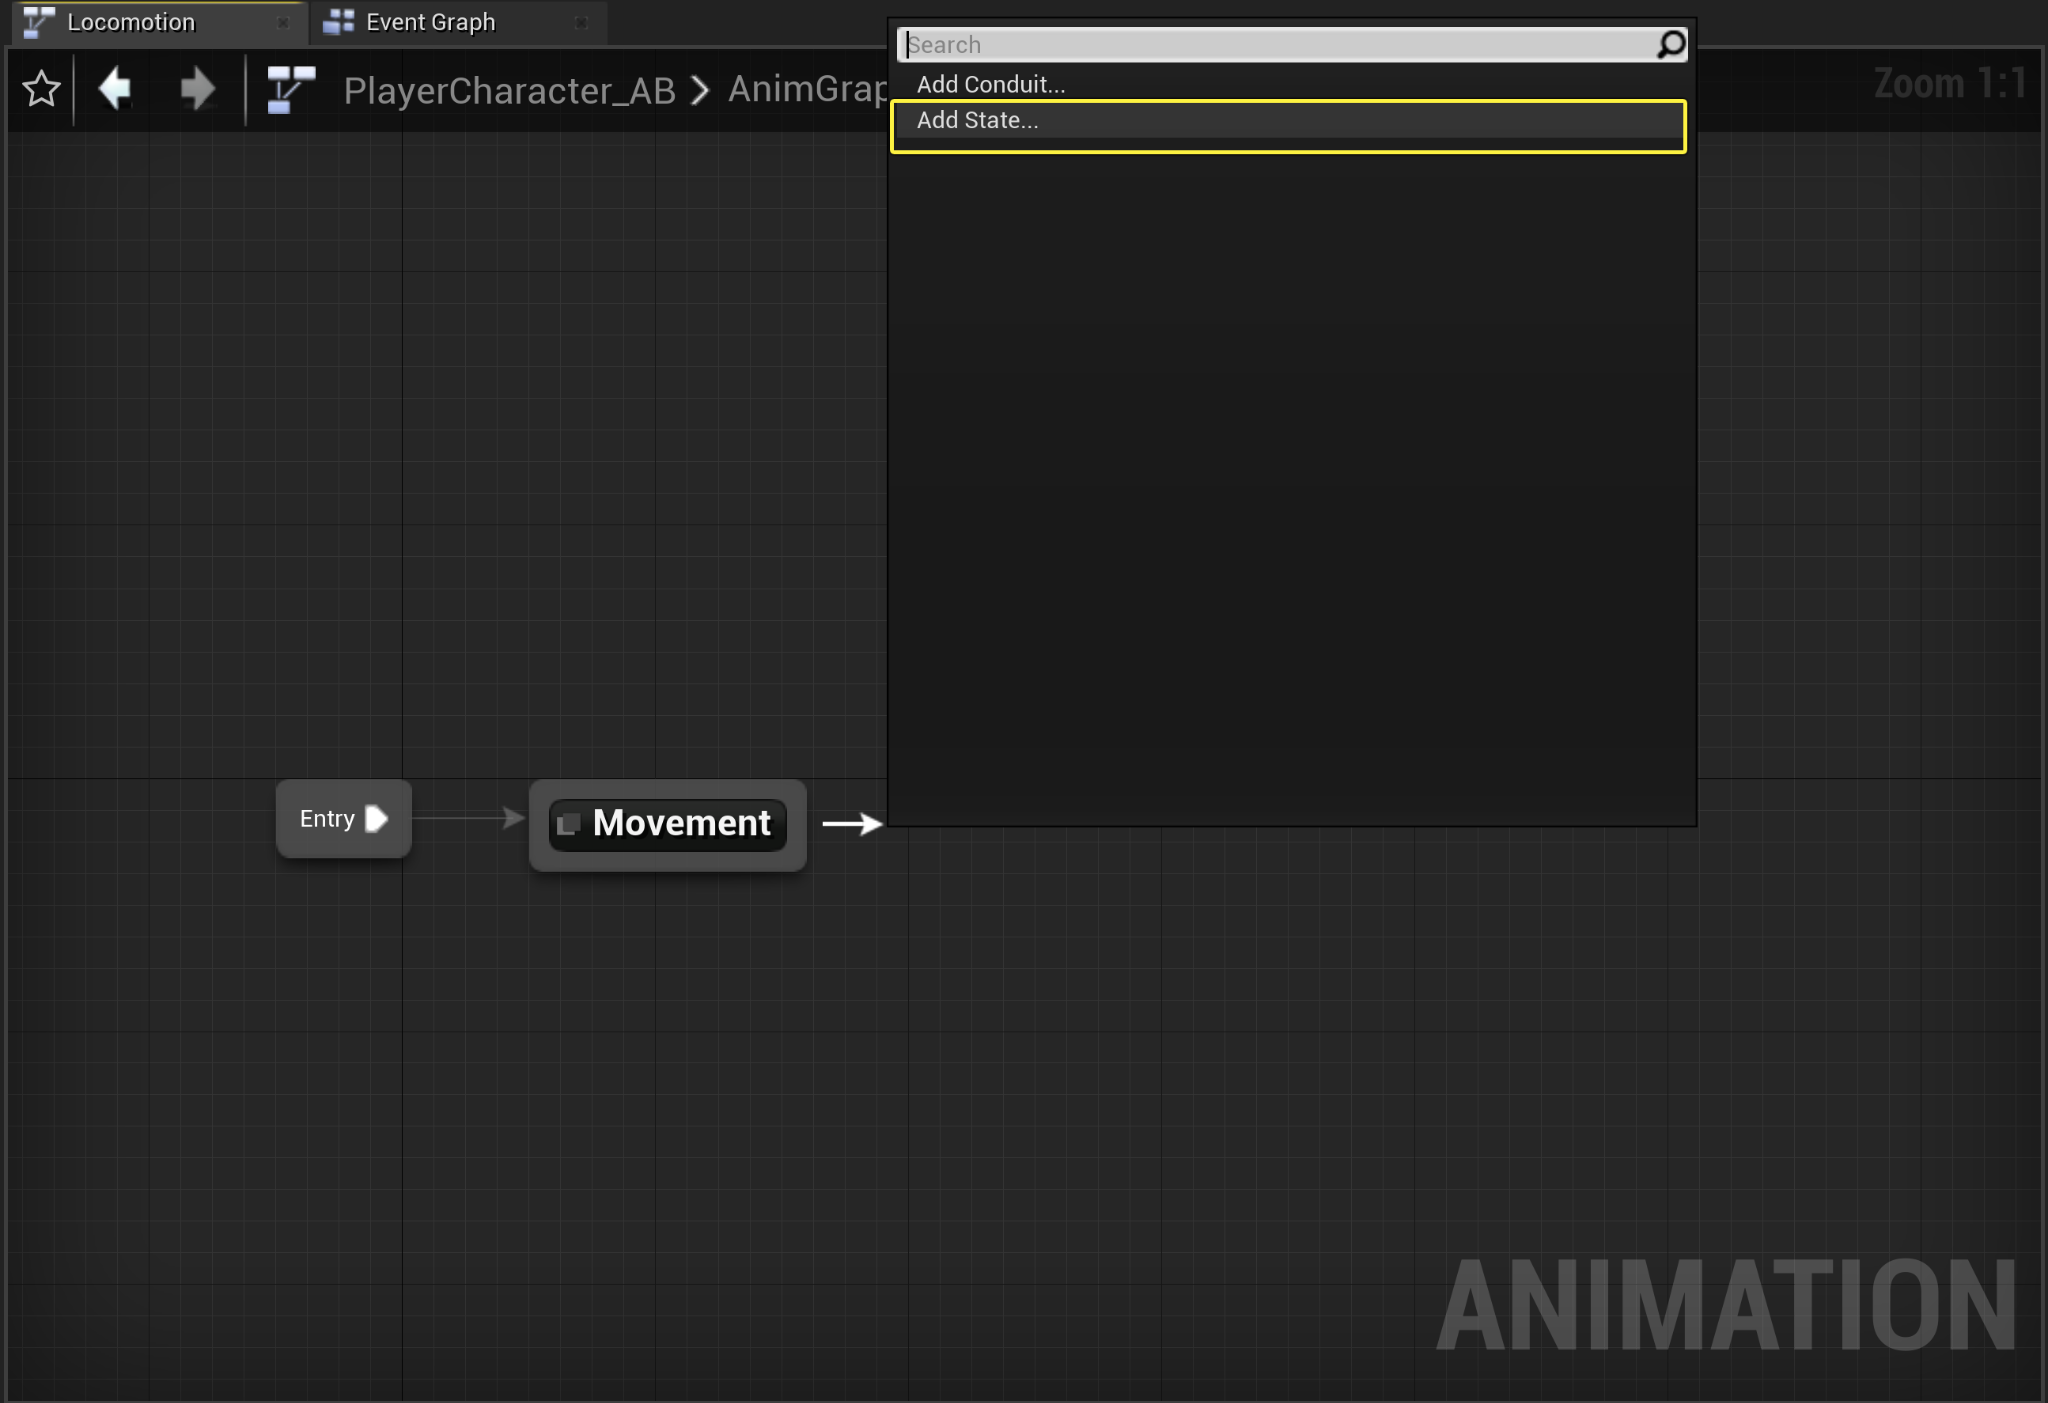
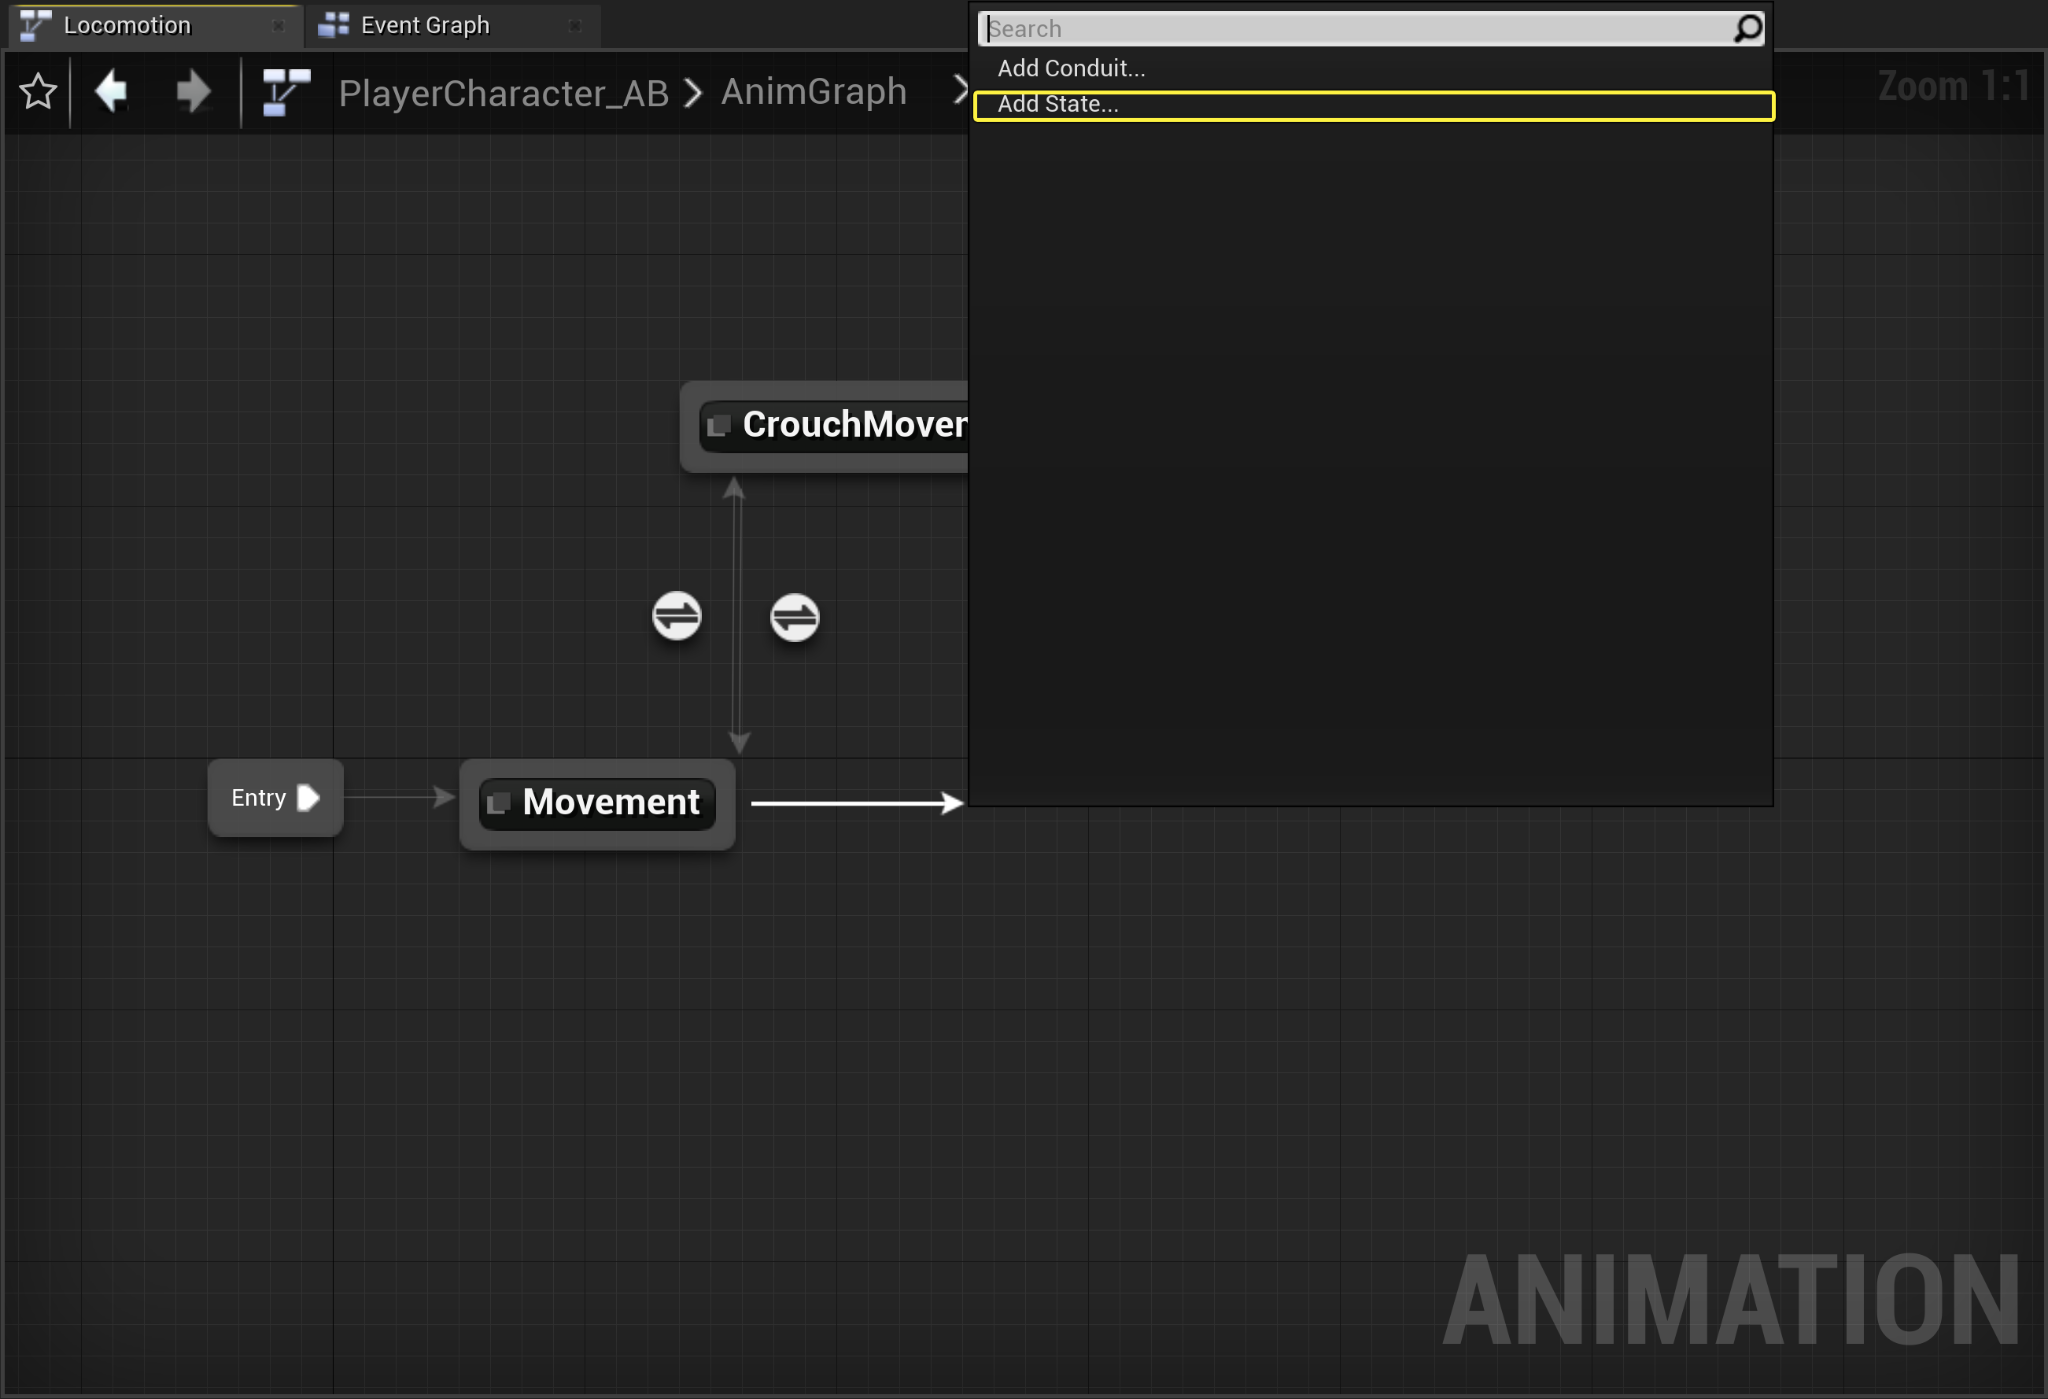
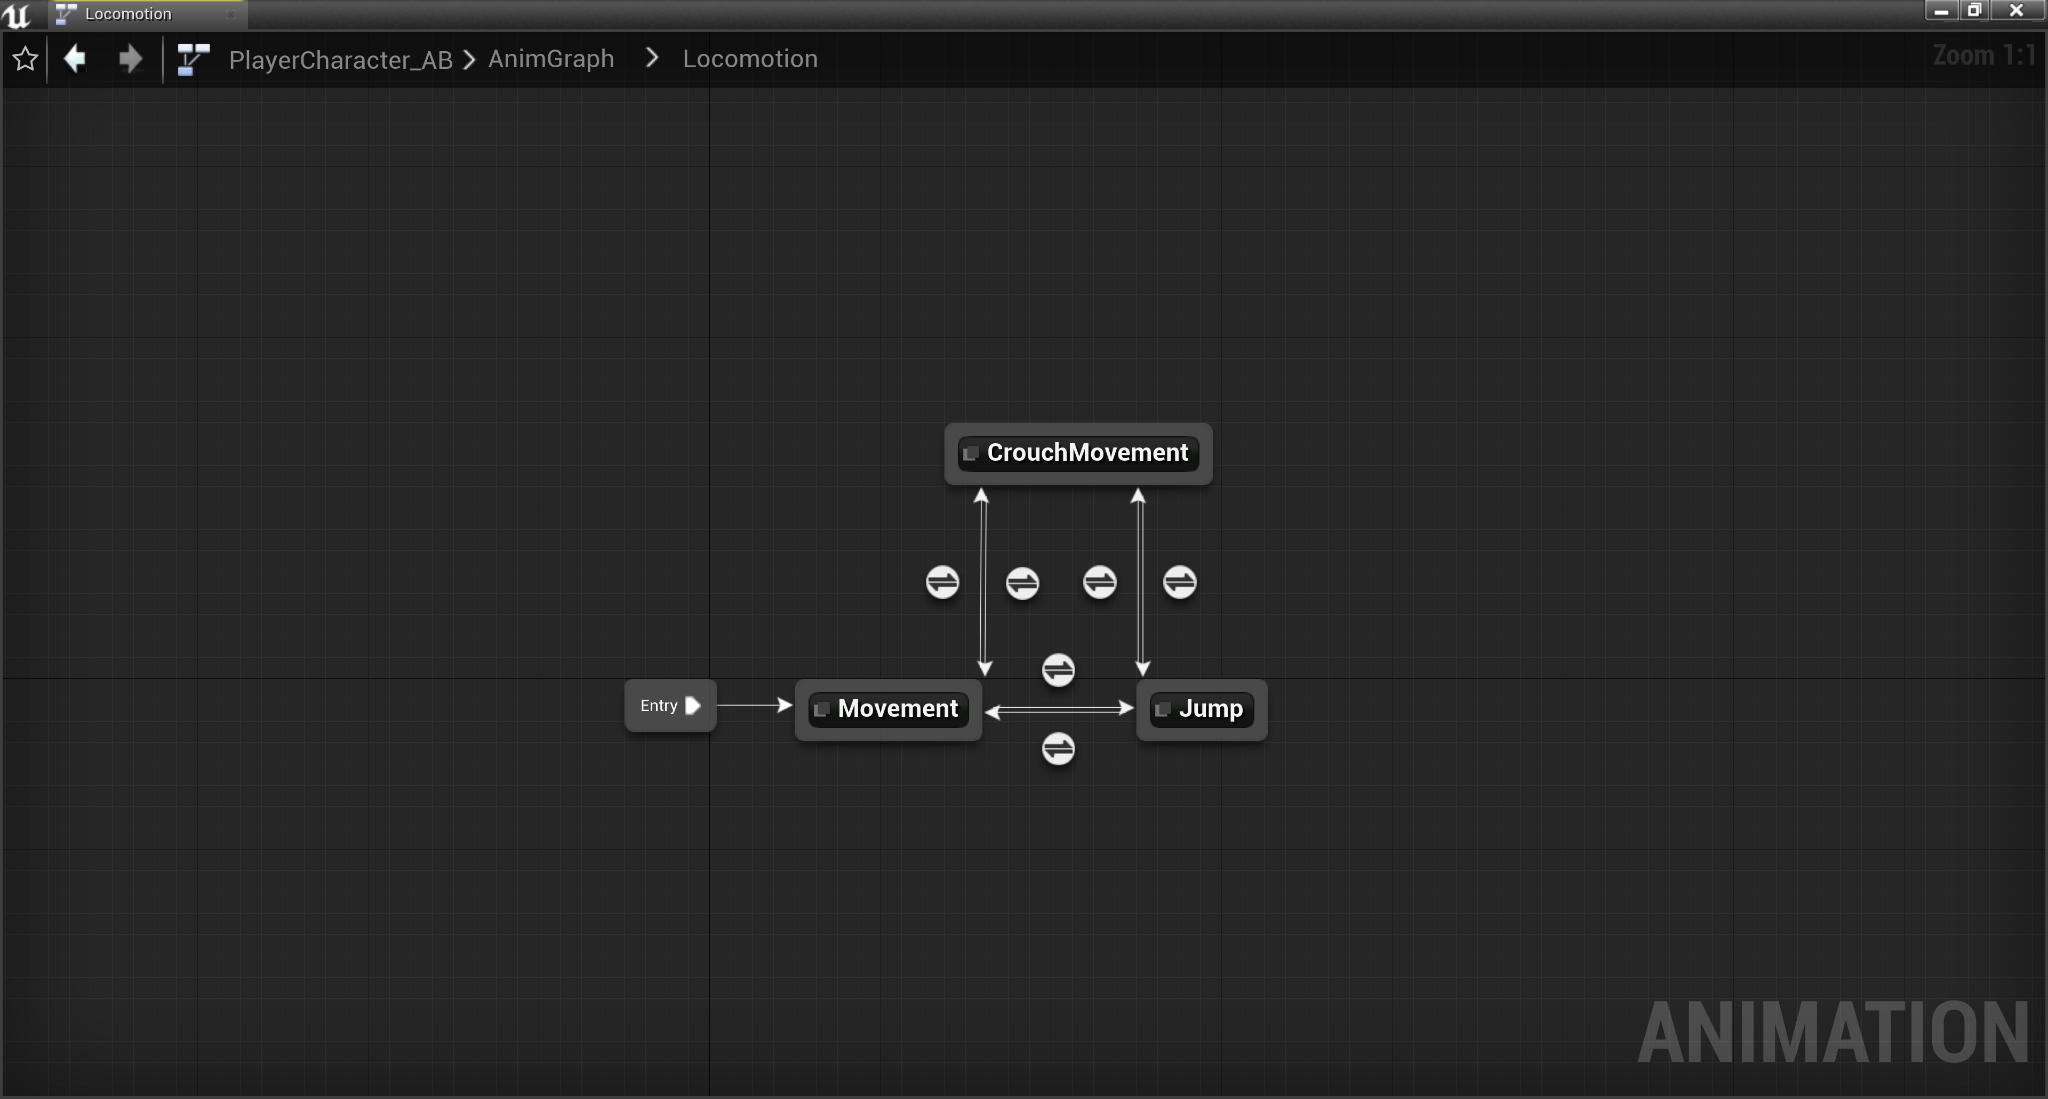
Rename your State Machine node to Locomotion, then double-click the node to open its graph. Drag off from the Entry pin, and from the Actions drop down menu, select Add State.
![Add State to Locomotion]()
Click image to expand.
-
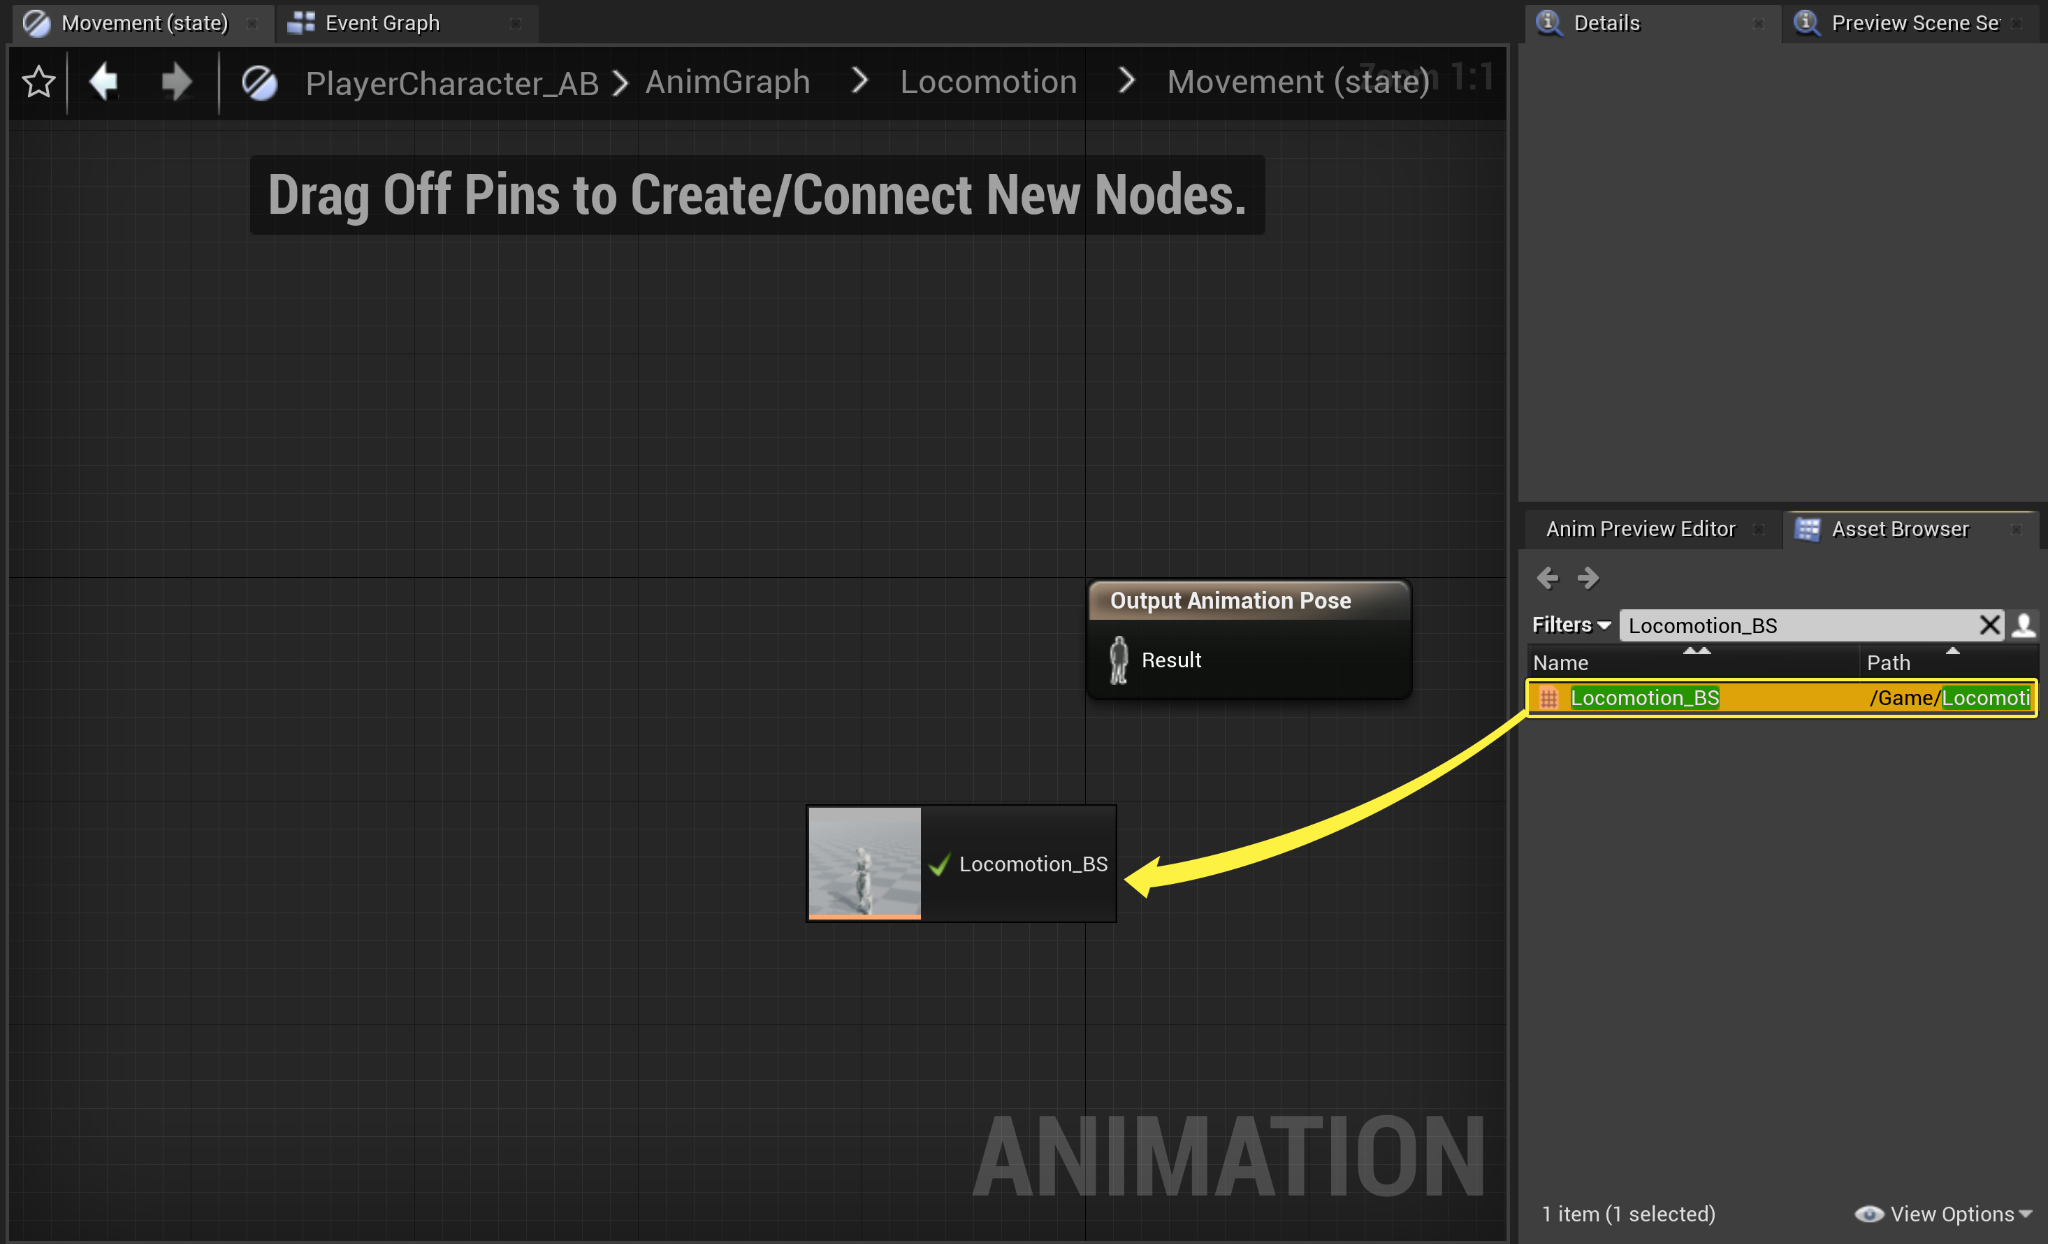
Name the new state Movement , then double-click to open the Movement State Node . Navigate to the Asset browser , and search for Locomotion_BS , then click and drag it into the graph.
![Add Locomotion Asset]()
Click image to expand.
-
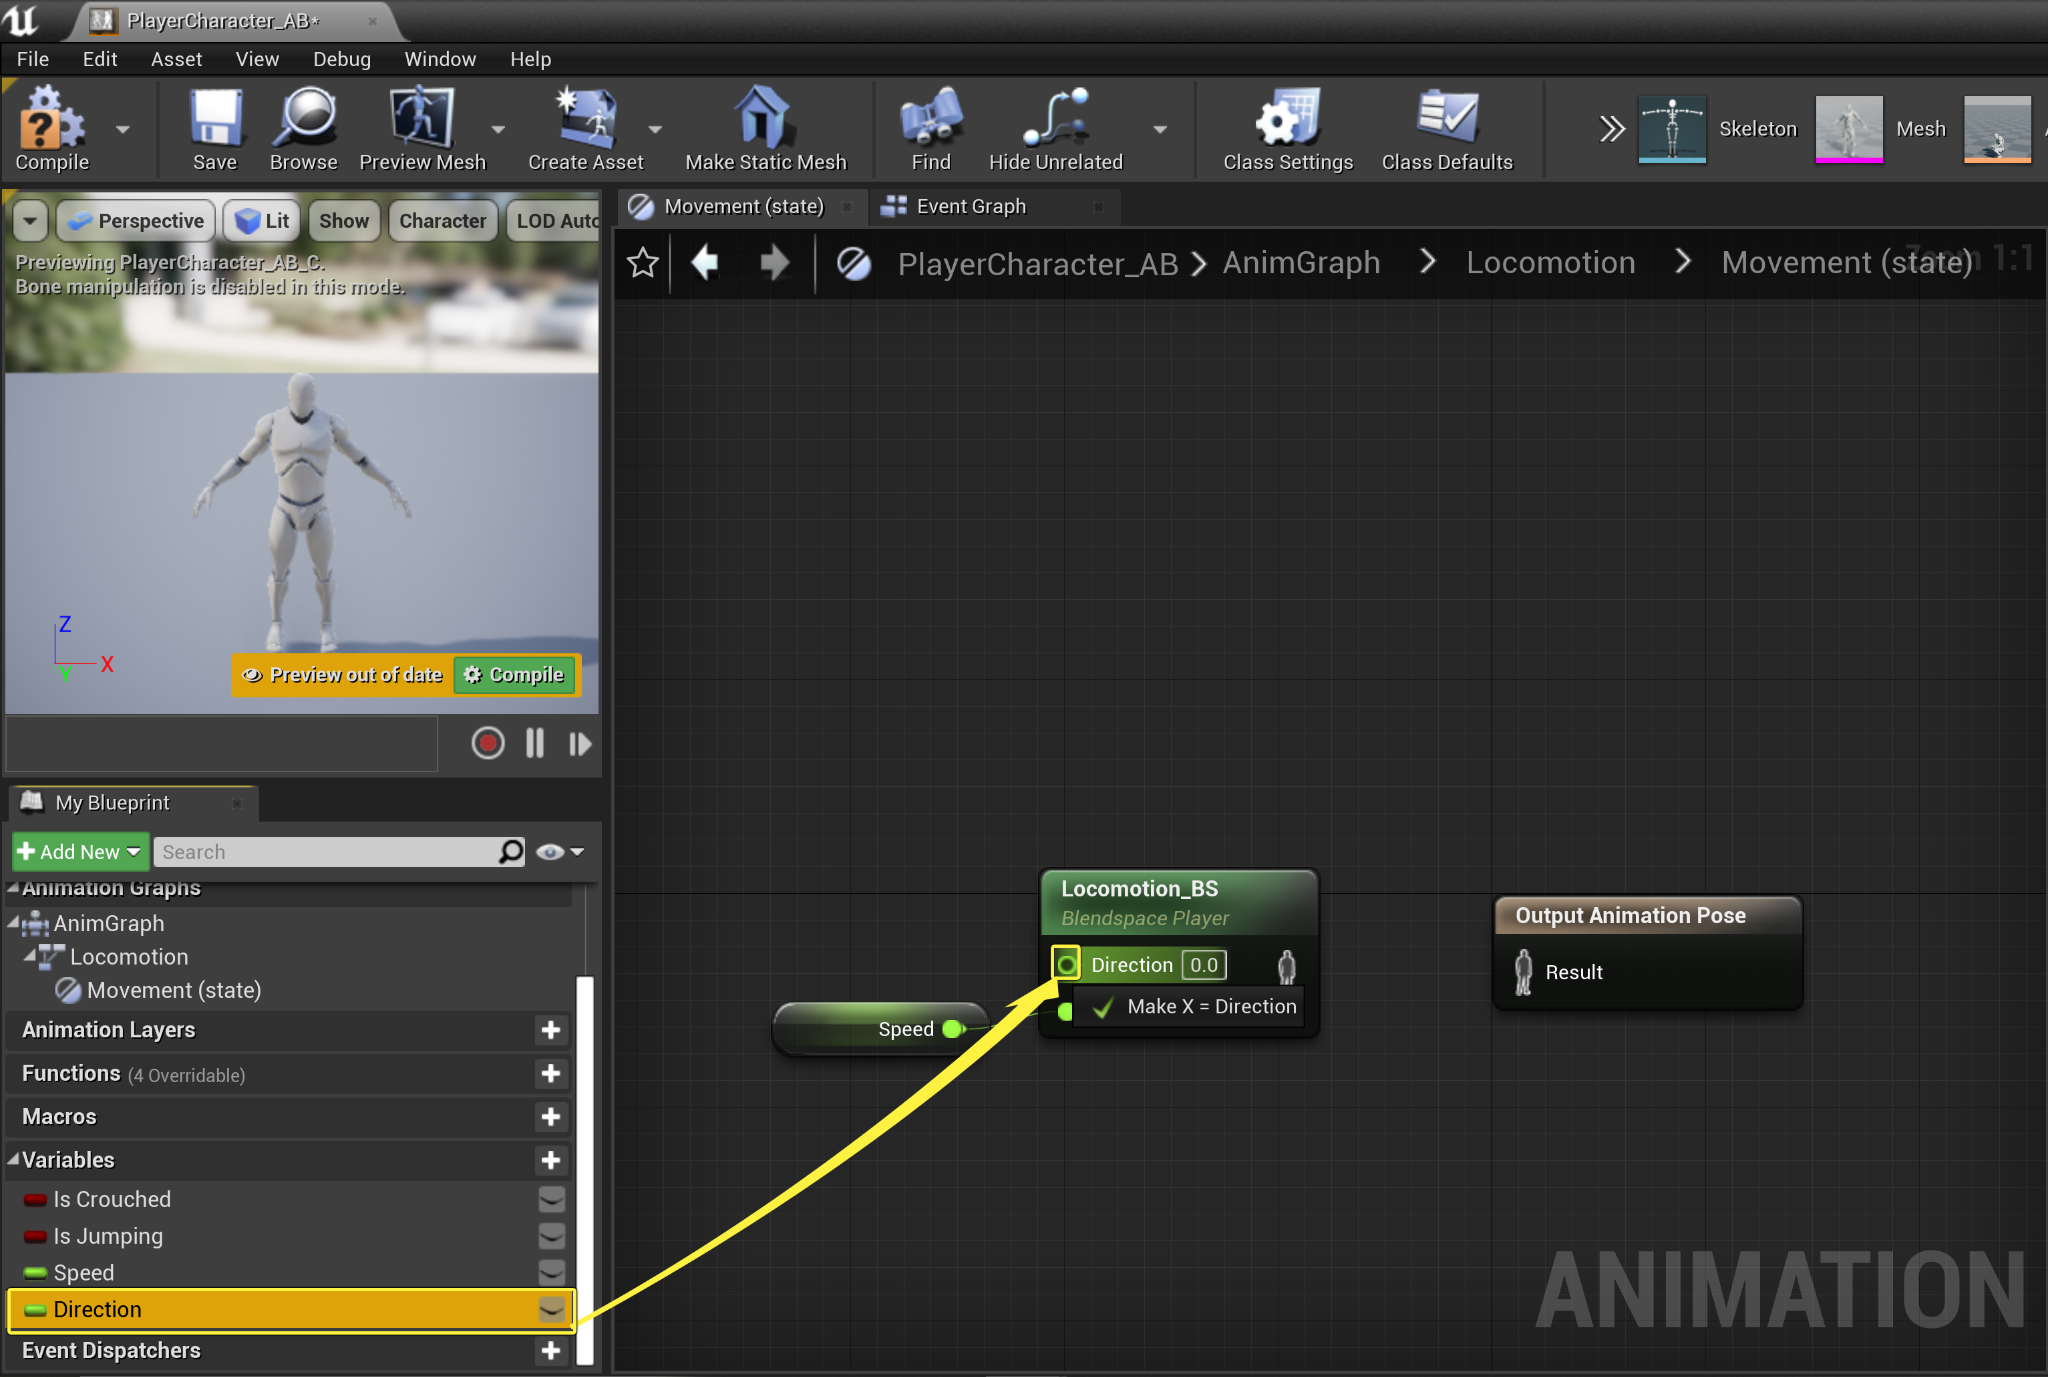
From the My Blueprint tab , click and drag your Speed float variable into the Blend Space's Speed vertical axis .
![Add Speed variable to Blend Space]()
Click image to expand.
-
Navigate back to the My Blueprint tab , then click and drag your Direction float variable into the Blend Space's Direction horizontal axis .
![Add Direction variable to Blend Space]()
Click image to expand.
-
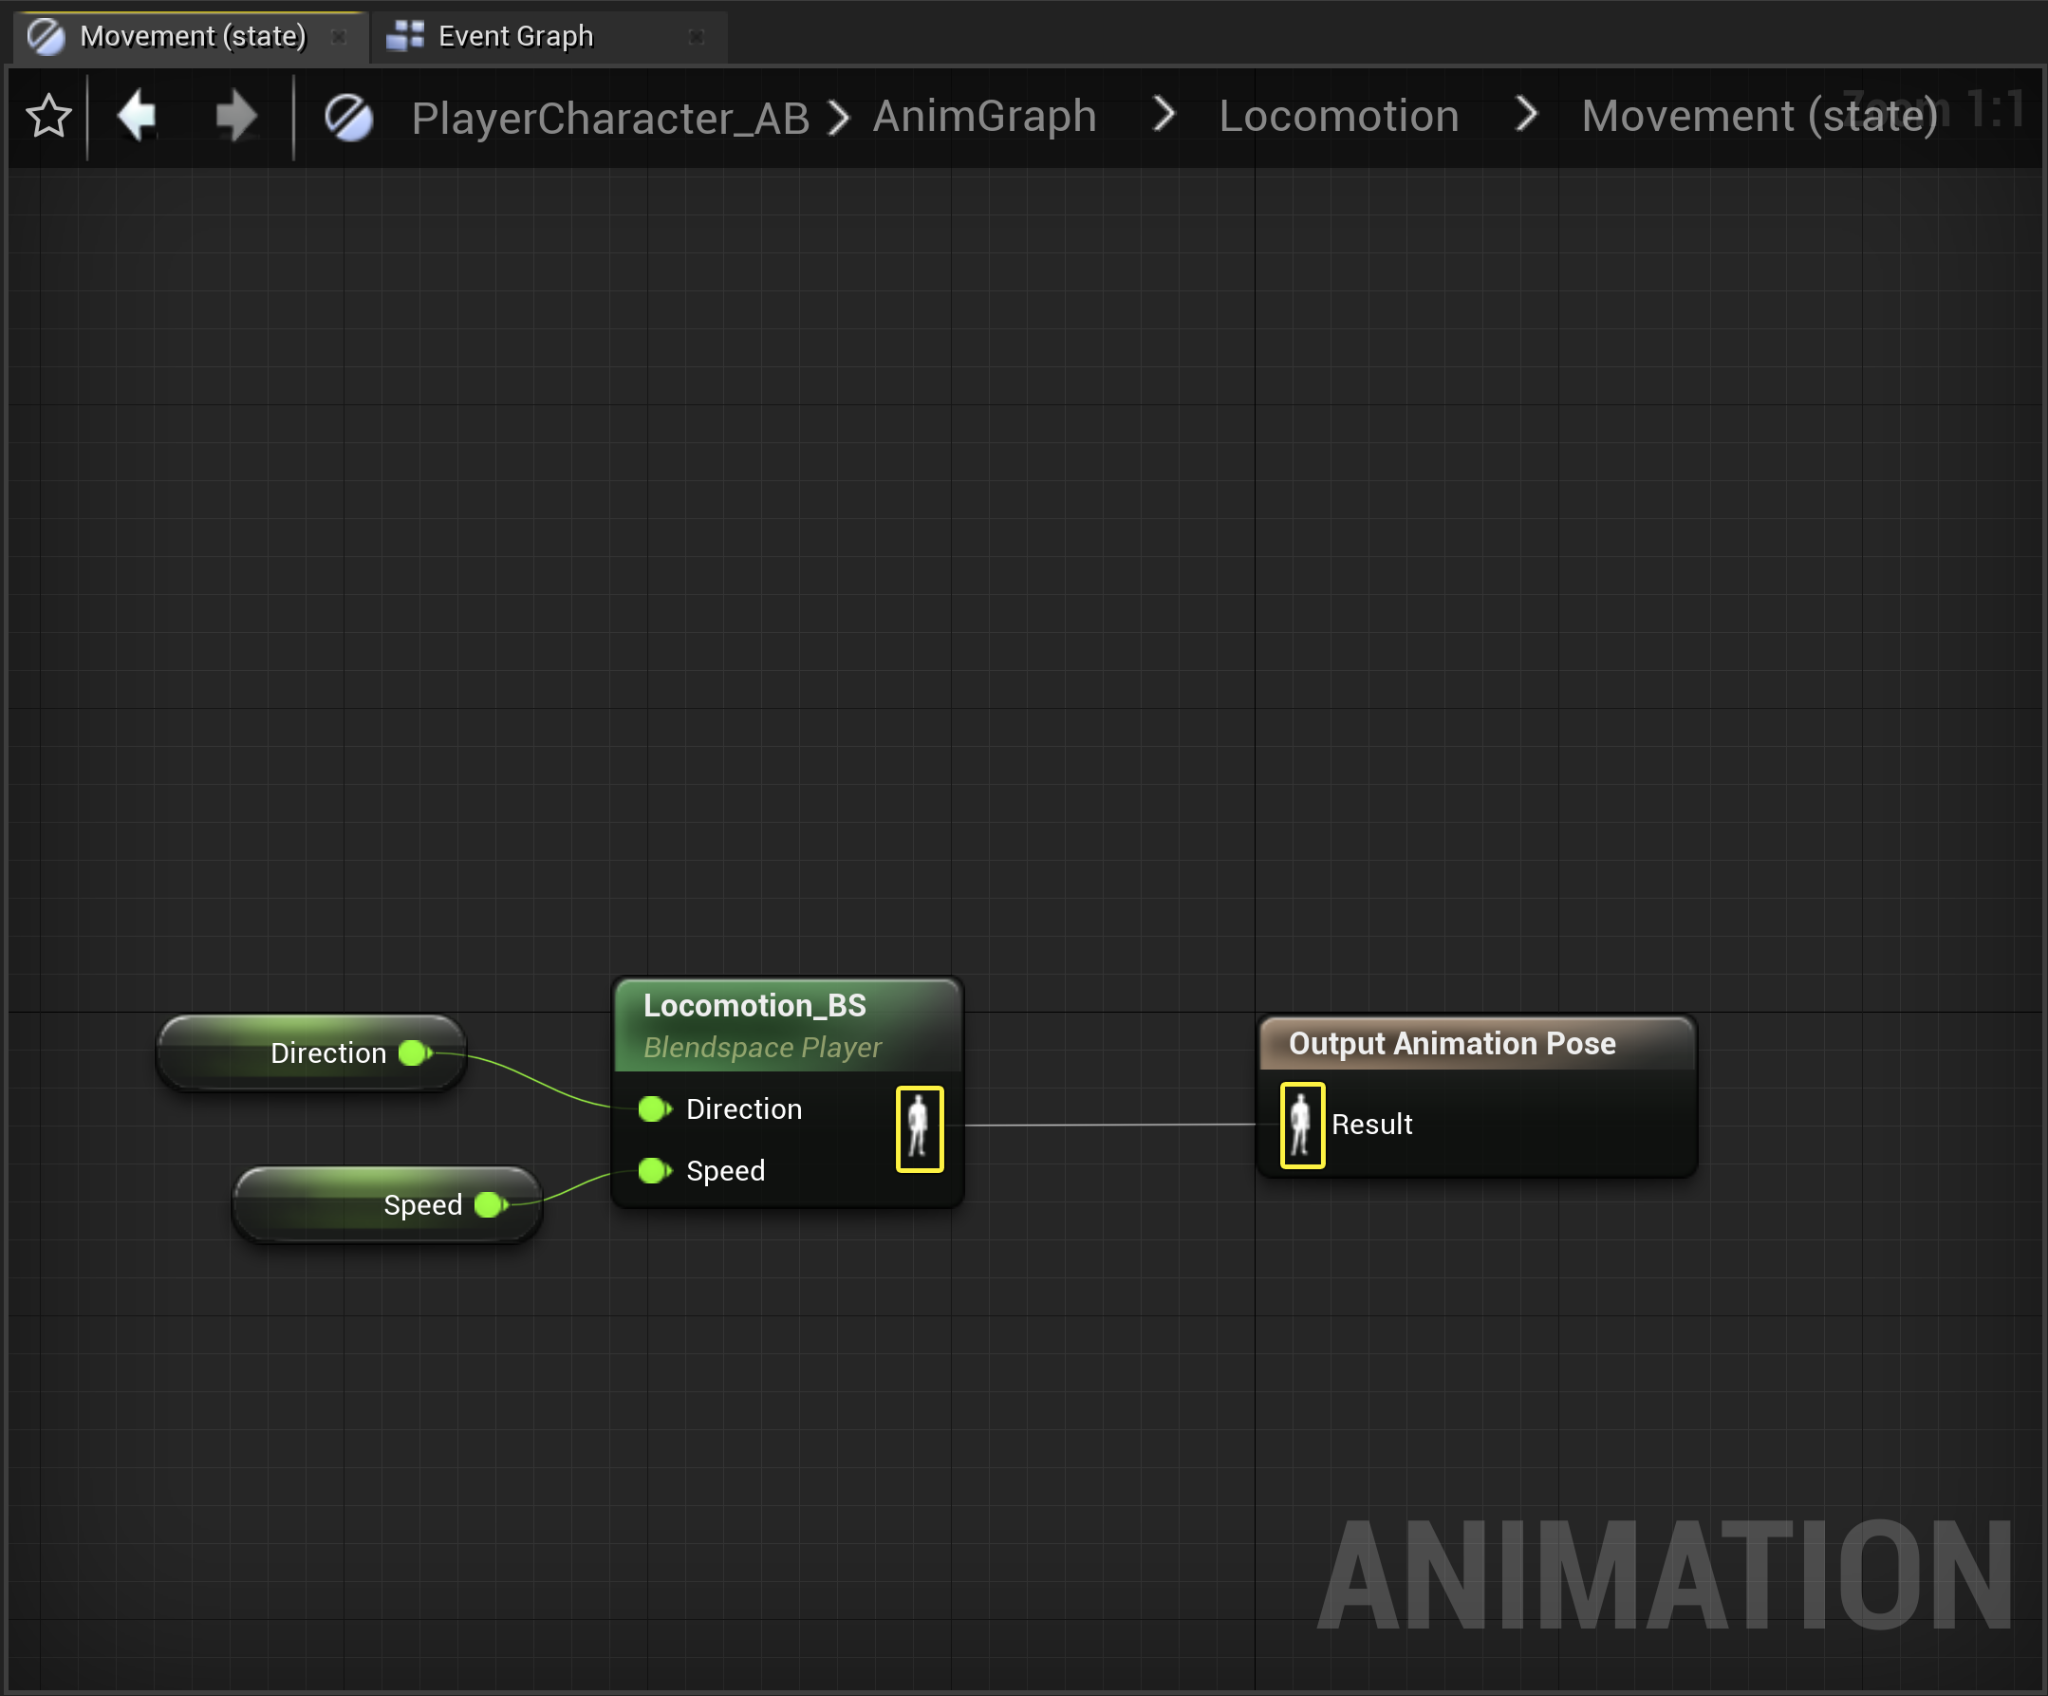
Connect the Animation Pose output pin to the Animation Pose Result pin of the Output Animation Pose node.
![Connect Animation Pose to Output Animation]()
Click image to expand.
-
Compile and Save .
![Compile and Save buttons]()
-
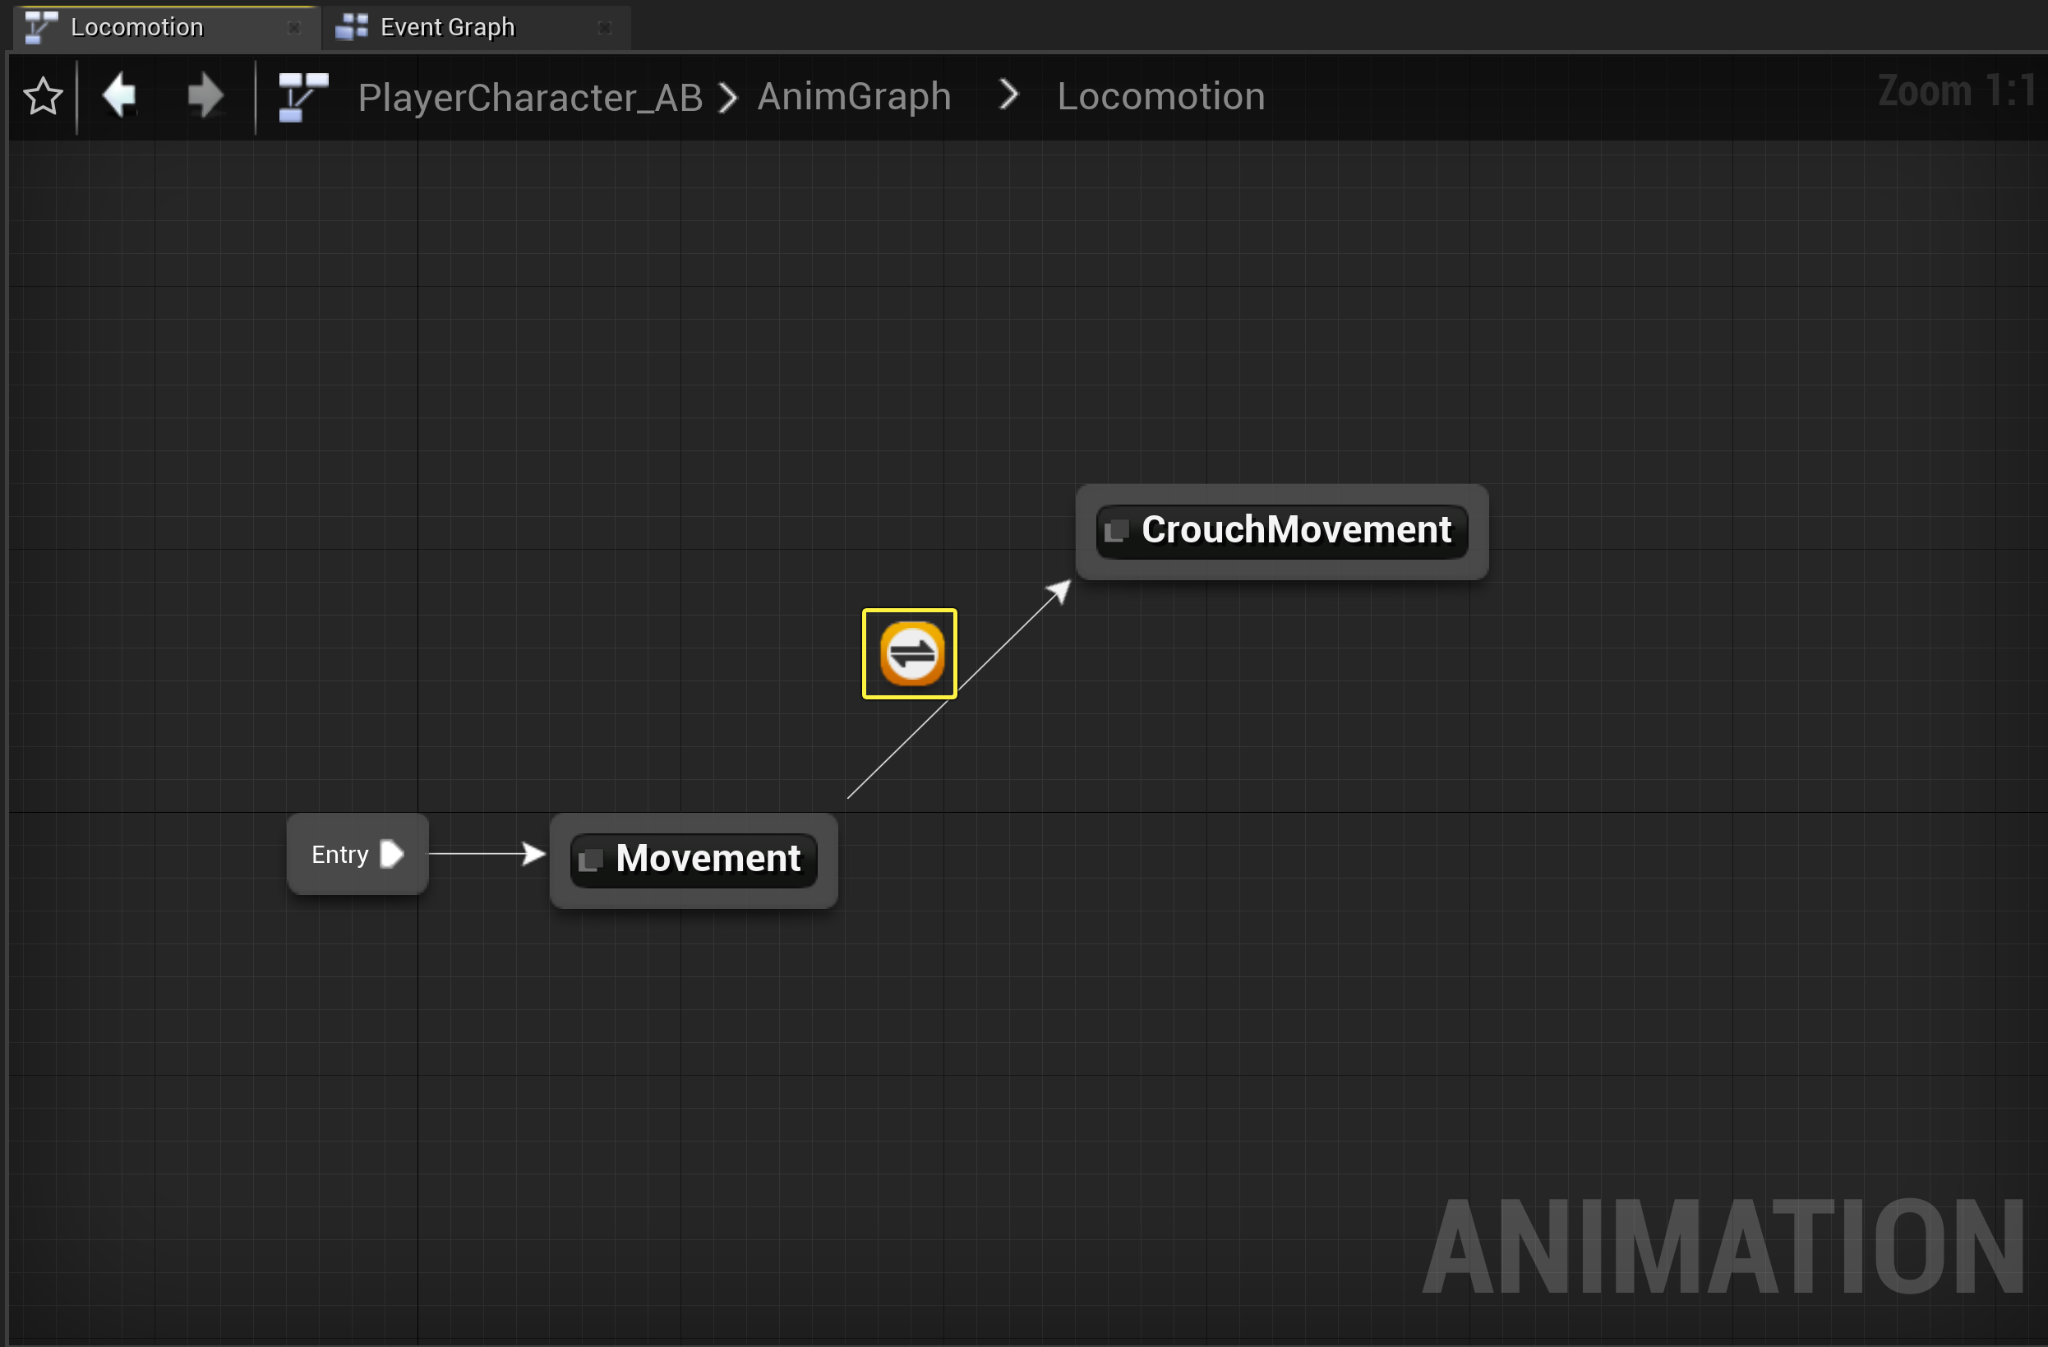
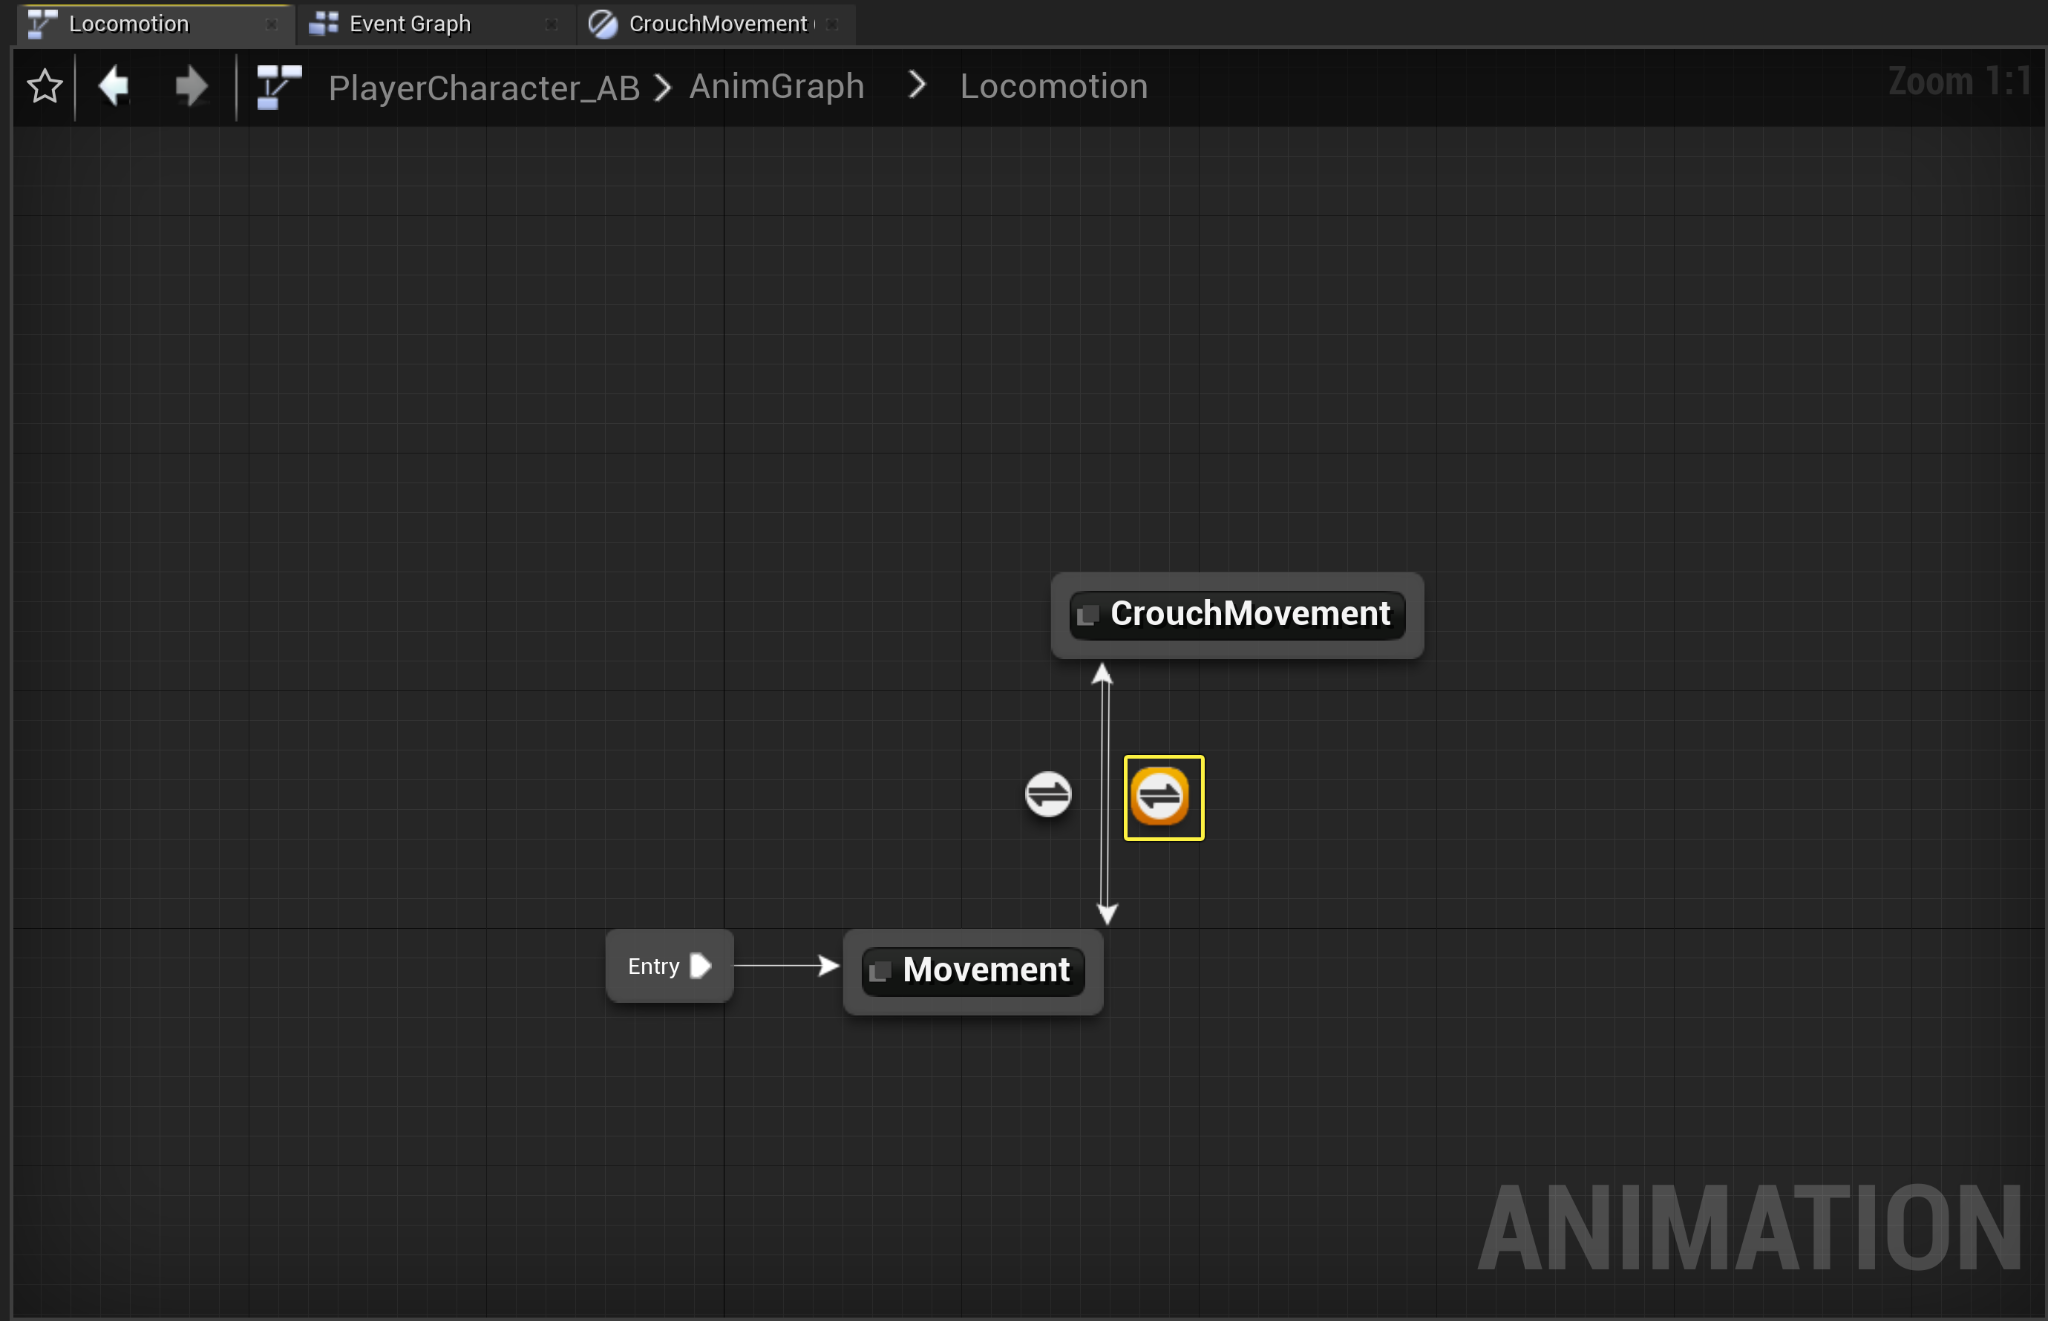
Navigate back to the Locomotion state machine , then click and drag the Movement state node to create a new Animation state named Crouch Movement .
![Add Crouch Movement Animation State]()
Click image to expand.
-
Double click the Transition rule node to open its Anim Graph.
![Open Transition Anim Graph]()
Click image to expand.
-
From the My Blueprint Tab , navigate to the variables category and drag your Is Crouched boolean onto the Can Enter Transition input pin from the Result node .
![Connect Is Crouched to Can Enter Transition]()
Click image to expand.
-
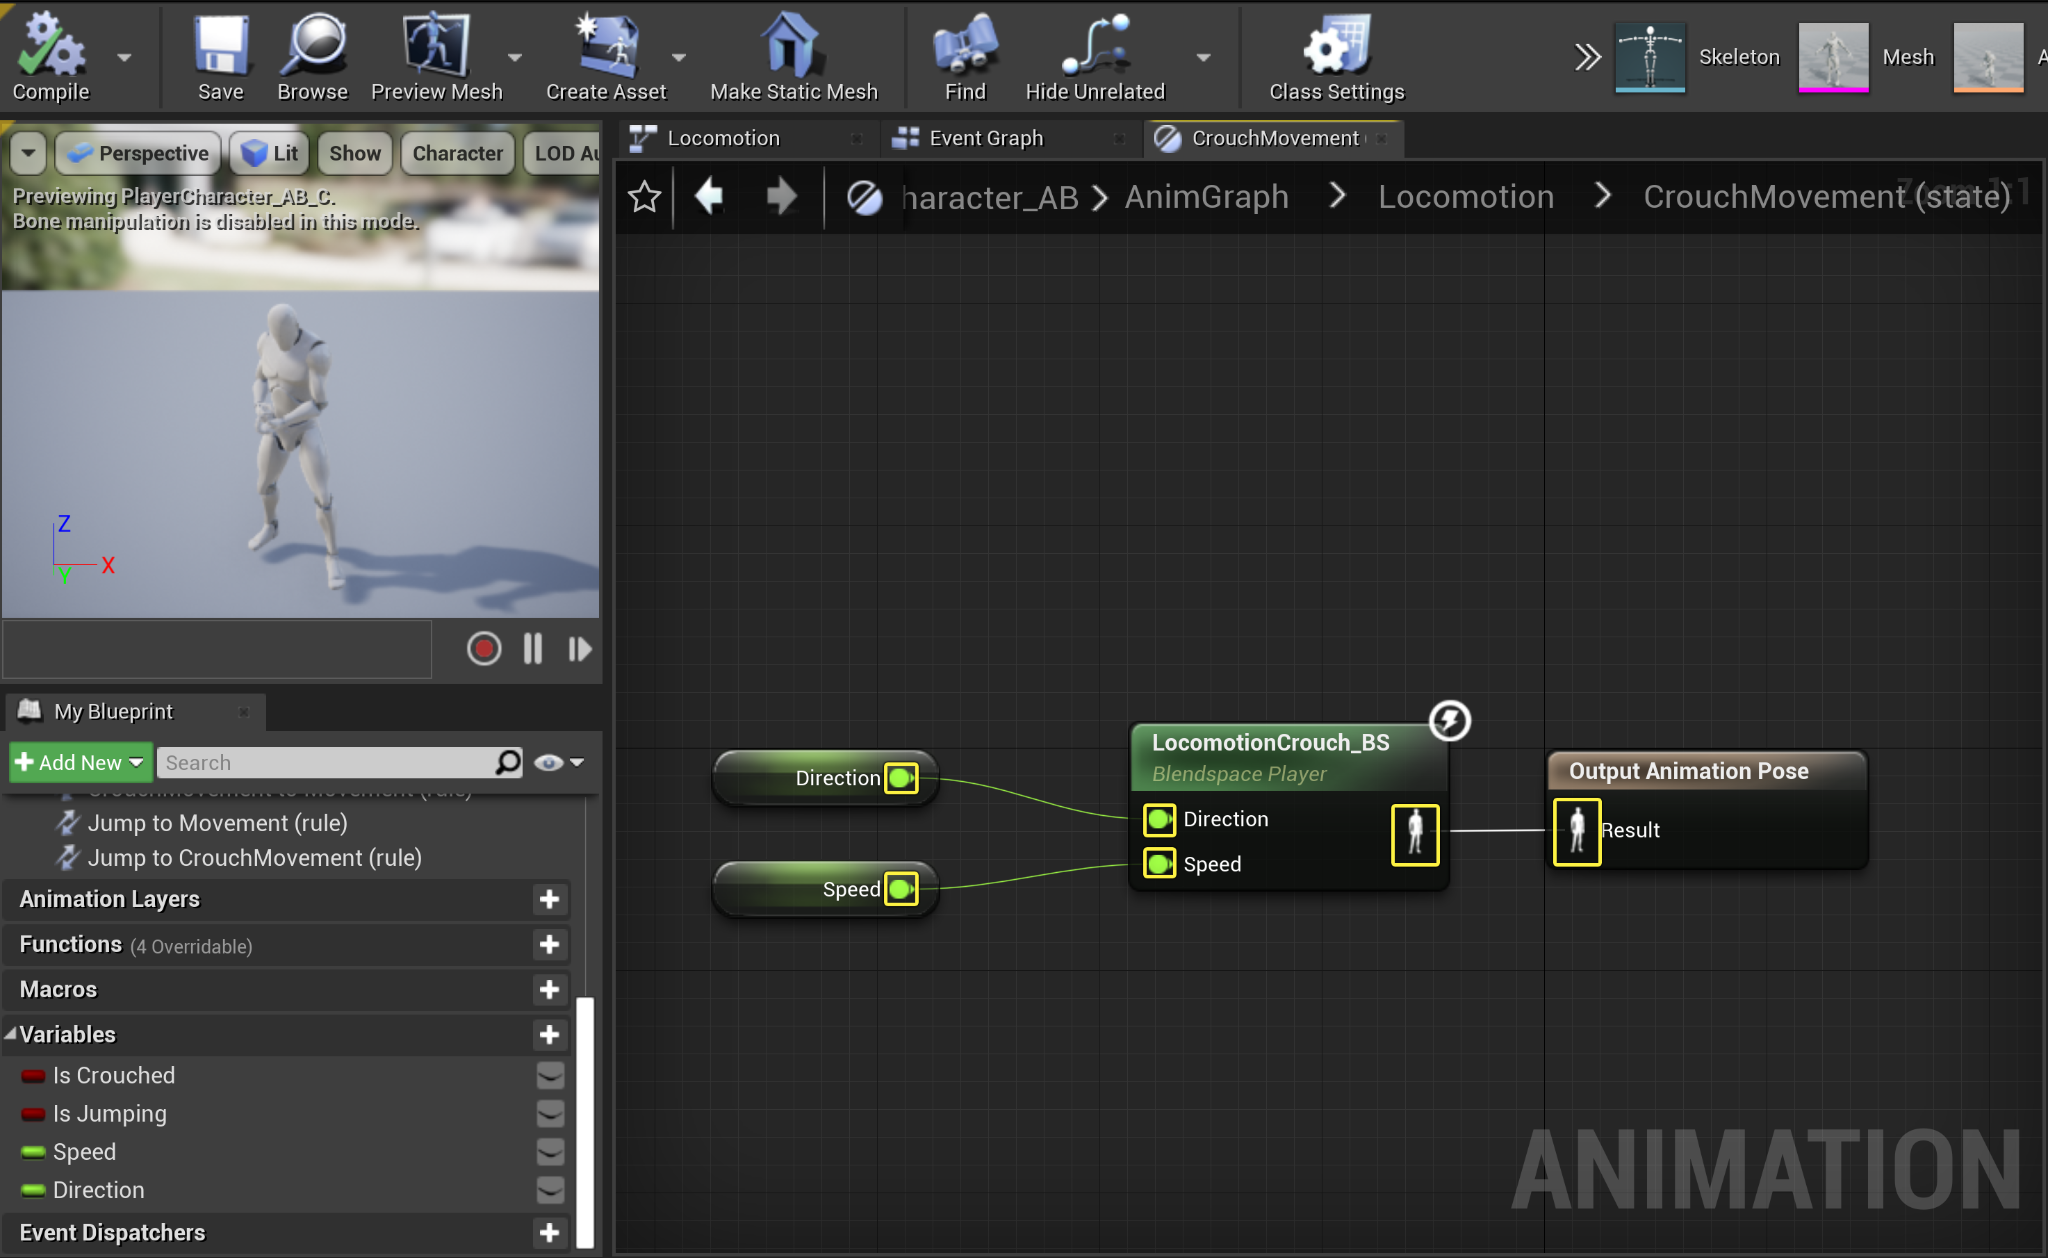
Navigate back to the Locomotion state machine graph , and double click on the Crouch Movement state to open its anim graph. From the Asset browser , search for your LocomotionCrouch_BS , then click and drag it into the graph.
![Add Locomotion Crouch asset]()
Click image to expand.
-
From the My Blueprint Tab , navigate to the variables category and drag your Speed and Direction float variables into their respective pins on the LocomotionCrouch_BS , then connect your LocomotionCrouch_BS Animation Pose into your Output Animation Pose Result pin .
![Connect variables to Locomotion Crouch]()
Click image to expand.
-
Compile and Save your Animation Blueprint.
![Compile and Save buttons]()
-
Navigate back to the Locomotion AnimGraph then click and drag off the CrouchMovement Animation state and connect it to the Movement Animation State .
![Connect Crouch Movement to Movement Animation]()
Click image to expand.
-
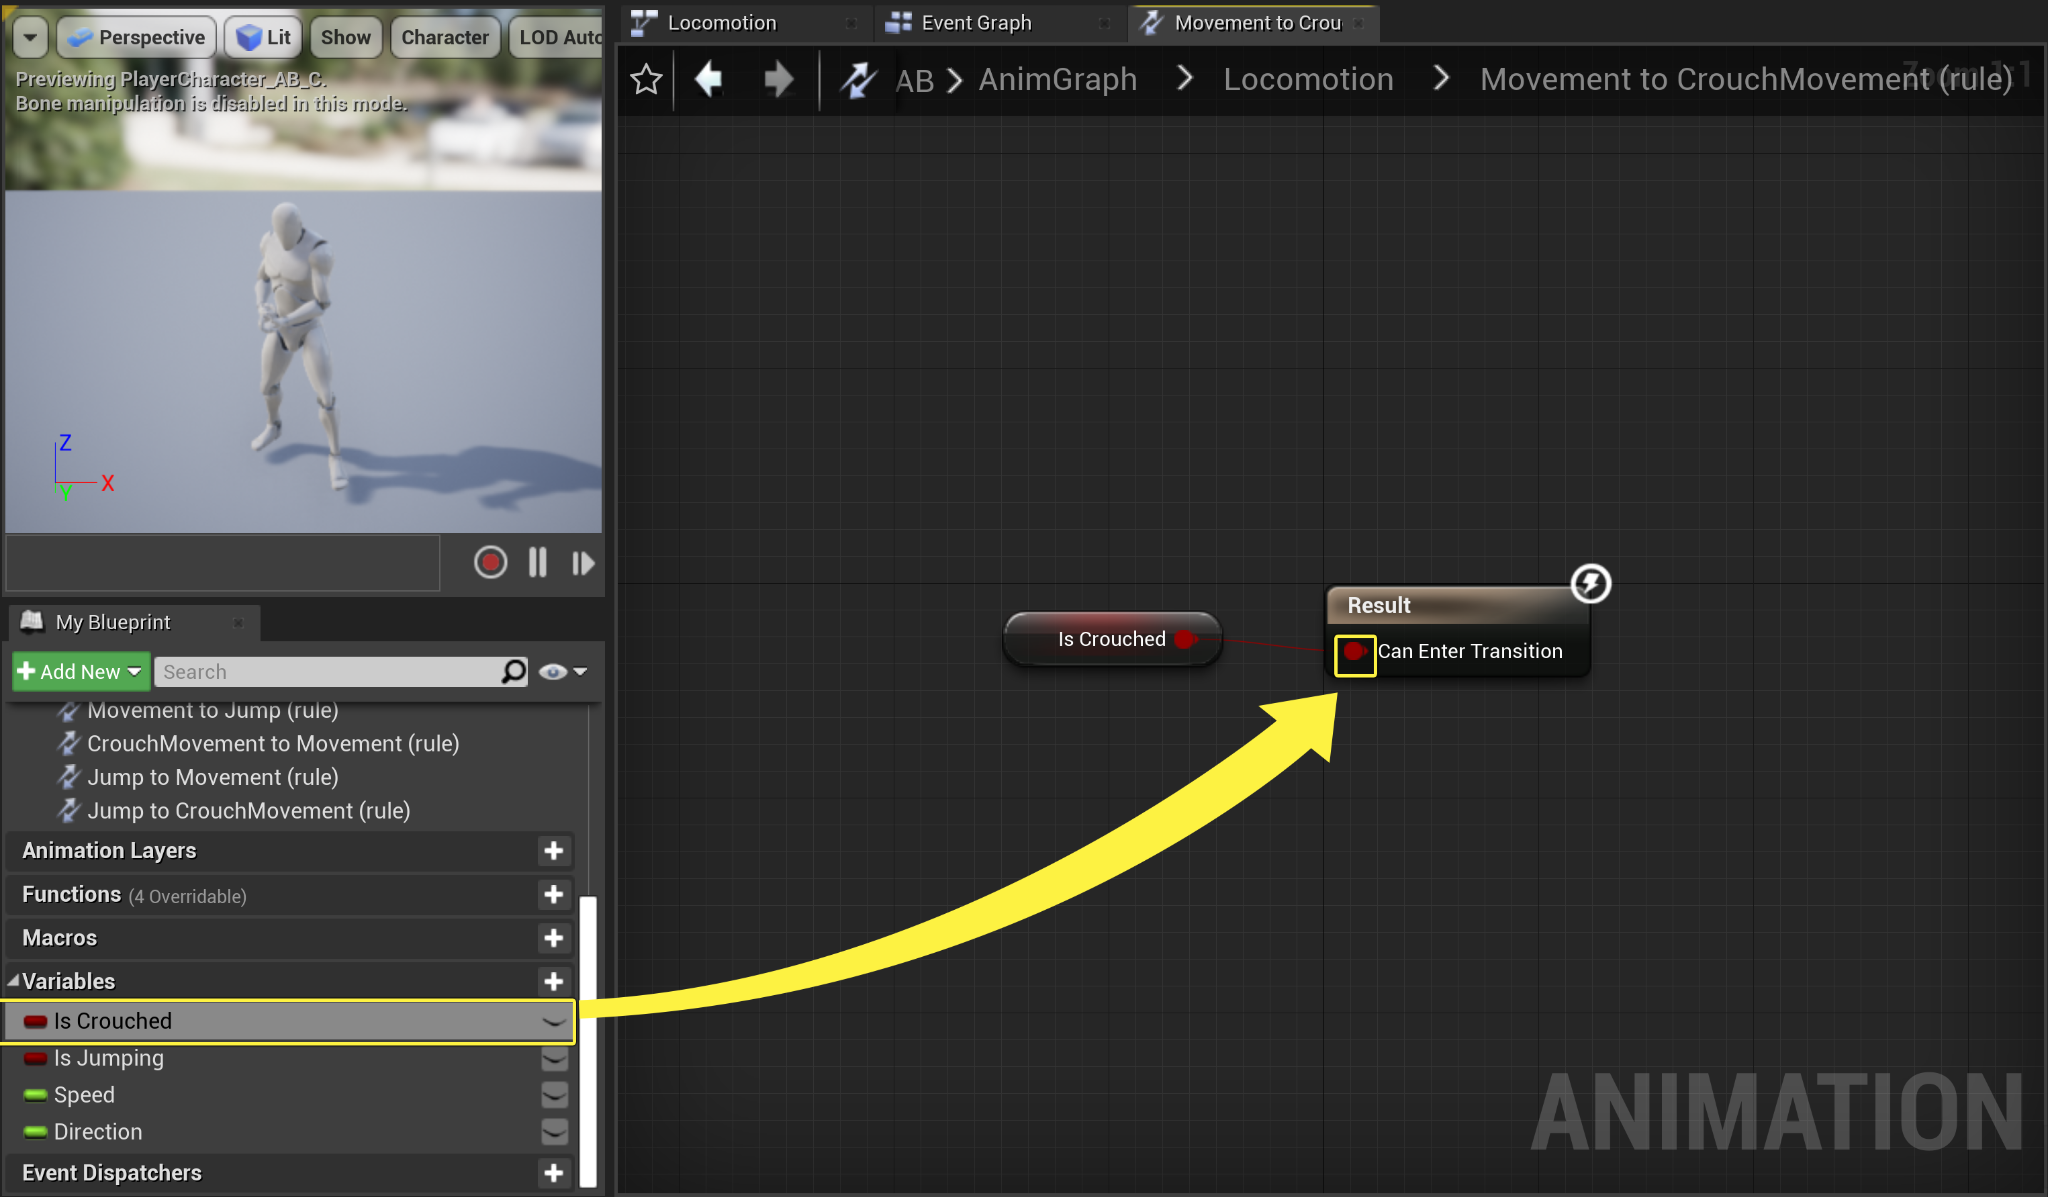
Double click the Transition rule node to open it's Anim Graph .
![Movement to Crouch Movement Transition]()
Click image to expand.
-
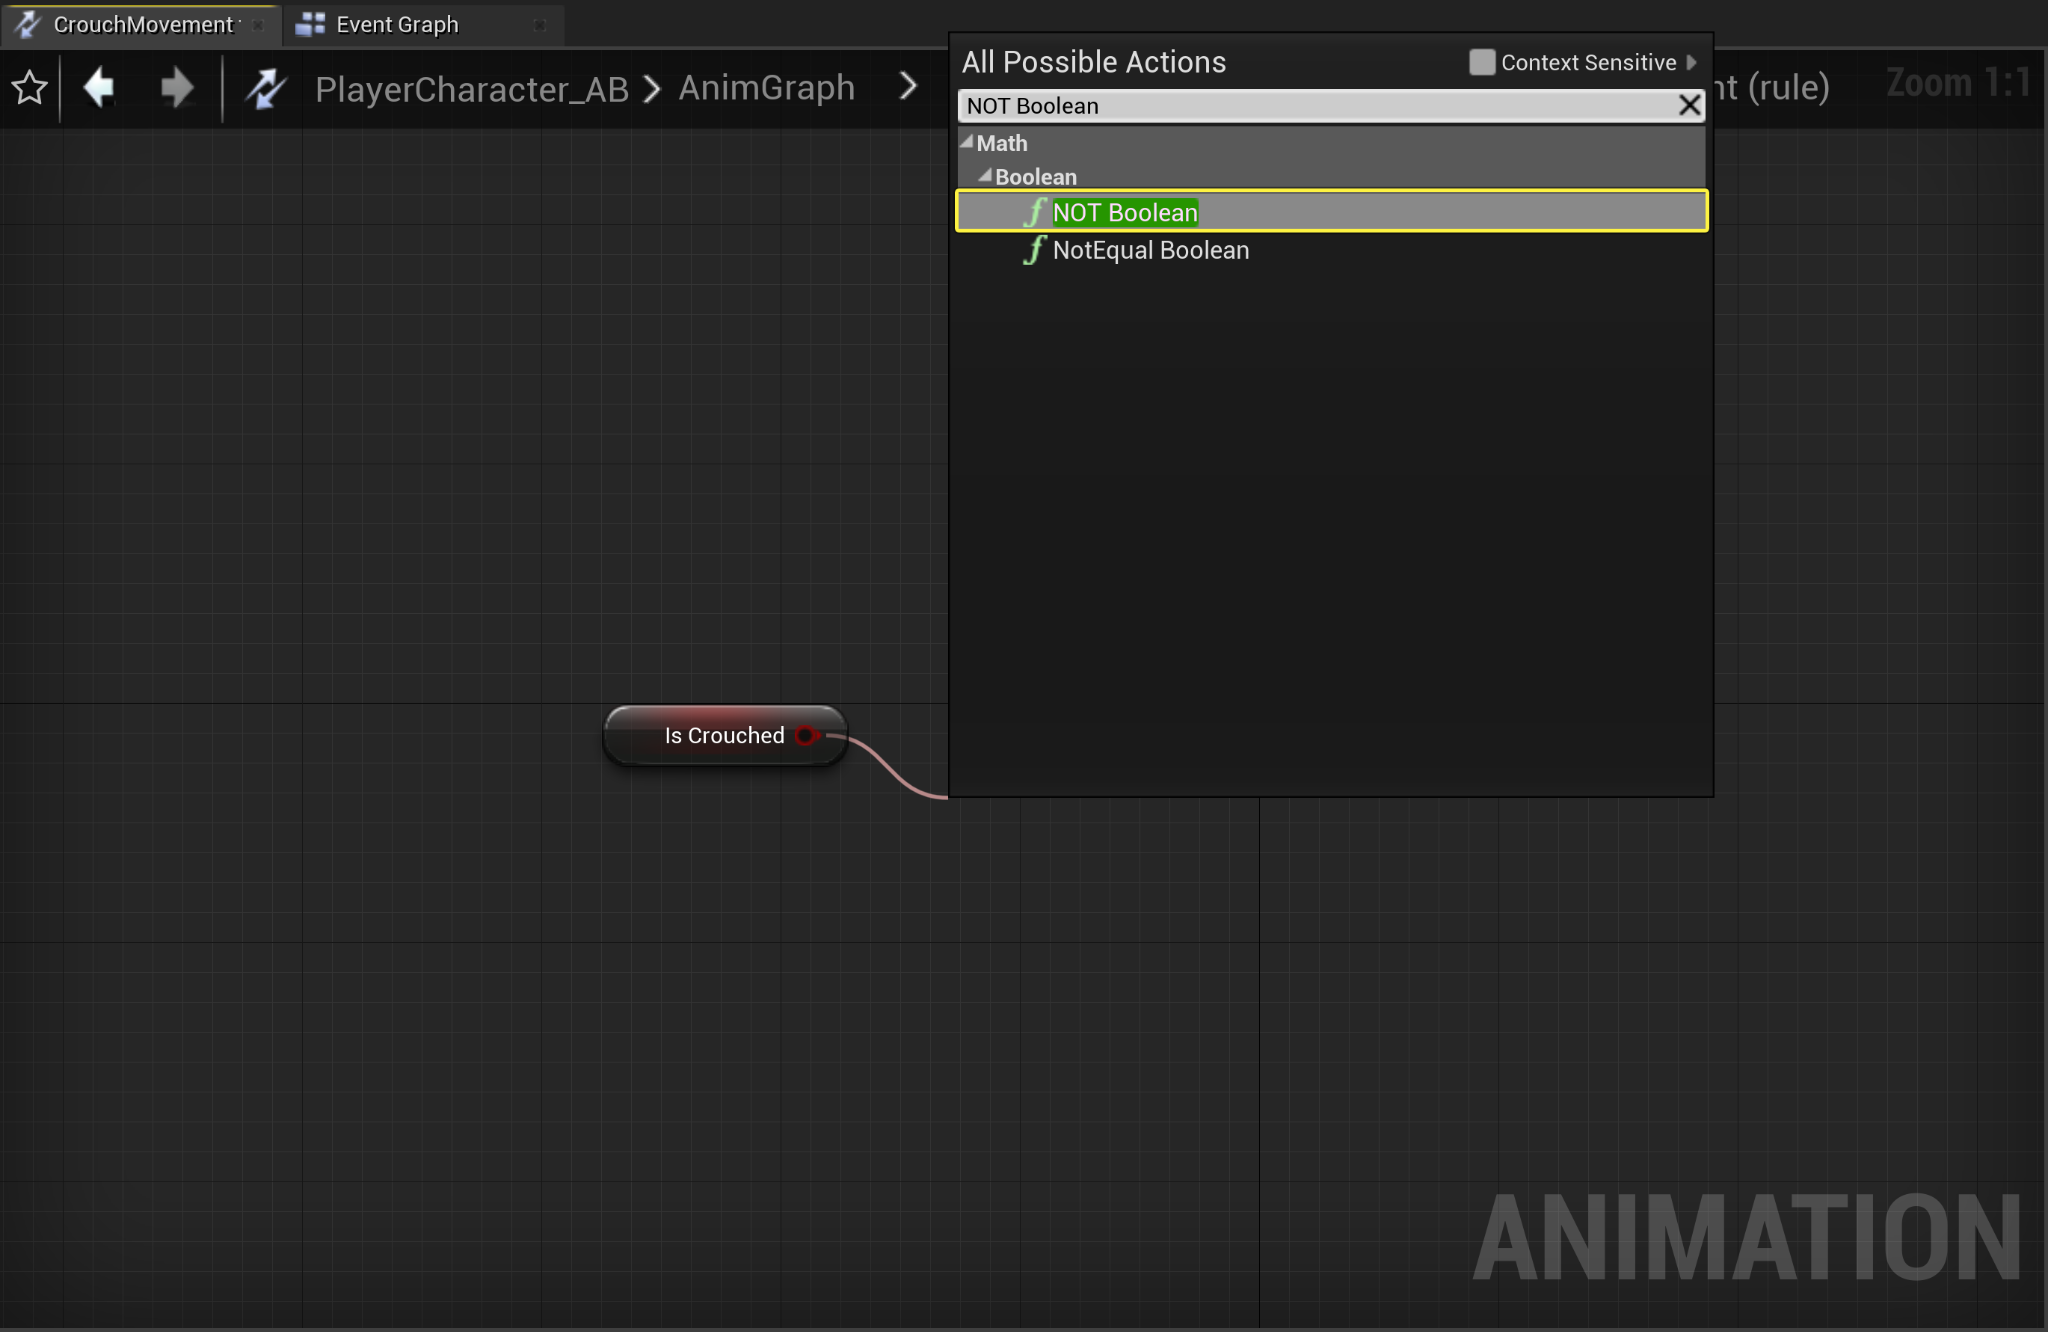
From the My Blueprints tab , click and drag the Is Crouched boolean variable onto the Anim Graph, select Get Is Crouched , then drag off from its output pin and in the drop down actions menu search for and select NOT Boolean.
![Is Crouched NOT Boolean]()
Click image to expand.
-
Next, connect the NOT Boolean's return pin to the Can Enter Transition input pin .
![Connect NOT Boolean to Can Enter Transition]()
Click image to expand.
-
Compile and Save .
![Compile and Save buttons]()
-
Navigate back to the Anim Graph , then click and drag off from the Movement Animation state and select Add State .
![Add Jump State]()
Click image to expand.
-
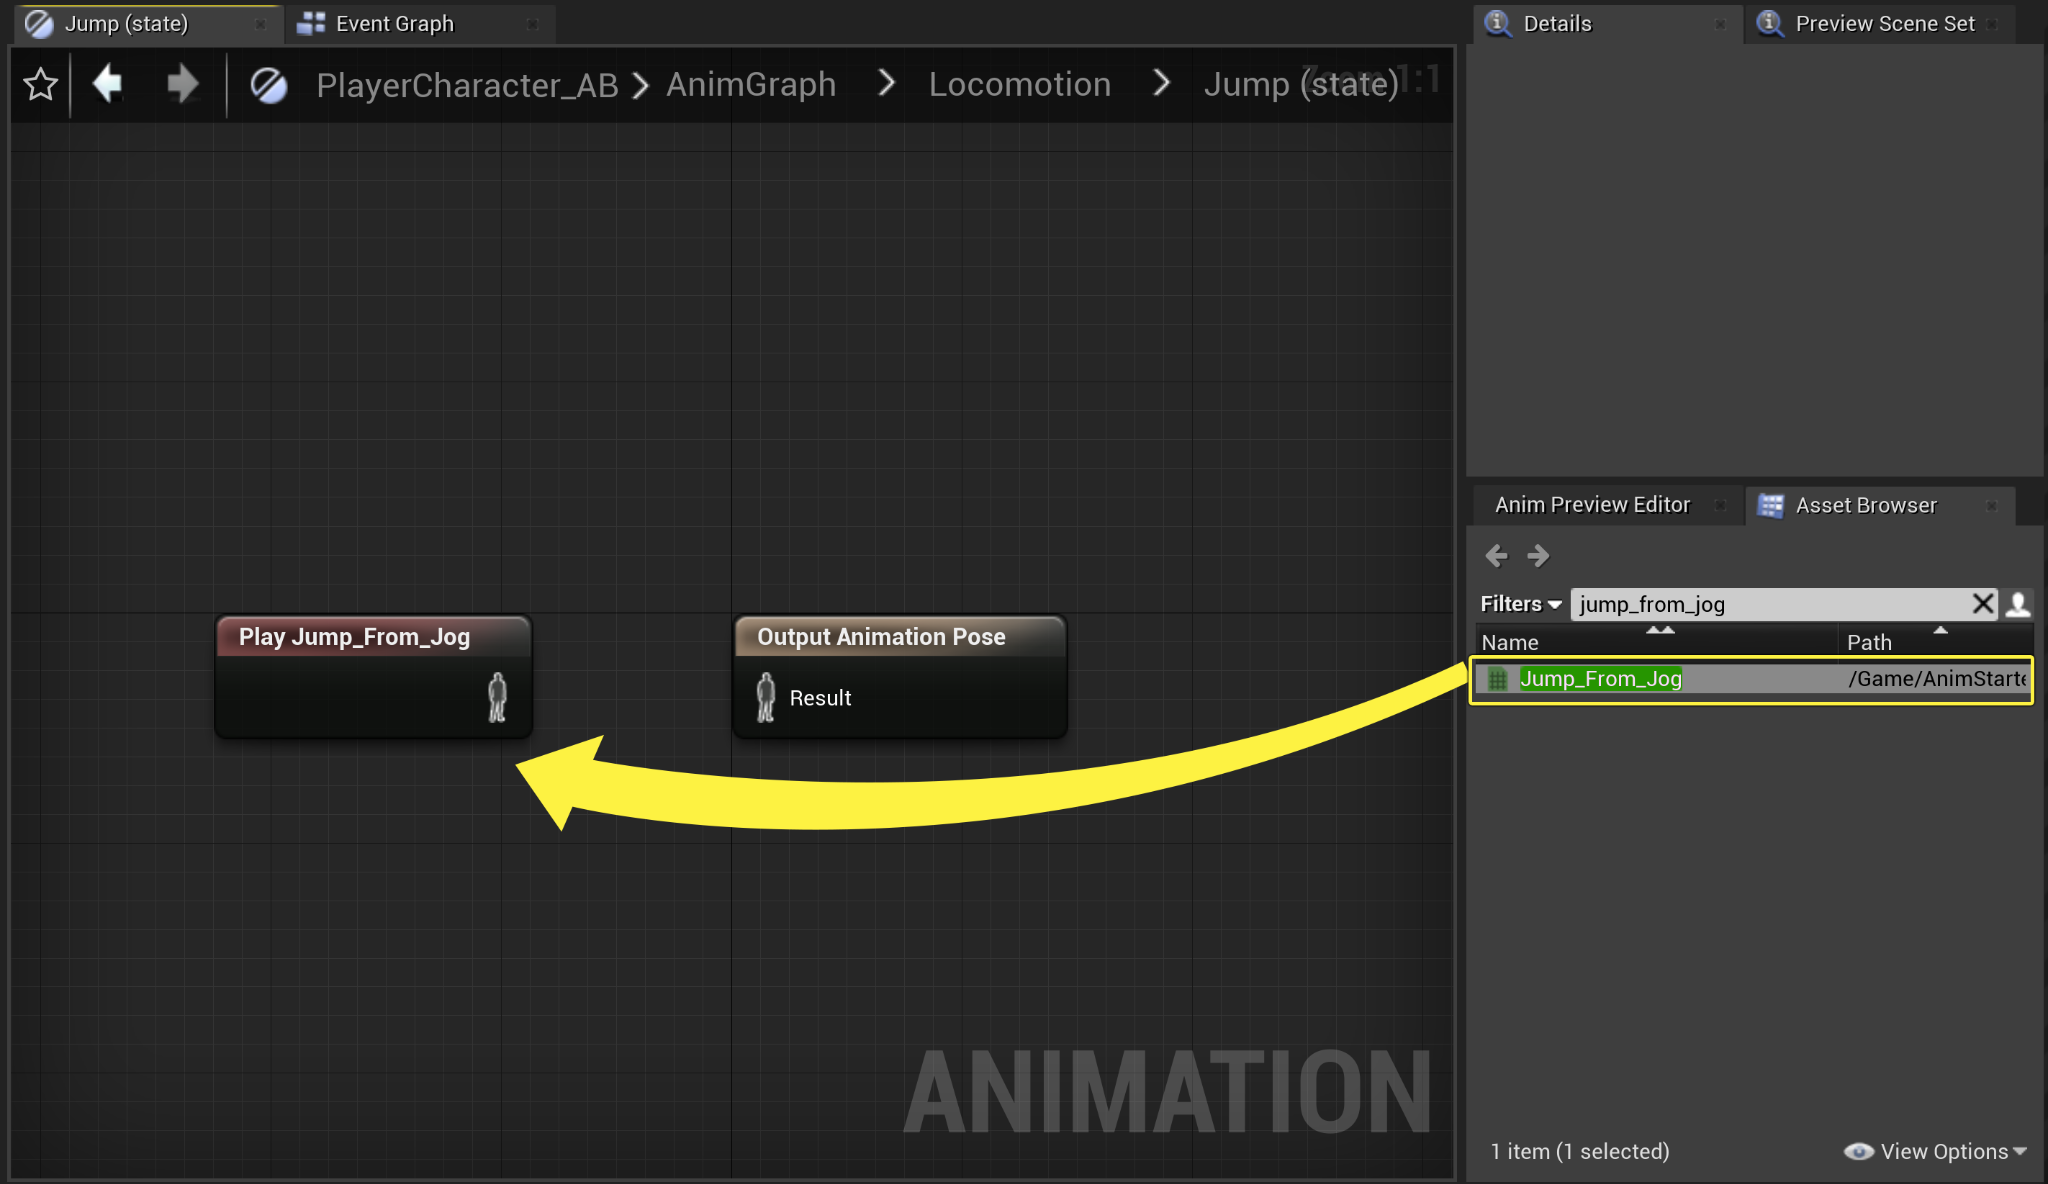
Rename this Animation State to Jump, then double-click to open its animation graph. Navigate to the Asset Browser and search for Jump_From_Jog , then drag it into the graph.
![Add Jump from Jog asset]()
Click image to expand.
-
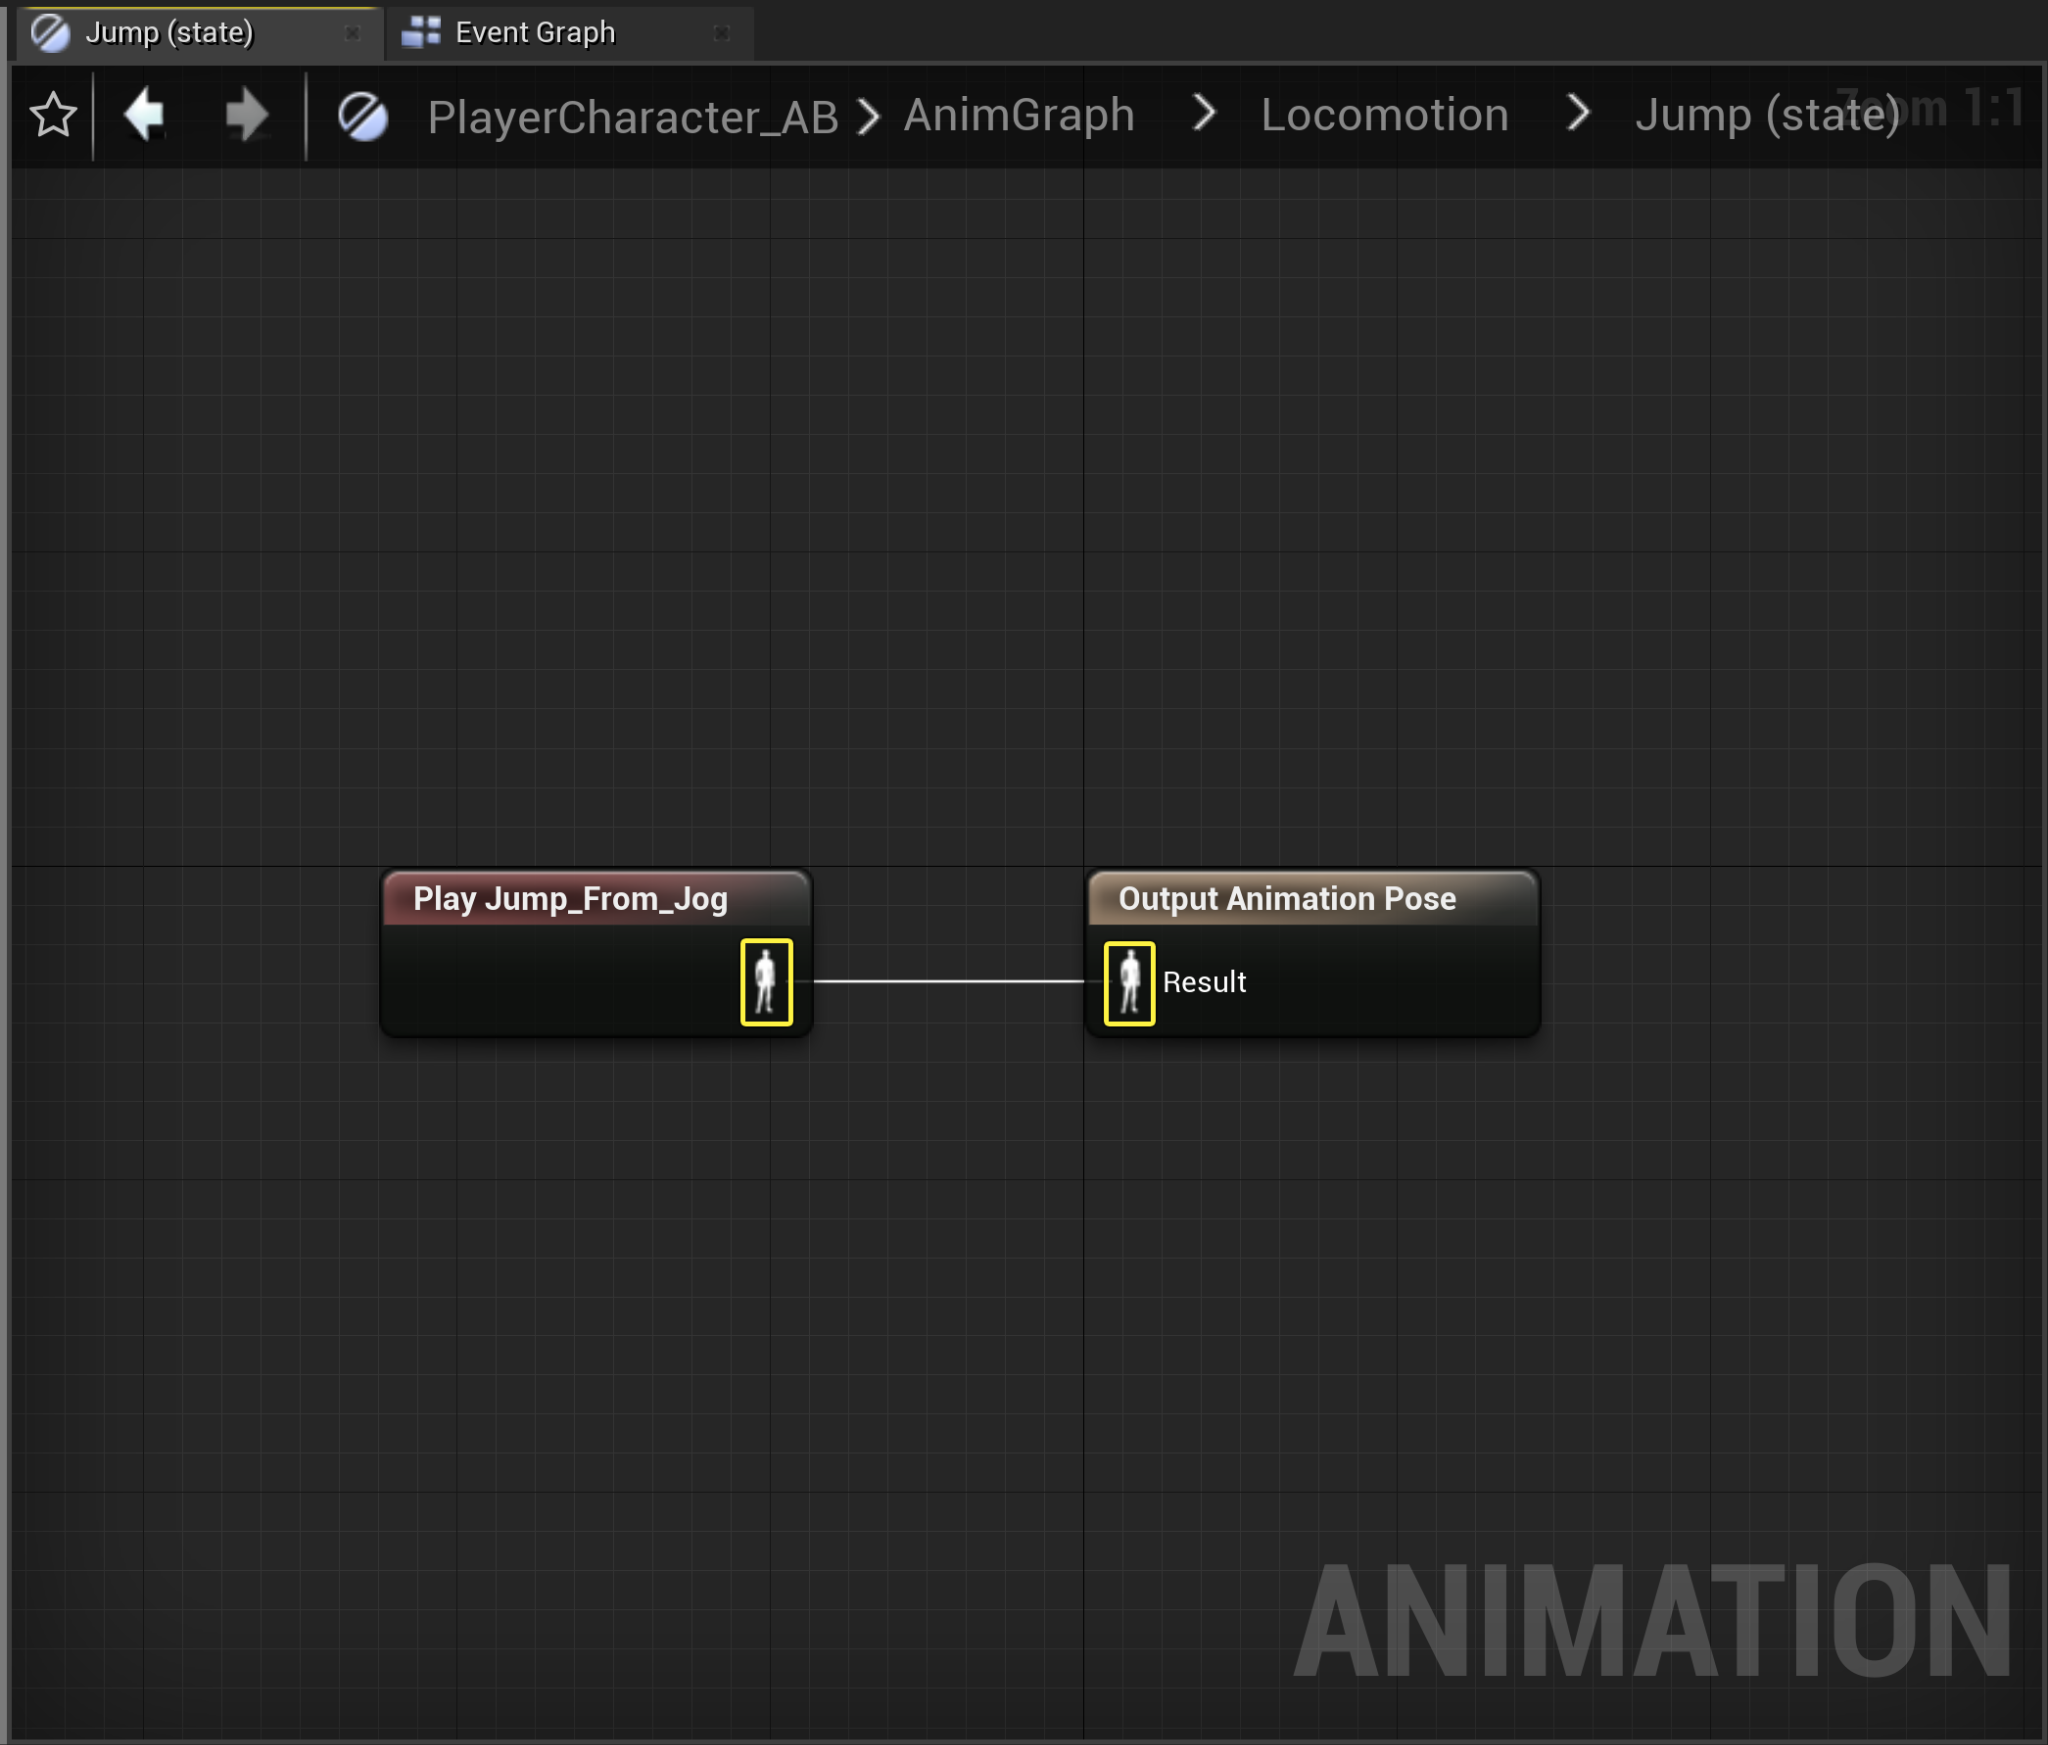
Finish your Jump Animation State by connecting your Play Jump_From_Jog Animation Pose to your Output Animation Pose Result pin.
![Connect Jump from Jog to Output Animation]()
Click image to expand.
-
Navigate back to the Locomotion Anim Graph , then double-click the Movement to Jump Transition rule node to open its Anim Graph.
![Open Movement to Jump Transition Anim Graph]()
Click image to expand.
-
Inside the Transition Rule Anim Graph , navigate to the My Blueprints tab , and drag your Is Jumping Boolean variable onto the Result node's Can Enter Transition input pin .
![Connect Is Jumping Boolean to Can Enter Transition]()
Click image to expand.
-
Navigate back to the Locomotion Anim Graph , then click and drag off the Jump anim node and create a transition to the Movement Anim Graph node .
![Jump animation transition to Movement]()
Click image to expand.
-
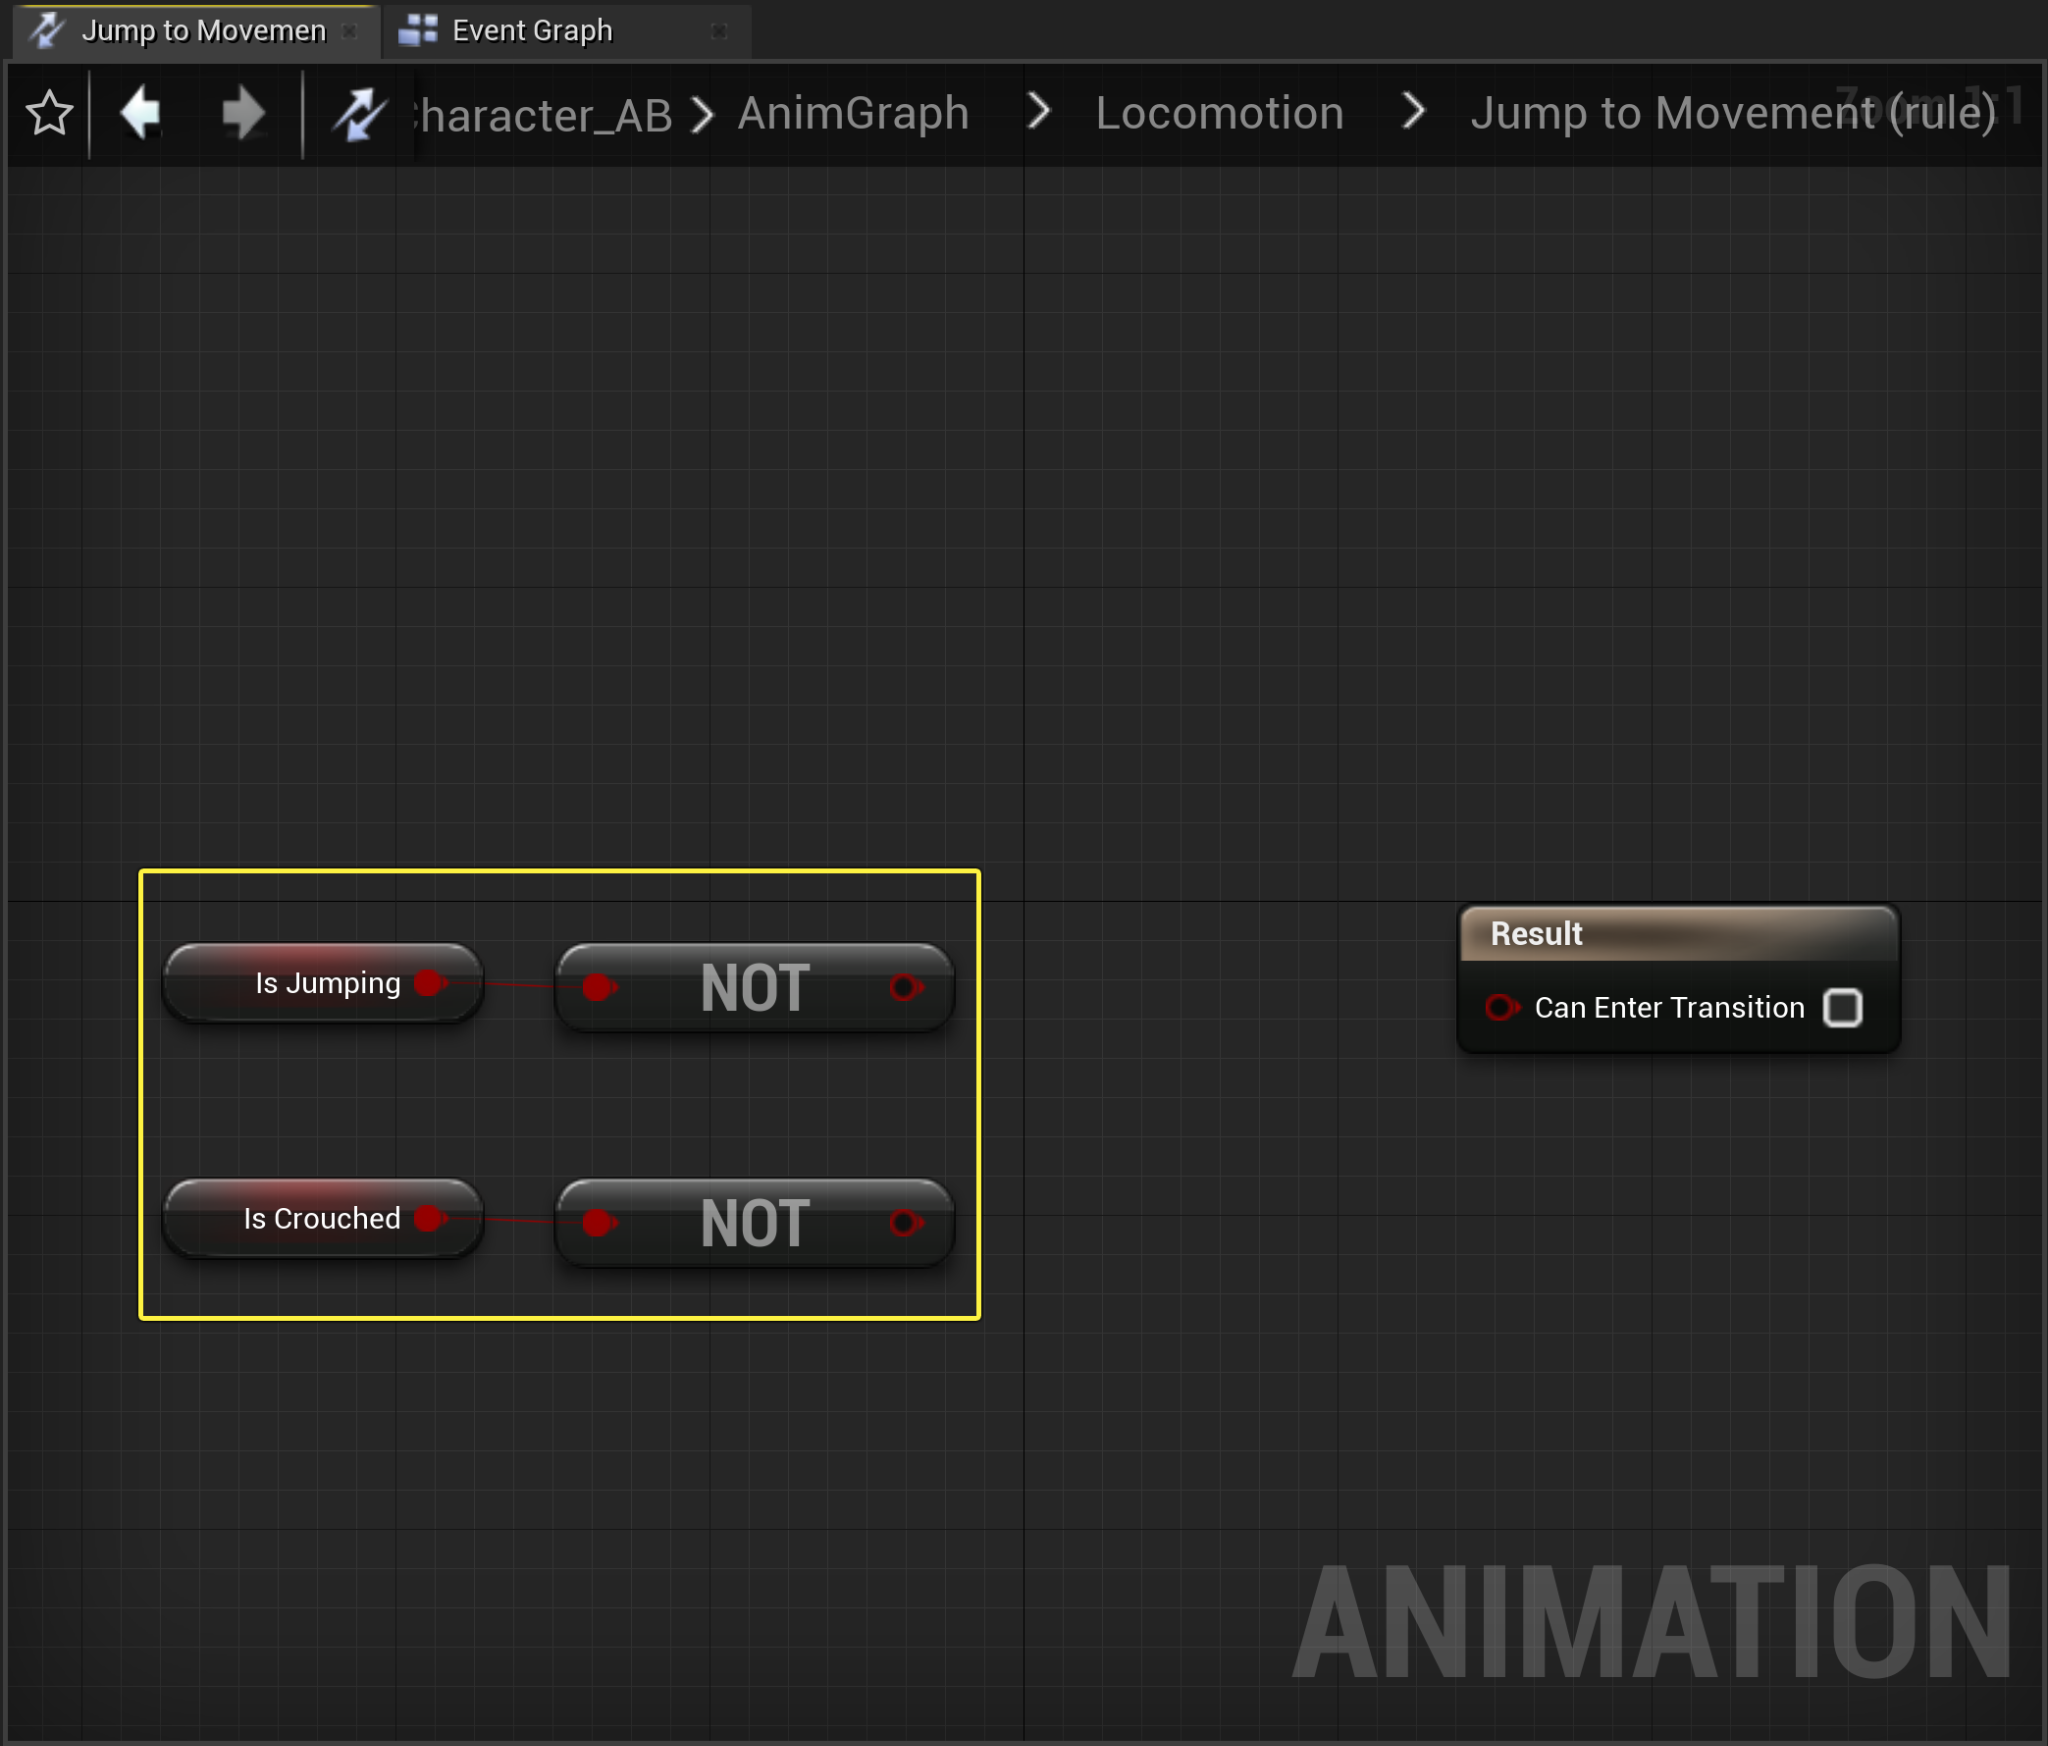
Double-click the Jump to Movement Transition rule node to open it's Anim Graph .
![Jump to Movement Transition Rule Anim Graph]()
Click image to expand.
-
From the My Blueprints tab , click and drag the Is Crouched , and Is Jumping Boolean variable onto the Anim Graph , then drag off each of their output pins and from the drop down actions menu search for and select NOT Boolean.
![Add Boolean variables and NOT node]()
Click image to expand.
-
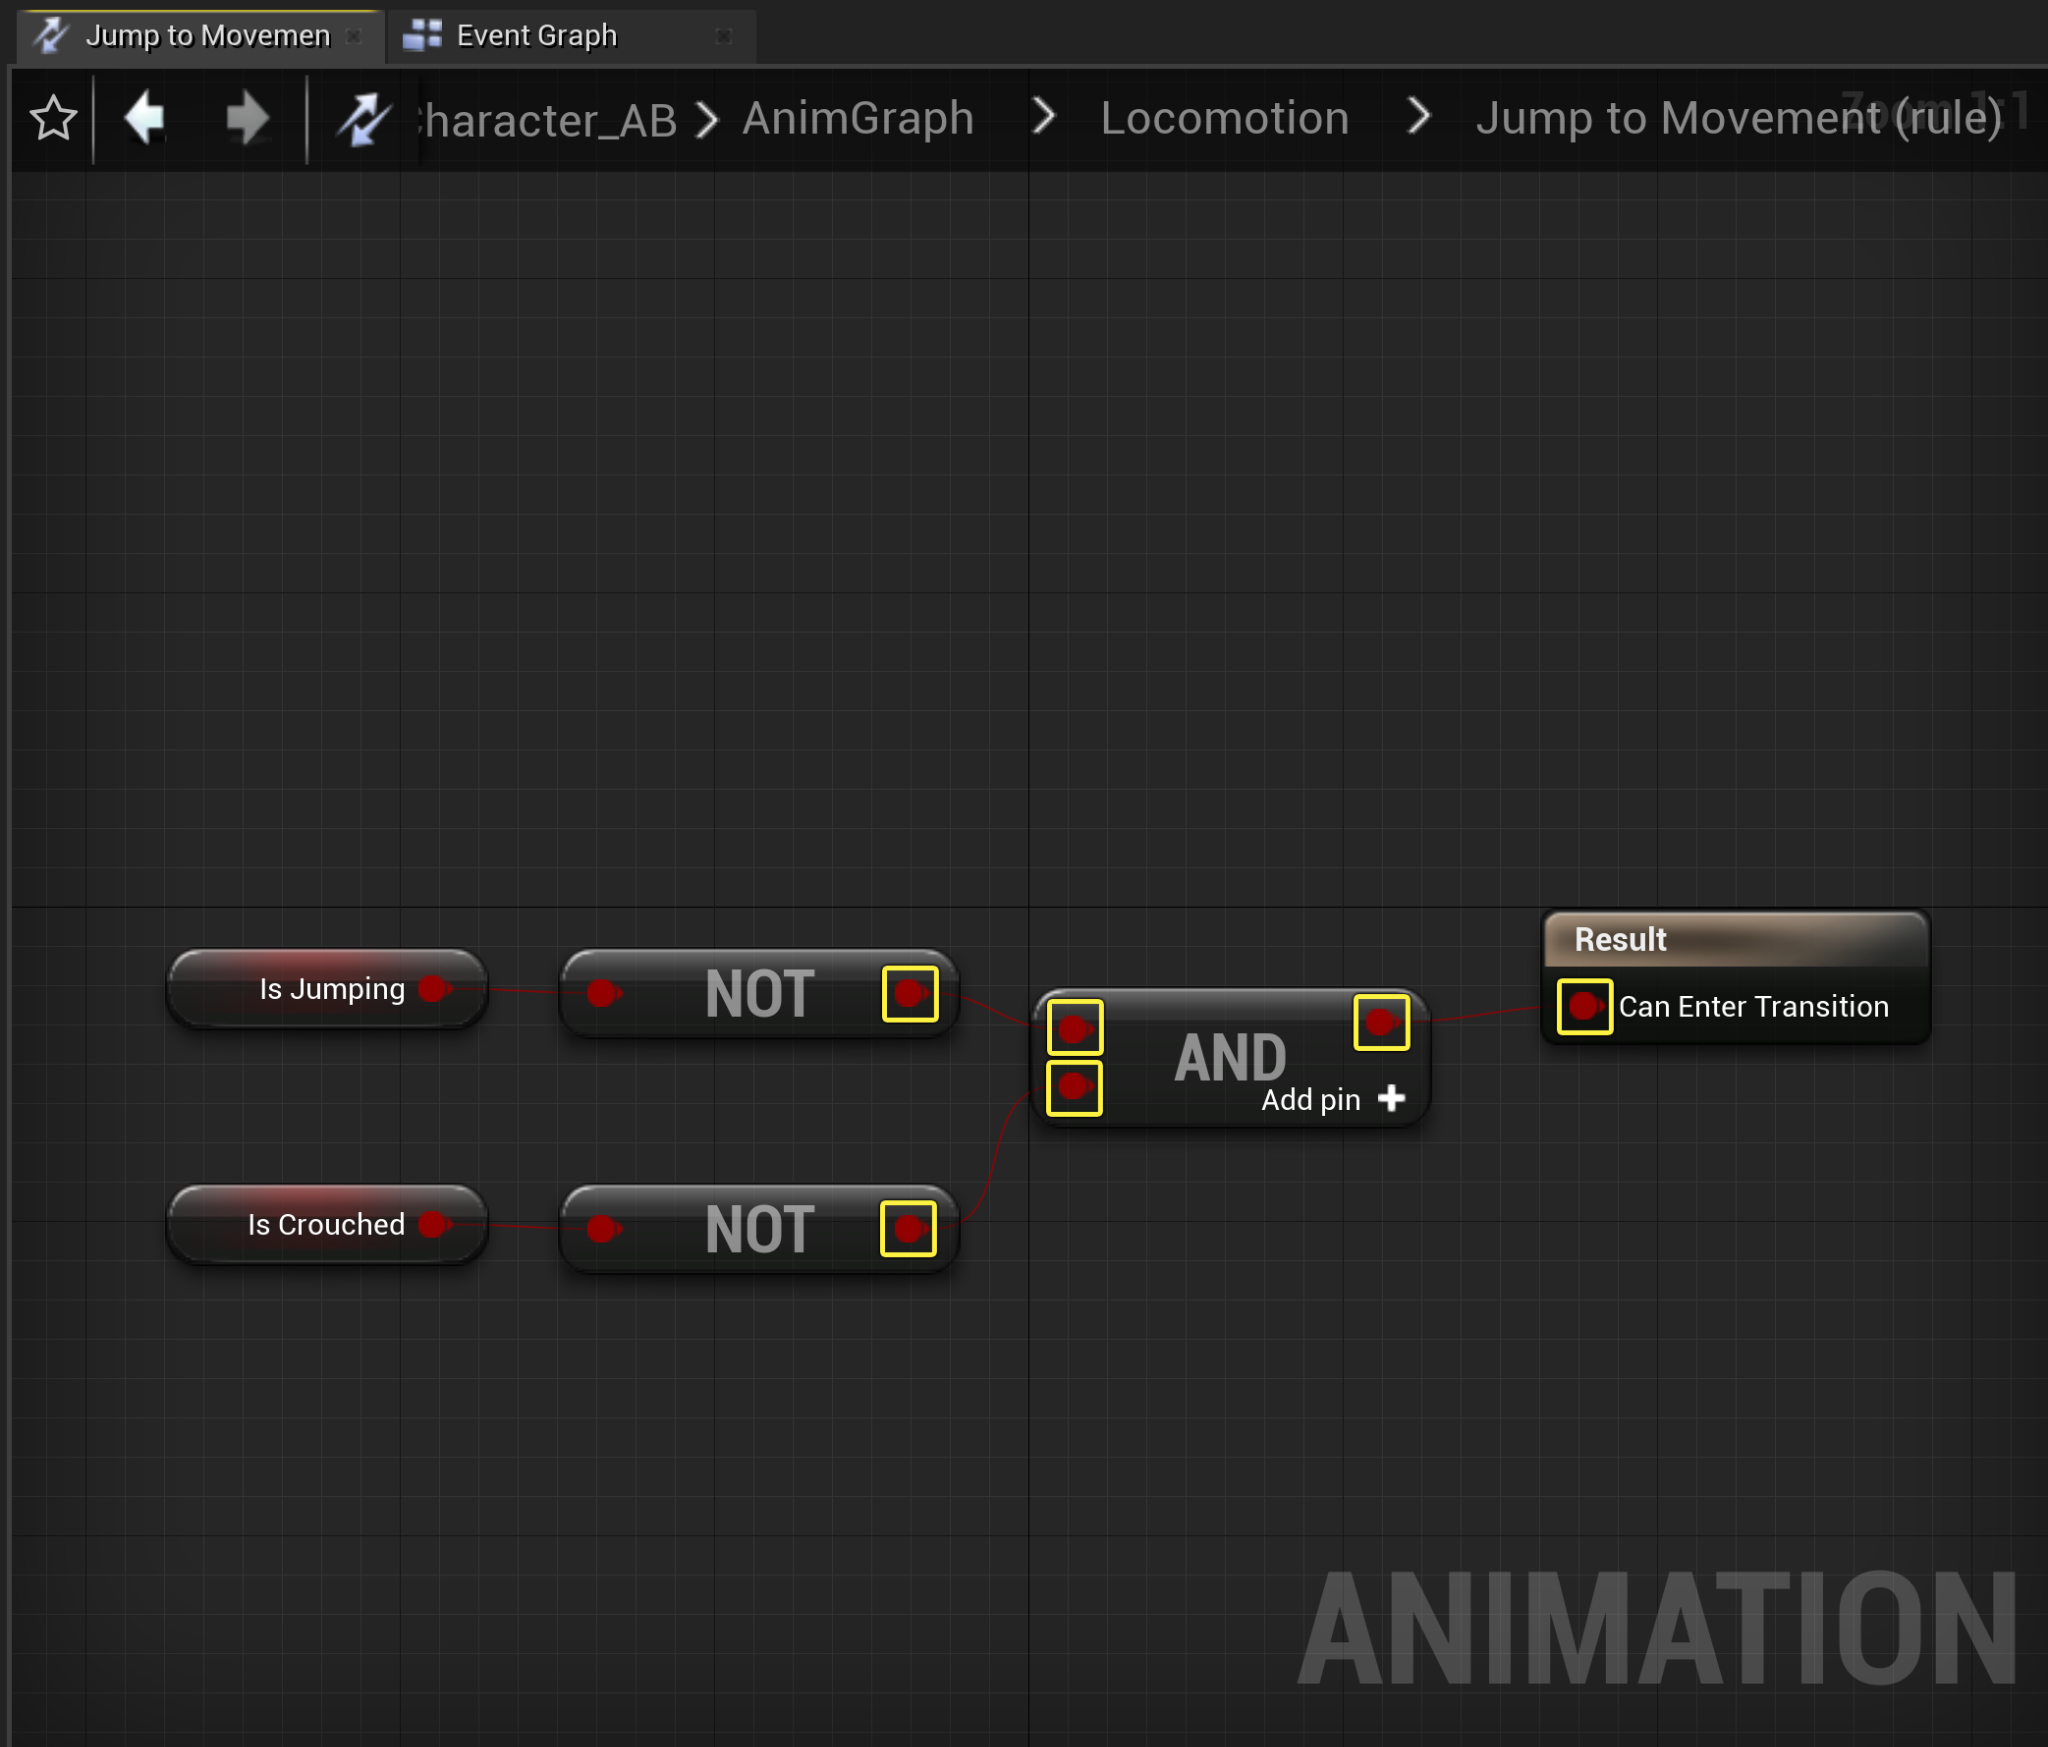
Drag off the NOT Boolean output pin and search for and select for the AND Boolean.
![Connect NOT Boolean to AND Boolean]()
-
Connect both the Is Crouched , and Is Jumping NOT Boolean node output pins into the AND Boolean node's input pins , then connect the AND boolean's output pin into the Result node's Can Enter Transition Input pin .
![Connect AND Boolean to Can Enter Transition]()
Click image to expand.
-
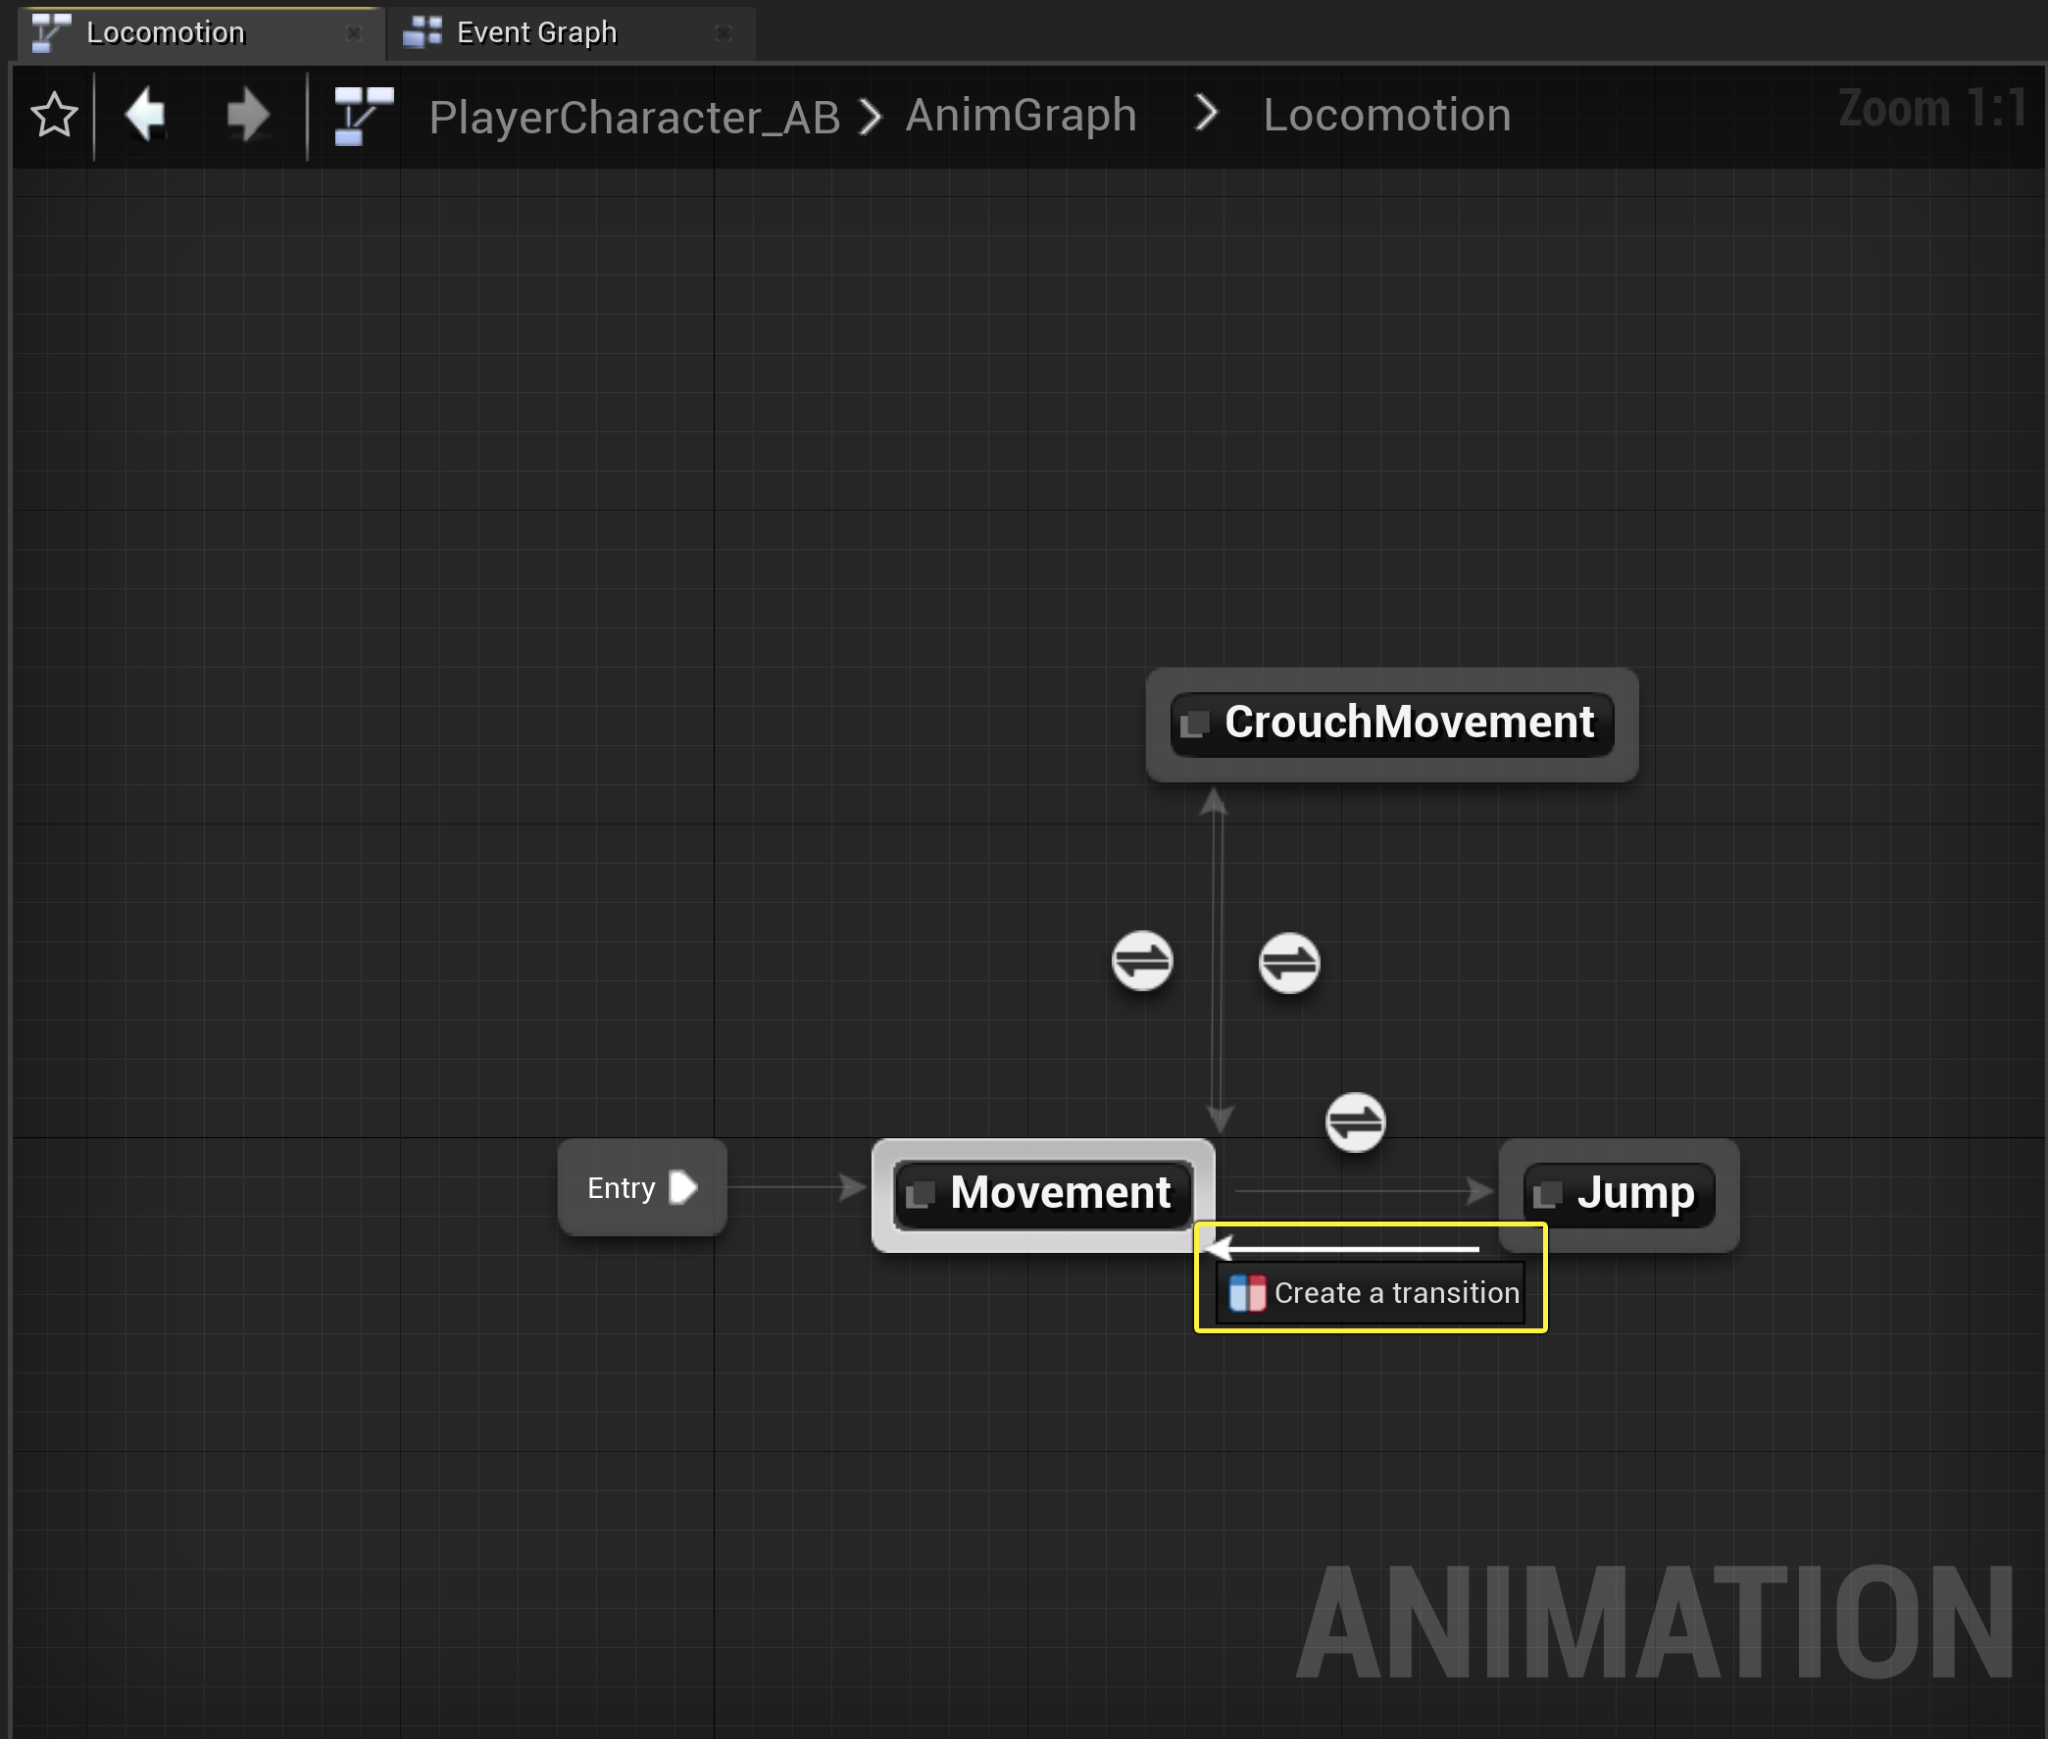
Navigate back to the Locomotion Anim Graph , then click and drag off the Crouch node and create a transition to the Jump node .
![Crouch Animation node Transition to Jump Animation node]()
Click image to expand.
-
Double-click the Crouch Movement to Jump Transition rule node to open it's Anim Graph .
![Open Jump Transition rule Anim Graph]()
Click image to expand.
-
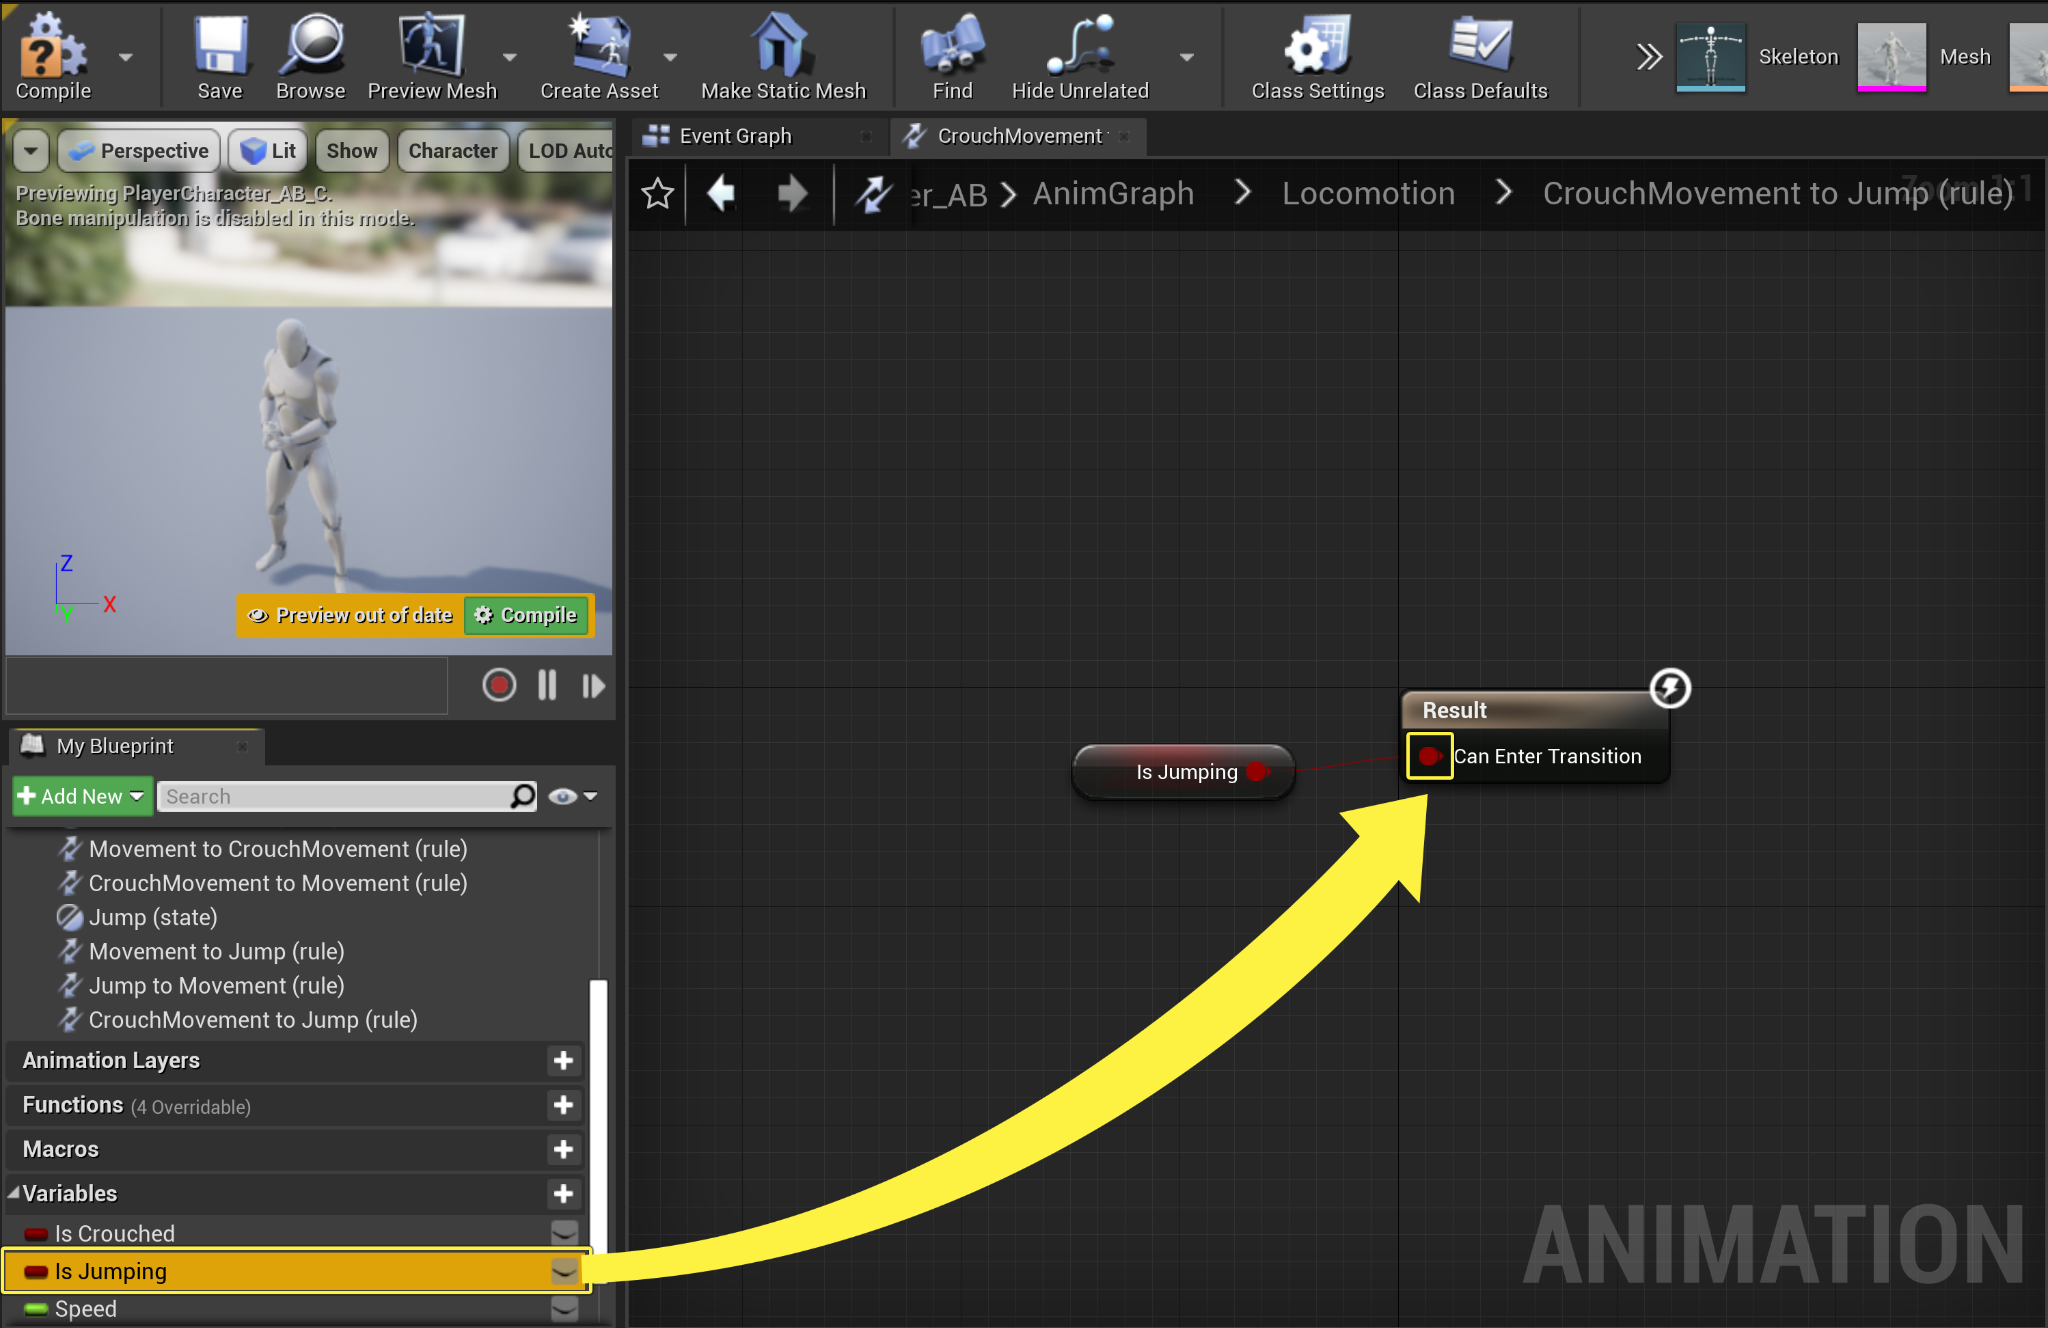
Inside the CrouchMovement to Jump transition rule Anim Graph, navigate to the My Blueprint tab , then click and drag your Is Jumping bool variable onto the Result node's Can Enter Transition input pin .
![Connect Is Jumping to Can Enter Transition]()
Click image to expand.
-
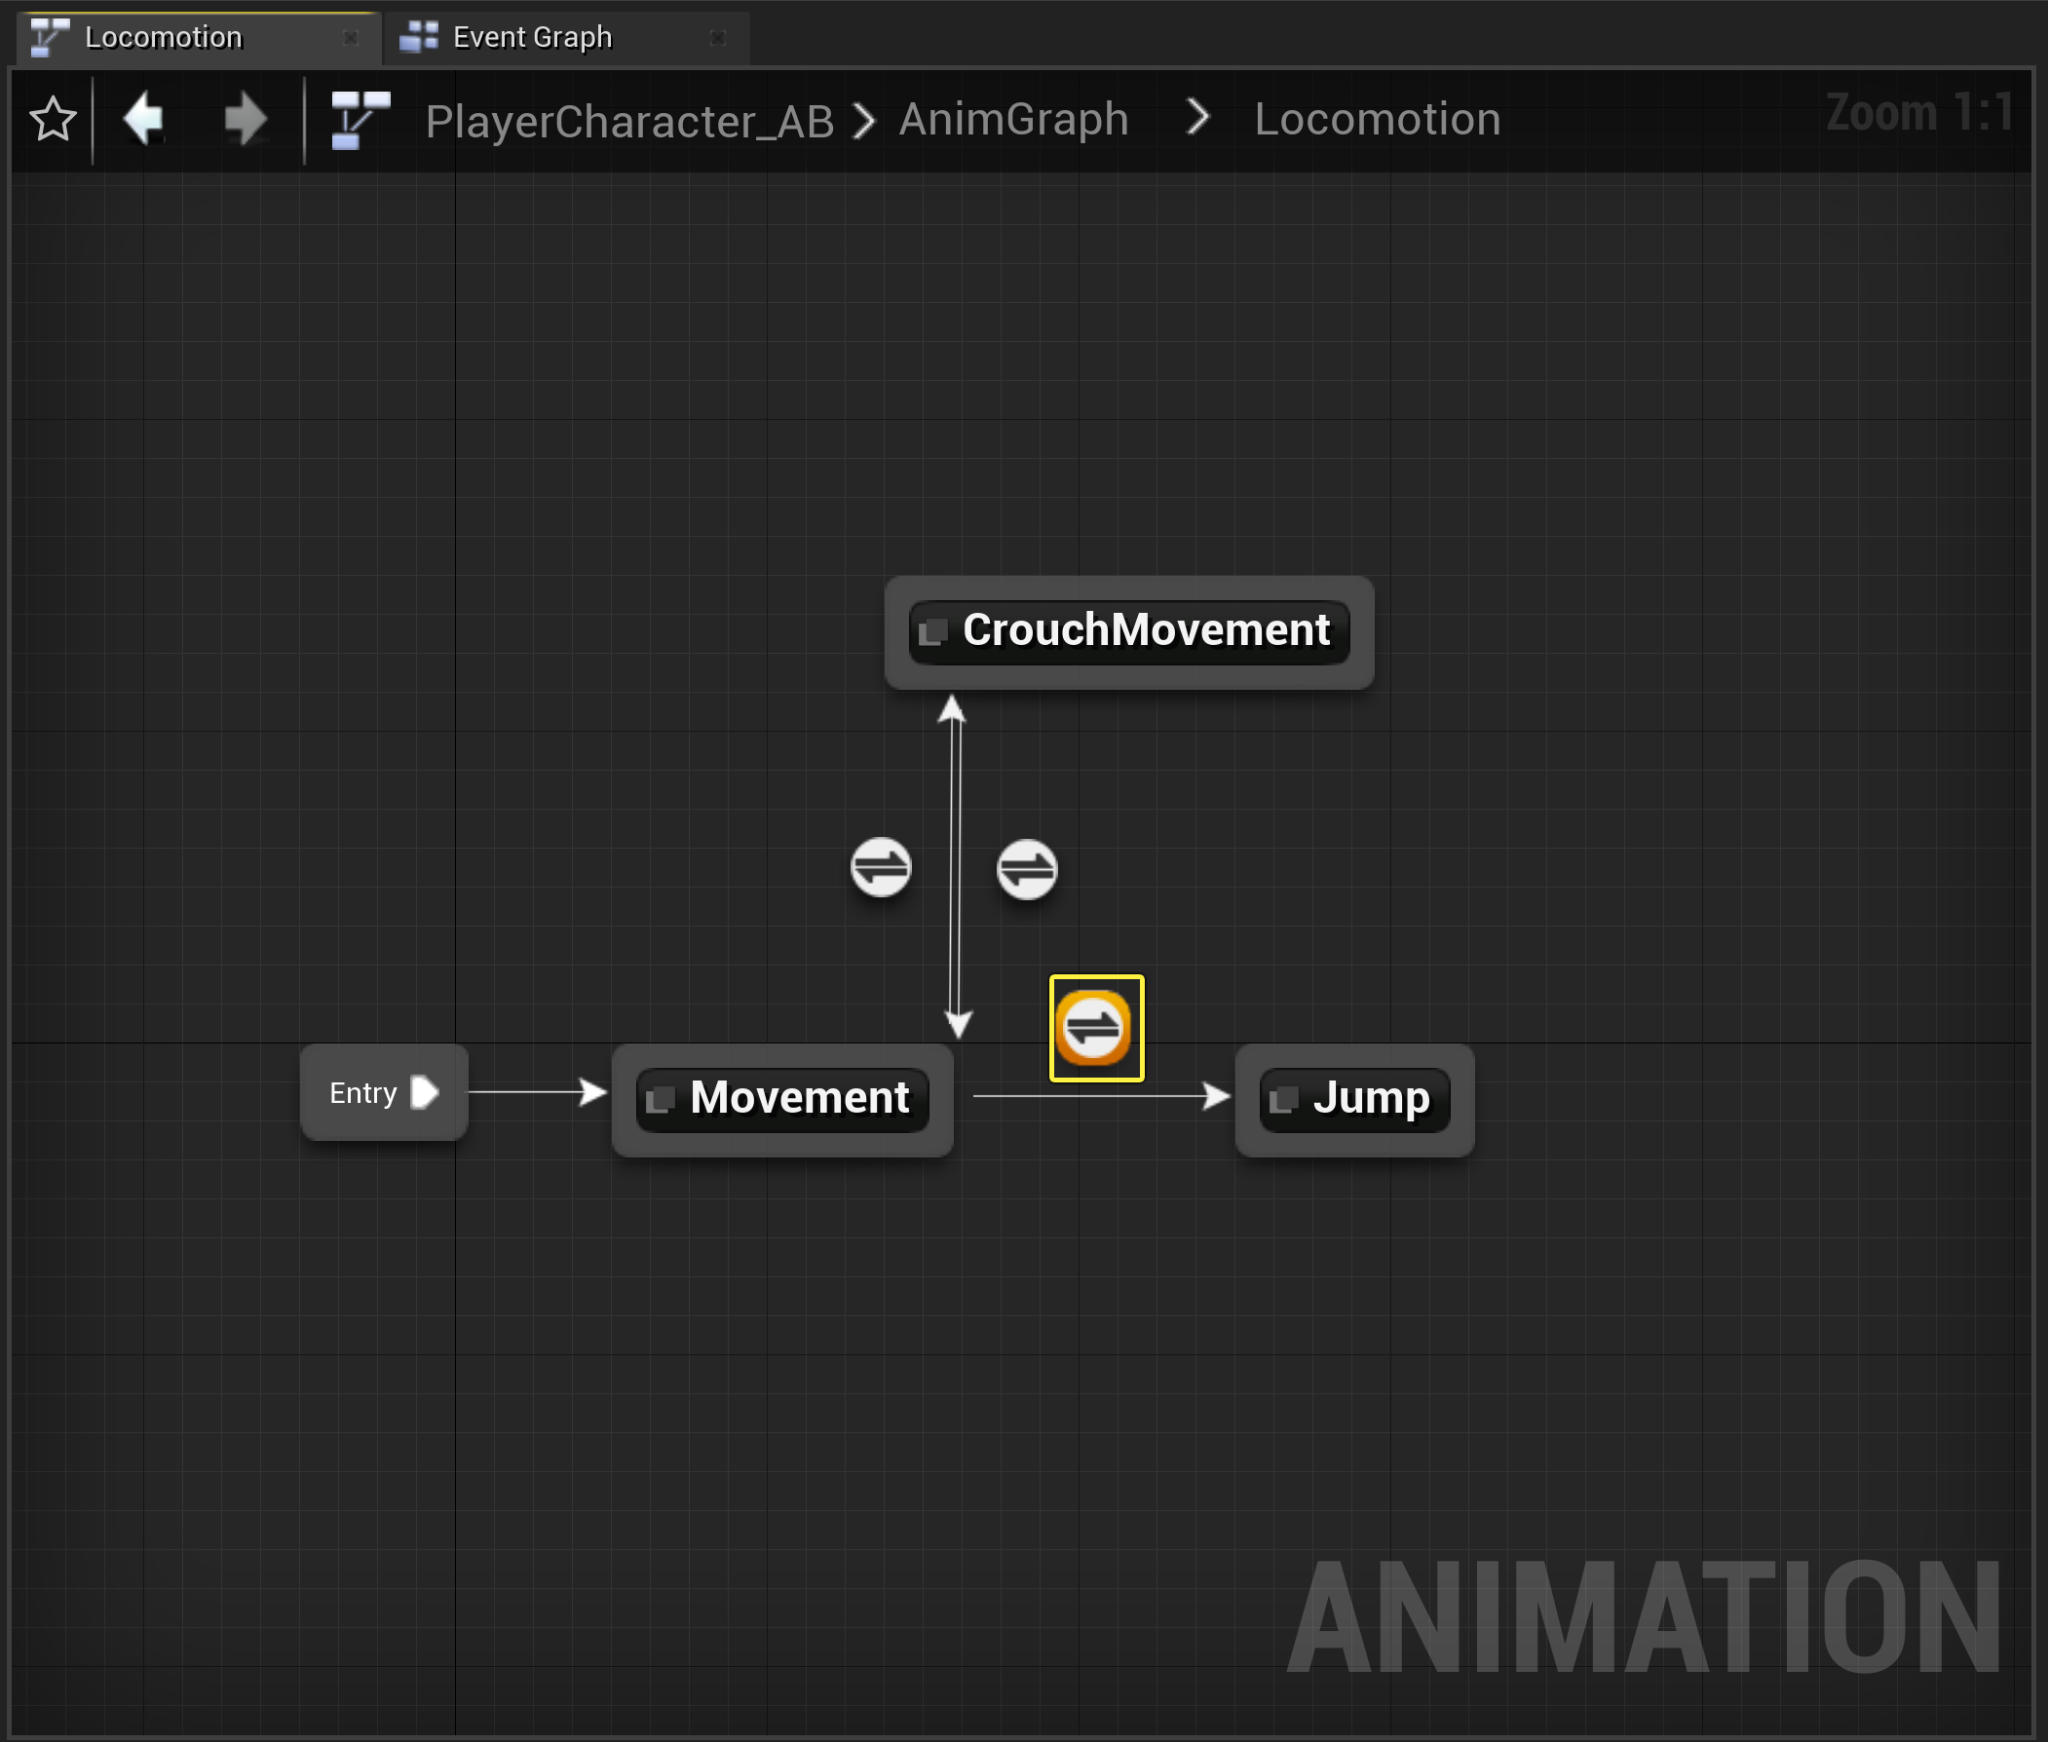
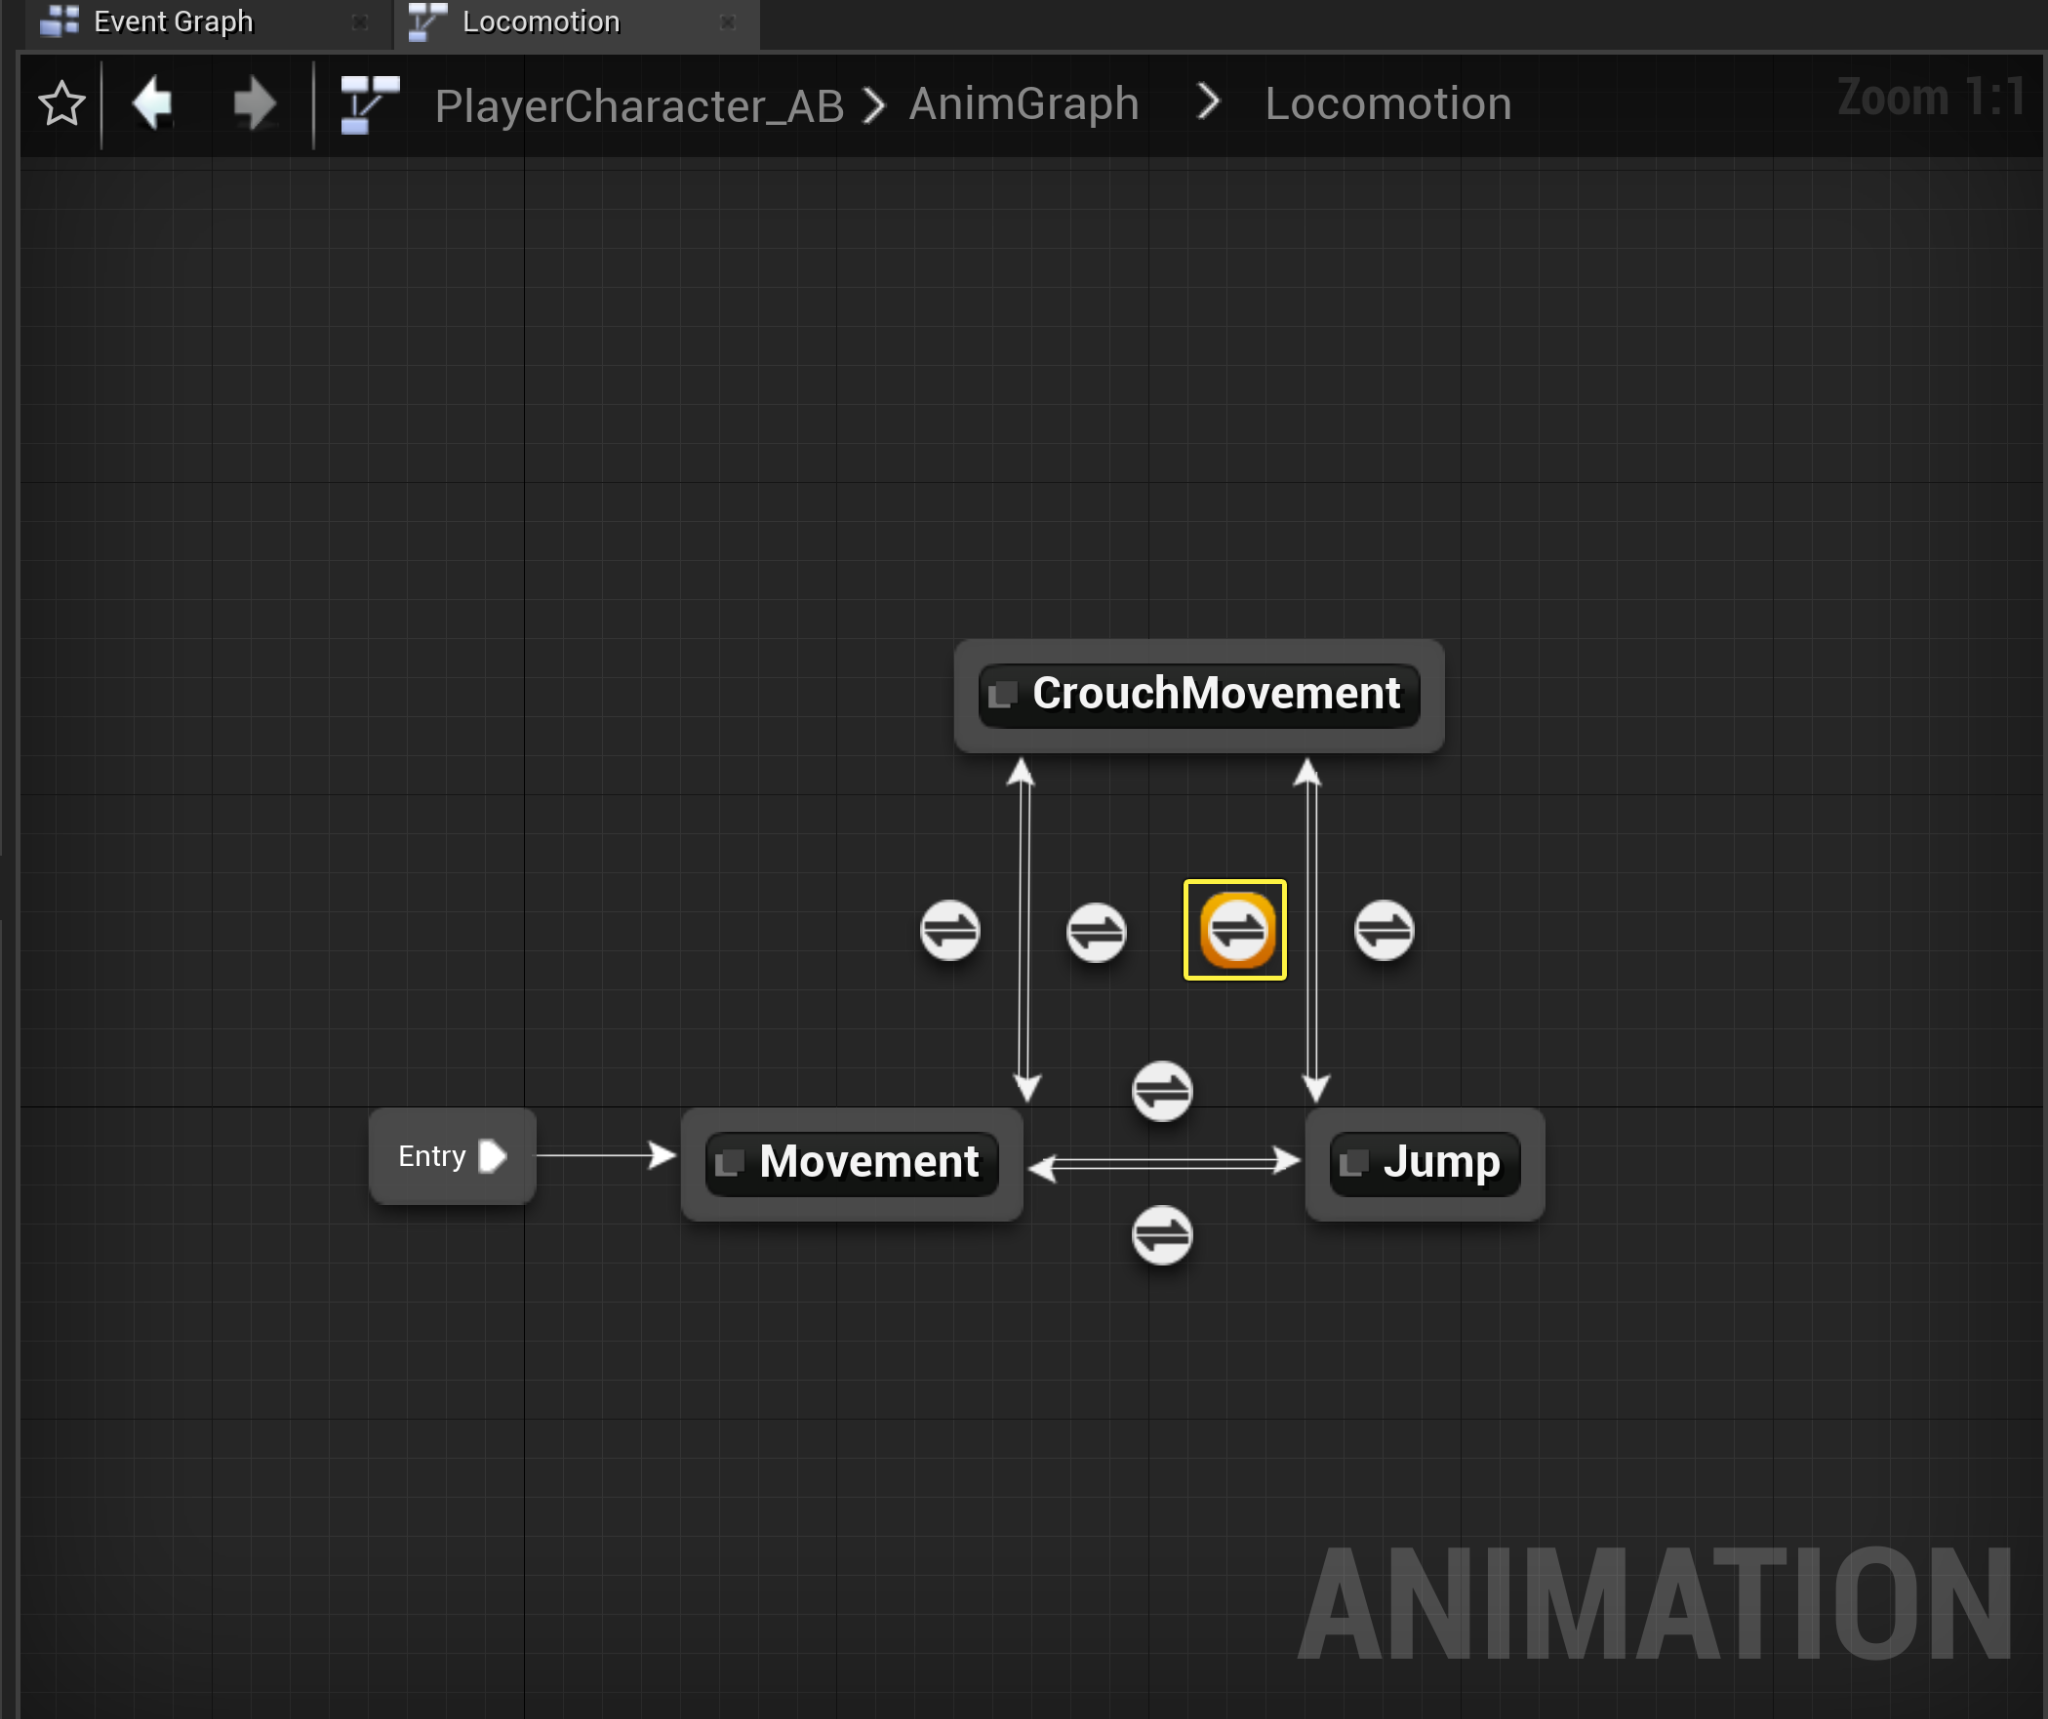
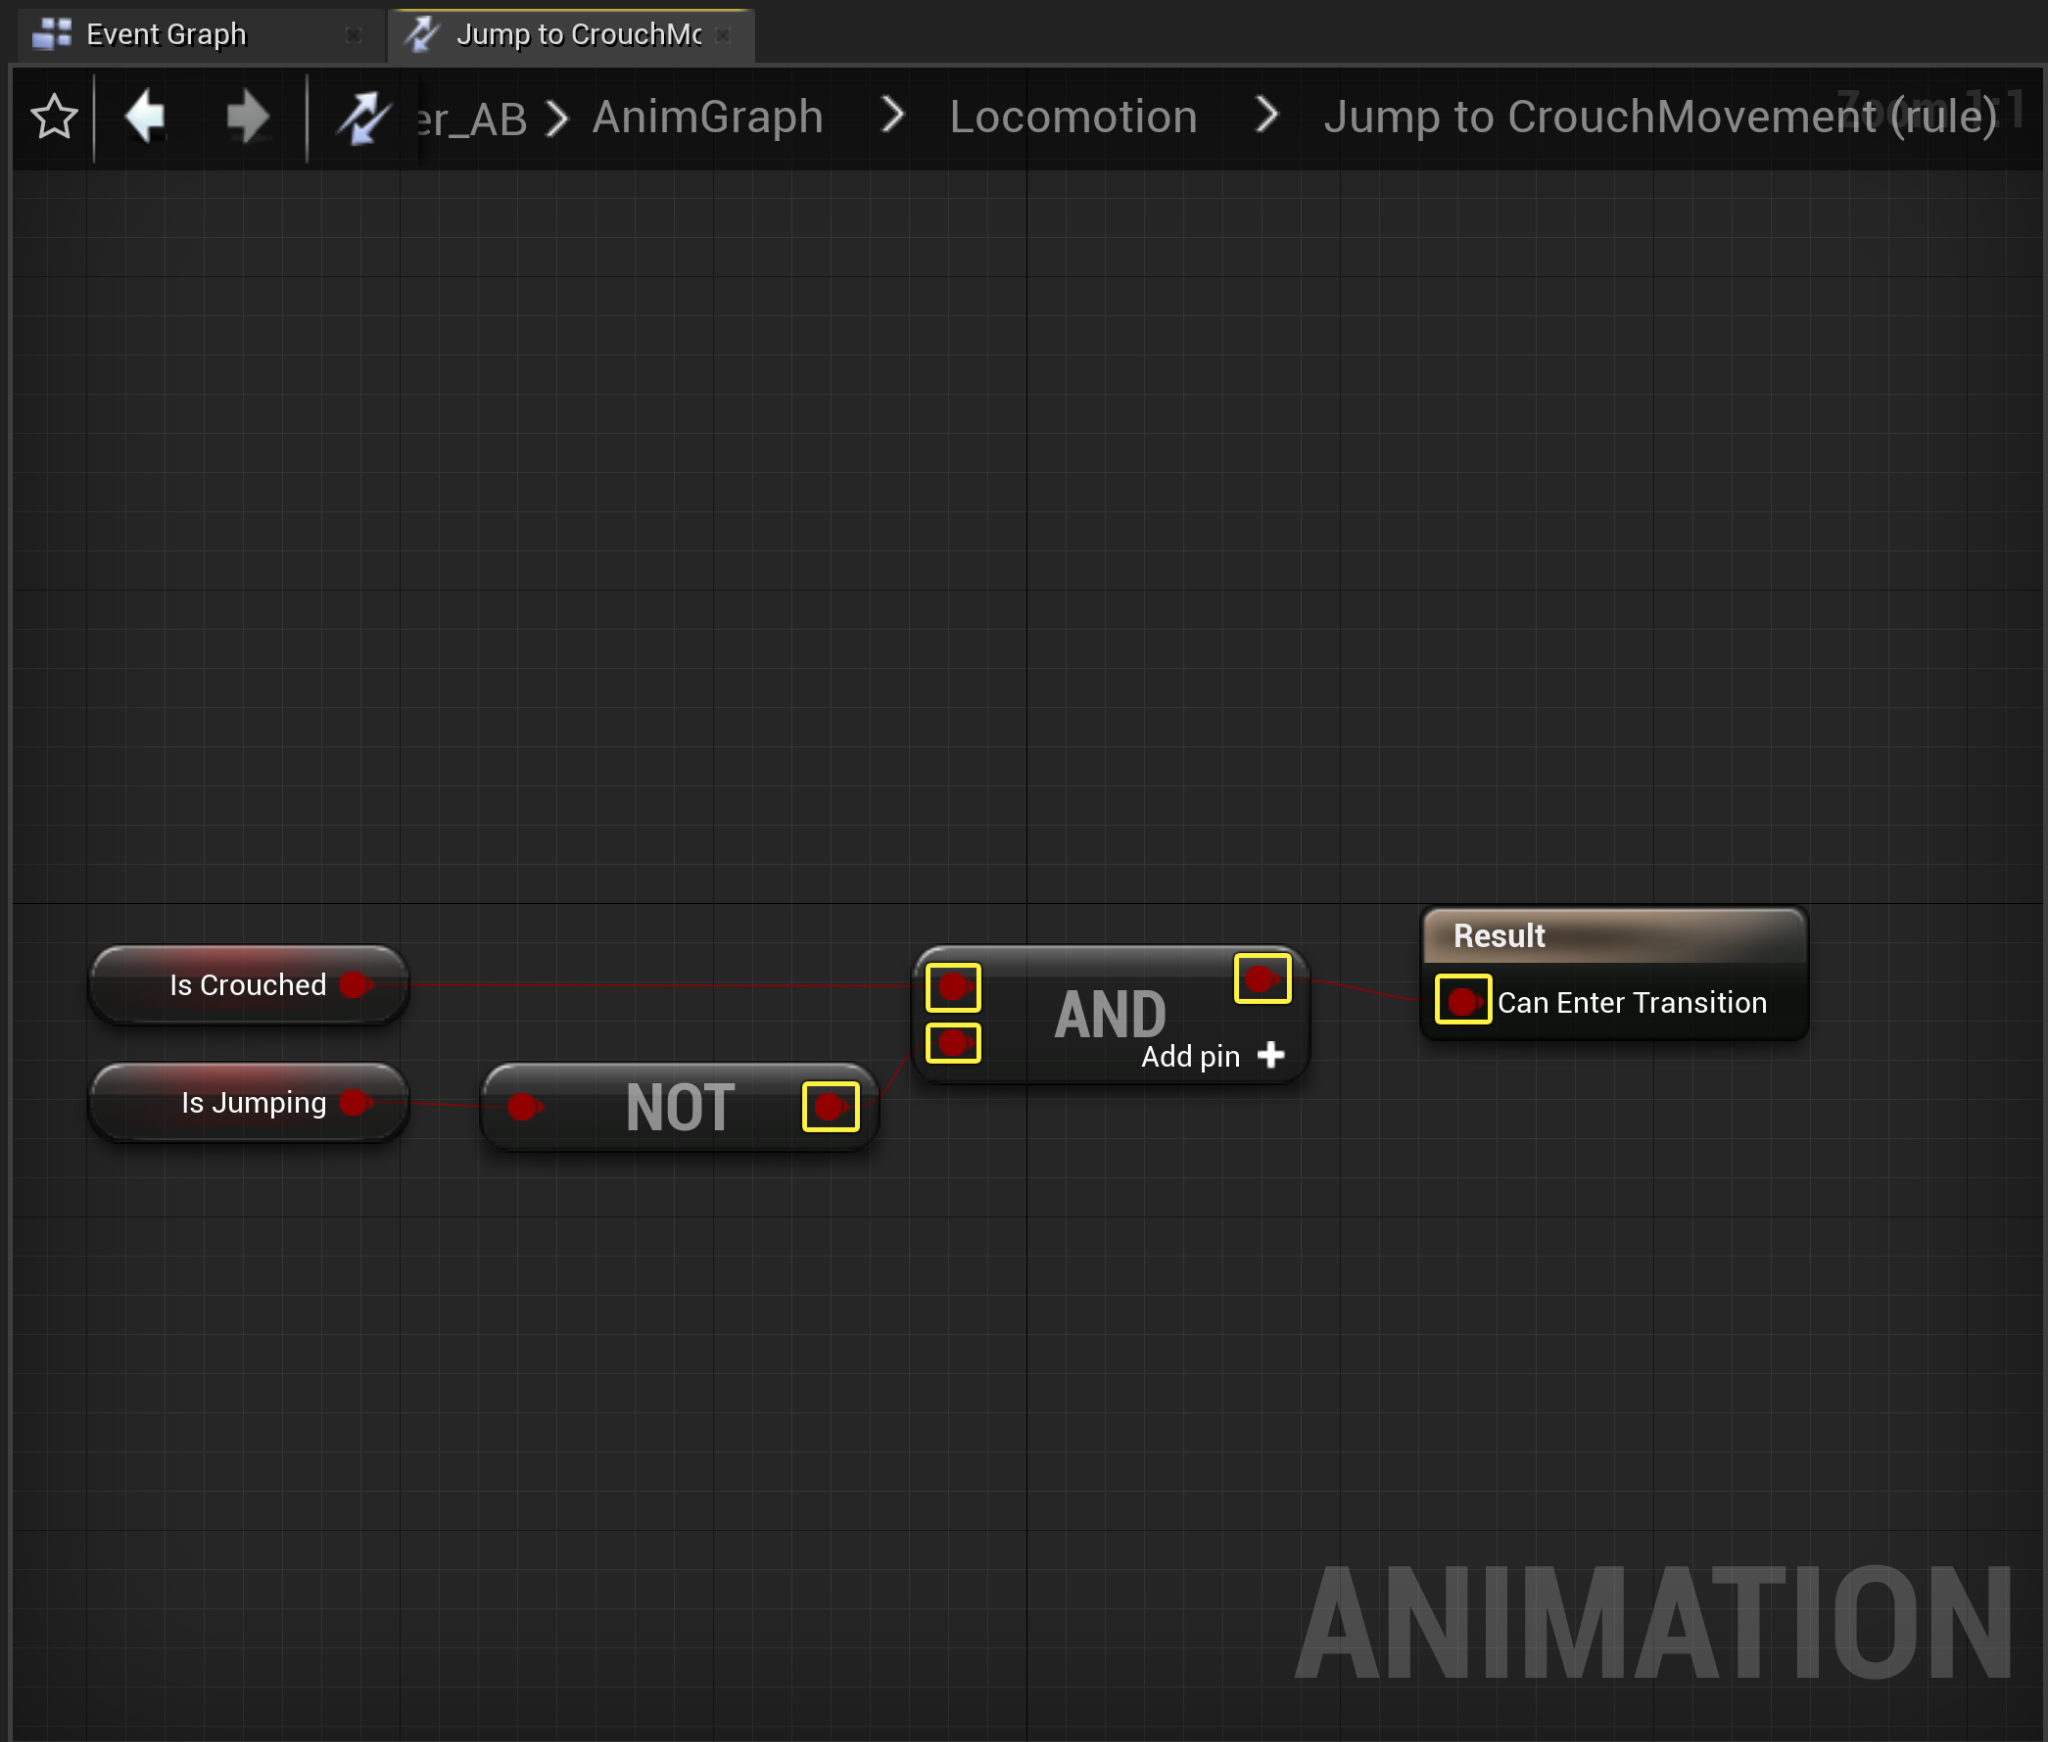
Navigate back to the Locomotion Anim Graph , then drag off from the Jump node to create a transition to the CrouchMovement node .
![Jump Transition to Crouch Movement]()
Click image to expand.
-
Double-click the Jump to Crouch Movement Transition rule node to open it's Anim Graph .
![Open Jump to Crouch Movement Transition rule Anim Graph]()
Click image to expand.
-
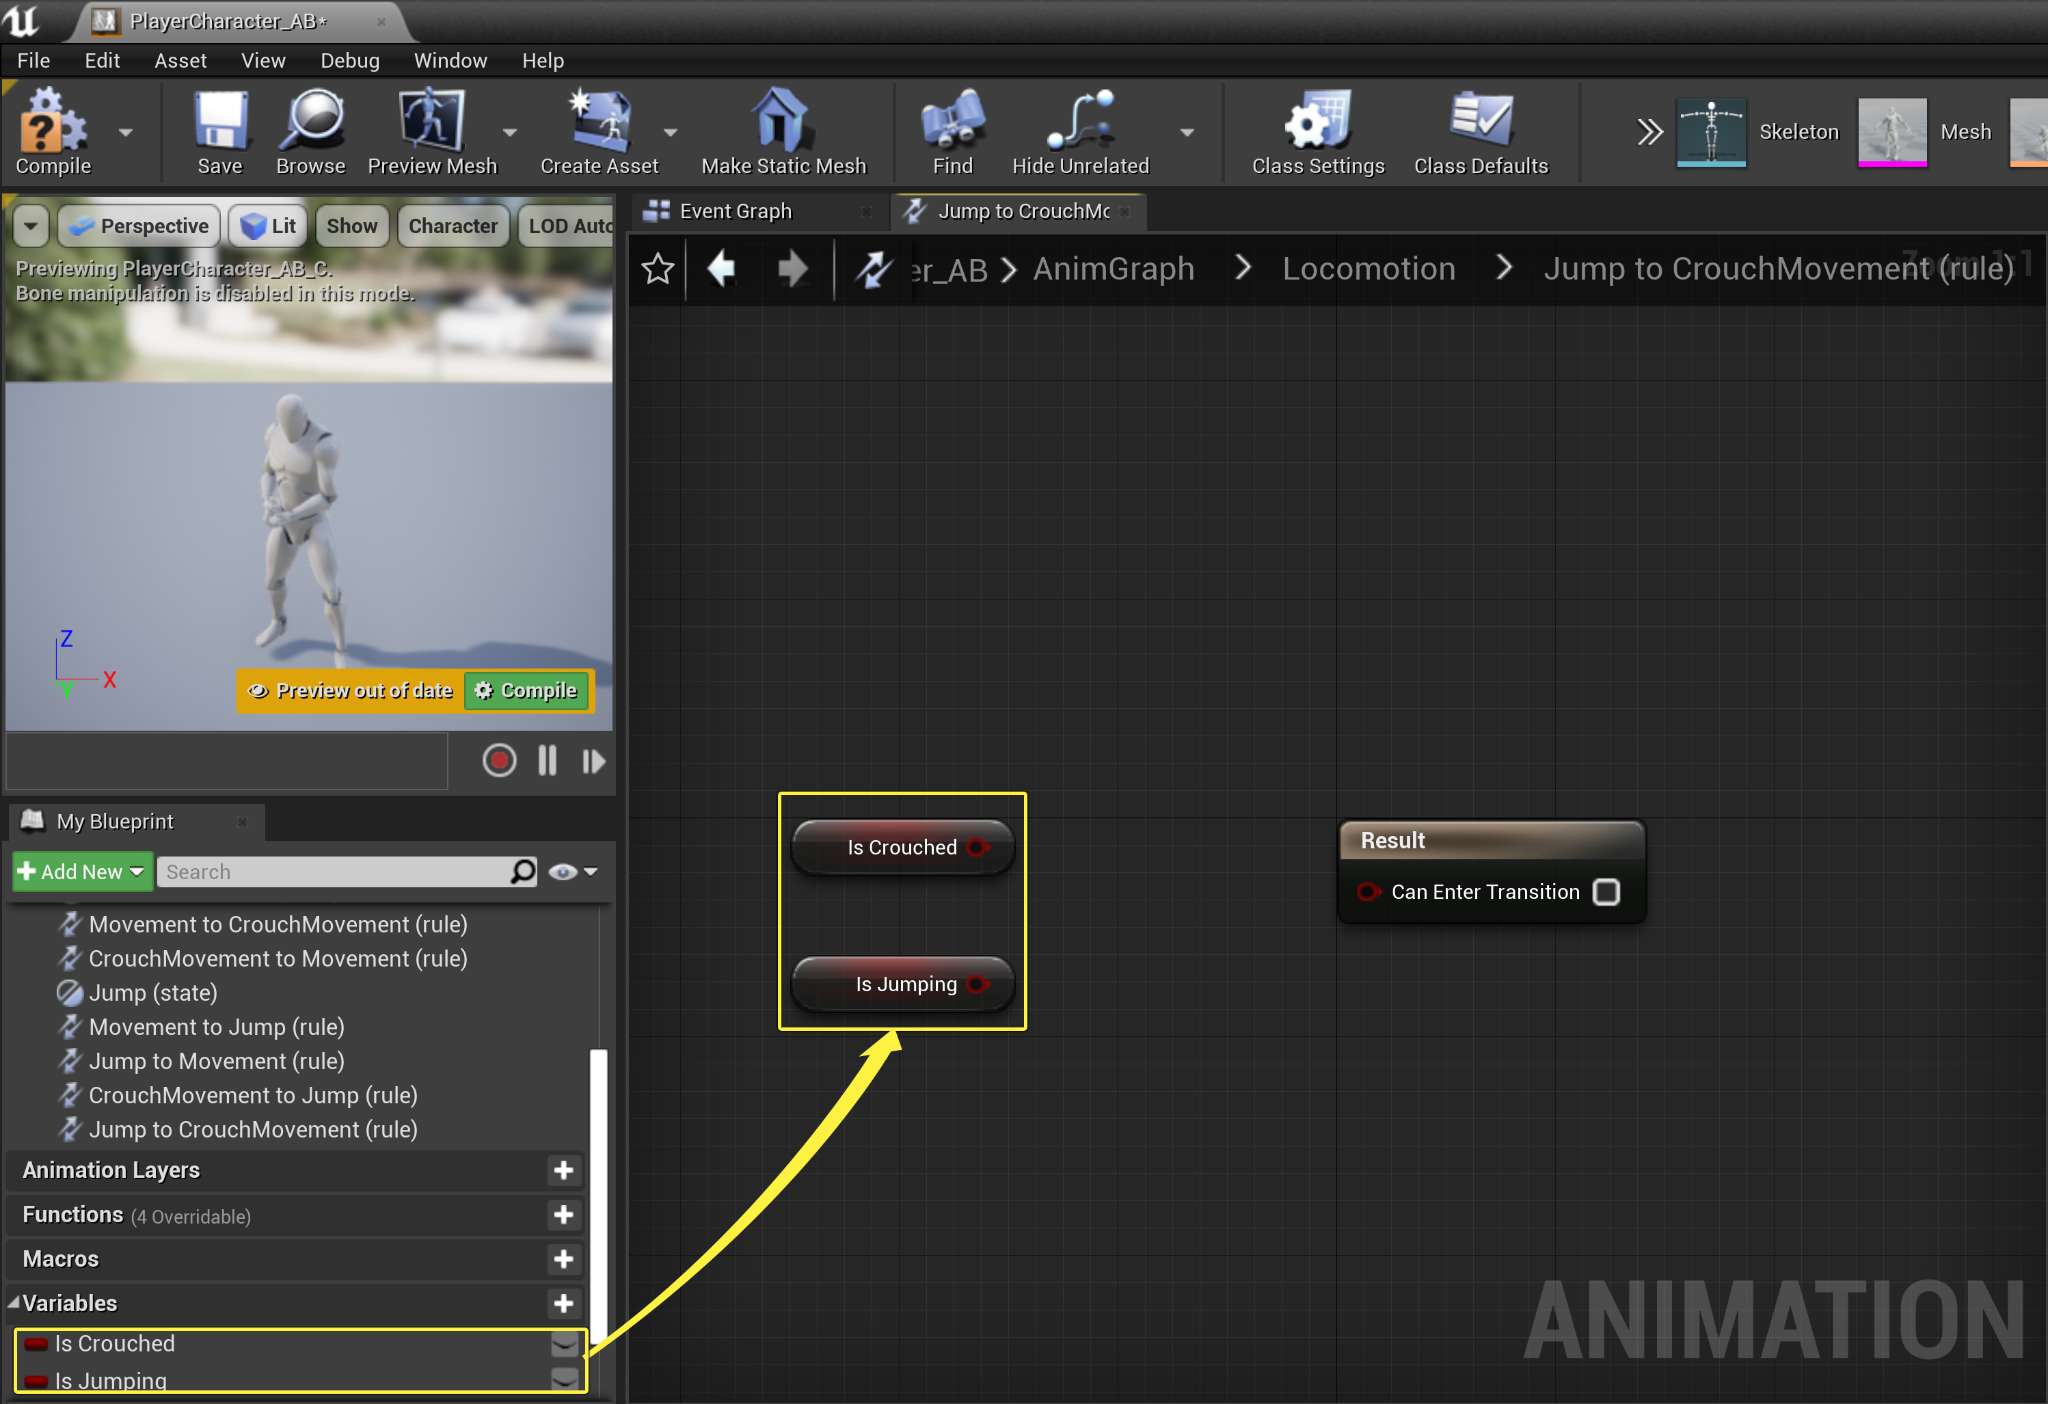
From the My Blueprints tab , click and drag the Is Crouched and Is Jumping Boolean variables onto the Anim Graph .
![Add Is Crouched and Is Jumping Booleans]()
Click image to expand.
-
Drag off from the Is Jumping Boolean output pin and from the actions drop down menu search for and select the NOT Boolean , then drag off from the Is Crouched Boolean output pin and search for and select for the AND Boolean . Connect the Is Jumping NOT Boolean output pin into the AND Boolean input pin , then connect the AND Boolean output pin into the Can Enter Transition Result pin to complete the transition rule.
![Connect NOT Boolean and AND Boolean]()
Click image to expand.
-
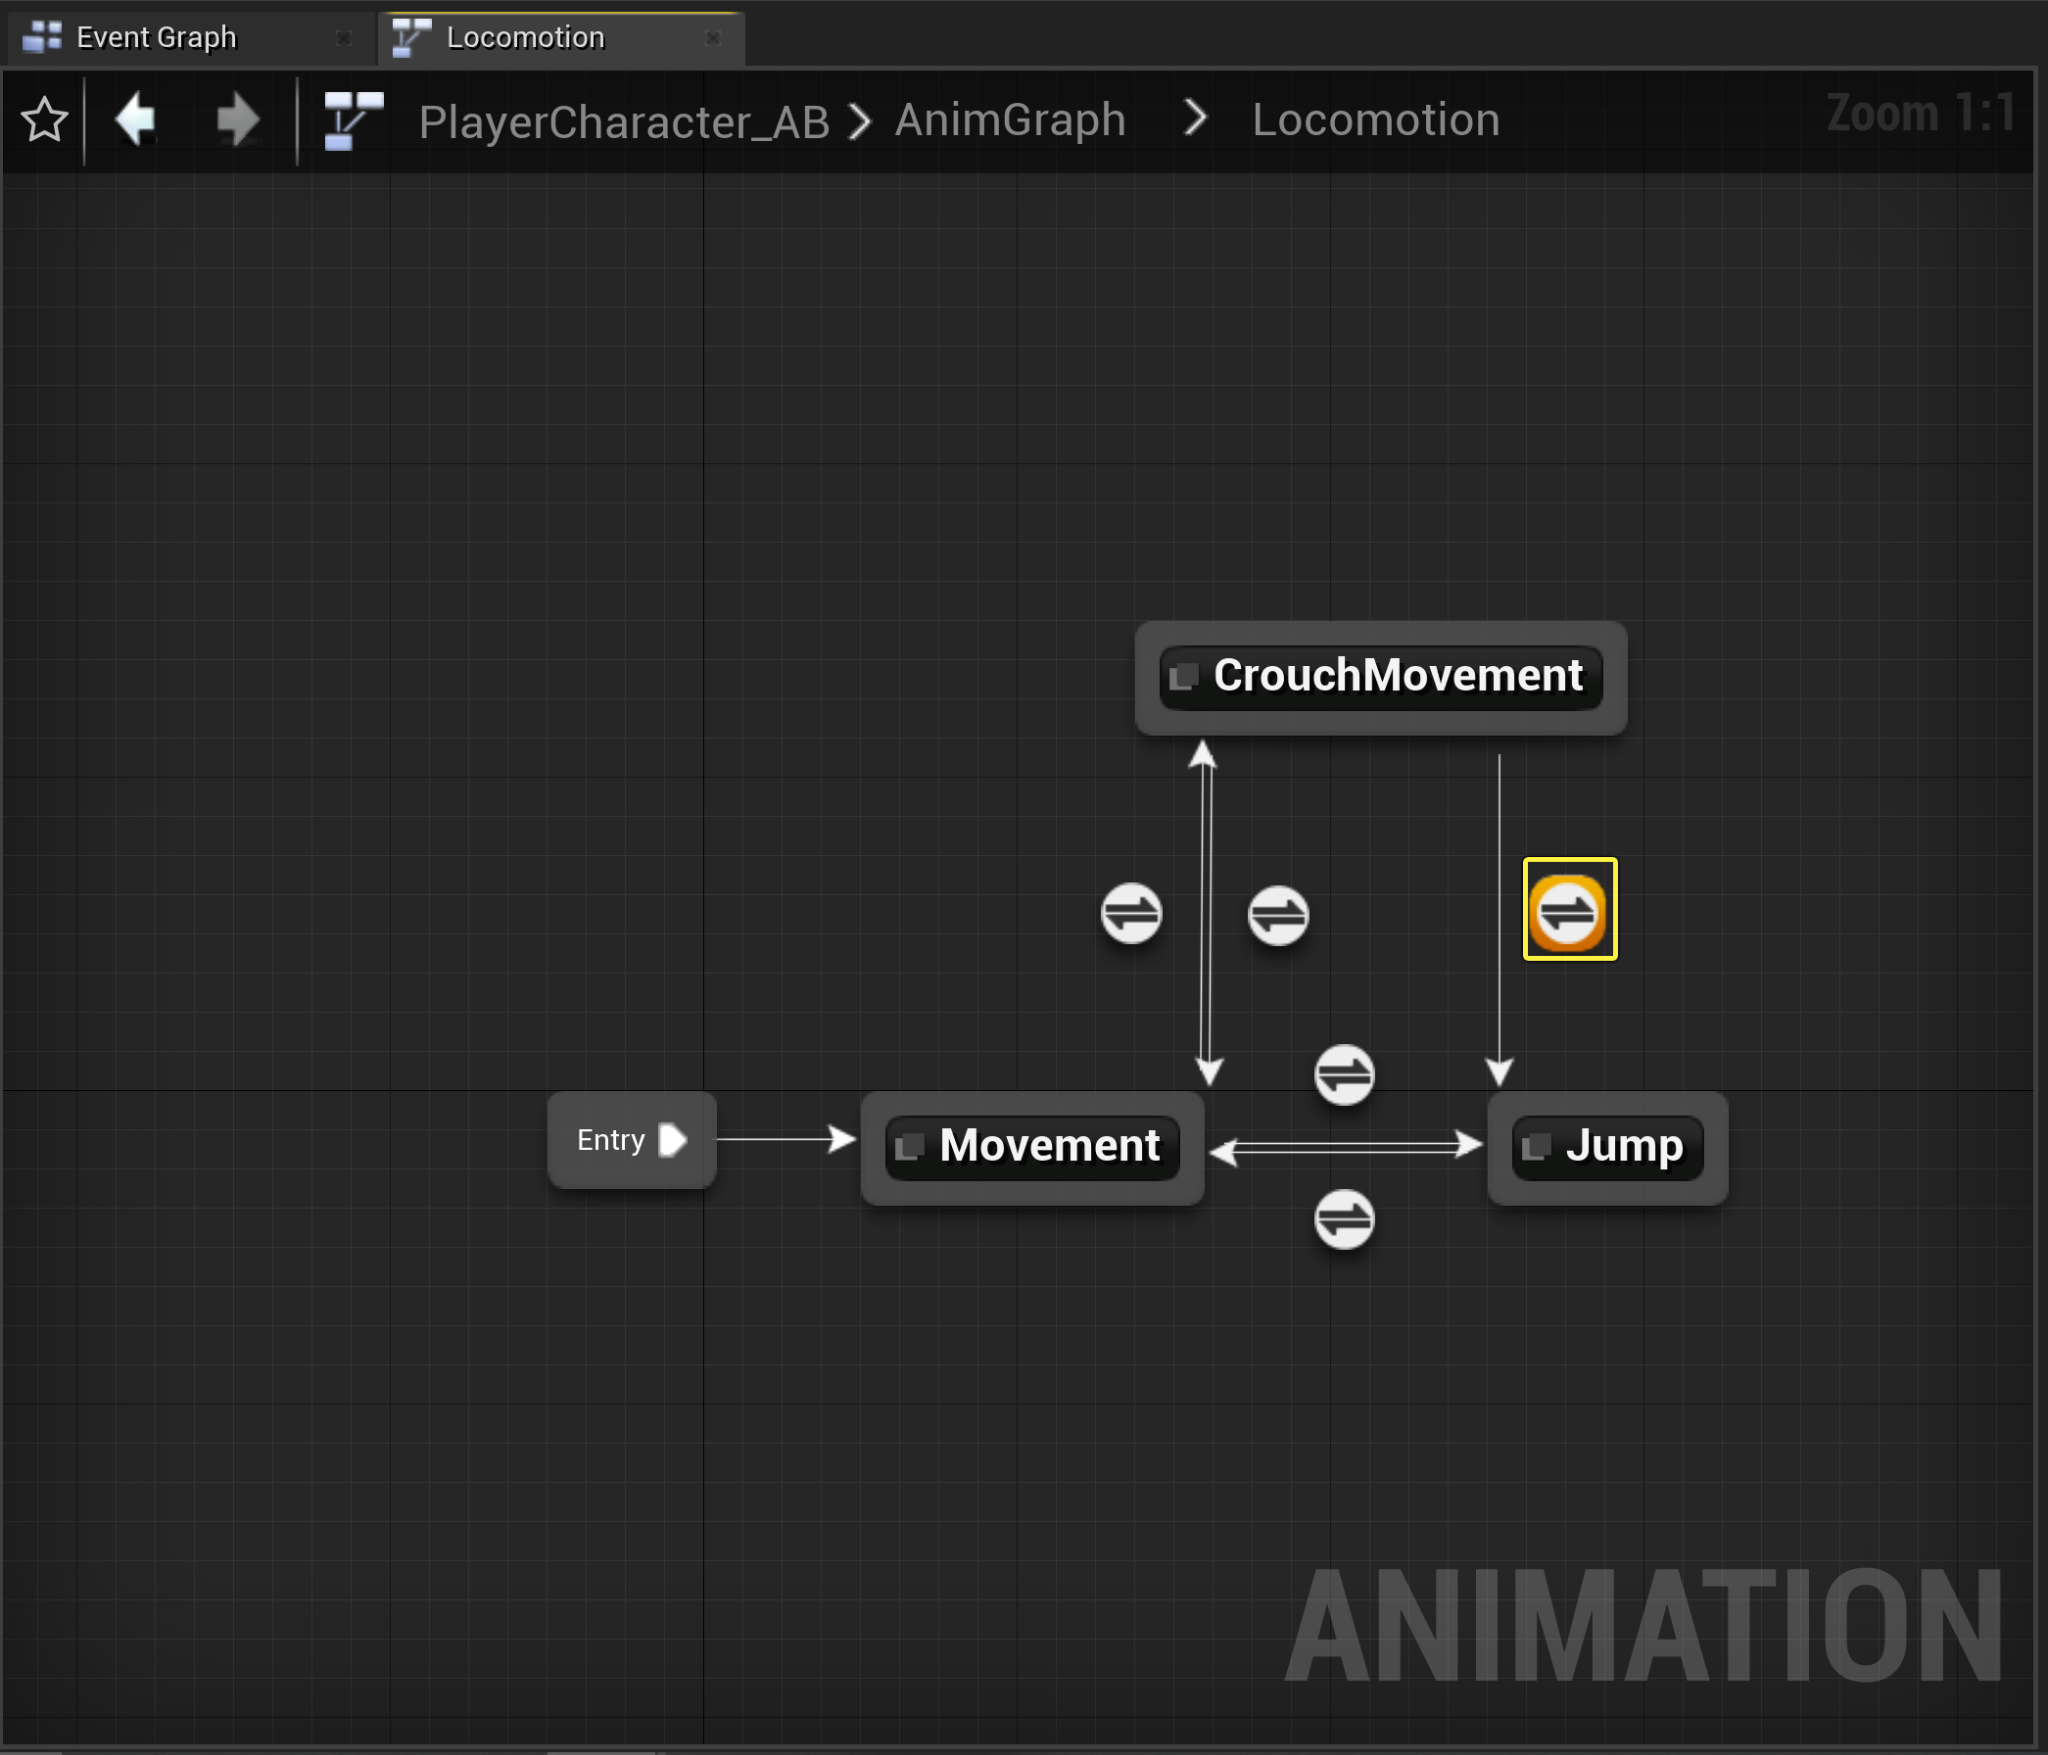
Your completed Locomotion AnimGraph will resemble the image below.
![Completed Locomotion Anim Graph]()
Click image to expand.
-
Navigate to the AnimGraph and connect the Locomotion Pose Output pin into the Output Pose Result pin .
![Connect Locomotion Anim Graph to Output Pose Result]()
Click image to expand.
-
Compile and Save .
![Compile and Save buttons]()
-
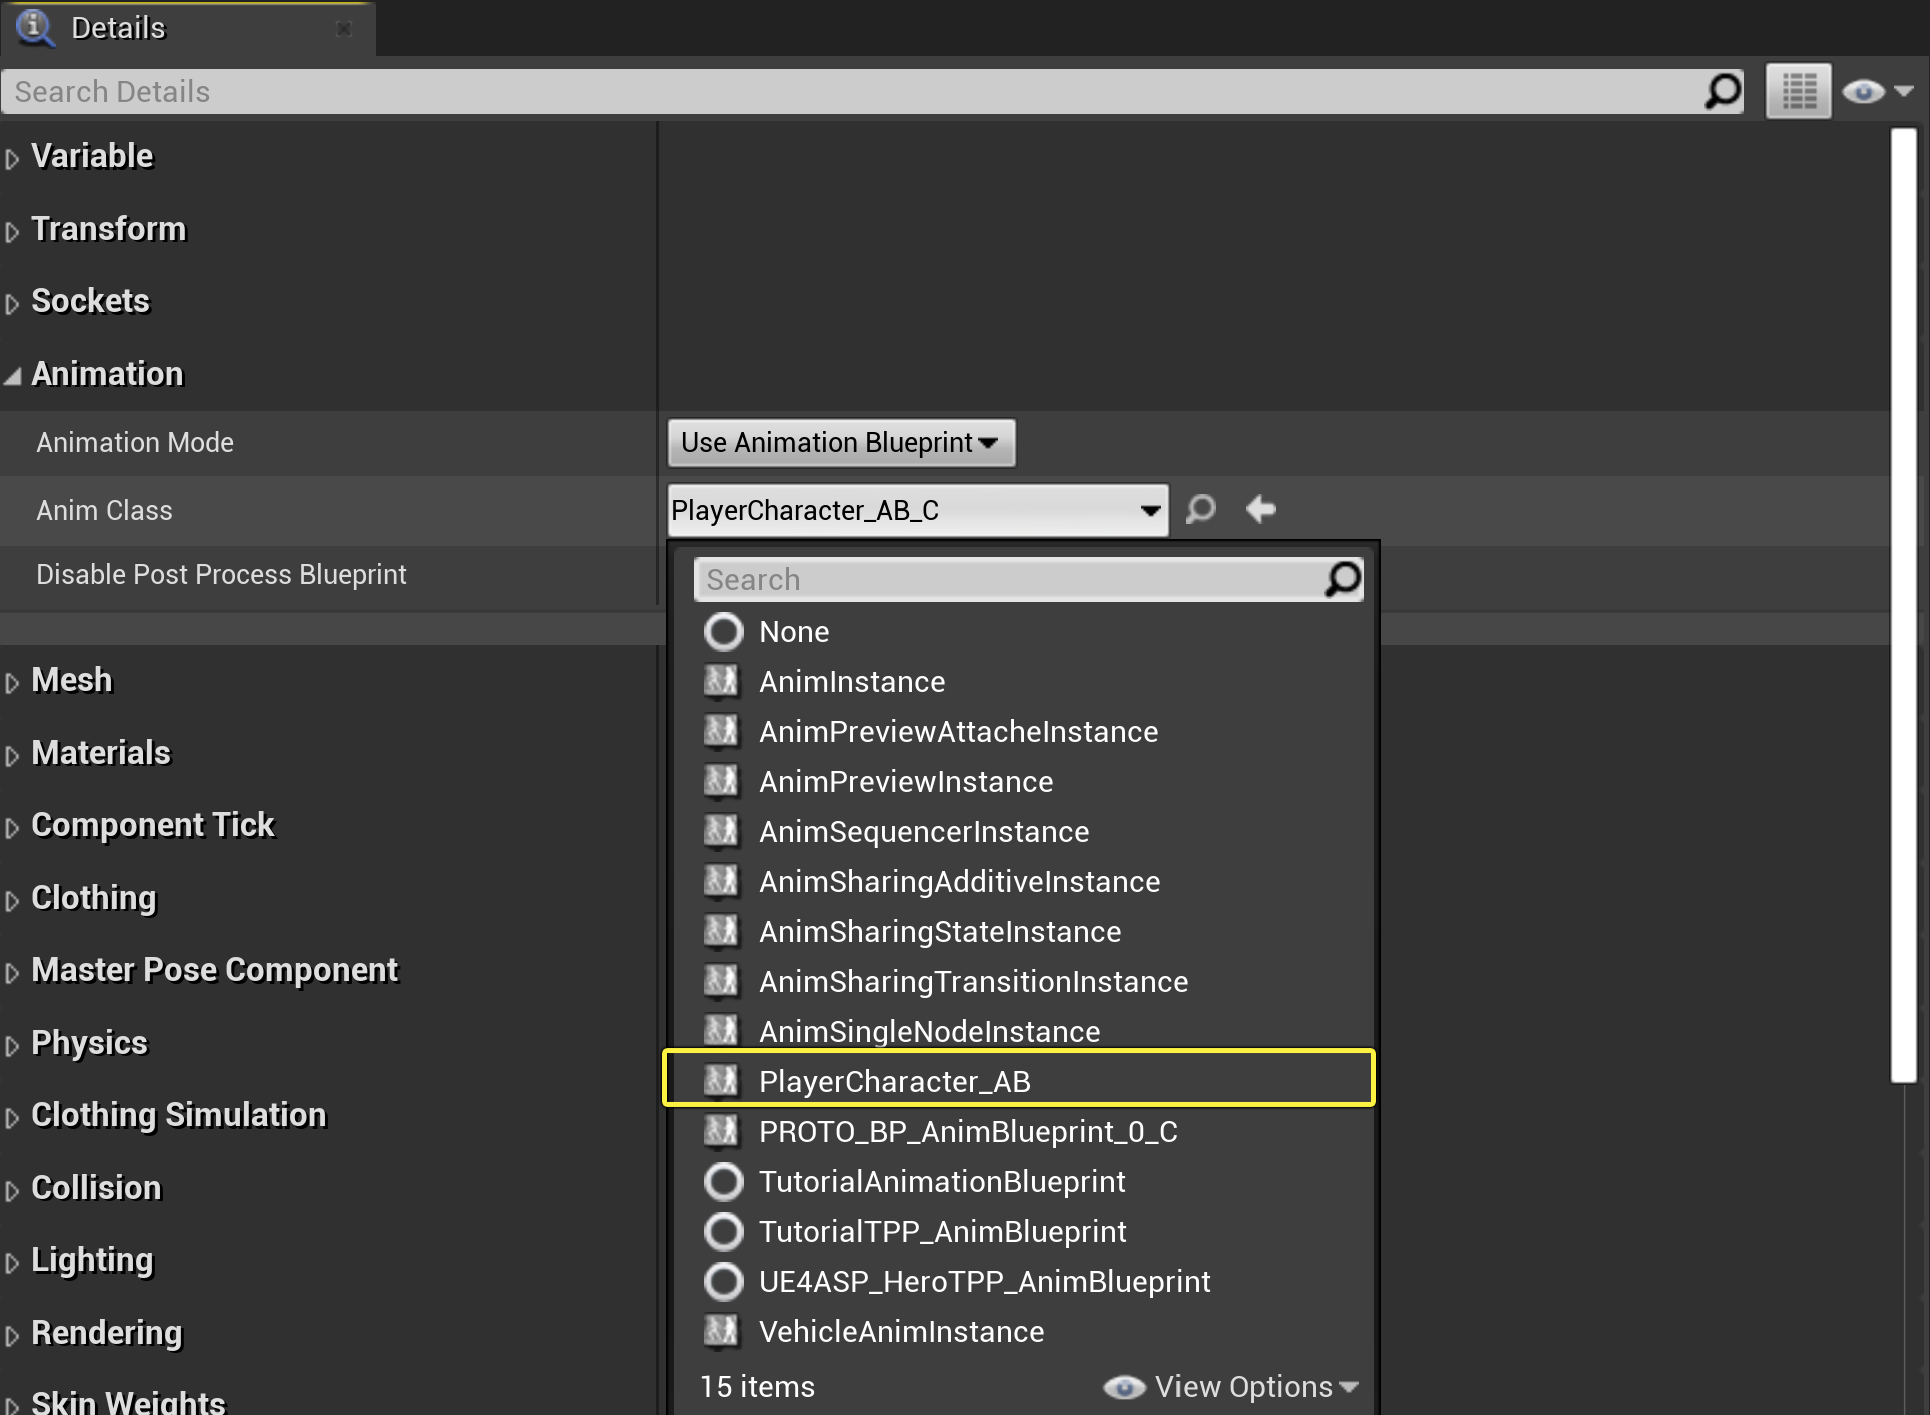
From the Content Browser , double-click your Bp_PlayerCharacter to open it's class defaults , then in the Components tab select the Mesh component , then navigate to the Details panel Animation category and in the Anim Class variable drop down menu , search for and select PlayerCharacter_AB.
![Add Animation to Blueprint]()
Click image to expand.


Result
Now is the time to test your logic. From the toolbar select Play (PIE) , you will be able to control your character's movement using the W,A,S,D keys. To sprint, click and hold your left shift key, to crouch, hold left ctrl, and to jump press the spacebar.