Choose your operating system:
Windows
macOS
Linux
If you need to create a swinging chandelier, a water wheel, or just want to keep a Physics Body in a general area, the Physics Constraint Actor is what you need. This document will cover the usage of the Physics Constraint Actor.
A constraint is basically a type of joint. It allows you to connect two Actors together (presumably one physically simulating), and also apply limits or forces. Unreal Engine has a very flexible and data-driven constraint system that allows designers to make many different types of joints simply by changing some options. The engine has a few default joint types (ball-and-socket, hinge, prismatic) but they only differ in their settings. You should feel free to start with any joint type and experiment with making your own configurations.
Physics Constraint Actor
-
The Physics Constraint Actor can be found in the All Classes tab of the Place Actors panel:
![PhysConMode.png]()
-
From here, it can be brought into the level, like any other Actor, by clicking and dragging it into the viewport.
![PhysCon_InToWorld.png]()
-
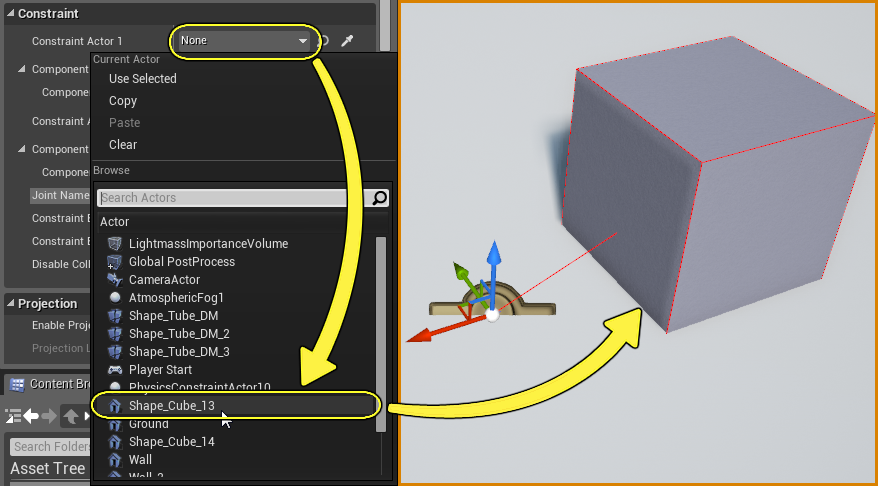
Once in the level, you can designate what two Actors it will constrain by using the Details pane, and expanding the Constraint category.
![PhysCon_ConsActorProp.png]()
-
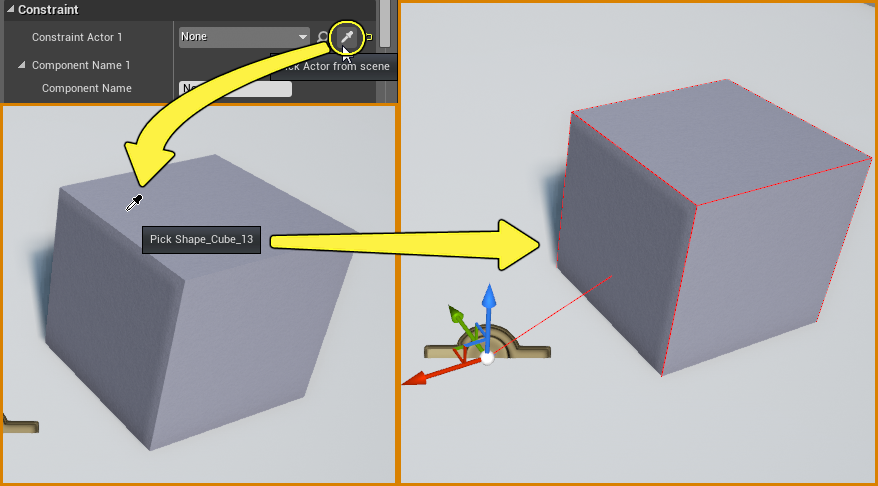
You can either use the pull down to search for the Actor you wish to select, or use the "eye dropper"
![eyedropper_button.png]()
![PhysCon_SelActor1.png]()
![PhysCon_SelActor2.png]()
-
Repeat step 4 for Constraint Actor 2 .
![PhysCon_Selected2.png]()
-
Position the Physics Constraint Actor and Constrained Actors where you desire them to be.
![PhysCon_RePosition.png]()
In this case, all three Actors (2 boxes and the Physics Constraint) were selected at the same time, then rotated 90 degrees so the red constrained box was above the blue constrained box. This also rotates the Physics Constraint so its Angular Swing Motions are on the correct axes.
-
Enable Physics on at least one of the Constrained Actors.
![PhysCon_FullEnablePhys.png]()
-
Set your desired settings for the Physics Constraint Actor.
The only properties changed for this example are:
-
Angular Swing 1Motion and Angular Swing 2Motion to ACM_Limited .
-
Swing 1Limit Angle and Swing 2Limit Angle to 25 degrees.
-
Disable Swing Limit Soft .
![AngularLimits1.png]()
![PhysCon_AngularCone_3.png]()
Want to know what all the properties on a Physics Constraint affect? See the Constraints Reference for specific details.
-
-
Test the Physics Constraint in Play in Editor or Simulate in Editor .
You may need a way to apply force to the constrained Actors depending on how you have them arranged and not all project templates have a way to do that. A RadialForceActor can be used. It is found in the All Classes tab just like the Physics Constraint Actor, and is placed in the same way.
![Arrows.png]()
For the cubes used in this document, a force of 50000 was found to be enough to push it around. Radius of the RadialForceActor reduced to fit in image.


Skeletal Mesh Considerations
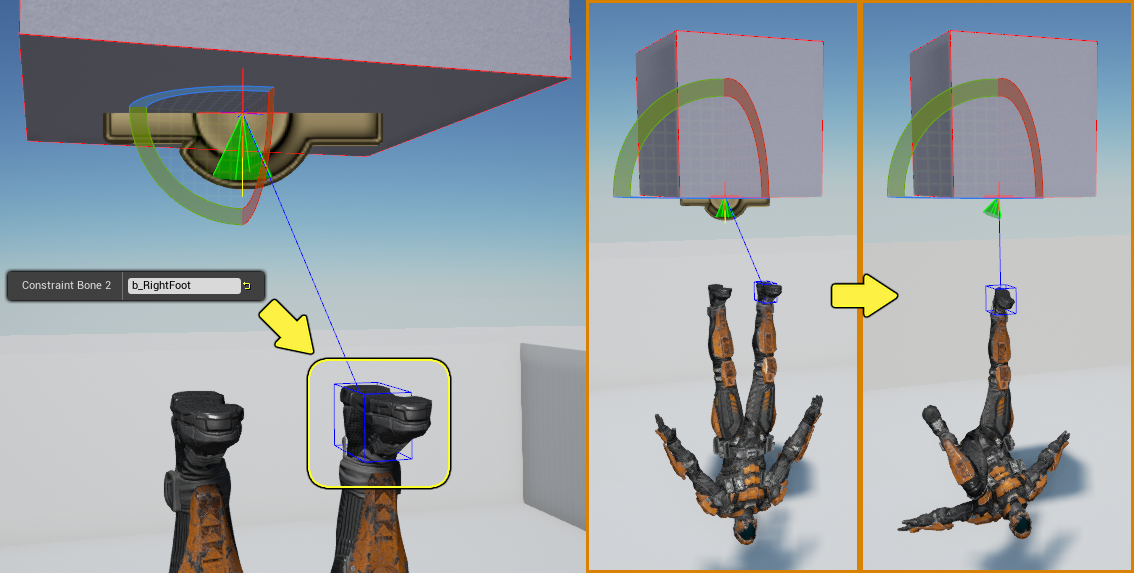
If you are constraining a Skeletal Mesh, you will need to provide a Constraint Bone name to the appropriate property. A Bone in this case is actually a Physics Body in the Skeletal Mesh's Physics Asset. The reason for specifying this is while the Physics Bodies will be named after the Skinned Bone they are associated with, a Physics Asset does not need a Physics Body for every Skinned Bone .
Components in Actors
If you would like to constrain a specific Component in an Actor, you can provide a Component Name in the appropriate property. If the root of the Actor is of a type that can be constrained, it will be the default Component that is constrained. However, if you provide a valid Component Name for either Constrained Actor 1 or 2, that Component will become the target of the Physics Constraint. If that Component is a Skeletal Mesh, you must also provide a Bone name in the appropriate property.

Functionally these two Actors and Physics Constraints produce the same effect; however, the Blueprint on the right could produce a different effect by making the Point Lights children of the Root. A Character has a Physics Capsule as a root, but also a Skeletal Mesh, both of which can be targets of the Physics Constraint.
Once you have provided a Component name that the Physics Constraint can attach to, a bounding volume will appear around that component. If a bounding volume does not appear, check the name of your Component and make sure it can actually be constrained by the Physics Constraint.