Choose your operating system:
Windows
macOS
Linux


It is recommended that you have a general understanding of the UMG UI Designer before proceeding.
When crafting your UI elements, it's best practice to think of ways you can optimize your content to increase performance and minimize inefficiencies. For example, based on the scope of your project, Property Binding may be fine for communicating information to your UI. However, if you have a more complex UI setup, or need to optimize your project, you may want to consider updating your UI on a need-to-know basis.
In this reference guide, we will examine three ways of communicating information to a HUD. While all three approaches accomplish the task, the third example presents the most cost effective way by moving the update process away from tick events, and instead manually updates information through the use of Event Dispatchers .
Example 1. Function Binding
For this example, we will take a look at updating Health/Energy for a player using Function Binding .
Here we have a basic Health/Energy setup.

With display in place, we Create Bindings for our progress bars called GetHealth and GetEnergy . The function bindings cast to the Player Character Blueprint and assign the variables we defined for Health and Energy.
Below is the binding for GetHealth. For debugging purposes, we also added a Print String node to print to the screen the value of our Health variable.

In the image below, you can see the Health and Energy values from the player character that are passed through and reflected in the HUD. However, you can also see that even when we are not updating the Health Value, the blue debug text illustrates that we are still checking the Health Value every frame.

Essentially, this approach is asking "What is the player character blueprint? And when I know what it is, "give me the values for health and energy" each frame. For smaller, less complex systems, this approach works well; however, if you are using a more complex system with multiple properties checking for updates every frame, this setup can lead to poor performance.
Example 2. Property Binding
The second approach is Property Binding , which is a bit more cost effective than Function Binding.
Using the same Health/Energy setup, let's examine how Property Bindings work.
In the Event Graph of our Widget Blueprint , we use the Event Construct to get a reference to the Player Character Blueprint.
By using Event Construct, we are casting to the Character Blueprint once and storing the information as a reference so the script does not have to call that information every frame.

Then, we can bind the values for the progress bars directly to the variables inside the Character Blueprint.

With this approach, we are no longer casting every frame and checking "what is the player character blueprint?" Instead, we are only querying the values for health and energy each frame.
Based on the scope of your project, this is approach can be efficient; however, if your system is more complex, then an Event Driven approach may be better.
Example 3. Event Driven
Here we take a look at using Events to update the HUD only when it changes, and we will continue with the same Health/Energy setup.
Inside the Character Blueprint, add an Event Dispatcher node to the end of the script that decrements our Health. In this example, the Event Dispatcher node is Call Update Health .
For testing purposes, Health is set to decrease whenever the F key is pressed.
We created a similar example in the Adjusting Character Variables section of our UMG UI Designer Quick Start Guide .

Now, whenever we decrease our Health, we also call this Event Dispatcher. In the Event Graph of the HUD Widget Blueprint, we can use the Event Construct again to get and store a reference to the Player Character Blueprint. We can also Bind a Custom Event to the Event Dispatcher inside that Character Blueprint so that the Custom Event is called when the Event Dispatcher is called.
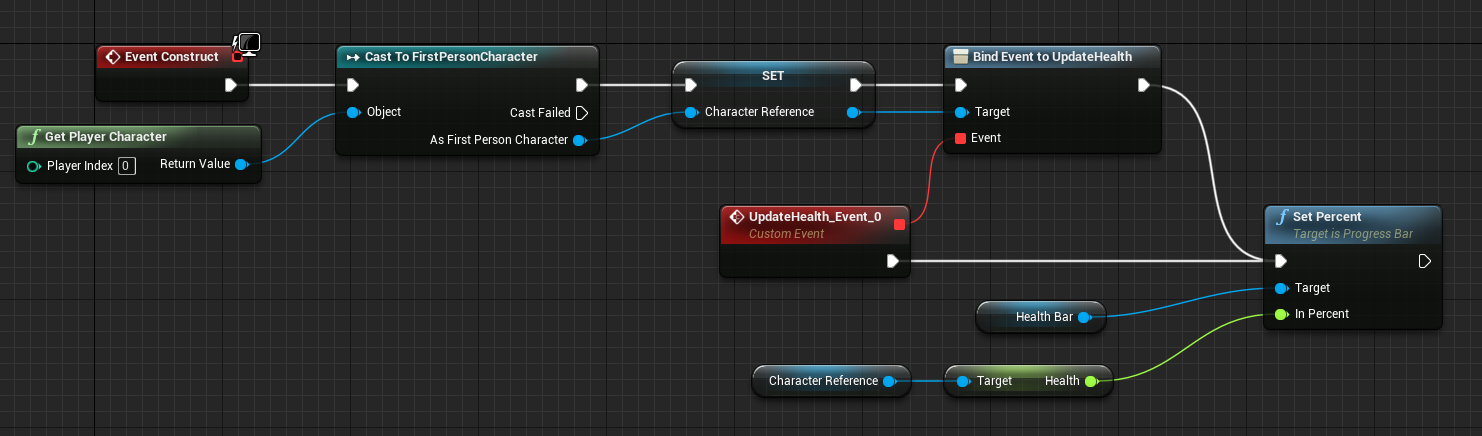
Click image for full view.
The Custom Event inside the HUD Widget Blueprint now only checks and updates the display of player's Health when it changes, rather than always checking the value regardless of whether or not it changed.
The image below shows how you can incorporate Health and Energy into the same Event Construct script.
The Custom Events UpdateHealth and UpdateEnergy are bound to Event Dispatchers from the Character Blueprint, which are only called when the character's Health/Energy value changes. We can also initialize the display by calling those two Custom Events when the HUD is constructed following the binding process.
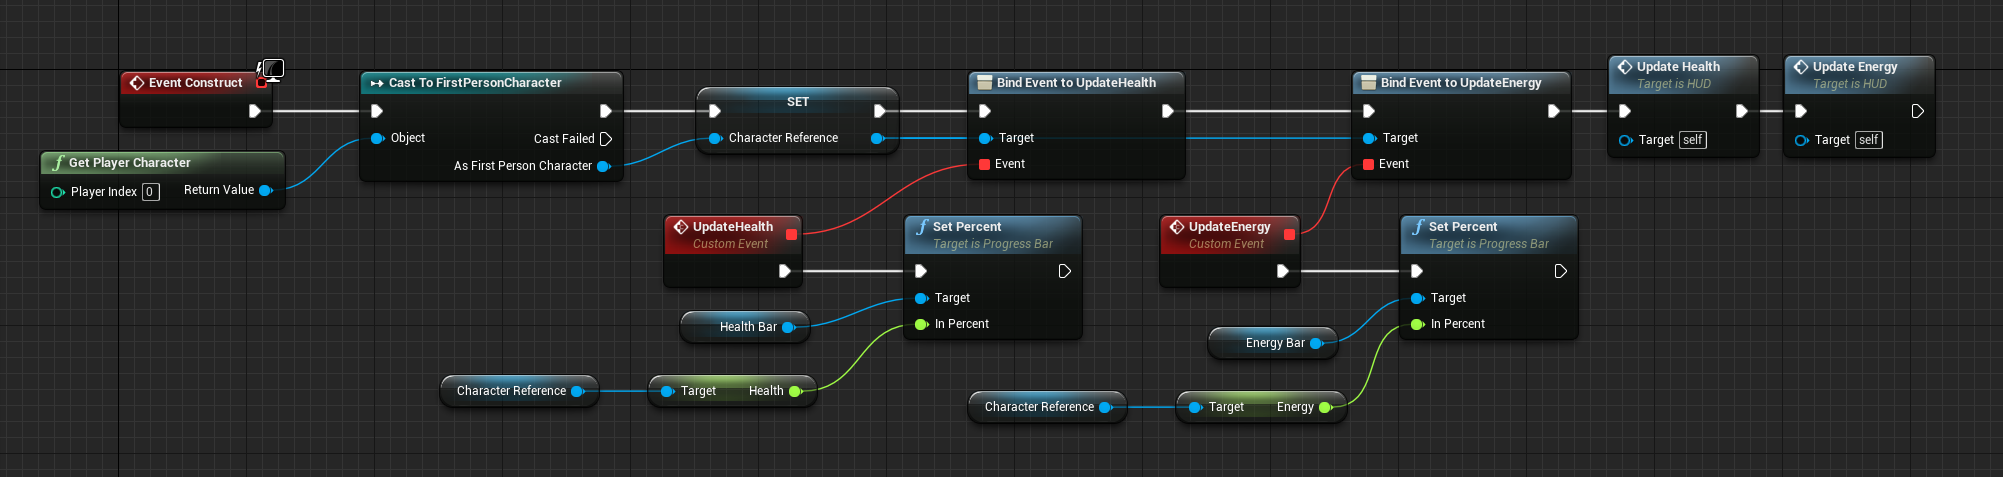
Click image for full view.