Choose your operating system:
Windows
macOS
Linux
In this How-to tutorial you will create a static (or fixed) camera angle that is used for the player's perspective during gameplay in a third person example map, and then you will create a trigger volume which will transition your viewpoint to the new static camera once your character overlaps the volume. Upon completing this tutorial, you can take the process used here and apply it to your own game to set up a fixed perspective for a player.
Creating The Static Camera Actor
Choose your implementation method:
C++
-
Begin by creating a New > Games > Third Person > Blueprint project named StaticCameras .
-
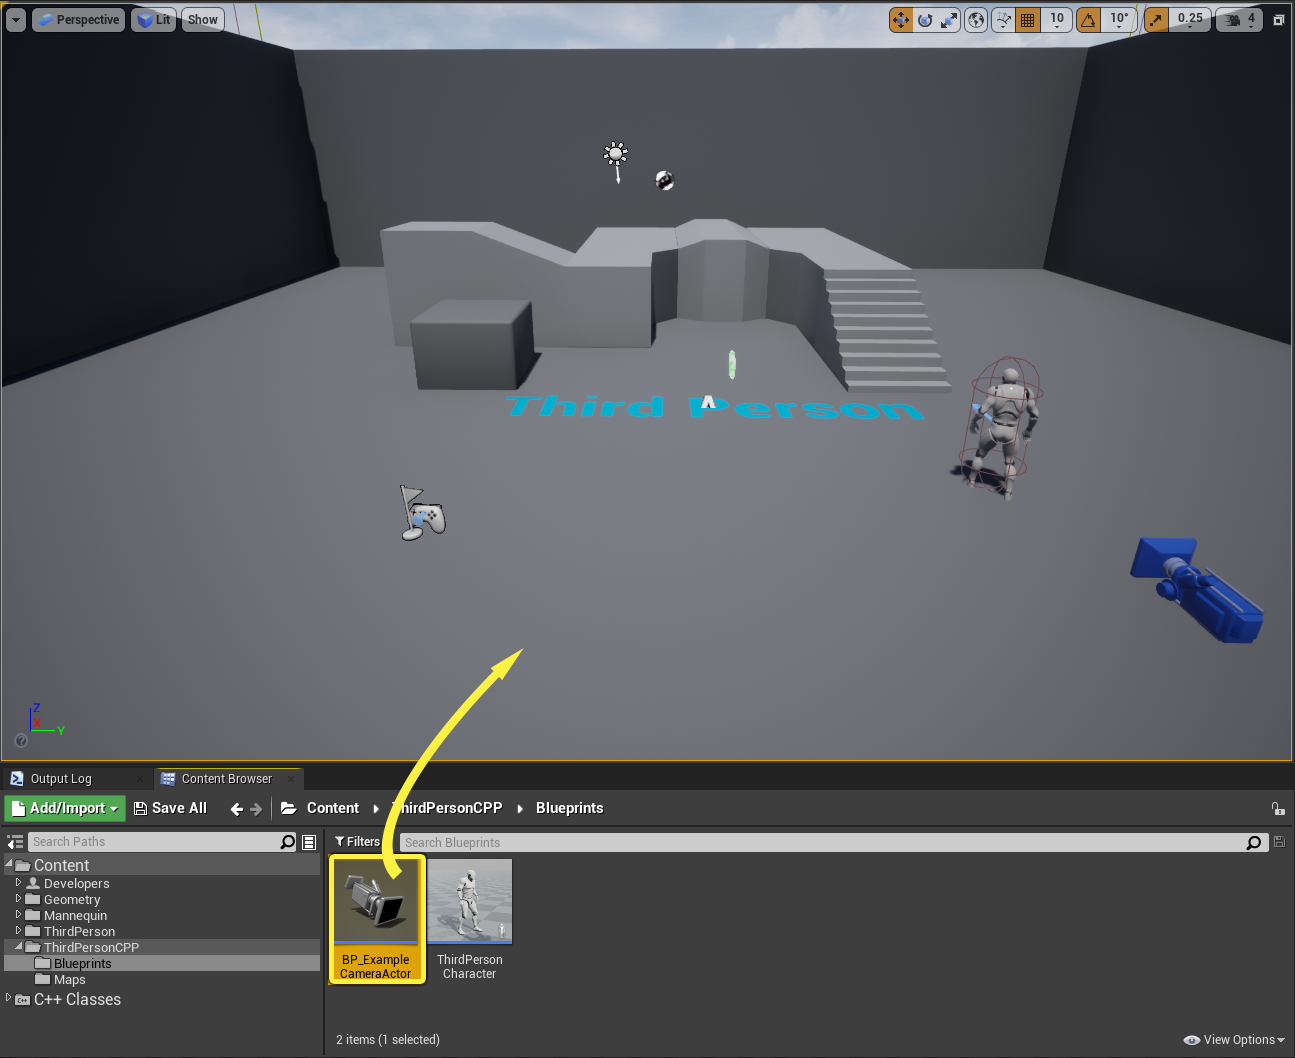
Click Add/Import > Blueprints > Blueprint Class , the Pick Parent Class menu will appear. Click the arrow to expand all classes, then search for and select CameraActor to create a new Blueprint CameraActor class named BP_ExampleCameraActor .
![Pick Parent Class menu select CameraActor]()
-
From the Content Browser panel, select and drag the BP_ExampleCameraActor into the Level.
![Drag camera actor into level]()


-
Begin by creating a New > Games > Third Person > C++ project named StaticCameras .
-
Launch the C++ Class Wizard , enable the checkbox for Show All Classes , then type CameraActor within the search field to select and create your new Camera Actor class named ExampleCameraActor .
![New C++ Camera Actor class]()
-
From the C++ Class panel, right click on your ExampleCamera and from the dropdown C++ Class actions menu select Create a Blueprint class based on ExampleCameraActor . Then drag an instance of BP_ExampleCameraActor into the level.
![Place Actor in level]()
Click image to expand.

Level Setup
In order to demonstrate the transition of perspectives between the player's camera and the static camera Actor, you will need to set up the scene. You can accomplish this by modifying some of the static mesh geometry from the third person template level.
-
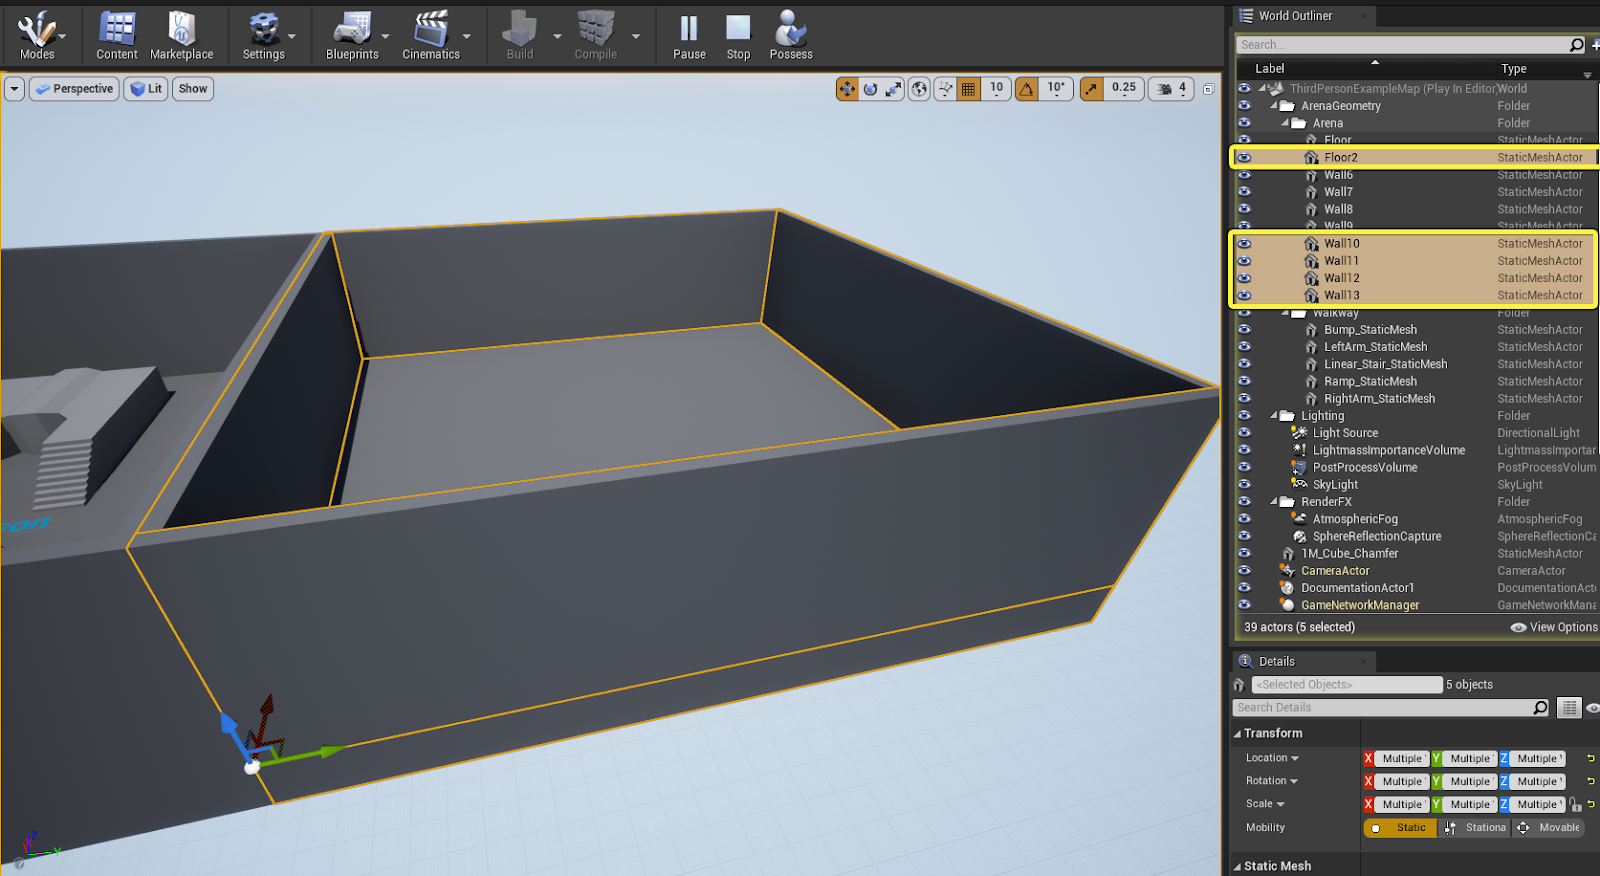
Begin by navigating to the world outliner panel, and shift select the Floor and the four Wall Static Mesh Actors from the ArenaGeometry > Arena folder.
![Selecting floors and walls in the World Outliner]()
In the example image above, the four Wall Static Mesh Actors are listed as Wall6 , Wall7 , Wall8 , and Wall9 .
-
Alt-click and drag the Transform gizmo to create a duplicate floor and wall setup.
![Drag duplicating floors and walls using the Transform gizmo]()
-
This will result in the creation of a second Floor , and four additional Wall Static Mesh Actors.
![Duplicated walls and floors]()
In the example image above, the duplicated floor is labeled Floor2, and the duplicated walls are named Wall10 , Wall11 , Wall12 , and Wall13 .
-
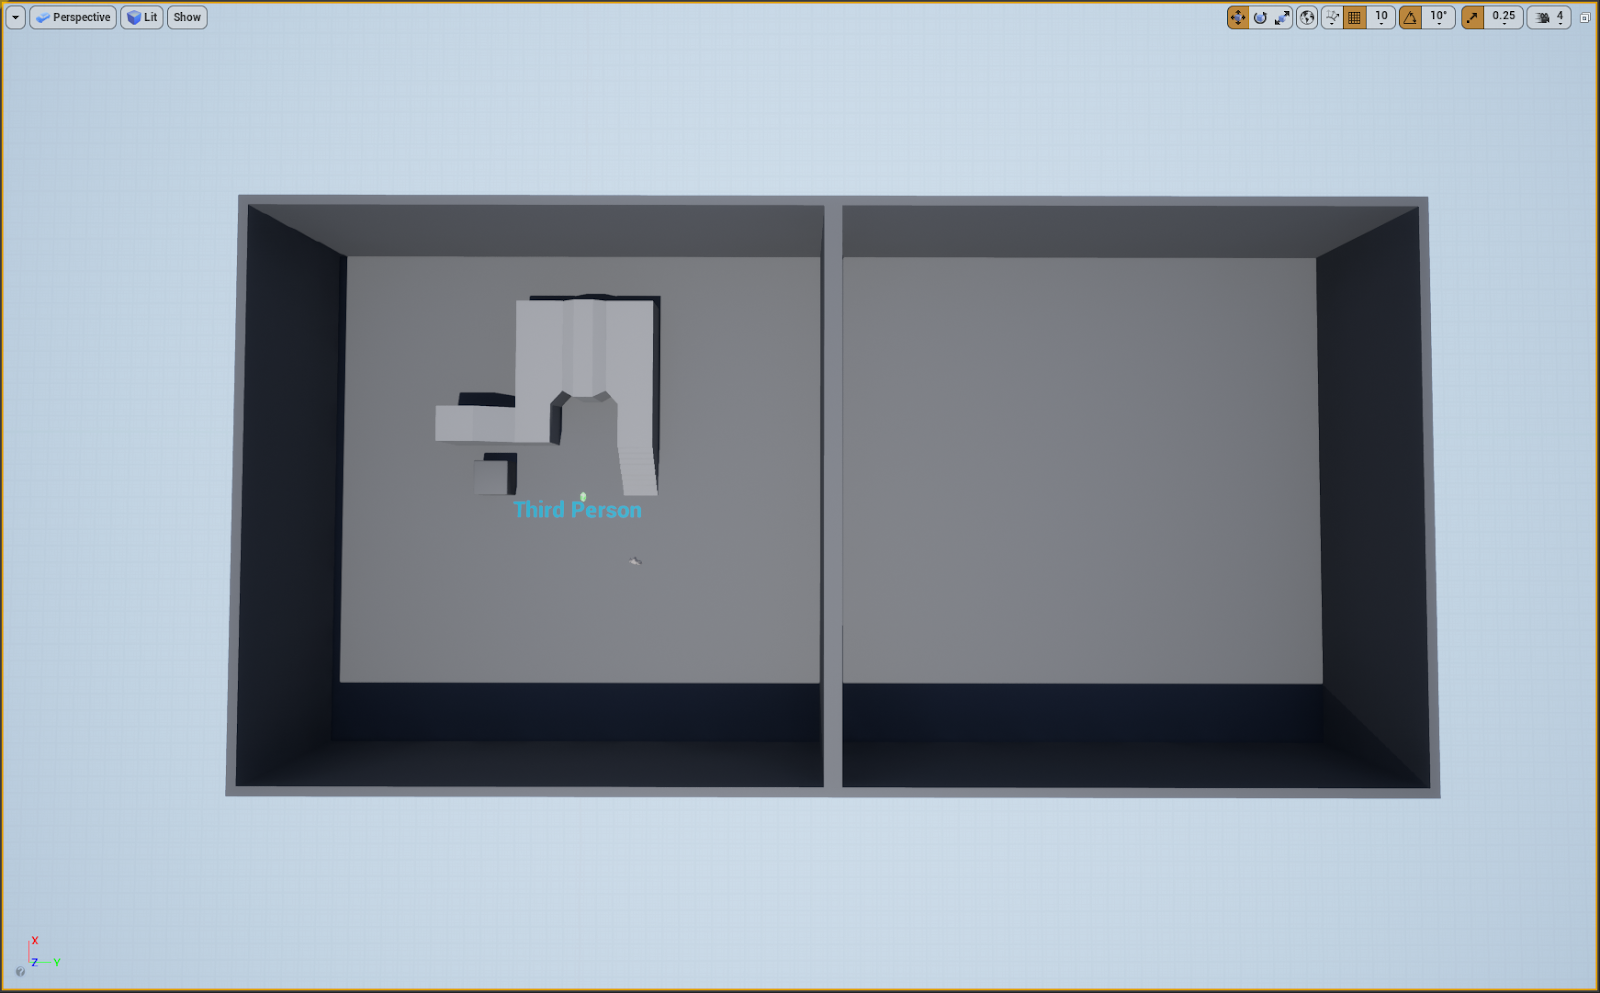
Move the newly duplicated static meshes to resemble the layout below, a new room duplicating the first but without any contents.
![Overhead view of new room]()
Click image to expand.


-
From the world outliner, select the two walls that connect the two rooms, and set their X Scale values to 14.
In the example image above, these two walls are labeled Wall9 and Wall12 .
![X Scale value in Details panel]()
-
Select both the connecting walls, then move them using the Transform gizmo so that they form a partition between rooms with a gap as shown in the gif below.
In the example image above, these two walls are labeled Wall9 and Wall10 /
![Move walls to create partition]()
-
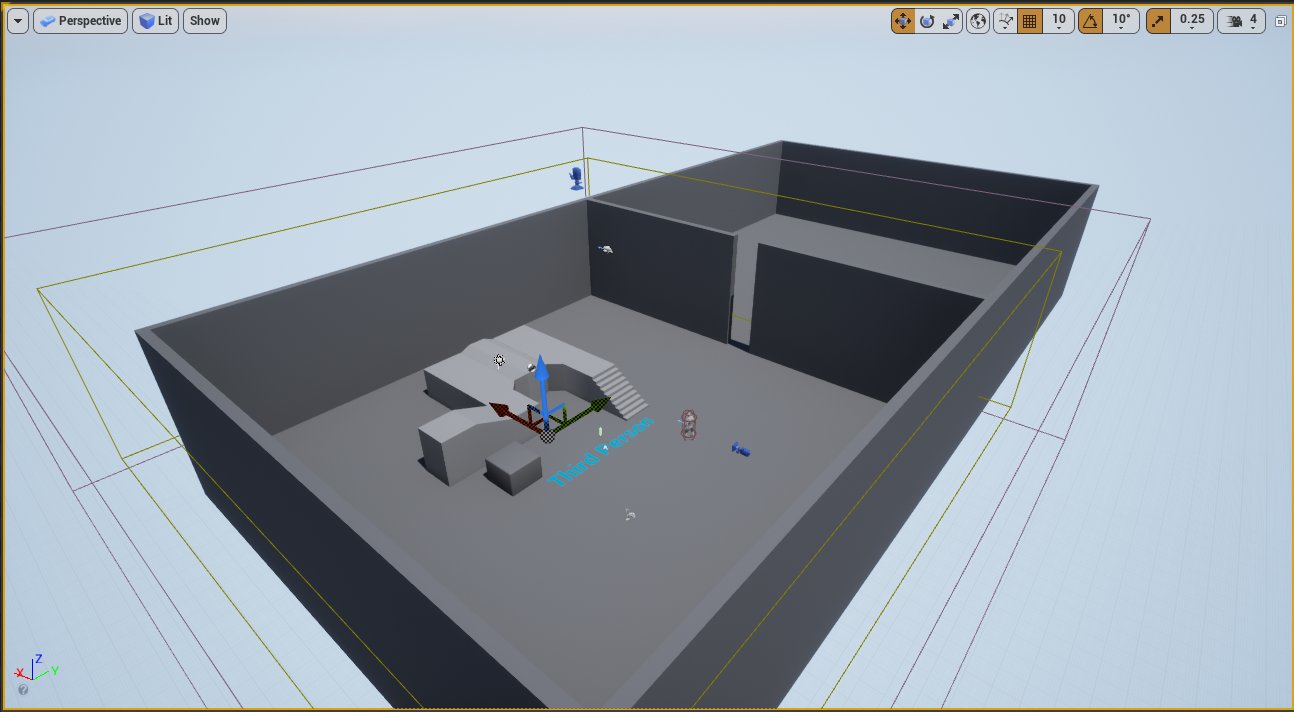
Your completed level setup should look similar to the image below, with a second room connected to the first by an opening in the wall.
![Connected rooms]()
Click image to expand.


Camera Perspective Setup
Now that you have completed the level setup, you can place the BP_ExampleCameraActor in the level to get a better idea of the view the player will have once they overlap the trigger volume. You can take a First Person perspective from the Camera's Point of View by locking the Viewport to the Camera Actor and entering Pilot mode.
-
With the Camera selected in the level, right-click on it, then from the context menu select Pilot 'CameraActor' .
![Context menu Pilot CameraActor]()
-
You can now move around the Viewport using the WASD keys while holding the Left or Right Mouse Button down. While you fly around the level, the Camera's position will move along with your movement allowing you to get an idea of the perspective the camera will take during gameplay.
-
To unlock the Camera, click the Unlock button.
![Unlock button]()
The camera will remain where it was positioned when you unlocked it. The icon next to the Unlock button allows you to toggle between showing the in-game camera view or the level editor view.
-
Pilot the Camera into a position looking down on the second room similar to the gif below.
![Pilot Camera into position looking down]()
-
Your completed camera scene setup should look similar to the image below, with a static camera looking down on the new room along with the original camera following the third-person actor.
![Completed Camera setup]()
Click image to expand.


Creating the Overlap Trigger Actor
In this example, the trigger Actor functions as the transition manager between the player's camera view point and the static camera view point, once the player overlaps its box component volume bounds, a transitional blend will occur between the perspectives.
-
Begin by clicking Add/Import > Blueprints > Blueprint Class , and create a new Blueprint Actor class named BP_BlendTriggerVolume .
-
Double click the BP_BlendTriggerVolume to open its class defaults. From the Components tab, click the Add Component button and select Box Collision to add a new Box Component named OverlapVolume .
![Adding new Box Collision Component]()
-
From the My Blueprint tab, navigate to the variables category and click the Add (+) button. Select your new variable and, from the Details panel, change its Variable type to a float and name your variable CameraBlendTime.
![CameraBlendTime variable]()
-
Compile and save your Blueprint.
![Compile button]()
-
Re-select your CameraBlendTime variable and set its float value to 1.0f.
![Set variable float value]()


Creating the On Component Begin Overlap Event
-
From the Components tab, select the OverlapVolume , navigate to the Details panel, scroll down to the Events category and click the Add (+) button next to the On Component Begin Overlap event.
![Select On Component Begin Overlap Event]()
-
Click the On Component Begin Overlap(OverlapVolume) node and drag off the execution pin onto the event graph, an Executable actions drop down menu will appear. Search for and select Cast To ThirdPersonCharacter .
![Executable actions dropdown menu]()
-
From the On Component Begin Overlap node, click and drag off of the Other Actor pin and input it into the Object pin of the Cast To Third PersonCharacter node.
![Drag off Other Actor pin]()
-
From the Cast To ThirdPersonCharacter node, select and drag off the As Third Person Character reference pin and from the actions drop down menu, search for and select Is Valid .
![Actions dropd down menu Is Valid]()
-
Select and drag from the Is Valid node's boolean return value. From the actions menu, search for and select a Branch node, then connect the execution pin from the Cast to ThirdPersonCharacter node to the Branch node.
![Is Valid connect to Branch]()
-
From the Branch node, click and drag off the True pin and, from the actions menu, search and select Cast to PlayerController .
![Executable actions Cast to PlayerController]()
-
From the Cast To ThirdPerson Character node, click and drag off the As Third Person Character pin and, from the actions menu, search for and select Get Controller .
![Actions menu Get Controller]()
-
From the Get Controller Node , click and drag off of the Return Value and connect it to the Object pin of your Cast To PlayerController node.
![Get Controller Return Value]()
-
From the CastToPlayerController node, drag off the As Player Controller pin, and repeat the Is Valid and Branch check described in steps 4 and 5.
![Repeat Is Valid and Branch]()
-
Select and drag off the True pin of the Branch node onto the event graph and, from the actions menu, search for and select Get Actor Of Class .
![Actions menu Get Actor Of Class]()
-
From the Actor Class pin's Select Class drop-down menu, search for and select your BP_ExampleCameraActor class.
![Select your Actor class]()
-
Navigate to your Cast To PlayerController node, click and drag off the As Player Controller pin and, from the actions menu, search for and select Set View Target With Blend .
![Actions menu Set View Target With Blend]()
-
From the Get Actor of Class node, click and drag the return value pin and plug it into the New View Target input pin of the Set View Target node, then connect the execution pin.
![Connect nodes]()
-
Navigate to the My Blueprint tab and, from the Variables categories, click and drag the CameraBlendTime float variable onto the event graph. Then, from the drop-down menu select Get CameraBlendTime to get a reference to your variable.
![CameraBlendTime variable added to graph]()
-
Connect your Camera Blend Time variable pin into the Blend Time pin from the Set View Target node.
![Connect nodes]()
-
Your VolumeTrigger On Component Begin Overlap logic should look as shown in the image below.
![Full VolumeTrigger On Component Begin Overlap logic]()
Click image to expand.


Creating the On Component End Overlap Event
The
On Component End Overlap
event will transition your view back to the Player Character's camera when they exit the
OverlapVolume
.
-
Navigate to the Components tab and select the Box component. Then from the Details panel, scroll down to the Events category and click the Add (+) button next to the On Component End Overlap event.
![Add On Component End Overlap event to Box component]()
-
Duplicate the previous logic that you created for your On Component Begin Overlap Event , then delete the Get Actor Of Class node.
![Delete Get Actor Of Class node]()
-
From the Cast to ThirdPersonCharacter node, drag off from the As ThirdPersonCharacter output pin.
![As ThirdPersonCharacter output pin]()
-
Connect the pin to the Set View Target with Blend node's New View Target input pin.
![Connect nodes]()
-
This logic will transition the camera back to the Third Person character view.
![Full VolumeTrigger On Component End Overlap logic]()
Click image to expand.


Finished Blueprint
BP_BlendTriggerVolume
Click image to expand.
Setting up the Overlap Trigger Actor
Now that you have created your overlap Actor, you will need to place it into the Level and set up its bounds.
-
From the Content Browser , drag an instance of your BP_BlendTriggerVolume into the Level.
![Place Volume Actor instance]()
-
Move the BP_BlendTriggerVolume into the room with your BP_ExampleCameraActor and, from the Details panel, select the box component. Navigate to the Shape category and modify the Box Extent X, Y, and Z values so the volume will fit your room.
![Modify Box Extent values]()
-
From the Main Editor View , click the Play button to play in the Editor.


-
Using the C++ Class Wizard , create a new Actor class named BlendTriggerVolume.
![New C++ Blend Trigger Volume class]()
-
Navigate to your
BlendTriggerVolume.hfile, and declare the following code in your class definition .protected: //Collision Bounds of the Actor Volume UPROPERTY(EditAnywhere, BlueprintReadWrite) class UBoxComponent* OverlapVolume; //Camera Actor which the Actor Volume blends to UPROPERTY(EditAnywhere, BlueprintReadWrite) TSubclassOf<ACameraActor> CameraToFind; //Blend time for camera transition UPROPERTY(EditAnywhere, BlueprintReadWrite) float CameraBlendTime; //Begin and End Overlap methods for our OverlapVolume Actor virtual void NotifyActorBeginOverlap(AActor* OtherActor); virtual void NotifyActorEndOverlap(AActor* OtherActor);

-
Next, navigate to your
BlendTriggerVolume.cppfile to set up your constructor and box component overlap methods. Declare the following include class libraries.#include "Components/BoxComponent.h"#include "StaticCamerasCharacter.h"#include "Camera/CameraActor.h"#include "Runtime/Engine/Classes/Kismet/GameplayStatics.h" -
In the constructor ABlendTriggerVolume::ABlendTriggerVolume , declare the following code.
ABlendTriggerVolume::ABlendTriggerVolume() { //Create box component default components OverlapVolume = CreateDefaultSubobject<UBoxComponent>(TEXT("CameraProximityVolume")); //Set the box component attachment to the root component. OverlapVolume->SetupAttachment(RootComponent); } -
Next, implement your
NotifyActorBeginOverlapandNotifyActorEndOverlapclass methods:void ABlendTriggerVolume::NotifyActorBeginOverlap(AActor* OtherActor){ //Cast check to see if overlapped Actor is Third Person Player Character if (AStaticCamerasCharacter* PlayerCharacterCheck = Cast<AStaticCamerasCharacter>(OtherActor)) { //Cast to Player Character's PlayerController if (APlayerController* PlayerCharacterController = Cast<APlayerController>(PlayerCharacterCheck->GetController())) { //Array to contain found Camera Actors TArray<AActor*> FoundActors; //Utility function to populate array with all Camera Actors in the level UGameplayStatics::GetAllActorsOfClass(GetWorld(), CameraToFind, FoundActors); //Sets Player Controller view to the first CameraActor found PlayerCharacterController->SetViewTargetWithBlend(FoundActors[0], CameraBlendTime, EViewTargetBlendFunction::VTBlend_Linear); } } } void ABlendTriggerVolume::NotifyActorEndOverlap(AActor* OtherActor){ if (AStaticCamerasCharacter* PlayerCharacterCheck = Cast<AStaticCamerasCharacter>(OtherActor)) { if (APlayerController* PlayerCharacterController = Cast<APlayerController>(PlayerCharacterCheck->GetController())) { //Blend to Player Character's Camera Component. PlayerCharacterController->SetViewTargetWithBlend(PlayerCharacterController->GetPawn(), CameraBlendTime, EViewTargetBlendFunction::VTBlend_Linear); } } } -
Compile your code.
Finished Code
BlendTriggerVolume.h
#pragma once

#include "CoreMinimal.h"
#include "GameFramework/Actor.h"
#include "BlendTriggerVolume.generated.h"

UCLASS()
class STATICCAMERAS_API ABlendTriggerVolume : public AActor
{
    GENERATED_BODY()

public:
    // Sets default values for this actor's properties
    ABlendTriggerVolume();

protected:
    //Collision Bounds of the Actor Volume
UPROPERTY(EditAnywhere, BlueprintReadWrite)
    class UBoxComponent* OverlapVolume;

    //Camera Actor which the Actor Volume blends to
    UPROPERTY(EditAnywhere, BlueprintReadWrite)
    TSubclassOf<ACameraActor> CameraToFind;

    //Blend time for camera transition
UPROPERTY(EditAnywhere, BlueprintReadWrite, meta =(ClampMin = 0.0f ))
float CameraBlendTime;

//Begin and End Overlap Actor methods for our OverlapVolume Actor.

    //Begin and End Overlap methods for our OverlapVolume Actor
    virtual void NotifyActorBeginOverlap(AActor* OtherActor);

    virtual void NotifyActorEndOverlap(AActor* OtherActor);
};
BlendTriggerVolume.cpp
#include "BlendTriggerVolume.h"
#include "Components/BoxComponent.h"
#include "StaticCamerasCharacter.h"
#include "Camera/CameraActor.h"
#include "Runtime/Engine/Classes/Kismet/GameplayStatics.h"

// Sets default values
ABlendTriggerVolume::ABlendTriggerVolume()
{

//Create box component default components
OverlapVolume = CreateDefaultSubobject<UBoxComponent>(TEXT("CameraProximityVolume"));

//Set the box component attachment to the root component. OverlapVolume->SetupAttachment(RootComponent);

//Set the CameraBlendTime
CameraBlendTime = 1.0f;

}
// Called when the game starts or when spawned

void ABlendTriggerVolume::BeginPlay()
{
Super::BeginPlay();
}

void ABlendTriggerVolume::NotifyActorBeginOverlap(AActor * OtherActor)
{

//Cast check to see if overlapped Actor is Third Person Player Character

if (AStaticCamerasCharacter* PlayerCharacterCheck = Cast<AStaticCamerasCharacter>(OtherActor))
{
//Cast to Player Character's PlayerController

if (APlayerController* PlayerCharacterController = Cast<APlayerController>(PlayerCharacterCheck->GetController()))
    {
//Array to contain found Camera Actors
TArray<AActor*> FoundActors;

 //Utility function to populate array with all Camera Actors in the level
UGameplayStatics::GetAllActorsOfClass(GetWorld(), CameraToFind, FoundActors);

//Sets Player Controller view to the first CameraActor found PlayerCharacterController->SetViewTargetWithBlend(FoundActors[0], CameraBlendTime, EViewTargetBlendFunction::VTBlend_Linear);
}
}

}
void ABlendTriggerVolume::NotifyActorEndOverlap(AActor* OtherActor)
{
    if (AStaticCamerasCharacter* PlayerCharacterCheck = Cast<AStaticCamerasCharacter>(OtherActor))
{
  if (APlayerController* PlayerCharacterController = Cast<APlayerController>(PlayerCharacterCheck->GetController()))
{

//Blend to Player Character's Camera Component.
PlayerCharacterController->SetViewTargetWithBlend(PlayerCharacterController->GetPawn(), CameraBlendTime, EViewTargetBlendFunction::VTBlend_Linear);
     }
 }

 }
// Called every frame
void ABlendTriggerVolume::Tick(float DeltaTime)
{
Super::Tick(DeltaTime);
}
Setting up the Overlap Trigger Actor
Now that you have created your overlap Actor, you will need to place it into the level and set up its bounds.
-
Begin by navigating to your C++ Classes folder, right-click on your BlendTriggerVolume class, select Create Blueprint Class based on BlendTriggerVolume , then name your Blueprint Actor BP_BlendTriggerVolume .
![Create Blueprint class]()
-
From the class defaults, navigate to Camera To Find in the Details panel, open the drop down menu, then select BP_ExampleCameraActor .
![FInding the camera]()
-
Optionally, you can change the default blend time for this Blueprint without having to go back into the source code, or affecting other Blueprints with the same inherited parent class.
![Change default Blend time]()
-
Compile and Save .
![Compile button]()
-
From the Content Browser , drag an instance of BP_BlendTriggerVolume into the level.
![Place Volume actor]()
Click image to expand.
-
Move the BP_BlendTriggerVolume into the room with your BP_ExampleCameraActor , and from the Details panel select the box component. Navigate to the Shape category and modify the Box Extent X, Y, and Z values so the volume will fit your room.
![Adjust Volume actor to fit room]()
Click image to expand.
-
From the Main Editor View , click the Play button to play in the Editor.


End Result
When the game starts, the player controls their character's movement using WASD . Upon overlapping the BP_BlendTriggerVolume the camera view is assigned to the Camera Actor that you have created and placed in your level, and the view will switch to an overhead shot of the player-controlled character.

You may have also noticed that the view is Widescreen; you can disable this by un-checking the Constrain Aspect Ratio option inside the Details panel for the Camera Actor.
