Choose your operating system:
Windows
macOS
Linux
This Quick Start page will get you up and running with the basics of the Multi-User Editing system. After going through the tutorial, you'll know:
-
How to set up multiple computers so that they're ready to join a session together.
-
How to start a server to manage your sessions.
-
How to start and join sessions, so that you can work together with your teammates.
-
How to persist the changes you make while working in a session back to the Project content on your local computer.
Prerequisites: Although you can run this tutorial using multiple instances of the Unreal Editor working on the same host, it's much more effective to connect multiple different computers to the same session. To start with:
-
Install the same version of Unreal Engine on each computer.
-
Make sure that all computers are connected to the same Local Area Network (LAN) or Virtual Private Network (VPN).
The images in this procedure use the Virtual Camera sample Project, which you can get from the Learn tab of the Epic Games Launcher. However, the same steps should work equally well for any Unreal Engine Project you're working on.
1 - Activate the Plugin
Before you can connect multiple instances of the Unreal Editor together to work in a shared session, you need to enable the Multi-User Editing Plugin for your Project.
-
Open your Project in the Unreal Editor.
-
From the main menu, select Edit > Plugins .
-
Under the Developer category, find the Multi-User Editing Plugin and check its Enabled box.

Click for full image. -
Click Yes to confirm.

-
Click Restart Now to restart your Project and apply the change.

Click for full image.


2 - Set Up Multiple Computers
Each computer that you want to connect to the same Multi-User Editing session needs to have the same version of Unreal Engine installed.
Each computer also needs to have a copy of the same Unreal Engine Project, each with exactly the same content.
-
The typical way to achieve this is to store your Project in a version control system such as Perforce, Git, or Subversion, and to sync every computer to the same revision or changelist.
If you're using Perforce, you can also consider using UnrealGameSync (UGS) to make this process easier. For details, see the UGS documentation .
-
The Multi-User Editing system doesn't absolutely require you to use source control. You could simply copy your Project folder from one computer to all the other computers that you want to join the same session. You may find this useful for initial testing of the Multi-User Editing system. However, avoid relying on this approach. Using version control effectively within your team is the safest way to maintain and share your Project content.
Once you have a copy of your Project on each computer, you'll want to customize a few key settings. On each computer:
-
Open your Project in the Unreal Editor, and choose Edit > Project Settings from the main menu.
-
In the Project Settings window, open the Plugins > Multi-User Editing section.

Click for full image.Change the following settings to add a shortcut button to the Editor UI, and to customize the presence information that each Unreal Editor instance shows to other instances while connected to a session.
Setting
Description
Enable Multi-User Toolbar Button
Adds a new button to the Toolbar in the main Unreal Editor window that provides shortcuts to the Multi-User Editing commands you'll need most often.
Display Name
Sets the name that the Multi-User Editing system uses when it displays presence information and session history for this computer.
By default, the Multi-User Editing system attempts to use the login information for the current user of the host operating system, but you may want to override this value in some cases — for example, if you have the same user account logged in on multiple computers.Avatar Color
Sets a color that the Multi-User Editing system associates with this computer when it displays presence information and session history.
By default, this color is the same for all users (white), but you can make your session history much easier to understand if you assign a different color to each computer.For details on all the settings available in this panel, see also the Multi-User Editing Reference .
-
Restart the Editor again for your new settings to take effect.

3 - Start a Server
Once you have your Project open in the Unreal Editor on each computer that you want to connect together, you'll need to start a server to manage the session shared by those computers. The easiest way to do this is from any one of those instances of the Unreal Editor.
-
Click the Multi-User Editing icon in the Toolbar. (It should say Browse , indicating that you aren't currently connected to a session.)

-
The Multi-User Browser window opens. This panel offers access to most of the session management tools that you'll need as you work in the Multi-User Editing system. You'll return to this window frequently.

Click for full image.Even when you don't have the Toolbar icon active, you can also open this panel at any time by choosing Window > Developer Tools > Multi-User Browser .
-
In the Multi-User Browser window, click the Launch icon on the far left of the Toolbar to start the Multi-User Editing Server on your computer.

Click for full image. -
You'll see a new command window open. The server periodically prints status messages to this window as you manage sessions and make changes to your Project content. For example:

Click for full image.


You can also start a server from the command line on any computer that has Unreal Engine installed. For details, see the UnrealMultiUserServer Command-line Parameters section of the Multi-User Editing Reference page.
4 - Start a Session
Now you have a server running on one of your computers, but none of your Unreal Editor instances are connected to that server yet. In order for that to happen, you need to create a new session. The session manages and shares all the modifications that all connected users make to the Assets and Levels in the Project.
To create a new session:
-
On any one of your computers, open the Multi-User Browser window as shown in the previous section.
There won't be any sessions listed here yet. However, as long as the computer running your server is visible over the network to the computer running this instance of Unreal Editor, you should be able to create a new session.
-
Click the Create a New Session icon in the Toolbar of the Multi-User Browser window.

Click for full image.You'll see a new row added to the list view for you to set up your new session.

Click for full image. -
Type a name for your new session, and select the server that you want to manage the session from the drop-down list. (You'll only have one server in this list for now.) Then, select the checkbox icon at the far right to create the session.

Click for full image.If you have a server running on the same LAN or VPN as the computer running Unreal Editor, but you can't create a new session or see your server listed in the Server drop-down list, you may need to stop and do some additional network configuration at this point. See Advanced Multi-User Networking .


You'll automatically connect to your new session. The layout of the Multi-User Browser window changes to show you the details about the session you've joined.

Click for full image.
In addition, the button in the Toolbar of the main Unreal Editor updates to indicate that you're connected.

5 - Join the Session
Now that you have a server running, and you've created a session on that server from the Unreal Editor on one of your computers, you'll be able to connect to that same session from other instances of the Unreal Editor running on other computers.
On each other computer you want to join the session:
-
Open the Multi-User Browser window. You'll see the session that you created on the other computer listed here.

Click for full image. -
Select the session to see details about the Project and who's currently connected to the session.

Click for full image.You can also mouse over any session to see its details:

-
Click the Join the selected session icon in the Toolbar to join. (Or, double-click the session name.)

Click for full image.


As soon as you're connected, the Multi-User Browser window changes to show you the details about the session you've joined. Now, you should see all connected users in the Clients list, and the history of changes made by all participants in the shared session.

Click for full image.
If any of the other computers already working in this session have already made any changes to the Level or the Assets in the Project before you joined, your instance of Unreal Editor will automatically fetch those transactions from the server and apply the changes in your local view of the shared session workspace. You'll now be locked in to working with the same content as all the other participants, but you'll be free to work with that content any way you need to in the Unreal Editor UI. You can do things like moving your camera viewpoint around in the Level Viewport, browsing to new folders in the Content Browser, switching tools, opening new windows and panels, and so on, without affecting other users.
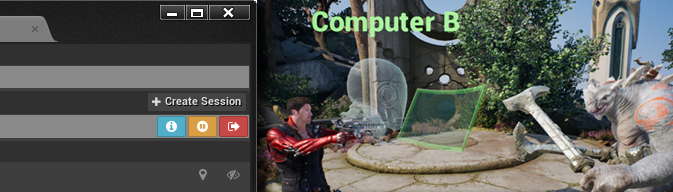
Now that you have multiple computers connected together in a single session, we can make some changes on one computer and see how those changes are propagated to the other computers in the same session.
6 - Work Together
Now that you have multiple users connected in the same live session, you can all build the virtual world together. Work on your Unreal Engine Project as you usually would, but now you'll all see the results of each others' changes as soon as they're applied.
For details on what to expect while you're working live, see the Multi-User Editing Overview .

Click for full image.
7 - Persist Session Changes
At this point, you and your teammates have probably made some changes to a Level and to some Assets in the Project. However, these transactions are not yet reflected in the actual files that make up the Project content on your computer. If you want to keep the work that your team has done in the live session, you'll need to persist these changes. That means, you'll have to apply all the transactions handled by the Multi-User Editing system to your local Project files.
You persist changes using the Source Control tools in the Toolbar, regardless of whether you're using a source control provider or not.
-
Click the arrow next to the Source Control button in the Toolbar, and select Persist Session Changes .

-
In the Persist & Submit Files window, you'll see a list of all the files that were modified during the live session. Use the checkboxes to indicate what modified files you want to apply to the Project files on your local computer.

-
If you had a source control provider set up when you started or joined your session, you have the option to immediately submit the changes that you're persisting back to that provider in a new changelist or revision.
If you don't choose to submit immediately, the Multi-User Editing system will check out the modified files automatically from your source control provider, so that it can apply and save the changes made in the session to the local files on your computer. You'll then be able to make further modifications (either in your session or offline after you leave the session) and submit all the changes later using the standard Source Control workflow, if you choose.
If you do want to submit the changes you've made in the session to source control immediately:
-
Check the Submit to Source Control option at the bottom of the window.

-
Just like in the usual Source Control workflow, you must set a description of the changes that you're submitting. Expand the Changelist Description at the top of the window, and type a description in the box.

-
If you know that you'll need to make more modifications to the files you're submitting, you can check the Keep Files Checked Out option as in the usual Source Control workflow.

-
-
When you're happy with the list of files you want to submit, and you've set the source control options you want, click Submit .


You'll remain connected to your session, and you can keep working as long as you like.
8 - Clean Up
Now that you've applied the changes that you and your teammates made to your Levels and Assets during your live session back to your Project on disk, and optionally committed those changes back to your source control system, you likely won't need your session anymore. Although you can rejoin and pick up the same session where you left off at any time, it's good practice to regularly start new editing sessions from updated changelists, rather than keep working in older sessions for a long period of time.
When you don't need a session anymore, you can use the Multi-User Browser to delete it.
Only the user who initially created the session can delete it. Other users will not see the option in the Multi-User Browser , even if they participated in that session.
-
Disconnect from the session, if you haven't already. (You can't delete a session while you're connected to it.)

Click for full image.If you have the Multi-User Editing button shown in the Toolbar, it says Leave while you're connected. You can simply click it to leave the session:

-
After you've disconnected, select your session in the Multi-User Browser and click the Delete icon in the Toolbar to delete it.

Click for full image. -
Confirm the deletion.

If there are any other users connected to the session you've deleted, they will be automatically disconnected.
-
Finally, if you know that you won't need to reconnect to any shared sessions for a while, you can stop the server by focusing on its console window and pressing Ctrl+C .
Avoid simply closing the console window. The server considers this an abnormal shutdown. Any sessions that are still active when you close the console window will be automatically restored next time you start the server.


Now you're back to where you started this tutorial, but with all the changes that all users made during the shared editing session.
9 - On Your Own
If you've successfully gone through all the steps above, you've had a first taste of live collaboration workflows in the Unreal Editor. You've learned how to set up your Project on multiple computers, connect those computers together into a shared editing session, and work together with your teammates on building a virtual world. You probably already have ideas for how to put these workflows into practice within your own teams working on your own Projects — now you'll be able to benefit from instant collaboration, zero iteration time, and the creative cooperation made possible by the Multi-User Editing system.
-
If you start using the Multi-User Editing system routinely in your team, you may want to set up a default server name and session name in your Project Settings . When this is set up, the Toolbar button is updated to say Join instead of Browse . You can then click the Toolbar icon to join your default session with one click. You can also choose to connect automatically to that default session when you open your Project.
-
If you need multiple users to see the same animations playing back in sync, you can configure the Multi-User Editing system to synchronize operations in the Sequencer UI between different users. Each user needs to opt in to this by setting some console commands.
For details on the settings you'll need to modify, see the Multi-User Editing Reference .