Choose your operating system:
Windows
macOS
Linux
Level Snapshots enable you to save a particular configuration of the Actors in the World Outliner of your Level and instantly restore your scene to that state. This can dramatically streamline complex setups and avoid duplication and management of multiple variations of the same Level for different scenarios. Level Snapshots are especially useful for Virtual Production, as they enable users to reset virtual environments to their starting position between takes as well as track per-shot changes that may occur during a shoot while preserving the base starting point of the Level.
Users also have the flexibility to selectively restore only certain Actors or Properties from a Level Snapshot in order to account for bespoke needs in the moment that can vary from one situation to the next. For example, you can choose to restore only the lighting from a Level Snapshots or the position of a single actor. Experienced users can construct custom filters using Blueprints to manage the restoration of Actors / Properties on the most complex Level setups and automate common project-specific requests.
Getting Started
In order to enable the Level Snapshot feature, you need to install the Level Snapshots plugin.
-
In the Unreal Editor, go to the main menu and select Project Settings .
-
In the Project Settings window, navigate to Plugins > LevelSnapshots .
-
Enable the LevelSnapshots plugin.
-
(Optional) Enable the nDisplay Support For Level Snapshots plugin.
-
the editor will prompt you to restart.

Support for nDisplay in Level Snapshots is through a separate plugin. This is important for using In-Camera VFX. If you aren't using nDisplay for your project, you don't need to enable the nDisplay Support for Level Snapshots plugin.
Once the engine restart is complete, you can take Level Snapshots, access the Level Snapshots menu in the Main Toolbar , and open the Level Snapshots window .

Taking Snapshots
There are three ways to take a Level Snapshot:
-
By clicking the Level Snapshot button in the main toolbar.
![Level Snapshots main toolbar button]()
-
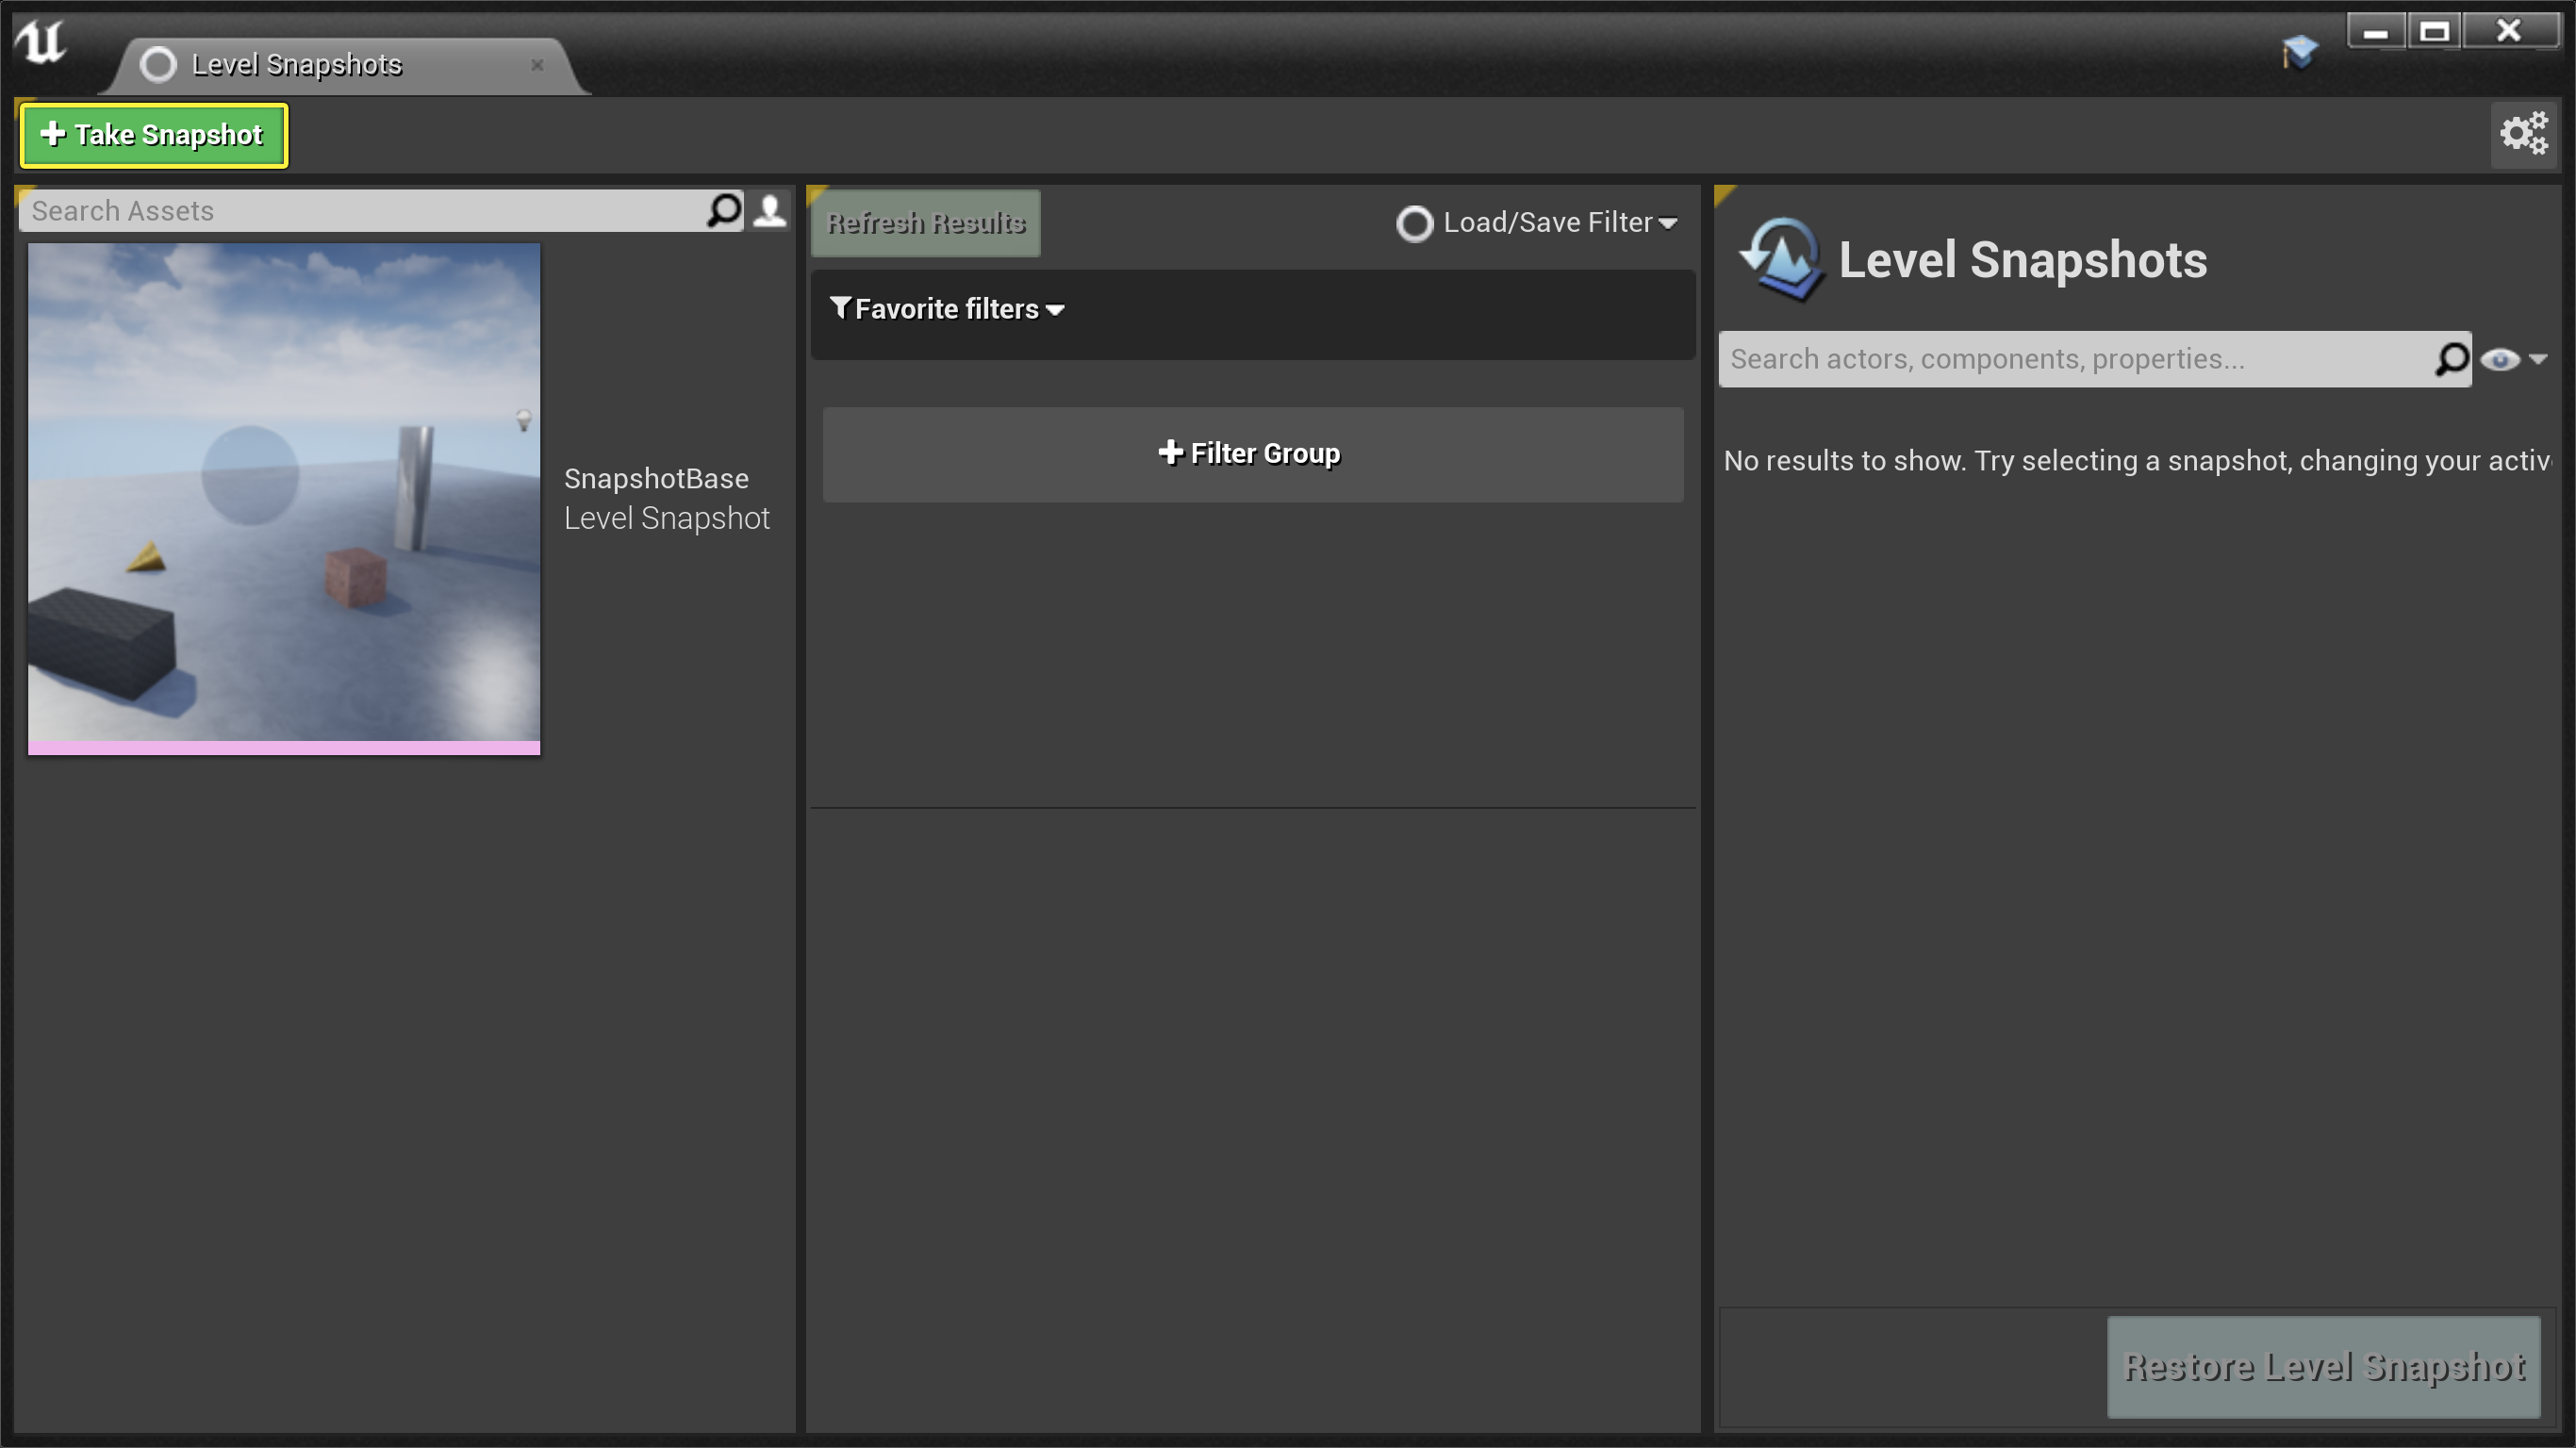
By clicking the Take Snapshot button in the Level Snapshot window.
![Take Snapshot in the Level Snapshot window]()
Click image to expand.
-
By activating Take Snapshot using the Remote Control Web Application .

All three of these methods will open the Create Level Snapshot window.
By default the new Level Snapshot shown in the Create Level Snapshot window will be named using the format


The Level Snapshot will be saved as an Asset in the directory shown under Root Directory in the Create Level Snapshot window, which will be named LevelSnapshots by default. The subdirectory location of a specific Level Snapshot will be based on the Map (Level) name and the date (year-month-day) the Level Snapshot was taken. You can change both the root directory and the subdirectory of a particular Level Snapshot. You can also change the default naming pattern for new Level Snapshots.
If you rename a Level Snapshot before saving it, be careful not to overwrite it with another Level Snapshot, because the revised name will become the new default unless you change or revert it.
Working With Level Snapshots
Level Snapshots contain a record of all the Actors in the World Outliner as well as the state of their Components and properties at the moment at which the Level Snapshot is taken. All the Actors are recorded, whether or not they are currently visible in the World Outliner when the Level Snapshot is taken, so you may need to check Actor visibility when using Level Snapshots to set up a scene in your Level. Similarly, the states of Assets (for example, Materials) are not recorded, so any changes to Assets need to be tracked independently using source control .
Once you have one or more Level Snapshots created, you can reset all the Actors to their saved state by selecting the Level Snapshot and clicking the Restore Level Snapshot button.
When you restore a Level Snapshot, any changes to Actors made since the Level Snapshot was taken will be reverted back to the states saved in the Level Snapshot.
-
New Actors added after the Snapshot was taken will be removed from the Level.
-
Actors removed after the Snapshot was taken will be added back to the Level.
-
All Actor transforms will be reverted to their saved states.
-
Any changes to Actor properties will be reverted to their saved states.

Click image to expand.
You can undo the Restore Level Snapshot action.
When you click a Level Snapshot, the right-hand side of the Level Snapshot window will show a list of all the Actors as well as their Components and properties that will be reverted to the states saved in the Level Snapshot.
You can use the checkboxes to manually apply or ignore specific changes, or use custom filters to specify which changes to apply or ignore; see Creating Custom Filters for more information on custom filters.
If you have multiple Levels in your Project, only the Level Snapshots associated with the currently open Level will be visible in the Level Snapshot window. Level Snapshots associated with other Levels will only be shown when those Levels are opened in the editor.
Known Limitations
This section describes known limitations when working with Level Snapshots.
-
The following Actors and Actor components are not tracked with Level Snapshots. If you want to use them with your Level, you will need to track them manually.
-
Foliage
-
Landscapes
-
USD actors
-
Console variables
-
Components added to Actors, either instanced components manually added using Add Component, or components added by construction scripts.
-
-
If you rename a sublevel after creating a Level Snapshot, the Level Snapshot system will consider all the Actors in the renamed sublevel new, instead of existing changed Actors. You will see this as the Level Snapshot system recommending to remove the Actors to get back to the original state.
Creating Custom Filters
The middle area of the Level Snapshot window contains the custom filters. You can use single filters, or use filter groups to create more complex filters including AND and OR Boolean operators. You can set favorite filters, and also save and load filters for later use.
When you hover over a filter, you will see a green or red bar on the left side, a checkbox, and a trash can.
-
Clicking the green bar will turn it red, which negates the filter, reversing its function. For example, if you had a filter that only included Actors with a particular tag, clicking it would cause those Actors to be excluded, and everything else to be included. Conversely, clicking the red bar turns it green, returning the filter to its original function. Refer to Negating Level Snapshot Filters for more information.
-
Clicking the checkbox disables the filter, and will gray it out to show it is not in use.
-
Clicking the trash can icon will delete the filter.

You can also negate the filter, undo negation, and enable or disable a filter from the filter properties. See the Level Snapshot Filter Reference for more details.
Custom Filter Basics
To create a basic custom filter, follow these steps:
-
Begin by clicking the +Filter Group button to add a new Filter Group .
![The Add Filter Group button]()
-
Click the Add Filter dropdown, and either select one of the common filters, or expand the C++ Filters submenu to select a filter. If you have created a custom filter using Blueprints , you can select it from the Blueprint Filters submenu. You can also use the Search text box to find a particular filter to add.
-
You can set specific filters as favorites that can be quickly dragged into Filter Groups.
![Favorite filters]()
-
The most commonly-used filters are included in the menu under the heading Common Filters . This includes Actor Changed Transform , Actor Has Tag , and Property Has Name .
![Common filters in the Add filter menu]()
-
-
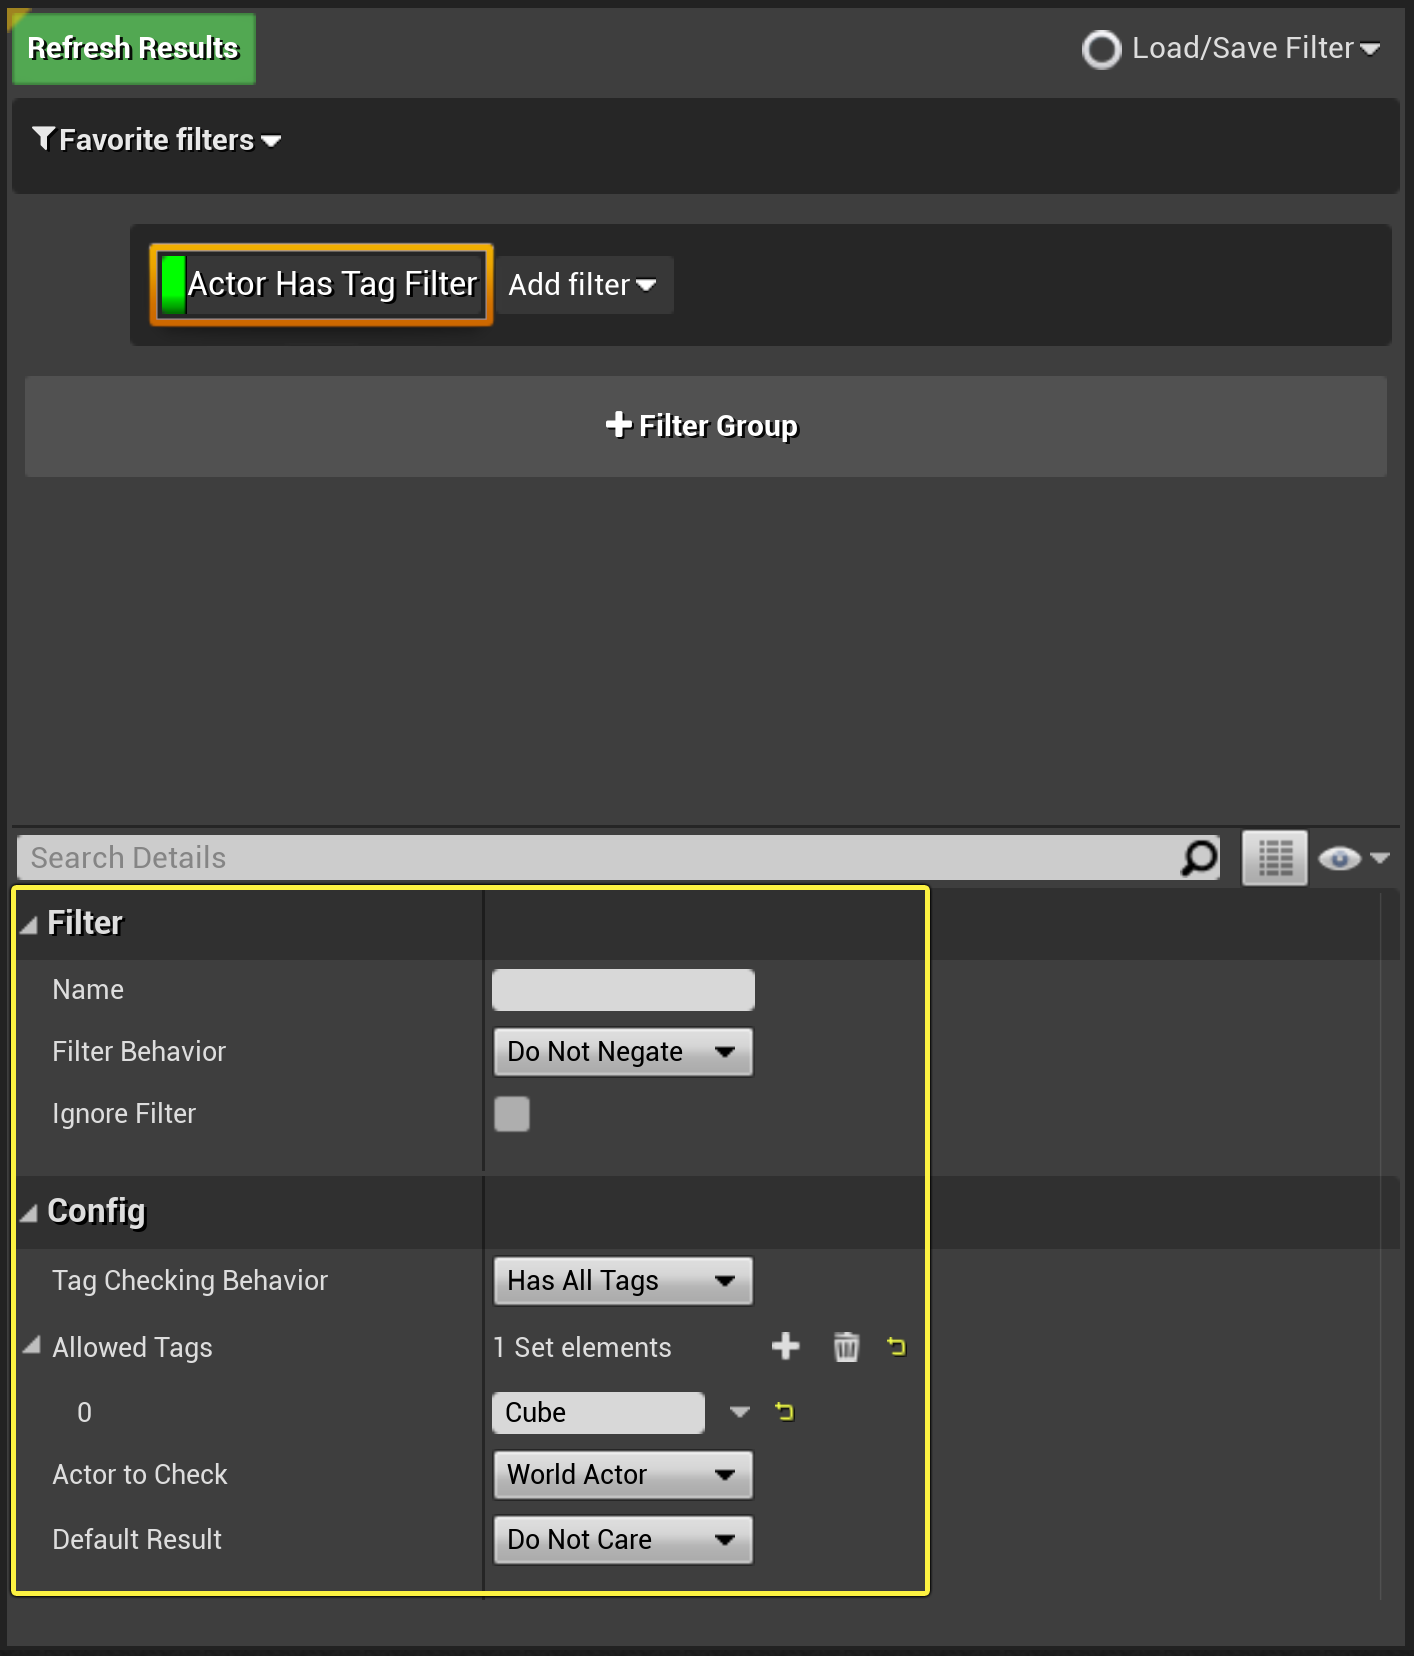
Once you have added a filter, select it to modify its properties. Most filters will have at least one property that you need to set before it is functional. For example, the Actor Has Tag Filter needs you to provide an Actor tag that it uses to filter the Level Snapshots. Refer to the Level Snapshot Filter Reference for more details.
![Level Snapshot filter properties]()
Click image to expand.
-
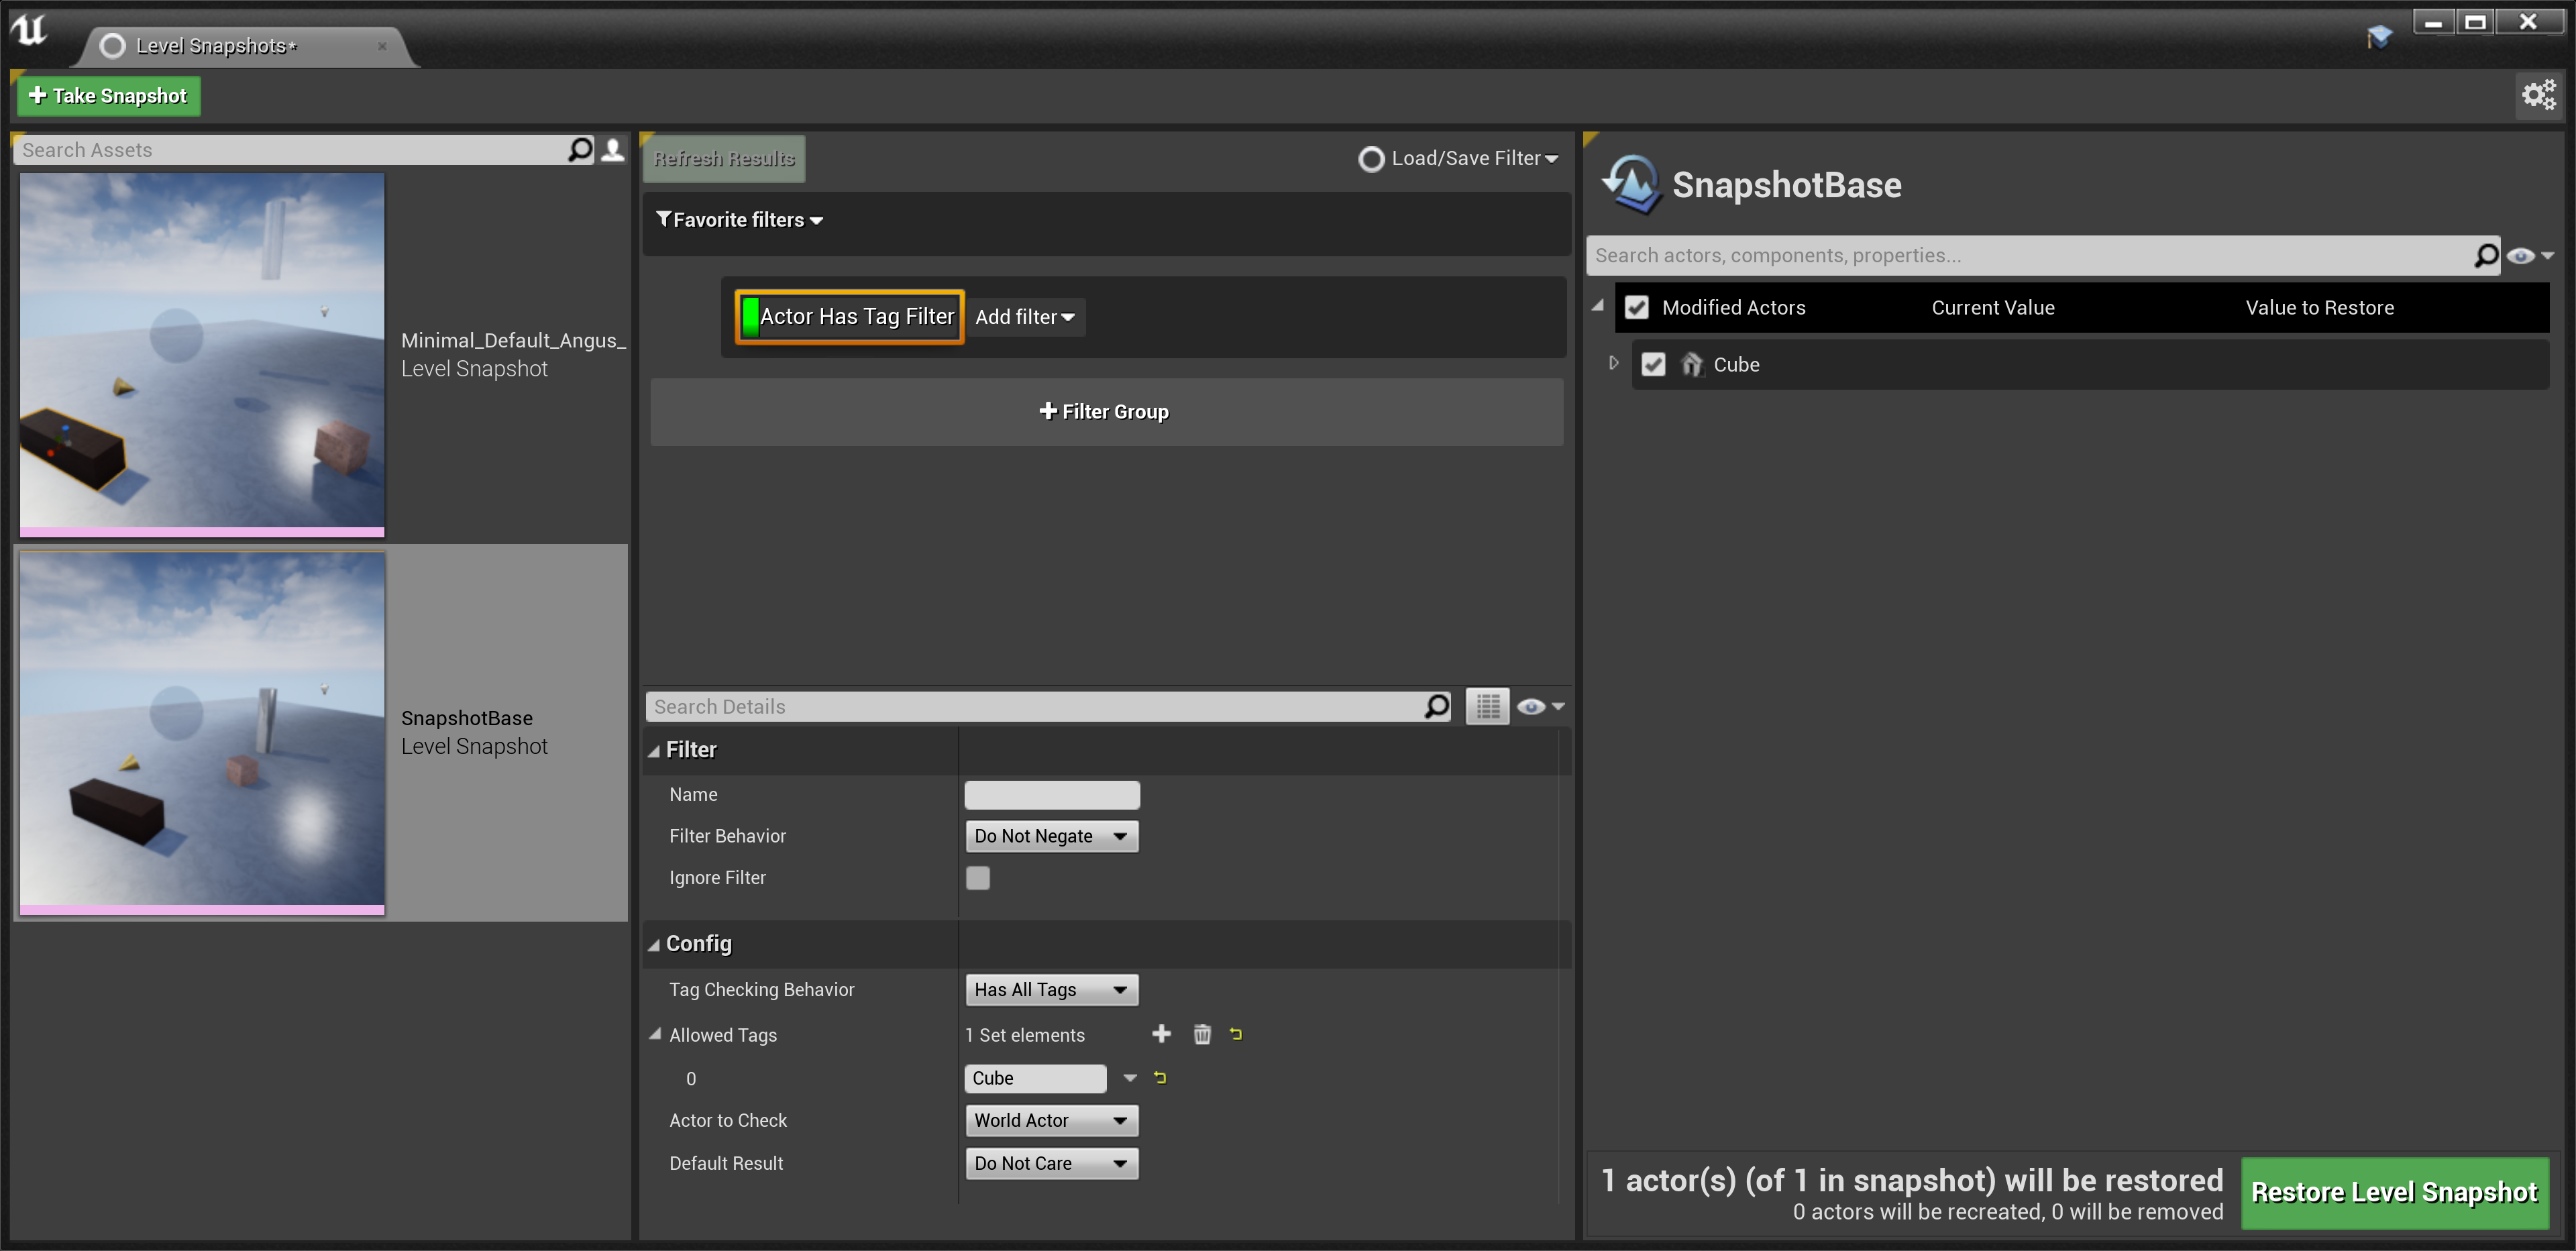
Select a saved Level Snapshot, then click Refresh Results . The Actors saved in the Level Snapshot will now be filtered according to the filter you configured.
![Level Snapshot filtered Actors results]()
Click image to expand.
-
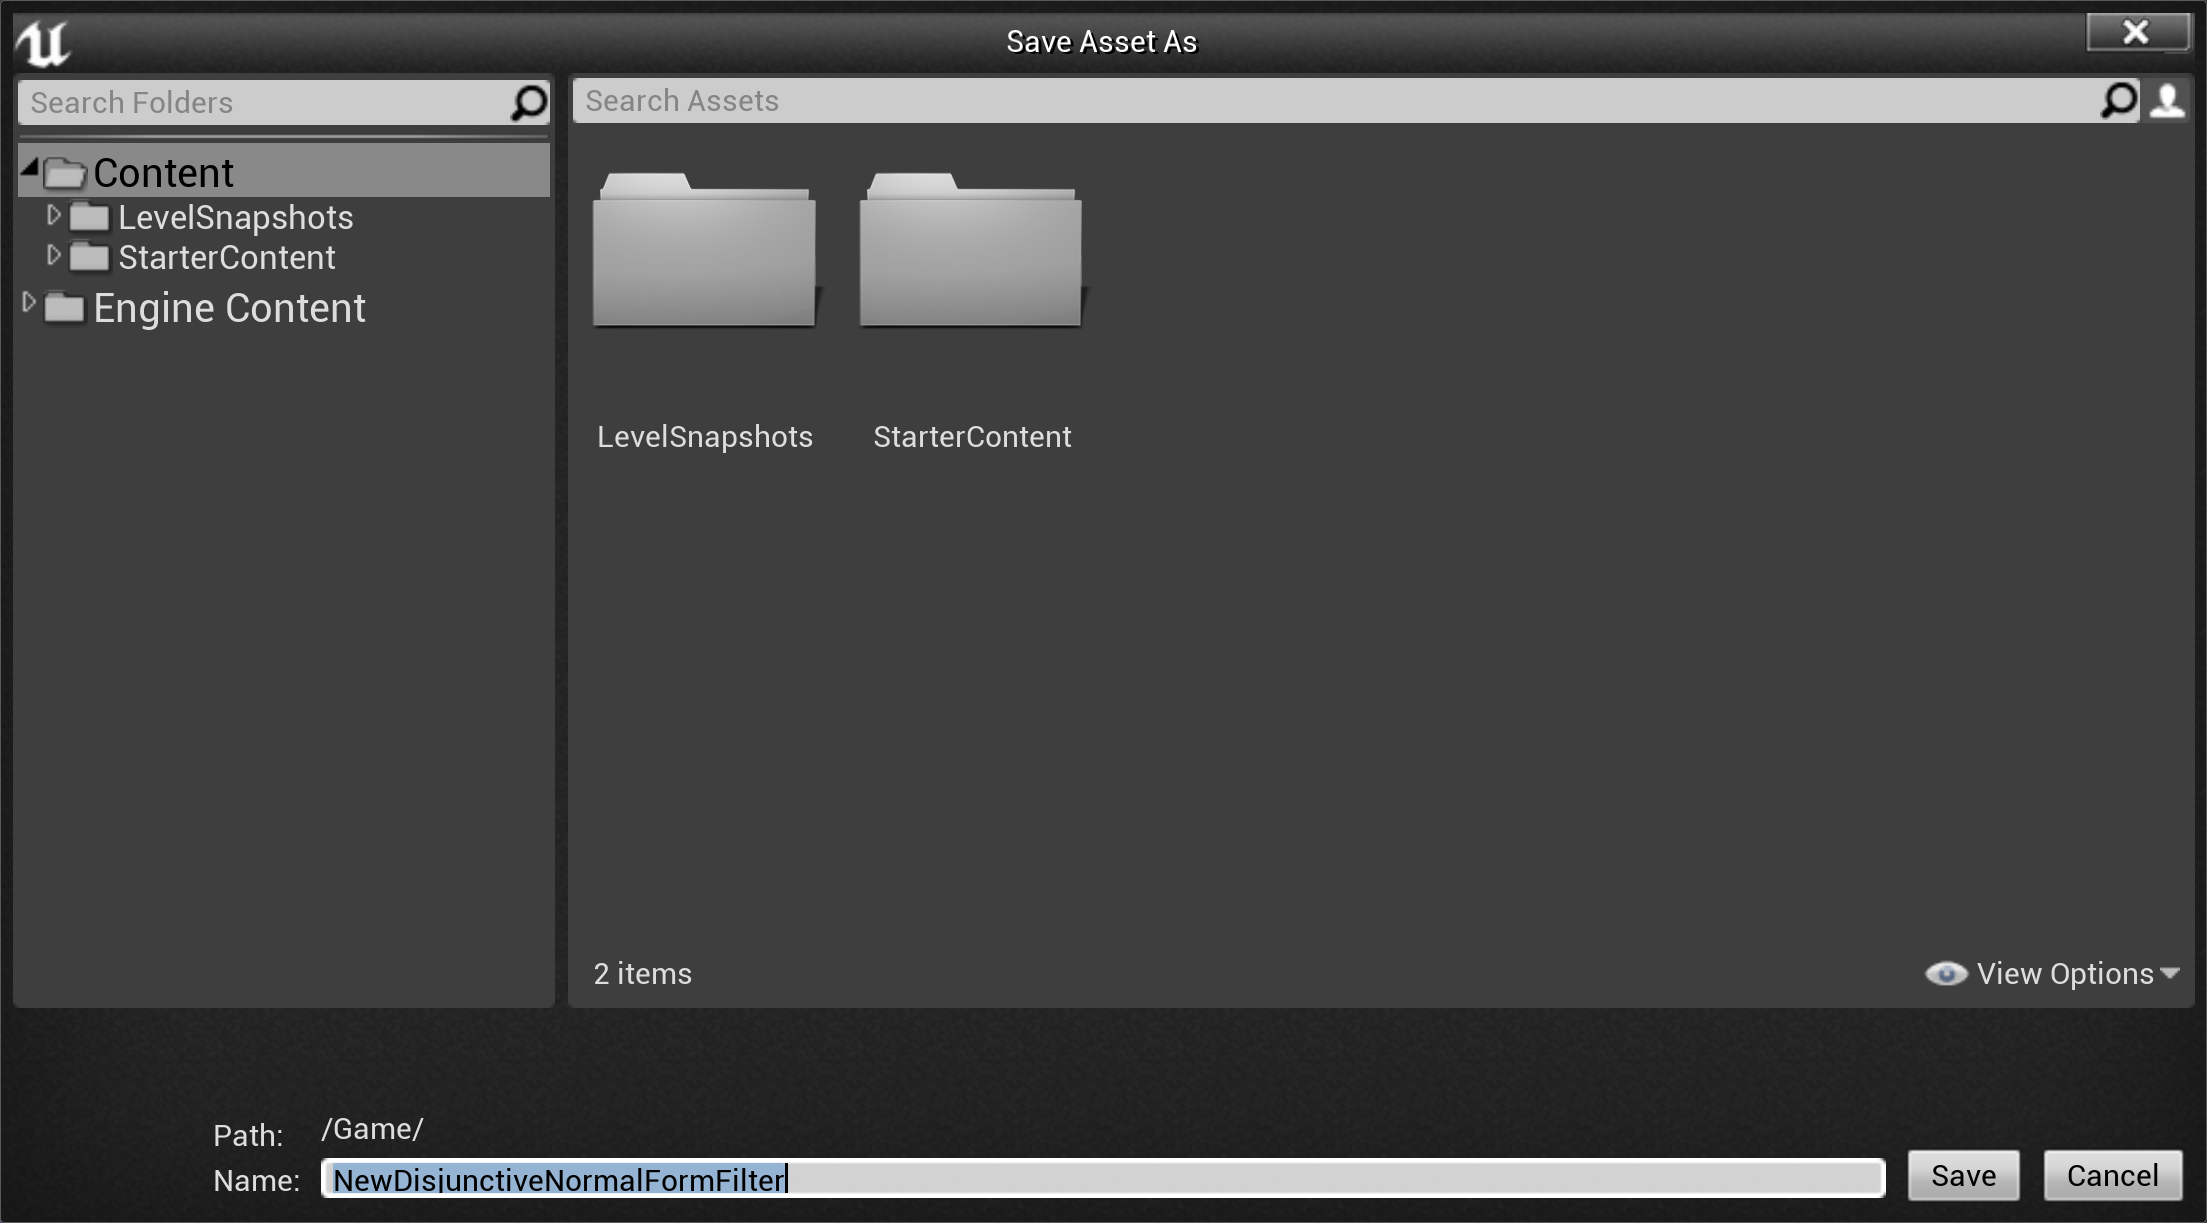
To save your new filter, open the Load / Save Filter dropdown, and select Save As . A new window opens, where you can name your filter and select the directory to save it in as an Asset.
![Load and save filter menu]()
![Saving a filter as an Asset]()
Click image to expand.
-
You can also load saved filters by opening the Load / Save Filter dropdown, selecting the filter Asset you want to load from the displayed list , then clicking Load filter . If you have a large number of saved filters, you can use the Search bar to find a specific filter.


Advanced Custom Filters
Level Snapshot filters have advanced features that allow for complex combinations of filters to achieve specific results. This can be helpful when you are dealing with large Levels with many Actors and multiple saved Level Snapshots.
-
You can add multiple filters to the same Filter Group and combine them using an AND operator (represented by &). This means that both filters will be applied to the Level Snapshots and only those Actors that meet all the filter criteria will be shown.
-
Adding additional Filter Groups using the + Filter Group button allows you to combine filters using the OR operator. This means that Actors that fit the criteria of either Filter Group will be shown.
-
You can ignore a Filter Group by clicking the checkbox to disable it, or include an ignored Filter Group by clicking the checkbox to enable it.
-
You can delete Filter Groups by clicking the trash can icon.
![Boolean operators for Level Snapshot filters]()
-
-
Most filters use the Default Result Filter property, which can be set to:
-
Include , which includes the results of the filter and exclude everything else.
-
Exclude , which excludes the results of the filter and includes everything else.
-
Do Not Care , which includes or excludes Actors directly affected by the filter according to the negation setting, but does not care about the state of any other Actor.
Refer to the Level Snapshot Filter Reference for more details.
![Default Result property dropdown]()
-


Negating a filter set to Exclude in the Default Result property will actually include the filter's results. Be careful to use well-defined logic as much as possible, so as not to confuse the function of your filter. Refer to Negating Level Snapshot Filters for more information.
Because of the potential for complex interactions between filters, we highly recommend that you carefully name your filters to identify their functionality, especially if other users will be using the filters you create.
Level Snapshot Filter Logic
All the default filters created using C++ and all custom filters created using Blueprints are fundamentally based on one of the following four validation checks:
-
Is Actor Valid: Decides whether an Actor can be restored.
-
Is Property Valid: Decides whether a property can be restored.
-
Is Deleted Actor Valid: Decides whether an Actor that was deleted from the Level (since the Level Snapshot was taken) should be respawned.
-
Is Added Actor Valid: Decides whether an Actor that was added to the Level (since the Level Snapshot was taken) should be despawned.
In most cases, we do not recommend using both Is Actor Valid and Is Property Valid filters at the same time, as the results will often not be useful. Specifically:
-
Do not mix the two in the same Filter Group in the Level Snapshot window.
-
Do not implement more than one function (IsActorValid, and so on) when creating a filter.
There are specific use cases where you may wish to carefully construct such a filter using C++ filters in multiple Filter Groups, or as a custom Blueprint filter. This would enable applying some of the settings of one Level Snapshot with a filter, and while also applying different settings from another Level Snapshot with another filter.
For example, consider a Virtual Production setup with two light options, and two set dressing options. Someone could ask for option 1 on lights, and option 2 on set dressing. With Level Snapshot Filter Blueprints you can create an interface to take and apply the appropriate settings from the different Level Snapshots. The full logic required for this setup can't be configured using only the Apply Snapshot to World button, so in this case you would need to construct a complicated filter.
Negating Level Snapshot Filters
When working with Level Snapshot filters, negating filters is a useful way to make a filter serve multiple purposes. In general, negating a filter has the following effects:
-
Include becomes Exclude.
-
Exclude becomes Include.
-
Do Not Care stays Do Not Care.
For example, suppose you used the ActorHasTag filter to only restore Actors with the tag "RestoreMe". The filter's IsActorValid function returns Include for Actors with the tag and Exclude for Actors without it. If you negate the filter in the UI, the behaviour is reversed: Actors with the "RestoreMe" tag will now be excluded and all other Actors will be included.
Certain default C++ filters have additional properties that can also affect the function of the filter. Be careful using negations with these filters to ensure you achieve the intended results when applying your filters to your Level Snapshots.
Creating Blueprint Filters
This section assumes you are already familiar with Blueprints. For more information, refer to the Blueprints documentation.
In order to create a new Level Snapshots Blueprint Filter, follow these steps:
-
Create a new Blueprint using the Level Snapshot Blueprint Filter base class.
![Level Snapshot Blueprint Filter base class in the Create Blueprint window]()
Click image to expand.
-
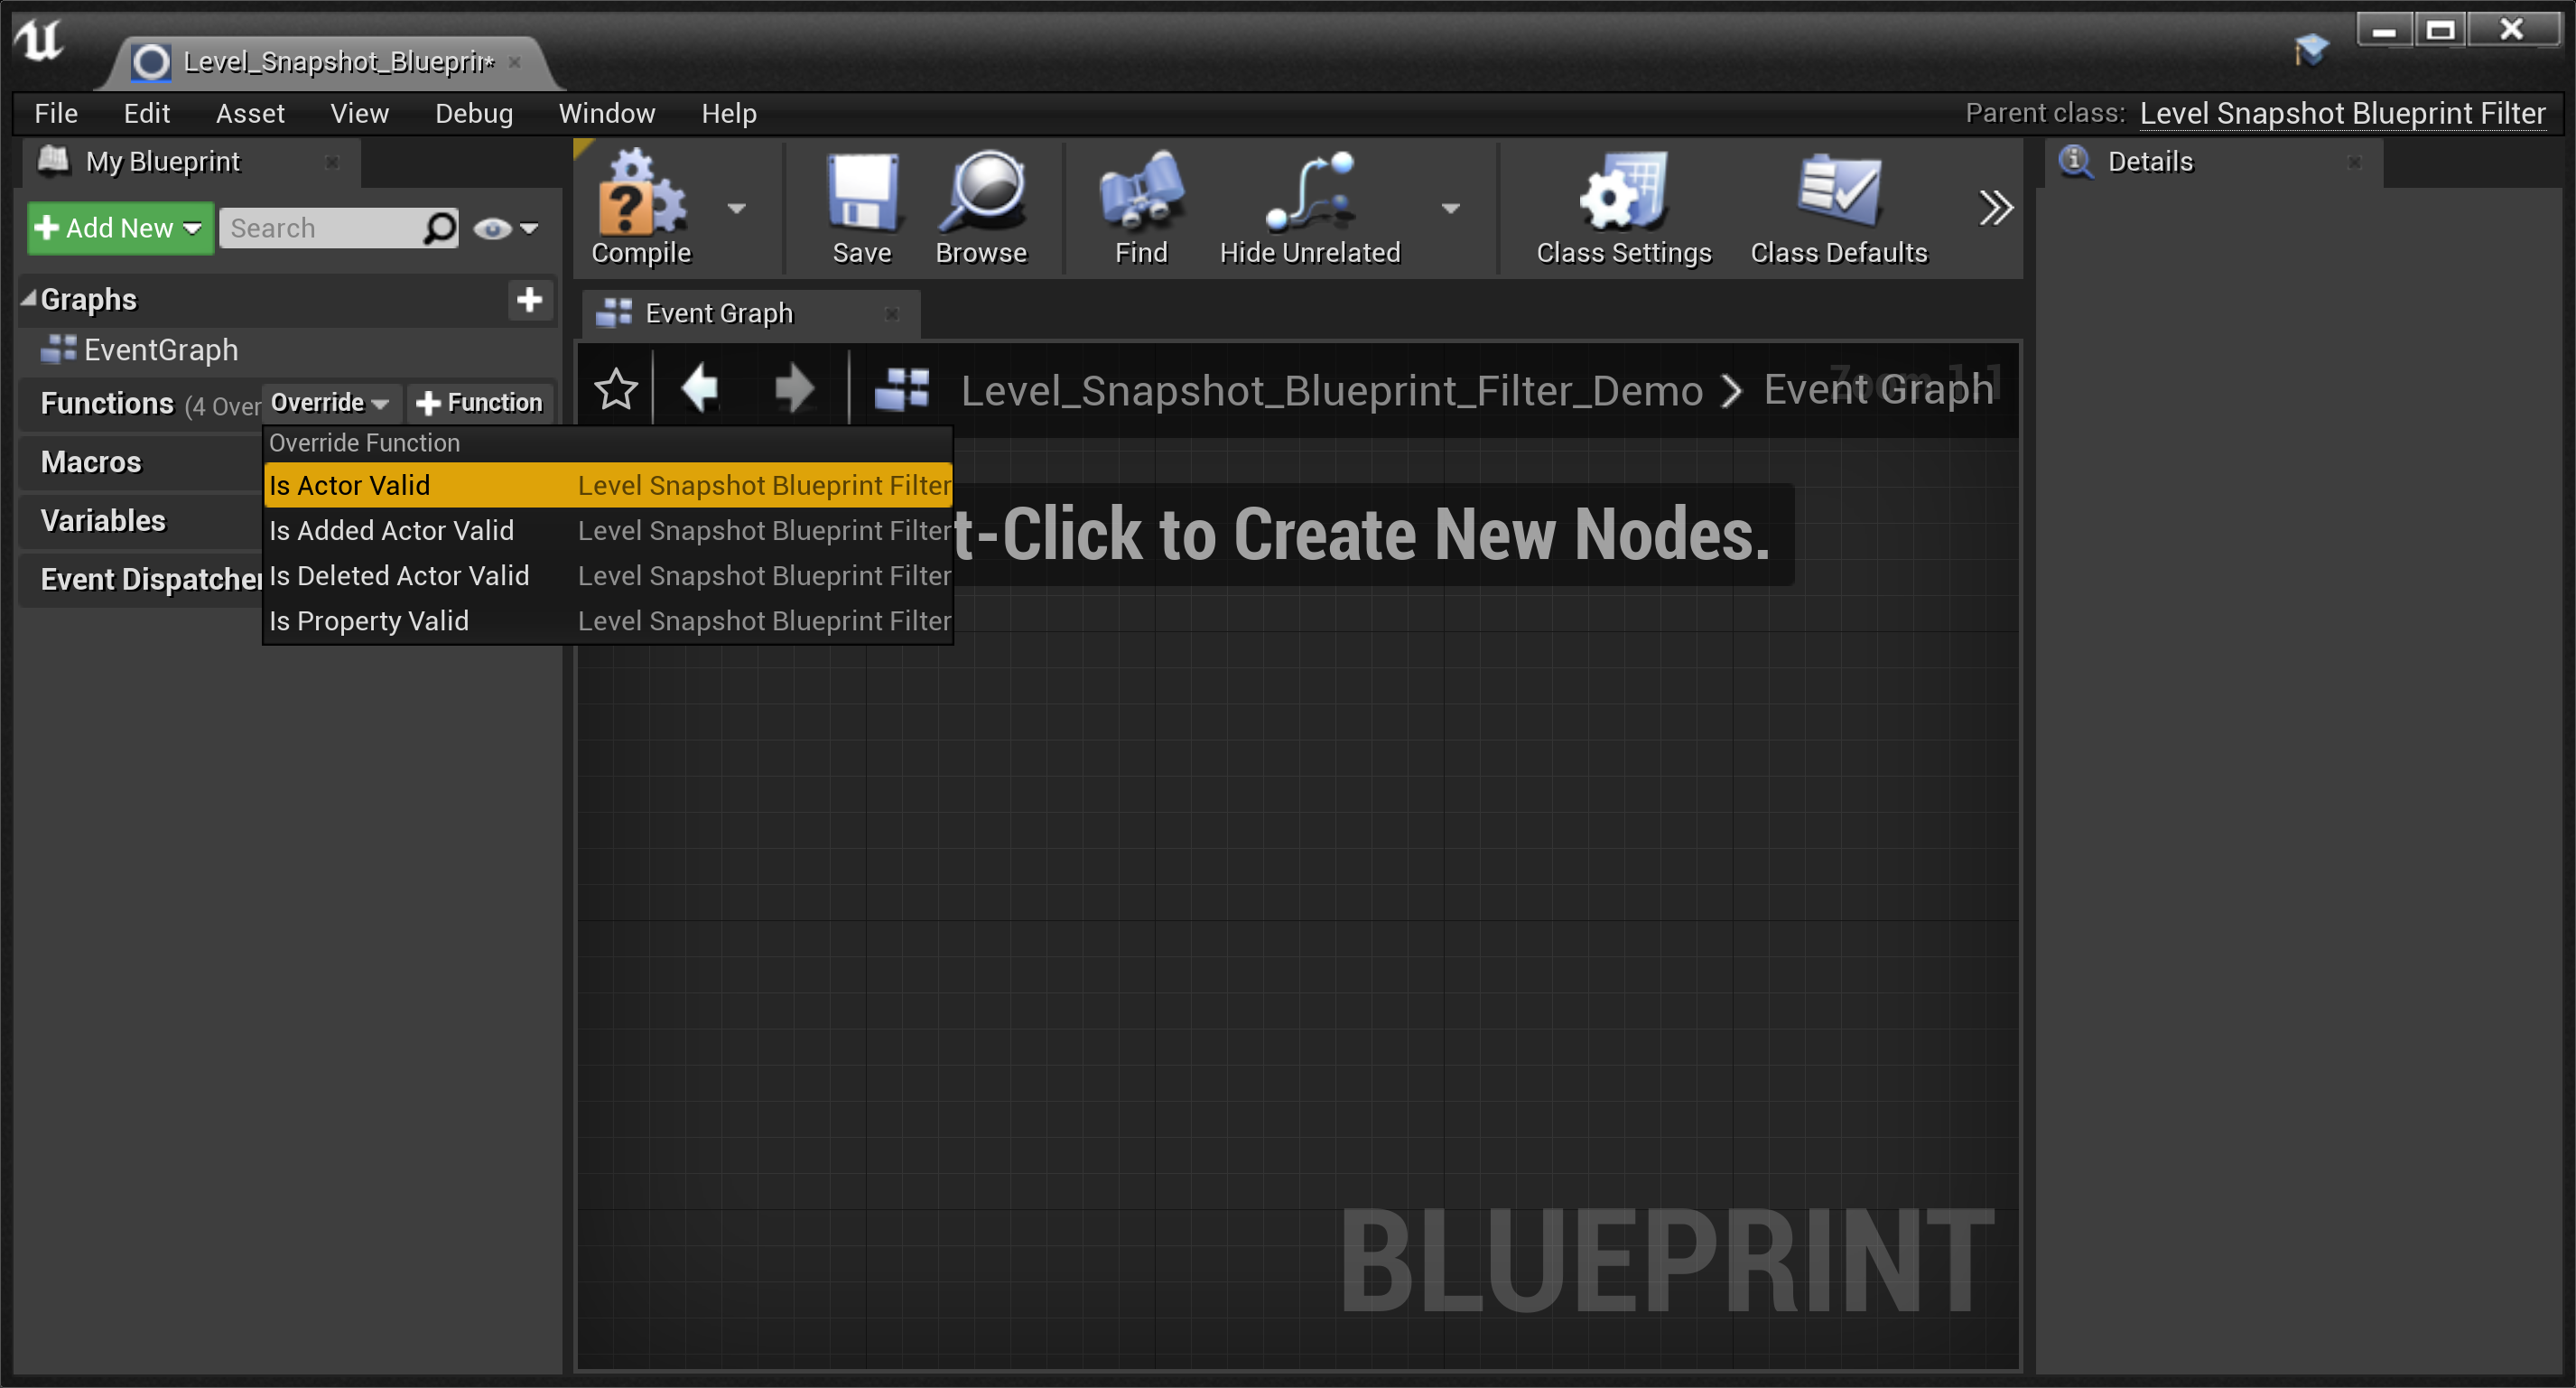
Select an Override Function from the available options:
-
Is Actor Valid: Decides whether an Actor can be restored.
-
Is Added Actor Valid: Decides whether an Actor that was added to the Level (since the Level Snapshot was taken) should be despawned.
-
Is Deleted Actor Valid: Decides whether an Actor that was deleted from the Level (since the Level Snapshot was taken) should be respawned.
-
Is Property Valid: Decides whether a Property can be restored.
![Selecting an Override Function for the Blueprint filter]()
Click image to expand.
-
-
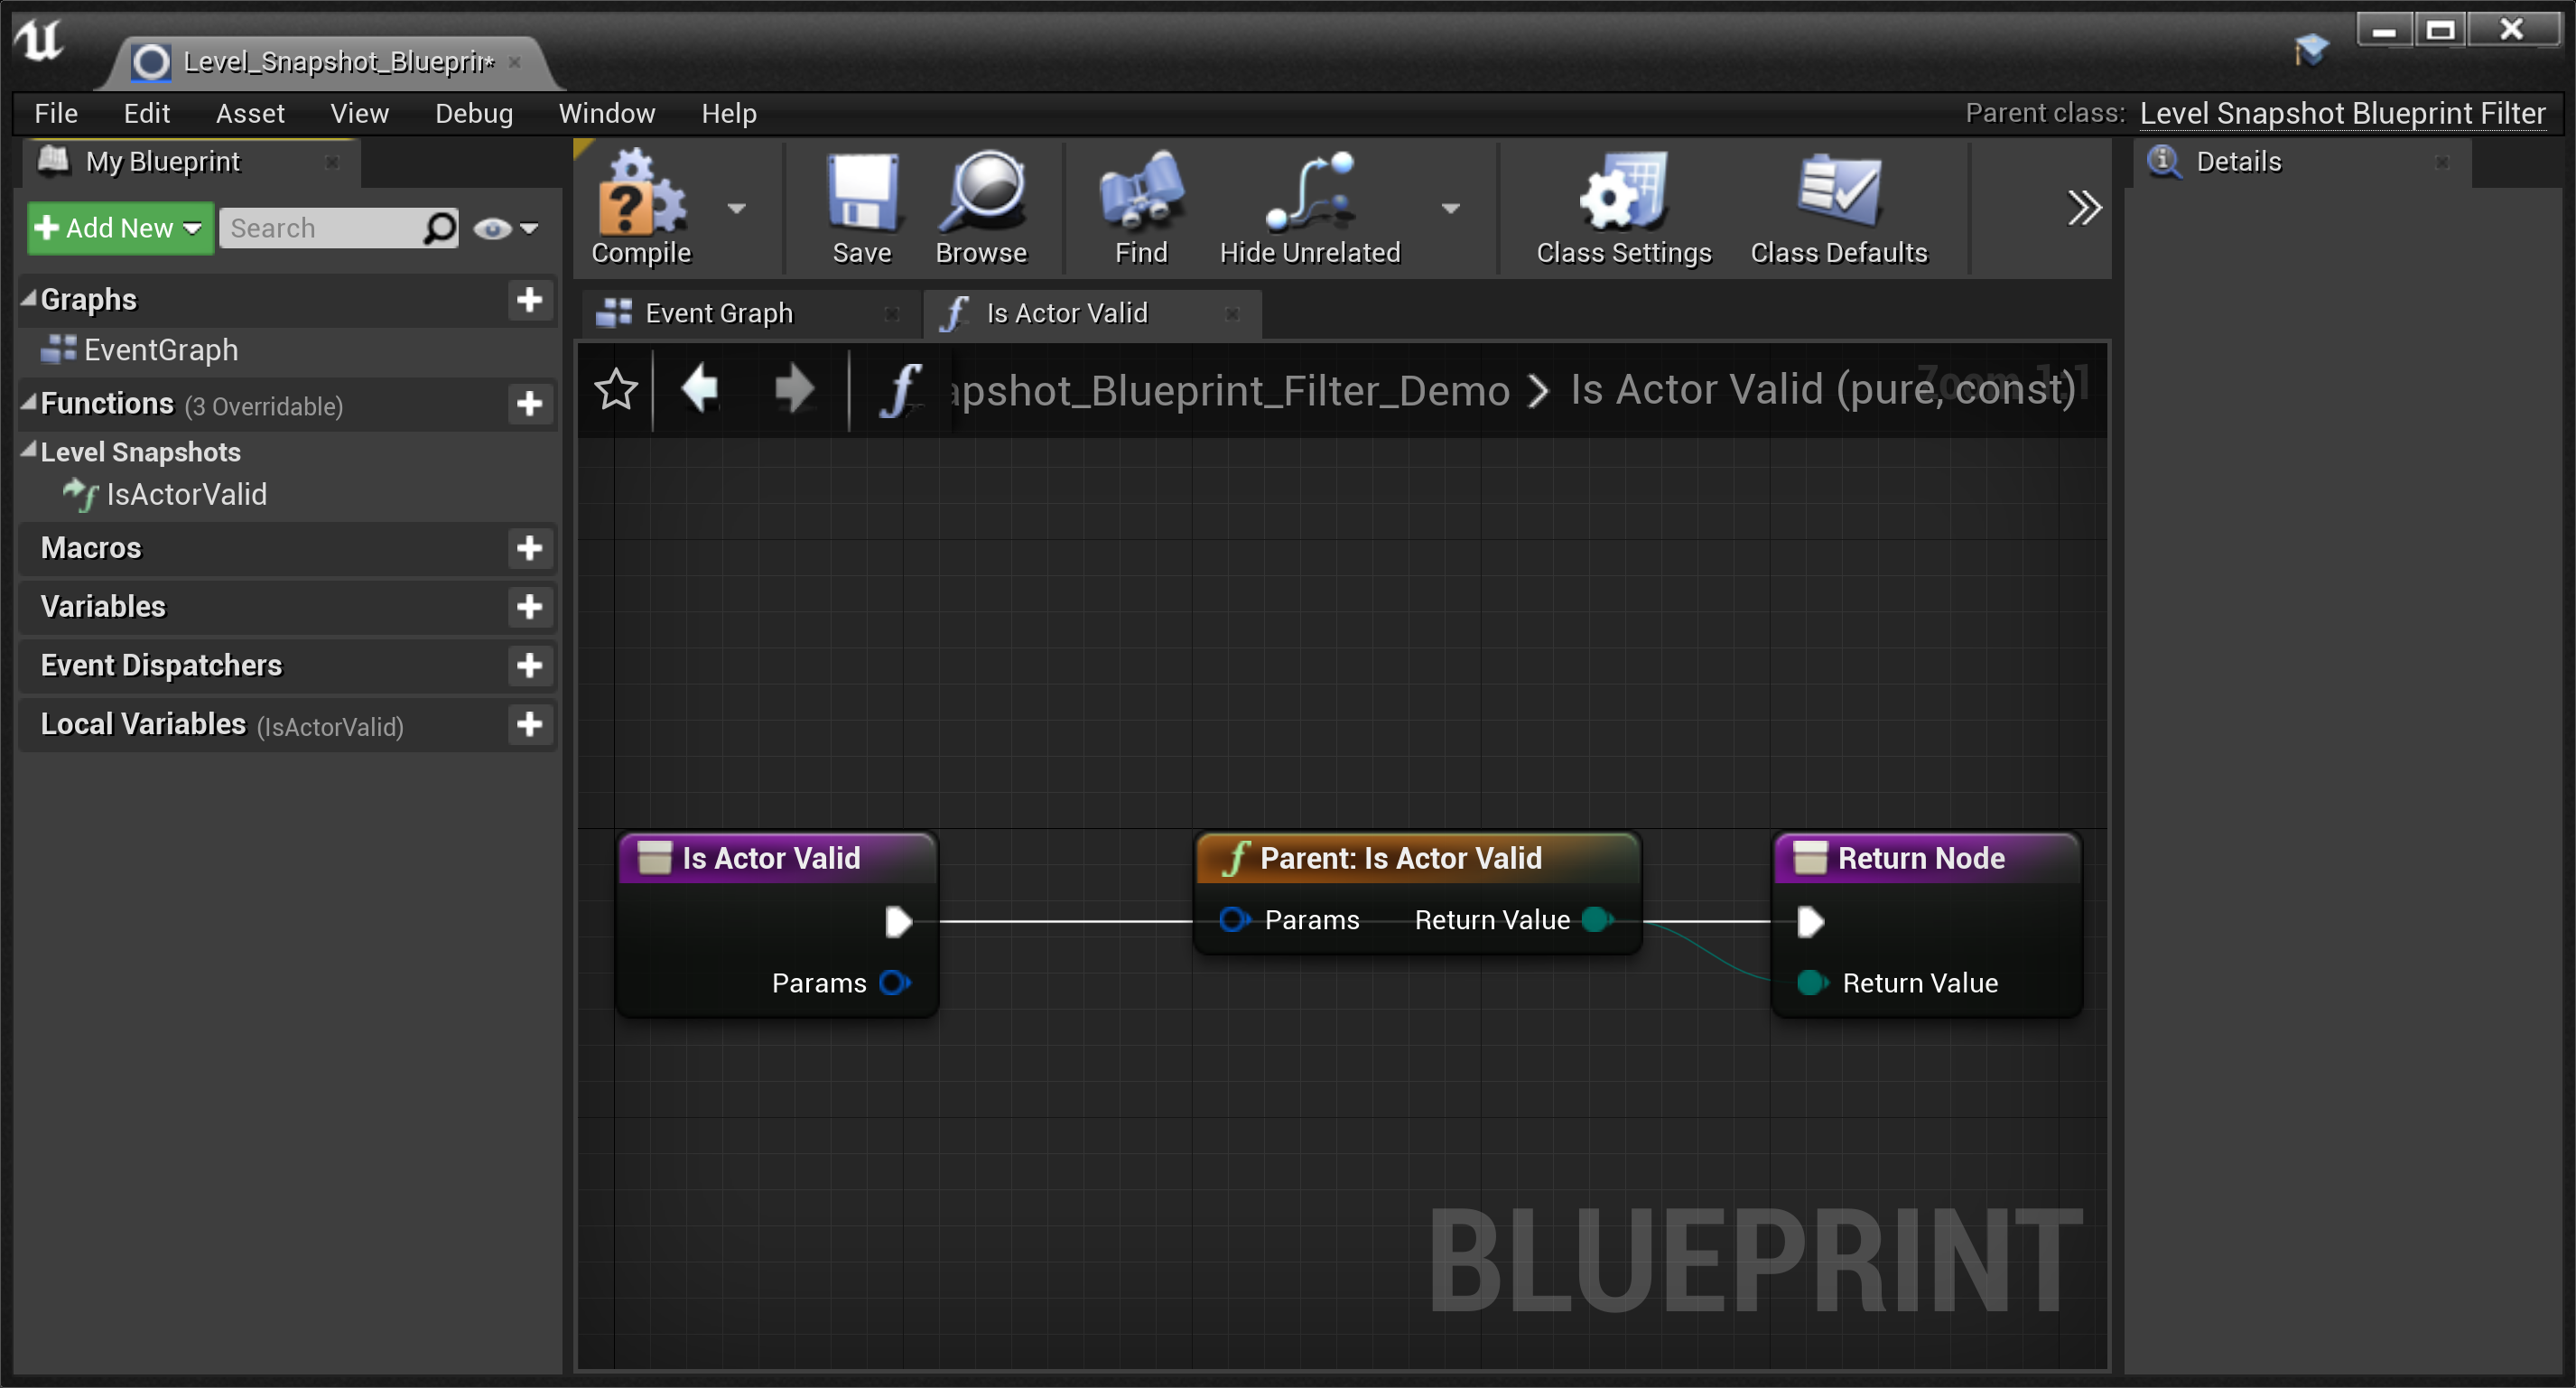
The selected Override function (in the example below, Is Actor Valid) opens in a new graph, with some default nodes.
![Is Actor Valid function default Blueprint nodes]()
Click image to expand.
-
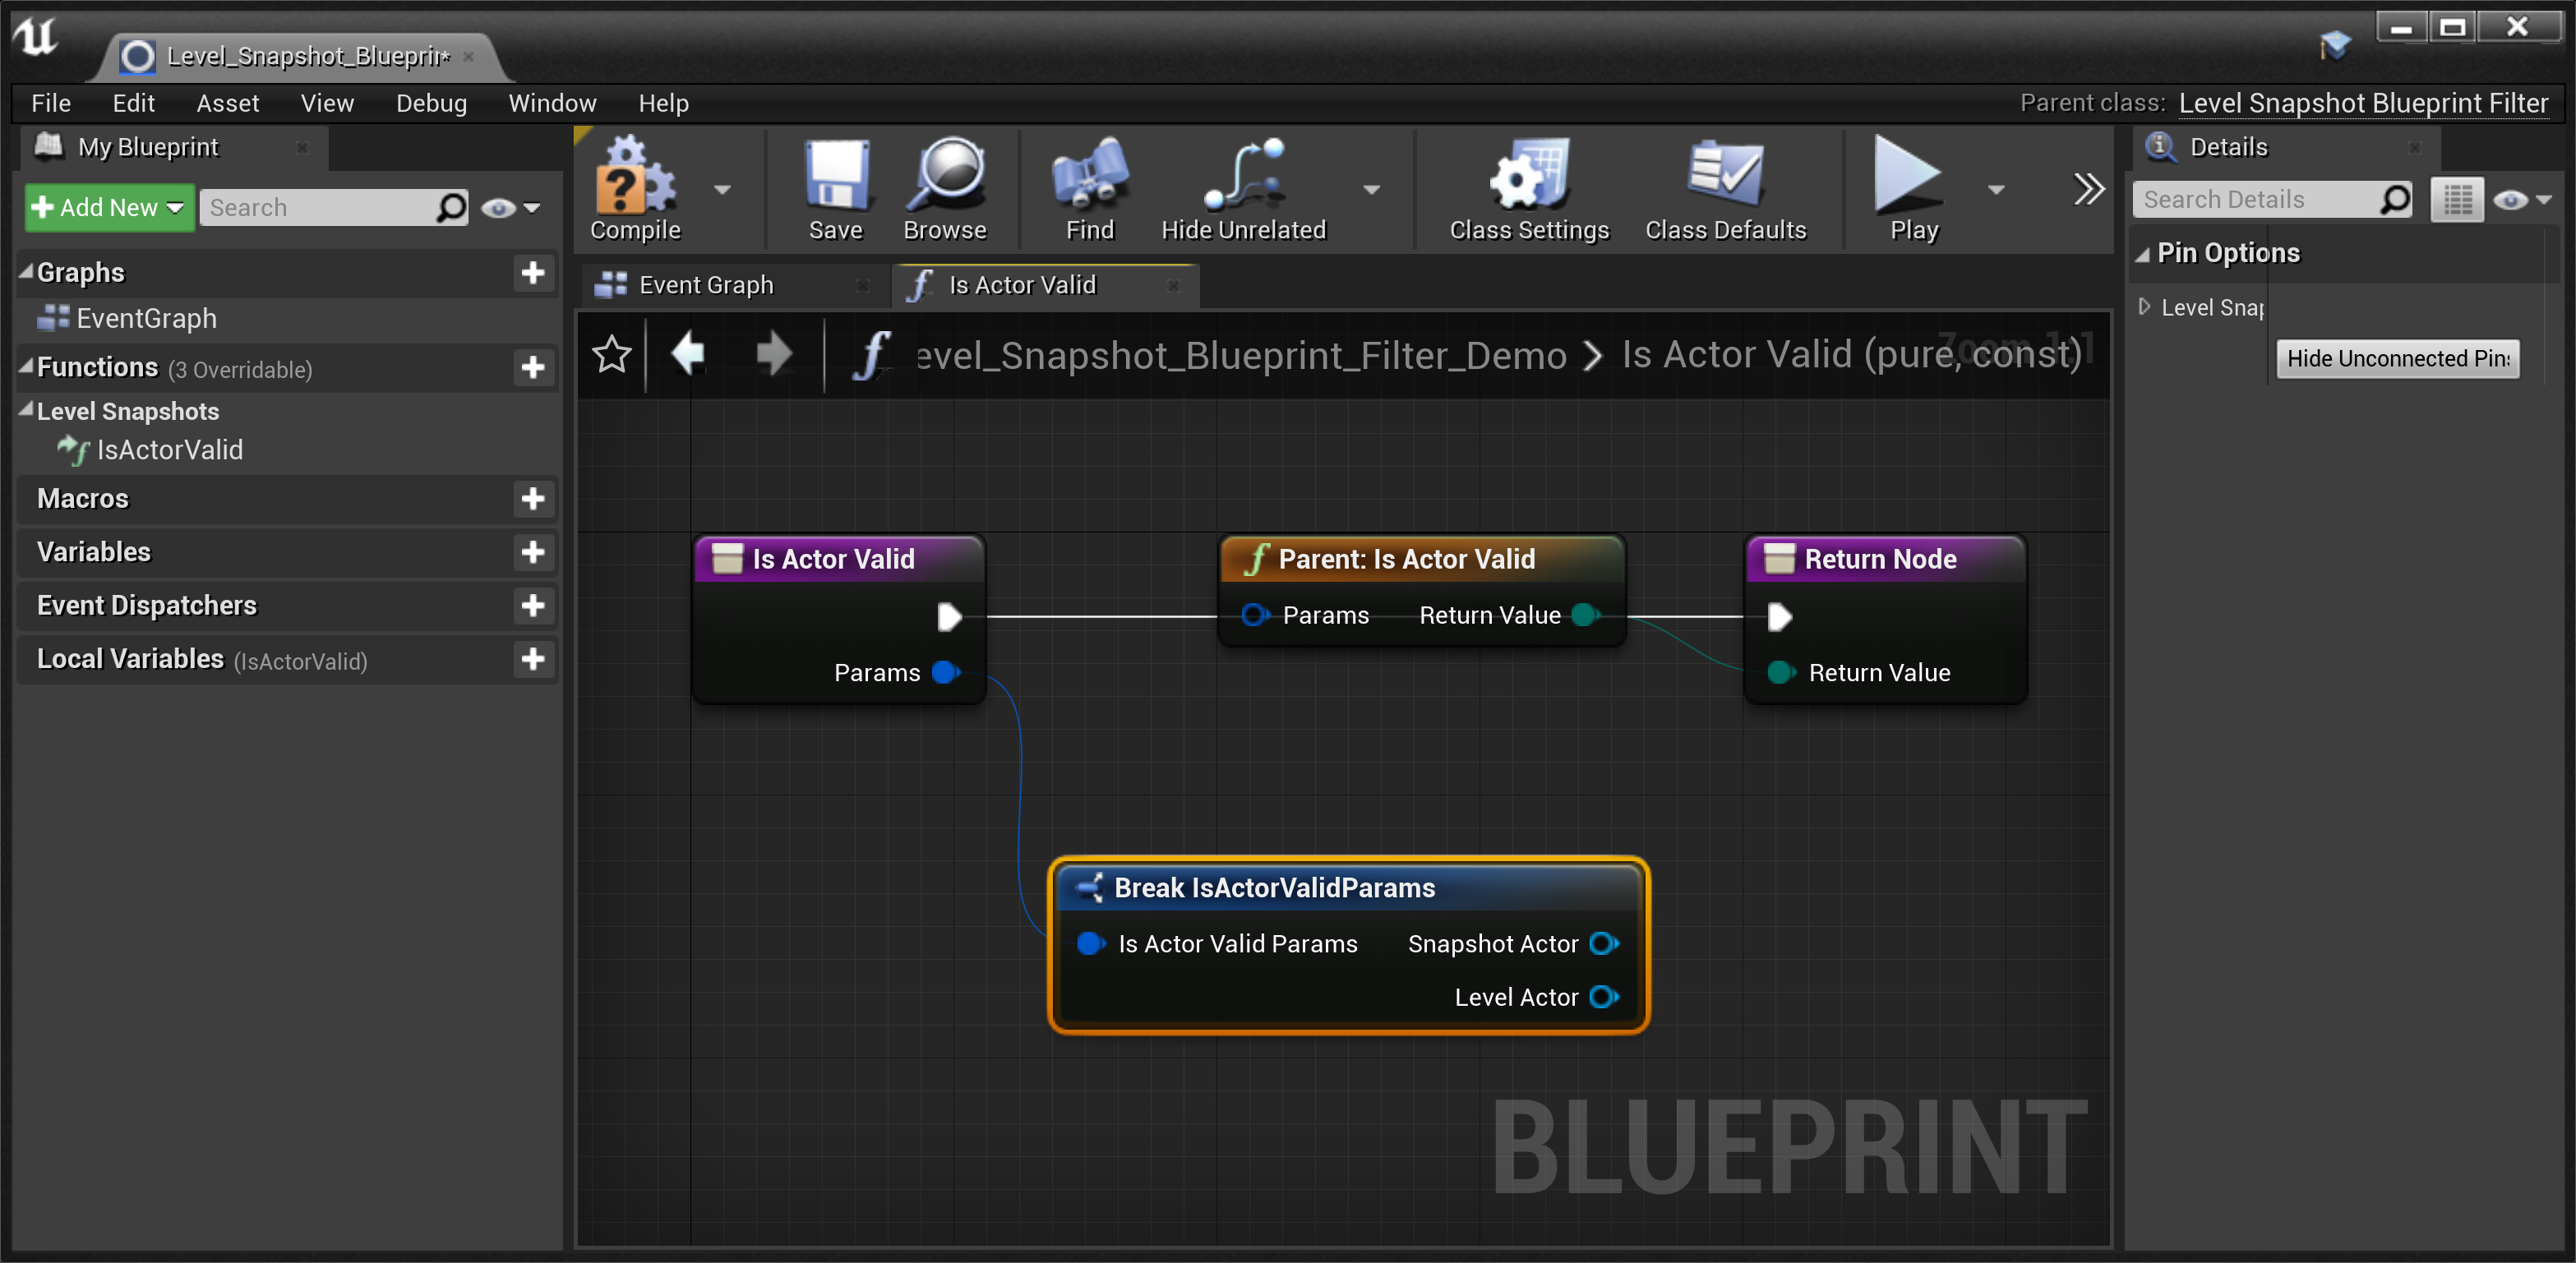
Drag off the Parameters output pin of the Is Actor Valid node, and add a Break node.
![Add a Break node to the Blueprint filter]()
Click image to expand.
From this point, you can define the logic for your new filter branched off of either the Snapshot Actor output or the Level Actor output. This will determine which one is validated against the filter's conditions. For the rest of this example, we will create a filter which checks whether a Snapshot Actor is a Skylight.
-
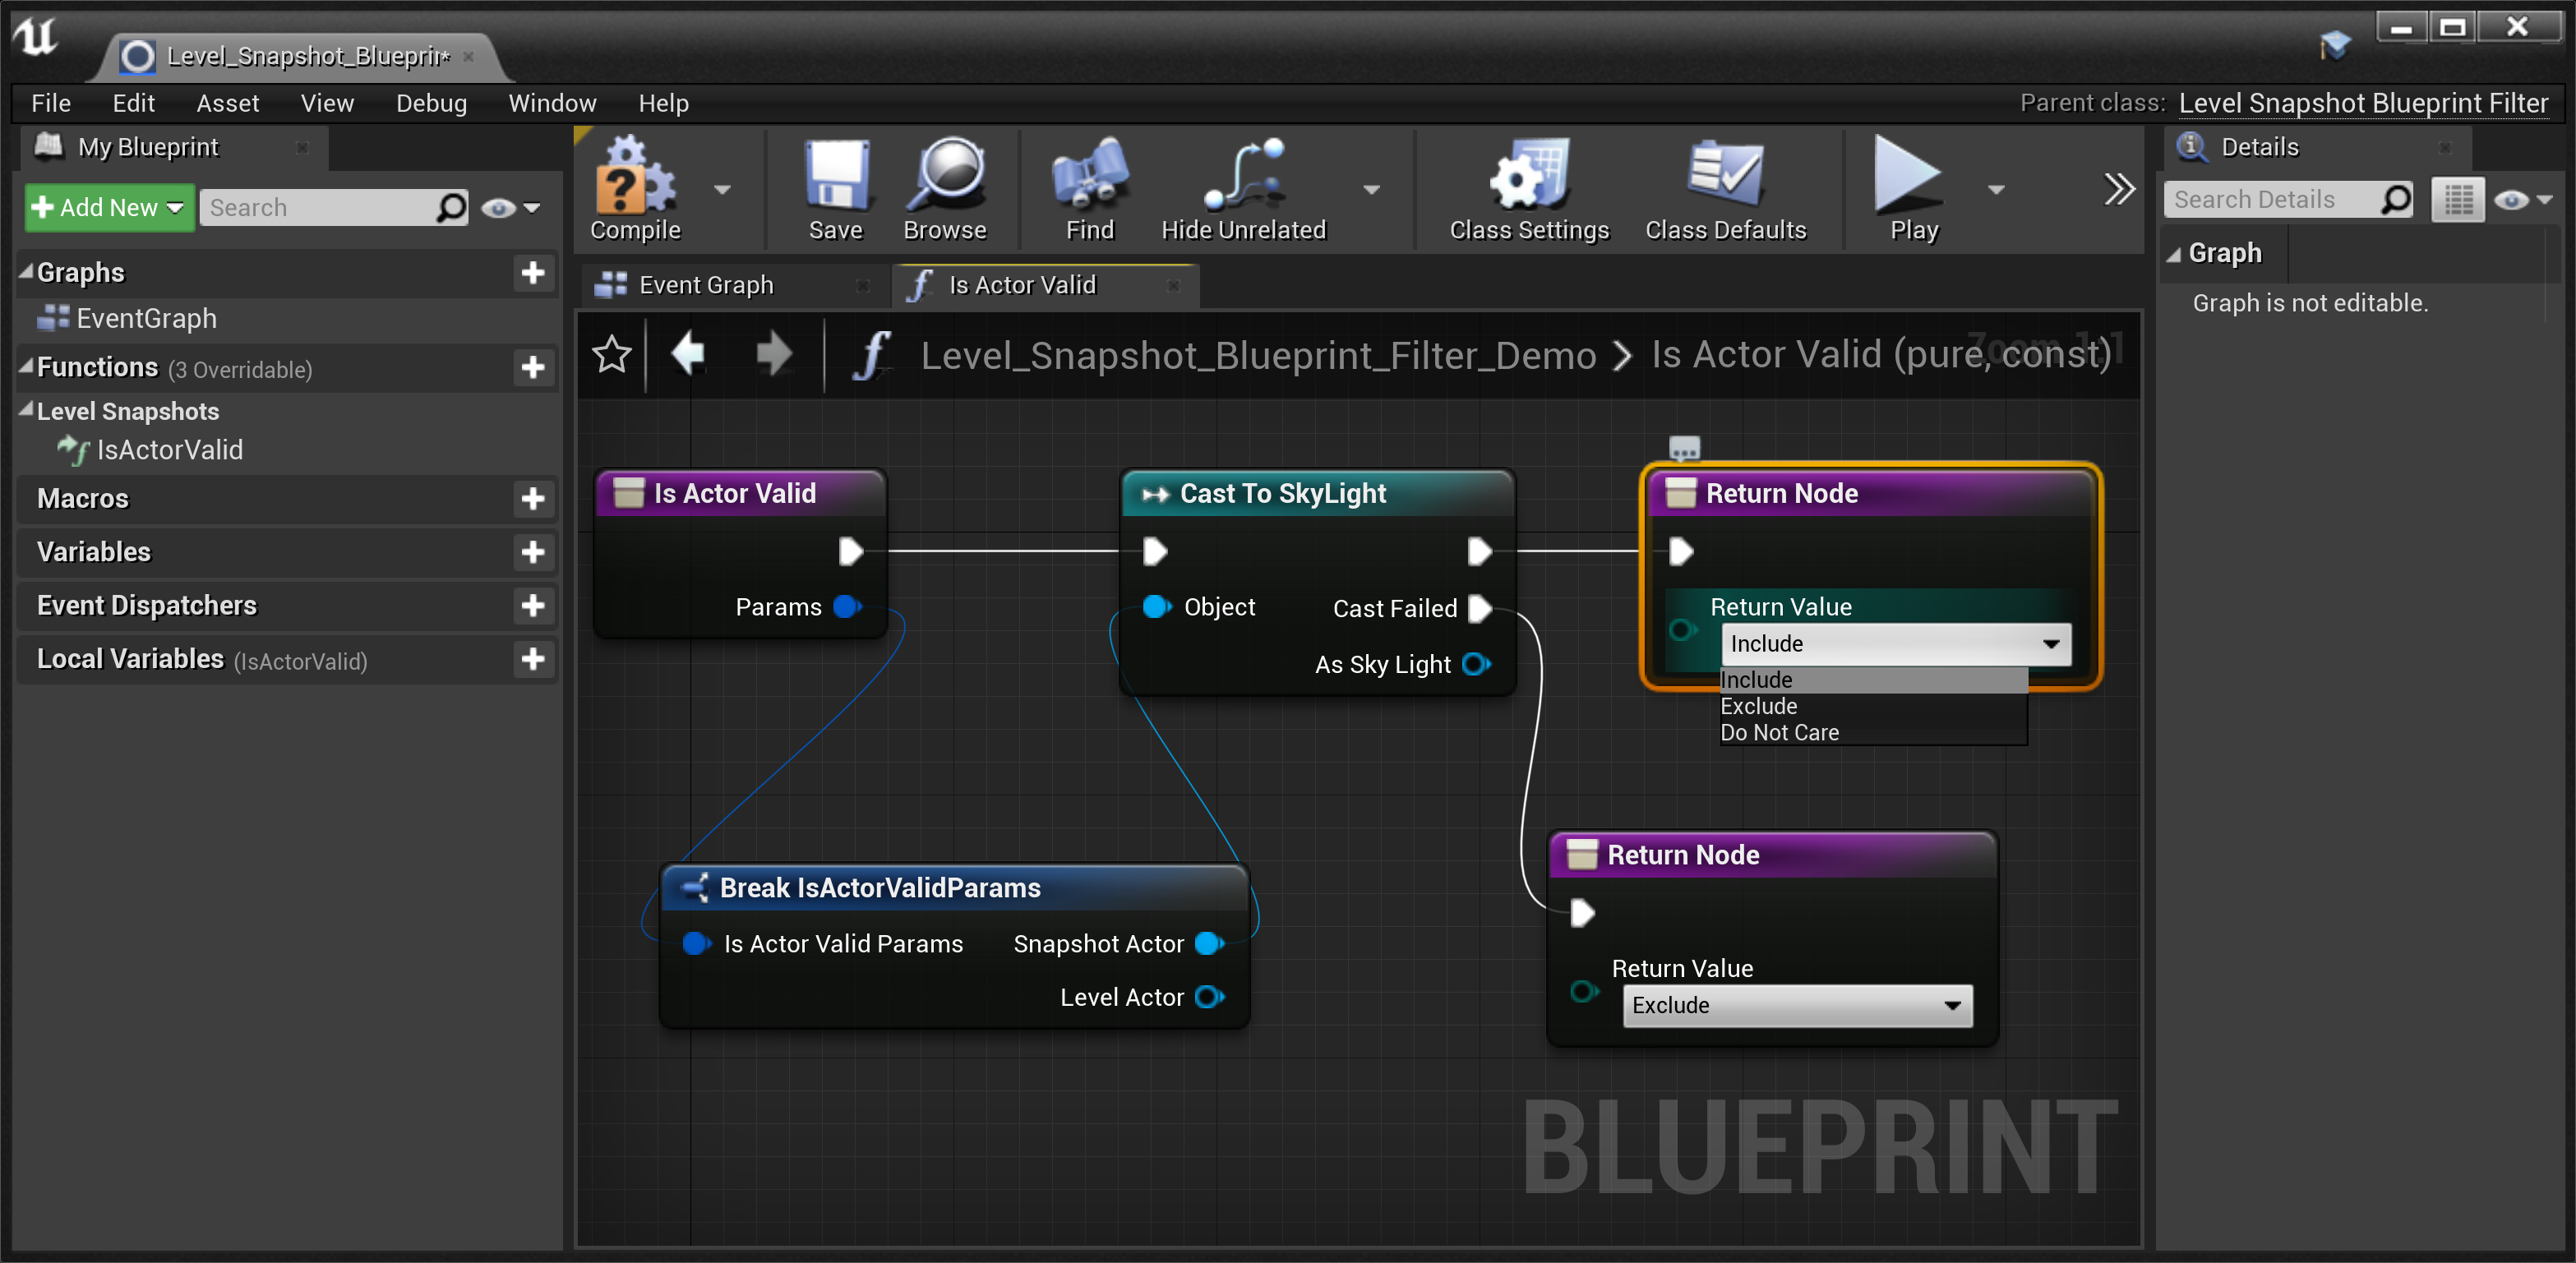
Remove the default parent, then add whatever node is appropriate to validate and connect it to the Break node. In the example below, we selected a Cast to Skylight node and connected its Object input pin to the Snapshot Actor output pin of the Break node.
![Adding Cast to Skylight node to Blueprint filter]()
Click image to expand.
-
Connect the Is Actor Valid node output pin to the Cast To Skylight node input pin. Duplicate the Return node, and connect one to the main output pin of the Cast To Skylight node, and the other to the Cast Failed output pin.
-
Choose Include for the Return Value of the Return node connected to the main output pin of the Cast To Skylight node, and choose Exclude for the Return Value of the node connected to the Cast Failed output pin.
![Connect Return nodes and set Return values]()
Click image to expand.
-
Save and Compile the Blueprint. The resulting filter, when used on a Level Snapshot, will only include Skylight Actors in the Level Snapshot.


If your Blueprint filter includes a variable that you expose as instance editable (shown by the open eye icon next to the variable in the My Blueprint panel), it will appear in the properties of that Level Snapshot filter when used.

Level Snapshot Editor Preference
Creating a Level Snapshot in a Level will result in a lot of References , and this increases quickly as the number of Level Snapshots grows. When deleting an Actor in a Level with a lot of Level Snapshots, the process of checking References can take a long time (several minutes or more). To help reduce this time, there is an Advanced Editor Preference in Level Editor - Miscellaneous called Check References on Delete that can be disabled.
This option should be used carefully, as it can result in errors when using Level Screenshots as the References will not be checked on Delete even when you would want them to be. Therefore, we recommend you disable this setting when working on your Level to speed up your workflow, and re-enable the setting on the final pass on your work to avoid errors.

Level Snapshot Plugin Settings
The Level Snapshot Plugin has settings that can be accessed directly from the Level Snapshot window by clicking the gears icon in the upper-right corner.

The Plugin Settings window will open, showing the Level Snapshot Plugin Settings.

|
Setting |
Description |
|
|---|---|---|
|
Behavior |
||
|
Blacklist - Actor Classes |
Specifies Actor classes and properties that should never be captured or restored. The property is a set containing multiple elements that are selected from the dropdown menu. |
|
|
Blacklist - Component Classes |
Specifies Component classes and properties that should never be captured or restored. The property is a set containing multiple elements that are selected from the dropdown menu. |
|
|
Editor |
||
|
Enable Level Snapshots Toolbar Button |
Enabled by default. |
|
|
Use Creation Form |
Enabled by default. |
|
|
Click Actor Group to Select Actor in Scene |
When enabled, clicking on an Actor group under Modified Actors will select the Actor in the scene. The previous selection will be deselected. Disabled by default. |
|
|
Preferred Creation Form Window Width |
Slider, defaults to 1000. |
|
|
Preferred Creation Form Window Height |
Slider, defaults to 1000. |
|