Choose your operating system:
Windows
macOS
Linux


Choose your implementation method:
C++
This document describes how to set up a light Actor that changes color and slowly fades away on contact.
This will be done using a Point Light Component containing a Box Component to serve as an overlap trigger and a Timeline component to manipulate the Point Light Actor.

Creating the Fading Light Actor
-
Begin by creating a New > Games > Blank > Blueprint project named FadingLights .
![image alt text]()
-
Click the Add/Import button to create a new Blueprint Actor class named BP_LightActor.
-
Double-click the BP_LightActor from the Content Browser to open it in the Blueprint Editor and open the Class Defaults .
![image alt text]()
-
Click Add Component, select Box Collision from the dropdown menu, and rename it to OverlapCollision .
![image alt text]()
-
From the Components tab, select and drag the overlap collision onto the DefaultSceneRoot to make OverlapCollision the new Root Component.
![image alt text]()
-
Click Add Component, search and select Point Light .
![image alt text]()
-
Open the Event Graph , right-click the graph, and choose Add Timeline from the Blueprint Context Menu . Name the Timeline PointLightTimeline .
![image alt text]()
-
Navigate to the My Blueprint tab and from the Variables category, click the + Variable button to add a new variable of type float. Name the variable BrightnessMultiplier , compile and set its Default Value to 20.0.
![image alt text]()
-
Compile and Save.


Setting Up the Brightness Track
When the player overlaps with the light Actor's box component bounds, the Timeline component will require a float curve to manipulate the point light component's brightness value.
The luminosity will have an initial value of 5000 and will decrease to 0 over the span of 5 seconds.
-
Double-click the PointLightTimeline node to open the Timeline Editor and add a float curve track.
![image alt text]()
-
Name the float curve track LightBrightnessFloatTrack , and shift-click to add two keys to the track. Assign one key a time-value (0,5000), and the other key a time-value of (5,0).
![image alt text]()
-
The completed LightBrightnessFloat track will appear as it does below.
![image alt text]()


Setting Up The Color Track
When the player overlaps with the light Actor's box component bounds, the PointLight Timeline will require a linear color curve track to manipulate the point light component's color property.
-
From the Timeline Editor add a color curve track.
![image alt text]()
-
Name the new color track LightLinearColorTrack .
![image alt text]()
-
Double-click the first color key to modify it with a time of 0 , and RGB value of: ( R :1, G: 0.665, B :0.015).
![image alt text]()
-
Modify the second color key with a time of 5 , and RGB value of: ( R :0, G :0, B :0).
![image alt text]()
-
Compile and Save the Blueprint.
-
Your completed color track will appear as it does below.
![image alt text]()


Work-In-Progress Blueprint

Creating the Collision Overlap Event and Update Logic
The Box Component requires the ability to trigger the TimelineComponent when an Actor enters its collision bounds.
Additionally, the PointLightTimeline will require update logic in order to change its luminosity and color.
-
Navigate to the Components tab in the BP_LightActor's Blueprint Editor and select the OverlapCollision box component. From the Details Panel, scroll down to the Events category and click the + icon next to the On Component Begin Overlap event.
![image alt text]()
-
Drag off the On Component Begin Overlap(OverlapCollision) node's execution pin and connect it into the PointTimelineComponent node's Play pin.
![image alt text]()
-
From the Components tab, select and drag the PointLight component into the Event Graph .
![image alt text]()
-
Drag off the PointLight 's pin and select Set Intensity from the actions menu search.
![image alt text]()
-
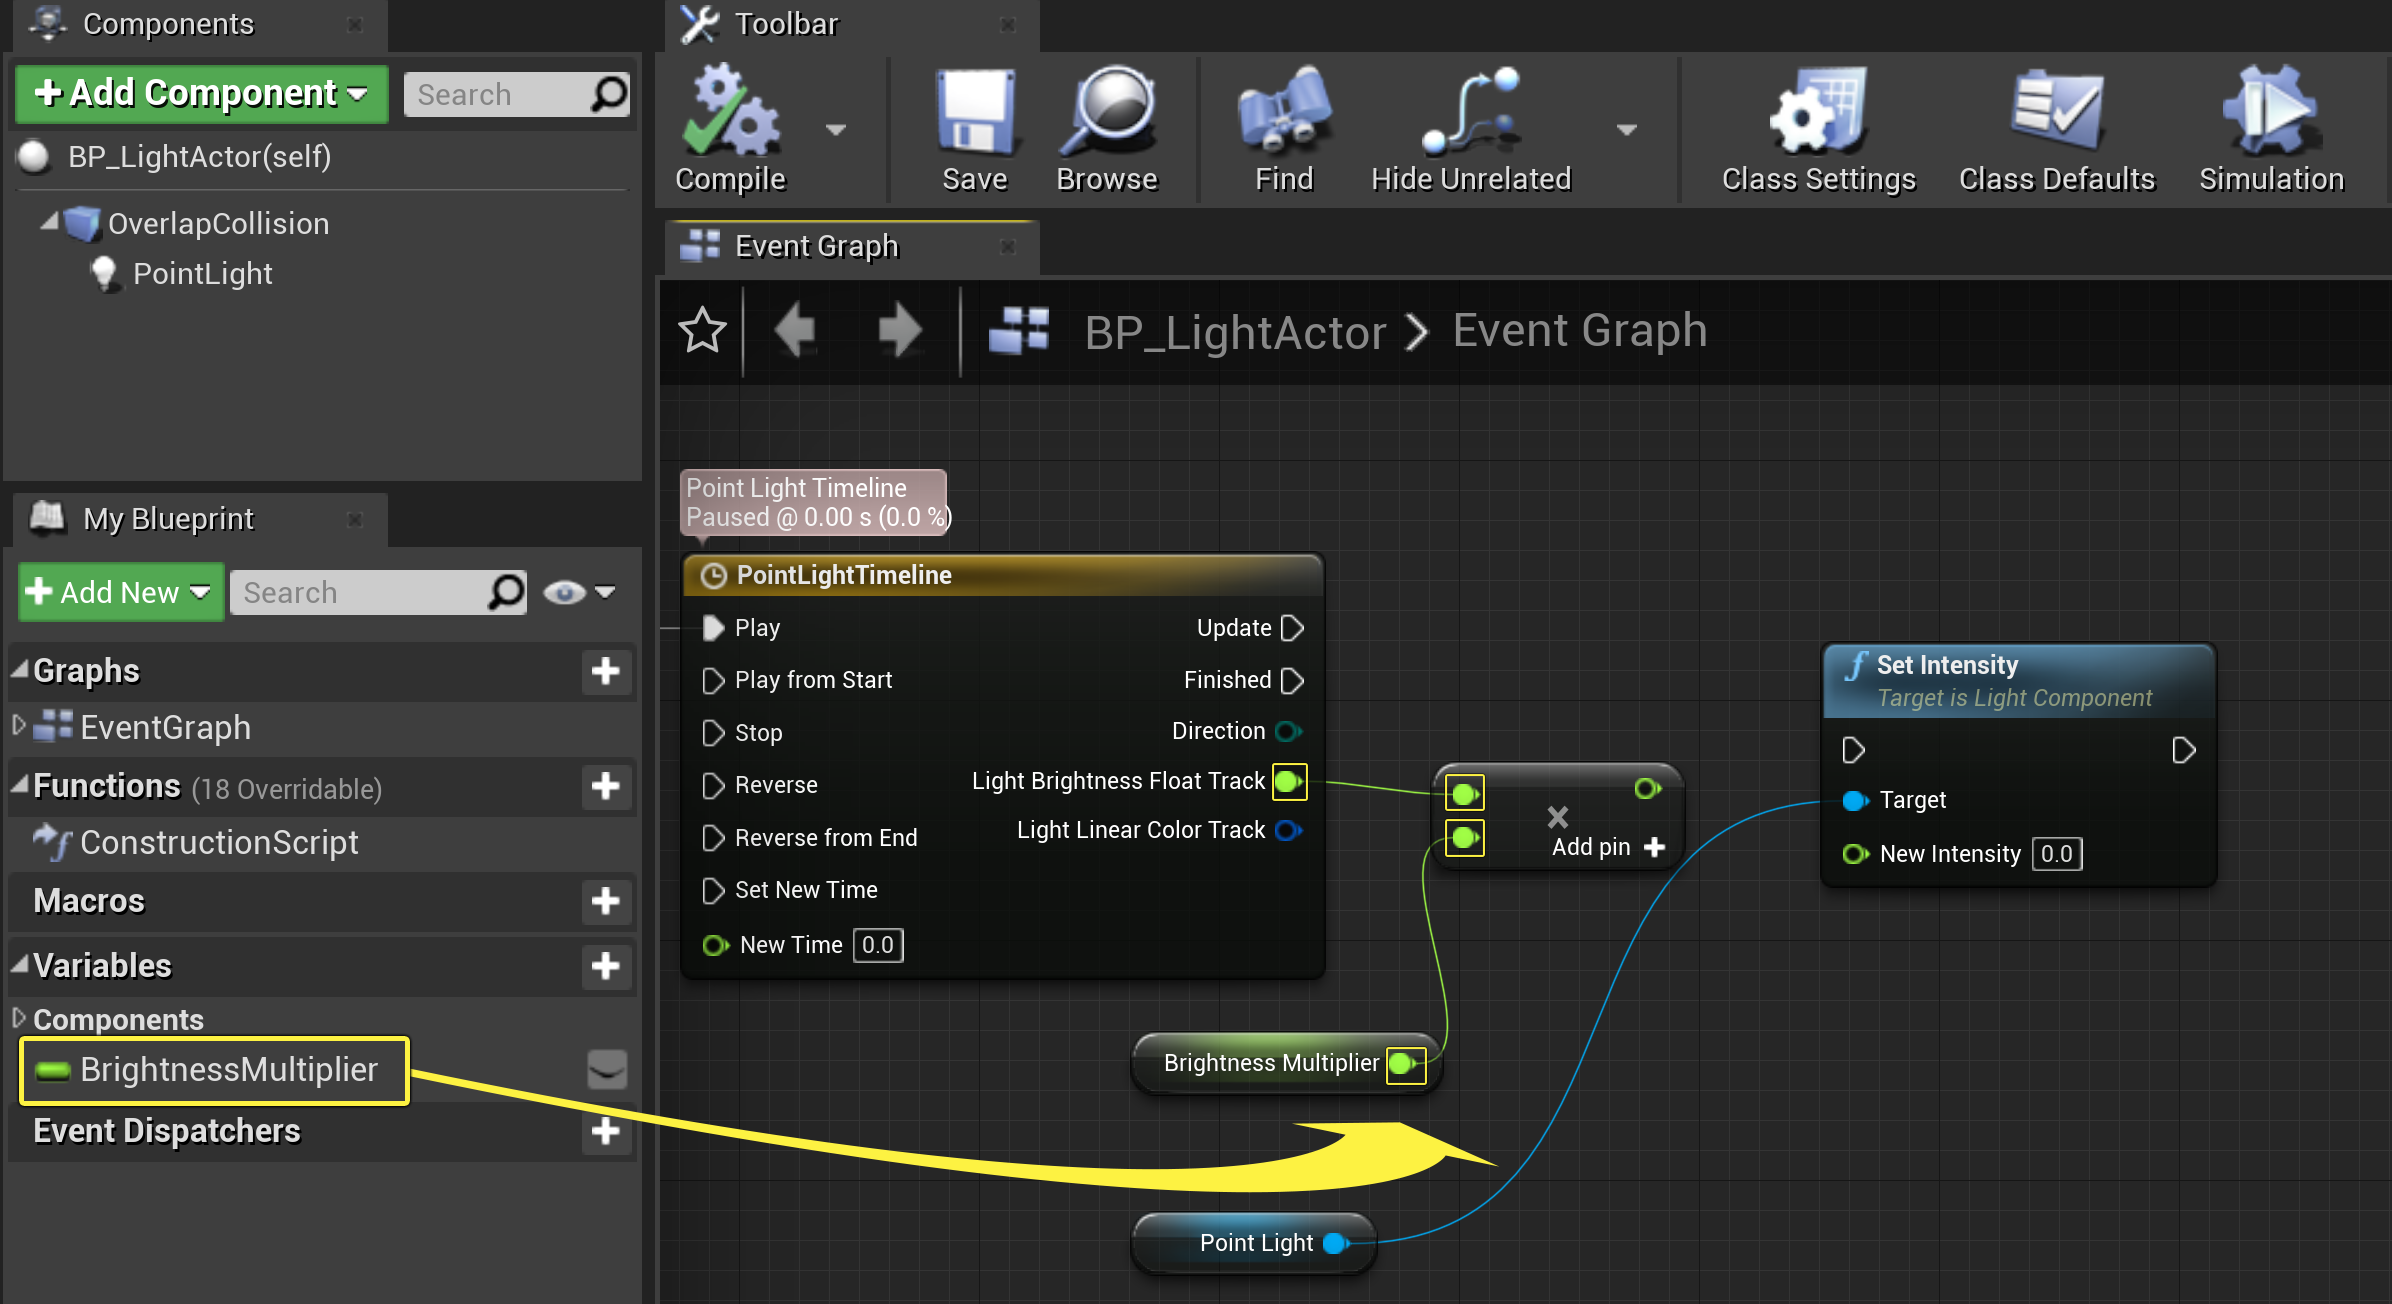
From the PointLightTimeline node, drag off the Light Brightness Float Track pin and select float * float from the actions menu search.
![image alt text]()
-
From the My Blueprint tab click and drag the BrightnessMultiplier float variable into the Event Graph, select Get Brightness Multiplier , then connect it into the float * float node.
![image alt text]()
-
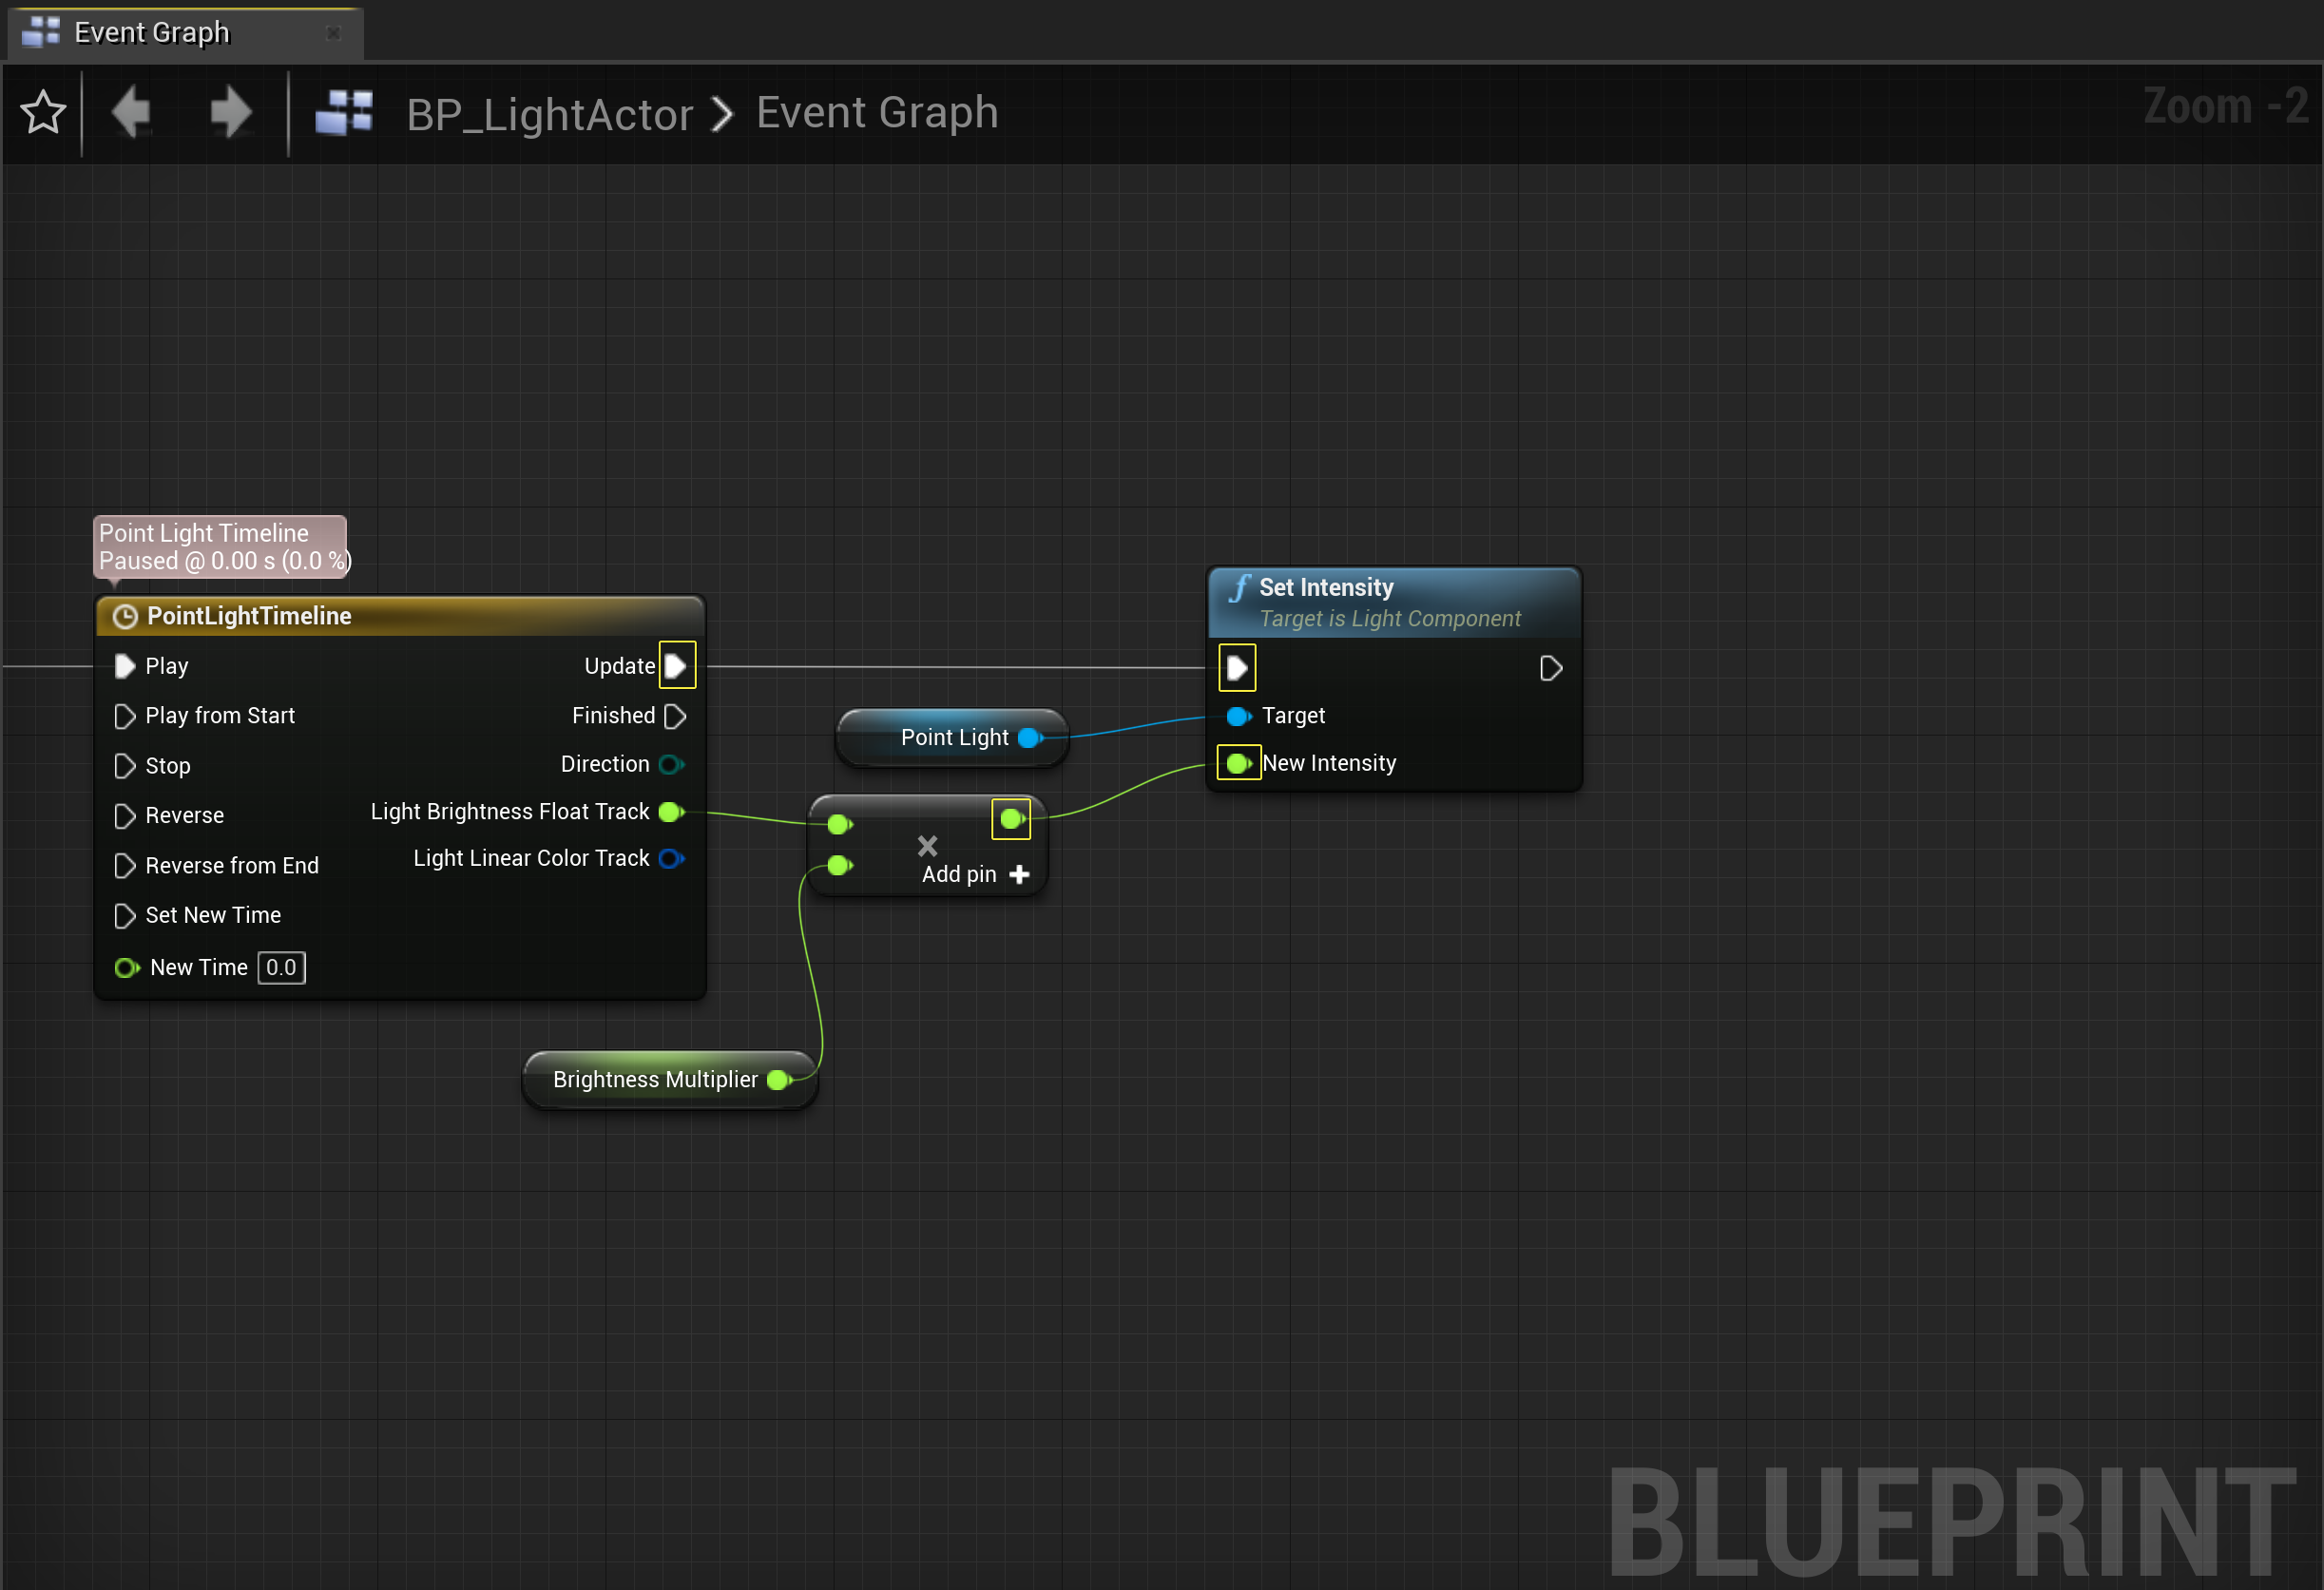
Connect the Update Execution pin to the Set Intensity node, then connect the result from the float * float node to the New Intensity input pin.
![image alt text]()
-
Drag off the PointLight node and select Set Light Color from the actions menu search.
![image alt text]()
-
From the PointLightTimeline node, drag off the Light Linear Color Track pin and connect it to the New Light Color pin of the Set Light Color node. Then connect the execution pin from the Set Intensity node to the Set Light Color node.
![image alt text]()
-
Compile and Save .


Finished Blueprint

Level Setup
To best demonstrate the functionality of the code you have written, you will need to remove all light sources from the level.
-
Begin by placing an instance of your BP_LightActor into the level.
![image alt text]()
-
Navigate to the World Outliner and select the Atmospheric Fog Actor. From the Details Panel navigate to the Sun category, and set its Default Brightness value to 0 .
![image alt text]()
-
Delete the Sky Sphere Actor from the World Outliner.
![image alt text]()
-
Delete the Light Source Actor from the World Outliner as well.
![image alt text]()
-
Navigate to the Toolbar , and select Build to re-build the lighting in the level.
![image alt text]()
-
Once the lighting has finished building, the level will look similar to the image below.
![image alt text]()


End Result
Now that the Light Actor and level have been set up, click PIE to automatically take possession of the spectator Pawn.
You can control the spectator Pawn and navigate into the Light Actor's box component bounds.
Once the Timeline Component's Play function has been triggered, the light's color and luminosity should begin to change over a 5-second timespan.

This document describes how to set up a light Actor that changes color and slowly fades away on contact.
This will be done using a Point Light Component containing a Box Component to serve as an overlap trigger and a Timeline component to manipulate the Point Light Actor.
Creating the Fading Light Actor
-
Begin by creating a New > Games > Blank > C++ project named FadingLights .
![image alt text]()
-
From the C++ Class Wizard , create a new Actor class named LightActor.
-
Navigate to the
LightActor.hfile and declare the following:#include "Components/TimelineComponent.h" -
Next, in the
LightActorclass definition, add the following code:public: UPROPERTY(EditAnywhere) UCurveFloat* PointLightFloatCurve; UPROPERTY(EditAnywhere) UCurveLinearColor* PointLightColorCurve; protected: //TimelineComponent to animate the point light component. UPROPERTY(VisibleAnywhere, BlueprintReadWrite) UTimelineComponent* LightTimelineComp; //BoxComponent which will be used as our proximity overlap volume. UPROPERTY(EditAnywhere, BlueprintReadWrite) class UBoxComponent* LightOverlapVolume; UPROPERTY(EditAnywhere,BlueprintReadWrite) class UPointLightComponent* PointLightComp; //Track used for Pointlight brightness FOnTimelineFloat UpdateBrightnessTrack; //Track used for Pointlight color FOnTimelineLinearColor UpdateColorTrack; //Function to Update Light's brightness relative to UpdateBrightnessTrack UFUNCTION() void UpdateLightBrightness(float BrightnessOutput); //Function to Update Light's color relative to UpdateColorTrack UFUNCTION() void UpdateLightColor(FLinearColor ColorOutput); UPROPERTY(EditDefaultsOnly) float BrightnessMultiplier; -
Navigate to
LightActor.cppand add the following class libraries.#include "Components/BoxComponent.h" #include "Components/PointLightComponent.h" -
In the constructor for ALightActor::ALightActor declare the following:
//Create our Default Components PointLightComp = CreateDefaultSubobject<UPointLightComponent>(TEXT("PointLightComp")); LightTimelineComp = CreateDefaultSubobject<UTimelineComponent>(TEXT("LightTimelineComp")); LightOverlapVolume = CreateDefaultSubobject<UBoxComponent>(TEXT("LightOverlapVolume")); //Setup our Attachments RootComponent = LightOverlapVolume; PointLightComp->AttachToComponent(LightOverlapVolume,FAttachmentTransformRules::KeepRelativeTransform); //Initialize Brightness Multiplier BrightnessMultiplier = 20.0f; -
Next, implement the point light component's UFunction methods:
void ALightActor::UpdateLightBrightness(float BrightnessOutput) { PointLightComp->SetLightBrightness(BrightnessOutput * 20.0f); } void ALightActor::UpdateLightColor(FLinearColor ColorOutput) { PointLightComp->SetLightColor(ColorOutput); } -
Then, in the BeginPlay method, add the following code:
//Binding our float and color track to their respective functions UpdateBrightnessTrack.BindDynamic(this, &ALightActor::UpdateLightBrightness); UpdateColorTrack.BindDynamic(this, &ALightActor::UpdateLightColor); //If we have a float curve, bind it's graph to our update function if (PointLightFloatCurve) { LightTimelineComp->AddInterpFloat(PointLightFloatCurve, UpdateBrightnessTrack); } //If we have a linear color curve, bind it's graph to our update function if (PointLightColorCurve) { LightTimelineComp->AddInterpLinearColor(PointLightColorCurve, UpdateColorTrack); } -
Compile your code.
-
From the Content Browser, navigate to the C++ Classes folder .
-
Right click the LightActor class, select Create Blueprint Class based on LightActor , and name the Blueprint Actor BP_LightActor .
![image alt text]()


The BP_LightActor's Class Defaults will appear as they do below:

Work-In-Progress Code
LightActor.h
//Copyright 1998-2021 Epic Games, Inc. All Rights Reserved.
#pragma once
#include "CoreMinimal.h"
#include "GameFramework/Actor.h"
#include "Components/TimelineComponent.h"
#include "LightActor.generated.h"
UCLASS()
class FADINGLIGHTS_API ALightActor : public AActor
{
GENERATED_BODY()
public:
// Sets default values for this actor's properties
ALightActor();
UPROPERTY(EditAnywhere)
UCurveFloat* PointLightFloatCurve;
UPROPERTY(EditAnywhere)
UCurveLinearColor* PointLightColorCurve;
protected:
// Called when the game starts or when spawned
virtual void BeginPlay() override;
//TimelineComponent to animate the point light component.
UPROPERTY(VisibleAnywhere, BlueprintReadWrite)
UTimelineComponent* LightTimelineComp;
//BoxComponent which will be used as our proximity overlap volume.
UPROPERTY(EditAnywhere, BlueprintReadWrite)
class UBoxComponent* LightOverlapVolume;
UPROPERTY(EditAnywhere,BlueprintReadWrite)
class UPointLightComponent* PointLightComp;
//Track used for Pointlight brightness
FOnTimelineFloat UpdateBrightnessTrack;
//Track used for Pointlight color
FOnTimelineLinearColor UpdateColorTrack;
//Function to Update Light's brightness relative to UpdateBrightnessTrack
UFUNCTION()
void UpdateLightBrightness(float BrightnessOutput);
//Function to Update Light's color relative to UpdateColorTrack
UFUNCTION()
void UpdateLightColor(FLinearColor ColorOutput);
UPROPERTY(EditDefaultsOnly)
float BrightnessMultiplier;
public:
// Called every frame
virtual void Tick(float DeltaTime) override;
}LightActor.cpp
//Copyright 1998-2021 Epic Games, Inc. All Rights Reserved.
#include "LightActor.h"
#include "Components/PointLightComponent.h"
#include "Components/BoxComponent.h"
// Sets default values
ALightActor::ALightActor()
{
// Set this actor to call Tick() every frame. You can turn this off to improve performance if you don't need it.
PrimaryActorTick.bCanEverTick = true;
//Create our Default Components
PointLightComp = CreateDefaultSubobject<UPointLightComponent>(TEXT("PointLightComp"));
LightTimelineComp = CreateDefaultSubobject<UTimelineComponent>(TEXT("LightTimelineComp"));
LightOverlapVolume= CreateDefaultSubobject<UBoxComponent>(TEXT("LightOverlapVolume"));
//Setup our Attachments
RootComponent = LightOverlapVolume;
PointLightComp->AttachToComponent(LightOverlapVolume,FAttachmentTransformRules::KeepRelativeTransform);}
// Called when the game starts or when spawned
void ALightActor::BeginPlay()
{
//Binding our float and color track to their respective functions
UpdateBrightnessTrack.BindDynamic(this, &ALightActor::UpdateLightBrightness);
UpdateColorTrack.BindDynamic(this, &ALightActor::UpdateLightColor);
//If we have a float curve, bind it's graph to our update function
if (PointLightFloatCurve)
{
LightTimelineComp->AddInterpFloat(PointLightFloatCurve, UpdateBrightnessTrack);
}
//If we have a linear color curve, bind it's graph to our update function
if (PointLightColorCurve)
{
LightTimelineComp->AddInterpLinearColor(PointLightColorCurve, UpdateColorTrack);
}
}
void ALightActor::UpdateLightBrightness(float BrightnessOutput)
{
PointLightComp->SetLightBrightness(BrightnessOutput * 20.0f);
}
void ALightActor::UpdateLightColor(FLinearColor ColorOutput)
{
PointLightComp->SetLightColor(ColorOutput);
}
// Called every frame
void ALightActor::Tick(float DeltaTime)
{
Super::Tick(DeltaTime);
}Creating and Binding the Collision Overlap Event
The Box Component requires the ability to trigger the TimelineComponent when an Actor enters its collision bounds.
-
Navigate to the class definition of the
LightActor.hfile and declare the following underBrightnessMultiplier:UFUNCTION() void OnOverlapBegin(class UPrimitiveComponent* OverlappedComp, class AActor* OtherActor, class UPrimitiveComponent* OtherComp, int32 OtherBodyIndex, bool bFromSweep, const FHitResult& SweepResult); -
Next, navigate to the
LightActor.cppfile and implement theOnOverlapBeginfunction.void ALightActor::OnOverlapBegin(class UPrimitiveComponent* OverlappedComp, class AActor* OtherActor, class UPrimitiveComponent* OtherComp, int32 OtherBodyIndex, bool bFromSweep, const FHitResult& SweepResult) { LightTimelineComp->Play(); } -
Bind the overlap function in the BeginPlay method:
//Binding our Box Component to our Light Actor's Overlap Function LightProxVolume->OnComponentBeginOverlap.AddDynamic(this, &ALightActor::OnOverlapBegin); -
Compile your code.
Finished Code
LightActor.h
// Fill out your copyright notice in the Description page of Project Settings.
#pragma once
#include "CoreMinimal.h"
#include "GameFramework/Actor.h"
#include "Components/TimelineComponent.h"
#include "LightActor.generated.h"
UCLASS()
class FADINGLIGHTS_API ALightActor : public AActor
{
GENERATED_BODY()
public:
// Sets default values for this actor's properties
ALightActor();
protected:
// Called when the game starts or when spawned
virtual void BeginPlay() override;
public:
UPROPERTY(EditAnywhere)
UCurveFloat* PointLightFloatCurve;
UPROPERTY(EditAnywhere)
UCurveLinearColor* PointLightColorCurve;
protected:
//TimelineComponent to animate the point light component.
UPROPERTY(VisibleAnywhere, BlueprintReadWrite)
UTimelineComponent* LightTimelineComp;
//BoxComponent which will be used as our proximity overlap volume.
UPROPERTY(EditAnywhere, BlueprintReadWrite)
class UBoxComponent* LightOverlapVolume;
UPROPERTY(EditAnywhere, BlueprintReadWrite)
class UPointLightComponent* PointLightComp;
//Track used for Pointlight brightness
FOnTimelineFloat UpdateBrightnessTrack;
//Track used for Pointlight color
FOnTimelineLinearColor UpdateColorTrack;
//Function to Update Light's brightness relative to UpdateBrightnessTrack
UFUNCTION()
void UpdateLightBrightness(float BrightnessOutput);
//Function to Update Light's color relative to UpdateColorTrack
UFUNCTION()
void UpdateLightColor(FLinearColor ColorOutput);
UPROPERTY(EditDefaultsOnly)
float BrightnessMultiplier;
UFUNCTION()
void OnOverlapBegin(class UPrimitiveComponent* OverlappedComp, class AActor* OtherActor, class UPrimitiveComponent* OtherComp, int32 OtherBodyIndex, bool bFromSweep, const FHitResult& SweepResult);
public:
// Called every frame
virtual void Tick(float DeltaTime) override;
};LightActor.cpp
// Fill out your copyright notice in the Description page of Project Settings.
#include "LightActor.h"
#include "Components/BoxComponent.h"
#include "Components/PointLightComponent.h"
// Sets default values
ALightActor::ALightActor()
{
// Set this actor to call Tick() every frame. You can turn this off to improve performance if you don't need it.
PrimaryActorTick.bCanEverTick = true;
//Create our Default Components
PointLightComp = CreateDefaultSubobject<UPointLightComponent>(TEXT("PointLightComp"));
LightTimelineComp = CreateDefaultSubobject<UTimelineComponent>(TEXT("LightTimelineComp"));
LightOverlapVolume = CreateDefaultSubobject<UBoxComponent>(TEXT("LightOverlapVolume"));
//Setup our Attachments
RootComponent = LightOverlapVolume;
PointLightComp->AttachToComponent(LightOverlapVolume, FAttachmentTransformRules::KeepRelativeTransform);
//Initialize Brightness Multiplier
BrightnessMultiplier = 20.0f;
}
void ALightActor::UpdateLightBrightness(float BrightnessOutput)
{
    PointLightComp->SetLightBrightness(BrightnessOutput * 20.0f);
}

void ALightActor::UpdateLightColor(FLinearColor ColorOutput)
{
    PointLightComp->SetLightColor(ColorOutput);
}
void ALightActor::OnOverlapBegin(class UPrimitiveComponent* OverlappedComp, class AActor* OtherActor, class UPrimitiveComponent* OtherComp, int32 OtherBodyIndex, bool bFromSweep, const FHitResult& SweepResult)
{
LightTimelineComp->Play();
}
// Called when the game starts or when spawned
void ALightActor::BeginPlay()
{
Super::BeginPlay();
    //Binding our float and color track to their respective functions
    UpdateBrightnessTrack.BindDynamic(this, &ALightActor::UpdateLightBrightness);
    UpdateColorTrack.BindDynamic(this, &ALightActor::UpdateLightColor);

    //If we have a float curve, bind it's graph to our update function
    if (PointLightFloatCurve)
    {
       LightTimelineComp->AddInterpFloat(PointLightFloatCurve, UpdateBrightnessTrack);
    }

    //If we have a linear color curve, bind it's graph to our update function
     if (PointLightColorCurve)
    {
       LightTimelineComp->AddInterpLinearColor(PointLightColorCurve, UpdateColorTrack);
    }
//Binding our Box Component to our Light Actor's Overlap Function
LightOverlapVolume->OnComponentBeginOverlap.AddDynamic(this, &ALightActor::OnOverlapBegin);
}
// Called every frame
void ALightActor::Tick(float DeltaTime)
{
Super::Tick(DeltaTime);
}Setting Up the Brightness Track
When the player overlaps with the light Actor's box component bounds, the Timeline component will require a float curve to manipulate the point light component's brightness value.
The luminosity will have an initial value of 5000 and will decrease to 0 over the span of 5 seconds.
-
From the Content Browser , select Add/Import > Miscellaneous > Curve .
![image alt text]()
-
Select CurveFloat and name the asset BrightnessCurveFloat
-
Double-click the BrightnessCurveFloat to open the Timeline Editor .
-
Add two keys to the Float Curve and assign one key the time-value (0,5000) and the other key the time-value of (5,0).
![image alt text]()
-
Save the BrightnessCurveFloat , then navigate back to the Content Browser and double-click the BP_LightActor to open its Class Defaults .
-
Navigate to the Details Panel and select Brightness Curve Float from the Point Light Float Curve dropdown menu.
![image alt text]()
-
Compile and Save .


Setting Up the Color Track
When the player overlaps with the light Actor's box component bounds, the PointLight Timeline will require a linear color curve track to manipulate the point light component's color property.
-
From the Content Browser , select Add/Import > Miscellaneous > Curve.
![image alt text]()
-
Select CurveLinearColor and name the asset LinearColorCurve .
-
Double-click the LinearColorCurve to open the Timeline Editor .
-
Modify the first color key to the time value of 0 and the RGB value of: ( R :1, G: 0.665, B :0.015) and modify the second color key to the time of 5 and RGB value of:( R :0, G :0, B :0).
![image alt text]()
-
Save the LinearColorCurve , then navigate back to the Content Browser and double-click the BP_LightActor to open its class defaults.
-
Navigate to the Details Panel and select Brightness Curve Float from the Point Light Float Curve dropdown menu.
![image alt text]()
-
Compile and Save .


Level Setup
To best demonstrate the functionality of the code you have written, you will need to remove all light sources from the level.
-
Begin by placing an instance of your BP_LightActor into the level.
![image alt text]()
-
Navigate to the World Outliner and select the Atmospheric Fog Actor. From the Details Panel navigate to the Sun category, and set its Default Brightness value to 0 .
![image alt text]()
-
Delete the Sky Sphere Actor from the World Outliner.
![image alt text]()
-
Delete the Light Source Actor from the World Outliner as well.
![image alt text]()
-
Navigate to the**Toolbar , and select Build** to re-build the lighting in the level.
![image alt text]()
-
Once the lighting has finished building, the level will look similar to the image below.
![image alt text]()


End Result
Now that the Light Actor and level have been set up, click PIE to automatically take possession of the spectator Pawn.
You can control the spectator Pawn and navigate into the Light Actor's box component bounds.
Once the Timeline Component's Play function has been triggered, the light's color and luminosity should begin to change over a 5-second timespan.
