Choose your operating system:
Windows
macOS
Linux


Depending on your development environment, rendering large and open worlds can take a lot of time because computing lighting, shadows, and geometry can be expensive. There are several ways to reduce your project's build time, such as upgrading your hardware beyond our recommended specifications or by utilizing a task distribution system, which is where Unreal Swarm comes in, reducing the time it takes to perform expensive computations, such as solving for high-quality static global illumination .
What is Unreal Swarm?
Unreal Swarm is a general application and task distribution system, comprised of two application types, one being a coordinator that distributes build task(s), and the other being an agent that utilizes the host system's resources to complete its assigned job(s).

After setting up the Swarm, a Swarm Coordinator will manage the job(s) and task(s) of Swarm Agent(s) on your network.
Requirements
Before you can begin setting up Unreal Swarm:
-
Install Unreal Engine 4 (UE4) on at least one Windows machine in your network. You'll use this machine to launch the Swarm Coordinator. See Installing Unreal Engine .
-
On each Windows machine that you want to act as a Swarm Agent, install the prerequisites required to run the Unreal Engine and editor. You can do this in any of the following ways:
-
Install the required version of the DirectX End-User Runtimes, which you can download from the link on the Hardware and Software Requirements page.
-
Run the prerequisite installer that is bundled with Unreal Engine, as decsribed on the Hardware and Software Requirements page.
-
Install the Epic Games Launcher and Unreal Engine.
-
-
Unreal Swarm currently runs only under Windows. The machine that you use to start the light build, and all machines that you want to participate in the distributed computation, must be running a version of Windows that is supported by Unreal Engine.
-
If you'd like to set up a render farm for computationally expensive tasks, please make sure to coordinate with your IT department to set up the appropriate permissions on machine(s) that will need to host Swarm Coordinator(s) and Agent(s).
Setting up Swarm Coordinator
If you've identified the machines that you'd like to use, and if you've installed UE4; you're ready to set up Swarm Coordinator by following these steps:
-
After installing UE4, navigate to
[UE4ROOT]\Engine\Binaries\DotNET. -
Make a new directory on the machine that will distribute tasks to other machines on the network. For illustrative purposes, we're naming the new directory,
Swarm Coordinator. -
Now, move (or copy) the following files from the
[UE4ROOT]\Engine\Binaries\DotNETfolder into the newly created directory:
-
AgentInterface.dll
-
SwarmCommonUtils.dll
-
SwarmCoordinator.exe
-
SwarmCoordinator.exe.config
-
SwarmCoordinatorInterface.dll
-
SwarmInterface.dll
-
UnrealControls.dll
-
-
Finally, to verify that you can run the application on your machine, go ahead and double click on the Swarm Coordinator executable.
![UnrealSwarm_CoordSetup-1.png]()

If you already have Swarm Agents deployed, Swarm Coordinator displays its Agent Dialog Window (1) and Restart Options Area (2).

Click for full image.
At this point, you don't need to do anything with the application, so go ahead and move onto the next section, where you'll set up Swarm Agent(s).
Deploying Swarm Agents
Now that you've set up Swarm Coordinator, you're ready to deploy Swarm Agents. After identifying the machine(s) that you'd like to host your agents, go ahead and follow these steps:
-
On each of the machines that you'd like to host a Swarm Agent, make a new directory. For illustrative purposes, we're naming our new directory,
Swarm Agent. -
Move (or copy) the following files from the
[UE4ROOT]\Engine\Binaries\DotNETfolder into the newly created directly: SwarmAgent.exe , AgentInterface.dll , SwarmCommonUtils.dll , SwarmCoordinatorInterface.dll , SwarmInterface.dll , and UnrealControls.dll . -
To deploy an agent, double click on the Swarm Agent executable.
-
After launching Swarm Agent, the Swarm icon appears in the Windows Notification Area . Double click the Swarm icon to open the application's main menu.
![UnrealSwarm_AgentSetup_4-1.png]()
-
To configure Swarm Agent, click the Settings tab.
![UnrealSwarm_AgentSetup_5-2.png]()
To enable Developer Settings , set the ShowDeveloperMenu flag (in Settings > Developer Settings ) to True .
![SwarmAgent_DeveloperSettings-2.png]()
When you update an Agent's settings, it's worth noting that Swarm Agent writes settings out to
SwarmAgent.Options.xml(or, if Developer Settings are enabled, toSwarmAgent.DeveloperOptions.xml).
-
In the Distribution Settings drop down menu, locate the CoordinatorRemotingHost field, entering the host computer's IPv4 Address .
![UnrealSwarm_AgentSetup_6-2.png]()
If you don't know your computer's IPv4 Address , go ahead and run
ipconfigfrom the Command Prompt . -
If you don't want to enter the system's IPv4 Address into the CoordinatorRemotingHost field, you can enter the Coordinator's DNS Name .
-
Finally, go ahead and open Swarm Coordinator , where you'll find details about deployed Swarm Agent(s).
![UnrealSwarm_AgentSetup_8-2.png]()
Click for full image.


Setting up Agent Groups
Setting up Agent Groups is useful for creating execution clusters. For example, one set of machines might belong to a group that isn't part of a render farm, whereas another cluster might have machines belonging to the farm.
Getting started, go ahead and open the
Settings > Distribution Settings
menu.

To set up an Agent group, you'll first want to specify which group jobs you want this Agent to be deployed to. For example, we're specifying that this Agent will deploy to "FarmGroup" jobs in the
AllowedRemoteAgentGroup
setting.

If you want this Agent to be deployed to "FarmGroup" jobs, make sure that the
AgentGroupName
matches
AllowedRemoteAgentGroup
. In the following example, we're precluding this Agent from being deployed to "FarmGroup" jobs.

If you'd like to learn more about an Agent's Distribution Settings , the following table provides some useful notes, covering the remaining properties that can be specified for each Agent in your execution cluster(s).
|
Setting |
Default Value |
Description |
|---|---|---|
|
AgentGroupName |
Default |
This is the name of the agent group that this Swarm Agent belongs to. |
|
AllowedRemoteAgentGroup |
DefaultDeployed |
This is the name of the agent group jobs that this Swarm Agent can be deployed to. |
|
AllowedRemoteAgentNames |
RENDER* |
The filter string (' ', ',' or ';' delimited) being used by the remote machine. |
|
AvoidLocalExecution |
False |
Setting this flag to
Setting this flag is more of a suggestion (rather than a mandate) because it sets the thread priority to
|
|
CoordinatorRemotingHost |
RENDER-01 |
This is the name of the machine that's hosting Swarm Coordinator. You can enter one of two strings into this field, either the Coordinator's DNS Name or its IPv4 address. |
|
EnableStandaloneMode |
False |
Setting this flag to
|
Managing Swarm Cache
After you've deployed your Swarm Agent(s), you'll want to manage the Agents' Swarm Cache. Typically, managing an Agent's Swarm Cache involves updating the Agent's cache settings, clearing its cache, and validating its cache.
To update the Agent's cache settings, navigate to the Settings > Cache settings menu.

From this menu, you'll be able to update the Agent's Cache Settings (as described below).
|
Setting |
Default Value |
Description |
|---|---|---|
|
CacheFolder |
[Folder on Disk]/SwarmCache |
This is the location of the cache folder, being on a fast drive with lots of space. |
|
MaximumCacheSize |
10 |
In gigabytes, this is the approximate maximum size of the cache folder. |
|
MaximumJobsToKeep |
5 |
This is the number of previous jobs to record logs and output data. |
Additionally, if you want to clear the host machine's cache, which is used by Swarm Agent to complete its assigned tasks, invoke the Clean command in the Cache menu.

Finally, if you want to validate the machine's cache, invoke the Validate command in the Cache menu.

It's good practice to clean and validate your Swarm Cache on a regular basis, especially if Unreal Lightmass is crashing and causing builds to fail.
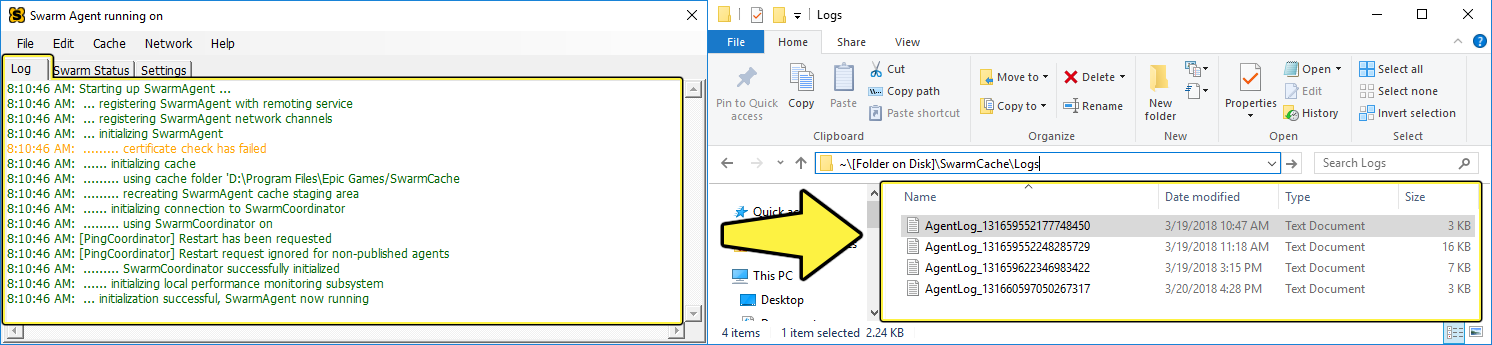
Reading Agent Logs
Clicking on the Log tab opens the Log window that Swarm Agent log messages are flushed to.

If you want to specify the amount of output being flushed to the Log window, update the MaximumJobApplicationLogLines variable (found in the Developer Settings > Log Settings menu) to change the number of output lines from a Job application before it truncates what goes to the Log window.

If you need to locate
AgentLog
text files for debug or maintenance purposes, it's important to note that, at the beginning and end of every Job, Agent activity is logged to a file in
[Folder on Disk]\SwarmCache\Logs
.
Click for full image.
Typically, the default logging level to files on disk is set to ExtraVerbose , whereas the default logging level to a Swarm Agent's Log window is set to Informative . If you want to change how detailed you'd like the Log output to be, update the Verbosity variable, which is found in the Settings > Log Settings menu.

Monitoring Progress
If you want to monitor an agent's progress as it works on the jobs and tasks being assigned to it, open the Swarm Status window.

When an agent is running, you'll see progress bars per machine, and for every progress bar, there are regions reflecting whether the application is initializing (1), preparing to do work (2) (both of which are not distributed work) or performing distributed work (3).

To get more details about a job's progress, hover your mouse cursor over the progress bars.
Finally, the Distributed Progress bar located at the bottom tells you the percentage of a Job that has been completed (4) versus the percentage that is currently being worked on (5).

Stopping Swarm Agents
To stop a Swarm Agent, click File > Exit to close the application and kill its process.

Alternatively, right click the Swarm icon in the Windows Notification Area and select its Exit command.
At this point, Swarm Coordinator and Swarm Agent can run with minimal intervention. Given the number of lights, objects, and the quality of calculations that need processing, you'll find that with enough agents, Unreal Lightmass builds should only take a few minutes rather than a few hours.
Depending on your development environment (including the size and complexity of the scene that you're working on), you may want to update how many cores are reserved on your local machine to improve build performance. This can be done by tuning the
LocalJobsDefaultProcessorCount
variable, which is located in the
Developer Settings > Local Performance Settings
menu.

If you have some general questions about running Unreal Swarm, check out the following set of Frequently Asked Questions.
Frequently Asked Questions
What are some ways I can improve build times when using Swarm Agent(s) and Coordinator?
-
Adding Lightmass Importance Volume(s) in player-accessible areas:
-
This volume is used to focus where Lightmass spends its time on for accuracy and quality. The idea is that these should cover an area where the player can be. Areas outside of the volume will receive fewer photons and thus a lower quality result. Note that using single large volumes to encompass an area defeats their purpose of focusing photon calculations in key areas.
-
-
Adjusting Lightmap Resolutions:
-
Individual Static Meshes that have high Lightmap resolutions and a lot of light contributions in a scene can increase build times, not only for the scene, but for a single Actor. Where possible, lower Lightmap resolutions for a quality result and use the Statistics window to get an idea of how long it took to build a single Actor for the Level. To get a good result for large (or complex) Static Meshes where you find you are setting higher Lightmap resolutions, you may want to consider breaking it into separate smaller meshes or rework the Lightmap UV (where possible) to get better coverage for the parts that matter.
-
-
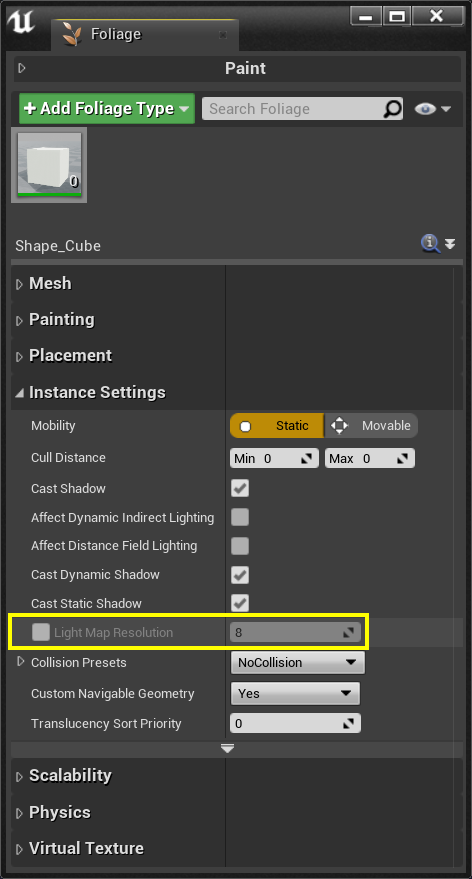
Enabling Foliage Tool Lightmap Resolutions:
-
Instanced Static Meshes used when you paint Foliage into your level automatically use the Lightmap resolution of the Static Mesh that it's referencing. When you have hundreds (or even thousands) of these painted into your level, that resolution can be too high for the system to handle. It will lead to exponentially longer build times, potential Lightmass crashes due to memory constraints, and higher texture memory consumption.
It is recommended to enable the Light Map Resolution and use the default value of 8 or possibly set it to a lower value of 4. This lowers the resolution of all instances, but the perceivable quality loss is minimal since static shadowing only needs to be displayed at a distance while dynamic shadowing is handled near the camera.
![FoliageTool_LMResolution.png]()
Click image for full size.
-
-
Reducing the number of scene Actors and (or) Lights:
-
The number of shadow casting Actors and (or) Lights in the levels means that all these interactions have to be considered when calculating lighting. Reducing light is a key way to limit the number of Actors that a single light interacts with. Reducing the influence radius for lights that don't need to affect a large area can decrease the number of computations and thus increase the speed of the light build being processed.
-
-
Using higher than recommended system specifications:
-
Swarm Agent is a CPU intensive process that requires a lot of calculations. If you're only using your local machine, a good CPU and lots of RAM can improve build process time. Keep in mind, that the other factors previously mentioned also play a role in build processing time.
-
Why am I not getting Agent distribution?
Remote Swarm Agents may decline to work on your job for a few different reasons, the most common among them is that they're already busy doing someone else's work. Another possibility is that they have determined that they are too busy to take on a job at that time, often caused by the machine doing something resource intensive, such as compiling or
cooking content
. In the
Swarm Status
tab of the Agent window, you should see a full list of all remote agents that could potentially help with your build. If one of them isn't currently available, you'll see a white bar ticking along with the rest of the build, and if you mouse over the bar, you will see "Waiting for remote to become available".
Also, a more advanced way to peek at the available remote agents (even when you're not doing a build) is to click on the Log tab and select Ping Remote Agents from the Network menu. You'll see a list of the remote machines and their current state.
How can I limit CPU usage when building lighting?
From the
Swarm > DeveloperSettings
tab, you can limit CPU cores used during a lighting build for your local machine and remote ones with
LocalJobDefaultProcessCount
and
RemoteJobDefaultProcessorCount
.
For your local machine, you may want to limit its contribution to only a few cores, leaving enough for it to comfortably work on other tasks. By default, a couple of cores will be left free for this, but you may find you need more cores available to work with locally leaving distributed tasks handling more of the work for light build computations.
When trying to launch Swarm Agent, I get a Windows application error for UnrealLightmass.exe, what does this mean?

-
This type of error means that something is preventing the application from opening in Windows that is not directly the cause of UE4. Below are some steps you can take to resolve the issue:
-
Make sure you have the appropriate and latest Visual Studio dependencies installed. For Unreal Engine version 4.9 and earlier, you'll need VS2013 dependencies and for 4.10 and later, you'll want to have VS2015 dependencies.
-
If that does not resolve your issue, try using a free application (for example, Dependency Walker ) to troubleshoot any DLL issues that may be preventing the UnrealLightmass.exe from loading.
-
Are Swarm Agent and Coordinator supported for Mac or Linux?
Currently, Swarm Agent and Coordinator are only supported for Windows . Light builds on Mac and Linux will only build locally.
Can my GPU be used to build lighting?
Swarm does not currently support GPU computations for lighting data.
What do the following errors mean?
-
Lightmass Crashed with "Ran out of memory allocating [some value]"

Click image for full size.
-
In this situation, Swarm Agent failed to process data for Lightmass because it ran out of memory. This most often happens when you're not using Swarm Coordinator to distribute a build across multiple agents requiring a single machine to do all the work. Lightmass can run out of memory when computing a large Level with many Actors and Lights or if Lightmap resolutions are too high.
You can reduce the chances of getting this error by increasing the amount of RAM on your local machine, adding agents for distribution, lowering the Lightmap resolution of Actors where possible or even adding a Lightmass Importance Volume to focus computations for key areas that players can access.
-
Lightmass Crashed with
"Assertion Failed: (Index >=0)&(Index<ArrayNum))"
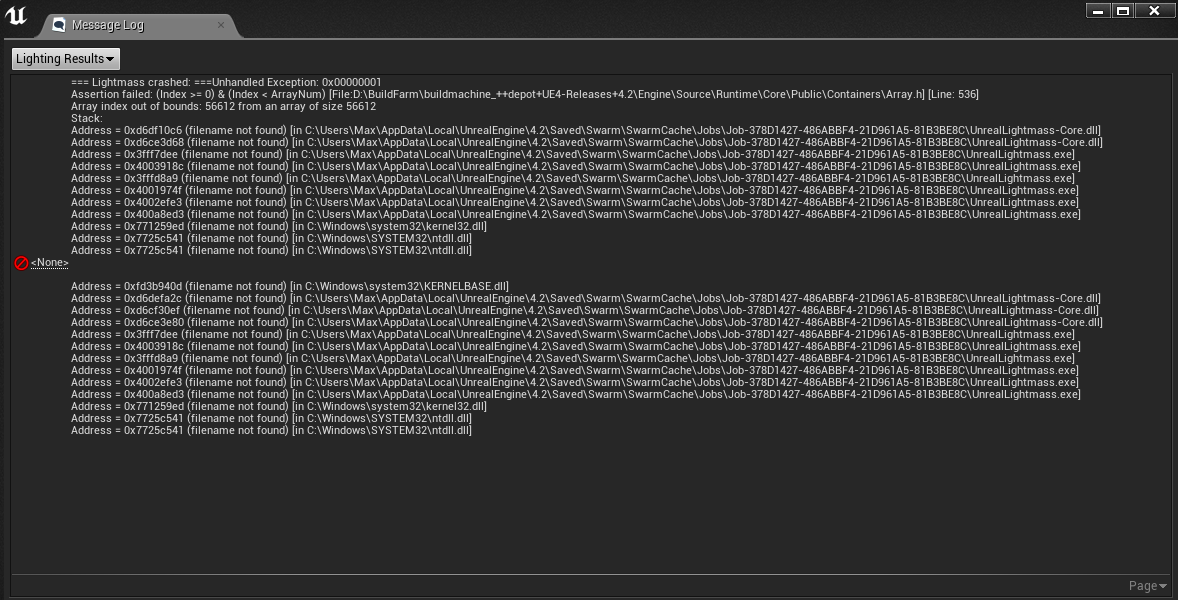
Click image for full size.
-
When you receive this error, you should Clean and Validate your Swarm Cache.
-
Editor toast pop-up "Light Build Failed. Swarm failed to kick off."
![FailedToKickOff.jpg]()
-
When you attempt to build lighting from the Unreal Editor, you may get this message. If so, the following are some common reasons:
-
Make sure you do not have multiple instances of Swarm Agent open and running. You can check this by looking at the task processing that is running or in Windows by looking in the Windows Notification Area .
-
Corrupt levels and/or Actors in the level.
-
Not having correct exceptions for SwarmAgent.exe for Firewall and Anti-Virus software.
-
Installation or corruption issue with the Engine. For users with the Launcher, select your engine version drop down and select Verify .
![VerifyEngine.png]()
-
Source build issue with Unreal Lightmass. Rebuild the UnrealLightmass solution.
-
-
If Swarm is still failing to start, its ports could be in use by another system process.
-
Open your Swarm Log and check for the following error message:
-
Exception details: System.Net.Sockets.SocketException (0x80004005): No connection could be made because the target machine actively refused it 123.456.7.89:8009
You may need to involve your IT department to solve this issue with port assignments, especially since Swarm requires ports 8008 and 8009 to function properly. Without those ports, it will fail to initiate any agents or coordinator. It is not an issue specifically caused by UE4.
-
-

