Choose your operating system:
Windows
macOS
Linux


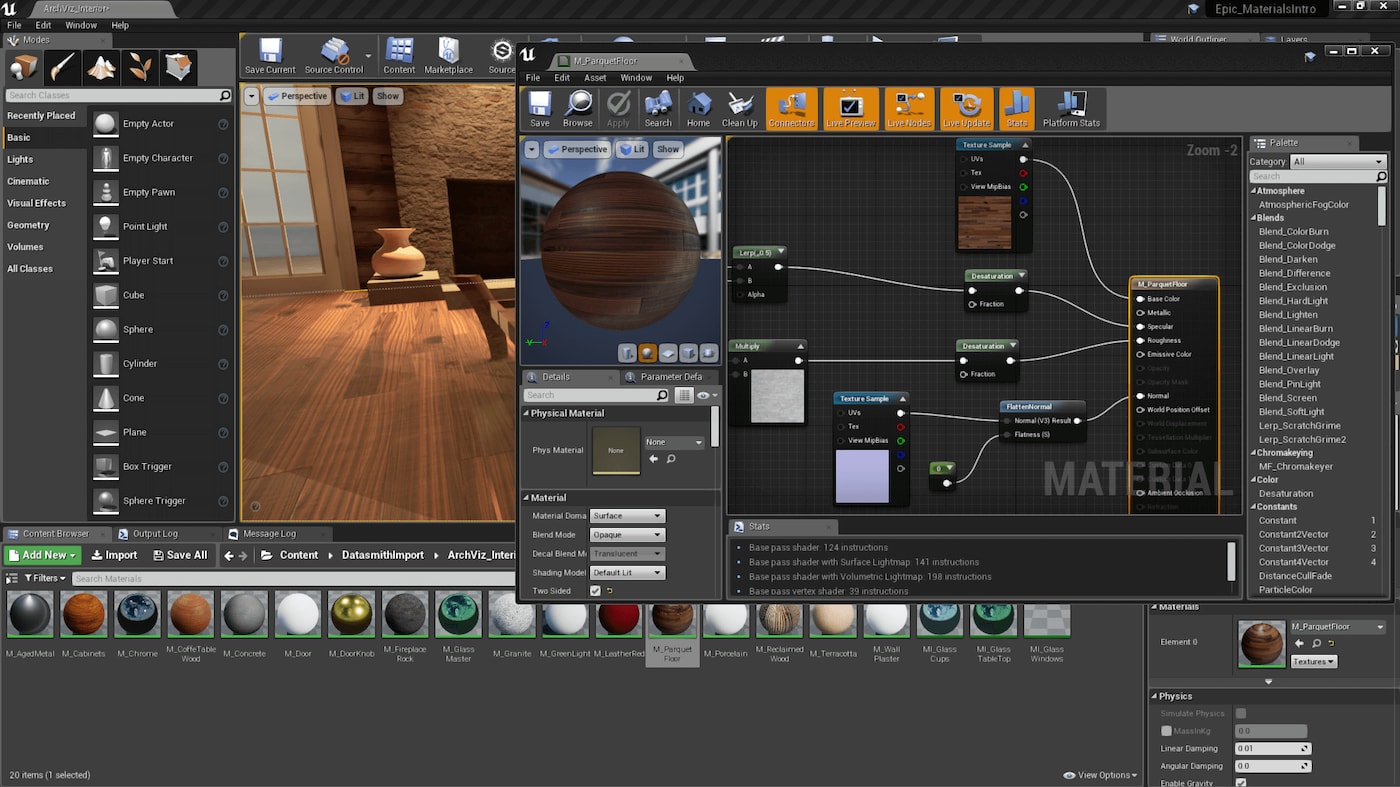


The Material Editor is a node-based graph interface that enables you to create shaders that can be applied to your geometry, such as Static and Skeletal Meshes, or with other systems such as Cascade to create interesting materials.
Throughout this page, you'll learn about some of the functions you can perform along with general good practices to follow while using the Material Editor, such as using the Comment boxes to call out what a specific section of your material network is doing, using reroute nodes to clean up the pin wires making your network easier to read, what to do when you get errors in the material statistics window and more.
Opening the Material Editor
The Material Editor can be opened by double-clicking any Material asset or through the right-click context menu of a Material asset in the Content Browser. When performing either of these operations, that particular Material will open in the Material Editor for editing .
Commenting Material Expression Networks
Using Comments are a great way to document what your Material is doing, making it easier for you and others to understand what is going on within a complicated material graph.
There are two ways you can add comments to your Materials; by adding text to the individual node using the Desc property or its comment bubble (...) as you hover over a material node, or by using a comment box to encapsulate a larger section of your material graph.
Adding Descriptions to Individual Nodes
Every material node contains a Desc property that is available through its Details panel. This property exists as a way for artists to add an explicit description of what a specific node is doing. When this property is used, the text will appear in the text bubble as you hover over the node.
You can add text descriptions to your nodes by doing the following:
-
Select it from your material graph and then from the Details panel, locate the Desc property to enter your text into.
-
Hover your mouse cursor over the node and click on the Text Bubble (...) to enter your description.
Additionally, if you'd like the comment to always be visible, you can click the Push Pin button in the text bubble for it to remain visible and not minimize when you are no longer hovering over the node.
Using Comments
Comments are another way to make descriptive notes about what certain parts of your material network are doing. Creating them will enable you to stretch a comment box around a group of multiple nodes, making this a perfect way to describe entire sections of a network rather than using the Desc property to describe individual nodes.
The comments are displayed as banners of text along the top of the comment box. This text will not scale with the graph's zoom level, so even when zoomed far away, you will still be able to read the comment descriptions.
To create a Comment Box you can do the following:
-
Press the C keyboard shortcut while the mouse is over the Material Graph. If you have any nodes selected in your graph, the comment box will scale to encompass the selection.
-
You can right-click and use the Material Graph context menu to select New Comment and add a comment box.
Some additional things you can do with your comment box is:
-
Any nodes that are captured within the comment box can be moved by dragging on the group comment text, thus moving any nodes with it. the frame can be resized by dragging on the edges of the comment box to add additional nodes.
-
Colors of the comment box can be adjusted for those more visually inclined. You can use the Details panel to set the Comment Color property using the color wheel to pick a color or entering a specific RGB value.
-
You can also rename your comments by double-clicking on the comment text banner, or by selecting the comment box and then modifying the Text property from the Details panel.
Live Preview, Live Nodes, and Live Update

When making changes to a network, it can be useful to get immediate feedback from each change in realtime. The Material Editor offers two features that can be enabled to give you instantaneous feedback for your network; Live Preview , Live Nodes and Live Update .
The difference between these options may not seem apparent at first but they each perform a specific task for viewing your material in realtime.
-
Live Preview - This option allows for any changes to update automatically in the Material Preview window in realtime without having to use the Save or Apply buttons.
-
Live Node - This option allows for any constant changes that the nodes make, such as material expressions for Panners, so that they playback in realtime inside the graph.
-
Live Update - This option allows for each node within the network to have its shader recompiled whenever a change is made. These changes include creation of new nodes, deletion of nodes, node connections and disconnections, and changes in properties. This recompilation is necessary so that the Material Preview drawn at that node is up to date. However, recompiling these intermediate shaders can be time-consuming, especially if your Material contains a large network. If you're experiencing long wait times after every change, you may want to deactivate the Live Update option.
As an example, consider the example below, in which we have a panning texture of an awesome rocket hull being multiplied by a vector parameter, which is supplying color.

-
In this example, activating Live Nodes would cause the rocket texture to pan in realtime in the node's preview thumbnail in the graph. If Live Nodes were deactivated, the texture would remain stationary even though the Panner was telling it to move. You may, however, notice small updates as you move your mouse around the graph area.
-
If you were to change the color from cyan to purple, you would only see the change if Live Update were enabled. With Live Update disabled, the change in color would not be visible on the nodes even though the color property was indeed changed. As an example, consider the example below, in which we have a panning texture of an awesome rocket hull being multiplied by a vector parameter, which is supplying color.
Also, when Live Update is deactivated, you can force-update all previews manually by hitting Spacebar . Fast iteration can be achieved by disabling Live Update and then pressing spacebar whenever you would like to view your changes.
Reroute Nodes

When making complex Materials, sometimes your shader networks can become difficult to read or make sense of as the connection wires overlap or criss-cross large portions of your material network to connect to different inputs. Reroute nodes enable you to easily organize and clean up your shader network without impacting performance or adding to the instruction count since these are purely visual.
To add Reroute nodes in the Material Editor, you can do the following:
-
From the right-click Context Menu or the Material Palette under the Utility category you can drag in the Add Reroute Node .
![AddRerouteNodeCM.png]()
-
Double-click on a connection wire to insert a new Reroute node inline.

Compiler Errors
Each time a change is made to the material network, the Material must be compiled to see the changes. If any required inputs of an expression within the network have no connections or are being passed the wrong type of data, a compiler error will occur.
These types of errors are indicated in two places.
-
The node that is throwing the error will display "ERROR!" along its bottom.
-
The Stats window will display the error that is being thrown causing the Material to fail to compile. If your Stats window is not opened, you can open it by going to Window > Stats .
Compiler errors let you know that a problem exists and what that problem is by providing information about the type of node expression they occurred on and the description of the error.

In this image, the MakeMaterialAttributes node is throwing an error with the Normal input property, as indicated by the Stats window in the lower portion.
Material Graph Search
The search functionality in the Material Editor enables you to quickly find any nodes (including comments) within the material network that contain a specific piece of text in their description or certain other properties specific to individual types of nodes. This makes it easy to add identifying keywords to nodes and jump to them at a later time without sifting through the network of nodes in your graph haphazardly.
You can open this tab by going to Window > Find Results .
Typing a full or partial keyword into the search box will perform a search against the properties of the nodes present within you your material graph. The currently selected result will be brought into view and highlighted.
Searches are performed against the following property values:
|
Searched Properties |
Expression Type |
|---|---|
|
Desc |
All Nodes |
|
Texture |
Texture Sample |
|
ParamName |
Parameters |
|
Text |
Comment |
|
Font |
Font Sample |
|
Material Function |
MaterialFunctionCall |
Searches can also be performed for specific types of expressions by using the
NAME=
switch with your search. For example, to find all texture samples, you could use
the following search:
NAME=textureWhen a new match is clicked in the Search panel, it will be brought into view in the graph table if it is not already visible.
To clear a search, simply press the Clear (X) button.