Choose your operating system:
Windows
macOS
Linux


When viewing a Material very closely, you will notice that the Textures used in the Material break down and become very pixilated, resulting in something that does not look very good. To address this issue, you can use what is known as a Detail Texture to help hide a Textures pixilation when a Material is viewed very closely.
Detail Texturing
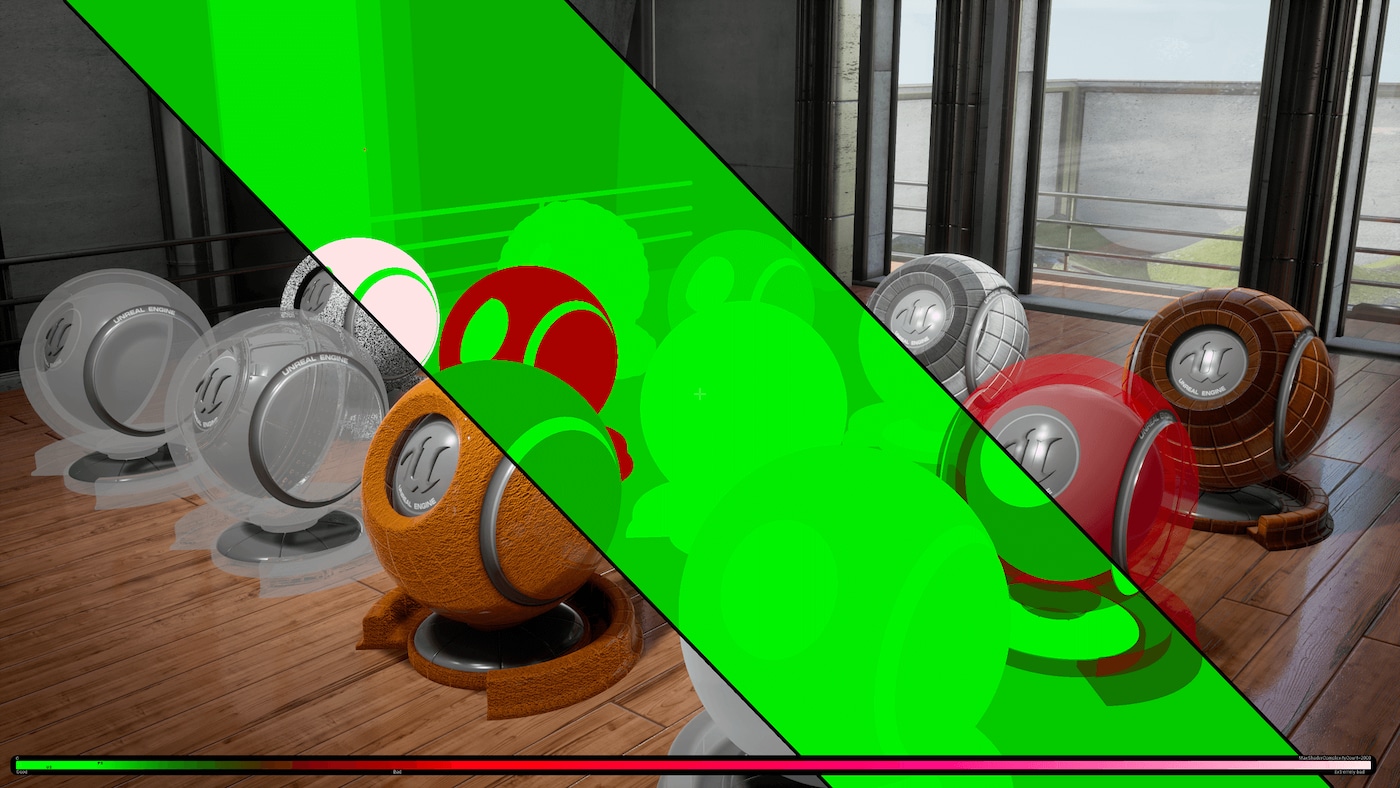
Detail Texturing allows you to give the illusion of more detail in a Texture by bringing in a highly repeated Diffuse and Normal map combination which layers over the original Diffuse and Normal for an object. This gives the illusion of greater detail at close range than normally would be possible. Here is an example of Detail Texturing in action.

On the Left Hand side, labeled with a number 1, you can see a Material that does make use of Detail Texturing. On the Right Hand side, labeled with a number 2, you can see a Material that does not make use of Detail Texturing. Notice how in the image on the left, 1, there looks to be more detail from the Normal map and that detail looks much sharper than the image on the right.
Detail Texturing Node Breakdown
If you do a search in the Palette for "Detail Texturing", you will find a DetailTexturing Material Function that you can use. While this is not the only way that you can apply Detail Textures to Materials, it is the quickest as all you have to do is just input Textures and settings you want to use.

|
Property |
Description |
|---|---|
|
Scale(S) |
This sets the scale of the detail Texture. Bigger numbers result in more titling smaller numbers results in less titling. |
|
Diffuse(V3) |
This is the input for the Diffuse Texture. |
|
DetailDiffuse(T2d) |
This is the input for the Diffuse Detail Texture. This input can only accept a Texture Object. |
|
DiffuseIntensity(S) |
This controls the intensity of Detail Diffuse Texture. |
|
Normal(V3) |
This is the input for the Normal Map Texture. |
|
DetailNormal(T2D) |
This is the input for the Normal Map Detail Texture. This input can only accept a Texture Object. |
|
NormalIntensity(S) |
This controls the intensity of the Detail Normal Map Texture. |
Converting Texture Sample to Texture Objects
In order for the Detail Texturing Material Function to work correctly, you will need to convert the Textures you want to use as the Detail Textures from regular Textures into Texture Objects. To change Textures into Texture Objects, all you have to do is the following.
-
First find the Texture you want to use as a Detail Texture.
![DT_Regular_Texture.png]()
-
Once the Texture has been located, use the Mouse to Right-Click on the Texture. When you do this, a Menu will appear and from that menu, select the Convert To Texture Object option.
![DT_Convert_Texture_To_Object.png]()
-
When completed, the Texture Sampler should now look like this.
![DT_Texture_Object_Texture.png]()


How to Use Detail Texturing in your Material
There are two different ways that you can setup a Material to use Detail Texturing which can be found below. The method that you choose to use depends on the needs of the Material and the needs of the project. One way is not better than the other as both give the same results in the end.
All of the content that is used in the following sections can be found if you include the Starter Content with your project. While the techniques that are shown here will work with any Textures, if you want to follow along, please make sure that your project does include the Starter Content .
However, before we begin, first set up a very simple Material to use for testing. To do this, Right-Click in the Content Browser and then from the Create Basic Asset section of the pop-up Menu, select Material . Once selected, a new Material will be created. Name the Material Detail_Material . When completed, your Content Browser should look like the following.

With The Detail Texturing Material Function
-
First open up the Material that was created above by Double-Clicking on it with the Left Mouse Button inside of the Content Browser .
-
With the Material open, add the following Textures by dragging them from their location in the Content Browser into the Material Graph.
-
T_Brick_Clay_Old_D
-
T_Brick_Clay_Old_N
-
T_Ground_Gravel_D
-
T_Ground_Moss_N
When completed, your Material Graph should look like this:
![DT_Adding_Textures.png]()
-
-
With all of the required Textures added to the Material Graph, it is now time to add the Detail Texturing Material Function. To do this, first search in the Palette for Detail Texturing .
![DT_Search_DT_MF.png]()
-
When the Detail Texturing Material Function has been located, click on it with the Left Mouse Button and then with the Left Mouse Button still held down, drag the Detail Texturing Material Function from the Palette into the Material Graph. Once over the Material Graph, release the Left Mouse Button to place the Detail Texturing Material Function in the Material Graph.
![DT_Adding_DT_MF.png]()
-
With the Detail Texturing Material Function now added, it is now time to start hooking the required inputs and outputs so the Material will work. For this example, we are going to be using the T_Brick_Clay_Old Textures as our base Textures and the T_Ground_Gravel as our Detail Textures. This means that the Diffuse and Normal maps for T_Brick_Clay_Old should go into the Diffuse and Normal inputs and the T_Ground_Gravel Diffuse and T_Ground_Moss Normal maps should go into the Detail Diffuse and Detail Normal inputs. When completed, your Material Graph should look like this.
![DT_Hooked_Up_Textures.png]()
Remember that the T_Ground_Gravel Diffuse and T_Ground_Moss Normal map Texture Samplers need to be converted into Texture Objects or the Material will not work. For more information on how to do this, please refer to the Converting Texture Sample to Texture Objects section above.
-
Now that the Textures have been hooked up, it is time to add some Constant Material Expressions so that things like the scale and intensity of the Detail Textures can be tweaked. To find the Constant Material Expression, search for Constant in the Material Palette and then drag the Constant from the Palette to the Material Graph. Once you have added one Constant Material Expression, duplicate it by first selecting it and then press CTRL + W on the keyboard two times. In the end, you want to have three Constant Material Expressions.
![DT_Adding_Constant_Nodes.png]()
-
With the appropriate amount of Constant Material Expression nodes added to the Material Graph, it is now time to hook them up and fill them in with data. To do this, all you need to do is connect the output of the Constant Material Expression nodes to the inputs on the Detail Texturing Material Function. Then input a value of 1 in each of the Constant Material Expression nodes. When completed, your Material Graph should look like this.
![DT_All_Connections_Made.png]()
-
By adjusting the values of the Constant Material Expression nodes, you can affect how the Detail Textures will look. Here is an example of what happens when you set the Scale to a value of 1 then 5 and finally 10.
![DT_Different_Scale_Settings.png]()


Without the Detail Material Function
If for whatever reason you cannot use the Detail Texturing Material Function, you can always build this functionality inside the Material Graph using Material Expression nodes and the directions below.
-
First make a copy of Detail_Material by Right-Clicking on the Material inside the Content Browser and then selecting Duplicate from the Menu.
![DT_Duplicate_Material.png]()
-
Once created, label the Material Detail_Material_2. When completed, the Content Browser should look like this.
![DT_Duplicate_Materia_Namedl.png]()
-
Open up the new created Material by Double-Clicking on it with the Left Mouse Button. When opened, delete everything except the Textures and make sure to convert the Texture Objects back to Texture Samples by first selecting all the Texture Objects and Right-Clicking on them and then selecting Convert To Texture Sampler from the menu. When completed, the Material Graph should look like this.
![DT_New_Material_Setup.png]()
-
Now that everything has been cleaned up and converted, we can start to lay down the required Material Expression nodes. For this part, we are going to need the following type and amount of nodes. You can find each of the following Material Expression nodes by searching for them in the Palette .
-
Texture Coordinate x 1
-
Clamp x 1
-
Constant x 2
-
Add x 2
-
Multiply x 3
When completed, the Material Graph should look like this.
![DT_RequiredNodes.jpg]()
-
-
Once all the required Material Expressions nodes have been added, it is now time to begin hooking everything up. The first section that is going to be hooked up is the Base Color portion. When completed, the Material Graph should look like this.
![DT_BaseColor_Connections.jpg]()
-
Next the Normal Map needs to be hooked up in the same manner that the Base Color was set up. When completed, the Material Graph should look like this.
![DT_NormalMap_Connections.jpg]()
-
With the Base Color and Normal map now all connected together, the Material is now ready to be compiled, saved, and used.
![DT_Complete_Material.jpg]()


Detail Texturing Tip & Tricks
The following section will cover some tips and tricks on different ways you can use Detail Texturing in your Materials.
Distance Based Detail Texturing
When dealing with large surfaces, such as terrain, you will notice that even though the Textures you are using might title, there is lots of noticeable repetition that does not look so good, especially when viewed in the distance. To fix this, we can build upon the Detail Material that was created previously to allow it to display one Texture when the camera is close and another Texture when the camera is far away. This is often referred to as Distance Based Texture Blending and can be set up following the instructions below.
-
First make a copy of the Detail_Material_2 and name it Distance_Fade. Once named, open up the Material and search in the Palette for the following Material Expression nodes and add them to the Material Graph.
-
World_Position x 1
-
Camera_Position_WS x 1
-
Distance x 1
-
Divide x 1
-
Power x 1
-
Clamp x 1
-
Constant x 2
-
-
With the all the required Material Expression nodes added to the Material Graph, we can begin hooking everything up. The distance at which the Texture change happens is controlled by the first Constant that is plugged into the Divide Material Expression, currently set to 512 in the example image. When completed, you should have something that looks like this.
![DT_Distance_Based_Blending_Nodes.png]()
-
Once the distance based blending has been completed, it can now be added to the rest of the Material. To accomplish this, we first need to add two LERP Material Expressions to the Material Graph. This is because the Alpha input of the LERP Material Expressions will control what distance at which the Textures are switched. Then it is just a matter of hooking up the rest of the Material. The only difference between this Material and the original one is that instead of adding the Textures together at the end, the LERP is used. When completed, your Material Graph should look like this.
![DT_Distance_Based_Completed_Material.png]()
-
To see the effect in action, all you have to do is hold down the Right Mouse Button while inside the Material Preview window and then move the mouse forward and backwards. When you get far enough away from the preview mesh, you should see the Material transition from one texture to the other one. If you cannot see this happening, adjust the first Constant that is plugged into the Divide Material Expression, currently set to 512, to something smaller as smaller numbers will allow the effect to happen closer to the object.


Conclusion
Detail Texturing is a very powerful tool that can really help make your 3D projects come to life. However like with every powerful tool care must be taken to make sure that this power is kept in check. Keep in mind that Detail Texturing can only help to hide pixilation to a certain point. Things like allowing the players camera to zoom in on objects could negate any benefits gained from Detail Texturing. Also remember that adding Detail Texturing could add two or more additional Texture lookups to your Material which could present some performance / memory issues, especially on mobile platforms.