Choose your operating system:
Windows
macOS
Linux


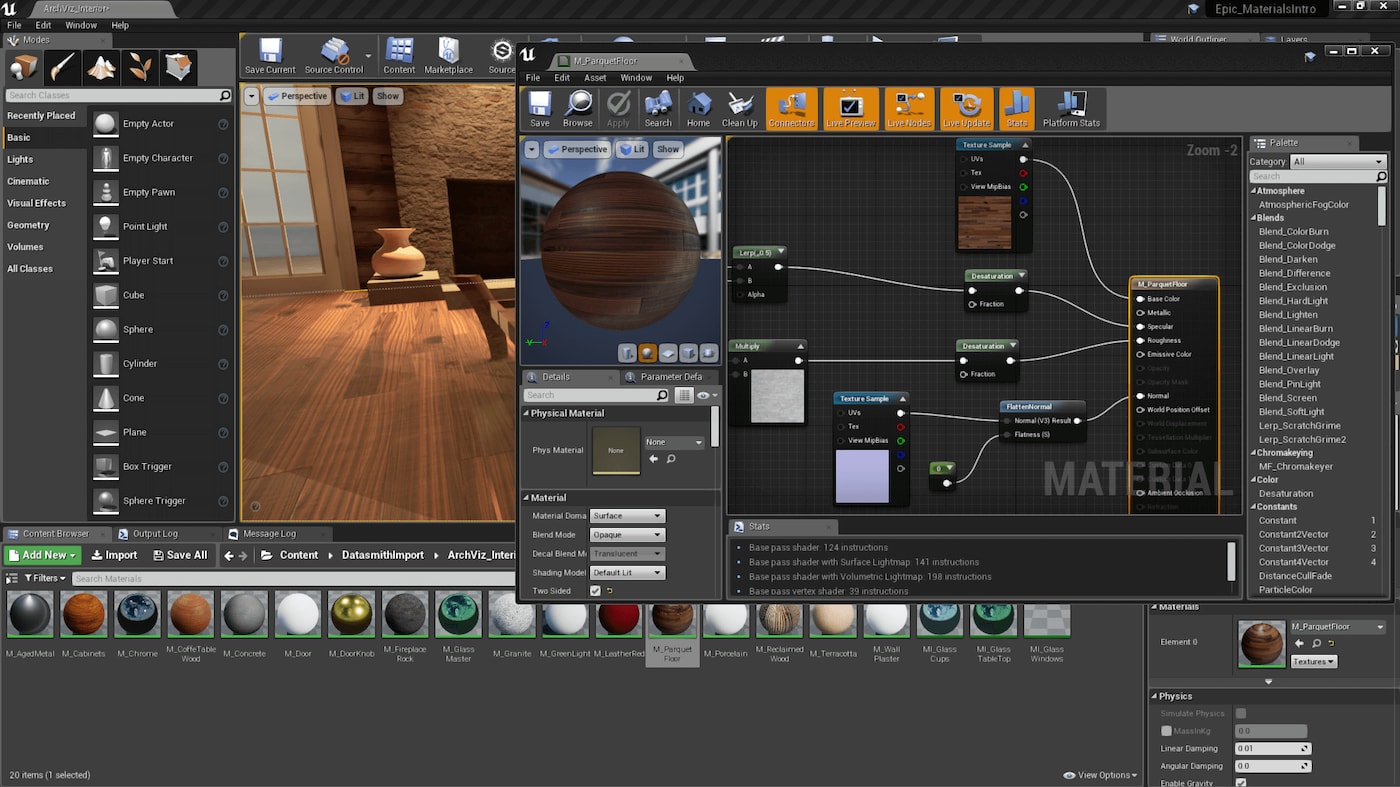


This document is designed to help those who need to quickly get up to speed in Unreal Engine 4's physically based Materials system. It assumes that you are at least somewhat familiar with Material creation in the Unreal Engine, at least with Unreal Engine 3 or later. If you are completely new to Materials in Unreal, you may prefer to start with the Essential Material Concepts page.
Our goal here is to give you just the "plain-language essentials" on how to make standard Materials using this system, as it can be confusing even for those with experience in previous Unreal Engine iterations. We will only be focusing on those aspects of Materials that are involved with our physically based approach. For a complete rundown of the available inputs, check out Material Inputs .
What Does Physically Based Mean?
Physically based shading means we approximate what light actually does as opposed to approximating what we intuitively think it should do. The end result is more accurate and typically more natural looking. Physically based Materials will work equally well in all lighting environments. In addition, the Material values can be less complex and interdependent, resulting in a more intuitive interface. These benefits are applicable even for non-photorealistic rendering as evident in the latest films from Pixar [4] and Disney [3] .
For these reasons and more, Unreal Engine 4 has adopted a new physically based Material and shading model. For an in depth, technical look at UE4's physically based Material and shading model, please refer to my SIGGRAPH presentation [2] .
Material Parameters
In terms of the "physically based" aspect of our Materials system, there are really only 4 different properties with which you need to be familiar. These are:
-
Base Color
-
Roughness
-
Metallic
-
Specular
All of these inputs are designed to take in values between 0 and 1. In the case of Base Color , this means a color with RGB values that fall between 0 and 1.
Physically based values can be measured from real world Materials. Some examples will be given below.
Base Color
Base Color defines the overall color of the Material, taking in a Vector3 (RGB) value where each channel is automatically clamped between 0 and 1.
If taken from the real world, this is the color when photographed using a polarizing filter (polarization removes the specular of nonmetals when aligned).

Measured BaseColor values for nonmetals (intensity only):
|
Material |
BaseColor Intensity |
|---|---|
|
Charcoal |
0.02 |
|
Fresh asphalt |
0.02 |
|
Worn asphalt |
0.08 |
|
Bare soil |
0.13 |
|
Green grass |
0.21 |
|
Desert sand |
0.36 |
|
Fresh concrete |
0.51 |
|
Ocean Ice |
0.56 |
|
Fresh snow |
0.81 |
Measured BaseColors for metals:
|
Material |
BaseColor (R, G, B) |
|---|---|
|
Iron |
(0.560, 0.570, 0.580) |
|
Silver |
(0.972, 0.960, 0.915) |
|
Aluminum |
(0.913, 0.921, 0.925) |
|
Gold |
(1.000, 0.766, 0.336) |
|
Copper |
(0.955, 0.637, 0.538) |
|
Chromium |
(0.550, 0.556, 0.554) |
|
Nickel |
(0.660, 0.609, 0.526) |
|
Titanium |
(0.542, 0.497, 0.449) |
|
Cobalt |
(0.662, 0.655, 0.634) |
|
Platinum |
(0.672, 0.637, 0.585) |
Roughness
The Roughness input controls how rough or smooth a Material's surface is. Rough Materials scatter reflected light in more directions than smooth Materials, which controls how blurry or sharp a reflection is (or how broad or tight a specular highlight is). A Roughness of 0 (smooth) results in a mirror reflection and roughness of 1 (rough) results in a diffuse (or matte) surface.


Roughness 0 to 1. Nonmetal top, metal bottom.
Drag the slider to see the Roughness value update


Mapping Roughness
Roughness is a property that will frequently be mapped on your objects in order to add the most physical variation to the surface.
Drag the slider to see the Roughness value update, biasing through a texture. The most interesting results are seen near 0.5.


If you have been making Materials in previous iterations of the Unreal Engine and are not accustomed to physically-based Materials, keep in mind that Roughness maps are where you will handle most of your Specularity texturing.
Metallic
The Metallic input controls how 'metal-like' your surface will be. Nonmetals have Metallic values of 0 and metals have Metallic values of 1. For pure surfaces, such as pure metal, pure stone, pure plastic, etc. this value will be 0 or 1, not anything in between. When creating hybrid surfaces like corroded, dusty, or rusty metals, you may find that you need some value between 0 and 1.

Metallic 0 to 1
You may be reluctant at first to make any Material completely metallic. Resist!
You will notice we have added a little bit of Roughness in this example. This was purely an artistic choice.
Drag the slider to see the Metallic value update


Specular
When you're editing a non-metallic surface material, there are times when you'll want to adjust its ability to reflect light, specifically, its Specular property. To update a Material's Specular, input a scalar value between 0 (non-reflective) and 1 (fully reflective). Note that a Material's default Specular value is 0.5.
For very diffuse Materials, you may be inclined to set this to zero. Resist! All Materials have specular, see this post for examples [5] . What you really want to do for very diffuse Materials is make them rough.
Commonly, if we modify Specular, we do so to add micro occlusion or small scale shadowing, say from cracks represented in the normal map. These are sometimes referred to as cavities. Small scale geometry, especially details only present in the high poly and baked into the normal map, will not be picked up by the renderer's real-time shadows. To capture this shadowing, we generate a cavity map, which is typically an AO map with very short trace distance. This is multiplied by the final BaseColor before output and multiplied with 0.5 (Specular default) as the Specular output. To be clear this is BaseColor = Cavity*OldBaseColor, Specular = Cavity*0.5.
For advanced use, this can be used to control the index of refraction (IOR). We have not found this to be necessary for 99% of Materials. Below are Specular values based off of measured IOR.
Measured Specular Values:
|
Material |
Specular |
|---|---|
|
Glass |
0.5 |
|
Plastic |
0.5 |
|
Quartz |
0.570 |
|
Ice |
0.224 |
|
Water |
0.255 |
|
Milk |
0.277 |
|
Skin |
0.35 |
Drag the slider to see the Specular value update.


Example measured Materials. Top: Charcoal, fresh concrete, worn asphalt. Bottom: Copper, iron, gold, aluminum, silver, nickel, titanium
References
1 . Lagarde, Feeding a physically based shading model
2 . Karis, Real Shading in Unreal Engine 4
3 . Burley, Physically-Based Shading at Disney
4 . Smits, Reflection Model Design for WALL-E and Up
5 . Hable, Everything is Shiny