Choose your operating system:
Windows
macOS
Linux
This document will cover the most common workflows of working with Particle Systems and the Particle System editor: Cascade . Links to more extensive documentation are provided when available.
Creating a Particle System
To create a Particle System , left-click the Add New button on the Content Browser , and select Particle System , or right-click in the Content Browser's Asset View, and using the context menu select Particle System .


Once created, the name of the new Particle System will be highlighted awaiting a new name. Once a new name is entered, or you click something else, the Particle System's icon will update with a "No Image" thumbnail. You will be able to generate a thumbnail from within Cascade, the Unreal Engine 4 particle editor.

Editing a Particle System
Double-click a Particle System in the Content Browser to open it in Cascade.

Adding Emitters
To add an Emitter to a Particle System, use the context menu by right-clicking in the empty area in the Emitters Panel, or by right-clicking an Emitter.

Or:

Editing Emitters
Left-click an Emitter and its properties will show in the Details Panel . Emitters house very few properties, but the big ones are Name , Detail Mode , and Medium Detail Spawn Rate Scale .

Reordering Emitters
To change the order of the emitters in a Particle System, select an emitter and use the Left and Right Arrow keys.

Solo Mode

Solo Mode will disable all other Particle Emitters except the one you enabled Solo Mode on (assuming no other emitters had Solo Mode enabled). This enables you to view the effect of just that emitter. Once Solo Mode has been enabled on one emitter, enabling Solo Mode on another emitter will add it to the preview along with any other emitters set to Solo Mode. This allows you to preview specific combinations of emitters.
If the emitter that you have enabled Solo Mode on only spawns based on an event in another emitter, then nothing will render. You will need to enable Solo Mode on the emitter with the spawn event as well.
Adding Modules
Modules can affect properties like where particles will spawn, how they will move, their colors, and many more. These can be added through the context menu by right-clicking on the Particle Emitter.

For more information on individual modules, see the Particle Reference Documentation .
Editing Modules
The Details Panel shows the properties of the currently selected Emitter or module.

From here, you can adjust all the properties of a module, from simple flags to adjusting the individual keys on a property that uses a distribution.
Distributions
Distributions enable you to adjust values over the lifetime of a particle.

Distributions are a group of data types that provide flexibility by allowing for constant values, random values within a range, values interpolated along a curve, and values driven by parameters.
Read more about Distributions on the Engine Basics: Distributions Documentation page.
Curves
Distributions can be visualized as curves by using the
Curve Editor
, and the curves for a specific module can be accessed by clicking the little graph icon


The sections at the left of the curve editor are the properties that support Distributions in the module.

Within those sections, you will see a number of smaller boxes. The boxes indicated by the " 1 " show or hide the individual data curves. For example: a color will have red, blue, and green curves, the boxes on the left will show or hide them in the curve editor.
The yellow boxes indicated by the " 2 " hide all the curves of the track.
Below are the most commonly used controls in the Curve Editor.
See the Curve Editor documentation for more details.
Type Data
TypeData modules are specialized modules that drastically change the appearance and functionality of a Particle Emitter. Only one TypeData module can be applied to an emitter, and it will appear in the black space between the emitter module and the other modules in the emitter stack.

For more information on the available TypeData modules, see the Particle Reference Documentation: TypeData Modules .
Deleting Emitters and Modules
To delete an emitter or module, right-click it and choose the delete option. For emitters, it will be under the Emitter expanding menu. For modules, it is just there.

You can also just select the emitter or module and press the Delete key.
Quick LOD Setup
Currently, Particle Emitters using the GPU Particles module cannot use LODs.
-
Add a new LOD using the Add LOD buttons. The "highest" LOD is LOD 0; highest in this sense meaning "highest quality."
-
Using the Add LOD Before
![AddLOD_After_button.png]()
-
Using the Add LOD After
![AddLOD_Before_button.png]()
-
-
Make sure you are on the LOD you wish to edit by checking and changing the Current LOD indicator.
![CurrentLOD_button.png]()
Reselect any module you are going to be editing, Cascade will show you a module is selected, but it very well may be selected on a different LOD. Make sure to select the module when you switch between LOD levels.
-
Right-click any module you wish to change in the current LOD and use copy from higher/highest .
-
Adjust values on that module to suit your needs.
-
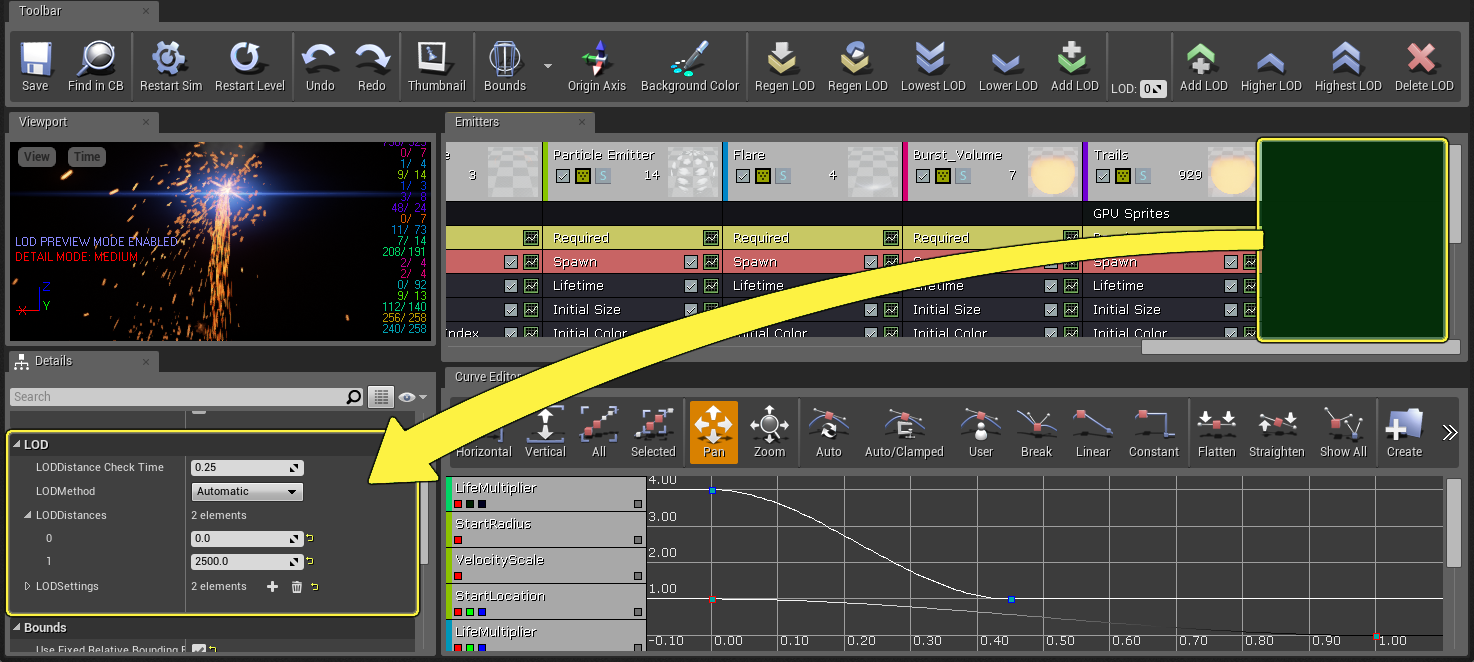
To adjust the distances at which the LODs will show:
![LODDetails.png]()
-
Left-click in the black area at the end of the emitters list.
-
Look in the Details panel to find the settings for the Particle System.
-
In the LOD category, you will be able to change the distance settings for each LOD in the Particle System.
-


See the Particle LOD documentation for more information on using the various LOD features in Cascade.