
Choose your operating system:
Windows
macOS
Linux
In order to understand and use the content on this page, make sure you are familiar with the following topics:
This guide is for Windows 10 64-bit users.
When the objective is to achieve a quality render offline, you do not have to be concerned with the cost of real-time rendering. This provides an opportunity to use settings and commands that greatly increase the quality, precision, and look for features like Ray-Tracing Global Illumination and Ray-Tracing Reflections . You can also get improved Motion Blur , and remove unwanted anti-aliasing artifacts.
The guide will take you through some of the settings you can use to produce a high-quality render outside of real-time concerns. You will learn to use the Movie Render Queue to configure a sample sequence using custom settings and console variables.
For a sense of what a full, high-quality render would look like, watch this video:
This guide follows a process similar to the one used to generate the video above. The primary difference is that you will be using Movie Render Queue instead of the Blueprint Director.
Objective
After going through this guide, you will have a better understanding of how to:
-
Get Sequencer ready for use with Movie Render Queue
-
Output high-quality image sequences
-
Tweak output settings for improved images when rendering images that use ray tracing
-
Apply your own custom settings using console variables
For best results, go through the steps below in sequence.
Step 1. Project Setup
Before starting, you will need to change a system setting, download the sample project that goes with this guide, and enable the Movie Render Pipeline plugin.
System Configuration (Optional but Recommended)
When GPU commands take too long to execute, Windows will assume that the graphics card has crashed, and will reset the driver, which in turn will cause the engine to close.
Increasing the amount of time it takes before Windows detects a GPU Timeout can be done by changing the Timeout Detection and Recovery (TDR) time in the Windows Registry.
You will need admin rights on your computer to make these edits.
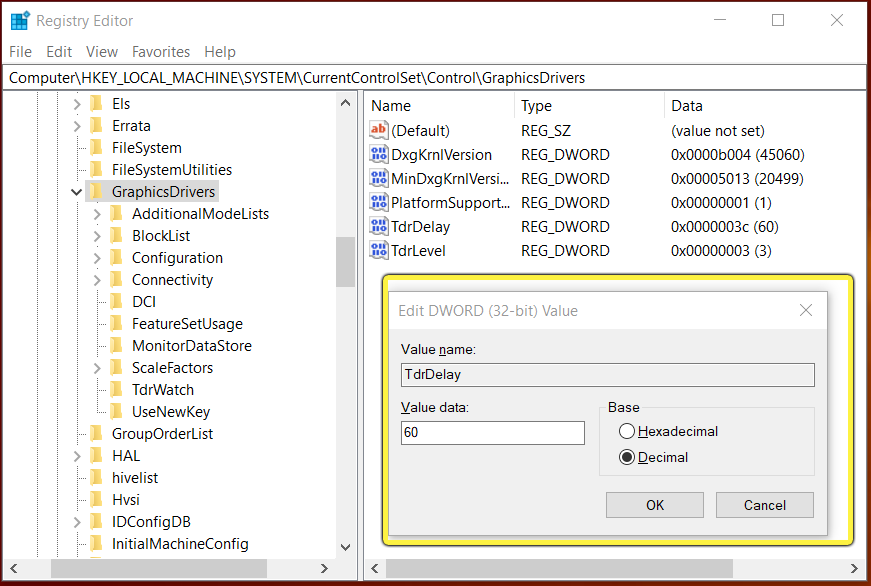
To edit the TDR (before loading the sample project):
-
Using the Windows Start menu search bar , enter regedit to launch the Registry Editor .
-
Navigate to the category Computer\HKEY_LOCAL_MACHINE\SYSTEM\CurrentControlSet\Control\GraphicsDrivers .
-
Select TdrDelay from the list, then right-click and select Modify .
![RegistryEditor.PNG]()
-
This value is measured in seconds. Select Decimal , set a Value data of 60 , then click OK .
Additional information on TDR can be found in the Microsoft Timeout Detection and Recovery (TDR) Registry Keys documentation.
Download the Sample Project
This guide uses ArchViz Interior as the sample project to generate the final image sequence that is rendered out at the end. The project provides a photorealistic scene that uses ray-tracing features, such as shadows, ambient occlusion,and global illumination.
-
Open Epic Games Launcher . Click Unreal Engine from the options on the left, then select the Learn tab on the top.
![The Learn tab on the Unreal Engine website]()
-
Scroll down to the Engine Feature Samples section, then select ArchViz Interior . When the CONTENT DETAIL window opens, click Free to download the project, then click Create Project . For this guide, leave the project name as ArchVizInterior .
-
Browse to select the download location or accept the default.

The project requires a ray tracing-compatible card with DirectX 12 ray-tracing support. For more information on ray tracing system requirements, see Real-Time Ray Tracing .
To learn more about the Archviz Interior project and how it was developed, see Archviz Interior Rendering .
Enable the Movie Render Pipeline Plugin
Before you can use the Movie Render Queue , the Movie Render Pipeline plugin must be enabled.
-
With the ArchViz Project downloaded and open in the engine, go to Edit > Plugins .
-
Select Built-In if not already selected, then search for movie . Movie Render Pipeline should appear.
![Enable the Movie Render Pipeline]()
-
If not enabled already, check the Enabled box to activate the plugin, then close the window.

Step 2: Load a Project Sequence into the Sequencer Editor
In this step, you will work with a cinematic sequence , or cinematic for short, that has been set up in the Archviz Interior project.
If you are not already familiar with the Sequencer and Movie Render Queue features, you might find it helpful to explore the prerequisite documents listed at the top of this page.
-
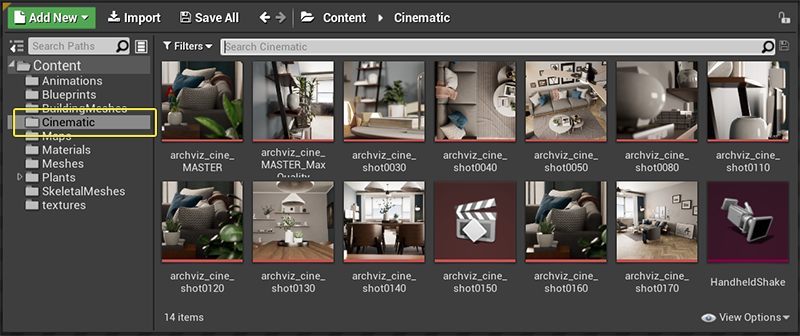
With the Archviz Interior project open, locate the level sequences in Content Browser . For this project, all level sequences are in the Content > Cinematic folder.
![ContentCinematic.png]()
-
Double-click the archviz_cine_MASTER sequence to open it in the Sequencer Editor . It should look similar to the image below.
![SequencerShotsPanel.png]()
This master sequence contains all of the individual shots used in this sample project.
Another way to access a master sequence is from the Level Editor. Click the Cinematics dropdown to select and access any existing master sequence in an open project.

The Sequencer Editor
The Sequence Editor provides an effective way to visually examine established shots, which can help you decide a frame range to render when using the Movie Render Queue.
For this exercise, the frame range will be specified, but later, you will probably want to select your own range of frames for rendering. If you are new to the Sequencer Editor, familiarize yourself with the features described below. Otherwise, go directly to Step 3: Add a Sequence to the Movie Render Queue .
The Shots Track contains information for all cameras used in the cinematic. In this cinematic, each shot contains the camera that will be used when rendering. Click the dropdowns on the left to view any nested tracks.

Clicking the Camera button for any camera in the panel will snap the Level viewport to the perspective of that camera.

Use the playback control panel or the slider to scrub the timeline and view shots and frame ranges. Note that the slider shows the current frame number.

With the Sequencer open, from the Level Editor, select Perspective > Cinematic Viewport .

This opens a playback control panel in the viewport, with additional information on the cinematic.

Step 3: Add a Sequence to the Movie Render Queue
Next, you will add a sequence to the Movie Render Queue. This is the sequence from which you will render a high-quality set of images.
If you are accustomed to the movie rendering workflow in Sequencer , note that the Movie Render Queue has a very different access path and user interface.
-
From the editor menu bar, select Window > Cinematics > Movie Render Queue .
![Cinematics_MovieRenderQueue.png]()
When first opened, the window should be empty, like the image below.
![MovieRenderQueue_empty.png]()
-
Click the + Render button, then click the archviz_cine_MASTER Level Sequence file from the dropdown list to add it to the queue.
![MRQ_SelectSequence.png]()
You can also add a sequence to the queue by dragging the sequence into the queue window from the Content Browser.
![MovieRenderQueue_content.png]()


To remove a sequence , use any of the following:
-
Select the sequence, then click the – button.
![MovieRenderQueue_del.png]()
-
Highlight and press the Del key on your keyboard.
-
Right-click the sequence, then click Delete .

To highlight multiple sequences , hold the Shift key and click to select. You can then delete multiple sequences at the same time.
Step 4: How to Select Configuration Options
Before rendering any sequences loaded in the queue, you will need to configure the settings you want to use. There are a wide variety of settings that can be adjusted, such as output format, filename, and anti-aliasing settings.
The first step is to select the settings you will want to configure.
-
With the window open and the master sequence on the list, click Unsaved Config*.
![MRQ_access_settings.png]()
-
This will open the Setting/Presets window.
![SettingPresetWindow.png]()
-
This window is where you will make configuration changes, but first you need to pick the settings you want to configure. To add a setting, click the + Setting button and a list of options will open.
![MRQ_OutputList.png]()
Options are in three groupings: Settings , Rendering , and Output (described in more detail below).
-
To move one of these options from this list to the Setting/Presets window, click the entry in the dropdown. When you add an item to the window, it is removed from this list.
-
Repeat steps 3 and 4 to add more options to the list.


Each option that you add to the Setting/Presets window has a toggle switch . Use these toggles to enable or disable the option for the rendering process. This will turn the setting off for that render only, without removing the option completely from these presets.

To remove an item from the Setting/Presets window, highlight the item, then press the Del key. It will be removed from the Setting/Presets window, and added back to the list of options.
Output Settings Explained

There are several image types that you can use for output. Each has its own pros and cons, so you'll need to find what fits best with your own project workflow.
One consideration is whether a file type provides an alpha channel —important if you need an image with a transparent background.
Another consideration is whether the format is lossless or lossy. Lossless compression means that all original image data can be recovered when a file is uncompressed, whereas lossy compression does not recover all original data.
|
Output Type |
Alpha Channel |
Lossy or Lossless |
Notes |
|---|---|---|---|
|
.bmp Sequence [8bit] |
No |
Lossless |
Quick to write to disk but large file sizes due to their uncompressed nature. |
|
.jpg Sequence [8bit] |
No |
Lossy |
Smaller file size makes this format good for previews. |
|
.png Sequence [8bit] |
Yes |
Lossless |
Larger file size, but higher quality image. |
|
.exr Sequence [16bit] |
Yes |
Lossless |
A high-dynamic range format developed by Industrial Light and Magic and used in video compositing. |
|
.wav Audio |
N/A |
N/A |
For audio output. |
More information about image types can be found in the Movie Render Queue Export Formats Guide .
Both .png and .exr image formats offer the ability to output the alpha channel with the image, but first you will need to enable this support. From the editor menu bar, select Edit > Project Settings > Engine > Rendering > Postprocessing > Enable alpha channel support in post processing (experimental) > Linear color space only .
Once this change is applied, you will be prompted to restart the engine. To create a transparent background, you will need to hide opaque objects in your scene such as Sky and Atmospheric Fog.
You can select more than one output format, but for this exercise, we will only use one.
Rendering Settings Explained

You have two possible settings for rendering . These specify how the final image will output.
|
Render Type |
Description |
|---|---|
|
Deferred Rendering |
The default option. Toggling Deferred Rendering off disables the final frame render but does not stop the queue from processing the other steps in the configuration settings. It should be enabled while following the steps in this guide. |
|
UI Renderer (Non-Composited) |
Provides flexibility by rendering UMG widgets into a separate .png or .exr file that can be composited with the frame render in a separate compositing application, such as Adobe Premiere or Final Cut Pro—useful when compositing interface-related graphics. |
Additional Settings Explained

With the Settings options , you can specify additional configurable items to use when rendering the final output image.
|
Setting Type |
Description |
|---|---|
|
Anti-aliasing |
Controls the number of samples and sample types used when rendering out the final images. |
|
Burn In |
An overlay with information such as the name of the scene or shot, or the date, time, or frame information. These overlays are referred to as Burn Ins as they are burned into the movie when it is rendered out. Can be replaced with a custom widget if needed. |
|
Camera |
Can be used to control shutter settings, which affects effects like motion blur and exposure. |
|
Console Variables |
Calls console variables to execute specifically when rendering from the Movie Render Queue. |
|
Game Overrides |
Overrides several common game-related settings, such as Game Mode and Cinematic Quality settings. This is useful if the normal mode of the game displays UI elements or loading screens that you do not want to capture. |
|
High Resolution |
Provides a way to use tiled renders to produce larger images than would normally be possible because of maximum texture sizes or memory limits on GPUs. |
You will only use a couple of these in this exercise, but you can (and should) explore all options later on your own.
For more information on these settings, see the Movie Render Queue Image Settings Guide .
Step 5: Select Your Options
Add the following options to the Setting/Presets window:
-
.png Sequence [8bit]
-
Deferred Rendering
-
Anti-Aliasing
-
Console Variables
Another option, Output , will also be on the list under Settings . This is the only option that cannot be deleted.

This is what your Setting/Presets window should look like at this point.
Step 6: Configure the Anti-Aliasing Settings
Anti-aliasing is a way of smoothing lines and removing visual distortions. Spatial sampling and temporal sampling each use different approaches to address anti-aliasing and noise-related issues.
-
Spatial samples work by rendering the same moment in time but with slightly different camera position offsets, and with no amount of time passing between two different spatial samples while accumulating samples from different offset positions.
-
Temporal samples work by slicing the camera shutter open time into specified sub-frames, and using engine motion blur to interpolate between the smaller slices. It is particularly suitable for increasing motion blur quality.
For more on the distinctions between temporal and spatial sampling, and guidelines on when to use one method over the other, see the Anti-Aliasing Movie Render Queue Settings .
The values used in this guide are a combination of both methods.
This guide was developed using an RTX-2080 Ti graphics card. Depending on your own setup, you may need to lower some values here to produce a final frame render, or, if you are using a higher-end card, like a Quadro RTX, you can push the sample count higher.
-
From the Movie Render Queue window, click the Unsaved Config* link to open the settings. (The * indicates that these settings have not yet been saved. You will save the presets once all settings have been entered.)
-
On the Setting/Presets window, click Anti-aliasing to open a settings dialog.
-
Add the following values:
-
Spatial Sample Count: 1
-
Temporal Sample Count: 64
-
Override Anti Aliasing Mode: Enabled
-
Anti Aliasing Method: None
-
Render Warm Up Count: 120
-
Engine Warm Up Count: 120
![MRQ_Configure_AntiAliasing.png]()
-

The values for the Render Warm Up Count and Engine Warm Up Count provide a buffer with enough time when building the temporal history and simulations for them to settle before a frame is captured. For example, this would allow auto exposure or other screen effects to achieve a good starting point before rendering out the first frame.
These settings will render a high-quality image. The goal here is to demonstrate a higher-quality image than what you would get from a real-time render. Because of this, you do not need to be concerned about real-time performance or the time the render takes.
This tradeoff in quality versus performance, however, does mean that the higher the sample count, the longer the render takes for each frame.
Because you can doesn't mean you should!
It is recommended that you test initially using a few frames rather than by setting everything to its highest value before starting. Your aim should be to find settings that work best for your project based on your GPU and setup.
Step 7: Configure the Console Variables
You can call most of the console variables (CVARs) that you will want to execute when rendering from the Movie Render Queue. This is extremely useful for rendering high-quality results that are too expensive for real time.
The CVARs listed in the queue will only execute when the image is rendered from the queue. These settings do not permanently change anything in the level that has already been set up—it works with existing settings and only overrides those settings indicated in the queue for the final image output.
This approach is particularly valuable with ray tracing, where increased sample counts and bounces directly affect performance but greatly improve the quality and precision of the lighting result.
-
Click Console Variables to open a settings dialog.
![MRQ_Configure_ConsoleEmpty.png]()
-
Click the Add (+) button to enter a variable and its value, using the list below:
-
r.MotionBlurQuality: 4
-
r.MotionBlurSeparable: 1
-
r.DepthOfFieldQuality: 4
-
r.BloomQuality: 5
-
r.Tonemapper.Quality: 5
-
r.RayTracing.GlobalIllumination: 1
-
r.RayTracing.GlobalIllumination.MaxBounces: 2
-
r.RayTracing.Reflections.MaxRoughness: 1
-
r.RayTracing.Reflections.MaxBounces: 2
-
r.RayTracing.Reflections.Shadows: 2
The fastest and most accurate way to enter these CVARs is to cut and paste from this document, then press the Tab key to move the cursor to the value field.
-
-
Repeat Step 2 until all have been added.
![MRQ_Configure_ConsoleFull.png]()


As with the anti-aliasing values, the console variables used here focus on quality over performance.
For Ray Tracing Global Illumination (
r.RayTracing.GlobalIllumination
), setting a value of
1
calls the brute force method. This is accurate, and allows multiple bounces of indirect lighting, but is computationally expensive. If you were to change this value to
2
, it would use a temporal history method, which is much faster but only allows a single bounce of indirect light, and produces some
ghosting artifacts
(pixels that trail after a moving image).
The other CVARs in this exercise use scalable values that control the quality level.
If you want to know the details of a console variable, you can use the backtick ( ` ) key to open the console and search for that console command. Use the following format to display the tooltip:
[consolevariablename] ?
For example, if you input
r.RayTracing.GlobalIllumination ?
, the output of the tooltip would look something like:
 HELP for 'r.RayTracing.GlobalIllumination':
-1: Value driven by post process volume (default)
0: ray tracing global illumination off
1: ray tracing global illumination brute force method enabled
2: ray tracing global illumination final gather method enabled
The result of this query will display in the Output Log . To access, go to Window > Developer Tools > Output Log .
All of the variables and values chosen for this guide offer a high-quality starting point for rendering out from the project.
As you work with your own projects, you may want to experiment with different variables and values. For CVARs specific to ray tracing, see On Your Own! at the end of this guide.
Step 8. Configure the Output
The final configuration step in the Setting/Presets window is Output .
You can render the entire sequence, a range of frames, or individual frames. Since the high-quality output is time-consuming, for this exercise you will limit the output to a short segment from the sequence.
-
Click Output on the Setting/Presets window to open a settings dialog.
![MRQ_OutputSettings.png]()
-
Under File Output , enter:
-
Output Directory: The directory where you want to render the image to. By default, it will be saved to your project folder. To browse for a different directory, click the ... to the right.
-
File Name Format: The default name, if unchanged, is the name of the sequence and the frame number(s) rendered.
-
Output Resolution: The target image size. Default is 1920 (width) by 1080 (height). Leave it at the default.
-
Use Custom Frame Rate: Changes the frame rate for the output. Leave disabled.
-
Override Existing Output: Click this box to enable.
-
-
Under Frames , enter:
-
Handle Frame Count: Not used in this exercise. Leave at default value of 0. To learn more about this option, see Sequencer Overview .
-
Output Frame Step: Not used in this exercise. Leave at default value of 1.
-
Use Custom Playback Range: Click to enable.
-
Custom Start Frame: Sets the first frame for the render range. Enter 450 .
-
Custom End Frame: Sets the last frame for the range. Enter 550 . This range of 100 frames is enough to show quality of reflections, motion blur, and global illumination, without spending an enormous amount of time waiting for the render to complete.
-
-
Click Accept to save all settings entered.

Step 9: Save Your Configuration Settings
Saving your settings is an easy way to use them again with this and other projects. Once you have saved a Preset, you can go back later and edit those settings as you find ways to tweak the settings for a project workflow, or copy the Preset to other projects.
You can also edit the settings and save or save-as later as you find ways to tweak the settings for a project workflow.
-
From the Movie Render Queue window, click Unsaved Config* to open the Setting/Preset window.
-
Click Presets , then Save As Preset .
![SavePreset.png]()
-
In the Save Config Preset window, give your preset Asset a name.
A new directory path will be automatically generated in the project Content Browser: Cinematics > MoviePipeline > Presets . Accept the default location, or use the Content navigation panel on the left to choose a different directory.
![SavePresetDefaultDirectory.png]()
-
Click Save .


Because this preset is now an Asset, it can be opened in the Content Browser and copied into another project, independent of a sequence file.
If your saved preset does not show, click the dropdown to open a list of any presets saved for this project.

Step 10: Final Output and Results
In this final exercise step, you will render out your selected range of images from the sample sequence using the values you set up and saved.
You have two options for rendering:
-
Render (Local): Renders the queue in the current Editor instance, and is similar to Play In Editor (PIE). This is the most common workflow and recommended due to the fast iteration time.
-
Render (Remote): The default behavior is to launch a separate process to render the queue, similar to the "Use Separate Process" in the old Render Movie system. Changes to files will need to be saved when launching the separate process. The behavior of this button can be replaced with an in-house solution, such as using a render farm.
For this exercise, you will render locally for easy preview.
-
In the Movie Render Queue window, make sure your sequence is loaded, along with the presets you saved, then click the Render (Local) button.
![RenderLocal.png]()
-
A preview window will launch, then capture and output each frame based on parameters and values in the presets.
![RenderPreview.png]()
The status information displays at the bottom on the left, and sequence information on the right.
This render output was set up for quality, not speed. If it seems like your computer is taking a long time, be patient—it can be a slow process.
-
Once the render is complete, the preview window will close. The captured frames can be found in your saved output directory. To navigate to that folder quickly, click the link in the Movie Render Queue window under the Output column.


Here is a video clip showing the final result of the 100-frame shot render.
You may see some artifacts that still need to be addressed, such as reflections that seem to flicker on the gold cup. Such issues can be optimized or addressed using other techniques in the Material. (For more on these techniques, see ArchViz Interior Rendering .
You will, however, see improved anti-aliasing, shadowing, motion blur, and multi-bounce global illumination and reflections. Use the comparison below to examine the differences in frame 540 with the default settings (left) and the settings specified for the output in this exercise (right).


In this guide, you have learned how to set up and configure the Movie Render Queue to render out high-quality image sequences in multiple formats. You can bring these image sequences into third-party editing and compositing software—like Adobe Premiere, After Effects, Final Cut Pro, Nuke, or Resolve—to generate a video clip or perform further shot editing and color grading.
Troubleshoot the Render
If the render fails, or if the engine freezes up or crashes, there are a few things you can check.
-
Do you have the most current GPU driver for your graphics card?
If you do not, then download it.
-
Does your GPU support ray tracing?
For more information ray-tracing system requirements, see Real-Time Ray Tracing .
If these do not resolve the issue, try the next step.
Disable GPU Timeout
The information below can also help avoid or reduce GPU timeouts, but should be applied only if you run into timeout issues or if the engine crashes when rendering.
The console command
r.D3D12.GPUTimeout
sets whether to enable or disable the GPU from timing out, which can cause the engine to close.
-
0 disables GPU timeout. This should be used with extreme care as it could cause your PC to freeze.
-
1 enables GPU timeout. This is set by default, and causes the editor to close when an operation is taking too long to complete on the GPU.
Because you are going to apply this only to your project, not to your entire system, do these steps after you have downloaded the ArchViz Interior sample project, and while Unreal Engine is closed.
-
With Unreal Engine closed, go to the project Config folder . Example:
D:\ue_local_project_Epic_official_demo\ArchVizInterior\Config -
Open the
ConsoleVariable.inifile in a text editor, and scroll to the bottom of the file, then add these two lines at the end:; disable GPU Timeoutr.D3D12.GPUTimeout=0The first line is a comment to remind you what the CVAR is for. The second line is the actual CVAR with the intended value.
-
Save the file. If prompted to override, click OK . Close your text editor.
-
Launch the engine and load the Archviz project. The GPU timeout CVAR is now in effect.
On Your Own!
You have learned a basic workflow for the Movie Render Queue, but settings you used here are just a starting point. Following are some suggestions for you to try on your own.
Rendering Locally versus Remotely
In Step 10: Final Output and Results , you output your render locally. This method is good for previewing while still providing a high quality result. However, using remote rendering does not run the Unreal Editor render code during the process.
If you have access to a render farm, then you can implement your own handling of the Render (Remote) command to have the job sent to a render farm. At this time Unreal Engine does not include support for any existing third-party render farm software. Unreal Engine 4.25 currently requires writing new implementations using C++. We are looking to add support for writing implementations in Python in the near future.
Temporal Sampling and Denoisers
There are two temporal sampling approaches to address anti-aliasing in the image processing.
When working in the editor in real time, you are using Temporal Anti-Aliasing (TAA) , which is a specific real-time, anti-aliasing technique. It has downsides, such as ghosting or noise artifacts when the camera moves really fast or objects move across finely detailed materials, which make it less suitable for high-quality image output.
Instead, you can use Temporal Sampling . This method is a similar technique to TAA, but uses real render data to anti-alias the image. It resolves the issues with real-time TAA, but processes much more slowly because it uses more samples to generate better results. For example, if it uses 8x samples, it would take eight times as long to process as real-time TAA.
The other aspect is that ray tracing uses different denoisers for many of its features. It uses fewer samples but produces an equivalent result as though it were using more samples by softening the samples with blurring and smoothing. With the Movie Render Queue, since you don't care about real-time performance, you can disable the denoisers and use more samples to produce a more physically accurate result.
With this in mind, you can disable the following denoisers when using Movie Render Queue with ray-tracing features by adding them to your console variables list:
-
r.AmbientOcclusion.Denoiser: 0
-
r.DiffuseIndirect.Denoiser: 0
-
r.RayTracing.SkyLight.Denoiser: 0
-
r.Reflections.Denoiser: 0
-
r.Shadow.Denoiser: 0
-
r.RayTracing.GlobalIllumination.Denoiser: 0
When TAA is disabled by setting the Anti Aliasing Method to None in the Configuration Settings dialog, it is also a good idea to turn off temporal accumulation of samples when the denoisers are disabled in the CVARs. Explore the ones below in your own tests for Movie Render Queue:
-
r.AmbientOcclusion.Denoiser.TemporalAccumulation: 0
-
r.GlobalIllumination.Denoiser.TemporalAccumulation: 0
-
r.Reflections.Denoiser.TemporalAccumulation: 0
-
r.Shadow.Denoiser.TemporalAccumulation: 0
Additional Ray-Tracing Console Commands
Many ray-tracing feature values are optimized for real-time usage. This means that they use fewer sample counts, with a limit on maximum bounces or other settings that trade quality for performance.
Below are more console variables you can use in the Movie Render Queue to trade performance for quality. This is especially useful since this feature executes these commands only when a render is run from the queue, and the settings do not permanently override any of the real-time settings you might have set up in a post process volume in the editor.
Samples Per Pixel: Each ray-tracing feature can use few or many samples to generate the final result. Denoisers use fewer pixels and are often used to do the heavy-lifting. With Movie Render Queue, you have the option of disabling the denoiser and increasing samples per pixel to increase quality.
Some examples would be:
-
r.RayTracing.Reflections.SamplesPerPixel
-
r.RayTracing.Shadow.SamplesPerPixel
-
r.RayTracing.GlobalIllumination.SamplesPerPixel
Maximum Number of Bounces:
Ray-tracing features like Reflections, Global Illumination, and Clear Coat benefit by having reflections or light bounce around multiple times in a scene to produce a more natural, higher quality result. These settings would be extremely expensive for real time rendering.
-
r.RayTracing.GlobalIllumination.MaxBounces
-
r.RayTracing.Reflections.MaxBounces
-
r.RayTracing.Reflections.MaxUnderCoatBounces
Sky Light: In real-time ray tracing, sky light can be an additional expense, given its infinite distance, when calculating each frame for features like Reflections and Global Illumination.
The following CVARs can enable additional skylight options in ray-tracing when working with the Movie Render Queue:
-
r.RayTracing.GlobalIllumination.EvalSkyLight
-
r.RayTracing.SkyLight.EnableTwoSidedGeometry
-
r.RayTracing.Reflections.RayTraceSkyLightContribution
-
r.RayTracing.SkyLight.EnableMaterials
These are a few of the CVARs available. You can explore others by opening the console window and typing
r.RayTracing
to see a list of available variables.