Choose your operating system:
Windows
macOS
Linux
The release of Unreal Engine 4.19 makes some significant changes to how Screen Percentage works. Most of this will directly affect those developing projects for Virtual Reality (VR) which will break backward compatibility in most cases.
Screen Percentage is a resolution scaling technique used to render a lower or higher resolution image than what is actually being presented. Being able to adjust the screen percentage enables your games to maintain a balance between performance and image resolution quality.
Prior to Unreal Engine 4 (UE4) version 4.19, you only had to change the screen percentage, but it has now been split into two types of scaling during the rendering pipeline: Primary and Secondary Spatial Upscaling.
-
Primary Spatial Upscaling is the same screen percentage that has been used previously. It is based on the idea of rendering a frame at a lower resolution and then upscaling it before the user interface (UI) is drawn.
-
Secondary Spatial Upscaling does a second and final spatial upscale pass, independently of the Primary upscaling pass.
Primary Screen Percentage
The Primary Spatial Upscale (or primary screen percentage) works by rendering the screen resolution at a percentage of the screen and then scaling it to fit your current screen resolution. Using a lower screen percentage (or lower resolution) and then upscaling it is called upsampling. Or, when the screen percentage is increased (rendering at a higher resolution), it is scaled down to your current screen's resolution, which is called super sampling . All of this takes place before the user interface (UI) is drawn and can have an impact on performance.
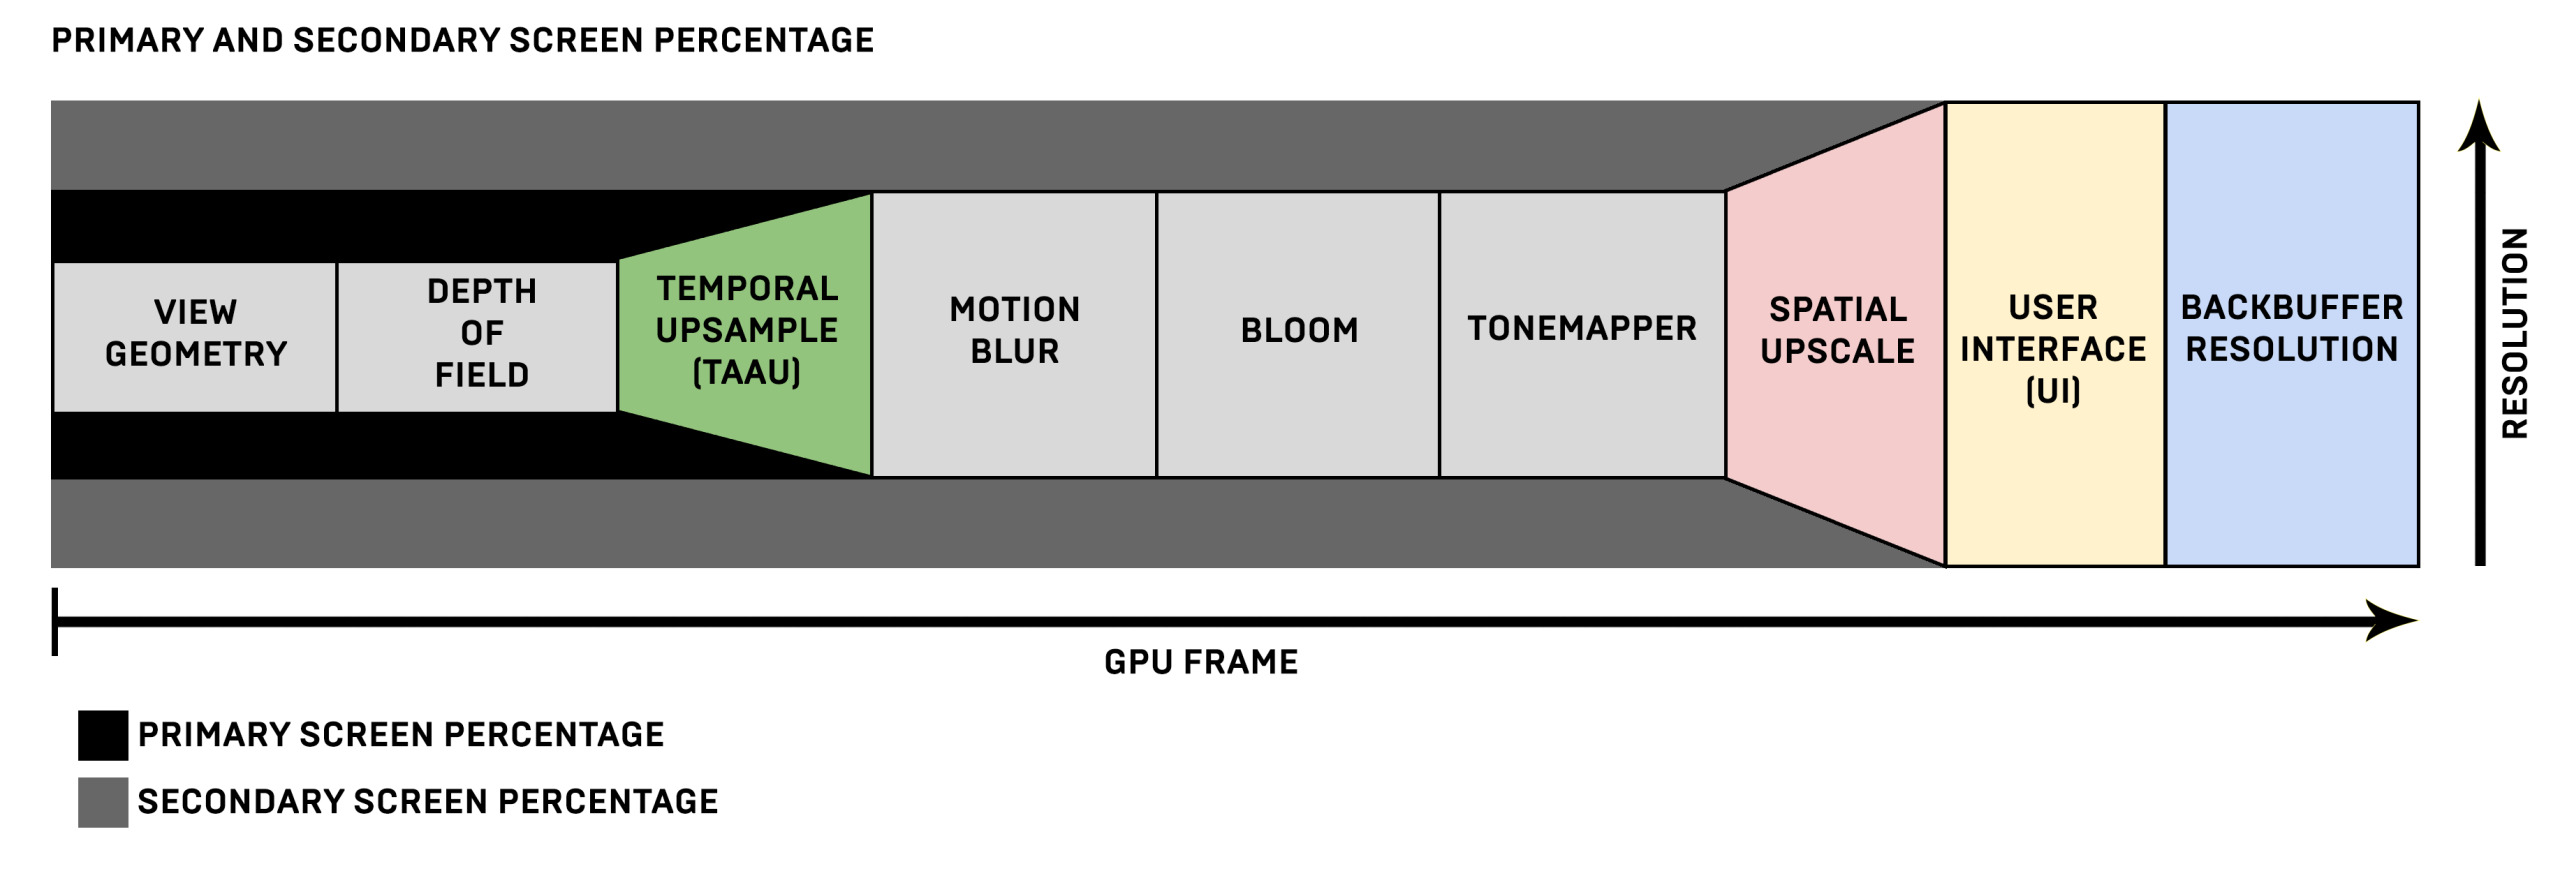
The conceptual idea of how screen percentage works for all the buffer render targets that make up the image rendered on screen for a single GPU frame can be shown as follows:

For each GPU frame, all the render targets use their full resolution throughout the pipeline.

With Spatial Upscaling, anything drawn before the UI is at a lower or higher resolution based on the Screen Percentage used. The screen percentage has been lowered (indicated by the narrower render targets before UI), creating a lower resolution image for the render targets. Spatial Scaling happens before the UI, scaling the image to the screen resolution it will be output to. For example, if the current resolution is set to 1920x1080 and a screen percentage of 83% is used, the render targets will be resized to an approximate resolution of 1600x900 before being upscaled back to 1920x1080.
Spatial Upscale Quality
When upscaling the render targets, the quality of the upscale can be defined by using the following console variable:
r.Upscale.QualityIt controls the quality in which screen percentage and Windowed Fullscreen mode scales the 3D rendering.
|
Upsample Quality Value |
Upsample Result |
|---|---|
|
0 |
Nearest Filtering |
|
1 |
Simple Bilinear |
|
2 |
Directional blur with unsharp mask upsample |
|
3 |
5-tap Catmull-Rom bicubic, approximating Lanczos 2 (default) |
|
4 |
13-tap Lanczos 3 |
|
5 |
36-tap Gaussian-filtered unsharp mask (very expensive, but good for extreme upsampling) |
Alternatively, you can control how the tonemapper pass is handled by using the following console variable:
r.Tonemapper.MergeWithUpscale.ModeThe tonemapper integrates a simple bilinear color space spatial upscale that can be used for performance reasons when enabled using a value of 1 . However, if a Post Process Material is inserted after the tonemapper, the tonemapper won't do the upscale. It will fall back to using the primary spatial upscale as if it were disabled.
Temporal Anti-Aliasing Upsample
In addition to Primary Spatial Upscale, a second upscaling technique is also supported for the primary screen percentage: Temporal Upsample. Instead of performing temporal integration with the Temporal Anti-Aliasing (TAA) and then doing a primary spatial upscale, both happen at the same time in the Temporal Anti-Aliasing Upsample (TAAU) shader. It also allows them to converge to sharper images than what a spatial-only upscale could provide but comes at a higher cost since a larger number of post processes run at a higher resolution. It also allows for primary screen percentage changes to be hidden by dynamic resolution allowing it change more often to match the GPU budget as closely as possible.

TAAU happens earlier in the pipeline causing the passes that follow to render at a higher resolution, leading to higher costs with sharper images.
It should be noted that with the temporal upsample, the ordering of the different post processes has not changed with the addition of TAAU, it simply replaced TAA. The difference now is that any process before TAAU will use a lower resolution before being upsampled to the resolution after the TAAU pass. Before 4.19, the resolution was assumed to be the same everywhere in the post processing.
As the primary screen percentage decreases, the convergence to a clean full-resolution output changes. Therefore, some existing TAA artifacts would be more noticeable. For example, aliasing can become an issue for very thin geometry increasing the probability to miss this geometric detail as the primary screen percentage is lowering.
Enabling Temporal Upsample
To use Temporal Anti-Aliasing Upsample, you'll need to opt into the Project Setting for Temporal Upsampling or more simply by using the following console variable:
r.TemporalAA.Upsampling 1A lower primary screen percentage with spatial upscale can lose significant detail when using lower resolutions. For example, for something like a chain-link fence or the grill on the front of a car, the detail can become harder to see at farther distances when Temporal Anti-Aliasing is used. Enabling TAAU, this can be reduced while still using a lower screen percentage.
In the comparison, the primary screen percentage has been set to 70 and the camera has been moved to a far enough distance to effectively see how TAA affects high-frequency geometry and materials. The temporal upsample enables this detail to be seen, even when lower resolutions are used to maintain this detail as much as possible.
Additional Examples
In this first set of comparisons, a default scene that has only lowered the screen percentage is compared to one using the same screen percentage except it has the temporal upsample enabled. The difference may seem minute for these screenshots but on larger screens the areas with dense geometry or high-frequency textures can regain some lost detail, like with the fencing on the top of the house, or the tree fronds on the trees (close and far ones).
In this one, the default screen percentage of 100 without any temporal upsample can be compared to the lower screen percentage that is using temporal upsample. While some specular highlights and some material detail is lost, the temporal upsample does a really good job of maintaining geometry detail even though the screen percentage has been lowered.
Automatic View Texture Mip Bias
Because screen percentage causes geometry to render at a lower pixel density, temporal upsample requires more texture information from the Surface and Deferred Decal Material Domains to maintain the same output sharpness. For this purpose, the Texture Sample expression can use, by default, Automatic View Mip Bias .
The Texture Sample expression can use Automatic View Mip Bias to toggle whether the texture should be sampled with per-view Mip biasing for sharper output with Temporal Anti-Aliasing.
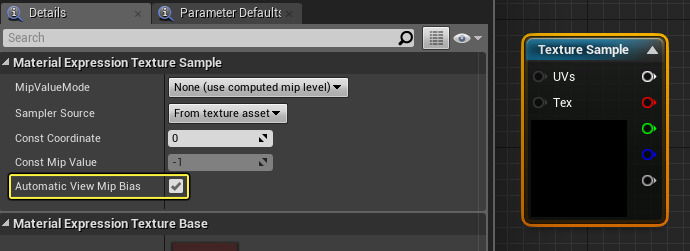
For high-frequency textures (like the example below), the automatic Mip bias can become problematic at lower screen percentages.

In this case, you can compensate with a Mip bias input, or opt-out of the
Automatic View Mip Bias
.

Automatic View Mip Bias only happens when TAAU is enabled. Normal Anti-Aliasing methods (TAA, MSAA, and FXAA) won't be able to use this option.
Shader Performance Permutations for Anti-Aliasing Quality
Like TAA, Temporal Upsample comes with faster shader permutations for Post Process Quality 3 and 4. The shader permutations are traded against some amount of quality to ship a title at 60Hz on consoles. The quality settings are similar to what is already used when setting Post Process Quality. Also, keep in mind that TAAU needs more work than TAA since it runs at a higher resolution along with the post processes that follow the TAAU pass.
The following console variable can be used to adjust the Post Process Quality:
r.PostProcessAAQuality
It is worth noting that post processing after temporal upsampling runs at full resolution, so disabling TAA will make them run at a lower resolution because they will be spatially upscaled at the end making post processing faster as a result. Use the command
profileGPU
to investigate the breakdown of GPU performance per pass, what passes are being used, and where most of the budget is spent.
The table below is an indication of what you could expect when using setting a primary screen percentage value between these ranges:
|
Screen Ranges |
Percentage |
Notes |
|---|---|---|
|
50% |
71% |
This is the fastest approach to performance because it uses a smaller Local Data Storage (LDS) tile in memory. It's ideal for targeting temporal upsampling to 4K on desktop and consoles. |
|
71% |
100% |
Ideal for normal DPI (Dots Per-Inch) rendering on desktop and consoles. |
|
100% |
200% |
This would be ideal to give Dynamic Resolution the theoretical possibility to go over 100%, if it's not limited by the GPU memory for the render targets. |
Material Improvements
There have been some improvements with how Materials use the Scene Texture expression to sample the scene. It has been simplified so that the view size is always equal to that of the render target being used. There is a new output on the Screen Position expression that enables accurate pixel position within the view size. There are some additional things listed to consider when using post process materials after TAAU as well.
View Size and Render Target Size
The view size will now always equal the render target size in a material. Prior to UE4, version 4.19, when sampling a scene texture, the material had to work with the complexity of Scene Texture UV, which is different from the Viewport UV. For example, the Screen Position expression would output both of these values and View Property would also expose a Render Target Size that was not necessarily equal to the View Size. That was due to the renderer actually rendering the viewport in possibly larger render targets.
Click image for full size.
With that complexity removed, the Material will always behave as if the Render Target Size is equal to the View Size. The Screen Position expression will now always return the Viewport UV and the Scene Texture expression takes the Viewport UV as an input.
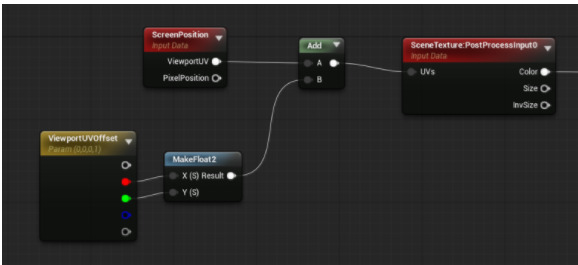
An example setup of how Screen Position returns the ViewportUV size for a Scene Texture expression.
Screen Position High-Precision Pixel Position Output
The Screen Position expression now includes a second input for Pixel Position, which is the Viewport UV multiplied by the size of the pass. The View Property's View Size will always return the resolution before TAAU, even in a post process material running after TAAU .
Pixel Position is used to give the material the most accurate pixel position within the View Size, which is critical for effects such as custom pixel dithering that is synchronized with TAA. The following is an example how the Viewport UV is computed:

Post Process Material after Temporal Upsample
When creating a Post Process Material, you can select the Blendable Location to use. The After Tonemapping and Replacing the Tonemapper locations are after TAAU in the pipeline, meaning that they are actually running at full resolution and are different from the View Size.

The View Property expression's View Size and Render Target Size will still return the resolution of the view before TAAU, even though it's happening after that.To know what the view size and texel UV size are after TAAU, the Scene Texture expression using PostProcessInput0 can use the outputs for Size and InvSize .

Recomputing Viewport UV from Pixel Position can be done like so:
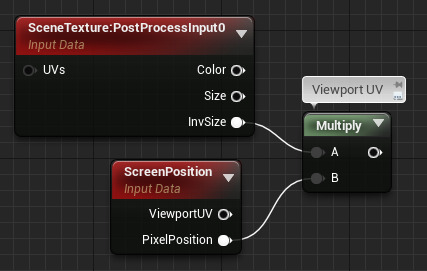
Now that Scene Texture expressions only accept Viewport UV, it's possible to sample in any arbitrary scene textures without possible errors while doing UV viewport conversion.
Secondary Spatial Upscale
In addition to the Primary Spatial Upscale , there is the Secondary Spatial Upscale taking place after the TAAU pass. This can be problematic for high DPI monitors where the GPU may not be able to keep up depending on scene complexity rendered at the higher resolution. For that purpose, the renderer supports using a secondary screen percentage that drive the second and final upscale pass. This pass is independent of the primary screen percentage.
Note that unlike the primary spatial upscale, the secondary spatial upscale is static and cannot be changed dynamically in-game.
You can set the secondary screen percentage by using the following console variable in your configuration (.ini) file:
r.SecondaryScreenPercentage.GameViewportIf we know that the backbuffer resolution is 1080p, we can target a lower resolution of 900p by entering the percentage of that for the secondary screen percentage.
Target Resolution / Currently Set Resolution * 100 = Secondary Screen Percentage
900 / 1080 * 100 = 0.8333 * 100 = 83.33
For example, we use a value of 83.33 when targeting 60hz on Xbox One for Fortnite Battle Royale and set it by using the following:
[XboxOne_60 DeviceProfile]
DeviceType=XboxOne
BaseProfileName=XboxOne
+CVars=r.SecondaryScreenPercentage.GameViewport=83.33
Adding the secondary screen percentage to your config file will override the Editor and any platforms it is set for. Also keep in mind that using the console variable
r.SetRes
controls the backbuffer resolution. It's best to leave that at 1080p or 4k so that the UI always renders at native resolution for the target platform.
DPI Editor Viewport Scaling
When working in the Editor, all viewports are rendered with a secondary screen percentage that is divided by the operating system's (OS) DPI scale. The following equation is used to determine the secondary screen percentage:
SecondaryScreenPercentage = 100 / OS's DPI ScaleThe scene scaling (or quality) is adjusted for high DPI monitors to ensure consistent performance with very large render targets. It also prevents allocation of an intermediary render target that could be too large for your system's GPU, which could crash the Editor and lose your work. By default, the Editor adjusts the scene scaling for high DPI monitors to ensure consistent performance with very high pixel density. However, this can be customized by enabling the setting Disable DPI Based Editor Viewport Scaling in the Editor Preferences. It will enable the secondary screen percentage to default to 100, rendering at full resolution for all of the Editor Viewports.
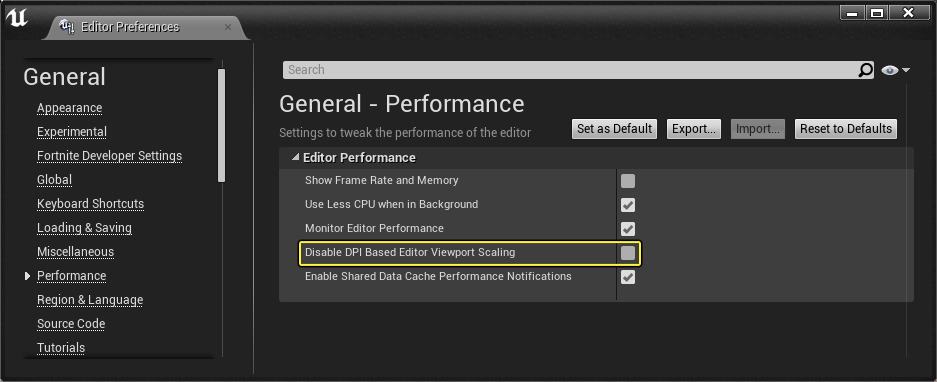
Changing this option only affects the Editor and the game build's secondary screen percentage will equal 100% by default.
VR Pixel Density
Prior to Unreal Engine 4.19, the screen percentage console variable was used to determine the resolution that the Head Mounted Display (HMD) screen should render your VR project at. This often was a "magic" number that had to be adjusted (and remembered) depending on the HMD being used to display the project.
Now, the resolution of the screen is controlled by Pixel Density. It removes the need to use "magic" numbers for screen percentages, making it easier to develope for multiple HMDs. By default, the eye views are going to be rendered at the HMD's recommended resolution to avoid the HMD compositor from doing any upscaling that normally is a cause of blurriness. You'll use the following console variable to give a higher or lower pixel density from the recommended resolution of the screen:
vr.PixelDensity

In this diagram, you can see that the ideal resolution of the HMD is used and VR Pixel Density enables you to adjust an arbitrary number to raise or lower the ideal HMD resolution as needed. This change allows independent control of the primary screen percentage to temporal upscale to the view resolution that is handed off to the HMD compositor in this pipeline.
For more information, read about VR Pixel Density here.


