Choose your operating system:
Windows
macOS
Linux
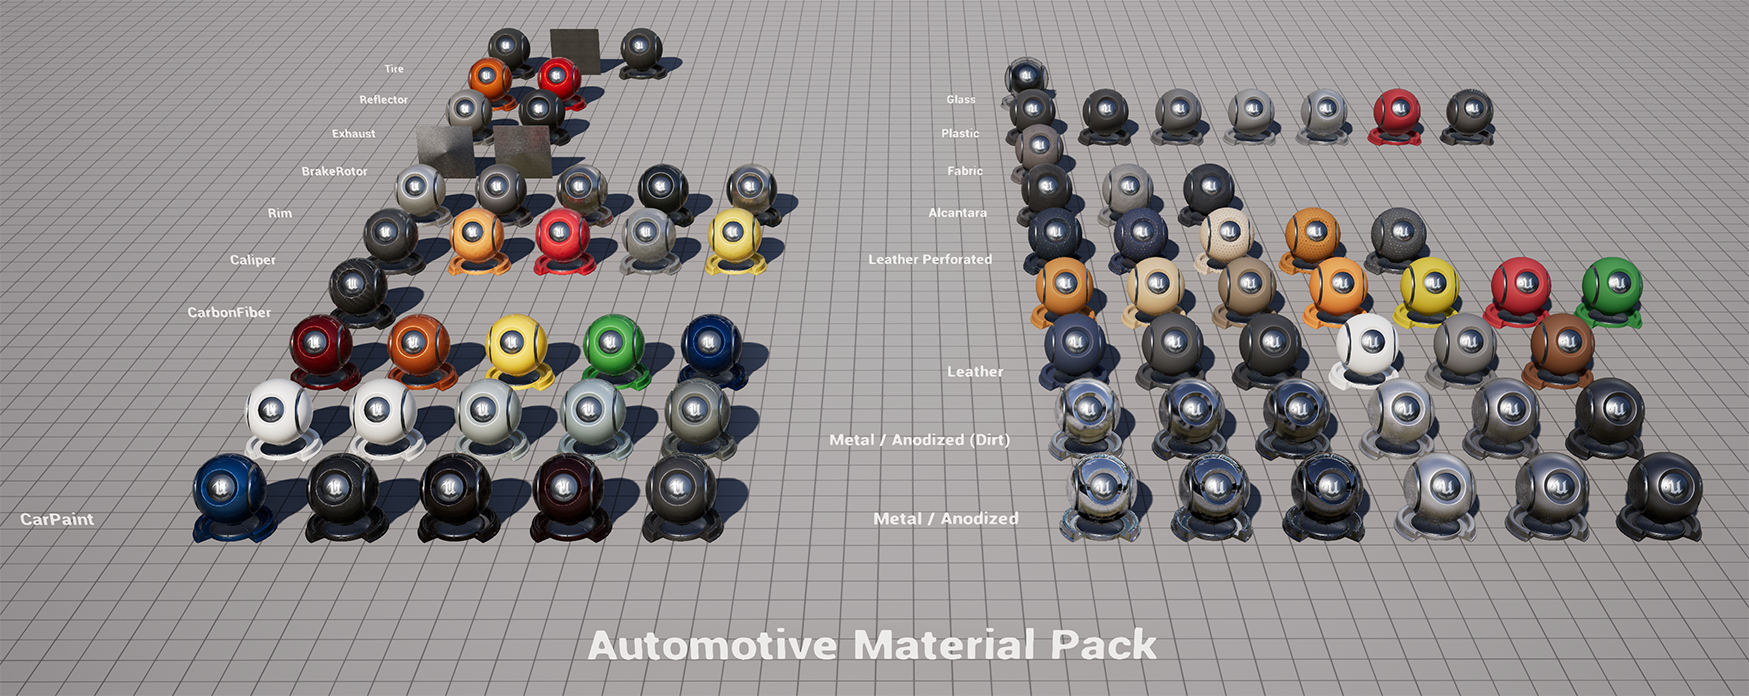
The Automotive Materials Pack, available on the Unreal Engine Marketplace, is a collection of automotive-themed physically based Materials ready for use in Unreal Engine 4 (UE4). The pack is designed to be an out-of-the-box solution for professional rendering of automotive finishes, featuring:
-
164 Materials Instances, driven by 10 Master Materials. All materials utilize PBR best practices.
-
High-quality 4K Textures, using the Quixel Megascans library of hand scanned 2D and 3D assets.
-
Support for both Object UVs and Triplanar mapping to work even when models have imperfect UV mapping.
-
Full support for all lighting methods, including ray tracing.
Overview
The Automotive Materials Pack is a state-of-the-art collection of Master Materials and example content created to provide 3D visualization professionals with a high-quality solution for creating exceptional automotive Materials.These Materials follow Physically-based Rendering (PBR) best practices and are designed for ease of use. 4K textures from the Quixel Megascans library are used to achieve stunning visual fidelity. Additionally, all materials are set up to use Triplanar Mapping to minimize texture stretching and seams. Finally, every Material is optimized for a variety of lighting solutions and is ray tracing ready.

The vehicles meshes used in the examples below are not included in the Automotive Materials Pack.
Master Materials and Material Instances
In Unreal Engine 4 (UE4), an instance of a Material can be used to change the look and properties of that Material without requiring an expensive recompile. These Material Instances are created from a Master Material, which contains several properties that have been designated as parameters. The Material Instance can see these parameters and you can use them to create multiple variations of a Master Material quickly.
Creating and using Master Materials in UE4 is an advanced workflow. For more information on Materials and their use, read the following documentation:
Inside of the Automotive Material Pack you will find the following Materials types:
Physically Based Rendering
All Master Materials in the Automotive Material Pack have been designed from scratch to achieve the most realistic and accurate results possible with Unreal's physically based rendering system . This means, for example:
-
In the real world, almost all surfaces behave either as a metal or as a non-metal (dielectric). Similarly, all Materials in the pack are either fully metallic or fully non-metallic. This is determined by a node in the Master Material, exposed to Material Instances as a single IsMetallic checkbox. This ensures that all surfaces reflect a physically accurate proportion of specular and diffuse light.
-
The Specular input is not used in any Materials. This avoids introducing any reflections that do not accurately match the behavior of light in the real world. The Specular value is typically left at the default value of 0.5.
-
The Roughness map controls the glossiness of the surface. Smoother surfaces, where the roughness map is closer to black, have sharper, more focused reflections. Rougher surfaces, where the roughness map is closer to white, have blurrier, less distinct reflections.
For a more in-depth explanation of what physically based rendering is and how to use it in UE4, see the Physically-Based Materials .
Triplanar Mapping
The pack includes a Material Function that performs efficient triplanar mapping. Triplanar mapping is a way of applying texture maps to an object that does not use UV mappings to map the object's 3D surfaces to 2D texture space. Instead, triplanar mapping applies the texture map to three orthogonal planes, then projects these three planes to the surface of the object.
This is the default behavior for all Materials in the pack. This means that you can use all Materials successfully on objects that do not have UVs, as is often the case for parts that come from CAD applications.
This triplanar mapping function has several useful features:
-
Uses local space positions to avoid textures appearing to slide across the surfaces of the objects.
-
Materials keep the same texel ratio when objects are scaled.
The image below illustrates how triplanar mapping uses planar maps projected along the X (red), Y (green), and Z (blue) axis to create a complete procedural UV projection with minimal seams or stretching:

However, because the calculations use local space positions, the triplanar UVs are dependent on the original geometry and rotation of the object's geometry relative to its pivot. For best results applying textures, author your objects so that flat surfaces lie close to the XY, XZ, and YZ planes of the objects' local space. If your Static Meshes do have UVs, and you want to use these UVs for texture mapping, enable the Use Object UVs option on your Material Instance.
Ray Tracing Support
All Master Materials are set up to optimize performance for ray tracing by using the RayTracingQualitySwitchReplace node to execute a different branch of the Material graph on the second bounce.

For the second bounce, all surface normals are considered flat, and the surface roughness is considered either fully rough or fully reflective.
Common Exposed Parameters
|
Parameter Category |
Settings |
|---|---|
|
Base Color |
Contains options for Color (RGBA), Color Maps, and Tinting options. |
|
Metalness |
Contains options for Metallic settings. Turning on IsMetallic applies a uniform texture to control the Metallic attribute of the material. Different Metallic Maps can be applied to differentiate between metallic and non-metallic surfaces on the same object. |
|
Roughness |
Contains settings for adjusting the Roughness of your Material. A Roughness Map can be applied to create specific wear patterns. The amount of Roughness can be randomized using Min and Max values. Roughness can be used to determine the glossiness of the Material. |
|
Normal |
Applies the chosen Normal Map to the material. Normal Intensity uses a value to control the effect. |
|
Imperfections |
Allows for the adding of Stains, Fingerprints, and Dust to a Material. A mask texture can be used to apply specific patterns. |
|
UVs |
Allows for the use of an object's own UV map. Triplanar Mapping is enabled by default. |
If you are unsure what a particular parameter is or how it is used, hovering your mouse over it will display additional information.

Master Materials
Inside the Masters folder, you will find several types of Master Materials.
Additive
Useful for creating LCD screens, clocks, HUDs, and other forms of display, the Additive Material features an Intensity setting that makes the display brighter when the camera is facing it and less intense when viewed from the side.
|
Parameter Category |
Settings |
|---|---|
|
Base Color |
Controls what is displayed on the screen. Facing Intensity affects the brightness when viewing near the center. Edge Intensity affects the brightness when viewing closer to the edges. |
In the example below, the Base Color texture map has been changed to represent a GPS unit:

Brake Rotor
Created to use radial UV mapping, the Brake Rotor Material contains settings for Imperfections such as cracks and stains, as well as the ability to use a Metallic map to add rust. Perfect for creating any Material that requires a radial finish.
|
Parameter Category |
Settings |
|---|---|
|
Base Color |
Applies a Color Map or color tint to the Material. |
|
Metalness |
Controls whether the Material is meant to be metallic. |
|
Roughness |
Used to apply wear patterns. Also determines the glossiness of the Material. |
|
Cracks |
Applies crack patterns to the Material. Can control both scale and intensity. |
|
Imperfections |
Supports stain imperfections. |
Below, you can see a brake rotor that uses the Material. Metal wear lines have been added, along with stains:

Car Paint
Designed for car exteriors and brake calipers, the Car Paint Material features support for Flakes, Orange Peel, Chameleon effects, Clear Coat, and Imperfections.
|
Parameter Category |
Settings |
|---|---|
|
Basic |
Applies a Color Map or color tint to the Material. Contains the setting for the Chameleon effect, which allows for a second color to be chosen. The first color will fade into the second color based on viewing angle. |
|
Clear Coat |
Applies a clear coat to the Material that affects glossiness. The intensity of this effect can be adjusted. |
|
Flakes |
Applies a flake effect to the paint's undercoat. |
|
Imperfections |
Supports fingerprint and dust imperfections. Can control both scale and intensity. |
|
Orange Peel |
Applies the dimple effect that is often seen in car paint. |
The Chameleon effect blends the primary paint color with a secondary color based on the viewing angle:


You can see an example of the Clear Coat feature below:


The Flake parameter simulates metal flakes suspended in the paint undercoat and is used to achieve a variety of different finishes:


The Orange Peel parameter represents the imperfections that can happen during the automitve paint process:


Decal
The Decal Material is projected onto a surface and will adjust to follow its contours, manking it perfect for adding logos, stripes, and other decals to the vehicle.
|
Parameter Category |
Settings |
|---|---|
|
Base Color |
Color Map controls the decal that is displayed. Tint options control the final color of the decal. |
Below you can see the Unreal Engine logo applied as a decal to the hood of the car:

Emissive
Useful for headlights, tail lights, and LED lights, the Emissive Material features color tint and intensity settings that vary depending on the viewing angle.
|
Parameter Category |
Settings |
|---|---|
|
Light |
Color Tint determines the final color of the Material. Facing Intensity affects the brightness when viewing near the center. Edge Intensity affects the brightness when viewing closer to the edges. |
Here you can see the Emissive Material applied to the brake light:

Glass
The Glass Material can be used to create windows, transparent light covers, and windshields. Windshields require a bit of setup and are made of 2 meshes: one interior and one exterior:
[

|
Number |
Description |
|---|---|
|
1 |
Interior Static Mesh using interior glass Material. Translucency Sort Priority property is set to 0. |
|
2 |
Exterior Static Mesh using exterior glass Material. Translucency Sort Priority property is set to 1. |
The interior mesh uses the interior windshield Material and hasTranslucency Sort Priority set to 0. While the exterior mesh uses the exterior windshield Material and has Translucency Sort Priority set to 1.
You can see the technique used below. The exterior windshield mesh is reflecting the environment.

|
Parameter Category |
Settings |
|---|---|
|
Glass |
Contains options for glass color, roughness, and darkening towards the edges. |
|
Transparency |
Contains options to apply a sun cover around the edge of the windshield. |
|
Imperfections |
Supports dust, fingerprints or stain imperfections. |
Masked
The Masked Material is used to create perforation or grill patterns for plastics and metals. This is great for components such as speaker covers, and supports clear coat and imperfections in the form of dust and fingerprints.
|
Parameter Category |
Settings |
|---|---|
|
Base Color |
Applies a Color Map or color tint to the Material. The color map contains your masked texture. |
|
Metalness |
Controls whether the Material is meant to be metallic. |
|
Roughness |
Applies roughness. Can be used to control the glossiness of the Material. |
|
Clear Coat |
Applies a shiny clear coat. |
|
Imperfections |
Supports dust and fingerprint imperfections. |

Opaque
A flexible Master Material, the Opaque Material is used to make anything that is opaque or has a coating such as metal, carbon fiber, leather, plastic, wood, rubber, or reflectors. It features clear coat and imperfection options, along with a range of color and roughness options.
|
Parameter Category |
Settings |
|---|---|
|
Base Color |
Applies a Color Map or color tint to the Material. |
|
Metalness |
Controls whether the Material is meant to be metallic. |
|
Roughness |
Applies roughness. Can be used to control the glossiness of the Material. |
|
Clear Coat |
Applies a shiny clear coat. |
|
Imperfections |
Supports dust and fingerprint imperfections. |
Below is an example of the flexibility of this Master Material. The leather of the seats, nylon straps of the seatbelts, and plastic of the interior paneling are all created using the Opaque Master Material:

Textile
Designed to create carpet, headliners, suede, perforated leather or anything with textile properties, the Textile Material features perforation, softness, and imperfection settings.
|
Parameter Category |
Settings |
|---|---|
|
Base Color |
Applies a Color Map or color tint to the Material. |
|
Roughness |
Applies roughness. Can be used to control the glossiness of the Material. |
|
Softness |
Applies a softness effect to the Material in the form of core darkness, brightness at the edges, and subsurface color. |
|
Wear |
Applies a wear pattern to the Material. |
|
Perforation |
Applies a mask that simulates perforation. A color tint can be added to the holes. Depth and size can also be controlled. |
In the example below, we can see the Textile Master Material used to create a brown suede:

Tint
Used in the setup of taillights, the Tint Material is used to modulate and tint the vehicle lights. Similar to the windshield, taillights can be setup using 3 meshes:

|
Number |
Description |
|---|---|
|
1 |
Glass Material |
|
2 |
Tint Material |
|
3 |
Emissive Material |
|
Parameter Category |
Settings |
|---|---|
|
Base Color |
Controls the tint color. Can have an additional edge tint that blends to when the viewing angle changes. |