Choose your operating system:
Windows
macOS
Linux
In the following document, we will cover what you need to do in order to get your UE4 mobile project ready to be released on the Google Play store.
Please keep in mind that this document will only focus on items that are relevant to getting UE4 based projects on the Google Play store. If you are looking for more general information about the Google Play store, please consult the official Google Developer Console Help .
Generating Key
Before you can submit or even upload your project to the Google Play store, you will need to generate a Keystore. A keystore is a unique key that will ensure that your project will be linked to your Google Play account and no one else's. In the following section we will go over how you generate this key as well as where it needs to be placed to ensure that your project will use it when being packaged.
-
Open a Command Line prompt window and navigate to the directory where Android Studio installed the
keytool.exefile. This will be the\jre\binfolder if you are using default installation directories. -
With the Command Line prompt window now open, input the following Command Line argument and then press the Enter key.
keytool -genkey -v -keystore ExampleKey.keystore -alias MyKey -keyalg RSA -keysize 2048 -validity 10000Instead of typing this in by hand you can also copy the above text and then click with the right mouse button to paste what you copied into the Command Line argument window
-
Now enter a password for your Key Store. Make sure that this is something you will remember as you will have to enter it one more time after this. For this example, we will be using 123password for our Keystore password.
-
Next you will need to enter a First and Last name into the Command Line window. For this example, input the name TestGuy and then press the Enter key.
-
Now enter the name of your Organizational Unit. For this example, input the name MyCompany and then press the Enter key to continue.
-
Then enter the name of your organization. For this example, input MyGame and then press the Enter key to continue.
-
Now enter the name of the City or Locality you are in. For this example, input MyCity and then press the Enter key to continue.
-
Then enter the name of the State or Province that city is located. For this example, input NC and then press the Enter key to continue.
-
Now input the country code where the city and state are located. For this example, input 00 and then press the Enter key to continue.
-
You will now be asked to verify that all the information that you have entered is correct. Type Yes or Y into the Command Line window and then press the Enter key to continue.
-
Because we are only storing a single key into this Keystore, all you need to do next is press the Enter key when asked to enter a password.
-
The last line in the Command Line window should now say, [Storing ExampleKey.keystore] if everything has been setup correctly.
Once the key has been created it will be placed in the
\jre\bin
folder containing
keytool.exe
.
Placing the Key
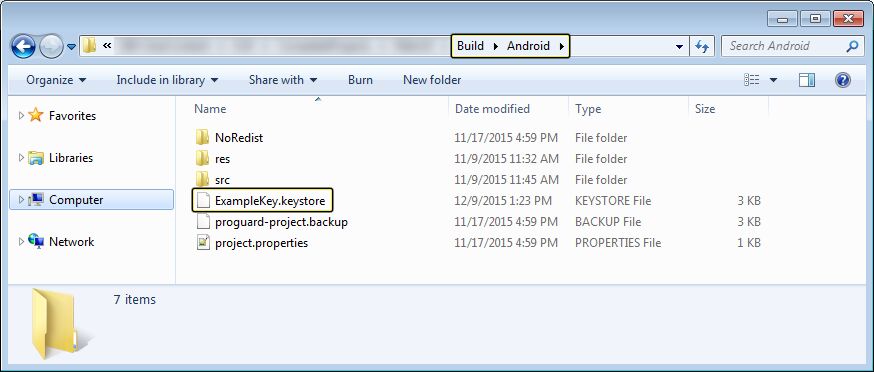
Once you have the key generated, it will need to be placed in the following location inside of your UE4 project.
(Your Game Folder)\Build\AndroidApplying the Key
After the key has been placed in your (Your Game Folder)\Build\Android folder, you will need to apply it to your UE4 project by doing the following.
-
Inside of UE4, go to Edit > ProjectSettings > Platforms > Android .
-
Under the APK Packing section, make sure to set the Store Version to the number one if this is the first time you are uploading the project to the store.
![APKPackaging_Store_Number.png]()
Each time you re-cook your project to re upload to the store, you will need to increase the Store Version number. If you do not do this, your new APK file will fail to be uploaded over the old one.
-
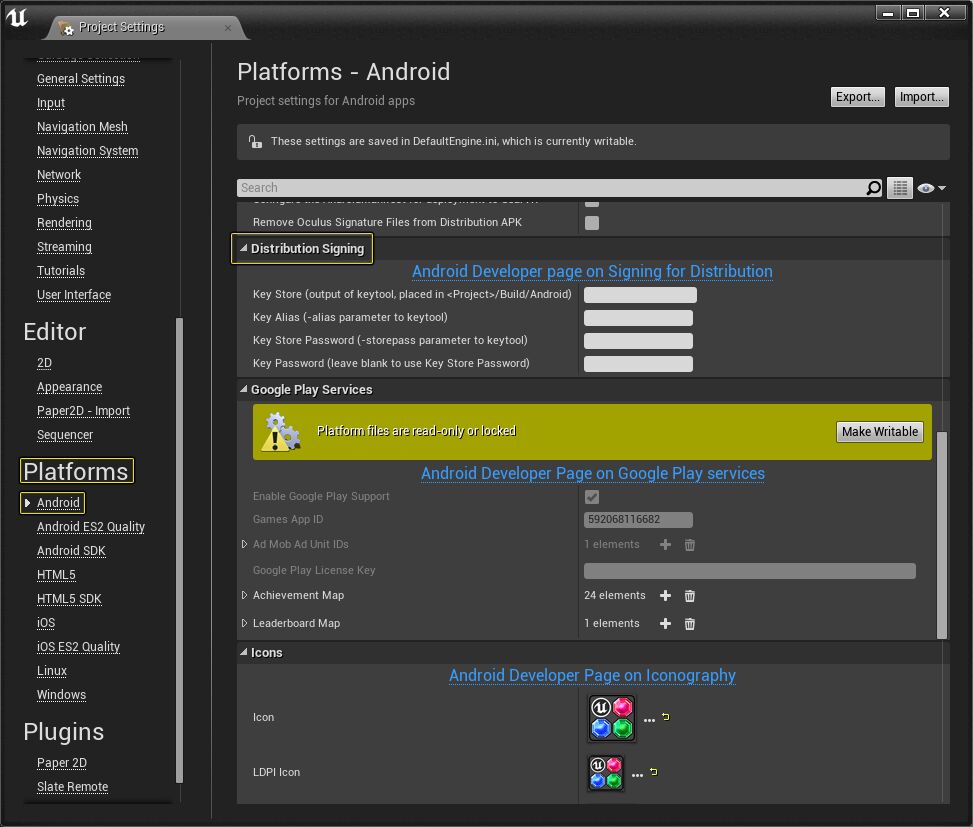
Next under Distribution Signing , make sure the following fields are filled in with the Keystore information that was used above to generate the Keystore.
![UE4_Keystore_Input.png]()
Property Name
Description
Name used in example
Key Store
This is the name given to the .Keystore file.
ExampleKey.keystore
Key Alias
This is the name of the .Keystore file. - ExampleKey.keystore
MyKey
Key Store Password
The password that was used to secure the key
123password
-
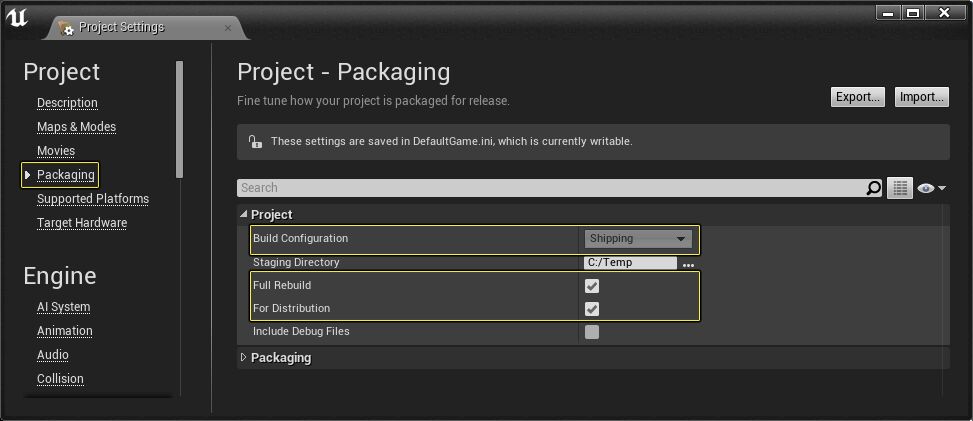
Once all of this has been filled, go to the Packaging section of your project and under the Project section make sure that both Full Rebuild and For Distribution are enabled.
Deploying to the Google Play Store
Now all that is left is to upload your project to the Google Play store. For a full breakdown of how to upload your project to the Google Play store, please check out the official Google Developer Console help page.


