Choose your operating system:
Windows
macOS
Linux
When you cook your project, Unreal Engine 4 (UE4) can divide up your game's assets into separate chunks that can be independently distributed, such as with DLC and patches. A chunk is a numbered collection of assets recognized by the engine's asset management system, and when a project cooks, each chunk generates a .pak file which you can then distribute through a content delivery system.
You can designate assets as belonging to specific chunks using the Asset Manager or using Primary Asset Labels . Both use a system of rules and metadata to construct chunks, which are then read during the cooking process. The sections below outline how to use these tools and how to interact with chunks in the editor.
Understanding Primary Asset Rules
A primary asset is an asset that can be manipulated directly by the asset manager, while secondary assets are assets that are loaded automatically when a primary asset references them. Primary assets are the type referenced in the cooking and chunking process.
Primary asset rules
are used to determine which primary assets have management authority over which secondary assets, as well as how to handle assets during the cooking process. These rules are defined by the
FPrimaryAssetRules
structure, and are used by the Asset Manager to determine how to handle Assets at cook time. For detailed information on the options available within
FPrimaryAssetRules
, check its
API Page
. You may also want to look up the Cooking Rules defined on the
EPrimaryAssetCookRule
API Page
.
One of the functions of primary asset rules is organizing chunks. By defining a rule and giving it a Chunk ID , all primary assets that fall under that rule are divided into a chunk with that ID number. Any secondary assets that those primary assets have authority over will be chunked alongside it.
Chunk Organization
Any asset not given a specific Chunk ID or given a negative Chunk ID will be packaged as part of chunk 0, which is the "default" chunk that is distributed with your game's base data. Any chunks with a higher ID value than 0 are separated into different .pak files at cook time. You can organize chunks in any way that suits your project. For example, the ShooterGame sample project has three chunks:
-
Chunk 1 for the "Sanctuary" map
-
Chunk 2 for the "Highrise" map
-
Chunk 0 for all other data
ShooterGame recognizes maps as primary assets, therefore any secondary asset used by a map, like a texture or a mesh, will use the chunk ID of the map that owns it, provided that the map has authority over it.
As another example, if you are creating a MOBA or any other "hero-based" game, you would divide different heroes' base assets into specific chunks, and then you might divide any additional costumes or skins into their own chunks as well so that they can be distributed separately.
Defining Chunks In Your Project
UE4 provides several methods for manipulating primary asset rules and defining chunks. You can define primary asset rules in the Asset Manager, edit them directly in your
*Game.ini
file, or you can use Primary Asset Labels in the Content Browser.
Defining Chunks With the Asset Manager
You can manually edit primary asset rules for your project by opening your Project Settings and navigating to Game > Asset Manager .
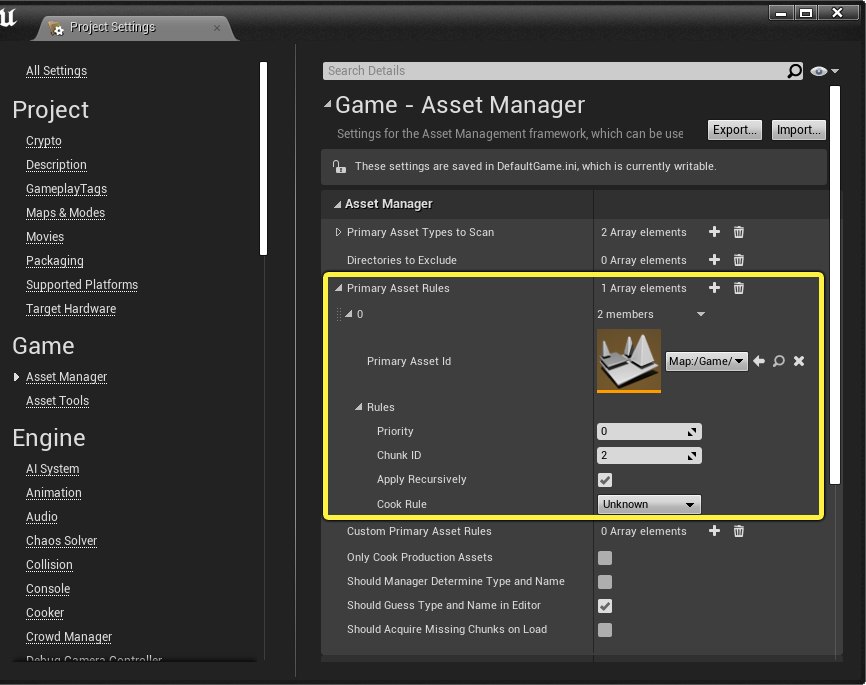
Editing Primary Asset Rules in the Asset Manager's settings. Click image to enlarge.
Primary Asset Types to Scan designates the asset types that you want the asset manager to recognize as primary assets. The primary asset rules list lets you designate the Priority and Chunk ID of individual primary assets.
Defining Chunks With Rules Overrides in Configs
Rules Overrides
in configs can be used to establish the priority and Chunk settings for a specific Primary Asset. To build our three-Chunk setup for ShooterGame using Rules Overrides instead of Primary Asset Labels, the following section should be created in
DefaultGame.ini
:
[/Script/Engine.AssetManagerSettings]
+PrimaryAssetRules=(PrimaryAssetId="Map:/Game/Maps/Sanctuary",Rules=(Priority=-1,ChunkId=1,CookRule=Unknown))
+PrimaryAssetRules=(PrimaryAssetId="Map:/Game/Maps/Highrise",Rules=(Prority=-1,ChunkId=2,CookRule=Unknown))
+PrimaryAssetRules=(PrimaryAssetId="Map:/Game/Maps/ShooterEntry",Rules=(Priority=-1,ChunkId=0,CookRule=AlwaysCook))
Cooking and chunking rules in the DefaultGame.ini file. We have added an explicit reference to the startup map, "ShooterEntry", in this example.
This sets our main game maps to be in specific chunks, which will cause all of their references to be added to those chunks as well. The final entry, governing Chunk 0, ensures that anything referenced by the map that loads when the game first starts up will be in Chunk 0, which is also the default Chunk. The priority value of -1 sets priority to the default value, which is 1.
Defining Chunks With Primary Asset Labels
Primary Asset Labels are a type of data asset that designates other assets for cooking and chunking. These can be much quicker compared with creating rules for individual assets.

An example of a Primary Asset Label in the Content Browser.
To create a Primary Asset Label, right-click inside the content browser , then click Miscellaneous > Data Asset .

In the Pick Data Asset Class menu, select PrimaryAssetLabel and click Select .
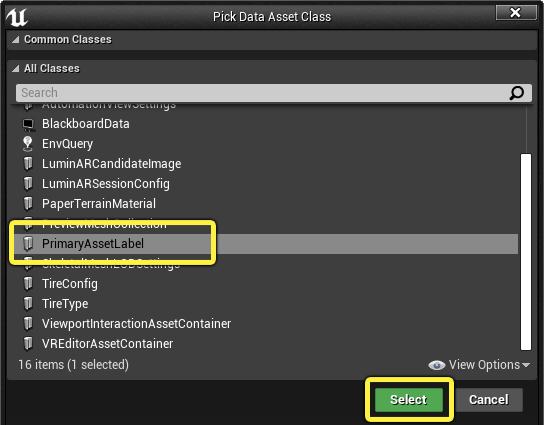
The Pick Data Asset Class menu pops up when you create a new Data Asset. Click image to enlarge.
Your new primary asset label will be created in the Content Browser . If you double-click it, you can edit its data.
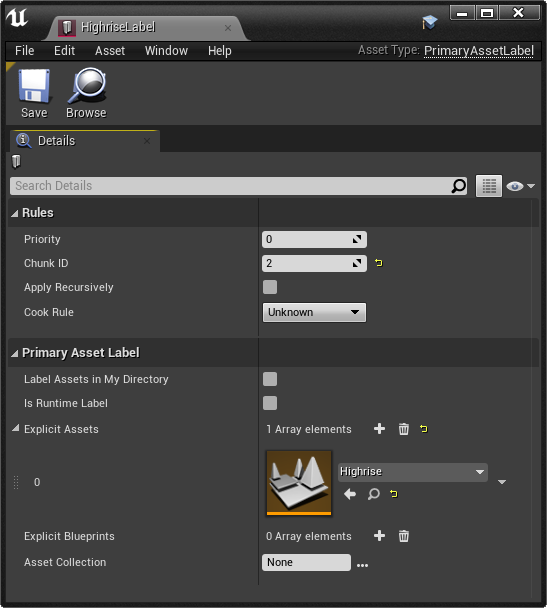
The settings for the HighriseLabel Primary Asset Label in ShooterGame. Click image to enlarge.
Primary Asset Labels include both a Chunk ID and Priority , just like Primary Asset Rules in the Asset Manager. However, you can apply those rules to multiple assets at a time in a Primary Asset Label. The Explicit Assets field lets you designate a list of specific assets, or you can designate an Asset Collection as belonging to this label. Alternatively, you can check Label Assets in My Directory , and the primary asset label will then affect all assets in the same folder in the content browser.
Packaging Chunks
Once you have defined your Chunk IDs, packaging your project will automatically create .pak files for each chunk. You can locate them in your project's
Saved/StagedBuilds/[PlatformName]/[ProjectName]/Content/Paks
folder.

Packaged .pak files are located in the StagedBuilds folder, under a subfolder for your platform and project, inside the Content/Paks directory.
The .pak files are generated based on the platform that you are packaging for, so they are not interchangeable between platforms. Once you have generated them, you can use them in your delivery system of choice.
Analyzing Asset-to-Chunk Assignments
UE4 provides several built-in tools to audit your Chunks. Using these tools, you can see which Assets are assigned to which Chunks, what source is giving them those assignments, and information about the size of chunked assets.
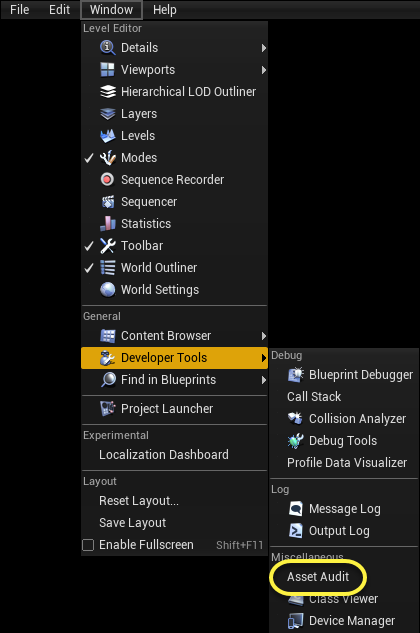
Asset Audit Window
To open the Asset Audit Window , open the Windows dropdown menu, expand Developer Tools , and choose Asset Audit .
Click image to enlarge.
The Asset Audit Window will display, but it will be blank.

The Asset Audit Window, as it appears when it is initially opened. Click image to enlarge.
Clicking the Add Chunks button will fill in the window with a summary of all Chunks that exist in the current project.

In ShooterGame, Assets are distributed between three Chunks. Click image to enlarge.
To inspect an individual Chunk, right-click it and choose either the Size Map or the Reference Viewer .

Click image to enlarge.
Size Map
The Size Map provides a visual representation of the type and size of each Asset contained within a Chunk. Assets are displayed as colored boxes with their icon or thumbnail in the box, and are scaled to represent the size of the Asset. Boxes nested within other boxes represent a parent-child reference relationship. For example, a texture that is referenced by a Material would appear inside the Material's box, because loading the Material implicitly involves loading the texture.
In ShooterGame, Chunk 0 contains the Assets needed to display the game's menu and get into a match, while Chunks 1 and 2 are used for the game's playable Maps. As a result, Chunk 0 is smaller than the other Chunks, and also has a wider variety of Asset types. Here we can see the Asset breakdown and total shipping disk size for Chunks 0 and 1:

Chunk 0 of ShooterGame contains many independent Assets, but is relatively small. Click image to enlarge.

Chunk 1 (pictured) and Chunk 2 contain the individual Maps in which the game takes place, so they feature a single, large group of connected Assets. Click image to enlarge.
The Size Map also supports visualization of the memory usage (in the Editor) of the Assets it contains. In-Editor memory size can be substantially different from a shipped product's disk space usage for the same group of Assets.

Chunk 0 displayed in Memory Size mode. This mode scales box sizes based on the memory usage of the Assets in the Editor. Click image to enlarge.
Individual Assets can be examined or edited by right-clicking the Asset's box. You can use the mouse wheel to zoom in or out, or double-click an Asset to expand it so that it fills the window.

The context menu for the "loading screen" texture Asset. Click image to enlarge.
Reference Viewer
The Reference Viewer generates a graph which represents inter-Asset references as a network of connections between the Assets themselves. Chunks and individual Assets can be examined with this tool. In our ShooterGame example, examining Chunk 1 reveals only two directly connected Assets: The "Sanctuary" Map, and the Primary Asset Label associated with Chunk 1.

The Reference Viewer's graph of Assets directly referenced by Chunk 1 in ShooterGame. The sanctuary map asset's node has been right-clicked. Click image to enlarge.
Right-clicking a node in the Content Browser or Reference Viewer and choosing "Re-Center Graph" (or double-clicking the node in the Reference Viewer) will display that node's references. In the following image, we have recentered from Chunk 1 to the "Map:/Game/Maps/Sanctuary" node, revealing that the "Sanctuary" Map is referenced by two nodes (Chunk 1 and Chunk 1's Primary Asset Label) to its left, and references many child nodes to its right, such as the "M_FFA_Wall_01" Material:

Examination of ShooterGame's "Sanctuary" Map (part of Chunk 1) in the Reference Viewer. Click image to enlarge.
The graph shown above is not complete. It has been limited by the options set in the Reference Viewer. Limiting the scope of the graph can greatly reduce the time taken by the Engine in building it. For detailed information on those options, see the Reference Viewer page .
Crawling through references in this way, you can see exactly why a given Asset is associated with another Asset, or a Chunk. This can help to discover and remove unnecessary Asset references, or adjust your Chunking strategy to better fit your project's needs.