Choose your operating system:
Windows
macOS
Linux

During patching, the engine compares all the content post-cook to the originally released cooked content, and uses that to determine what is included in a patch. The smallest piece of content is a single package (like a .ulevel or .uasset), so if anything changes in a package then the entire package will be included in the patch. The method you use to get the patch's PAK (.pak) file to the users will depend on your distribution platforms, but this procedure will allow you to create a much smaller PAK file that just contains the updated content.
You can patch a project you have previously released using a versioned release. Some things to keep in mind are:
-
Lock down the serialization code paths at the time of release.
-
Keep the released cooked content, as the UnrealPak tool uses this to determine which content should be in the patch package file.
-
At runtime, mount both PAK files, with a higher priority for the patch file so any content within it is loaded first.
There are several methods for patching projects created in Unreal Engine 4 (UE4). The method used here is platform-agnostic, meaning it technically can be used for any platform. However, the only two platforms that you would intentionally use this method with are Windows and Xbox One. Other platforms have specific patching methods. You can find documentation on these platform-specific methods in the section for the platform you are planning to develop for.
This method can eventually use a lot of data storage, because this method keeps all old files, and merely points the game to the newest files that exist. Platform-specific methods often use less space.
How to Create a Patch Using the Project Launcher
In this example, we are creating a patch for the sample Shooter Game. This patch will change the weapon capacity and magazine size. If you are following along and want to use the example as a learning tool, instead of using your actual release build:
-
Download the sample Shooter Game . Navigate to the Learn tab in the Epic Launcher , and scroll all the way down to the Games section. Click the Shooter Game icon, and follow the instructions to download.
-
Follow the instructions on the Packaging Projects page in our documentation, using the downloaded Shooter Game project. This will give you a shipping release build for the sample game.
To make the example change, follow these steps.
-
In the Tool Bar, click the Blueprints icon and select Open Blueprint Class , then type the first few letters of WeapGun in the search field. When WeapGun appears in the list, click to open that class.
-
Locate and expand the Config section. Change the following values.
Parameter
Initial Value
Changed Value
Max Ammo
250
50
Ammo Per Clip
500
100
-
Click the Save button, and close the WeapGun class.
Create a Launch Profile for Testing the Patch
Now that we have a base build, we'll create a Launch Profile for the patch in the Project Launcher. You might want to create one Launch Profile for creating a test version of your patch, and another Launch Profile for your actual patch release.
-
Open the Project Launcher , by clicking Windows > Project Launcher .
![OpenProjectLauncher.png]()
-
Create a new Custom Launch Profile using the Plus sign ( + ) button. This first Launch Profile is specifically for a test version of your patch. Type in a Name and Description that makes that clear.
![ProjectLauncherWindow.png]()
Click for full view.
-
There are a number of settings in the Project Launcher that you can customize for a Launch Profile. You can further customize each setting by clicking the Advanced Settings dropdown menus. You can also click the top dropdown in the Cook , Package or Deploy sections, and your selection can change the available options.
![ProjectLauncher-Advanced-Config.png]()
Click for full view.
Launch Profile Section Name
Description of Advanced Settings
Project
You can browse to the specific project to use, or use Any Project to patch the current project.
Build
Options are DebugGame , Development and Shipping . Click the Advanced Settings dropdown to build the Unreal Automation Tool (UAT) as part of the patch process.
Cook
Click the dropdown to select Cook by the Book or Cook on the Fly . You can also select Do Not Cook . You can click the Advanced Settings dropdown to select Only Cook Modified Content . Additional options display for Advanced Settings , and for Release/DLC/Patching , when you select Cook by the Book .
Package
Options are Package and Store Locally , Package and Store in Repository , or Do Not Package .
Archive
If you want to archive the build, check the box in this section.
Deploy
Options are Copy to Device , Copy Repository , File Server , or Do Not Deploy .
Launch
Options are Using Default Role , Using Custom Roles , and Do Not Launch .


Customize the Launch Profile
Follow these steps to customize your new Launch Profile.
-
In the Project section, click the dropdown to browse to your project.
![CustomizeProfileSettings_1.png]()
Click for full view.
-
In the Build section, click the dropdown and select Shipping . Optionally, expand Advanced Settings if you need to build Unreal Automation Tool (UAT) as part of the patch process because you are creating the patch on a build machine.
![CustomizeProfileSettings_2.png]()
Click for full view.
-
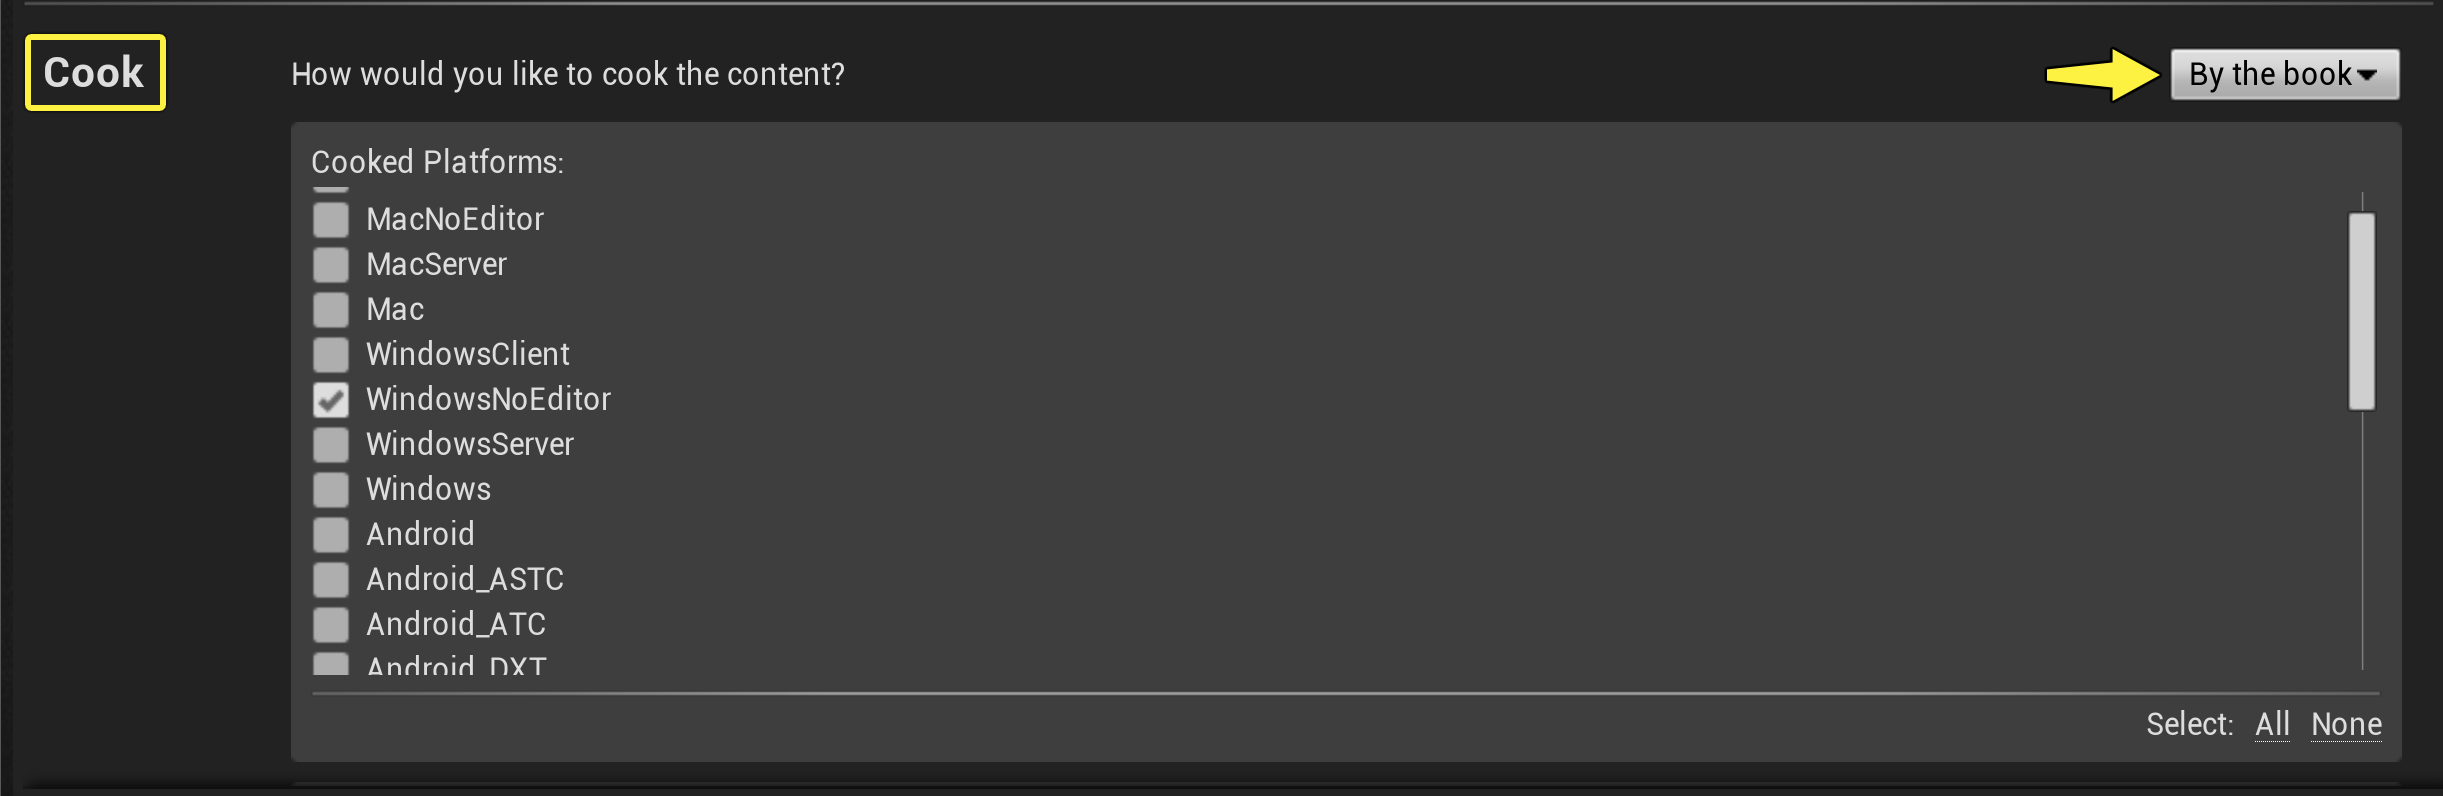
In the Cook section, click the dropdown and select By the Book . This gives you options for Cooked Platforms , Cooked Cultures , and Cooked Maps . Check the Cook settings for your project.
![CustomizeProfileSettings_3.png]()
Click for full view.
The Cook settings determine which content in your project is cooked for this patch, and that content is then compared to the original package file.
-
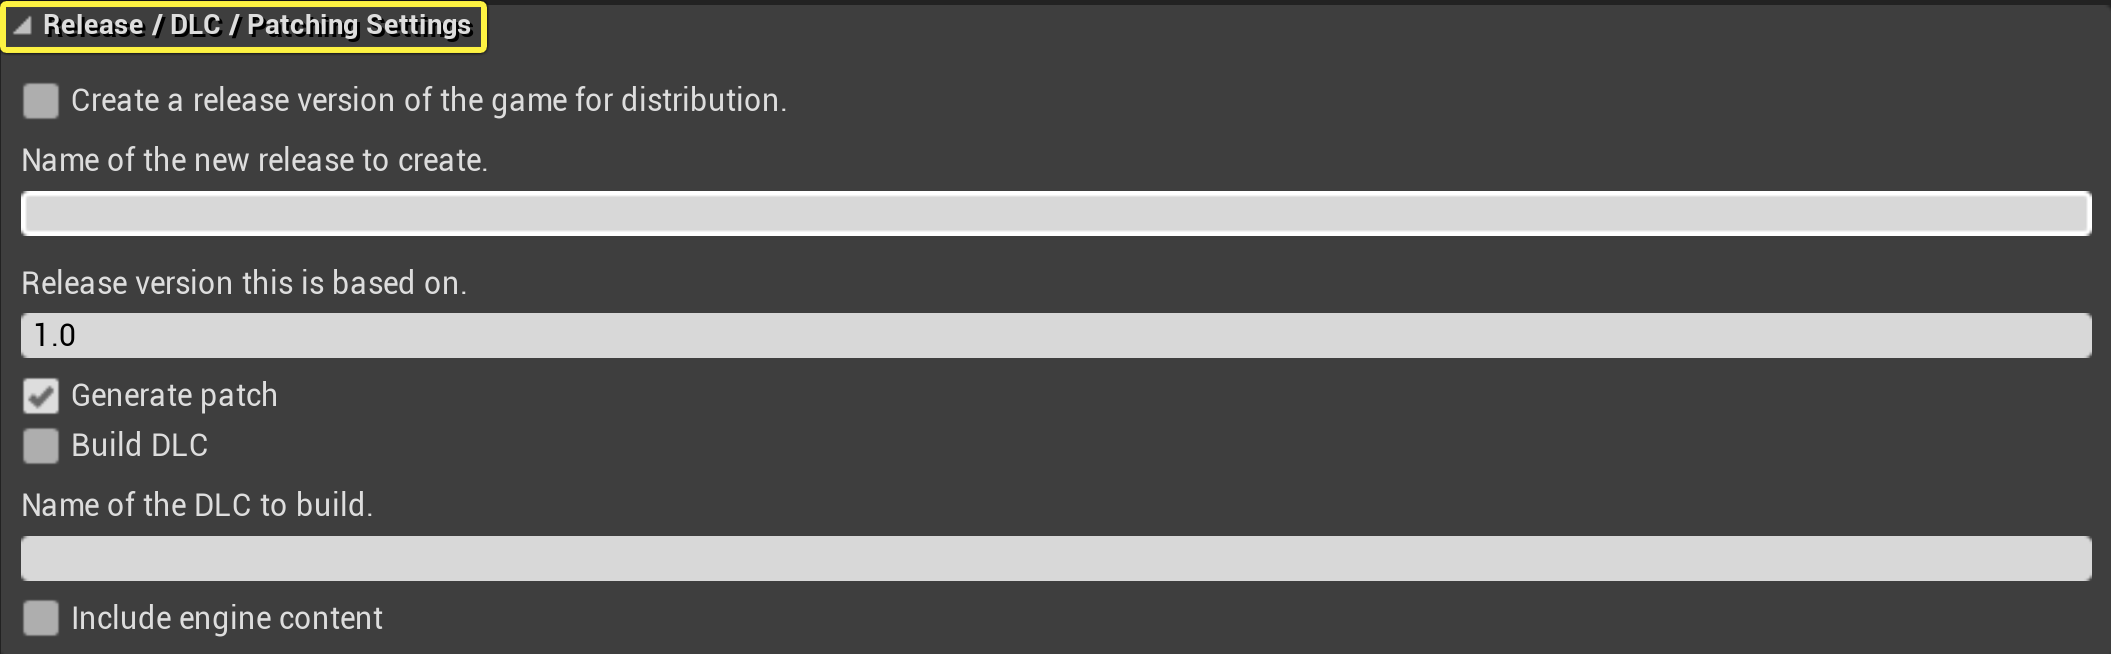
Click the arrow to expand Release/DLC/Patching Settings .
![CustomizeProfileSettings_7.png]()
Click for full view.
-
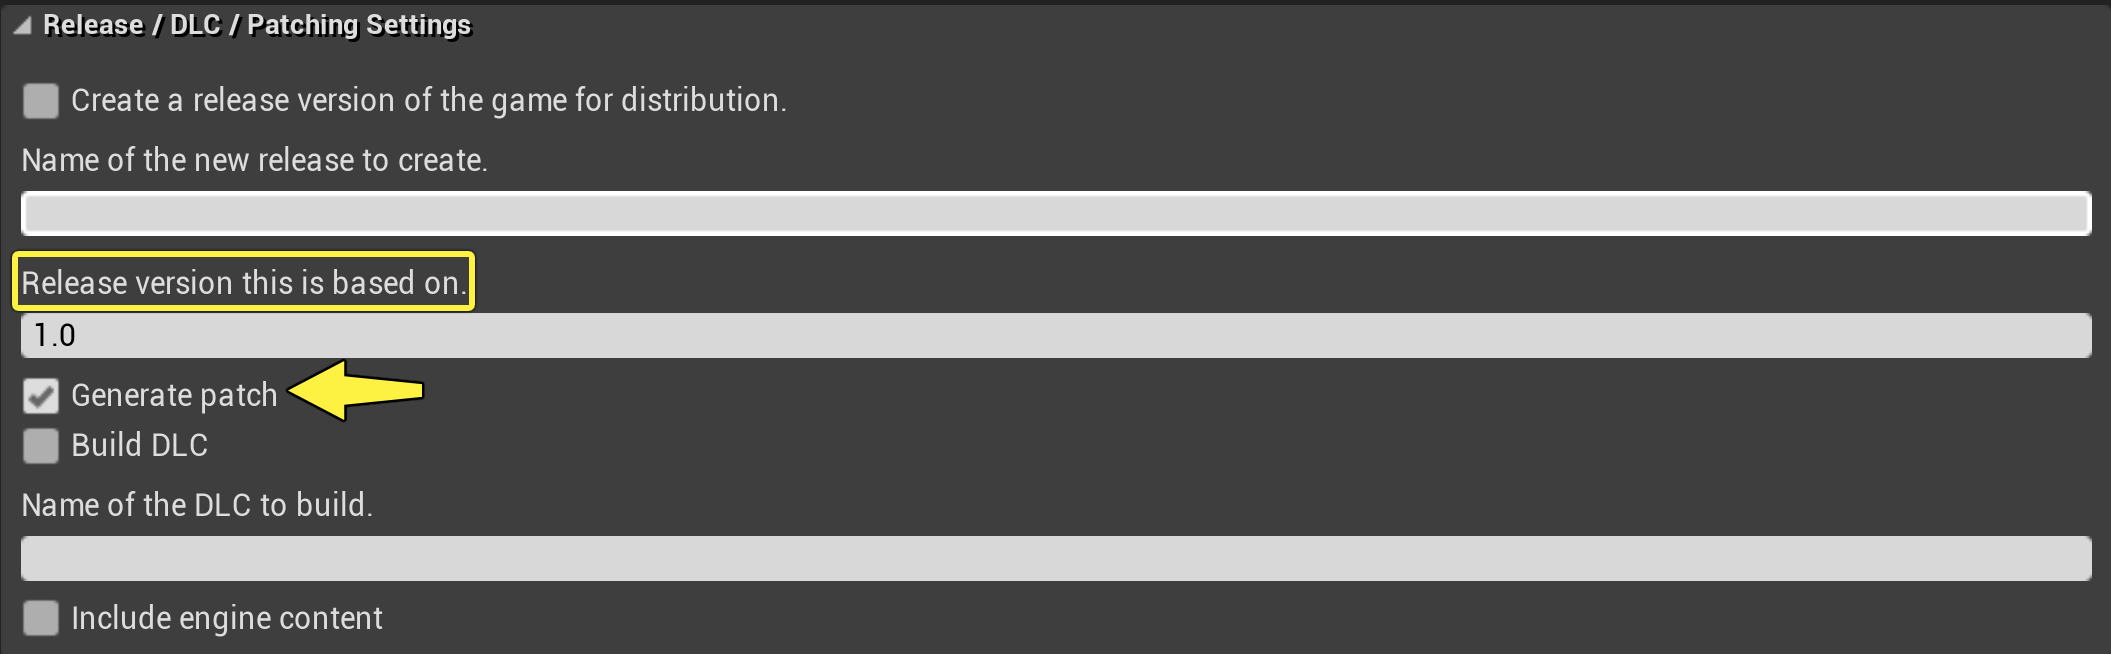
Under Release Version This is Based On , type the release version. Then check the box for Generate Patch .
![CustomizeProfileSettings_8.png]()
Click for full view.
-
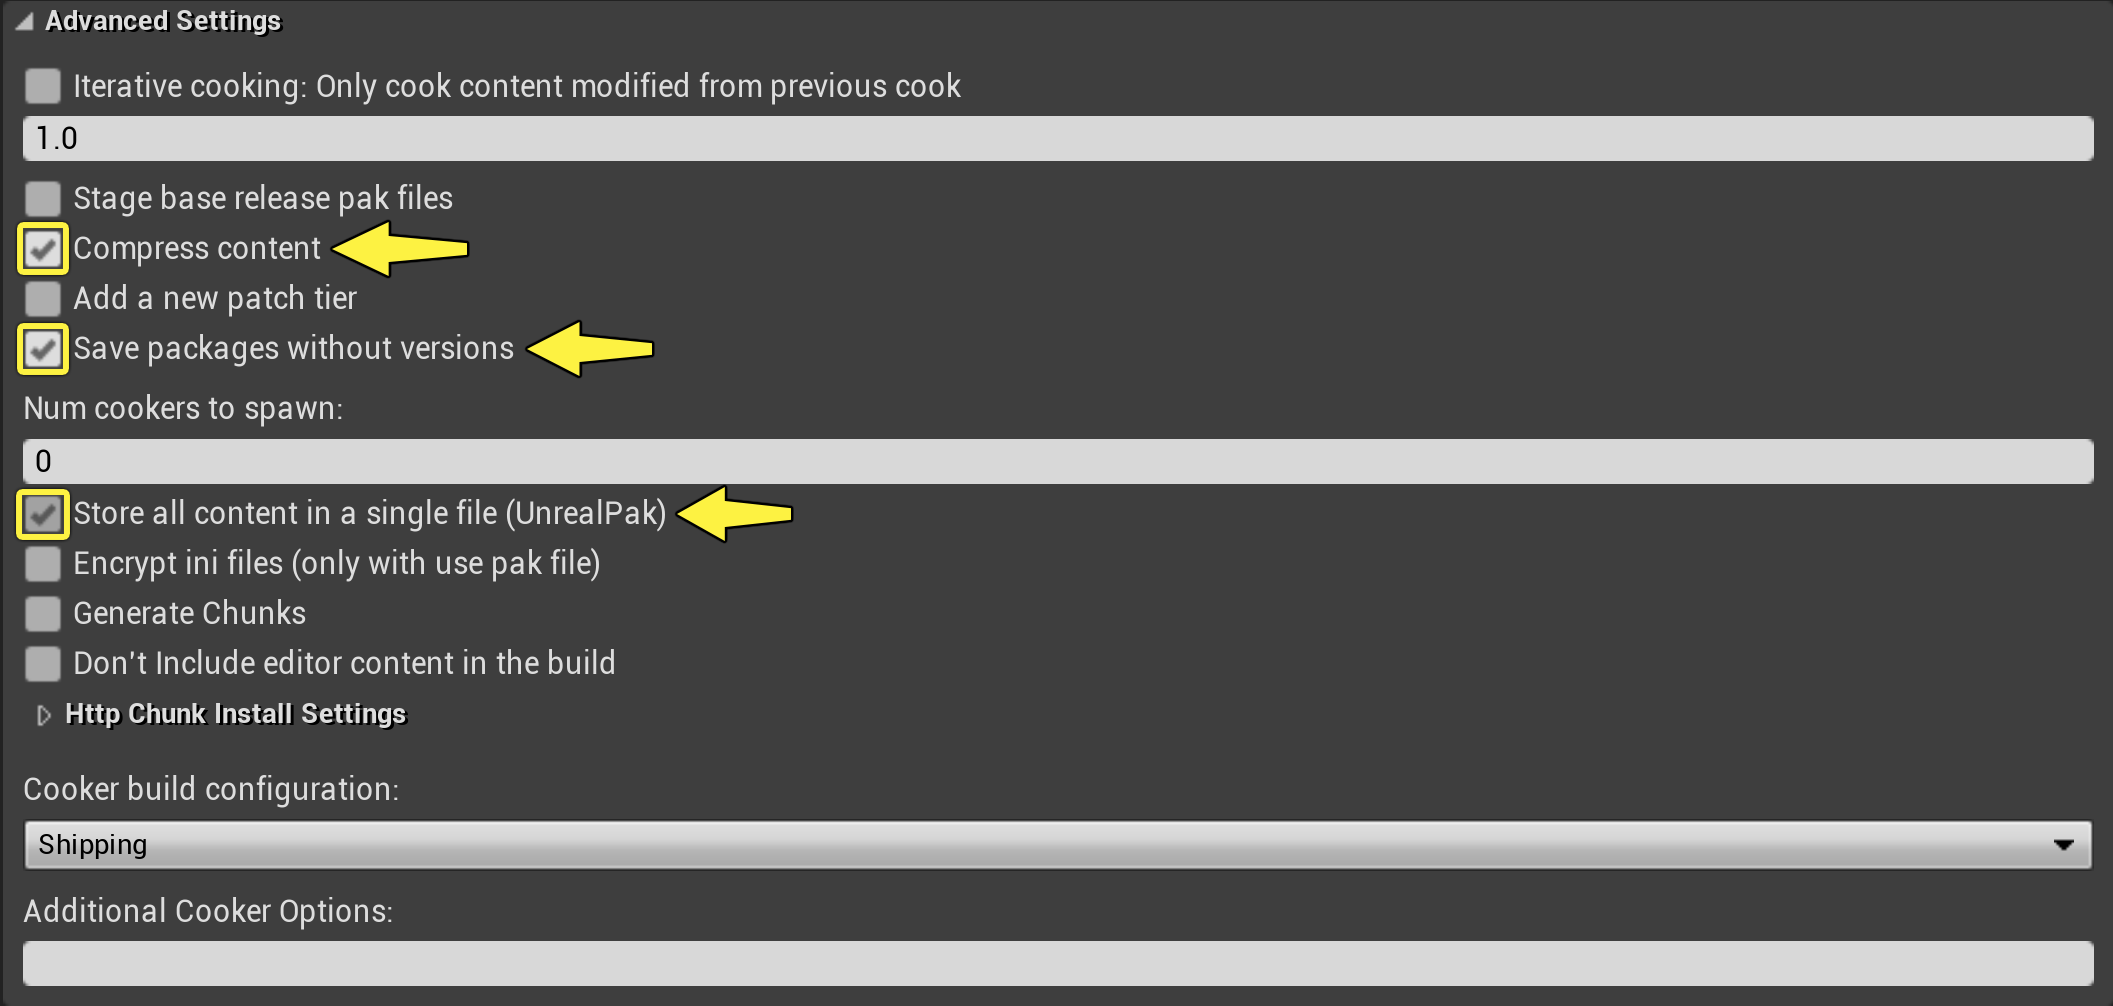
Click the arrow to expand Advanced Settings . Make sure the following boxes are checked, as well as any others you need for your specific project's distribution method.
-
Compress Content
-
Save Packages Without Versions
-
Store All Content in a Single File (UnrealPak)
![CustomizeProfileSettings_9.png]()
Click for full view.
-
-
Also in Advanced Settings , click the dropdown for Cooker Build Configuration and select Shipping .
![CustomizeProfileSettings_10.png]()
Click for full view.
-
In the Package section, click the dropdown and select Package and Store Locally . The local directory is entered by default; if you want to change it, click Browse and select the directory where you want to store the package.
![CustomizeProfileSettings_11.png]()
Click for full view.
-
In the Deploy section, click the dropdown and select Do Not Deploy .
![CustomizeProfileSettings_12.png]()
Click for full view.
Select Do Not Deploy to test the patch. When you have tested your patch and are ready to build a shipping version, follow the steps in this section and just choose a different Deploy method.


Launch the Test Version of the Patch
-
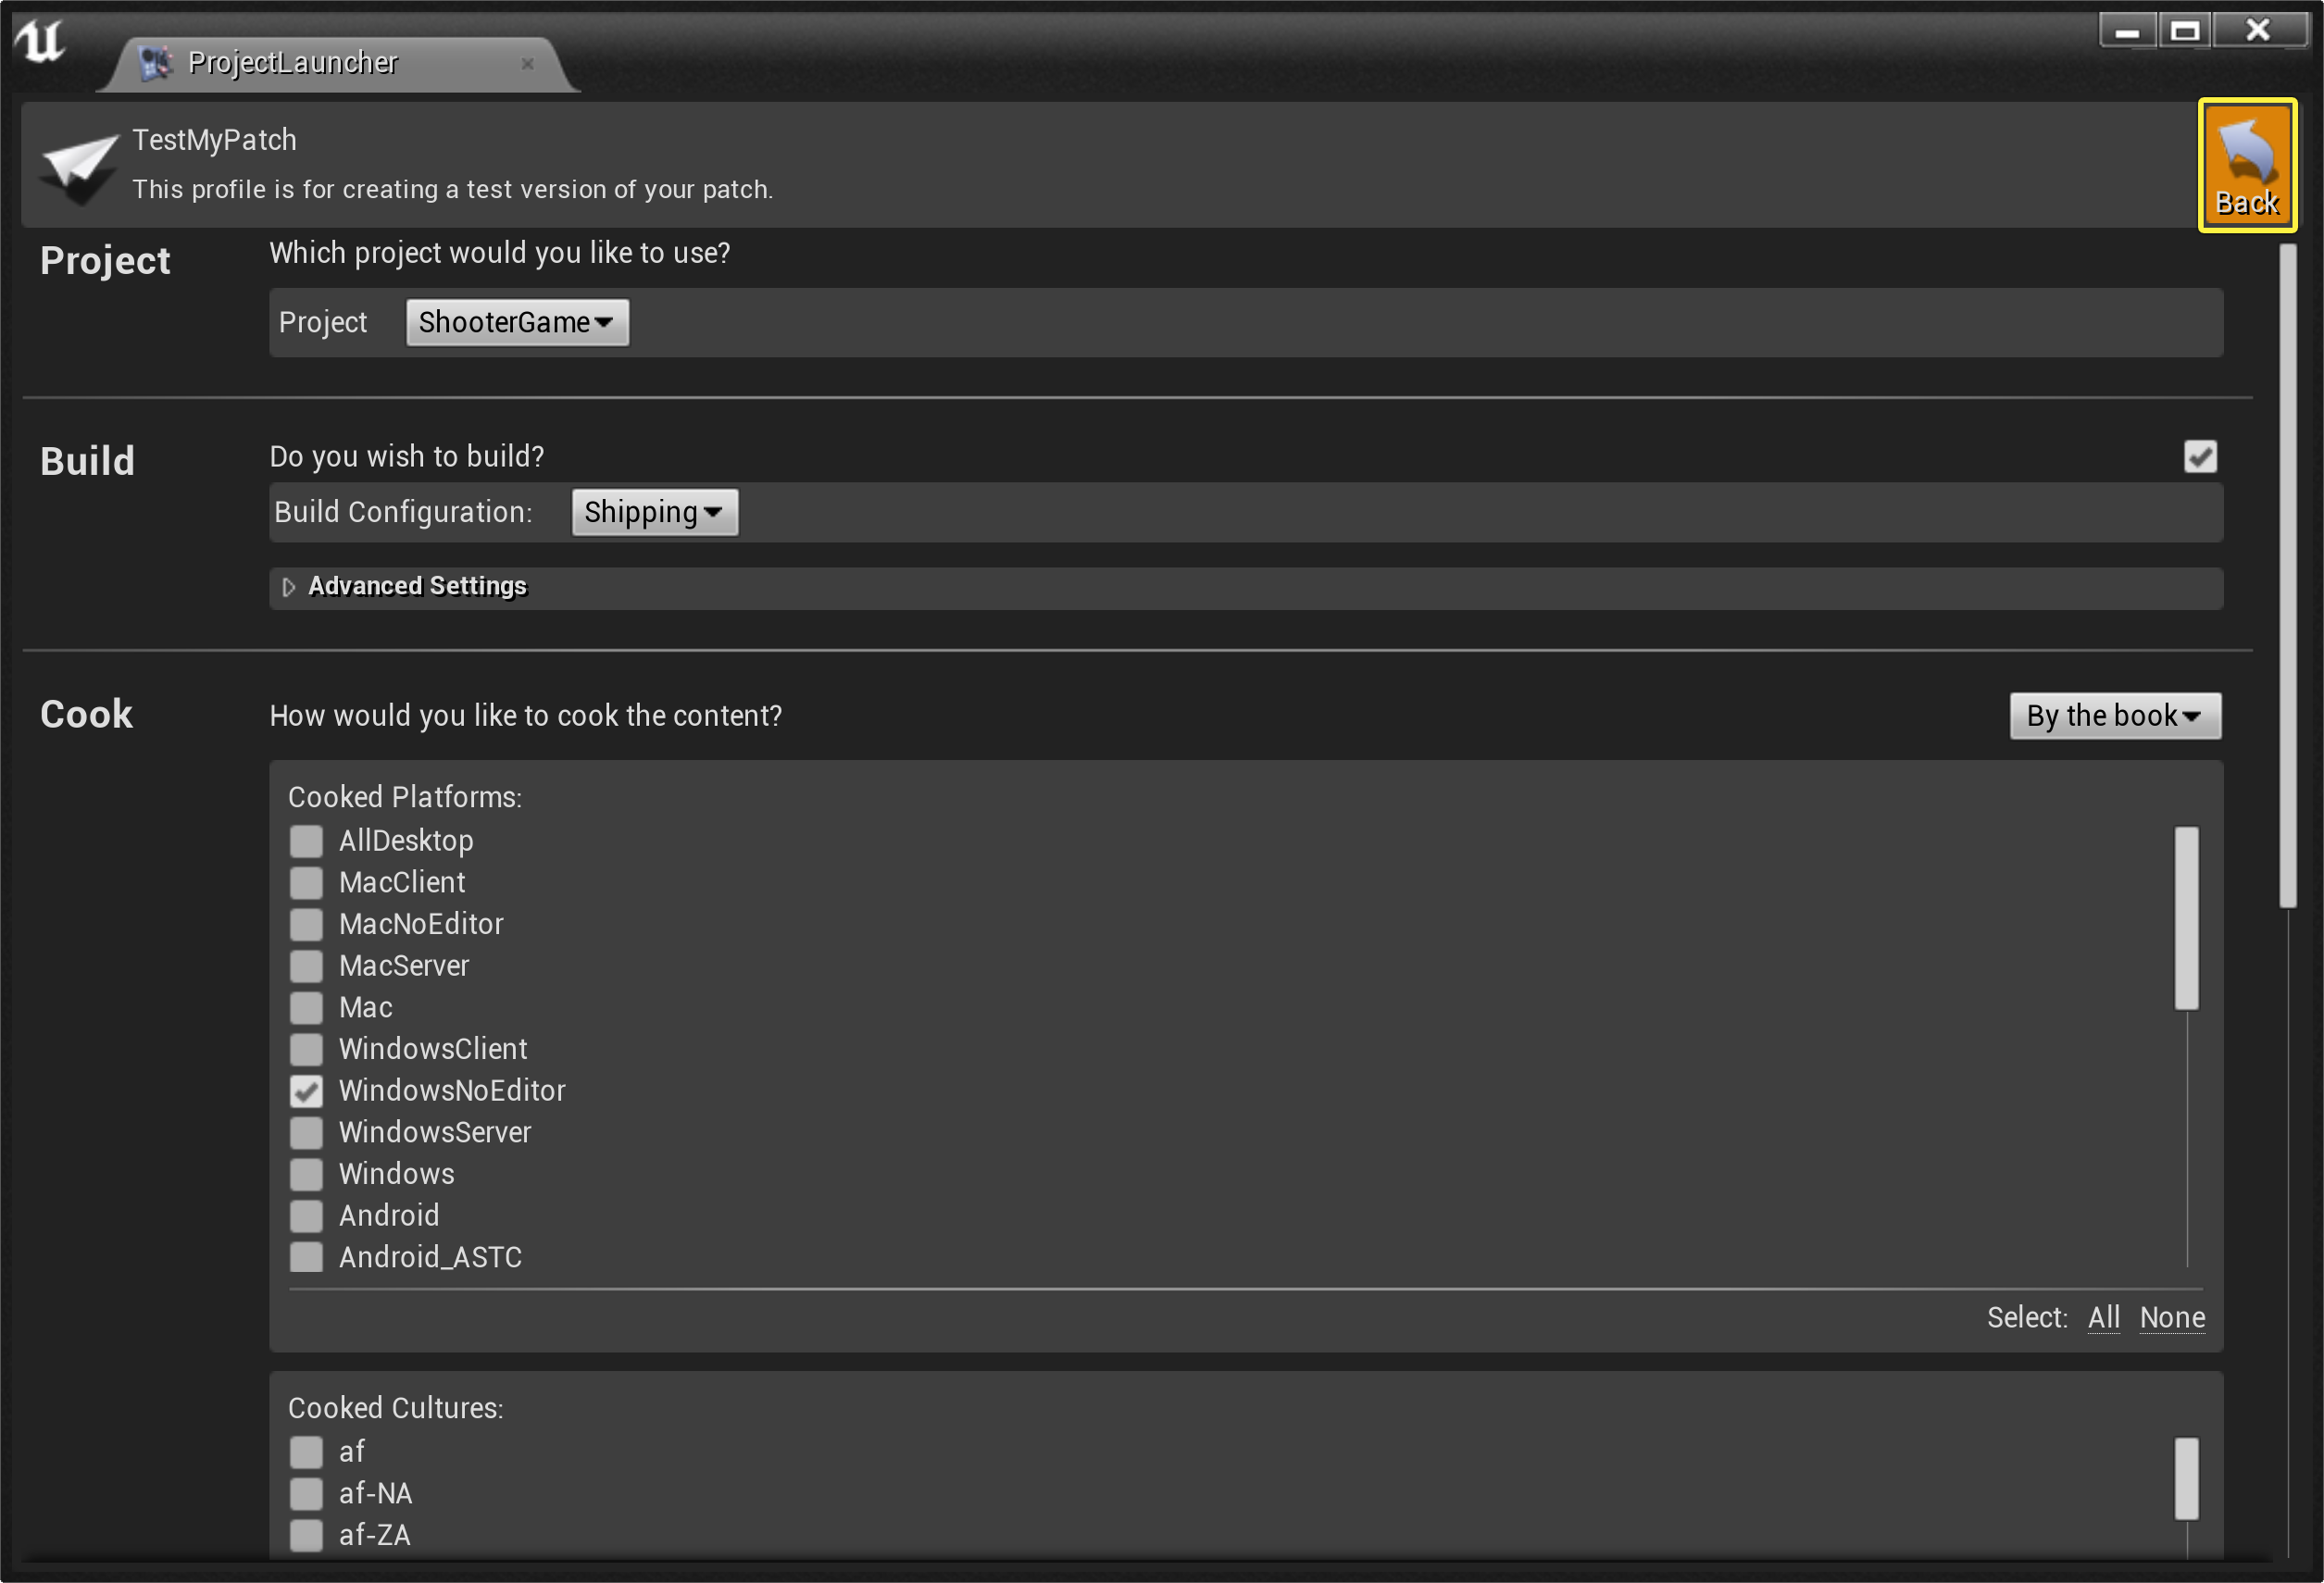
Navigate back to the main profile window using the Back button in the top right corner.
![LaunchTestPatch_1.png]()
Click for full view.
-
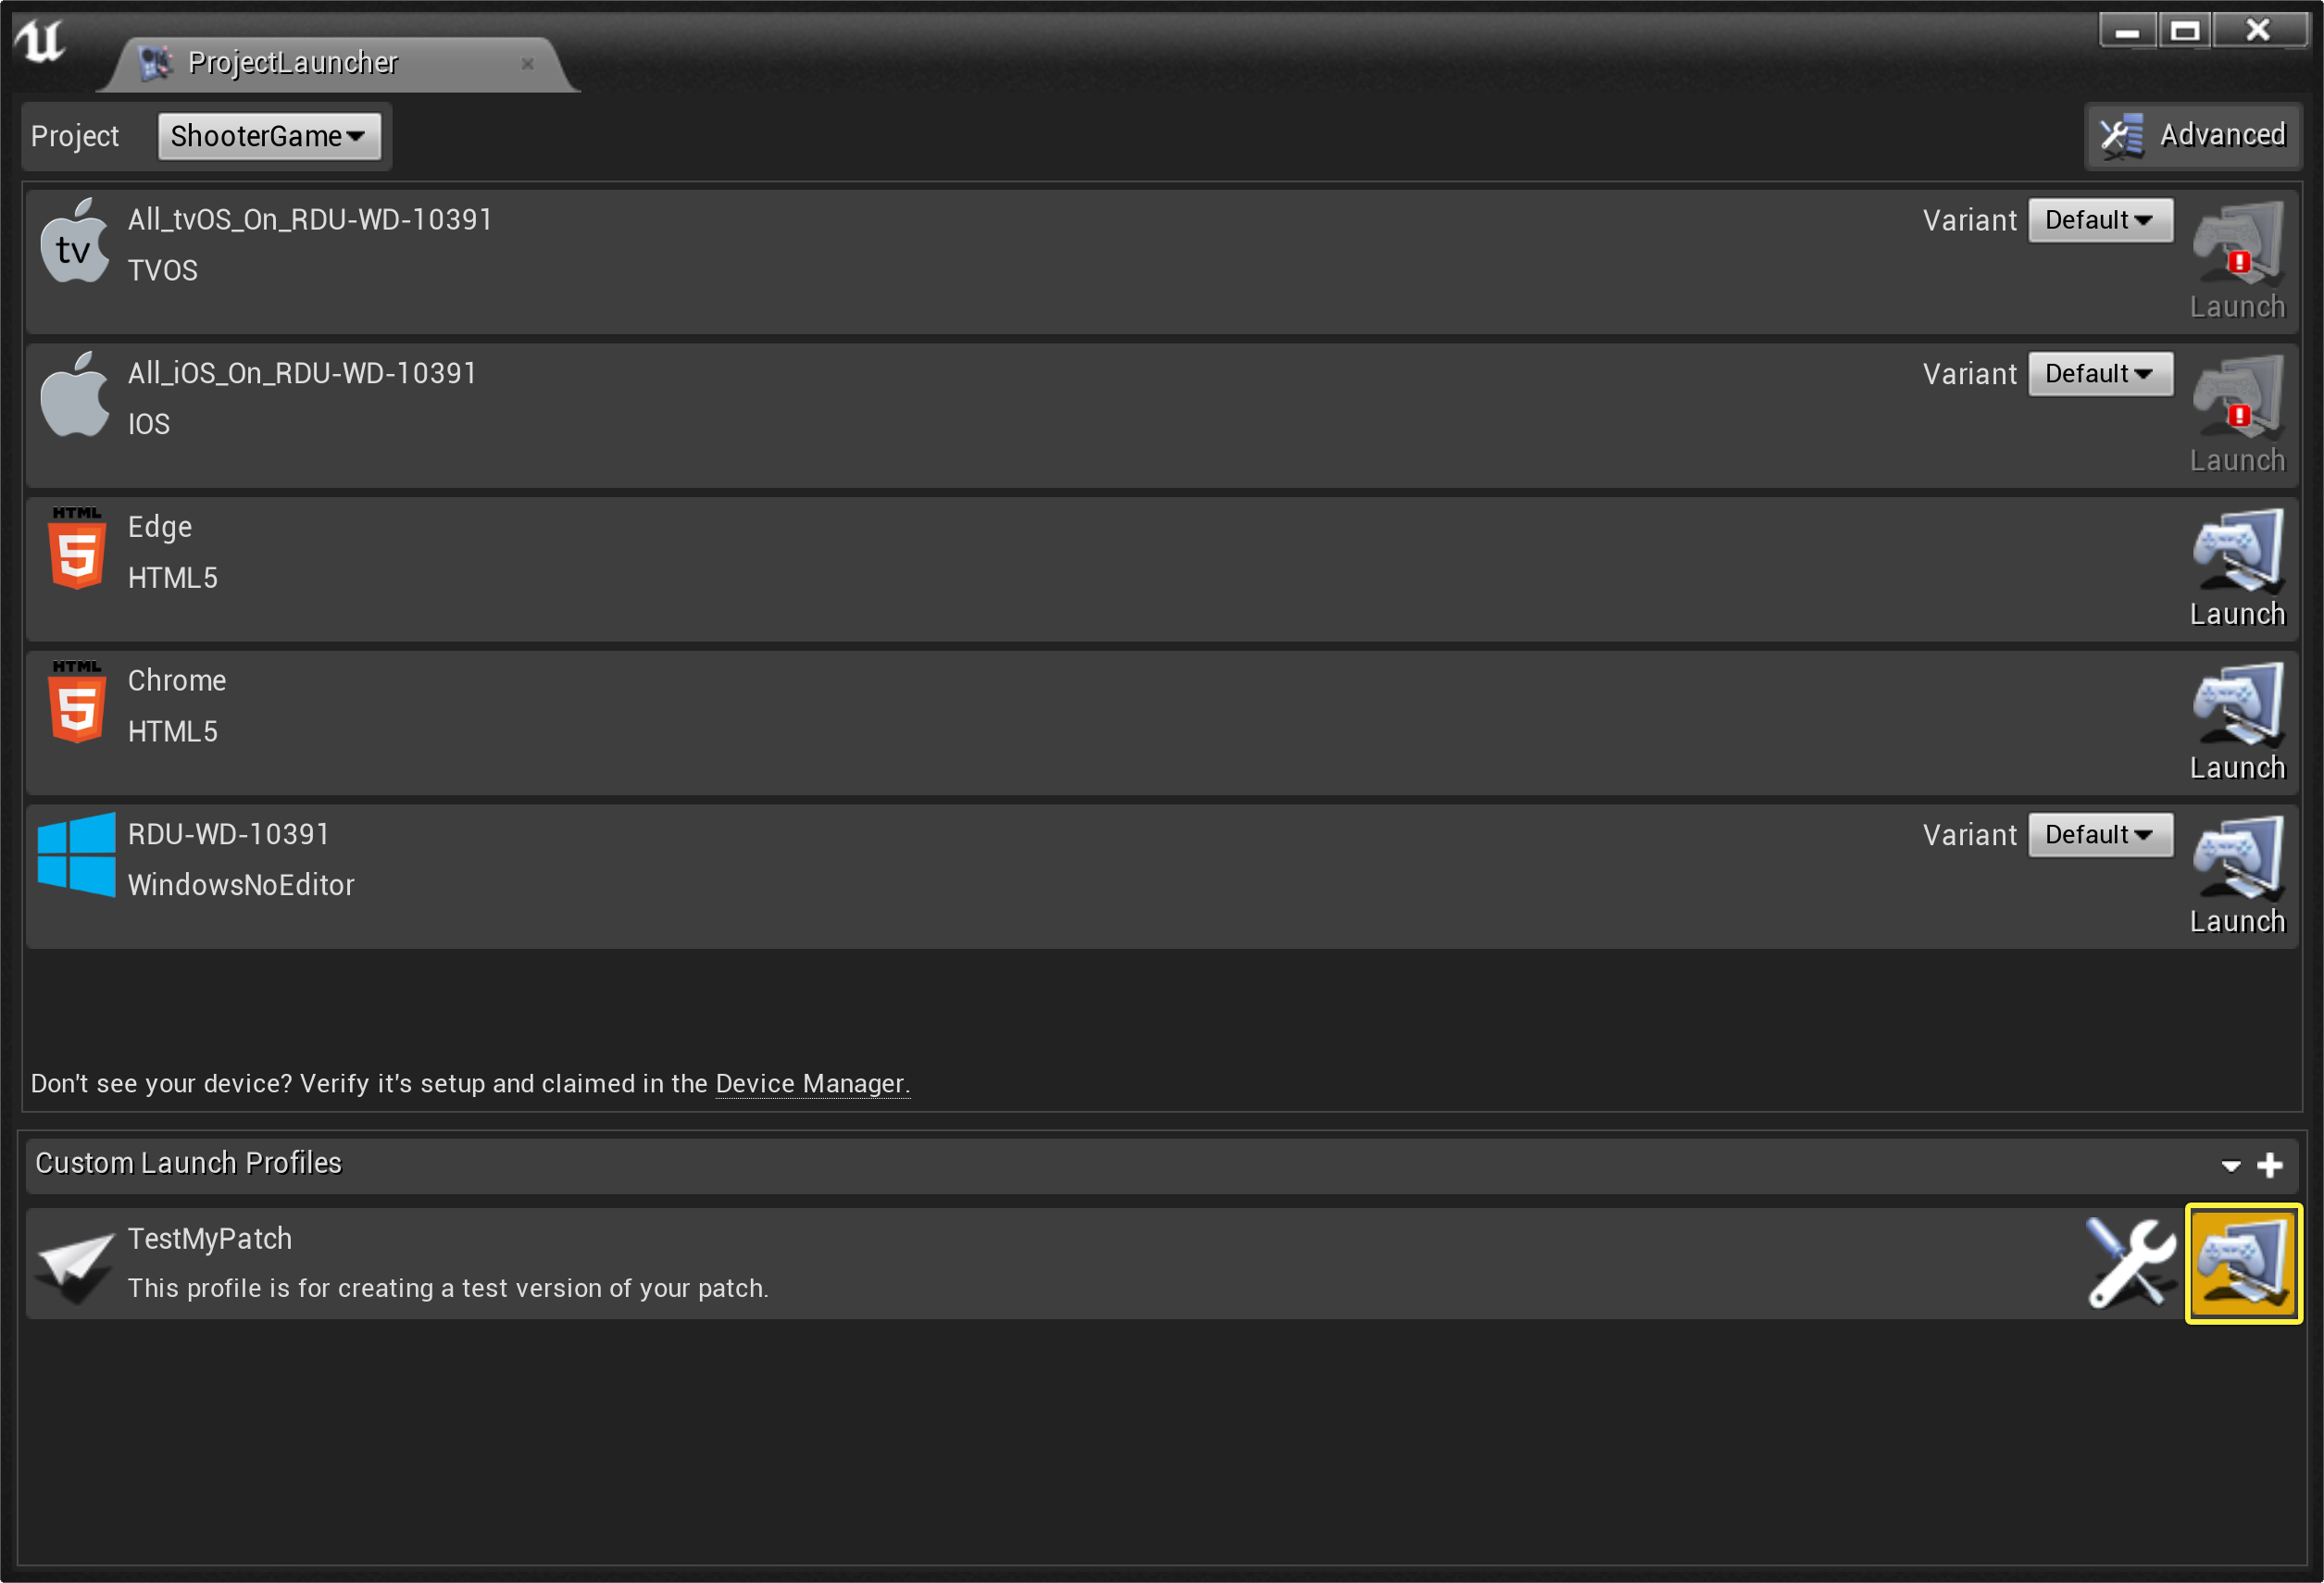
Click on the launch icon next to your Patching profile.
![LaunchTestPatch_2.png]()
Click for full view.
-
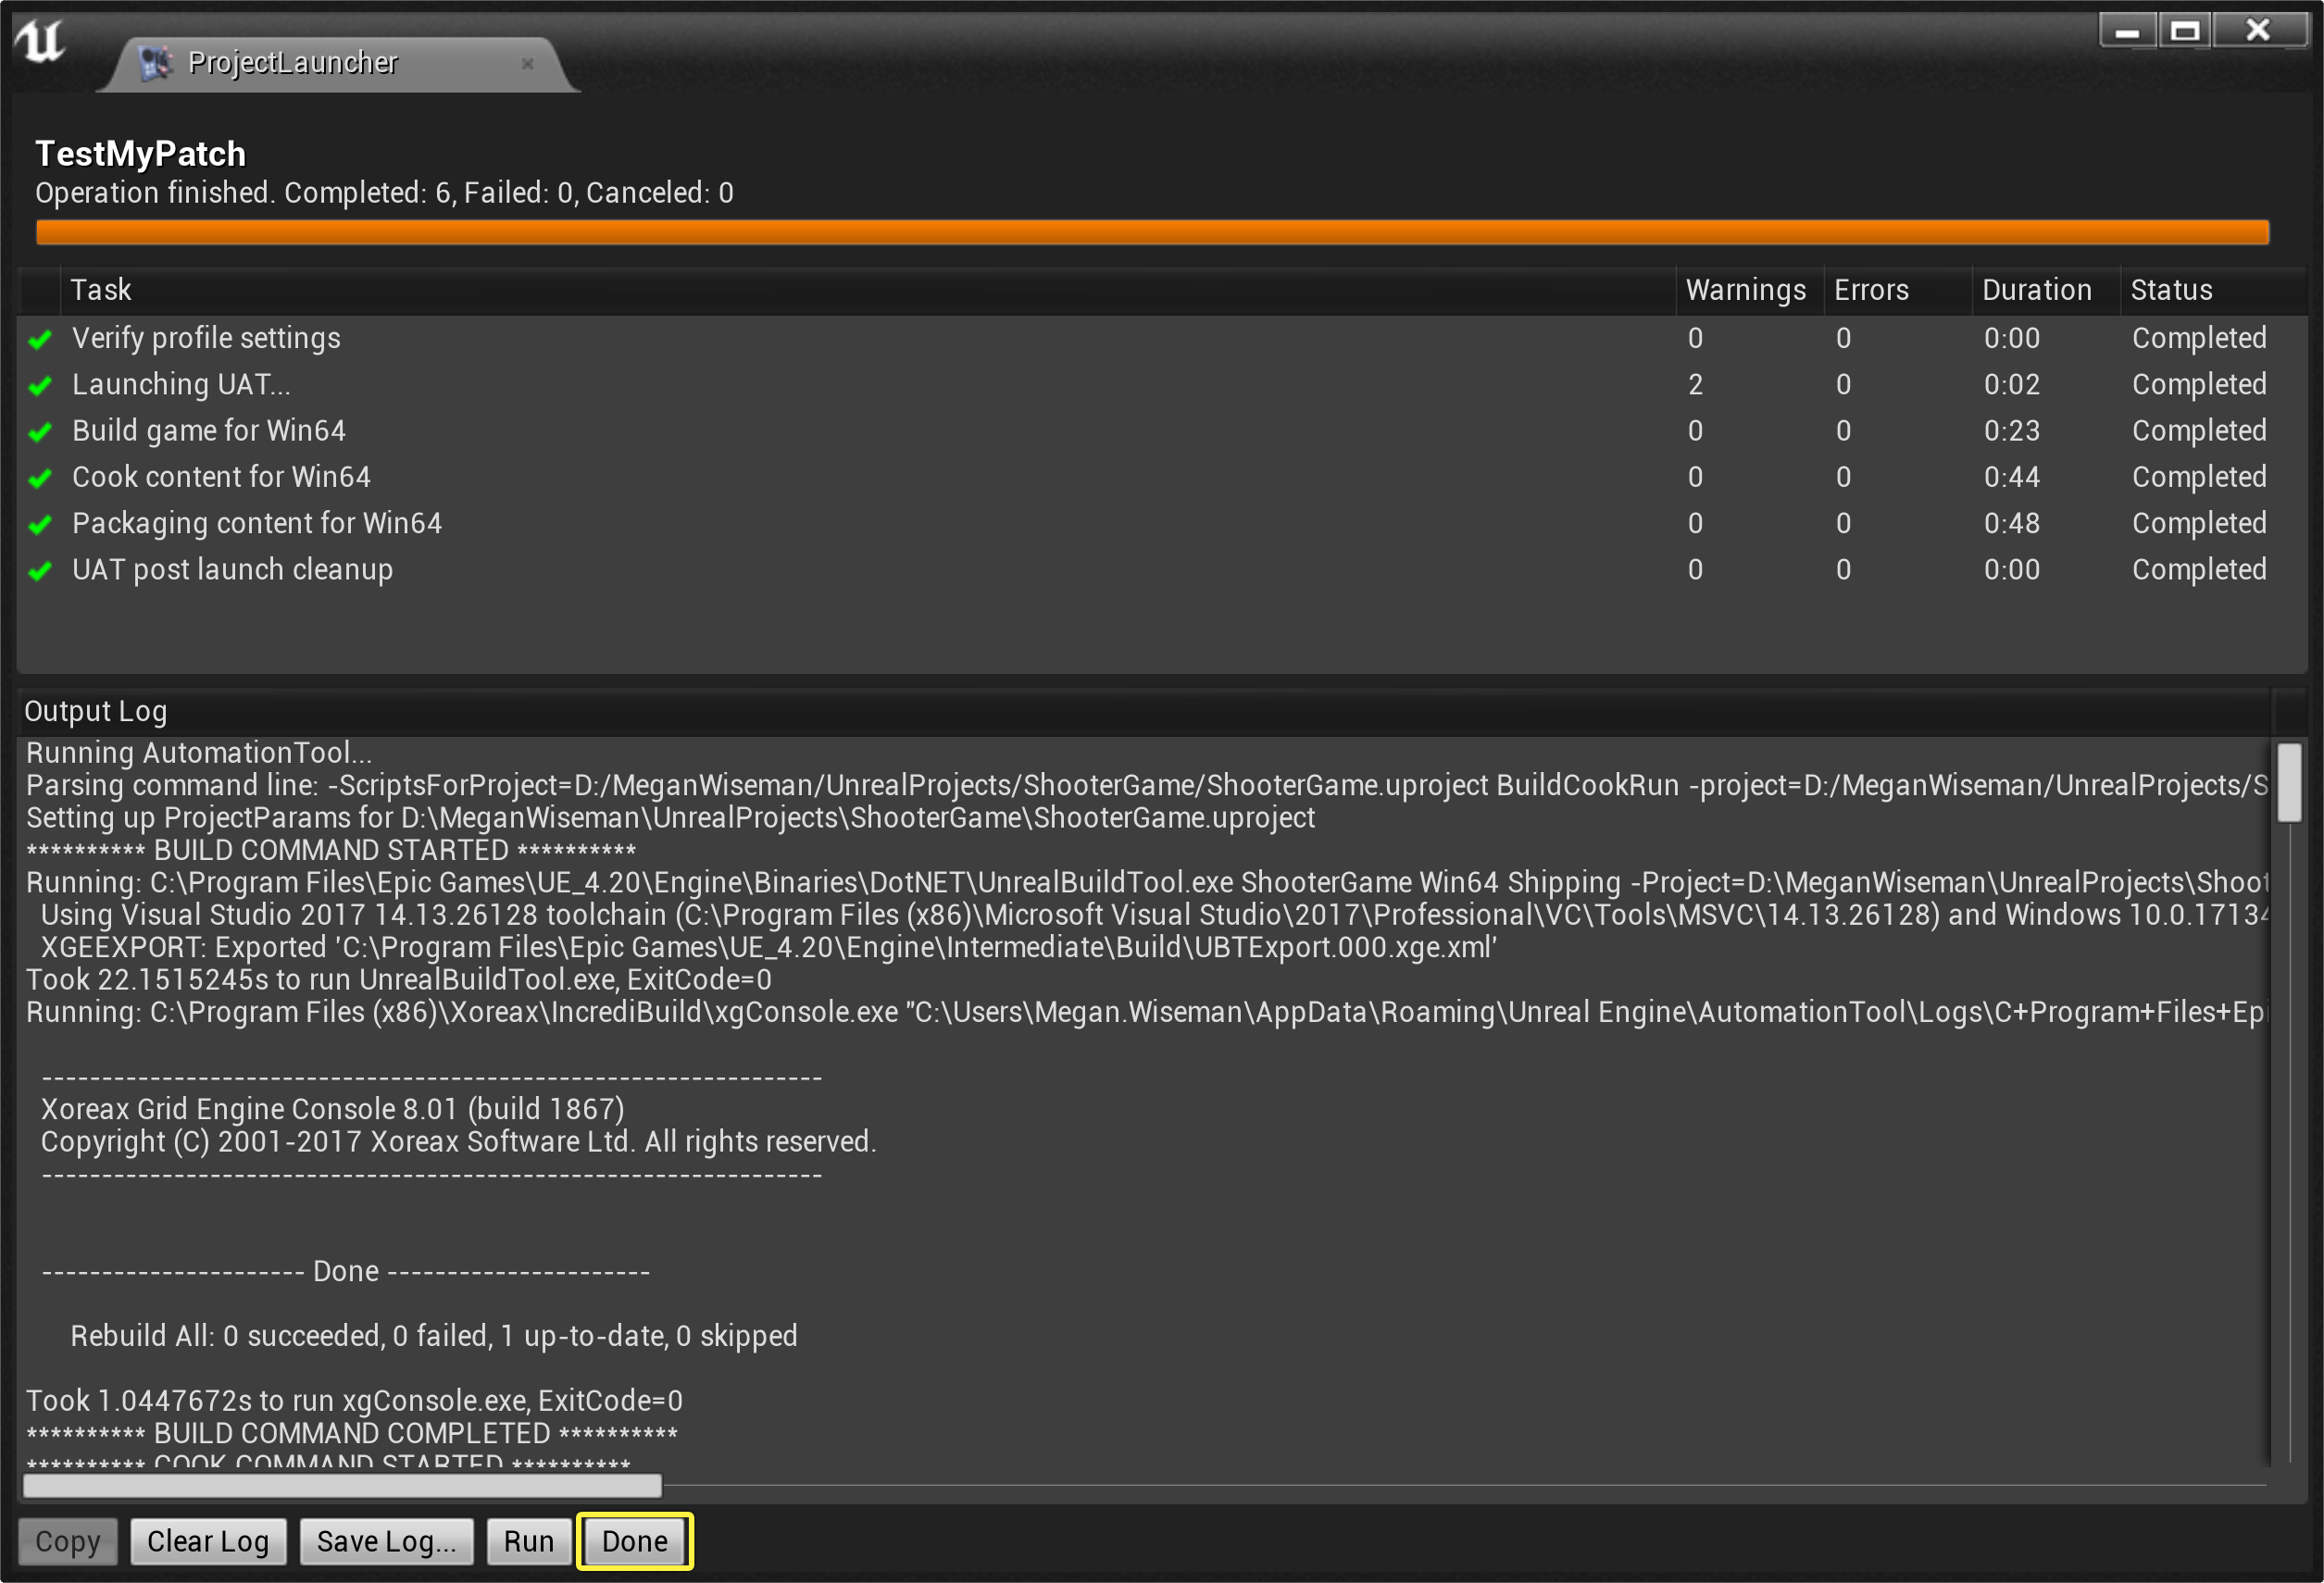
The project launcher will go through the building, cooking, and packaging process. This may take some time depending on the complexity of your project.
![LaunchTestPatch_3.png]()
Click for full view.
-
Once the operation is complete, close the window or click on Done .
![LaunchTestPatch_4.png]()
Click for full view.

Create and Customize a Launch Profile for Shipping the Patch
-
Create a new Custom Launch Profile using the Plus ( + ) button. This profile is for shipping your patch, so type a Name and Description to make that clear.
-
Follow steps 1-11 in the Customize the Launch Profile section. If needed, change the custom settings if your test version was significantly different from what you want to ship.
-
In the Deploy section, click the dropdown and select the deployment option you want to use.
-
When you've finished making the Shipping Launch Profile, follow the steps in the Launch the Test Version of the Patch section.
How to Create a Patch Using the Command Line
The Project Launcher is not the only option for creating a platform-agnostic patch for your project. You can also create a patch using command-line instructions with UAT.
First you need to create a base build. This is probably your shipping build. You need to use the command line parameter
-Createreleaseversion=<releasenumber>
when creating this build. This will create version 1.0 of your project.
Example:
BuildCookRun <normalbuildcookrunarguments> -build -cook -stage -pak -createreleaseversion=1.0
This will save a build in the
<ProjectPath>\Releases\1.0\
directory which will be required when generating the patch.
Once you have a numbered base build, you can create a patch that is based on that previous build. You need to use the command line parameter
-basedonreleaseversion=<releasenumber>
when creating this patch.
Example:
BuildCookRun <normalbuildcookrunarguments> -build -cook -stage -pak -generatepatch -basedonreleaseversion=1.0Installing a Patch
The platform-agnostic patching process creates a PAK file in following directory:
[ProjectName]\Saved\StagedBuilds[PlatformName][ProjectName]\Content\Paks
. Depending on the platform your project is created for, the PAK file contains the new or changed content that should be distributed to users. For example, on Windows, you would create an installer to copy that PAK file into the user's
[ProjectName]\Releases[VersionNumber][PlatformName]
folder, next to the original content PAK file.
The patch PAK file will automatically be mounted when it is located on the device in any of the PAK search directories set in
FPakPlatformFile::GetPakFolders
. To prioritize patches, the mounting system uses a
_p
at the end of the filename to determine that it gets priority over other PAK files. It can be renamed, but you need to include the
_p.pak
at the end of the file name.
If you build two patches from the same release version, they are both complete patches, so you should remove the first patch while installing the second patch.