Choose your operating system:
Windows
macOS
Linux
In order to understand and use the content on this page, make sure you are familiar with the following topics:
The Gear VR Motion Controller(MC) has some different buttons and a touchpad that can be setup to handle a wide variety of different input tasks in UE4. In the following How - To we will take a look at how to setup and use the touchpad and the five different buttons that it offers.
In this How - To we will be starting with a Pawn that already has a VR Camera and Motion Controller support added to it. If you do not have this setup, please check out the documents listed in the Prerequisite Topics list at the top of this page.
Steps
-
First, open up your Player Pawn Blueprint and from the Component tab, add a new Text Render component, called FaceButtonPressed and make sure that it is parented to the Motion Controller component like in the image below.
![HTGVRTouchpad_00.png]()
-
Click on the Text Component and then in the Details panel set the following properties with the following values.
![HTGVRTouchpad_01.png]()
Click for full image.
Property Name
Value
Location
X = 20, Y = 0, Z = 0
Rotation
X = 0, Y = 0, Z = -180
Horizontal Alignment
Center
Vertical Alignment
Text Center
World Size
13.0
-
Next, we need to create a new Text variable that will store and display what button is currently being pressed on the Motion Controller touchpad. To accomplish this go to the Variables list and create a new Text variable called ButtonText .
![HTGVRTouchpad_02.png]()
-
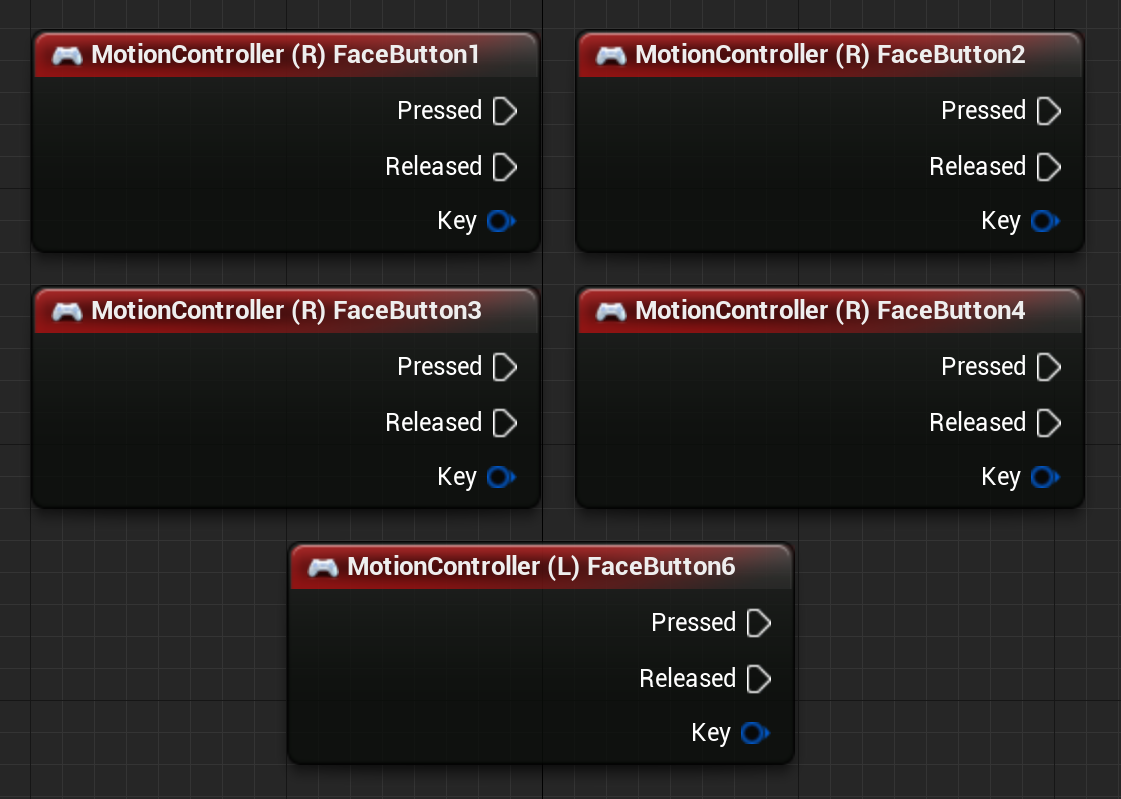
The GearVR Motion Controller touchpad has five buttons that can be used. Four of the five buttons are activated by pressing in one of the four cardinal directions ( North South East and West) on the touchpad. The fifth button is triggered when a user touches the surface of the touchpad. To set this up in our Blueprint, add the following five Motion Controller (R) FaceButton Event nodes to the Event Graph.
![HTGVRTouchpad_03.png]()
Click for full image.
Node Name
Default Value
Motion Controller (R) FaceButton1
N/A
Motion Controller (R) FaceButton2
N/A
Motion Controller (R) FaceButton3
N/A
Motion Controller (R) FaceButton4
N/A
Motion Controller (R) FaceButton6
N/A
-
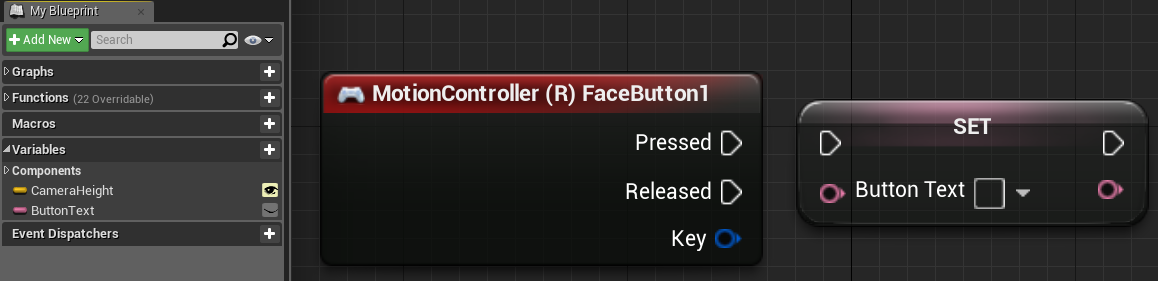
Now we are going to setup the logic for displaying which button on the touchpad was pressed. To accomplish this, first, drag the ButtonText variable into the Event Graph and choose the Set option as we want to set the text that is displayed.
![HTGVRTouchpad_04.png]()
Click for full image.
-
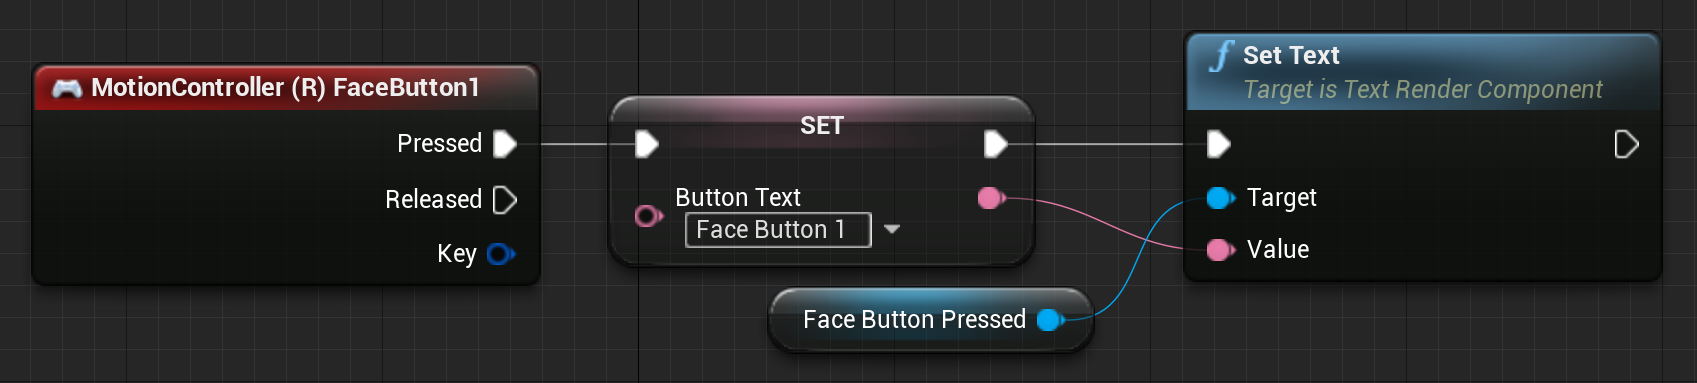
Connect the Pressed output on the Motion Controller (R) FaceButton1 Event node to the input on the Set Button Text node. Then in the Button Text input Face Button 1 into the Button Text input.
![HTGVRTouchpad_05.png]()
Click for full image.
-
If we pressed the Motion Controller Face Button 1 now, nothing would happen as we have the only setup the ability to input the text we want to display. To display the text, you will first need to right-click in the Event Graph and then search for the Set Text node as this will set the text to what we input in the Set Button Text variable. When searching for the Set Text node, make sure to select the SetText(FaceButtonPressed) option so that it will automatically add a reference to the Face Button Pressed text to render the component.
![HTGVRTouchpad_06.png]()
Click for full image.
-
Next, we need to connect the Set Button Text node to the Set Text node so that the text input in the Set Button Text node will be displayed when the touchpad button is pressed. To accomplish this, connect both outputs on the Set Button Text node to the available inputs on the Set Text node and when completed your Blueprint should look like the following.
![HTGVRTouchpad_07.png]()
Click for full image.
-
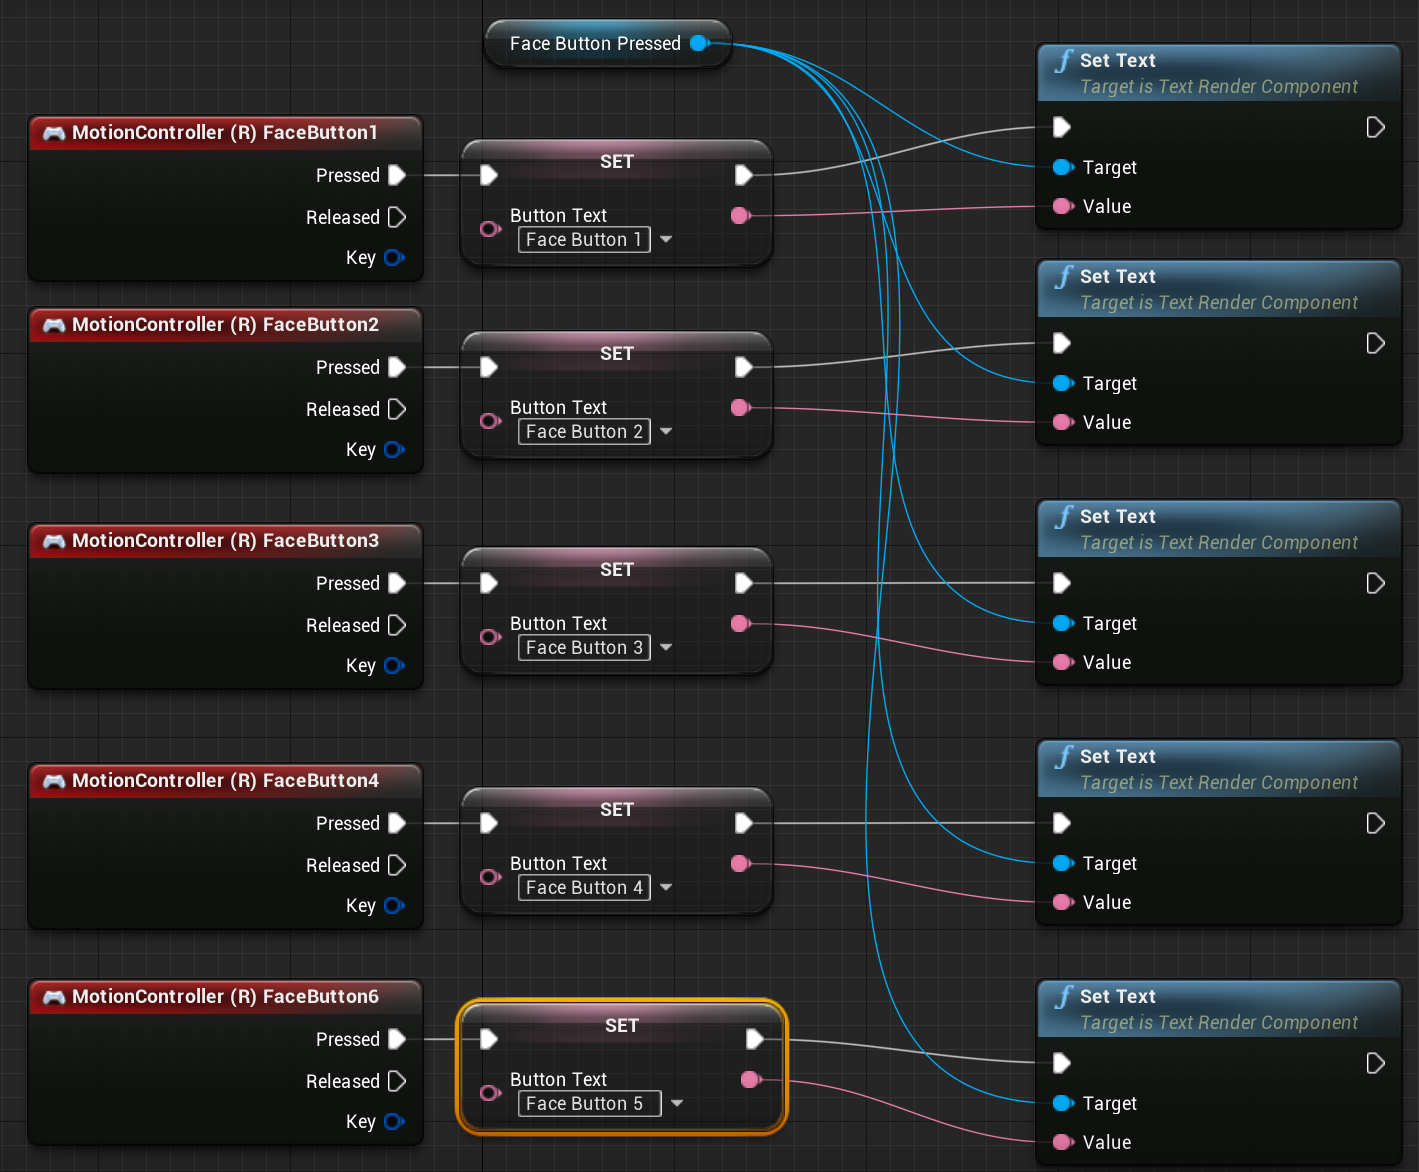
Repeat this process for the remaining button directions. When doing this, make sure to change the text input into the Set Face Button Text to reflect the button that is being pressed. When completed with this your Blueprint should look like the following image.
Copy Node Graph![HTGVRTouchpad_08.png]()
BEGIN OBJECT
                Begin Object Class=/Script/BlueprintGraph.K2Node_InputKey Name="K2Node_InputKey_8"
   InputKey=MotionController_Right_FaceButton1
   NodePosX=-304
   NodePosY=-1312
   NodeGuid=F94B04D1498718E8E0EB54A57B7E3AF5
   CustomProperties Pin (PinId=8822F87D404D43434EF0158FD05FF007,PinName="Pressed",Direction="EGPD_Output",PinType.PinCategory="exec",PinType.PinSubCategory="",PinType.PinSubCategoryObject=None,PinType.PinSubCategoryMemberReference=(),PinType.PinValueType=(),PinType.bIsMap=False,PinType.bIsSet=False,PinType.bIsArray=False,PinType.bIsReference=False,PinType.bIsConst=False,PinType.bIsWeakPointer=False,LinkedTo=(K2Node_VariableSet_0 5FB439FB47FA9D52C7B38D9A2B7BBE4E,),PersistentGuid=00000000000000000000000000000000,bHidden=False,bNotConnectable=False,bDefaultValueIsReadOnly=False,bDefaultValueIsIgnored=False,bAdvancedView=False,)
   CustomProperties Pin (PinId=2F2D84E346D4C15336FD1B9A06DB1A7D,PinName="Released",Direction="EGPD_Output",PinType.PinCategory="exec",PinType.PinSubCategory="",PinType.PinSubCategoryObject=None,PinType.PinSubCategoryMemberReference=(),PinType.PinValueType=(),PinType.bIsMap=False,PinType.bIsSet=False,PinType.bIsArray=False,PinType.bIsReference=False,PinType.bIsConst=False,PinType.bIsWeakPointer=False,PersistentGuid=00000000000000000000000000000000,bHidden=False,bNotConnectable=False,bDefaultValueIsReadOnly=False,bDefaultValueIsIgnored=False,bAdvancedView=False,)
   CustomProperties Pin (PinId=2FC76AEC4798622D03F5908A09DA5898,PinName="Key",Direction="EGPD_Output",PinType.PinCategory="struct",PinType.PinSubCategory="",PinType.PinSubCategoryObject=ScriptStruct'/Script/InputCore.Key',PinType.PinSubCategoryMemberReference=(),PinType.PinValueType=(),PinType.bIsMap=False,PinType.bIsSet=False,PinType.bIsArray=False,PinType.bIsReference=False,PinType.bIsConst=False,PinType.bIsWeakPointer=False,DefaultValue="AnyKey",PersistentGuid=00000000000000000000000000000000,bHidden=False,bNotConnectable=False,bDefaultValueIsReadOnly=False,bDefaultValueIsIgnored=False,bAdvancedView=False,)
End Object
Begin Object Class=/Script/BlueprintGraph.K2Node_VariableSet Name="K2Node_VariableSet_0"
   VariableReference=(MemberName="ButtonText",MemberGuid=31750A1E463AB401FFD6BE8B873D2717,bSelfContext=True)
   NodePosX=-16
   NodePosY=-1296
   NodeGuid=7B99AB85405195A51B71A899535A722F
   CustomProperties Pin (PinId=5FB439FB47FA9D52C7B38D9A2B7BBE4E,PinName="execute",PinType.PinCategory="exec",PinType.PinSubCategory="",PinType.PinSubCategoryObject=None,PinType.PinSubCategoryMemberReference=(),PinType.PinValueType=(),PinType.bIsMap=False,PinType.bIsSet=False,PinType.bIsArray=False,PinType.bIsReference=False,PinType.bIsConst=False,PinType.bIsWeakPointer=False,LinkedTo=(K2Node_InputKey_8 8822F87D404D43434EF0158FD05FF007,),PersistentGuid=00000000000000000000000000000000,bHidden=False,bNotConnectable=False,bDefaultValueIsReadOnly=False,bDefaultValueIsIgnored=False,bAdvancedView=False,)
   CustomProperties Pin (PinId=97D9F789468F99CD6C6BDDB2C968094C,PinName="then",Direction="EGPD_Output",PinType.PinCategory="exec",PinType.PinSubCategory="",PinType.PinSubCategoryObject=None,PinType.PinSubCategoryMemberReference=(),PinType.PinValueType=(),PinType.bIsMap=False,PinType.bIsSet=False,PinType.bIsArray=False,PinType.bIsReference=False,PinType.bIsConst=False,PinType.bIsWeakPointer=False,LinkedTo=(K2Node_CallFunction_10 037AAA80412386621D064AAEB01C399E,),PersistentGuid=00000000000000000000000000000000,bHidden=False,bNotConnectable=False,bDefaultValueIsReadOnly=False,bDefaultValueIsIgnored=False,bAdvancedView=False,)
   CustomProperties Pin (PinId=6E53533F4F389ABE5FD0A396BC0F91A7,PinName="ButtonText",PinType.PinCategory="text",PinType.PinSubCategory="",PinType.PinSubCategoryObject=None,PinType.PinSubCategoryMemberReference=(),PinType.PinValueType=(),PinType.bIsMap=False,PinType.bIsSet=False,PinType.bIsArray=False,PinType.bIsReference=False,PinType.bIsConst=False,PinType.bIsWeakPointer=False,DefaultTextValue=NSLOCTEXT("[C4ACC4FF43E74999CA75679D79E79C6C]", "92902F73431F8D04BC8132A52FCF6BB2", "Face Button 1"),PersistentGuid=00000000000000000000000000000000,bHidden=False,bNotConnectable=False,bDefaultValueIsReadOnly=False,bDefaultValueIsIgnored=False,bAdvancedView=False,)
   CustomProperties Pin (PinId=6E1049664FBB7B5E55C62683F46956D3,PinName="self",PinFriendlyName=NSLOCTEXT("K2Node", "Target", "Target"),PinType.PinCategory="object",PinType.PinSubCategory="",PinType.PinSubCategoryObject=BlueprintGeneratedClass'/Game/GearVR_Pawn/GearVR_Pawn_MotionController.GearVR_Pawn_MotionController_C',PinType.PinSubCategoryMemberReference=(),PinType.PinValueType=(),PinType.bIsMap=False,PinType.bIsSet=False,PinType.bIsArray=False,PinType.bIsReference=False,PinType.bIsConst=False,PinType.bIsWeakPointer=False,PersistentGuid=00000000000000000000000000000000,bHidden=True,bNotConnectable=False,bDefaultValueIsReadOnly=False,bDefaultValueIsIgnored=False,bAdvancedView=False,)
   CustomProperties Pin (PinId=95865FD640C415FAD0AD54BAD89D8A90,PinName="Output_Get",PinToolTip="Retrieves the value of the variable, can use instead of a separate Get node",Direction="EGPD_Output",PinType.PinCategory="text",PinType.PinSubCategory="",PinType.PinSubCategoryObject=None,PinType.PinSubCategoryMemberReference=(),PinType.PinValueType=(),PinType.bIsMap=False,PinType.bIsSet=False,PinType.bIsArray=False,PinType.bIsReference=False,PinType.bIsConst=False,PinType.bIsWeakPointer=False,LinkedTo=(K2Node_CallFunction_10 8A082F984E05B2DEB777F6B3C43BCEFF,),PersistentGuid=00000000000000000000000000000000,bHidden=False,bNotConnectable=False,bDefaultValueIsReadOnly=False,bDefaultValueIsIgnored=False,bAdvancedView=False,)
End Object
Begin Object Class=/Script/BlueprintGraph.K2Node_CallFunction Name="K2Node_CallFunction_10"
   FunctionReference=(MemberParent=Class'/Script/Engine.TextRenderComponent',MemberName="K2_SetText")
   NodePosX=368
   NodePosY=-1360
   NodeGuid=D30780C04036465DA0E3C2B7B2237AC1
   CustomProperties Pin (PinId=037AAA80412386621D064AAEB01C399E,PinName="execute",PinToolTip="\nExec",PinType.PinCategory="exec",PinType.PinSubCategory="",PinType.PinSubCategoryObject=None,PinType.PinSubCategoryMemberReference=(),PinType.PinValueType=(),PinType.bIsMap=False,PinType.bIsSet=False,PinType.bIsArray=False,PinType.bIsReference=False,PinType.bIsConst=False,PinType.bIsWeakPointer=False,LinkedTo=(K2Node_VariableSet_0 97D9F789468F99CD6C6BDDB2C968094C,),PersistentGuid=00000000000000000000000000000000,bHidden=False,bNotConnectable=False,bDefaultValueIsReadOnly=False,bDefaultValueIsIgnored=False,bAdvancedView=False,)
   CustomProperties Pin (PinId=7748D0014B92D10F704A17A89D3E9135,PinName="then",PinToolTip="\nExec",Direction="EGPD_Output",PinType.PinCategory="exec",PinType.PinSubCategory="",PinType.PinSubCategoryObject=None,PinType.PinSubCategoryMemberReference=(),PinType.PinValueType=(),PinType.bIsMap=False,PinType.bIsSet=False,PinType.bIsArray=False,PinType.bIsReference=False,PinType.bIsConst=False,PinType.bIsWeakPointer=False,PersistentGuid=00000000000000000000000000000000,bHidden=False,bNotConnectable=False,bDefaultValueIsReadOnly=False,bDefaultValueIsIgnored=False,bAdvancedView=False,)
   CustomProperties Pin (PinId=364A00E644985F0744F0C8B76E751DA6,PinName="self",PinFriendlyName=NSLOCTEXT("K2Node", "Target", "Target"),PinToolTip="Target\nText Render Component Reference",PinType.PinCategory="object",PinType.PinSubCategory="",PinType.PinSubCategoryObject=Class'/Script/Engine.TextRenderComponent',PinType.PinSubCategoryMemberReference=(),PinType.PinValueType=(),PinType.bIsMap=False,PinType.bIsSet=False,PinType.bIsArray=False,PinType.bIsReference=False,PinType.bIsConst=False,PinType.bIsWeakPointer=False,LinkedTo=(K2Node_VariableGet_5 BD58F6B3484F733566EF86874304DA91,),PersistentGuid=00000000000000000000000000000000,bHidden=False,bNotConnectable=False,bDefaultValueIsReadOnly=False,bDefaultValueIsIgnored=False,bAdvancedView=False,)
   CustomProperties Pin (PinId=8A082F984E05B2DEB777F6B3C43BCEFF,PinName="Value",PinToolTip="Value\nText (by ref)",PinType.PinCategory="text",PinType.PinSubCategory="",PinType.PinSubCategoryObject=None,PinType.PinSubCategoryMemberReference=(),PinType.PinValueType=(),PinType.bIsMap=False,PinType.bIsSet=False,PinType.bIsArray=False,PinType.bIsReference=True,PinType.bIsConst=True,PinType.bIsWeakPointer=False,LinkedTo=(K2Node_VariableSet_0 95865FD640C415FAD0AD54BAD89D8A90,),PersistentGuid=00000000000000000000000000000000,bHidden=False,bNotConnectable=False,bDefaultValueIsReadOnly=False,bDefaultValueIsIgnored=True,bAdvancedView=False,)
End Object
Begin Object Class=/Script/BlueprintGraph.K2Node_VariableGet Name="K2Node_VariableGet_5"
   VariableReference=(MemberName="FaceButtonPressed",bSelfContext=True)
   NodePosY=-1376
   NodeGuid=7CE6AECF4804CF54FCABBC950F6D6FBD
   CustomProperties Pin (PinId=BD58F6B3484F733566EF86874304DA91,PinName="FaceButtonPressed",Direction="EGPD_Output",PinType.PinCategory="object",PinType.PinSubCategory="",PinType.PinSubCategoryObject=Class'/Script/Engine.TextRenderComponent',PinType.PinSubCategoryMemberReference=(),PinType.PinValueType=(),PinType.bIsMap=False,PinType.bIsSet=False,PinType.bIsArray=False,PinType.bIsReference=False,PinType.bIsConst=False,PinType.bIsWeakPointer=False,LinkedTo=(K2Node_CallFunction_10 364A00E644985F0744F0C8B76E751DA6,K2Node_CallFunction_2355 24D9A43A4CC5BB2E7963438C3FE88719,K2Node_CallFunction_2356 24D9A43A4CC5BB2E7963438C3FE88719,K2Node_CallFunction_7739 24D9A43A4CC5BB2E7963438C3FE88719,K2Node_CallFunction_6047 24D9A43A4CC5BB2E7963438C3FE88719,),PersistentGuid=00000000000000000000000000000000,bHidden=False,bNotConnectable=False,bDefaultValueIsReadOnly=False,bDefaultValueIsIgnored=False,bAdvancedView=False,)
   CustomProperties Pin (PinId=E71EF1B74CC4F941968EA098BBAEC85A,PinName="self",PinFriendlyName=NSLOCTEXT("K2Node", "Target", "Target"),PinType.PinCategory="object",PinType.PinSubCategory="",PinType.PinSubCategoryObject=BlueprintGeneratedClass'/Game/GearVR_Pawn/GearVR_Pawn_MotionController.GearVR_Pawn_MotionController_C',PinType.PinSubCategoryMemberReference=(),PinType.PinValueType=(),PinType.bIsMap=False,PinType.bIsSet=False,PinType.bIsArray=False,PinType.bIsReference=False,PinType.bIsConst=False,PinType.bIsWeakPointer=False,PersistentGuid=00000000000000000000000000000000,bHidden=True,bNotConnectable=False,bDefaultValueIsReadOnly=False,bDefaultValueIsIgnored=False,bAdvancedView=False,)
End Object
Begin Object Class=/Script/BlueprintGraph.K2Node_InputKey Name="K2Node_InputKey_70"
   InputKey=MotionController_Right_FaceButton2
   NodePosX=-304
   NodePosY=-1184
   NodeGuid=5B043B46441FA0EB3F9ED0BAAC47E184
   CustomProperties Pin (PinId=167E144F4A8223EA32A872866056D25C,PinName="Pressed",Direction="EGPD_Output",PinType.PinCategory="exec",PinType.PinSubCategory="",PinType.PinSubCategoryObject=None,PinType.PinSubCategoryMemberReference=(),PinType.PinValueType=(),PinType.bIsMap=False,PinType.bIsSet=False,PinType.bIsArray=False,PinType.bIsReference=False,PinType.bIsConst=False,PinType.bIsWeakPointer=False,LinkedTo=(K2Node_VariableSet_239 7086F8D84E7102D2AAAC73A717284D52,),PersistentGuid=00000000000000000000000000000000,bHidden=False,bNotConnectable=False,bDefaultValueIsReadOnly=False,bDefaultValueIsIgnored=False,bAdvancedView=False,)
   CustomProperties Pin (PinId=CF464F9C407B107FBC14B7BACC2E933D,PinName="Released",Direction="EGPD_Output",PinType.PinCategory="exec",PinType.PinSubCategory="",PinType.PinSubCategoryObject=None,PinType.PinSubCategoryMemberReference=(),PinType.PinValueType=(),PinType.bIsMap=False,PinType.bIsSet=False,PinType.bIsArray=False,PinType.bIsReference=False,PinType.bIsConst=False,PinType.bIsWeakPointer=False,PersistentGuid=00000000000000000000000000000000,bHidden=False,bNotConnectable=False,bDefaultValueIsReadOnly=False,bDefaultValueIsIgnored=False,bAdvancedView=False,)
   CustomProperties Pin (PinId=1D87647F41CC7BC8A91451911253FE98,PinName="Key",Direction="EGPD_Output",PinType.PinCategory="struct",PinType.PinSubCategory="",PinType.PinSubCategoryObject=ScriptStruct'/Script/InputCore.Key',PinType.PinSubCategoryMemberReference=(),PinType.PinValueType=(),PinType.bIsMap=False,PinType.bIsSet=False,PinType.bIsArray=False,PinType.bIsReference=False,PinType.bIsConst=False,PinType.bIsWeakPointer=False,DefaultValue="AnyKey",PersistentGuid=00000000000000000000000000000000,bHidden=False,bNotConnectable=False,bDefaultValueIsReadOnly=False,bDefaultValueIsIgnored=False,bAdvancedView=False,)
End Object
Begin Object Class=/Script/BlueprintGraph.K2Node_InputKey Name="K2Node_InputKey_47"
   InputKey=MotionController_Right_FaceButton3
   NodePosX=-304
   NodePosY=-1040
   NodeGuid=546359924262023F07C89097DE1482EE
   CustomProperties Pin (PinId=6246EFCF4D85DCC9594A25815D4717FD,PinName="Pressed",Direction="EGPD_Output",PinType.PinCategory="exec",PinType.PinSubCategory="",PinType.PinSubCategoryObject=None,PinType.PinSubCategoryMemberReference=(),PinType.PinValueType=(),PinType.bIsMap=False,PinType.bIsSet=False,PinType.bIsArray=False,PinType.bIsReference=False,PinType.bIsConst=False,PinType.bIsWeakPointer=False,LinkedTo=(K2Node_VariableSet_240 7086F8D84E7102D2AAAC73A717284D52,),PersistentGuid=00000000000000000000000000000000,bHidden=False,bNotConnectable=False,bDefaultValueIsReadOnly=False,bDefaultValueIsIgnored=False,bAdvancedView=False,)
   CustomProperties Pin (PinId=FC8714DF458365BFEC19BFB8256F4825,PinName="Released",Direction="EGPD_Output",PinType.PinCategory="exec",PinType.PinSubCategory="",PinType.PinSubCategoryObject=None,PinType.PinSubCategoryMemberReference=(),PinType.PinValueType=(),PinType.bIsMap=False,PinType.bIsSet=False,PinType.bIsArray=False,PinType.bIsReference=False,PinType.bIsConst=False,PinType.bIsWeakPointer=False,PersistentGuid=00000000000000000000000000000000,bHidden=False,bNotConnectable=False,bDefaultValueIsReadOnly=False,bDefaultValueIsIgnored=False,bAdvancedView=False,)
   CustomProperties Pin (PinId=A8C935A64EBFE00BBE51EE8D6EDFF1B9,PinName="Key",Direction="EGPD_Output",PinType.PinCategory="struct",PinType.PinSubCategory="",PinType.PinSubCategoryObject=ScriptStruct'/Script/InputCore.Key',PinType.PinSubCategoryMemberReference=(),PinType.PinValueType=(),PinType.bIsMap=False,PinType.bIsSet=False,PinType.bIsArray=False,PinType.bIsReference=False,PinType.bIsConst=False,PinType.bIsWeakPointer=False,DefaultValue="AnyKey",PersistentGuid=00000000000000000000000000000000,bHidden=False,bNotConnectable=False,bDefaultValueIsReadOnly=False,bDefaultValueIsIgnored=False,bAdvancedView=False,)
End Object
Begin Object Class=/Script/BlueprintGraph.K2Node_InputKey Name="K2Node_InputKey_675"
   InputKey=MotionController_Right_FaceButton4
   NodePosX=-304
   NodePosY=-880
   NodeGuid=2F3C6C6F4CF95019ADDC5987840E3A90
   CustomProperties Pin (PinId=56AA20794C0E07D6202330841279B010,PinName="Pressed",Direction="EGPD_Output",PinType.PinCategory="exec",PinType.PinSubCategory="",PinType.PinSubCategoryObject=None,PinType.PinSubCategoryMemberReference=(),PinType.PinValueType=(),PinType.bIsMap=False,PinType.bIsSet=False,PinType.bIsArray=False,PinType.bIsReference=False,PinType.bIsConst=False,PinType.bIsWeakPointer=False,LinkedTo=(K2Node_VariableSet_1083 7086F8D84E7102D2AAAC73A717284D52,),PersistentGuid=00000000000000000000000000000000,bHidden=False,bNotConnectable=False,bDefaultValueIsReadOnly=False,bDefaultValueIsIgnored=False,bAdvancedView=False,)
   CustomProperties Pin (PinId=B118DEE243AF90D85893DEB64ECD5EAB,PinName="Released",Direction="EGPD_Output",PinType.PinCategory="exec",PinType.PinSubCategory="",PinType.PinSubCategoryObject=None,PinType.PinSubCategoryMemberReference=(),PinType.PinValueType=(),PinType.bIsMap=False,PinType.bIsSet=False,PinType.bIsArray=False,PinType.bIsReference=False,PinType.bIsConst=False,PinType.bIsWeakPointer=False,PersistentGuid=00000000000000000000000000000000,bHidden=False,bNotConnectable=False,bDefaultValueIsReadOnly=False,bDefaultValueIsIgnored=False,bAdvancedView=False,)
   CustomProperties Pin (PinId=F89F1FE44148B95879EAC3B03FB0BFCA,PinName="Key",Direction="EGPD_Output",PinType.PinCategory="struct",PinType.PinSubCategory="",PinType.PinSubCategoryObject=ScriptStruct'/Script/InputCore.Key',PinType.PinSubCategoryMemberReference=(),PinType.PinValueType=(),PinType.bIsMap=False,PinType.bIsSet=False,PinType.bIsArray=False,PinType.bIsReference=False,PinType.bIsConst=False,PinType.bIsWeakPointer=False,DefaultValue="AnyKey",PersistentGuid=00000000000000000000000000000000,bHidden=False,bNotConnectable=False,bDefaultValueIsReadOnly=False,bDefaultValueIsIgnored=False,bAdvancedView=False,)
End Object
Begin Object Class=/Script/BlueprintGraph.K2Node_VariableSet Name="K2Node_VariableSet_239"
   VariableReference=(MemberName="FaceButtonText",MemberGuid=F15511E54806C7C059885291FF9AAF27,bSelfContext=True)
   NodePosX=-16
   NodePosY=-1168
   NodeGuid=47B844AC412B87B453C73C987F9B07D0
   CustomProperties Pin (PinId=7086F8D84E7102D2AAAC73A717284D52,PinName="execute",PinType.PinCategory="exec",PinType.PinSubCategory="",PinType.PinSubCategoryObject=None,PinType.PinSubCategoryMemberReference=(),PinType.PinValueType=(),PinType.bIsMap=False,PinType.bIsSet=False,PinType.bIsArray=False,PinType.bIsReference=False,PinType.bIsConst=False,PinType.bIsWeakPointer=False,LinkedTo=(K2Node_InputKey_70 167E144F4A8223EA32A872866056D25C,),PersistentGuid=00000000000000000000000000000000,bHidden=False,bNotConnectable=False,bDefaultValueIsReadOnly=False,bDefaultValueIsIgnored=False,bAdvancedView=False,)
   CustomProperties Pin (PinId=63500149426D44931CA763B85ADEB73D,PinName="then",Direction="EGPD_Output",PinType.PinCategory="exec",PinType.PinSubCategory="",PinType.PinSubCategoryObject=None,PinType.PinSubCategoryMemberReference=(),PinType.PinValueType=(),PinType.bIsMap=False,PinType.bIsSet=False,PinType.bIsArray=False,PinType.bIsReference=False,PinType.bIsConst=False,PinType.bIsWeakPointer=False,LinkedTo=(K2Node_CallFunction_2355 96D7193F444562BF1B9D1A82C15146E1,),PersistentGuid=00000000000000000000000000000000,bHidden=False,bNotConnectable=False,bDefaultValueIsReadOnly=False,bDefaultValueIsIgnored=False,bAdvancedView=False,)
   CustomProperties Pin (PinId=E396746D4A3B7891E114AFA567A2C866,PinName="FaceButtonText",PinType.PinCategory="text",PinType.PinSubCategory="",PinType.PinSubCategoryObject=None,PinType.PinSubCategoryMemberReference=(),PinType.PinValueType=(),PinType.bIsMap=False,PinType.bIsSet=False,PinType.bIsArray=False,PinType.bIsReference=False,PinType.bIsConst=False,PinType.bIsWeakPointer=False,DefaultTextValue=NSLOCTEXT("[C4ACC4FF43E74999CA75679D79E79C6C]", "AC3D26A94ABD2B946F946EAF116D7D93", "Face Button 2"),PersistentGuid=00000000000000000000000000000000,bHidden=False,bNotConnectable=False,bDefaultValueIsReadOnly=False,bDefaultValueIsIgnored=False,bAdvancedView=False,)
   CustomProperties Pin (PinId=367530C44C0C4915FC0E65AD54830B28,PinName="Output_Get",PinToolTip="Retrieves the value of the variable, can use instead of a separate Get node",Direction="EGPD_Output",PinType.PinCategory="text",PinType.PinSubCategory="",PinType.PinSubCategoryObject=None,PinType.PinSubCategoryMemberReference=(),PinType.PinValueType=(),PinType.bIsMap=False,PinType.bIsSet=False,PinType.bIsArray=False,PinType.bIsReference=False,PinType.bIsConst=False,PinType.bIsWeakPointer=False,LinkedTo=(K2Node_CallFunction_2355 FD05F54B48F429BC42F882B6033BFA3B,),PersistentGuid=00000000000000000000000000000000,bHidden=False,bNotConnectable=False,bDefaultValueIsReadOnly=False,bDefaultValueIsIgnored=False,bAdvancedView=False,)
   CustomProperties Pin (PinId=107060D34D288ED8DC0C14AA71422DBE,PinName="self",PinFriendlyName=NSLOCTEXT("K2Node", "Target", "Target"),PinType.PinCategory="object",PinType.PinSubCategory="",PinType.PinSubCategoryObject=BlueprintGeneratedClass'/Game/GearVR_Pawn/GearVR_Pawn_MotionController.GearVR_Pawn_MotionController_C',PinType.PinSubCategoryMemberReference=(),PinType.PinValueType=(),PinType.bIsMap=False,PinType.bIsSet=False,PinType.bIsArray=False,PinType.bIsReference=False,PinType.bIsConst=False,PinType.bIsWeakPointer=False,PersistentGuid=00000000000000000000000000000000,bHidden=True,bNotConnectable=False,bDefaultValueIsReadOnly=False,bDefaultValueIsIgnored=False,bAdvancedView=False,)
End Object
Begin Object Class=/Script/BlueprintGraph.K2Node_VariableSet Name="K2Node_VariableSet_240"
   VariableReference=(MemberName="FaceButtonText",MemberGuid=F15511E54806C7C059885291FF9AAF27,bSelfContext=True)
   NodePosX=-16
   NodePosY=-1024
   NodeGuid=C5B6BF6340F374200A11A383CC4FFE94
   CustomProperties Pin (PinId=7086F8D84E7102D2AAAC73A717284D52,PinName="execute",PinType.PinCategory="exec",PinType.PinSubCategory="",PinType.PinSubCategoryObject=None,PinType.PinSubCategoryMemberReference=(),PinType.PinValueType=(),PinType.bIsMap=False,PinType.bIsSet=False,PinType.bIsArray=False,PinType.bIsReference=False,PinType.bIsConst=False,PinType.bIsWeakPointer=False,LinkedTo=(K2Node_InputKey_47 6246EFCF4D85DCC9594A25815D4717FD,),PersistentGuid=00000000000000000000000000000000,bHidden=False,bNotConnectable=False,bDefaultValueIsReadOnly=False,bDefaultValueIsIgnored=False,bAdvancedView=False,)
   CustomProperties Pin (PinId=63500149426D44931CA763B85ADEB73D,PinName="then",Direction="EGPD_Output",PinType.PinCategory="exec",PinType.PinSubCategory="",PinType.PinSubCategoryObject=None,PinType.PinSubCategoryMemberReference=(),PinType.PinValueType=(),PinType.bIsMap=False,PinType.bIsSet=False,PinType.bIsArray=False,PinType.bIsReference=False,PinType.bIsConst=False,PinType.bIsWeakPointer=False,LinkedTo=(K2Node_CallFunction_2356 96D7193F444562BF1B9D1A82C15146E1,),PersistentGuid=00000000000000000000000000000000,bHidden=False,bNotConnectable=False,bDefaultValueIsReadOnly=False,bDefaultValueIsIgnored=False,bAdvancedView=False,)
   CustomProperties Pin (PinId=E396746D4A3B7891E114AFA567A2C866,PinName="FaceButtonText",PinType.PinCategory="text",PinType.PinSubCategory="",PinType.PinSubCategoryObject=None,PinType.PinSubCategoryMemberReference=(),PinType.PinValueType=(),PinType.bIsMap=False,PinType.bIsSet=False,PinType.bIsArray=False,PinType.bIsReference=False,PinType.bIsConst=False,PinType.bIsWeakPointer=False,DefaultTextValue=NSLOCTEXT("[C4ACC4FF43E74999CA75679D79E79C6C]", "FFE491BC49F7D6AD64CE6886AE4119CB", "Face Button 3"),PersistentGuid=00000000000000000000000000000000,bHidden=False,bNotConnectable=False,bDefaultValueIsReadOnly=False,bDefaultValueIsIgnored=False,bAdvancedView=False,)
   CustomProperties Pin (PinId=367530C44C0C4915FC0E65AD54830B28,PinName="Output_Get",PinToolTip="Retrieves the value of the variable, can use instead of a separate Get node",Direction="EGPD_Output",PinType.PinCategory="text",PinType.PinSubCategory="",PinType.PinSubCategoryObject=None,PinType.PinSubCategoryMemberReference=(),PinType.PinValueType=(),PinType.bIsMap=False,PinType.bIsSet=False,PinType.bIsArray=False,PinType.bIsReference=False,PinType.bIsConst=False,PinType.bIsWeakPointer=False,LinkedTo=(K2Node_CallFunction_2356 FD05F54B48F429BC42F882B6033BFA3B,),PersistentGuid=00000000000000000000000000000000,bHidden=False,bNotConnectable=False,bDefaultValueIsReadOnly=False,bDefaultValueIsIgnored=False,bAdvancedView=False,)
   CustomProperties Pin (PinId=A0E4809F49066E2F115883B73C5A35BB,PinName="self",PinFriendlyName=NSLOCTEXT("K2Node", "Target", "Target"),PinType.PinCategory="object",PinType.PinSubCategory="",PinType.PinSubCategoryObject=BlueprintGeneratedClass'/Game/GearVR_Pawn/GearVR_Pawn_MotionController.GearVR_Pawn_MotionController_C',PinType.PinSubCategoryMemberReference=(),PinType.PinValueType=(),PinType.bIsMap=False,PinType.bIsSet=False,PinType.bIsArray=False,PinType.bIsReference=False,PinType.bIsConst=False,PinType.bIsWeakPointer=False,PersistentGuid=00000000000000000000000000000000,bHidden=True,bNotConnectable=False,bDefaultValueIsReadOnly=False,bDefaultValueIsIgnored=False,bAdvancedView=False,)
End Object
Begin Object Class=/Script/BlueprintGraph.K2Node_VariableSet Name="K2Node_VariableSet_1083"
   VariableReference=(MemberName="FaceButtonText",MemberGuid=F15511E54806C7C059885291FF9AAF27,bSelfContext=True)
   NodePosX=-16
   NodePosY=-864
   NodeGuid=32D1DFFB447C10C7331F61A9302FF83D
   CustomProperties Pin (PinId=7086F8D84E7102D2AAAC73A717284D52,PinName="execute",PinType.PinCategory="exec",PinType.PinSubCategory="",PinType.PinSubCategoryObject=None,PinType.PinSubCategoryMemberReference=(),PinType.PinValueType=(),PinType.bIsMap=False,PinType.bIsSet=False,PinType.bIsArray=False,PinType.bIsReference=False,PinType.bIsConst=False,PinType.bIsWeakPointer=False,LinkedTo=(K2Node_InputKey_675 56AA20794C0E07D6202330841279B010,),PersistentGuid=00000000000000000000000000000000,bHidden=False,bNotConnectable=False,bDefaultValueIsReadOnly=False,bDefaultValueIsIgnored=False,bAdvancedView=False,)
   CustomProperties Pin (PinId=63500149426D44931CA763B85ADEB73D,PinName="then",Direction="EGPD_Output",PinType.PinCategory="exec",PinType.PinSubCategory="",PinType.PinSubCategoryObject=None,PinType.PinSubCategoryMemberReference=(),PinType.PinValueType=(),PinType.bIsMap=False,PinType.bIsSet=False,PinType.bIsArray=False,PinType.bIsReference=False,PinType.bIsConst=False,PinType.bIsWeakPointer=False,LinkedTo=(K2Node_CallFunction_7739 96D7193F444562BF1B9D1A82C15146E1,),PersistentGuid=00000000000000000000000000000000,bHidden=False,bNotConnectable=False,bDefaultValueIsReadOnly=False,bDefaultValueIsIgnored=False,bAdvancedView=False,)
   CustomProperties Pin (PinId=E396746D4A3B7891E114AFA567A2C866,PinName="FaceButtonText",PinType.PinCategory="text",PinType.PinSubCategory="",PinType.PinSubCategoryObject=None,PinType.PinSubCategoryMemberReference=(),PinType.PinValueType=(),PinType.bIsMap=False,PinType.bIsSet=False,PinType.bIsArray=False,PinType.bIsReference=False,PinType.bIsConst=False,PinType.bIsWeakPointer=False,DefaultTextValue=NSLOCTEXT("[C4ACC4FF43E74999CA75679D79E79C6C]", "8B6D582746B55A019C03A79ACF92EBE4", "Face Button 4"),PersistentGuid=00000000000000000000000000000000,bHidden=False,bNotConnectable=False,bDefaultValueIsReadOnly=False,bDefaultValueIsIgnored=False,bAdvancedView=False,)
   CustomProperties Pin (PinId=367530C44C0C4915FC0E65AD54830B28,PinName="Output_Get",PinToolTip="Retrieves the value of the variable, can use instead of a separate Get node",Direction="EGPD_Output",PinType.PinCategory="text",PinType.PinSubCategory="",PinType.PinSubCategoryObject=None,PinType.PinSubCategoryMemberReference=(),PinType.PinValueType=(),PinType.bIsMap=False,PinType.bIsSet=False,PinType.bIsArray=False,PinType.bIsReference=False,PinType.bIsConst=False,PinType.bIsWeakPointer=False,LinkedTo=(K2Node_CallFunction_7739 FD05F54B48F429BC42F882B6033BFA3B,),PersistentGuid=00000000000000000000000000000000,bHidden=False,bNotConnectable=False,bDefaultValueIsReadOnly=False,bDefaultValueIsIgnored=False,bAdvancedView=False,)
   CustomProperties Pin (PinId=D217BF514A0F90C066BC6790165FC030,PinName="self",PinFriendlyName=NSLOCTEXT("K2Node", "Target", "Target"),PinType.PinCategory="object",PinType.PinSubCategory="",PinType.PinSubCategoryObject=BlueprintGeneratedClass'/Game/GearVR_Pawn/GearVR_Pawn_MotionController.GearVR_Pawn_MotionController_C',PinType.PinSubCategoryMemberReference=(),PinType.PinValueType=(),PinType.bIsMap=False,PinType.bIsSet=False,PinType.bIsArray=False,PinType.bIsReference=False,PinType.bIsConst=False,PinType.bIsWeakPointer=False,PersistentGuid=00000000000000000000000000000000,bHidden=True,bNotConnectable=False,bDefaultValueIsReadOnly=False,bDefaultValueIsIgnored=False,bAdvancedView=False,)
End Object
Begin Object Class=/Script/BlueprintGraph.K2Node_CallFunction Name="K2Node_CallFunction_2355"
   FunctionReference=(MemberParent=Class'/Script/Engine.TextRenderComponent',MemberName="K2_SetText")
   NodePosX=368
   NodePosY=-1216
   NodeGuid=1CCF41CB41F5021C008851B9A2D92D75
   CustomProperties Pin (PinId=96D7193F444562BF1B9D1A82C15146E1,PinName="execute",PinToolTip="\nExec",PinType.PinCategory="exec",PinType.PinSubCategory="",PinType.PinSubCategoryObject=None,PinType.PinSubCategoryMemberReference=(),PinType.PinValueType=(),PinType.bIsMap=False,PinType.bIsSet=False,PinType.bIsArray=False,PinType.bIsReference=False,PinType.bIsConst=False,PinType.bIsWeakPointer=False,LinkedTo=(K2Node_VariableSet_239 63500149426D44931CA763B85ADEB73D,),PersistentGuid=00000000000000000000000000000000,bHidden=False,bNotConnectable=False,bDefaultValueIsReadOnly=False,bDefaultValueIsIgnored=False,bAdvancedView=False,)
   CustomProperties Pin (PinId=66DCFA3744967675B795929682EA35F0,PinName="then",PinToolTip="\nExec",Direction="EGPD_Output",PinType.PinCategory="exec",PinType.PinSubCategory="",PinType.PinSubCategoryObject=None,PinType.PinSubCategoryMemberReference=(),PinType.PinValueType=(),PinType.bIsMap=False,PinType.bIsSet=False,PinType.bIsArray=False,PinType.bIsReference=False,PinType.bIsConst=False,PinType.bIsWeakPointer=False,PersistentGuid=00000000000000000000000000000000,bHidden=False,bNotConnectable=False,bDefaultValueIsReadOnly=False,bDefaultValueIsIgnored=False,bAdvancedView=False,)
   CustomProperties Pin (PinId=24D9A43A4CC5BB2E7963438C3FE88719,PinName="self",PinFriendlyName=NSLOCTEXT("K2Node", "Target", "Target"),PinToolTip="Target\nText Render Component Reference",PinType.PinCategory="object",PinType.PinSubCategory="",PinType.PinSubCategoryObject=Class'/Script/Engine.TextRenderComponent',PinType.PinSubCategoryMemberReference=(),PinType.PinValueType=(),PinType.bIsMap=False,PinType.bIsSet=False,PinType.bIsArray=False,PinType.bIsReference=False,PinType.bIsConst=False,PinType.bIsWeakPointer=False,LinkedTo=(K2Node_VariableGet_5 BD58F6B3484F733566EF86874304DA91,),PersistentGuid=00000000000000000000000000000000,bHidden=False,bNotConnectable=False,bDefaultValueIsReadOnly=False,bDefaultValueIsIgnored=False,bAdvancedView=False,)
   CustomProperties Pin (PinId=FD05F54B48F429BC42F882B6033BFA3B,PinName="Value",PinToolTip="Value\nText (by ref)",PinType.PinCategory="text",PinType.PinSubCategory="",PinType.PinSubCategoryObject=None,PinType.PinSubCategoryMemberReference=(),PinType.PinValueType=(),PinType.bIsMap=False,PinType.bIsSet=False,PinType.bIsArray=False,PinType.bIsReference=True,PinType.bIsConst=True,PinType.bIsWeakPointer=False,LinkedTo=(K2Node_VariableSet_239 367530C44C0C4915FC0E65AD54830B28,),PersistentGuid=00000000000000000000000000000000,bHidden=False,bNotConnectable=False,bDefaultValueIsReadOnly=False,bDefaultValueIsIgnored=True,bAdvancedView=False,)
End Object
Begin Object Class=/Script/BlueprintGraph.K2Node_CallFunction Name="K2Node_CallFunction_2356"
   FunctionReference=(MemberParent=Class'/Script/Engine.TextRenderComponent',MemberName="K2_SetText")
   NodePosX=368
   NodePosY=-1056
   NodeGuid=112B3CD24441090F61C2F193DE94E49F
   CustomProperties Pin (PinId=96D7193F444562BF1B9D1A82C15146E1,PinName="execute",PinToolTip="\nExec",PinType.PinCategory="exec",PinType.PinSubCategory="",PinType.PinSubCategoryObject=None,PinType.PinSubCategoryMemberReference=(),PinType.PinValueType=(),PinType.bIsMap=False,PinType.bIsSet=False,PinType.bIsArray=False,PinType.bIsReference=False,PinType.bIsConst=False,PinType.bIsWeakPointer=False,LinkedTo=(K2Node_VariableSet_240 63500149426D44931CA763B85ADEB73D,),PersistentGuid=00000000000000000000000000000000,bHidden=False,bNotConnectable=False,bDefaultValueIsReadOnly=False,bDefaultValueIsIgnored=False,bAdvancedView=False,)
   CustomProperties Pin (PinId=66DCFA3744967675B795929682EA35F0,PinName="then",PinToolTip="\nExec",Direction="EGPD_Output",PinType.PinCategory="exec",PinType.PinSubCategory="",PinType.PinSubCategoryObject=None,PinType.PinSubCategoryMemberReference=(),PinType.PinValueType=(),PinType.bIsMap=False,PinType.bIsSet=False,PinType.bIsArray=False,PinType.bIsReference=False,PinType.bIsConst=False,PinType.bIsWeakPointer=False,PersistentGuid=00000000000000000000000000000000,bHidden=False,bNotConnectable=False,bDefaultValueIsReadOnly=False,bDefaultValueIsIgnored=False,bAdvancedView=False,)
   CustomProperties Pin (PinId=24D9A43A4CC5BB2E7963438C3FE88719,PinName="self",PinFriendlyName=NSLOCTEXT("K2Node", "Target", "Target"),PinToolTip="Target\nText Render Component Reference",PinType.PinCategory="object",PinType.PinSubCategory="",PinType.PinSubCategoryObject=Class'/Script/Engine.TextRenderComponent',PinType.PinSubCategoryMemberReference=(),PinType.PinValueType=(),PinType.bIsMap=False,PinType.bIsSet=False,PinType.bIsArray=False,PinType.bIsReference=False,PinType.bIsConst=False,PinType.bIsWeakPointer=False,LinkedTo=(K2Node_VariableGet_5 BD58F6B3484F733566EF86874304DA91,),PersistentGuid=00000000000000000000000000000000,bHidden=False,bNotConnectable=False,bDefaultValueIsReadOnly=False,bDefaultValueIsIgnored=False,bAdvancedView=False,)
   CustomProperties Pin (PinId=FD05F54B48F429BC42F882B6033BFA3B,PinName="Value",PinToolTip="Value\nText (by ref)",PinType.PinCategory="text",PinType.PinSubCategory="",PinType.PinSubCategoryObject=None,PinType.PinSubCategoryMemberReference=(),PinType.PinValueType=(),PinType.bIsMap=False,PinType.bIsSet=False,PinType.bIsArray=False,PinType.bIsReference=True,PinType.bIsConst=True,PinType.bIsWeakPointer=False,LinkedTo=(K2Node_VariableSet_240 367530C44C0C4915FC0E65AD54830B28,),PersistentGuid=00000000000000000000000000000000,bHidden=False,bNotConnectable=False,bDefaultValueIsReadOnly=False,bDefaultValueIsIgnored=True,bAdvancedView=False,)
End Object
Begin Object Class=/Script/BlueprintGraph.K2Node_CallFunction Name="K2Node_CallFunction_7739"
   FunctionReference=(MemberParent=Class'/Script/Engine.TextRenderComponent',MemberName="K2_SetText")
   NodePosX=368
   NodePosY=-896
   NodeGuid=D2D1F7C84B9D6DB950D888912A1A1367
   CustomProperties Pin (PinId=96D7193F444562BF1B9D1A82C15146E1,PinName="execute",PinToolTip="\nExec",PinType.PinCategory="exec",PinType.PinSubCategory="",PinType.PinSubCategoryObject=None,PinType.PinSubCategoryMemberReference=(),PinType.PinValueType=(),PinType.bIsMap=False,PinType.bIsSet=False,PinType.bIsArray=False,PinType.bIsReference=False,PinType.bIsConst=False,PinType.bIsWeakPointer=False,LinkedTo=(K2Node_VariableSet_1083 63500149426D44931CA763B85ADEB73D,),PersistentGuid=00000000000000000000000000000000,bHidden=False,bNotConnectable=False,bDefaultValueIsReadOnly=False,bDefaultValueIsIgnored=False,bAdvancedView=False,)
   CustomProperties Pin (PinId=66DCFA3744967675B795929682EA35F0,PinName="then",PinToolTip="\nExec",Direction="EGPD_Output",PinType.PinCategory="exec",PinType.PinSubCategory="",PinType.PinSubCategoryObject=None,PinType.PinSubCategoryMemberReference=(),PinType.PinValueType=(),PinType.bIsMap=False,PinType.bIsSet=False,PinType.bIsArray=False,PinType.bIsReference=False,PinType.bIsConst=False,PinType.bIsWeakPointer=False,PersistentGuid=00000000000000000000000000000000,bHidden=False,bNotConnectable=False,bDefaultValueIsReadOnly=False,bDefaultValueIsIgnored=False,bAdvancedView=False,)
   CustomProperties Pin (PinId=24D9A43A4CC5BB2E7963438C3FE88719,PinName="self",PinFriendlyName=NSLOCTEXT("K2Node", "Target", "Target"),PinToolTip="Target\nText Render Component Reference",PinType.PinCategory="object",PinType.PinSubCategory="",PinType.PinSubCategoryObject=Class'/Script/Engine.TextRenderComponent',PinType.PinSubCategoryMemberReference=(),PinType.PinValueType=(),PinType.bIsMap=False,PinType.bIsSet=False,PinType.bIsArray=False,PinType.bIsReference=False,PinType.bIsConst=False,PinType.bIsWeakPointer=False,LinkedTo=(K2Node_VariableGet_5 BD58F6B3484F733566EF86874304DA91,),PersistentGuid=00000000000000000000000000000000,bHidden=False,bNotConnectable=False,bDefaultValueIsReadOnly=False,bDefaultValueIsIgnored=False,bAdvancedView=False,)
   CustomProperties Pin (PinId=FD05F54B48F429BC42F882B6033BFA3B,PinName="Value",PinToolTip="Value\nText (by ref)",PinType.PinCategory="text",PinType.PinSubCategory="",PinType.PinSubCategoryObject=None,PinType.PinSubCategoryMemberReference=(),PinType.PinValueType=(),PinType.bIsMap=False,PinType.bIsSet=False,PinType.bIsArray=False,PinType.bIsReference=True,PinType.bIsConst=True,PinType.bIsWeakPointer=False,LinkedTo=(K2Node_VariableSet_1083 367530C44C0C4915FC0E65AD54830B28,),PersistentGuid=00000000000000000000000000000000,bHidden=False,bNotConnectable=False,bDefaultValueIsReadOnly=False,bDefaultValueIsIgnored=True,bAdvancedView=False,)
End Object
Begin Object Class=/Script/BlueprintGraph.K2Node_InputKey Name="K2Node_InputKey_27"
   InputKey=MotionController_Right_FaceButton6
   NodePosX=-304
   NodePosY=-736
   NodeGuid=B65E42714A5E5898745F05AB07A87FDD
   CustomProperties Pin (PinId=56AA20794C0E07D6202330841279B010,PinName="Pressed",Direction="EGPD_Output",PinType.PinCategory="exec",PinType.PinSubCategory="",PinType.PinSubCategoryObject=None,PinType.PinSubCategoryMemberReference=(),PinType.PinValueType=(),PinType.bIsMap=False,PinType.bIsSet=False,PinType.bIsArray=False,PinType.bIsReference=False,PinType.bIsConst=False,PinType.bIsWeakPointer=False,LinkedTo=(K2Node_VariableSet_828 7086F8D84E7102D2AAAC73A717284D52,),PersistentGuid=00000000000000000000000000000000,bHidden=False,bNotConnectable=False,bDefaultValueIsReadOnly=False,bDefaultValueIsIgnored=False,bAdvancedView=False,)
   CustomProperties Pin (PinId=B118DEE243AF90D85893DEB64ECD5EAB,PinName="Released",Direction="EGPD_Output",PinType.PinCategory="exec",PinType.PinSubCategory="",PinType.PinSubCategoryObject=None,PinType.PinSubCategoryMemberReference=(),PinType.PinValueType=(),PinType.bIsMap=False,PinType.bIsSet=False,PinType.bIsArray=False,PinType.bIsReference=False,PinType.bIsConst=False,PinType.bIsWeakPointer=False,PersistentGuid=00000000000000000000000000000000,bHidden=False,bNotConnectable=False,bDefaultValueIsReadOnly=False,bDefaultValueIsIgnored=False,bAdvancedView=False,)
   CustomProperties Pin (PinId=F89F1FE44148B95879EAC3B03FB0BFCA,PinName="Key",Direction="EGPD_Output",PinType.PinCategory="struct",PinType.PinSubCategory="",PinType.PinSubCategoryObject=ScriptStruct'/Script/InputCore.Key',PinType.PinSubCategoryMemberReference=(),PinType.PinValueType=(),PinType.bIsMap=False,PinType.bIsSet=False,PinType.bIsArray=False,PinType.bIsReference=False,PinType.bIsConst=False,PinType.bIsWeakPointer=False,DefaultValue="AnyKey",PersistentGuid=00000000000000000000000000000000,bHidden=False,bNotConnectable=False,bDefaultValueIsReadOnly=False,bDefaultValueIsIgnored=False,bAdvancedView=False,)
End Object
Begin Object Class=/Script/BlueprintGraph.K2Node_VariableSet Name="K2Node_VariableSet_828"
   VariableReference=(MemberName="FaceButtonText",MemberGuid=F15511E54806C7C059885291FF9AAF27,bSelfContext=True)
   NodePosX=-16
   NodePosY=-720
   NodeGuid=59A34EA0423FAFD678238D8900CCC4DE
   CustomProperties Pin (PinId=7086F8D84E7102D2AAAC73A717284D52,PinName="execute",PinType.PinCategory="exec",PinType.PinSubCategory="",PinType.PinSubCategoryObject=None,PinType.PinSubCategoryMemberReference=(),PinType.PinValueType=(),PinType.bIsMap=False,PinType.bIsSet=False,PinType.bIsArray=False,PinType.bIsReference=False,PinType.bIsConst=False,PinType.bIsWeakPointer=False,LinkedTo=(K2Node_InputKey_27 56AA20794C0E07D6202330841279B010,),PersistentGuid=00000000000000000000000000000000,bHidden=False,bNotConnectable=False,bDefaultValueIsReadOnly=False,bDefaultValueIsIgnored=False,bAdvancedView=False,)
   CustomProperties Pin (PinId=63500149426D44931CA763B85ADEB73D,PinName="then",Direction="EGPD_Output",PinType.PinCategory="exec",PinType.PinSubCategory="",PinType.PinSubCategoryObject=None,PinType.PinSubCategoryMemberReference=(),PinType.PinValueType=(),PinType.bIsMap=False,PinType.bIsSet=False,PinType.bIsArray=False,PinType.bIsReference=False,PinType.bIsConst=False,PinType.bIsWeakPointer=False,LinkedTo=(K2Node_CallFunction_6047 96D7193F444562BF1B9D1A82C15146E1,),PersistentGuid=00000000000000000000000000000000,bHidden=False,bNotConnectable=False,bDefaultValueIsReadOnly=False,bDefaultValueIsIgnored=False,bAdvancedView=False,)
   CustomProperties Pin (PinId=E396746D4A3B7891E114AFA567A2C866,PinName="FaceButtonText",PinType.PinCategory="text",PinType.PinSubCategory="",PinType.PinSubCategoryObject=None,PinType.PinSubCategoryMemberReference=(),PinType.PinValueType=(),PinType.bIsMap=False,PinType.bIsSet=False,PinType.bIsArray=False,PinType.bIsReference=False,PinType.bIsConst=False,PinType.bIsWeakPointer=False,DefaultTextValue=NSLOCTEXT("[C4ACC4FF43E74999CA75679D79E79C6C]", "4C180B4A4A0AA70382ED3DB9A471AB29", "Face Button 5"),PersistentGuid=00000000000000000000000000000000,bHidden=False,bNotConnectable=False,bDefaultValueIsReadOnly=False,bDefaultValueIsIgnored=False,bAdvancedView=False,)
   CustomProperties Pin (PinId=367530C44C0C4915FC0E65AD54830B28,PinName="Output_Get",PinToolTip="Retrieves the value of the variable, can use instead of a separate Get node",Direction="EGPD_Output",PinType.PinCategory="text",PinType.PinSubCategory="",PinType.PinSubCategoryObject=None,PinType.PinSubCategoryMemberReference=(),PinType.PinValueType=(),PinType.bIsMap=False,PinType.bIsSet=False,PinType.bIsArray=False,PinType.bIsReference=False,PinType.bIsConst=False,PinType.bIsWeakPointer=False,LinkedTo=(K2Node_CallFunction_6047 FD05F54B48F429BC42F882B6033BFA3B,),PersistentGuid=00000000000000000000000000000000,bHidden=False,bNotConnectable=False,bDefaultValueIsReadOnly=False,bDefaultValueIsIgnored=False,bAdvancedView=False,)
   CustomProperties Pin (PinId=DB9C57934BE943B76CA944A33EA7D4D2,PinName="self",PinFriendlyName=NSLOCTEXT("K2Node", "Target", "Target"),PinType.PinCategory="object",PinType.PinSubCategory="",PinType.PinSubCategoryObject=BlueprintGeneratedClass'/Game/GearVR_Pawn/GearVR_Pawn_MotionController.GearVR_Pawn_MotionController_C',PinType.PinSubCategoryMemberReference=(),PinType.PinValueType=(),PinType.bIsMap=False,PinType.bIsSet=False,PinType.bIsArray=False,PinType.bIsReference=False,PinType.bIsConst=False,PinType.bIsWeakPointer=False,PersistentGuid=00000000000000000000000000000000,bHidden=True,bNotConnectable=False,bDefaultValueIsReadOnly=False,bDefaultValueIsIgnored=False,bAdvancedView=False,)
End Object
Begin Object Class=/Script/BlueprintGraph.K2Node_CallFunction Name="K2Node_CallFunction_6047"
   FunctionReference=(MemberParent=Class'/Script/Engine.TextRenderComponent',MemberName="K2_SetText")
   NodePosX=368
   NodePosY=-736
   NodeGuid=74226AA74B25E061678433806119C724
   CustomProperties Pin (PinId=96D7193F444562BF1B9D1A82C15146E1,PinName="execute",PinToolTip="\nExec",PinType.PinCategory="exec",PinType.PinSubCategory="",PinType.PinSubCategoryObject=None,PinType.PinSubCategoryMemberReference=(),PinType.PinValueType=(),PinType.bIsMap=False,PinType.bIsSet=False,PinType.bIsArray=False,PinType.bIsReference=False,PinType.bIsConst=False,PinType.bIsWeakPointer=False,LinkedTo=(K2Node_VariableSet_828 63500149426D44931CA763B85ADEB73D,),PersistentGuid=00000000000000000000000000000000,bHidden=False,bNotConnectable=False,bDefaultValueIsReadOnly=False,bDefaultValueIsIgnored=False,bAdvancedView=False,)
   CustomProperties Pin (PinId=66DCFA3744967675B795929682EA35F0,PinName="then",PinToolTip="\nExec",Direction="EGPD_Output",PinType.PinCategory="exec",PinType.PinSubCategory="",PinType.PinSubCategoryObject=None,PinType.PinSubCategoryMemberReference=(),PinType.PinValueType=(),PinType.bIsMap=False,PinType.bIsSet=False,PinType.bIsArray=False,PinType.bIsReference=False,PinType.bIsConst=False,PinType.bIsWeakPointer=False,PersistentGuid=00000000000000000000000000000000,bHidden=False,bNotConnectable=False,bDefaultValueIsReadOnly=False,bDefaultValueIsIgnored=False,bAdvancedView=False,)
   CustomProperties Pin (PinId=24D9A43A4CC5BB2E7963438C3FE88719,PinName="self",PinFriendlyName=NSLOCTEXT("K2Node", "Target", "Target"),PinToolTip="Target\nText Render Component Reference",PinType.PinCategory="object",PinType.PinSubCategory="",PinType.PinSubCategoryObject=Class'/Script/Engine.TextRenderComponent',PinType.PinSubCategoryMemberReference=(),PinType.PinValueType=(),PinType.bIsMap=False,PinType.bIsSet=False,PinType.bIsArray=False,PinType.bIsReference=False,PinType.bIsConst=False,PinType.bIsWeakPointer=False,LinkedTo=(K2Node_VariableGet_5 BD58F6B3484F733566EF86874304DA91,),PersistentGuid=00000000000000000000000000000000,bHidden=False,bNotConnectable=False,bDefaultValueIsReadOnly=False,bDefaultValueIsIgnored=False,bAdvancedView=False,)
   CustomProperties Pin (PinId=FD05F54B48F429BC42F882B6033BFA3B,PinName="Value",PinToolTip="Value\nText (by ref)",PinType.PinCategory="text",PinType.PinSubCategory="",PinType.PinSubCategoryObject=None,PinType.PinSubCategoryMemberReference=(),PinType.PinValueType=(),PinType.bIsMap=False,PinType.bIsSet=False,PinType.bIsArray=False,PinType.bIsReference=True,PinType.bIsConst=True,PinType.bIsWeakPointer=False,LinkedTo=(K2Node_VariableSet_828 367530C44C0C4915FC0E65AD54830B28,),PersistentGuid=00000000000000000000000000000000,bHidden=False,bNotConnectable=False,bDefaultValueIsReadOnly=False,bDefaultValueIsIgnored=True,bAdvancedView=False,)
End Object
END OBJECT
Click for full image.
-
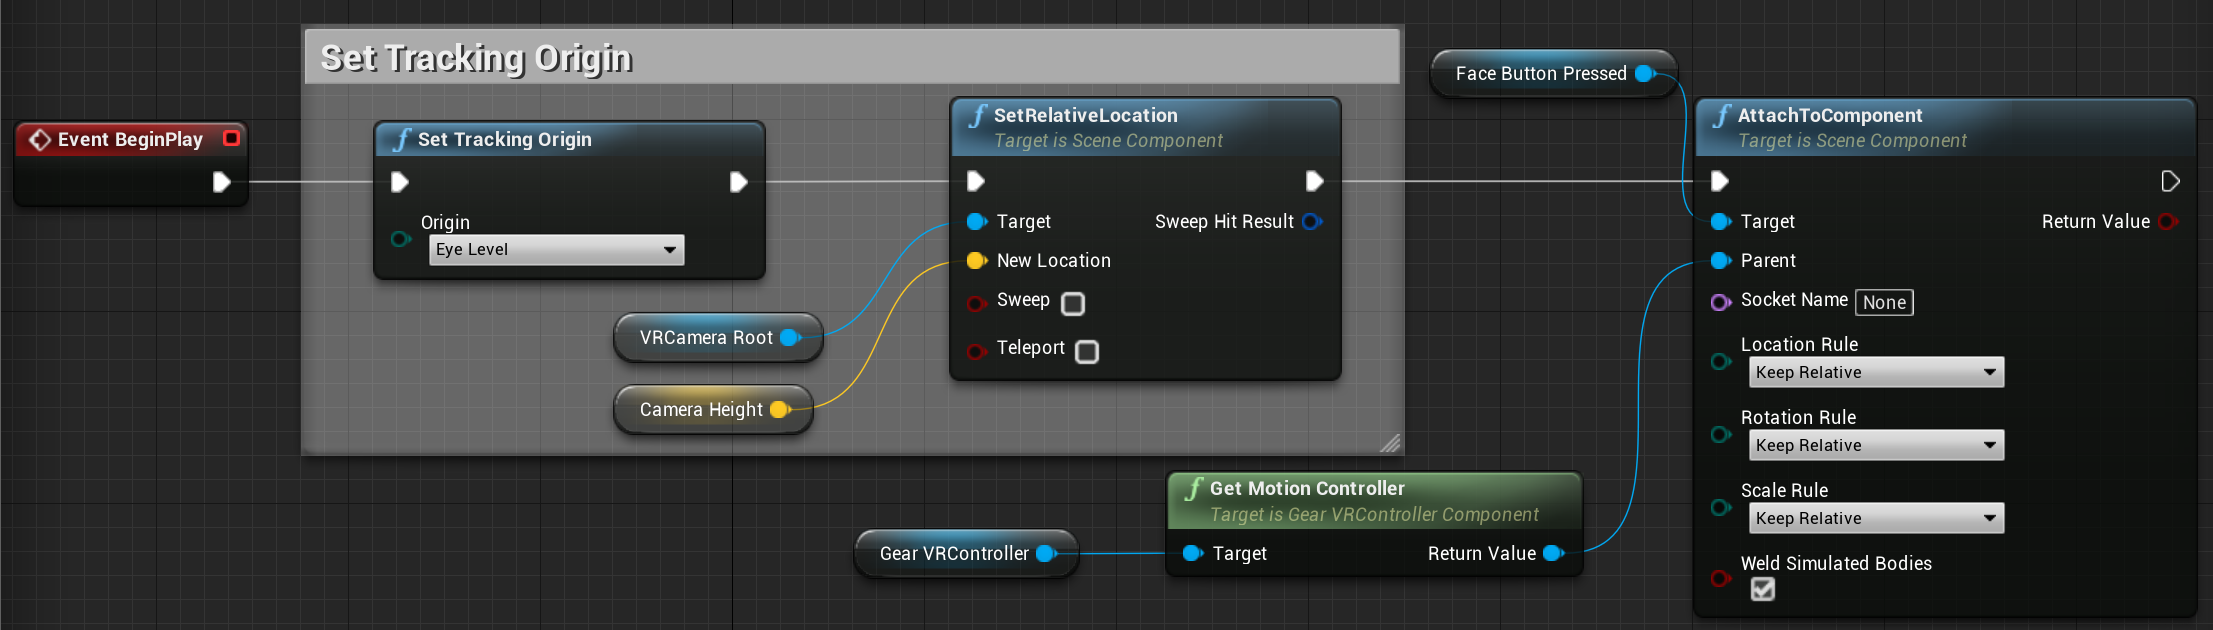
Finally, we need to attach the text that tells us which Motion Controller is pressed to the Motion Controller so that when the Motion Controller is moved, the text will move along with it. To get this working first add the following nodes to the Event Graph:
Node Name
Default Value
GearVRController
N/A
FaceButtonPressed
N/A
Get Motion Controller
N/A
AttachToComponent
N/A
Once the nodes have been added, connect the AttachToComponent node to the output of the SetRelativeLocation node. Then connect the FaceButtonPressed to the Target input on the AttachToComponent node. Finally, connect the GearVRController to the GetMotionController node and connect the output of that into the Parent input on the AttachToComponent node and when completed this part of your Blueprint should look like the following image.
Copy Node Graph![HTGVRTouchpad_09.png]()
BEGIN OBJECT
                Begin Object Class=/Script/BlueprintGraph.K2Node_Event Name="K2Node_Event_3"
   EventReference=(MemberParent=Class'/Script/Engine.Actor',MemberName="ReceiveBeginPlay")
   bOverrideFunction=True
   NodePosX=-480
   NodePosY=640
   NodeGuid=CFD8FE4E4AB7DBCE50A5D9A03A18A492
   CustomProperties Pin (PinId=AFA3867A4AF5FF821E532D8C61A8BD25,PinName="OutputDelegate",Direction="EGPD_Output",PinType.PinCategory="delegate",PinType.PinSubCategory="",PinType.PinSubCategoryObject=None,PinType.PinSubCategoryMemberReference=(MemberParent=Class'/Script/Engine.Actor',MemberName="ReceiveBeginPlay"),PinType.PinValueType=(),PinType.bIsMap=False,PinType.bIsSet=False,PinType.bIsArray=False,PinType.bIsReference=False,PinType.bIsConst=False,PinType.bIsWeakPointer=False,PersistentGuid=00000000000000000000000000000000,bHidden=False,bNotConnectable=False,bDefaultValueIsReadOnly=False,bDefaultValueIsIgnored=False,bAdvancedView=False,)
   CustomProperties Pin (PinId=411DC79A44290122965E6E8DEC74847D,PinName="then",Direction="EGPD_Output",PinType.PinCategory="exec",PinType.PinSubCategory="",PinType.PinSubCategoryObject=None,PinType.PinSubCategoryMemberReference=(),PinType.PinValueType=(),PinType.bIsMap=False,PinType.bIsSet=False,PinType.bIsArray=False,PinType.bIsReference=False,PinType.bIsConst=False,PinType.bIsWeakPointer=False,LinkedTo=(K2Node_CallFunction_1 3D7A29FF47171501A97138AD19D4171C,),PersistentGuid=00000000000000000000000000000000,bHidden=False,bNotConnectable=False,bDefaultValueIsReadOnly=False,bDefaultValueIsIgnored=False,bAdvancedView=False,)
End Object
Begin Object Class=/Script/BlueprintGraph.K2Node_CallFunction Name="K2Node_CallFunction_1"
   FunctionReference=(MemberParent=Class'/Script/Engine.HeadMountedDisplayFunctionLibrary',MemberName="SetTrackingOrigin")
   NodePosX=-240
   NodePosY=640
   NodeGuid=D4B323944A89C6160384BF86F6EC418F
   CustomProperties Pin (PinId=3D7A29FF47171501A97138AD19D4171C,PinName="execute",PinToolTip="\nExec",PinType.PinCategory="exec",PinType.PinSubCategory="",PinType.PinSubCategoryObject=None,PinType.PinSubCategoryMemberReference=(),PinType.PinValueType=(),PinType.bIsMap=False,PinType.bIsSet=False,PinType.bIsArray=False,PinType.bIsReference=False,PinType.bIsConst=False,PinType.bIsWeakPointer=False,LinkedTo=(K2Node_Event_3 411DC79A44290122965E6E8DEC74847D,),PersistentGuid=00000000000000000000000000000000,bHidden=False,bNotConnectable=False,bDefaultValueIsReadOnly=False,bDefaultValueIsIgnored=False,bAdvancedView=False,)
   CustomProperties Pin (PinId=531310494E6C6680D37032ADC4A9A30B,PinName="then",PinToolTip="\nExec",Direction="EGPD_Output",PinType.PinCategory="exec",PinType.PinSubCategory="",PinType.PinSubCategoryObject=None,PinType.PinSubCategoryMemberReference=(),PinType.PinValueType=(),PinType.bIsMap=False,PinType.bIsSet=False,PinType.bIsArray=False,PinType.bIsReference=False,PinType.bIsConst=False,PinType.bIsWeakPointer=False,LinkedTo=(K2Node_CallFunction_2 A78495AB45D9776B8C64AB87763A0EAE,),PersistentGuid=00000000000000000000000000000000,bHidden=False,bNotConnectable=False,bDefaultValueIsReadOnly=False,bDefaultValueIsIgnored=False,bAdvancedView=False,)
   CustomProperties Pin (PinId=208C0AB145122075DD37BF94C43BFD44,PinName="self",PinFriendlyName=NSLOCTEXT("K2Node", "Target", "Target"),PinToolTip="Target\nHead Mounted Display Function Library Reference",PinType.PinCategory="object",PinType.PinSubCategory="",PinType.PinSubCategoryObject=Class'/Script/Engine.HeadMountedDisplayFunctionLibrary',PinType.PinSubCategoryMemberReference=(),PinType.PinValueType=(),PinType.bIsMap=False,PinType.bIsSet=False,PinType.bIsArray=False,PinType.bIsReference=False,PinType.bIsConst=False,PinType.bIsWeakPointer=False,DefaultObject="/Script/Engine.Default__HeadMountedDisplayFunctionLibrary",PersistentGuid=00000000000000000000000000000000,bHidden=True,bNotConnectable=False,bDefaultValueIsReadOnly=False,bDefaultValueIsIgnored=False,bAdvancedView=False,)
   CustomProperties Pin (PinId=B65401E44C63D606F066DC93B491B59B,PinName="Origin",PinToolTip="Origin\nEHMDTrackingOrigin Enum",PinType.PinCategory="byte",PinType.PinSubCategory="",PinType.PinSubCategoryObject=Enum'/Script/Engine.EHMDTrackingOrigin',PinType.PinSubCategoryMemberReference=(),PinType.PinValueType=(),PinType.bIsMap=False,PinType.bIsSet=False,PinType.bIsArray=False,PinType.bIsReference=False,PinType.bIsConst=False,PinType.bIsWeakPointer=False,DefaultValue="Eye",PersistentGuid=00000000000000000000000000000000,bHidden=False,bNotConnectable=False,bDefaultValueIsReadOnly=False,bDefaultValueIsIgnored=False,bAdvancedView=False,)
End Object
Begin Object Class=/Script/BlueprintGraph.K2Node_CallFunction Name="K2Node_CallFunction_2"
   FunctionReference=(MemberParent=Class'/Script/Engine.SceneComponent',MemberName="K2_SetRelativeLocation")
   NodePosX=144
   NodePosY=624
   NodeGuid=5AC00D864D4BE3BFEA35F49932ECEA14
   CustomProperties Pin (PinId=A78495AB45D9776B8C64AB87763A0EAE,PinName="execute",PinToolTip="\nExec",PinType.PinCategory="exec",PinType.PinSubCategory="",PinType.PinSubCategoryObject=None,PinType.PinSubCategoryMemberReference=(),PinType.PinValueType=(),PinType.bIsMap=False,PinType.bIsSet=False,PinType.bIsArray=False,PinType.bIsReference=False,PinType.bIsConst=False,PinType.bIsWeakPointer=False,LinkedTo=(K2Node_CallFunction_1 531310494E6C6680D37032ADC4A9A30B,),PersistentGuid=00000000000000000000000000000000,bHidden=False,bNotConnectable=False,bDefaultValueIsReadOnly=False,bDefaultValueIsIgnored=False,bAdvancedView=False,)
   CustomProperties Pin (PinId=F04BDF1147BA7E125E4840A88C069D20,PinName="then",PinToolTip="\nExec",Direction="EGPD_Output",PinType.PinCategory="exec",PinType.PinSubCategory="",PinType.PinSubCategoryObject=None,PinType.PinSubCategoryMemberReference=(),PinType.PinValueType=(),PinType.bIsMap=False,PinType.bIsSet=False,PinType.bIsArray=False,PinType.bIsReference=False,PinType.bIsConst=False,PinType.bIsWeakPointer=False,LinkedTo=(K2Node_CallFunction_29 848D99F94FB3B4B6E6754784B160122F,),PersistentGuid=00000000000000000000000000000000,bHidden=False,bNotConnectable=False,bDefaultValueIsReadOnly=False,bDefaultValueIsIgnored=False,bAdvancedView=False,)
   CustomProperties Pin (PinId=33E937D74128D41E79BFA19357F17FCC,PinName="self",PinFriendlyName=NSLOCTEXT("K2Node", "Target", "Target"),PinToolTip="Target\nScene Component Reference",PinType.PinCategory="object",PinType.PinSubCategory="",PinType.PinSubCategoryObject=Class'/Script/Engine.SceneComponent',PinType.PinSubCategoryMemberReference=(),PinType.PinValueType=(),PinType.bIsMap=False,PinType.bIsSet=False,PinType.bIsArray=False,PinType.bIsReference=False,PinType.bIsConst=False,PinType.bIsWeakPointer=False,LinkedTo=(K2Node_VariableGet_0 D54F70164DEB290CF70605B4FA2B6DDC,),PersistentGuid=00000000000000000000000000000000,bHidden=False,bNotConnectable=False,bDefaultValueIsReadOnly=False,bDefaultValueIsIgnored=False,bAdvancedView=False,)
   CustomProperties Pin (PinId=C8E8E85B47FDA9165A2BE09988EC41BA,PinName="NewLocation",PinToolTip="New Location\nVector \n\nNew location of the component relative to its parent.",PinType.PinCategory="struct",PinType.PinSubCategory="",PinType.PinSubCategoryObject=ScriptStruct'/Script/CoreUObject.Vector',PinType.PinSubCategoryMemberReference=(),PinType.PinValueType=(),PinType.bIsMap=False,PinType.bIsSet=False,PinType.bIsArray=False,PinType.bIsReference=False,PinType.bIsConst=False,PinType.bIsWeakPointer=False,DefaultValue="0, 0, 0",AutogeneratedDefaultValue="0, 0, 0",LinkedTo=(K2Node_VariableGet_33 A64AB15E43F313AE2301E9B5FAE3919E,),PersistentGuid=00000000000000000000000000000000,bHidden=False,bNotConnectable=False,bDefaultValueIsReadOnly=False,bDefaultValueIsIgnored=False,bAdvancedView=False,)
   CustomProperties Pin (PinId=5512BFEC43130461A9D7C085F1A97BF9,PinName="bSweep",PinToolTip="Sweep\nBoolean\n\nWhether we sweep to the destination location, triggering overlaps along the way and stopping short of the target if blocked by something. Only the root component is swept and checked for blocking collision, child components move without sweeping. If collision is off, this has no effect.",PinType.PinCategory="bool",PinType.PinSubCategory="",PinType.PinSubCategoryObject=None,PinType.PinSubCategoryMemberReference=(),PinType.PinValueType=(),PinType.bIsMap=False,PinType.bIsSet=False,PinType.bIsArray=False,PinType.bIsReference=False,PinType.bIsConst=False,PinType.bIsWeakPointer=False,DefaultValue="false",AutogeneratedDefaultValue="false",PersistentGuid=00000000000000000000000000000000,bHidden=False,bNotConnectable=False,bDefaultValueIsReadOnly=False,bDefaultValueIsIgnored=False,bAdvancedView=False,)
   CustomProperties Pin (PinId=3A2DE83A4296CEBD305E609340A9346D,PinName="SweepHitResult",PinToolTip="Sweep Hit Result\nHit Result Structure\n\nHit result from any impact if sweep is true.",Direction="EGPD_Output",PinType.PinCategory="struct",PinType.PinSubCategory="",PinType.PinSubCategoryObject=ScriptStruct'/Script/Engine.HitResult',PinType.PinSubCategoryMemberReference=(),PinType.PinValueType=(),PinType.bIsMap=False,PinType.bIsSet=False,PinType.bIsArray=False,PinType.bIsReference=False,PinType.bIsConst=False,PinType.bIsWeakPointer=False,PersistentGuid=00000000000000000000000000000000,bHidden=False,bNotConnectable=False,bDefaultValueIsReadOnly=False,bDefaultValueIsIgnored=False,bAdvancedView=False,)
   CustomProperties Pin (PinId=796D53394F52A43EAF06DA988CFA7406,PinName="bTeleport",PinToolTip="Teleport\nBoolean\n\nWhether we teleport the physics state (if physics collision is enabled for this object). If true, physics velocity for this object is unchanged (so ragdoll parts are not affected by change in location). If false, physics velocity is updated based on the change in position (affecting ragdoll parts). If CCD is on and not teleporting, this will affect objects along the entire sweep volume.",PinType.PinCategory="bool",PinType.PinSubCategory="",PinType.PinSubCategoryObject=None,PinType.PinSubCategoryMemberReference=(),PinType.PinValueType=(),PinType.bIsMap=False,PinType.bIsSet=False,PinType.bIsArray=False,PinType.bIsReference=False,PinType.bIsConst=False,PinType.bIsWeakPointer=False,DefaultValue="false",AutogeneratedDefaultValue="false",PersistentGuid=00000000000000000000000000000000,bHidden=False,bNotConnectable=False,bDefaultValueIsReadOnly=False,bDefaultValueIsIgnored=False,bAdvancedView=False,)
End Object
Begin Object Class=/Script/BlueprintGraph.K2Node_VariableGet Name="K2Node_VariableGet_0"
   VariableReference=(MemberName="VRCameraRoot",bSelfContext=True)
   NodePosX=-80
   NodePosY=768
   ErrorType=1
   ErrorMsg="Warning Could not find a variable named \"VRCameraRoot\" in \'GearVR_Pawn_MotionController_C\'.\nMake sure \'GearVR_Pawn_MotionController_C\' has been compiled for  Get VRCameraRoot\nError The property associated with  VRCamera Root  could not be found"
   NodeGuid=E67D62664966A733029D6E90E42584CB
   CustomProperties Pin (PinId=D54F70164DEB290CF70605B4FA2B6DDC,PinName="VRCameraRoot",Direction="EGPD_Output",PinType.PinCategory="object",PinType.PinSubCategory="",PinType.PinSubCategoryObject=Class'/Script/Engine.SceneComponent',PinType.PinSubCategoryMemberReference=(),PinType.PinValueType=(),PinType.bIsMap=False,PinType.bIsSet=False,PinType.bIsArray=False,PinType.bIsReference=False,PinType.bIsConst=False,PinType.bIsWeakPointer=False,LinkedTo=(K2Node_CallFunction_2 33E937D74128D41E79BFA19357F17FCC,),PersistentGuid=00000000000000000000000000000000,bHidden=False,bNotConnectable=False,bDefaultValueIsReadOnly=False,bDefaultValueIsIgnored=False,bAdvancedView=False,)
   CustomProperties Pin (PinId=C08D05ED40B7A4501C8439A109713277,PinName="self",PinFriendlyName=NSLOCTEXT("K2Node", "Target", "Target"),PinType.PinCategory="object",PinType.PinSubCategory="",PinType.PinSubCategoryObject=BlueprintGeneratedClass'/Game/GearVR_Pawn/GearVR_Pawn_MotionController.GearVR_Pawn_MotionController_C',PinType.PinSubCategoryMemberReference=(),PinType.PinValueType=(),PinType.bIsMap=False,PinType.bIsSet=False,PinType.bIsArray=False,PinType.bIsReference=False,PinType.bIsConst=False,PinType.bIsWeakPointer=False,PersistentGuid=00000000000000000000000000000000,bHidden=True,bNotConnectable=False,bDefaultValueIsReadOnly=False,bDefaultValueIsIgnored=False,bAdvancedView=False,)
End Object
Begin Object Class=/Script/BlueprintGraph.K2Node_VariableGet Name="K2Node_VariableGet_33"
   VariableReference=(MemberName="CameraHeight",MemberGuid=83FE95AF4462E2608A0C7BBA63C39D08,bSelfContext=True)
   NodePosX=-80
   NodePosY=816
   ErrorType=1
   ErrorMsg="Warning Could not find a variable named \"CameraHeight\" in \'GearVR_Pawn_MotionController_C\'.\nMake sure \'GearVR_Pawn_MotionController_C\' has been compiled for  Get CameraHeight\nError The property associated with  Camera Height  could not be found"
   NodeGuid=8C097E86469D2264DD0FAE97FCDAE1E6
   CustomProperties Pin (PinId=A64AB15E43F313AE2301E9B5FAE3919E,PinName="CameraHeight",Direction="EGPD_Output",PinType.PinCategory="struct",PinType.PinSubCategory="",PinType.PinSubCategoryObject=ScriptStruct'/Script/CoreUObject.Vector',PinType.PinSubCategoryMemberReference=(),PinType.PinValueType=(),PinType.bIsMap=False,PinType.bIsSet=False,PinType.bIsArray=False,PinType.bIsReference=False,PinType.bIsConst=False,PinType.bIsWeakPointer=False,AutogeneratedDefaultValue="0, 0, 0",LinkedTo=(K2Node_CallFunction_2 C8E8E85B47FDA9165A2BE09988EC41BA,),PersistentGuid=00000000000000000000000000000000,bHidden=False,bNotConnectable=False,bDefaultValueIsReadOnly=False,bDefaultValueIsIgnored=False,bAdvancedView=False,)
   CustomProperties Pin (PinId=515805284552C843EBA77ABB03B31A8A,PinName="self",PinFriendlyName=NSLOCTEXT("K2Node", "Target", "Target"),PinType.PinCategory="object",PinType.PinSubCategory="",PinType.PinSubCategoryObject=BlueprintGeneratedClass'/Game/GearVR_Pawn/GearVR_Pawn_MotionController.GearVR_Pawn_MotionController_C',PinType.PinSubCategoryMemberReference=(),PinType.PinValueType=(),PinType.bIsMap=False,PinType.bIsSet=False,PinType.bIsArray=False,PinType.bIsReference=False,PinType.bIsConst=False,PinType.bIsWeakPointer=False,PersistentGuid=00000000000000000000000000000000,bHidden=True,bNotConnectable=False,bDefaultValueIsReadOnly=False,bDefaultValueIsIgnored=False,bAdvancedView=False,)
End Object
Begin Object Class=/Script/UnrealEd.EdGraphNode_Comment Name="EdGraphNode_Comment_1"
   NodePosX=-288
   NodePosY=576
   NodeWidth=736
   NodeHeight=288
   NodeComment="Set Tracking Origin"
   NodeGuid=936A747040049056FBB6A39DE1623F6F
End Object
Begin Object Class=/Script/BlueprintGraph.K2Node_CallFunction Name="K2Node_CallFunction_29"
   FunctionReference=(MemberParent=Class'/Script/Engine.SceneComponent',MemberName="K2_AttachToComponent")
   NodePosX=640
   NodePosY=624
   NodeGuid=FBE2586943E5548D7827769DE5F4636D
   CustomProperties Pin (PinId=848D99F94FB3B4B6E6754784B160122F,PinName="execute",PinToolTip="\nExec",PinType.PinCategory="exec",PinType.PinSubCategory="",PinType.PinSubCategoryObject=None,PinType.PinSubCategoryMemberReference=(),PinType.PinValueType=(),PinType.bIsMap=False,PinType.bIsSet=False,PinType.bIsArray=False,PinType.bIsReference=False,PinType.bIsConst=False,PinType.bIsWeakPointer=False,LinkedTo=(K2Node_CallFunction_2 F04BDF1147BA7E125E4840A88C069D20,),PersistentGuid=00000000000000000000000000000000,bHidden=False,bNotConnectable=False,bDefaultValueIsReadOnly=False,bDefaultValueIsIgnored=False,bAdvancedView=False,)
   CustomProperties Pin (PinId=1DE6561946BEEBAC6D199F84D37CD396,PinName="then",PinToolTip="\nExec",Direction="EGPD_Output",PinType.PinCategory="exec",PinType.PinSubCategory="",PinType.PinSubCategoryObject=None,PinType.PinSubCategoryMemberReference=(),PinType.PinValueType=(),PinType.bIsMap=False,PinType.bIsSet=False,PinType.bIsArray=False,PinType.bIsReference=False,PinType.bIsConst=False,PinType.bIsWeakPointer=False,PersistentGuid=00000000000000000000000000000000,bHidden=False,bNotConnectable=False,bDefaultValueIsReadOnly=False,bDefaultValueIsIgnored=False,bAdvancedView=False,)
   CustomProperties Pin (PinId=70B728EE41D816995D9F549480223BB7,PinName="self",PinFriendlyName=NSLOCTEXT("K2Node", "Target", "Target"),PinToolTip="Target\nScene Component Reference",PinType.PinCategory="object",PinType.PinSubCategory="",PinType.PinSubCategoryObject=Class'/Script/Engine.SceneComponent',PinType.PinSubCategoryMemberReference=(),PinType.PinValueType=(),PinType.bIsMap=False,PinType.bIsSet=False,PinType.bIsArray=False,PinType.bIsReference=False,PinType.bIsConst=False,PinType.bIsWeakPointer=False,LinkedTo=(K2Node_VariableGet_50 3C3F0FF04ADB9050E66602A35D13644E,),PersistentGuid=00000000000000000000000000000000,bHidden=False,bNotConnectable=False,bDefaultValueIsReadOnly=False,bDefaultValueIsIgnored=False,bAdvancedView=False,)
   CustomProperties Pin (PinId=939D547E4825E9206B3F41900E456398,PinName="Parent",PinToolTip="Parent\nScene Component Reference\n\nParent to attach to.",PinType.PinCategory="object",PinType.PinSubCategory="",PinType.PinSubCategoryObject=Class'/Script/Engine.SceneComponent',PinType.PinSubCategoryMemberReference=(),PinType.PinValueType=(),PinType.bIsMap=False,PinType.bIsSet=False,PinType.bIsArray=False,PinType.bIsReference=False,PinType.bIsConst=False,PinType.bIsWeakPointer=False,LinkedTo=(K2Node_CallFunction_30 E82E5F334DA9721611006585F7B25C30,),PersistentGuid=00000000000000000000000000000000,bHidden=False,bNotConnectable=False,bDefaultValueIsReadOnly=False,bDefaultValueIsIgnored=False,bAdvancedView=False,)
   CustomProperties Pin (PinId=C4B215C14A717BEB9D71CB946A9932B9,PinName="SocketName",PinToolTip="Socket Name\nName\n\nOptional socket to attach to on the parent.",PinType.PinCategory="name",PinType.PinSubCategory="",PinType.PinSubCategoryObject=None,PinType.PinSubCategoryMemberReference=(),PinType.PinValueType=(),PinType.bIsMap=False,PinType.bIsSet=False,PinType.bIsArray=False,PinType.bIsReference=False,PinType.bIsConst=False,PinType.bIsWeakPointer=False,DefaultValue="None",AutogeneratedDefaultValue="None",PersistentGuid=00000000000000000000000000000000,bHidden=False,bNotConnectable=False,bDefaultValueIsReadOnly=False,bDefaultValueIsIgnored=False,bAdvancedView=False,)
   CustomProperties Pin (PinId=B804028342A0C6E8C9E615AAD167CDAA,PinName="LocationRule",PinToolTip="Location Rule\nEAttachmentRule Enum\n\nHow to handle translation when attaching.",PinType.PinCategory="byte",PinType.PinSubCategory="",PinType.PinSubCategoryObject=Enum'/Script/Engine.EAttachmentRule',PinType.PinSubCategoryMemberReference=(),PinType.PinValueType=(),PinType.bIsMap=False,PinType.bIsSet=False,PinType.bIsArray=False,PinType.bIsReference=False,PinType.bIsConst=False,PinType.bIsWeakPointer=False,DefaultValue="KeepRelative",PersistentGuid=00000000000000000000000000000000,bHidden=False,bNotConnectable=False,bDefaultValueIsReadOnly=False,bDefaultValueIsIgnored=False,bAdvancedView=False,)
   CustomProperties Pin (PinId=A41D43EE4314B267165F019F8F68C052,PinName="RotationRule",PinToolTip="Rotation Rule\nEAttachmentRule Enum\n\nHow to handle rotation when attaching.",PinType.PinCategory="byte",PinType.PinSubCategory="",PinType.PinSubCategoryObject=Enum'/Script/Engine.EAttachmentRule',PinType.PinSubCategoryMemberReference=(),PinType.PinValueType=(),PinType.bIsMap=False,PinType.bIsSet=False,PinType.bIsArray=False,PinType.bIsReference=False,PinType.bIsConst=False,PinType.bIsWeakPointer=False,DefaultValue="KeepRelative",PersistentGuid=00000000000000000000000000000000,bHidden=False,bNotConnectable=False,bDefaultValueIsReadOnly=False,bDefaultValueIsIgnored=False,bAdvancedView=False,)
   CustomProperties Pin (PinId=0C615AF64FF94166040B0B936F58316E,PinName="ScaleRule",PinToolTip="Scale Rule\nEAttachmentRule Enum\n\nHow to handle scale when attaching.",PinType.PinCategory="byte",PinType.PinSubCategory="",PinType.PinSubCategoryObject=Enum'/Script/Engine.EAttachmentRule',PinType.PinSubCategoryMemberReference=(),PinType.PinValueType=(),PinType.bIsMap=False,PinType.bIsSet=False,PinType.bIsArray=False,PinType.bIsReference=False,PinType.bIsConst=False,PinType.bIsWeakPointer=False,DefaultValue="KeepRelative",PersistentGuid=00000000000000000000000000000000,bHidden=False,bNotConnectable=False,bDefaultValueIsReadOnly=False,bDefaultValueIsIgnored=False,bAdvancedView=False,)
   CustomProperties Pin (PinId=362A557549E396A0D25F9BA36B2A580F,PinName="bWeldSimulatedBodies",PinToolTip="Weld Simulated Bodies\nBoolean\n\nWhether to weld together simulated physics bodies.",PinType.PinCategory="bool",PinType.PinSubCategory="",PinType.PinSubCategoryObject=None,PinType.PinSubCategoryMemberReference=(),PinType.PinValueType=(),PinType.bIsMap=False,PinType.bIsSet=False,PinType.bIsArray=False,PinType.bIsReference=False,PinType.bIsConst=False,PinType.bIsWeakPointer=False,DefaultValue="TRUE",AutogeneratedDefaultValue="TRUE",PersistentGuid=00000000000000000000000000000000,bHidden=False,bNotConnectable=False,bDefaultValueIsReadOnly=False,bDefaultValueIsIgnored=False,bAdvancedView=False,)
   CustomProperties Pin (PinId=F05FBE524204ABAE624BF1A79AAB42A1,PinName="ReturnValue",PinToolTip="Return Value\nBoolean\n\nTrue if attachment is successful (or already attached to requested parent/socket), false if attachment is rejected and there is no change in AttachParent.",Direction="EGPD_Output",PinType.PinCategory="bool",PinType.PinSubCategory="",PinType.PinSubCategoryObject=None,PinType.PinSubCategoryMemberReference=(),PinType.PinValueType=(),PinType.bIsMap=False,PinType.bIsSet=False,PinType.bIsArray=False,PinType.bIsReference=False,PinType.bIsConst=False,PinType.bIsWeakPointer=False,DefaultValue="false",AutogeneratedDefaultValue="false",PersistentGuid=00000000000000000000000000000000,bHidden=False,bNotConnectable=False,bDefaultValueIsReadOnly=False,bDefaultValueIsIgnored=False,bAdvancedView=False,)
End Object
Begin Object Class=/Script/BlueprintGraph.K2Node_VariableGet Name="K2Node_VariableGet_50"
   VariableReference=(MemberName="FaceButtonPressed",bSelfContext=True)
   NodePosX=464
   NodePosY=592
   NodeGuid=49A6DD324E9FE4B1A5979589E7847F09
   CustomProperties Pin (PinId=3C3F0FF04ADB9050E66602A35D13644E,PinName="FaceButtonPressed",Direction="EGPD_Output",PinType.PinCategory="object",PinType.PinSubCategory="",PinType.PinSubCategoryObject=Class'/Script/Engine.TextRenderComponent',PinType.PinSubCategoryMemberReference=(),PinType.PinValueType=(),PinType.bIsMap=False,PinType.bIsSet=False,PinType.bIsArray=False,PinType.bIsReference=False,PinType.bIsConst=False,PinType.bIsWeakPointer=False,LinkedTo=(K2Node_CallFunction_29 70B728EE41D816995D9F549480223BB7,),PersistentGuid=00000000000000000000000000000000,bHidden=False,bNotConnectable=False,bDefaultValueIsReadOnly=False,bDefaultValueIsIgnored=False,bAdvancedView=False,)
   CustomProperties Pin (PinId=EDA8C630436C26E8A0819B8ACD5279CF,PinName="self",PinFriendlyName=NSLOCTEXT("K2Node", "Target", "Target"),PinType.PinCategory="object",PinType.PinSubCategory="",PinType.PinSubCategoryObject=BlueprintGeneratedClass'/Game/GearVR_Pawn/GearVR_Pawn_MotionController.GearVR_Pawn_MotionController_C',PinType.PinSubCategoryMemberReference=(),PinType.PinValueType=(),PinType.bIsMap=False,PinType.bIsSet=False,PinType.bIsArray=False,PinType.bIsReference=False,PinType.bIsConst=False,PinType.bIsWeakPointer=False,PersistentGuid=00000000000000000000000000000000,bHidden=True,bNotConnectable=False,bDefaultValueIsReadOnly=False,bDefaultValueIsIgnored=False,bAdvancedView=False,)
End Object
Begin Object Class=/Script/BlueprintGraph.K2Node_VariableGet Name="K2Node_VariableGet_51"
   VariableReference=(MemberName="GearVRController",bSelfContext=True)
   NodePosX=80
   NodePosY=912
   NodeGuid=BFC2AC1D410C015E87DCB2B0A5EC7DB4
   CustomProperties Pin (PinId=7F7C053B446F135AF69C8BA798D4931B,PinName="GearVRController",Direction="EGPD_Output",PinType.PinCategory="object",PinType.PinSubCategory="",PinType.PinSubCategoryObject=Class'/Script/GearVRController.GearVRControllerComponent',PinType.PinSubCategoryMemberReference=(),PinType.PinValueType=(),PinType.bIsMap=False,PinType.bIsSet=False,PinType.bIsArray=False,PinType.bIsReference=False,PinType.bIsConst=False,PinType.bIsWeakPointer=False,LinkedTo=(K2Node_CallFunction_30 4E6029FF49E336946E8F52B62F4BFC8E,),PersistentGuid=00000000000000000000000000000000,bHidden=False,bNotConnectable=False,bDefaultValueIsReadOnly=False,bDefaultValueIsIgnored=False,bAdvancedView=False,)
   CustomProperties Pin (PinId=233C36A54EB782FE7D6C0FA4BB6458F5,PinName="self",PinFriendlyName=NSLOCTEXT("K2Node", "Target", "Target"),PinType.PinCategory="object",PinType.PinSubCategory="",PinType.PinSubCategoryObject=BlueprintGeneratedClass'/Game/GearVR_Pawn/GearVR_Pawn_MotionController.GearVR_Pawn_MotionController_C',PinType.PinSubCategoryMemberReference=(),PinType.PinValueType=(),PinType.bIsMap=False,PinType.bIsSet=False,PinType.bIsArray=False,PinType.bIsReference=False,PinType.bIsConst=False,PinType.bIsWeakPointer=False,PersistentGuid=00000000000000000000000000000000,bHidden=True,bNotConnectable=False,bDefaultValueIsReadOnly=False,bDefaultValueIsIgnored=False,bAdvancedView=False,)
End Object
Begin Object Class=/Script/BlueprintGraph.K2Node_CallFunction Name="K2Node_CallFunction_30"
   bIsPureFunc=True
   bIsConstFunc=True
   FunctionReference=(MemberParent=Class'/Script/GearVRController.GearVRControllerComponent',MemberName="GetMotionController")
   NodePosX=288
   NodePosY=873
   NodeGuid=383370454D15248E217543AA03987AEA
   CustomProperties Pin (PinId=4E6029FF49E336946E8F52B62F4BFC8E,PinName="self",PinFriendlyName=NSLOCTEXT("K2Node", "Target", "Target"),PinToolTip="Target\nGear VRController Component Reference",PinType.PinCategory="object",PinType.PinSubCategory="",PinType.PinSubCategoryObject=Class'/Script/GearVRController.GearVRControllerComponent',PinType.PinSubCategoryMemberReference=(),PinType.PinValueType=(),PinType.bIsMap=False,PinType.bIsSet=False,PinType.bIsArray=False,PinType.bIsReference=False,PinType.bIsConst=False,PinType.bIsWeakPointer=False,LinkedTo=(K2Node_VariableGet_51 7F7C053B446F135AF69C8BA798D4931B,),PersistentGuid=00000000000000000000000000000000,bHidden=False,bNotConnectable=False,bDefaultValueIsReadOnly=False,bDefaultValueIsIgnored=False,bAdvancedView=False,)
   CustomProperties Pin (PinId=E82E5F334DA9721611006585F7B25C30,PinName="ReturnValue",PinToolTip="Return Value\nMotion Controller Component Reference",Direction="EGPD_Output",PinType.PinCategory="object",PinType.PinSubCategory="",PinType.PinSubCategoryObject=Class'/Script/HeadMountedDisplay.MotionControllerComponent',PinType.PinSubCategoryMemberReference=(),PinType.PinValueType=(),PinType.bIsMap=False,PinType.bIsSet=False,PinType.bIsArray=False,PinType.bIsReference=False,PinType.bIsConst=False,PinType.bIsWeakPointer=False,LinkedTo=(K2Node_CallFunction_29 939D547E4825E9206B3F41900E456398,),PersistentGuid=00000000000000000000000000000000,bHidden=False,bNotConnectable=False,bDefaultValueIsReadOnly=False,bDefaultValueIsIgnored=False,bAdvancedView=False,)
End Object

END OBJECT
Click for full image.


End Result
Compile and save your Blueprint and then use the Launch On button to deploy and launch the project to your Samsung Galaxy Note smartphone. When the project is deployed to your phone, put your phone in the Gear VR HMD and pick up the Motion Controller. Now when you press in any of the cardinal directions on the touchpad, the button you pressed should be displayed like in the following video.
UE4 Project Downloads
Below you will find a link to where you can download the UE4 project that was used to create this example.