Choose your operating system:
Windows
macOS
Linux
In order to understand and use the content on this page, make sure you are familiar with the following topics:

The Google Daydream Motion Controller (MC) has a number of different buttons on the Touchpad that can be setup to handle a wide variety of different input tasks in Unreal Engine. In the following how to, we will take a look at how to set up and use the Touchpad.
In this how to, we will be starting with a Pawn that already has a VR Camera and Motion Controller support added to it. If you do not have this setup, please check out the documents listed in the Prerequisite Topics list at the top of this page.
Steps
Below you will find information on how to use the Google Daydream Motion Controller touch pad.
-
First, open up your Player Pawn Blueprint, go to the Component tab, add a new Text Render Component named FaceButtonPressed , and make sure that this Component is parented to the Motion Controller Component as shown in the image below.
![HTGVRTouchpad_00.png]()
-
Click on the Text Render Component and then, in the Details panel, set the following properties with the corresponding values from this table:
![HTGVRTouchpad_01.png]()
Click for full image.
Property Name
Value
Location
X = 20, Y = 0, Z = 0
Rotation
X = 0, Y = 0, Z = -180
Horizontal Alignment
Center
Vertical Alignment
Text Center
World Size
13.0
-
Next, we need to create a new Text variable that will store and display what button is currently being pressed on the Motion Controller Touchpad. To accomplish this, go to the Variables list and create a new Text variable called ButtonText .
![HTGVRTouchpad_02.png]()
-
The Google Daydream Motion Controller Touchpad has five buttons that can be used. Four of the five buttons are activated by pressing Up , Right , Down and Left on the Touchpad. The fifth button is triggered when a user touches the surface of the Touchpad. To set this up in our Blueprint, add the following five Motion Controller (R) FaceButton Event nodes to the Event Graph.
![HTGVRTouchpad_03.png]()
Click for full image.
Node Name
Default Value
Motion Controller (R) FaceButton1
N/A
Motion Controller (R) FaceButton2
N/A
Motion Controller (R) FaceButton3
N/A
Motion Controller (R) FaceButton4
N/A
Steam Touch 0
N/A
-
Now we are going to set up the logic for displaying which button on the Touchpad was pressed. To accomplish this, drag the ButtonText variable into the Event Graph and choose the Set option, since we want to set the text that is displayed.
![HTGVRTouchpad_04.png]()
Click for full image.
-
Connect the Pressed output on the Motion Controller (R) FaceButton1 Event node to the input on the Set Button Text node and then, in the Button Text field, input the following text:
-
Face Button 1 Touch Pad UP
![HTGVRTouchpad_05.png]()
Click for full image.
-
-
If we pressed the Motion Controller Face Button 1 now, nothing would happen, as we have the only set up the ability to input the text we want to display. To display the text, you will first need to right-click in the Event Graph and then search for the Set Text node, as this will set the text to display the value of the Set Button Text variable. When searching for the Set Text node, make sure to select the SetText(FaceButtonPressed) option so that it will automatically add a reference to the "Face Button Pressed" Text Render Component.
![HTGVRTouchpad_06.png]()
Click for full image.
-
Next, we need to connect the Set Button Text node to the Set Text node so that the text input in the Set Button Text node will be displayed when the Touchpad button is pressed. To accomplish this, connect both outputs on the Set Button Text node to the available inputs on the Set Text node and when completed your Blueprint should look like the following:
![HTGVRTouchpad_07.png]()
Click for full image.
-
Repeat this process for the remaining button directions. When doing this, make sure to change the text input into the Set Face Button Text to reflect the button that is being pressed. When this step is completed, your Blueprint should look like the following image:
Copy Node Graph![HTGVRTouchpad_08.png]()
BEGIN OBJECT
                    Begin Object Class=/Script/BlueprintGraph.K2Node_InputKey Name="K2Node_InputKey_29"
   InputKey=MotionController_Right_FaceButton1
   NodePosX=624
   NodePosY=-1072
   NodeGuid=D72008FF4E5CC56E467437809C7E3FBB
   CustomProperties Pin (PinId=6DE353C649B0D2FA9E8ADC97190D377B,PinName="Pressed",Direction="EGPD_Output",PinType.PinCategory="exec",PinType.PinSubCategory="",PinType.PinSubCategoryObject=None,PinType.PinSubCategoryMemberReference=(),PinType.PinValueType=(),PinType.ContainerType=None,PinType.bIsMap=False,PinType.bIsSet=False,PinType.bIsArray=False,PinType.bIsReference=False,PinType.bIsConst=False,PinType.bIsWeakPointer=False,LinkedTo=(K2Node_VariableSet_24 86855D4141752EA775F08C889FC5D16B,),PersistentGuid=00000000000000000000000000000000,bHidden=False,bNotConnectable=False,bDefaultValueIsReadOnly=False,bDefaultValueIsIgnored=False,bAdvancedView=False,bOrphanedPin=False,)
   CustomProperties Pin (PinId=D4757098488FD518854274AD673D1D3C,PinName="Released",Direction="EGPD_Output",PinType.PinCategory="exec",PinType.PinSubCategory="",PinType.PinSubCategoryObject=None,PinType.PinSubCategoryMemberReference=(),PinType.PinValueType=(),PinType.ContainerType=None,PinType.bIsMap=False,PinType.bIsSet=False,PinType.bIsArray=False,PinType.bIsReference=False,PinType.bIsConst=False,PinType.bIsWeakPointer=False,PersistentGuid=00000000000000000000000000000000,bHidden=False,bNotConnectable=False,bDefaultValueIsReadOnly=False,bDefaultValueIsIgnored=False,bAdvancedView=False,bOrphanedPin=False,)
   CustomProperties Pin (PinId=148A2ABC44E8CDFB4C973FA8A0824DEB,PinName="Key",Direction="EGPD_Output",PinType.PinCategory="struct",PinType.PinSubCategory="",PinType.PinSubCategoryObject=ScriptStruct'/Script/InputCore.Key',PinType.PinSubCategoryMemberReference=(),PinType.PinValueType=(),PinType.ContainerType=None,PinType.bIsMap=False,PinType.bIsSet=False,PinType.bIsArray=False,PinType.bIsReference=False,PinType.bIsConst=False,PinType.bIsWeakPointer=False,PersistentGuid=00000000000000000000000000000000,bHidden=False,bNotConnectable=False,bDefaultValueIsReadOnly=False,bDefaultValueIsIgnored=False,bAdvancedView=False,bOrphanedPin=False,)
End Object
Begin Object Class=/Script/BlueprintGraph.K2Node_InputKey Name="K2Node_InputKey_25"
   InputKey=MotionController_Right_FaceButton2
   NodePosX=624
   NodePosY=-928
   NodeGuid=1CD76FAA42AA4D1958C52BA2E53AF88B
   CustomProperties Pin (PinId=FC46515A4D78BABE04F187A12A322223,PinName="Pressed",Direction="EGPD_Output",PinType.PinCategory="exec",PinType.PinSubCategory="",PinType.PinSubCategoryObject=None,PinType.PinSubCategoryMemberReference=(),PinType.PinValueType=(),PinType.ContainerType=None,PinType.bIsMap=False,PinType.bIsSet=False,PinType.bIsArray=False,PinType.bIsReference=False,PinType.bIsConst=False,PinType.bIsWeakPointer=False,LinkedTo=(K2Node_VariableSet_9 86855D4141752EA775F08C889FC5D16B,),PersistentGuid=00000000000000000000000000000000,bHidden=False,bNotConnectable=False,bDefaultValueIsReadOnly=False,bDefaultValueIsIgnored=False,bAdvancedView=False,bOrphanedPin=False,)
   CustomProperties Pin (PinId=6125124A4CB091A87DE81392218C5B57,PinName="Released",Direction="EGPD_Output",PinType.PinCategory="exec",PinType.PinSubCategory="",PinType.PinSubCategoryObject=None,PinType.PinSubCategoryMemberReference=(),PinType.PinValueType=(),PinType.ContainerType=None,PinType.bIsMap=False,PinType.bIsSet=False,PinType.bIsArray=False,PinType.bIsReference=False,PinType.bIsConst=False,PinType.bIsWeakPointer=False,PersistentGuid=00000000000000000000000000000000,bHidden=False,bNotConnectable=False,bDefaultValueIsReadOnly=False,bDefaultValueIsIgnored=False,bAdvancedView=False,bOrphanedPin=False,)
   CustomProperties Pin (PinId=76D06A3B452A2C5F58DE5C823122275A,PinName="Key",Direction="EGPD_Output",PinType.PinCategory="struct",PinType.PinSubCategory="",PinType.PinSubCategoryObject=ScriptStruct'/Script/InputCore.Key',PinType.PinSubCategoryMemberReference=(),PinType.PinValueType=(),PinType.ContainerType=None,PinType.bIsMap=False,PinType.bIsSet=False,PinType.bIsArray=False,PinType.bIsReference=False,PinType.bIsConst=False,PinType.bIsWeakPointer=False,PersistentGuid=00000000000000000000000000000000,bHidden=False,bNotConnectable=False,bDefaultValueIsReadOnly=False,bDefaultValueIsIgnored=False,bAdvancedView=False,bOrphanedPin=False,)
End Object
Begin Object Class=/Script/BlueprintGraph.K2Node_InputKey Name="K2Node_InputKey_26"
   InputKey=MotionController_Right_FaceButton3
   NodePosX=624
   NodePosY=-784
   NodeGuid=7FB04B3047D92C2737CC868B3D2F6AED
   CustomProperties Pin (PinId=5936DA8D4EC344ACEA35EB8E1683D833,PinName="Pressed",Direction="EGPD_Output",PinType.PinCategory="exec",PinType.PinSubCategory="",PinType.PinSubCategoryObject=None,PinType.PinSubCategoryMemberReference=(),PinType.PinValueType=(),PinType.ContainerType=None,PinType.bIsMap=False,PinType.bIsSet=False,PinType.bIsArray=False,PinType.bIsReference=False,PinType.bIsConst=False,PinType.bIsWeakPointer=False,LinkedTo=(K2Node_VariableSet_10 86855D4141752EA775F08C889FC5D16B,),PersistentGuid=00000000000000000000000000000000,bHidden=False,bNotConnectable=False,bDefaultValueIsReadOnly=False,bDefaultValueIsIgnored=False,bAdvancedView=False,bOrphanedPin=False,)
   CustomProperties Pin (PinId=931D65BB43E3DD4A690ACF8DA33DAFEC,PinName="Released",Direction="EGPD_Output",PinType.PinCategory="exec",PinType.PinSubCategory="",PinType.PinSubCategoryObject=None,PinType.PinSubCategoryMemberReference=(),PinType.PinValueType=(),PinType.ContainerType=None,PinType.bIsMap=False,PinType.bIsSet=False,PinType.bIsArray=False,PinType.bIsReference=False,PinType.bIsConst=False,PinType.bIsWeakPointer=False,PersistentGuid=00000000000000000000000000000000,bHidden=False,bNotConnectable=False,bDefaultValueIsReadOnly=False,bDefaultValueIsIgnored=False,bAdvancedView=False,bOrphanedPin=False,)
   CustomProperties Pin (PinId=502B67864280724E90F15BBEA24AF3D5,PinName="Key",Direction="EGPD_Output",PinType.PinCategory="struct",PinType.PinSubCategory="",PinType.PinSubCategoryObject=ScriptStruct'/Script/InputCore.Key',PinType.PinSubCategoryMemberReference=(),PinType.PinValueType=(),PinType.ContainerType=None,PinType.bIsMap=False,PinType.bIsSet=False,PinType.bIsArray=False,PinType.bIsReference=False,PinType.bIsConst=False,PinType.bIsWeakPointer=False,PersistentGuid=00000000000000000000000000000000,bHidden=False,bNotConnectable=False,bDefaultValueIsReadOnly=False,bDefaultValueIsIgnored=False,bAdvancedView=False,bOrphanedPin=False,)
End Object
Begin Object Class=/Script/BlueprintGraph.K2Node_InputKey Name="K2Node_InputKey_27"
   InputKey=MotionController_Right_FaceButton4
   NodePosX=624
   NodePosY=-640
   NodeGuid=2733E2C141E8BC093D79A58D71A2282C
   CustomProperties Pin (PinId=D2055AF14D37939ECF8E679C5D0E6A7D,PinName="Pressed",Direction="EGPD_Output",PinType.PinCategory="exec",PinType.PinSubCategory="",PinType.PinSubCategoryObject=None,PinType.PinSubCategoryMemberReference=(),PinType.PinValueType=(),PinType.ContainerType=None,PinType.bIsMap=False,PinType.bIsSet=False,PinType.bIsArray=False,PinType.bIsReference=False,PinType.bIsConst=False,PinType.bIsWeakPointer=False,LinkedTo=(K2Node_VariableSet_11 86855D4141752EA775F08C889FC5D16B,),PersistentGuid=00000000000000000000000000000000,bHidden=False,bNotConnectable=False,bDefaultValueIsReadOnly=False,bDefaultValueIsIgnored=False,bAdvancedView=False,bOrphanedPin=False,)
   CustomProperties Pin (PinId=D5444A454E590A3160ADF8951B7EA989,PinName="Released",Direction="EGPD_Output",PinType.PinCategory="exec",PinType.PinSubCategory="",PinType.PinSubCategoryObject=None,PinType.PinSubCategoryMemberReference=(),PinType.PinValueType=(),PinType.ContainerType=None,PinType.bIsMap=False,PinType.bIsSet=False,PinType.bIsArray=False,PinType.bIsReference=False,PinType.bIsConst=False,PinType.bIsWeakPointer=False,PersistentGuid=00000000000000000000000000000000,bHidden=False,bNotConnectable=False,bDefaultValueIsReadOnly=False,bDefaultValueIsIgnored=False,bAdvancedView=False,bOrphanedPin=False,)
   CustomProperties Pin (PinId=08D080F54710006C7B45329C106A6673,PinName="Key",Direction="EGPD_Output",PinType.PinCategory="struct",PinType.PinSubCategory="",PinType.PinSubCategoryObject=ScriptStruct'/Script/InputCore.Key',PinType.PinSubCategoryMemberReference=(),PinType.PinValueType=(),PinType.ContainerType=None,PinType.bIsMap=False,PinType.bIsSet=False,PinType.bIsArray=False,PinType.bIsReference=False,PinType.bIsConst=False,PinType.bIsWeakPointer=False,PersistentGuid=00000000000000000000000000000000,bHidden=False,bNotConnectable=False,bDefaultValueIsReadOnly=False,bDefaultValueIsIgnored=False,bAdvancedView=False,bOrphanedPin=False,)
End Object
Begin Object Class=/Script/BlueprintGraph.K2Node_VariableSet Name="K2Node_VariableSet_24"
   VariableReference=(MemberName="BottonText",MemberGuid=C3EBE01F47A406AAC03695B5083C3E84,bSelfContext=True)
   NodePosX=960
   NodePosY=-1056
   NodeGuid=DFC5E41F4289E0615D60F3B8988E677B
   CustomProperties Pin (PinId=86855D4141752EA775F08C889FC5D16B,PinName="execute",PinType.PinCategory="exec",PinType.PinSubCategory="",PinType.PinSubCategoryObject=None,PinType.PinSubCategoryMemberReference=(),PinType.PinValueType=(),PinType.ContainerType=None,PinType.bIsMap=False,PinType.bIsSet=False,PinType.bIsArray=False,PinType.bIsReference=False,PinType.bIsConst=False,PinType.bIsWeakPointer=False,LinkedTo=(K2Node_InputKey_29 6DE353C649B0D2FA9E8ADC97190D377B,),PersistentGuid=00000000000000000000000000000000,bHidden=False,bNotConnectable=False,bDefaultValueIsReadOnly=False,bDefaultValueIsIgnored=False,bAdvancedView=False,bOrphanedPin=False,)
   CustomProperties Pin (PinId=E239DC784863F456BD95629285FD2639,PinName="then",Direction="EGPD_Output",PinType.PinCategory="exec",PinType.PinSubCategory="",PinType.PinSubCategoryObject=None,PinType.PinSubCategoryMemberReference=(),PinType.PinValueType=(),PinType.ContainerType=None,PinType.bIsMap=False,PinType.bIsSet=False,PinType.bIsArray=False,PinType.bIsReference=False,PinType.bIsConst=False,PinType.bIsWeakPointer=False,LinkedTo=(K2Node_CallFunction_128 CBF87C99424FD6672A88DABC390A044B,),PersistentGuid=00000000000000000000000000000000,bHidden=False,bNotConnectable=False,bDefaultValueIsReadOnly=False,bDefaultValueIsIgnored=False,bAdvancedView=False,bOrphanedPin=False,)
   CustomProperties Pin (PinId=37CCB75845E0C4DB113702B697810BD5,PinName="BottonText",PinType.PinCategory="text",PinType.PinSubCategory="",PinType.PinSubCategoryObject=None,PinType.PinSubCategoryMemberReference=(),PinType.PinValueType=(),PinType.ContainerType=None,PinType.bIsMap=False,PinType.bIsSet=False,PinType.bIsArray=False,PinType.bIsReference=False,PinType.bIsConst=False,PinType.bIsWeakPointer=False,DefaultTextValue=NSLOCTEXT("[34EC6F074F4432AF540B9EA5EB69071A]", "CA0DF90F4C81BE1039A5328CAAD5B900", "Face Button 1 Touch Pad UP"),PersistentGuid=00000000000000000000000000000000,bHidden=False,bNotConnectable=False,bDefaultValueIsReadOnly=False,bDefaultValueIsIgnored=False,bAdvancedView=False,bOrphanedPin=False,)
   CustomProperties Pin (PinId=CB719A134FFFF83A73A0D3864F0185D5,PinName="Output_Get",PinToolTip="Retrieves the value of the variable, can use instead of a separate Get node",Direction="EGPD_Output",PinType.PinCategory="text",PinType.PinSubCategory="",PinType.PinSubCategoryObject=None,PinType.PinSubCategoryMemberReference=(),PinType.PinValueType=(),PinType.ContainerType=None,PinType.bIsMap=False,PinType.bIsSet=False,PinType.bIsArray=False,PinType.bIsReference=False,PinType.bIsConst=False,PinType.bIsWeakPointer=False,LinkedTo=(K2Node_CallFunction_128 6480ABFC47C59006DD90F9A7500B1915,),PersistentGuid=00000000000000000000000000000000,bHidden=False,bNotConnectable=False,bDefaultValueIsReadOnly=False,bDefaultValueIsIgnored=False,bAdvancedView=False,bOrphanedPin=False,)
   CustomProperties Pin (PinId=34FD94C04C1F6CA8090A239A0FB9C10E,PinName="self",PinFriendlyName=NSLOCTEXT("K2Node", "Target", "Target"),PinType.PinCategory="object",PinType.PinSubCategory="",PinType.PinSubCategoryObject=BlueprintGeneratedClass'/Game/GoogleVR_Pawn/GoogleVR_Pawn_MotionController.GoogleVR_Pawn_MotionController_C',PinType.PinSubCategoryMemberReference=(),PinType.PinValueType=(),PinType.ContainerType=None,PinType.bIsMap=False,PinType.bIsSet=False,PinType.bIsArray=False,PinType.bIsReference=False,PinType.bIsConst=False,PinType.bIsWeakPointer=False,PersistentGuid=00000000000000000000000000000000,bHidden=True,bNotConnectable=False,bDefaultValueIsReadOnly=False,bDefaultValueIsIgnored=False,bAdvancedView=False,bOrphanedPin=False,)
End Object
Begin Object Class=/Script/BlueprintGraph.K2Node_CallFunction Name="K2Node_CallFunction_128"
   FunctionReference=(MemberParent=Class'/Script/Engine.TextRenderComponent',MemberName="K2_SetText")
   NodePosX=1344
   NodePosY=-1088
   NodeGuid=B621993A41EBCBD8833F549485E12667
   CustomProperties Pin (PinId=CBF87C99424FD6672A88DABC390A044B,PinName="execute",PinToolTip="\nExec",PinType.PinCategory="exec",PinType.PinSubCategory="",PinType.PinSubCategoryObject=None,PinType.PinSubCategoryMemberReference=(),PinType.PinValueType=(),PinType.ContainerType=None,PinType.bIsMap=False,PinType.bIsSet=False,PinType.bIsArray=False,PinType.bIsReference=False,PinType.bIsConst=False,PinType.bIsWeakPointer=False,LinkedTo=(K2Node_VariableSet_24 E239DC784863F456BD95629285FD2639,),PersistentGuid=00000000000000000000000000000000,bHidden=False,bNotConnectable=False,bDefaultValueIsReadOnly=False,bDefaultValueIsIgnored=False,bAdvancedView=False,bOrphanedPin=False,)
   CustomProperties Pin (PinId=D6D9F186474D62BF96FF1B8E9DAA92D6,PinName="then",PinToolTip="\nExec",Direction="EGPD_Output",PinType.PinCategory="exec",PinType.PinSubCategory="",PinType.PinSubCategoryObject=None,PinType.PinSubCategoryMemberReference=(),PinType.PinValueType=(),PinType.ContainerType=None,PinType.bIsMap=False,PinType.bIsSet=False,PinType.bIsArray=False,PinType.bIsReference=False,PinType.bIsConst=False,PinType.bIsWeakPointer=False,PersistentGuid=00000000000000000000000000000000,bHidden=False,bNotConnectable=False,bDefaultValueIsReadOnly=False,bDefaultValueIsIgnored=False,bAdvancedView=False,bOrphanedPin=False,)
   CustomProperties Pin (PinId=B945011C446C6A70BBD2A9AD129C3431,PinName="self",PinFriendlyName=NSLOCTEXT("K2Node", "Target", "Target"),PinToolTip="Target\nText Render Component Object Reference",PinType.PinCategory="object",PinType.PinSubCategory="",PinType.PinSubCategoryObject=Class'/Script/Engine.TextRenderComponent',PinType.PinSubCategoryMemberReference=(),PinType.PinValueType=(),PinType.ContainerType=None,PinType.bIsMap=False,PinType.bIsSet=False,PinType.bIsArray=False,PinType.bIsReference=False,PinType.bIsConst=False,PinType.bIsWeakPointer=False,LinkedTo=(K2Node_VariableGet_96 612261524C8D0B90D702A1AFBF8BD9B6,),PersistentGuid=00000000000000000000000000000000,bHidden=False,bNotConnectable=False,bDefaultValueIsReadOnly=False,bDefaultValueIsIgnored=False,bAdvancedView=False,bOrphanedPin=False,)
   CustomProperties Pin (PinId=6480ABFC47C59006DD90F9A7500B1915,PinName="Value",PinToolTip="Value\nText (by ref)",PinType.PinCategory="text",PinType.PinSubCategory="",PinType.PinSubCategoryObject=None,PinType.PinSubCategoryMemberReference=(),PinType.PinValueType=(),PinType.ContainerType=None,PinType.bIsMap=False,PinType.bIsSet=False,PinType.bIsArray=False,PinType.bIsReference=True,PinType.bIsConst=False,PinType.bIsWeakPointer=False,LinkedTo=(K2Node_VariableSet_24 CB719A134FFFF83A73A0D3864F0185D5,),PersistentGuid=00000000000000000000000000000000,bHidden=False,bNotConnectable=False,bDefaultValueIsReadOnly=False,bDefaultValueIsIgnored=True,bAdvancedView=False,bOrphanedPin=False,)
End Object
Begin Object Class=/Script/BlueprintGraph.K2Node_VariableGet Name="K2Node_VariableGet_96"
   VariableReference=(MemberName="FaceButtonPressed",bSelfContext=True)
   NodePosX=1024
   NodePosY=-960
   NodeGuid=BF6FBC2243545BC284496480B3FA5A91
   CustomProperties Pin (PinId=612261524C8D0B90D702A1AFBF8BD9B6,PinName="FaceButtonPressed",Direction="EGPD_Output",PinType.PinCategory="object",PinType.PinSubCategory="",PinType.PinSubCategoryObject=Class'/Script/Engine.TextRenderComponent',PinType.PinSubCategoryMemberReference=(),PinType.PinValueType=(),PinType.ContainerType=None,PinType.bIsMap=False,PinType.bIsSet=False,PinType.bIsArray=False,PinType.bIsReference=False,PinType.bIsConst=False,PinType.bIsWeakPointer=False,LinkedTo=(K2Node_CallFunction_128 B945011C446C6A70BBD2A9AD129C3431,),PersistentGuid=00000000000000000000000000000000,bHidden=False,bNotConnectable=False,bDefaultValueIsReadOnly=False,bDefaultValueIsIgnored=False,bAdvancedView=False,bOrphanedPin=False,)
   CustomProperties Pin (PinId=58B96C8140F4014A5CC480BC1A5B875A,PinName="self",PinFriendlyName=NSLOCTEXT("K2Node", "Target", "Target"),PinType.PinCategory="object",PinType.PinSubCategory="",PinType.PinSubCategoryObject=BlueprintGeneratedClass'/Game/GoogleVR_Pawn/GoogleVR_Pawn_MotionController.GoogleVR_Pawn_MotionController_C',PinType.PinSubCategoryMemberReference=(),PinType.PinValueType=(),PinType.ContainerType=None,PinType.bIsMap=False,PinType.bIsSet=False,PinType.bIsArray=False,PinType.bIsReference=False,PinType.bIsConst=False,PinType.bIsWeakPointer=False,PersistentGuid=00000000000000000000000000000000,bHidden=True,bNotConnectable=False,bDefaultValueIsReadOnly=False,bDefaultValueIsIgnored=False,bAdvancedView=False,bOrphanedPin=False,)
End Object
Begin Object Class=/Script/BlueprintGraph.K2Node_VariableSet Name="K2Node_VariableSet_9"
   VariableReference=(MemberName="BottonText",MemberGuid=C3EBE01F47A406AAC03695B5083C3E84,bSelfContext=True)
   NodePosX=976
   NodePosY=-912
   NodeGuid=9F65307D429DEAF23B6D4EBD19DF116C
   CustomProperties Pin (PinId=86855D4141752EA775F08C889FC5D16B,PinName="execute",PinType.PinCategory="exec",PinType.PinSubCategory="",PinType.PinSubCategoryObject=None,PinType.PinSubCategoryMemberReference=(),PinType.PinValueType=(),PinType.ContainerType=None,PinType.bIsMap=False,PinType.bIsSet=False,PinType.bIsArray=False,PinType.bIsReference=False,PinType.bIsConst=False,PinType.bIsWeakPointer=False,LinkedTo=(K2Node_InputKey_25 FC46515A4D78BABE04F187A12A322223,),PersistentGuid=00000000000000000000000000000000,bHidden=False,bNotConnectable=False,bDefaultValueIsReadOnly=False,bDefaultValueIsIgnored=False,bAdvancedView=False,bOrphanedPin=False,)
   CustomProperties Pin (PinId=E239DC784863F456BD95629285FD2639,PinName="then",Direction="EGPD_Output",PinType.PinCategory="exec",PinType.PinSubCategory="",PinType.PinSubCategoryObject=None,PinType.PinSubCategoryMemberReference=(),PinType.PinValueType=(),PinType.ContainerType=None,PinType.bIsMap=False,PinType.bIsSet=False,PinType.bIsArray=False,PinType.bIsReference=False,PinType.bIsConst=False,PinType.bIsWeakPointer=False,LinkedTo=(K2Node_CallFunction_78 CBF87C99424FD6672A88DABC390A044B,),PersistentGuid=00000000000000000000000000000000,bHidden=False,bNotConnectable=False,bDefaultValueIsReadOnly=False,bDefaultValueIsIgnored=False,bAdvancedView=False,bOrphanedPin=False,)
   CustomProperties Pin (PinId=37CCB75845E0C4DB113702B697810BD5,PinName="BottonText",PinType.PinCategory="text",PinType.PinSubCategory="",PinType.PinSubCategoryObject=None,PinType.PinSubCategoryMemberReference=(),PinType.PinValueType=(),PinType.ContainerType=None,PinType.bIsMap=False,PinType.bIsSet=False,PinType.bIsArray=False,PinType.bIsReference=False,PinType.bIsConst=False,PinType.bIsWeakPointer=False,DefaultTextValue=NSLOCTEXT("[34EC6F074F4432AF540B9EA5EB69071A]", "F5315E3E444CCC62222C9782A705A32D", "Face Button 2 TouchPad Right"),PersistentGuid=00000000000000000000000000000000,bHidden=False,bNotConnectable=False,bDefaultValueIsReadOnly=False,bDefaultValueIsIgnored=False,bAdvancedView=False,bOrphanedPin=False,)
   CustomProperties Pin (PinId=CB719A134FFFF83A73A0D3864F0185D5,PinName="Output_Get",PinToolTip="Retrieves the value of the variable, can use instead of a separate Get node",Direction="EGPD_Output",PinType.PinCategory="text",PinType.PinSubCategory="",PinType.PinSubCategoryObject=None,PinType.PinSubCategoryMemberReference=(),PinType.PinValueType=(),PinType.ContainerType=None,PinType.bIsMap=False,PinType.bIsSet=False,PinType.bIsArray=False,PinType.bIsReference=False,PinType.bIsConst=False,PinType.bIsWeakPointer=False,LinkedTo=(K2Node_CallFunction_78 6480ABFC47C59006DD90F9A7500B1915,),PersistentGuid=00000000000000000000000000000000,bHidden=False,bNotConnectable=False,bDefaultValueIsReadOnly=False,bDefaultValueIsIgnored=False,bAdvancedView=False,bOrphanedPin=False,)
   CustomProperties Pin (PinId=34FD94C04C1F6CA8090A239A0FB9C10E,PinName="self",PinFriendlyName=NSLOCTEXT("K2Node", "Target", "Target"),PinType.PinCategory="object",PinType.PinSubCategory="",PinType.PinSubCategoryObject=BlueprintGeneratedClass'/Game/GoogleVR_Pawn/GoogleVR_Pawn_MotionController.GoogleVR_Pawn_MotionController_C',PinType.PinSubCategoryMemberReference=(),PinType.PinValueType=(),PinType.ContainerType=None,PinType.bIsMap=False,PinType.bIsSet=False,PinType.bIsArray=False,PinType.bIsReference=False,PinType.bIsConst=False,PinType.bIsWeakPointer=False,PersistentGuid=00000000000000000000000000000000,bHidden=True,bNotConnectable=False,bDefaultValueIsReadOnly=False,bDefaultValueIsIgnored=False,bAdvancedView=False,bOrphanedPin=False,)
End Object
Begin Object Class=/Script/BlueprintGraph.K2Node_CallFunction Name="K2Node_CallFunction_78"
   FunctionReference=(MemberParent=Class'/Script/Engine.TextRenderComponent',MemberName="K2_SetText")
   NodePosX=1344
   NodePosY=-944
   NodeGuid=E41136C64CA79A956366CB8BB7E2664E
   CustomProperties Pin (PinId=CBF87C99424FD6672A88DABC390A044B,PinName="execute",PinToolTip="\nExec",PinType.PinCategory="exec",PinType.PinSubCategory="",PinType.PinSubCategoryObject=None,PinType.PinSubCategoryMemberReference=(),PinType.PinValueType=(),PinType.ContainerType=None,PinType.bIsMap=False,PinType.bIsSet=False,PinType.bIsArray=False,PinType.bIsReference=False,PinType.bIsConst=False,PinType.bIsWeakPointer=False,LinkedTo=(K2Node_VariableSet_9 E239DC784863F456BD95629285FD2639,),PersistentGuid=00000000000000000000000000000000,bHidden=False,bNotConnectable=False,bDefaultValueIsReadOnly=False,bDefaultValueIsIgnored=False,bAdvancedView=False,bOrphanedPin=False,)
   CustomProperties Pin (PinId=D6D9F186474D62BF96FF1B8E9DAA92D6,PinName="then",PinToolTip="\nExec",Direction="EGPD_Output",PinType.PinCategory="exec",PinType.PinSubCategory="",PinType.PinSubCategoryObject=None,PinType.PinSubCategoryMemberReference=(),PinType.PinValueType=(),PinType.ContainerType=None,PinType.bIsMap=False,PinType.bIsSet=False,PinType.bIsArray=False,PinType.bIsReference=False,PinType.bIsConst=False,PinType.bIsWeakPointer=False,PersistentGuid=00000000000000000000000000000000,bHidden=False,bNotConnectable=False,bDefaultValueIsReadOnly=False,bDefaultValueIsIgnored=False,bAdvancedView=False,bOrphanedPin=False,)
   CustomProperties Pin (PinId=B945011C446C6A70BBD2A9AD129C3431,PinName="self",PinFriendlyName=NSLOCTEXT("K2Node", "Target", "Target"),PinToolTip="Target\nText Render Component Object Reference",PinType.PinCategory="object",PinType.PinSubCategory="",PinType.PinSubCategoryObject=Class'/Script/Engine.TextRenderComponent',PinType.PinSubCategoryMemberReference=(),PinType.PinValueType=(),PinType.ContainerType=None,PinType.bIsMap=False,PinType.bIsSet=False,PinType.bIsArray=False,PinType.bIsReference=False,PinType.bIsConst=False,PinType.bIsWeakPointer=False,LinkedTo=(K2Node_VariableGet_40 612261524C8D0B90D702A1AFBF8BD9B6,),PersistentGuid=00000000000000000000000000000000,bHidden=False,bNotConnectable=False,bDefaultValueIsReadOnly=False,bDefaultValueIsIgnored=False,bAdvancedView=False,bOrphanedPin=False,)
   CustomProperties Pin (PinId=6480ABFC47C59006DD90F9A7500B1915,PinName="Value",PinToolTip="Value\nText (by ref)",PinType.PinCategory="text",PinType.PinSubCategory="",PinType.PinSubCategoryObject=None,PinType.PinSubCategoryMemberReference=(),PinType.PinValueType=(),PinType.ContainerType=None,PinType.bIsMap=False,PinType.bIsSet=False,PinType.bIsArray=False,PinType.bIsReference=True,PinType.bIsConst=False,PinType.bIsWeakPointer=False,LinkedTo=(K2Node_VariableSet_9 CB719A134FFFF83A73A0D3864F0185D5,),PersistentGuid=00000000000000000000000000000000,bHidden=False,bNotConnectable=False,bDefaultValueIsReadOnly=False,bDefaultValueIsIgnored=True,bAdvancedView=False,bOrphanedPin=False,)
End Object
Begin Object Class=/Script/BlueprintGraph.K2Node_VariableGet Name="K2Node_VariableGet_40"
   VariableReference=(MemberName="FaceButtonPressed",bSelfContext=True)
   NodePosX=1040
   NodePosY=-816
   NodeGuid=7B1052294FBD667AAA865EADD026BE82
   CustomProperties Pin (PinId=612261524C8D0B90D702A1AFBF8BD9B6,PinName="FaceButtonPressed",Direction="EGPD_Output",PinType.PinCategory="object",PinType.PinSubCategory="",PinType.PinSubCategoryObject=Class'/Script/Engine.TextRenderComponent',PinType.PinSubCategoryMemberReference=(),PinType.PinValueType=(),PinType.ContainerType=None,PinType.bIsMap=False,PinType.bIsSet=False,PinType.bIsArray=False,PinType.bIsReference=False,PinType.bIsConst=False,PinType.bIsWeakPointer=False,LinkedTo=(K2Node_CallFunction_78 B945011C446C6A70BBD2A9AD129C3431,),PersistentGuid=00000000000000000000000000000000,bHidden=False,bNotConnectable=False,bDefaultValueIsReadOnly=False,bDefaultValueIsIgnored=False,bAdvancedView=False,bOrphanedPin=False,)
   CustomProperties Pin (PinId=58B96C8140F4014A5CC480BC1A5B875A,PinName="self",PinFriendlyName=NSLOCTEXT("K2Node", "Target", "Target"),PinType.PinCategory="object",PinType.PinSubCategory="",PinType.PinSubCategoryObject=BlueprintGeneratedClass'/Game/GoogleVR_Pawn/GoogleVR_Pawn_MotionController.GoogleVR_Pawn_MotionController_C',PinType.PinSubCategoryMemberReference=(),PinType.PinValueType=(),PinType.ContainerType=None,PinType.bIsMap=False,PinType.bIsSet=False,PinType.bIsArray=False,PinType.bIsReference=False,PinType.bIsConst=False,PinType.bIsWeakPointer=False,PersistentGuid=00000000000000000000000000000000,bHidden=True,bNotConnectable=False,bDefaultValueIsReadOnly=False,bDefaultValueIsIgnored=False,bAdvancedView=False,bOrphanedPin=False,)
End Object
Begin Object Class=/Script/BlueprintGraph.K2Node_VariableSet Name="K2Node_VariableSet_10"
   VariableReference=(MemberName="BottonText",MemberGuid=C3EBE01F47A406AAC03695B5083C3E84,bSelfContext=True)
   NodePosX=992
   NodePosY=-768
   NodeGuid=59E8EC0F494741B999E7218EFCCA2160
   CustomProperties Pin (PinId=86855D4141752EA775F08C889FC5D16B,PinName="execute",PinType.PinCategory="exec",PinType.PinSubCategory="",PinType.PinSubCategoryObject=None,PinType.PinSubCategoryMemberReference=(),PinType.PinValueType=(),PinType.ContainerType=None,PinType.bIsMap=False,PinType.bIsSet=False,PinType.bIsArray=False,PinType.bIsReference=False,PinType.bIsConst=False,PinType.bIsWeakPointer=False,LinkedTo=(K2Node_InputKey_26 5936DA8D4EC344ACEA35EB8E1683D833,),PersistentGuid=00000000000000000000000000000000,bHidden=False,bNotConnectable=False,bDefaultValueIsReadOnly=False,bDefaultValueIsIgnored=False,bAdvancedView=False,bOrphanedPin=False,)
   CustomProperties Pin (PinId=E239DC784863F456BD95629285FD2639,PinName="then",Direction="EGPD_Output",PinType.PinCategory="exec",PinType.PinSubCategory="",PinType.PinSubCategoryObject=None,PinType.PinSubCategoryMemberReference=(),PinType.PinValueType=(),PinType.ContainerType=None,PinType.bIsMap=False,PinType.bIsSet=False,PinType.bIsArray=False,PinType.bIsReference=False,PinType.bIsConst=False,PinType.bIsWeakPointer=False,LinkedTo=(K2Node_CallFunction_79 CBF87C99424FD6672A88DABC390A044B,),PersistentGuid=00000000000000000000000000000000,bHidden=False,bNotConnectable=False,bDefaultValueIsReadOnly=False,bDefaultValueIsIgnored=False,bAdvancedView=False,bOrphanedPin=False,)
   CustomProperties Pin (PinId=37CCB75845E0C4DB113702B697810BD5,PinName="BottonText",PinType.PinCategory="text",PinType.PinSubCategory="",PinType.PinSubCategoryObject=None,PinType.PinSubCategoryMemberReference=(),PinType.PinValueType=(),PinType.ContainerType=None,PinType.bIsMap=False,PinType.bIsSet=False,PinType.bIsArray=False,PinType.bIsReference=False,PinType.bIsConst=False,PinType.bIsWeakPointer=False,DefaultTextValue=NSLOCTEXT("[34EC6F074F4432AF540B9EA5EB69071A]", "8C1E56CA4DC221EF696AF8AB94807794", "Face Button 3 Touch Pad Down"),PersistentGuid=00000000000000000000000000000000,bHidden=False,bNotConnectable=False,bDefaultValueIsReadOnly=False,bDefaultValueIsIgnored=False,bAdvancedView=False,bOrphanedPin=False,)
   CustomProperties Pin (PinId=CB719A134FFFF83A73A0D3864F0185D5,PinName="Output_Get",PinToolTip="Retrieves the value of the variable, can use instead of a separate Get node",Direction="EGPD_Output",PinType.PinCategory="text",PinType.PinSubCategory="",PinType.PinSubCategoryObject=None,PinType.PinSubCategoryMemberReference=(),PinType.PinValueType=(),PinType.ContainerType=None,PinType.bIsMap=False,PinType.bIsSet=False,PinType.bIsArray=False,PinType.bIsReference=False,PinType.bIsConst=False,PinType.bIsWeakPointer=False,LinkedTo=(K2Node_CallFunction_79 6480ABFC47C59006DD90F9A7500B1915,),PersistentGuid=00000000000000000000000000000000,bHidden=False,bNotConnectable=False,bDefaultValueIsReadOnly=False,bDefaultValueIsIgnored=False,bAdvancedView=False,bOrphanedPin=False,)
   CustomProperties Pin (PinId=34FD94C04C1F6CA8090A239A0FB9C10E,PinName="self",PinFriendlyName=NSLOCTEXT("K2Node", "Target", "Target"),PinType.PinCategory="object",PinType.PinSubCategory="",PinType.PinSubCategoryObject=BlueprintGeneratedClass'/Game/GoogleVR_Pawn/GoogleVR_Pawn_MotionController.GoogleVR_Pawn_MotionController_C',PinType.PinSubCategoryMemberReference=(),PinType.PinValueType=(),PinType.ContainerType=None,PinType.bIsMap=False,PinType.bIsSet=False,PinType.bIsArray=False,PinType.bIsReference=False,PinType.bIsConst=False,PinType.bIsWeakPointer=False,PersistentGuid=00000000000000000000000000000000,bHidden=True,bNotConnectable=False,bDefaultValueIsReadOnly=False,bDefaultValueIsIgnored=False,bAdvancedView=False,bOrphanedPin=False,)
End Object
Begin Object Class=/Script/BlueprintGraph.K2Node_CallFunction Name="K2Node_CallFunction_79"
   FunctionReference=(MemberParent=Class'/Script/Engine.TextRenderComponent',MemberName="K2_SetText")
   NodePosX=1344
   NodePosY=-800
   NodeGuid=8B19C0044978FD9F43F416993C7B6847
   CustomProperties Pin (PinId=CBF87C99424FD6672A88DABC390A044B,PinName="execute",PinToolTip="\nExec",PinType.PinCategory="exec",PinType.PinSubCategory="",PinType.PinSubCategoryObject=None,PinType.PinSubCategoryMemberReference=(),PinType.PinValueType=(),PinType.ContainerType=None,PinType.bIsMap=False,PinType.bIsSet=False,PinType.bIsArray=False,PinType.bIsReference=False,PinType.bIsConst=False,PinType.bIsWeakPointer=False,LinkedTo=(K2Node_VariableSet_10 E239DC784863F456BD95629285FD2639,),PersistentGuid=00000000000000000000000000000000,bHidden=False,bNotConnectable=False,bDefaultValueIsReadOnly=False,bDefaultValueIsIgnored=False,bAdvancedView=False,bOrphanedPin=False,)
   CustomProperties Pin (PinId=D6D9F186474D62BF96FF1B8E9DAA92D6,PinName="then",PinToolTip="\nExec",Direction="EGPD_Output",PinType.PinCategory="exec",PinType.PinSubCategory="",PinType.PinSubCategoryObject=None,PinType.PinSubCategoryMemberReference=(),PinType.PinValueType=(),PinType.ContainerType=None,PinType.bIsMap=False,PinType.bIsSet=False,PinType.bIsArray=False,PinType.bIsReference=False,PinType.bIsConst=False,PinType.bIsWeakPointer=False,PersistentGuid=00000000000000000000000000000000,bHidden=False,bNotConnectable=False,bDefaultValueIsReadOnly=False,bDefaultValueIsIgnored=False,bAdvancedView=False,bOrphanedPin=False,)
   CustomProperties Pin (PinId=B945011C446C6A70BBD2A9AD129C3431,PinName="self",PinFriendlyName=NSLOCTEXT("K2Node", "Target", "Target"),PinToolTip="Target\nText Render Component Object Reference",PinType.PinCategory="object",PinType.PinSubCategory="",PinType.PinSubCategoryObject=Class'/Script/Engine.TextRenderComponent',PinType.PinSubCategoryMemberReference=(),PinType.PinValueType=(),PinType.ContainerType=None,PinType.bIsMap=False,PinType.bIsSet=False,PinType.bIsArray=False,PinType.bIsReference=False,PinType.bIsConst=False,PinType.bIsWeakPointer=False,LinkedTo=(K2Node_VariableGet_41 612261524C8D0B90D702A1AFBF8BD9B6,),PersistentGuid=00000000000000000000000000000000,bHidden=False,bNotConnectable=False,bDefaultValueIsReadOnly=False,bDefaultValueIsIgnored=False,bAdvancedView=False,bOrphanedPin=False,)
   CustomProperties Pin (PinId=6480ABFC47C59006DD90F9A7500B1915,PinName="Value",PinToolTip="Value\nText (by ref)",PinType.PinCategory="text",PinType.PinSubCategory="",PinType.PinSubCategoryObject=None,PinType.PinSubCategoryMemberReference=(),PinType.PinValueType=(),PinType.ContainerType=None,PinType.bIsMap=False,PinType.bIsSet=False,PinType.bIsArray=False,PinType.bIsReference=True,PinType.bIsConst=False,PinType.bIsWeakPointer=False,LinkedTo=(K2Node_VariableSet_10 CB719A134FFFF83A73A0D3864F0185D5,),PersistentGuid=00000000000000000000000000000000,bHidden=False,bNotConnectable=False,bDefaultValueIsReadOnly=False,bDefaultValueIsIgnored=True,bAdvancedView=False,bOrphanedPin=False,)
End Object
Begin Object Class=/Script/BlueprintGraph.K2Node_VariableGet Name="K2Node_VariableGet_41"
   VariableReference=(MemberName="FaceButtonPressed",bSelfContext=True)
   NodePosX=1056
   NodePosY=-672
   NodeGuid=BA22E1F9483152DBD4FFF3B3903B67E6
   CustomProperties Pin (PinId=612261524C8D0B90D702A1AFBF8BD9B6,PinName="FaceButtonPressed",Direction="EGPD_Output",PinType.PinCategory="object",PinType.PinSubCategory="",PinType.PinSubCategoryObject=Class'/Script/Engine.TextRenderComponent',PinType.PinSubCategoryMemberReference=(),PinType.PinValueType=(),PinType.ContainerType=None,PinType.bIsMap=False,PinType.bIsSet=False,PinType.bIsArray=False,PinType.bIsReference=False,PinType.bIsConst=False,PinType.bIsWeakPointer=False,LinkedTo=(K2Node_CallFunction_79 B945011C446C6A70BBD2A9AD129C3431,),PersistentGuid=00000000000000000000000000000000,bHidden=False,bNotConnectable=False,bDefaultValueIsReadOnly=False,bDefaultValueIsIgnored=False,bAdvancedView=False,bOrphanedPin=False,)
   CustomProperties Pin (PinId=58B96C8140F4014A5CC480BC1A5B875A,PinName="self",PinFriendlyName=NSLOCTEXT("K2Node", "Target", "Target"),PinType.PinCategory="object",PinType.PinSubCategory="",PinType.PinSubCategoryObject=BlueprintGeneratedClass'/Game/GoogleVR_Pawn/GoogleVR_Pawn_MotionController.GoogleVR_Pawn_MotionController_C',PinType.PinSubCategoryMemberReference=(),PinType.PinValueType=(),PinType.ContainerType=None,PinType.bIsMap=False,PinType.bIsSet=False,PinType.bIsArray=False,PinType.bIsReference=False,PinType.bIsConst=False,PinType.bIsWeakPointer=False,PersistentGuid=00000000000000000000000000000000,bHidden=True,bNotConnectable=False,bDefaultValueIsReadOnly=False,bDefaultValueIsIgnored=False,bAdvancedView=False,bOrphanedPin=False,)
End Object
Begin Object Class=/Script/BlueprintGraph.K2Node_VariableSet Name="K2Node_VariableSet_11"
   VariableReference=(MemberName="BottonText",MemberGuid=C3EBE01F47A406AAC03695B5083C3E84,bSelfContext=True)
   NodePosX=992
   NodePosY=-624
   NodeGuid=FC63750644C667F22A9E018A1E408DFF
   CustomProperties Pin (PinId=86855D4141752EA775F08C889FC5D16B,PinName="execute",PinType.PinCategory="exec",PinType.PinSubCategory="",PinType.PinSubCategoryObject=None,PinType.PinSubCategoryMemberReference=(),PinType.PinValueType=(),PinType.ContainerType=None,PinType.bIsMap=False,PinType.bIsSet=False,PinType.bIsArray=False,PinType.bIsReference=False,PinType.bIsConst=False,PinType.bIsWeakPointer=False,LinkedTo=(K2Node_InputKey_27 D2055AF14D37939ECF8E679C5D0E6A7D,),PersistentGuid=00000000000000000000000000000000,bHidden=False,bNotConnectable=False,bDefaultValueIsReadOnly=False,bDefaultValueIsIgnored=False,bAdvancedView=False,bOrphanedPin=False,)
   CustomProperties Pin (PinId=E239DC784863F456BD95629285FD2639,PinName="then",Direction="EGPD_Output",PinType.PinCategory="exec",PinType.PinSubCategory="",PinType.PinSubCategoryObject=None,PinType.PinSubCategoryMemberReference=(),PinType.PinValueType=(),PinType.ContainerType=None,PinType.bIsMap=False,PinType.bIsSet=False,PinType.bIsArray=False,PinType.bIsReference=False,PinType.bIsConst=False,PinType.bIsWeakPointer=False,LinkedTo=(K2Node_CallFunction_80 CBF87C99424FD6672A88DABC390A044B,),PersistentGuid=00000000000000000000000000000000,bHidden=False,bNotConnectable=False,bDefaultValueIsReadOnly=False,bDefaultValueIsIgnored=False,bAdvancedView=False,bOrphanedPin=False,)
   CustomProperties Pin (PinId=37CCB75845E0C4DB113702B697810BD5,PinName="BottonText",PinType.PinCategory="text",PinType.PinSubCategory="",PinType.PinSubCategoryObject=None,PinType.PinSubCategoryMemberReference=(),PinType.PinValueType=(),PinType.ContainerType=None,PinType.bIsMap=False,PinType.bIsSet=False,PinType.bIsArray=False,PinType.bIsReference=False,PinType.bIsConst=False,PinType.bIsWeakPointer=False,DefaultTextValue=NSLOCTEXT("[34EC6F074F4432AF540B9EA5EB69071A]", "30CFDBA34A4F84717E15B19349BED23F", "Face Button 4 Touch Pad Left"),PersistentGuid=00000000000000000000000000000000,bHidden=False,bNotConnectable=False,bDefaultValueIsReadOnly=False,bDefaultValueIsIgnored=False,bAdvancedView=False,bOrphanedPin=False,)
   CustomProperties Pin (PinId=CB719A134FFFF83A73A0D3864F0185D5,PinName="Output_Get",PinToolTip="Retrieves the value of the variable, can use instead of a separate Get node",Direction="EGPD_Output",PinType.PinCategory="text",PinType.PinSubCategory="",PinType.PinSubCategoryObject=None,PinType.PinSubCategoryMemberReference=(),PinType.PinValueType=(),PinType.ContainerType=None,PinType.bIsMap=False,PinType.bIsSet=False,PinType.bIsArray=False,PinType.bIsReference=False,PinType.bIsConst=False,PinType.bIsWeakPointer=False,LinkedTo=(K2Node_CallFunction_80 6480ABFC47C59006DD90F9A7500B1915,),PersistentGuid=00000000000000000000000000000000,bHidden=False,bNotConnectable=False,bDefaultValueIsReadOnly=False,bDefaultValueIsIgnored=False,bAdvancedView=False,bOrphanedPin=False,)
   CustomProperties Pin (PinId=34FD94C04C1F6CA8090A239A0FB9C10E,PinName="self",PinFriendlyName=NSLOCTEXT("K2Node", "Target", "Target"),PinType.PinCategory="object",PinType.PinSubCategory="",PinType.PinSubCategoryObject=BlueprintGeneratedClass'/Game/GoogleVR_Pawn/GoogleVR_Pawn_MotionController.GoogleVR_Pawn_MotionController_C',PinType.PinSubCategoryMemberReference=(),PinType.PinValueType=(),PinType.ContainerType=None,PinType.bIsMap=False,PinType.bIsSet=False,PinType.bIsArray=False,PinType.bIsReference=False,PinType.bIsConst=False,PinType.bIsWeakPointer=False,PersistentGuid=00000000000000000000000000000000,bHidden=True,bNotConnectable=False,bDefaultValueIsReadOnly=False,bDefaultValueIsIgnored=False,bAdvancedView=False,bOrphanedPin=False,)
End Object
Begin Object Class=/Script/BlueprintGraph.K2Node_CallFunction Name="K2Node_CallFunction_80"
   FunctionReference=(MemberParent=Class'/Script/Engine.TextRenderComponent',MemberName="K2_SetText")
   NodePosX=1344
   NodePosY=-656
   NodeGuid=BAE454A14E7CDE1E9C597495DA0F2B87
   CustomProperties Pin (PinId=CBF87C99424FD6672A88DABC390A044B,PinName="execute",PinToolTip="\nExec",PinType.PinCategory="exec",PinType.PinSubCategory="",PinType.PinSubCategoryObject=None,PinType.PinSubCategoryMemberReference=(),PinType.PinValueType=(),PinType.ContainerType=None,PinType.bIsMap=False,PinType.bIsSet=False,PinType.bIsArray=False,PinType.bIsReference=False,PinType.bIsConst=False,PinType.bIsWeakPointer=False,LinkedTo=(K2Node_VariableSet_11 E239DC784863F456BD95629285FD2639,),PersistentGuid=00000000000000000000000000000000,bHidden=False,bNotConnectable=False,bDefaultValueIsReadOnly=False,bDefaultValueIsIgnored=False,bAdvancedView=False,bOrphanedPin=False,)
   CustomProperties Pin (PinId=D6D9F186474D62BF96FF1B8E9DAA92D6,PinName="then",PinToolTip="\nExec",Direction="EGPD_Output",PinType.PinCategory="exec",PinType.PinSubCategory="",PinType.PinSubCategoryObject=None,PinType.PinSubCategoryMemberReference=(),PinType.PinValueType=(),PinType.ContainerType=None,PinType.bIsMap=False,PinType.bIsSet=False,PinType.bIsArray=False,PinType.bIsReference=False,PinType.bIsConst=False,PinType.bIsWeakPointer=False,PersistentGuid=00000000000000000000000000000000,bHidden=False,bNotConnectable=False,bDefaultValueIsReadOnly=False,bDefaultValueIsIgnored=False,bAdvancedView=False,bOrphanedPin=False,)
   CustomProperties Pin (PinId=B945011C446C6A70BBD2A9AD129C3431,PinName="self",PinFriendlyName=NSLOCTEXT("K2Node", "Target", "Target"),PinToolTip="Target\nText Render Component Object Reference",PinType.PinCategory="object",PinType.PinSubCategory="",PinType.PinSubCategoryObject=Class'/Script/Engine.TextRenderComponent',PinType.PinSubCategoryMemberReference=(),PinType.PinValueType=(),PinType.ContainerType=None,PinType.bIsMap=False,PinType.bIsSet=False,PinType.bIsArray=False,PinType.bIsReference=False,PinType.bIsConst=False,PinType.bIsWeakPointer=False,LinkedTo=(K2Node_VariableGet_42 612261524C8D0B90D702A1AFBF8BD9B6,),PersistentGuid=00000000000000000000000000000000,bHidden=False,bNotConnectable=False,bDefaultValueIsReadOnly=False,bDefaultValueIsIgnored=False,bAdvancedView=False,bOrphanedPin=False,)
   CustomProperties Pin (PinId=6480ABFC47C59006DD90F9A7500B1915,PinName="Value",PinToolTip="Value\nText (by ref)",PinType.PinCategory="text",PinType.PinSubCategory="",PinType.PinSubCategoryObject=None,PinType.PinSubCategoryMemberReference=(),PinType.PinValueType=(),PinType.ContainerType=None,PinType.bIsMap=False,PinType.bIsSet=False,PinType.bIsArray=False,PinType.bIsReference=True,PinType.bIsConst=False,PinType.bIsWeakPointer=False,LinkedTo=(K2Node_VariableSet_11 CB719A134FFFF83A73A0D3864F0185D5,),PersistentGuid=00000000000000000000000000000000,bHidden=False,bNotConnectable=False,bDefaultValueIsReadOnly=False,bDefaultValueIsIgnored=True,bAdvancedView=False,bOrphanedPin=False,)
End Object
Begin Object Class=/Script/BlueprintGraph.K2Node_VariableGet Name="K2Node_VariableGet_42"
   VariableReference=(MemberName="FaceButtonPressed",bSelfContext=True)
   NodePosX=1056
   NodePosY=-528
   NodeGuid=4954628D44B9FD1C4F98B2AF3514A793
   CustomProperties Pin (PinId=612261524C8D0B90D702A1AFBF8BD9B6,PinName="FaceButtonPressed",Direction="EGPD_Output",PinType.PinCategory="object",PinType.PinSubCategory="",PinType.PinSubCategoryObject=Class'/Script/Engine.TextRenderComponent',PinType.PinSubCategoryMemberReference=(),PinType.PinValueType=(),PinType.ContainerType=None,PinType.bIsMap=False,PinType.bIsSet=False,PinType.bIsArray=False,PinType.bIsReference=False,PinType.bIsConst=False,PinType.bIsWeakPointer=False,LinkedTo=(K2Node_CallFunction_80 B945011C446C6A70BBD2A9AD129C3431,),PersistentGuid=00000000000000000000000000000000,bHidden=False,bNotConnectable=False,bDefaultValueIsReadOnly=False,bDefaultValueIsIgnored=False,bAdvancedView=False,bOrphanedPin=False,)
   CustomProperties Pin (PinId=58B96C8140F4014A5CC480BC1A5B875A,PinName="self",PinFriendlyName=NSLOCTEXT("K2Node", "Target", "Target"),PinType.PinCategory="object",PinType.PinSubCategory="",PinType.PinSubCategoryObject=BlueprintGeneratedClass'/Game/GoogleVR_Pawn/GoogleVR_Pawn_MotionController.GoogleVR_Pawn_MotionController_C',PinType.PinSubCategoryMemberReference=(),PinType.PinValueType=(),PinType.ContainerType=None,PinType.bIsMap=False,PinType.bIsSet=False,PinType.bIsArray=False,PinType.bIsReference=False,PinType.bIsConst=False,PinType.bIsWeakPointer=False,PersistentGuid=00000000000000000000000000000000,bHidden=True,bNotConnectable=False,bDefaultValueIsReadOnly=False,bDefaultValueIsIgnored=False,bAdvancedView=False,bOrphanedPin=False,)
End Object
Begin Object Class=/Script/BlueprintGraph.K2Node_InputKey Name="K2Node_InputKey_28"
   InputKey=Steam_Touch_0
   NodePosX=624
   NodePosY=-480
   NodeGuid=8A5017284A8FD9FA9A1803AE5AB0388E
   CustomProperties Pin (PinId=F22440DF48907ED67741D782BD8C6670,PinName="Pressed",Direction="EGPD_Output",PinType.PinCategory="exec",PinType.PinSubCategory="",PinType.PinSubCategoryObject=None,PinType.PinSubCategoryMemberReference=(),PinType.PinValueType=(),PinType.ContainerType=None,PinType.bIsMap=False,PinType.bIsSet=False,PinType.bIsArray=False,PinType.bIsReference=False,PinType.bIsConst=False,PinType.bIsWeakPointer=False,LinkedTo=(K2Node_VariableSet_762 86855D4141752EA775F08C889FC5D16B,),PersistentGuid=00000000000000000000000000000000,bHidden=False,bNotConnectable=False,bDefaultValueIsReadOnly=False,bDefaultValueIsIgnored=False,bAdvancedView=False,bOrphanedPin=False,)
   CustomProperties Pin (PinId=AA66071444ABDB18C6DD21976084E8C1,PinName="Released",Direction="EGPD_Output",PinType.PinCategory="exec",PinType.PinSubCategory="",PinType.PinSubCategoryObject=None,PinType.PinSubCategoryMemberReference=(),PinType.PinValueType=(),PinType.ContainerType=None,PinType.bIsMap=False,PinType.bIsSet=False,PinType.bIsArray=False,PinType.bIsReference=False,PinType.bIsConst=False,PinType.bIsWeakPointer=False,PersistentGuid=00000000000000000000000000000000,bHidden=False,bNotConnectable=False,bDefaultValueIsReadOnly=False,bDefaultValueIsIgnored=False,bAdvancedView=False,bOrphanedPin=False,)
   CustomProperties Pin (PinId=20BBF01F4CD780BA7B241CB5E3907C7A,PinName="Key",Direction="EGPD_Output",PinType.PinCategory="struct",PinType.PinSubCategory="",PinType.PinSubCategoryObject=ScriptStruct'/Script/InputCore.Key',PinType.PinSubCategoryMemberReference=(),PinType.PinValueType=(),PinType.ContainerType=None,PinType.bIsMap=False,PinType.bIsSet=False,PinType.bIsArray=False,PinType.bIsReference=False,PinType.bIsConst=False,PinType.bIsWeakPointer=False,PersistentGuid=00000000000000000000000000000000,bHidden=False,bNotConnectable=False,bDefaultValueIsReadOnly=False,bDefaultValueIsIgnored=False,bAdvancedView=False,bOrphanedPin=False,)
End Object
Begin Object Class=/Script/BlueprintGraph.K2Node_VariableSet Name="K2Node_VariableSet_762"
   VariableReference=(MemberName="BottonText",MemberGuid=C3EBE01F47A406AAC03695B5083C3E84,bSelfContext=True)
   NodePosX=1008
   NodePosY=-464
   NodeGuid=BE805FA046F4F971B31797B212B70B90
   CustomProperties Pin (PinId=86855D4141752EA775F08C889FC5D16B,PinName="execute",PinType.PinCategory="exec",PinType.PinSubCategory="",PinType.PinSubCategoryObject=None,PinType.PinSubCategoryMemberReference=(),PinType.PinValueType=(),PinType.ContainerType=None,PinType.bIsMap=False,PinType.bIsSet=False,PinType.bIsArray=False,PinType.bIsReference=False,PinType.bIsConst=False,PinType.bIsWeakPointer=False,LinkedTo=(K2Node_InputKey_28 F22440DF48907ED67741D782BD8C6670,),PersistentGuid=00000000000000000000000000000000,bHidden=False,bNotConnectable=False,bDefaultValueIsReadOnly=False,bDefaultValueIsIgnored=False,bAdvancedView=False,bOrphanedPin=False,)
   CustomProperties Pin (PinId=E239DC784863F456BD95629285FD2639,PinName="then",Direction="EGPD_Output",PinType.PinCategory="exec",PinType.PinSubCategory="",PinType.PinSubCategoryObject=None,PinType.PinSubCategoryMemberReference=(),PinType.PinValueType=(),PinType.ContainerType=None,PinType.bIsMap=False,PinType.bIsSet=False,PinType.bIsArray=False,PinType.bIsReference=False,PinType.bIsConst=False,PinType.bIsWeakPointer=False,LinkedTo=(K2Node_CallFunction_76 CBF87C99424FD6672A88DABC390A044B,),PersistentGuid=00000000000000000000000000000000,bHidden=False,bNotConnectable=False,bDefaultValueIsReadOnly=False,bDefaultValueIsIgnored=False,bAdvancedView=False,bOrphanedPin=False,)
   CustomProperties Pin (PinId=37CCB75845E0C4DB113702B697810BD5,PinName="BottonText",PinType.PinCategory="text",PinType.PinSubCategory="",PinType.PinSubCategoryObject=None,PinType.PinSubCategoryMemberReference=(),PinType.PinValueType=(),PinType.ContainerType=None,PinType.bIsMap=False,PinType.bIsSet=False,PinType.bIsArray=False,PinType.bIsReference=False,PinType.bIsConst=False,PinType.bIsWeakPointer=False,DefaultTextValue=NSLOCTEXT("[34EC6F074F4432AF540B9EA5EB69071A]", "8035DB8C465DE7A021F86A8AEA4A76D3", "Touch Pad - Touch - Center"),PersistentGuid=00000000000000000000000000000000,bHidden=False,bNotConnectable=False,bDefaultValueIsReadOnly=False,bDefaultValueIsIgnored=False,bAdvancedView=False,bOrphanedPin=False,)
   CustomProperties Pin (PinId=CB719A134FFFF83A73A0D3864F0185D5,PinName="Output_Get",PinToolTip="Retrieves the value of the variable, can use instead of a separate Get node",Direction="EGPD_Output",PinType.PinCategory="text",PinType.PinSubCategory="",PinType.PinSubCategoryObject=None,PinType.PinSubCategoryMemberReference=(),PinType.PinValueType=(),PinType.ContainerType=None,PinType.bIsMap=False,PinType.bIsSet=False,PinType.bIsArray=False,PinType.bIsReference=False,PinType.bIsConst=False,PinType.bIsWeakPointer=False,LinkedTo=(K2Node_CallFunction_76 6480ABFC47C59006DD90F9A7500B1915,),PersistentGuid=00000000000000000000000000000000,bHidden=False,bNotConnectable=False,bDefaultValueIsReadOnly=False,bDefaultValueIsIgnored=False,bAdvancedView=False,bOrphanedPin=False,)
   CustomProperties Pin (PinId=34FD94C04C1F6CA8090A239A0FB9C10E,PinName="self",PinFriendlyName=NSLOCTEXT("K2Node", "Target", "Target"),PinType.PinCategory="object",PinType.PinSubCategory="",PinType.PinSubCategoryObject=BlueprintGeneratedClass'/Game/GoogleVR_Pawn/GoogleVR_Pawn_MotionController.GoogleVR_Pawn_MotionController_C',PinType.PinSubCategoryMemberReference=(),PinType.PinValueType=(),PinType.ContainerType=None,PinType.bIsMap=False,PinType.bIsSet=False,PinType.bIsArray=False,PinType.bIsReference=False,PinType.bIsConst=False,PinType.bIsWeakPointer=False,PersistentGuid=00000000000000000000000000000000,bHidden=True,bNotConnectable=False,bDefaultValueIsReadOnly=False,bDefaultValueIsIgnored=False,bAdvancedView=False,bOrphanedPin=False,)
End Object
Begin Object Class=/Script/BlueprintGraph.K2Node_CallFunction Name="K2Node_CallFunction_76"
   FunctionReference=(MemberParent=Class'/Script/Engine.TextRenderComponent',MemberName="K2_SetText")
   NodePosX=1344
   NodePosY=-496
   NodeGuid=3EF6FA4A48FEA79493EAD09B6BF9D66B
   CustomProperties Pin (PinId=CBF87C99424FD6672A88DABC390A044B,PinName="execute",PinToolTip="\nExec",PinType.PinCategory="exec",PinType.PinSubCategory="",PinType.PinSubCategoryObject=None,PinType.PinSubCategoryMemberReference=(),PinType.PinValueType=(),PinType.ContainerType=None,PinType.bIsMap=False,PinType.bIsSet=False,PinType.bIsArray=False,PinType.bIsReference=False,PinType.bIsConst=False,PinType.bIsWeakPointer=False,LinkedTo=(K2Node_VariableSet_762 E239DC784863F456BD95629285FD2639,),PersistentGuid=00000000000000000000000000000000,bHidden=False,bNotConnectable=False,bDefaultValueIsReadOnly=False,bDefaultValueIsIgnored=False,bAdvancedView=False,bOrphanedPin=False,)
   CustomProperties Pin (PinId=D6D9F186474D62BF96FF1B8E9DAA92D6,PinName="then",PinToolTip="\nExec",Direction="EGPD_Output",PinType.PinCategory="exec",PinType.PinSubCategory="",PinType.PinSubCategoryObject=None,PinType.PinSubCategoryMemberReference=(),PinType.PinValueType=(),PinType.ContainerType=None,PinType.bIsMap=False,PinType.bIsSet=False,PinType.bIsArray=False,PinType.bIsReference=False,PinType.bIsConst=False,PinType.bIsWeakPointer=False,PersistentGuid=00000000000000000000000000000000,bHidden=False,bNotConnectable=False,bDefaultValueIsReadOnly=False,bDefaultValueIsIgnored=False,bAdvancedView=False,bOrphanedPin=False,)
   CustomProperties Pin (PinId=B945011C446C6A70BBD2A9AD129C3431,PinName="self",PinFriendlyName=NSLOCTEXT("K2Node", "Target", "Target"),PinToolTip="Target\nText Render Component Object Reference",PinType.PinCategory="object",PinType.PinSubCategory="",PinType.PinSubCategoryObject=Class'/Script/Engine.TextRenderComponent',PinType.PinSubCategoryMemberReference=(),PinType.PinValueType=(),PinType.ContainerType=None,PinType.bIsMap=False,PinType.bIsSet=False,PinType.bIsArray=False,PinType.bIsReference=False,PinType.bIsConst=False,PinType.bIsWeakPointer=False,LinkedTo=(K2Node_VariableGet_38 612261524C8D0B90D702A1AFBF8BD9B6,),PersistentGuid=00000000000000000000000000000000,bHidden=False,bNotConnectable=False,bDefaultValueIsReadOnly=False,bDefaultValueIsIgnored=False,bAdvancedView=False,bOrphanedPin=False,)
   CustomProperties Pin (PinId=6480ABFC47C59006DD90F9A7500B1915,PinName="Value",PinToolTip="Value\nText (by ref)",PinType.PinCategory="text",PinType.PinSubCategory="",PinType.PinSubCategoryObject=None,PinType.PinSubCategoryMemberReference=(),PinType.PinValueType=(),PinType.ContainerType=None,PinType.bIsMap=False,PinType.bIsSet=False,PinType.bIsArray=False,PinType.bIsReference=True,PinType.bIsConst=False,PinType.bIsWeakPointer=False,LinkedTo=(K2Node_VariableSet_762 CB719A134FFFF83A73A0D3864F0185D5,),PersistentGuid=00000000000000000000000000000000,bHidden=False,bNotConnectable=False,bDefaultValueIsReadOnly=False,bDefaultValueIsIgnored=True,bAdvancedView=False,bOrphanedPin=False,)
End Object
Begin Object Class=/Script/BlueprintGraph.K2Node_VariableGet Name="K2Node_VariableGet_38"
   VariableReference=(MemberName="FaceButtonPressed",bSelfContext=True)
   NodePosX=1072
   NodePosY=-368
   NodeGuid=9A444D1A4C593508102A7390FE4C2638
   CustomProperties Pin (PinId=612261524C8D0B90D702A1AFBF8BD9B6,PinName="FaceButtonPressed",Direction="EGPD_Output",PinType.PinCategory="object",PinType.PinSubCategory="",PinType.PinSubCategoryObject=Class'/Script/Engine.TextRenderComponent',PinType.PinSubCategoryMemberReference=(),PinType.PinValueType=(),PinType.ContainerType=None,PinType.bIsMap=False,PinType.bIsSet=False,PinType.bIsArray=False,PinType.bIsReference=False,PinType.bIsConst=False,PinType.bIsWeakPointer=False,LinkedTo=(K2Node_CallFunction_76 B945011C446C6A70BBD2A9AD129C3431,),PersistentGuid=00000000000000000000000000000000,bHidden=False,bNotConnectable=False,bDefaultValueIsReadOnly=False,bDefaultValueIsIgnored=False,bAdvancedView=False,bOrphanedPin=False,)
   CustomProperties Pin (PinId=58B96C8140F4014A5CC480BC1A5B875A,PinName="self",PinFriendlyName=NSLOCTEXT("K2Node", "Target", "Target"),PinType.PinCategory="object",PinType.PinSubCategory="",PinType.PinSubCategoryObject=BlueprintGeneratedClass'/Game/GoogleVR_Pawn/GoogleVR_Pawn_MotionController.GoogleVR_Pawn_MotionController_C',PinType.PinSubCategoryMemberReference=(),PinType.PinValueType=(),PinType.ContainerType=None,PinType.bIsMap=False,PinType.bIsSet=False,PinType.bIsArray=False,PinType.bIsReference=False,PinType.bIsConst=False,PinType.bIsWeakPointer=False,PersistentGuid=00000000000000000000000000000000,bHidden=True,bNotConnectable=False,bDefaultValueIsReadOnly=False,bDefaultValueIsIgnored=False,bAdvancedView=False,bOrphanedPin=False,)
End Object
END OBJECT
Click for full image.
-
Finally, we need to attach the text that tells us which Motion Controller is pressed to the Motion Controller so that when the Motion Controller is moved, the text will move along with it. To get this working, add the following nodes to the Event Graph:
Node Name
Default Value
GoogleVRMotionController
N/A
FaceButtonPressed
N/A
Get Motion Controller
N/A
AttachToComponent
N/A
Once the nodes have been added, connect the AttachToComponent node to the output of the SetRelativeLocation node. Then connect the FaceButtonPressed to the Target input on the AttachToComponent node. Finally, plug in the GoogleVRMotionController to the GetMotionController node and connect the output of that into the Parent input on the AttachToComponent node. When completed, this part of your Blueprint should look like the following image:
Copy Node Graph![HTGVRTouchpad_09.png]()
BEGIN OBJECT
            Begin Object Class=/Script/BlueprintGraph.K2Node_Event Name="K2Node_Event_3"
   EventReference=(MemberParent=Class'/Script/Engine.Actor',MemberName="ReceiveBeginPlay")
   bOverrideFunction=True
   NodePosX=-208
   NodePosY=208
   NodeGuid=93C09D814ED1E9D44D261A9686B86DCA
   CustomProperties Pin (PinId=7F2EC56943D8143A39FA97A62B1F4E79,PinName="OutputDelegate",Direction="EGPD_Output",PinType.PinCategory="delegate",PinType.PinSubCategory="",PinType.PinSubCategoryObject=None,PinType.PinSubCategoryMemberReference=(MemberParent=Class'/Script/Engine.Actor',MemberName="ReceiveBeginPlay"),PinType.PinValueType=(),PinType.ContainerType=None,PinType.bIsMap=False,PinType.bIsSet=False,PinType.bIsArray=False,PinType.bIsReference=False,PinType.bIsConst=False,PinType.bIsWeakPointer=False,PersistentGuid=00000000000000000000000000000000,bHidden=False,bNotConnectable=False,bDefaultValueIsReadOnly=False,bDefaultValueIsIgnored=False,bAdvancedView=False,bOrphanedPin=False,)
   CustomProperties Pin (PinId=FBAC704C41732BA0574711B1FCA29206,PinName="then",Direction="EGPD_Output",PinType.PinCategory="exec",PinType.PinSubCategory="",PinType.PinSubCategoryObject=None,PinType.PinSubCategoryMemberReference=(),PinType.PinValueType=(),PinType.ContainerType=None,PinType.bIsMap=False,PinType.bIsSet=False,PinType.bIsArray=False,PinType.bIsReference=False,PinType.bIsConst=False,PinType.bIsWeakPointer=False,LinkedTo=(K2Node_CallFunction_1 65C430D34EC91388FB4328874913A070,),PersistentGuid=00000000000000000000000000000000,bHidden=False,bNotConnectable=False,bDefaultValueIsReadOnly=False,bDefaultValueIsIgnored=False,bAdvancedView=False,bOrphanedPin=False,)
End Object
Begin Object Class=/Script/BlueprintGraph.K2Node_CallFunction Name="K2Node_CallFunction_1"
   FunctionReference=(MemberParent=Class'/Script/HeadMountedDisplay.HeadMountedDisplayFunctionLibrary',MemberName="SetTrackingOrigin")
   NodePosX=176
   NodePosY=208
   NodeGuid=9A4CBAD3436F40EAADD15FB1E078F81F
   CustomProperties Pin (PinId=65C430D34EC91388FB4328874913A070,PinName="execute",PinToolTip="\nExec",PinType.PinCategory="exec",PinType.PinSubCategory="",PinType.PinSubCategoryObject=None,PinType.PinSubCategoryMemberReference=(),PinType.PinValueType=(),PinType.ContainerType=None,PinType.bIsMap=False,PinType.bIsSet=False,PinType.bIsArray=False,PinType.bIsReference=False,PinType.bIsConst=False,PinType.bIsWeakPointer=False,LinkedTo=(K2Node_Event_3 FBAC704C41732BA0574711B1FCA29206,),PersistentGuid=00000000000000000000000000000000,bHidden=False,bNotConnectable=False,bDefaultValueIsReadOnly=False,bDefaultValueIsIgnored=False,bAdvancedView=False,bOrphanedPin=False,)
   CustomProperties Pin (PinId=93BC380F44B0A11FE8A023977452EE2B,PinName="then",PinToolTip="\nExec",Direction="EGPD_Output",PinType.PinCategory="exec",PinType.PinSubCategory="",PinType.PinSubCategoryObject=None,PinType.PinSubCategoryMemberReference=(),PinType.PinValueType=(),PinType.ContainerType=None,PinType.bIsMap=False,PinType.bIsSet=False,PinType.bIsArray=False,PinType.bIsReference=False,PinType.bIsConst=False,PinType.bIsWeakPointer=False,LinkedTo=(K2Node_CallFunction_52 FE5D38794B000B7752514CAFCC5316E4,),PersistentGuid=00000000000000000000000000000000,bHidden=False,bNotConnectable=False,bDefaultValueIsReadOnly=False,bDefaultValueIsIgnored=False,bAdvancedView=False,bOrphanedPin=False,)
   CustomProperties Pin (PinId=3CDA4D324563AA248BE6FD898AE21B08,PinName="self",PinFriendlyName=NSLOCTEXT("K2Node", "Target", "Target"),PinToolTip="Target\nHead Mounted Display Function Library Object Reference",PinType.PinCategory="object",PinType.PinSubCategory="",PinType.PinSubCategoryObject=Class'/Script/HeadMountedDisplay.HeadMountedDisplayFunctionLibrary',PinType.PinSubCategoryMemberReference=(),PinType.PinValueType=(),PinType.ContainerType=None,PinType.bIsMap=False,PinType.bIsSet=False,PinType.bIsArray=False,PinType.bIsReference=False,PinType.bIsConst=False,PinType.bIsWeakPointer=False,DefaultObject="/Script/HeadMountedDisplay.Default__HeadMountedDisplayFunctionLibrary",PersistentGuid=00000000000000000000000000000000,bHidden=True,bNotConnectable=False,bDefaultValueIsReadOnly=False,bDefaultValueIsIgnored=False,bAdvancedView=False,bOrphanedPin=False,)
   CustomProperties Pin (PinId=61713C8E4CF694BE266DD2BD7B1A2A53,PinName="Origin",PinToolTip="Origin\nEHMDTrackingOrigin Enum",PinType.PinCategory="byte",PinType.PinSubCategory="",PinType.PinSubCategoryObject=Enum'/Script/HeadMountedDisplay.EHMDTrackingOrigin',PinType.PinSubCategoryMemberReference=(),PinType.PinValueType=(),PinType.ContainerType=None,PinType.bIsMap=False,PinType.bIsSet=False,PinType.bIsArray=False,PinType.bIsReference=False,PinType.bIsConst=False,PinType.bIsWeakPointer=False,DefaultValue="Eye",PersistentGuid=00000000000000000000000000000000,bHidden=False,bNotConnectable=False,bDefaultValueIsReadOnly=False,bDefaultValueIsIgnored=False,bAdvancedView=False,bOrphanedPin=False,)
End Object
Begin Object Class=/Script/BlueprintGraph.K2Node_CallFunction Name="K2Node_CallFunction_52"
   FunctionReference=(MemberParent=Class'/Script/Engine.SceneComponent',MemberName="K2_SetRelativeLocation")
   NodePosX=528
   NodePosY=189
   NodeGuid=CBF27D16498498DCC1B698BBB05BBB64
   CustomProperties Pin (PinId=FE5D38794B000B7752514CAFCC5316E4,PinName="execute",PinToolTip="\nExec",PinType.PinCategory="exec",PinType.PinSubCategory="",PinType.PinSubCategoryObject=None,PinType.PinSubCategoryMemberReference=(),PinType.PinValueType=(),PinType.ContainerType=None,PinType.bIsMap=False,PinType.bIsSet=False,PinType.bIsArray=False,PinType.bIsReference=False,PinType.bIsConst=False,PinType.bIsWeakPointer=False,LinkedTo=(K2Node_CallFunction_1 93BC380F44B0A11FE8A023977452EE2B,),PersistentGuid=00000000000000000000000000000000,bHidden=False,bNotConnectable=False,bDefaultValueIsReadOnly=False,bDefaultValueIsIgnored=False,bAdvancedView=False,bOrphanedPin=False,)
   CustomProperties Pin (PinId=1C7A9A54494AE23B7164B7B8725F5D52,PinName="then",PinToolTip="\nExec",Direction="EGPD_Output",PinType.PinCategory="exec",PinType.PinSubCategory="",PinType.PinSubCategoryObject=None,PinType.PinSubCategoryMemberReference=(),PinType.PinValueType=(),PinType.ContainerType=None,PinType.bIsMap=False,PinType.bIsSet=False,PinType.bIsArray=False,PinType.bIsReference=False,PinType.bIsConst=False,PinType.bIsWeakPointer=False,LinkedTo=(K2Node_CallFunction_4529 B4D1BA9A4BD505C307FAD1BEFF3AE98B,),PersistentGuid=00000000000000000000000000000000,bHidden=False,bNotConnectable=False,bDefaultValueIsReadOnly=False,bDefaultValueIsIgnored=False,bAdvancedView=False,bOrphanedPin=False,)
   CustomProperties Pin (PinId=0811E84B4E91F1030D8FE3BAC770A247,PinName="self",PinFriendlyName=NSLOCTEXT("K2Node", "Target", "Target"),PinToolTip="Target\nScene Component Object Reference",PinType.PinCategory="object",PinType.PinSubCategory="",PinType.PinSubCategoryObject=Class'/Script/Engine.SceneComponent',PinType.PinSubCategoryMemberReference=(),PinType.PinValueType=(),PinType.ContainerType=None,PinType.bIsMap=False,PinType.bIsSet=False,PinType.bIsArray=False,PinType.bIsReference=False,PinType.bIsConst=False,PinType.bIsWeakPointer=False,LinkedTo=(K2Node_VariableGet_23 14EFDA2C47FF2DF1F58E7A9BA401135E,),PersistentGuid=00000000000000000000000000000000,bHidden=False,bNotConnectable=False,bDefaultValueIsReadOnly=False,bDefaultValueIsIgnored=False,bAdvancedView=False,bOrphanedPin=False,)
   CustomProperties Pin (PinId=C2D0A283497566CAFA793CB992D07158,PinName="NewLocation",PinToolTip="New Location\nVector \n\nNew location of the component relative to its parent.",PinType.PinCategory="struct",PinType.PinSubCategory="",PinType.PinSubCategoryObject=ScriptStruct'/Script/CoreUObject.Vector',PinType.PinSubCategoryMemberReference=(),PinType.PinValueType=(),PinType.ContainerType=None,PinType.bIsMap=False,PinType.bIsSet=False,PinType.bIsArray=False,PinType.bIsReference=False,PinType.bIsConst=False,PinType.bIsWeakPointer=False,DefaultValue="0, 0, 0",AutogeneratedDefaultValue="0, 0, 0",LinkedTo=(K2Node_VariableGet_24 7FE7B76D4888DB151FF54EAB9D25F826,),PersistentGuid=00000000000000000000000000000000,bHidden=False,bNotConnectable=False,bDefaultValueIsReadOnly=False,bDefaultValueIsIgnored=False,bAdvancedView=False,bOrphanedPin=False,)
   CustomProperties Pin (PinId=3D1069744CC4C94F298F3980C2A0F289,PinName="bSweep",PinToolTip="Sweep\nBoolean\n\nWhether we sweep to the destination location, triggering overlaps along the way and stopping short of the target if blocked by something. Only the root component is swept and checked for blocking collision, child components move without sweeping. If collision is off, this has no effect.",PinType.PinCategory="bool",PinType.PinSubCategory="",PinType.PinSubCategoryObject=None,PinType.PinSubCategoryMemberReference=(),PinType.PinValueType=(),PinType.ContainerType=None,PinType.bIsMap=False,PinType.bIsSet=False,PinType.bIsArray=False,PinType.bIsReference=False,PinType.bIsConst=False,PinType.bIsWeakPointer=False,DefaultValue="false",AutogeneratedDefaultValue="false",PersistentGuid=00000000000000000000000000000000,bHidden=False,bNotConnectable=False,bDefaultValueIsReadOnly=False,bDefaultValueIsIgnored=False,bAdvancedView=False,bOrphanedPin=False,)
   CustomProperties Pin (PinId=63A901EA42073DA211529DBD9BDB4FF8,PinName="SweepHitResult",PinToolTip="Sweep Hit Result\nHit Result Structure\n\nHit result from any impact if sweep is true.",Direction="EGPD_Output",PinType.PinCategory="struct",PinType.PinSubCategory="",PinType.PinSubCategoryObject=ScriptStruct'/Script/Engine.HitResult',PinType.PinSubCategoryMemberReference=(),PinType.PinValueType=(),PinType.ContainerType=None,PinType.bIsMap=False,PinType.bIsSet=False,PinType.bIsArray=False,PinType.bIsReference=False,PinType.bIsConst=False,PinType.bIsWeakPointer=False,PersistentGuid=00000000000000000000000000000000,bHidden=False,bNotConnectable=False,bDefaultValueIsReadOnly=False,bDefaultValueIsIgnored=False,bAdvancedView=False,bOrphanedPin=False,)
   CustomProperties Pin (PinId=03544D8C4FC9FC037BE82CB2780E14A1,PinName="bTeleport",PinToolTip="Teleport\nBoolean\n\nWhether we teleport the physics state (if physics collision is enabled for this object). If true, physics velocity for this object is unchanged (so ragdoll parts are not affected by change in location). If false, physics velocity is updated based on the change in position (affecting ragdoll parts). If CCD is on and not teleporting, this will affect objects along the entire sweep volume.",PinType.PinCategory="bool",PinType.PinSubCategory="",PinType.PinSubCategoryObject=None,PinType.PinSubCategoryMemberReference=(),PinType.PinValueType=(),PinType.ContainerType=None,PinType.bIsMap=False,PinType.bIsSet=False,PinType.bIsArray=False,PinType.bIsReference=False,PinType.bIsConst=False,PinType.bIsWeakPointer=False,DefaultValue="false",AutogeneratedDefaultValue="false",PersistentGuid=00000000000000000000000000000000,bHidden=False,bNotConnectable=False,bDefaultValueIsReadOnly=False,bDefaultValueIsIgnored=False,bAdvancedView=False,bOrphanedPin=False,)
End Object
Begin Object Class=/Script/BlueprintGraph.K2Node_VariableGet Name="K2Node_VariableGet_23"
   VariableReference=(MemberName="VRCameraRoot",bSelfContext=True)
   NodePosX=272
   NodePosY=352
   NodeGuid=8372D50849CD3678B5FC15A6DEF7B8FF
   CustomProperties Pin (PinId=14EFDA2C47FF2DF1F58E7A9BA401135E,PinName="VRCameraRoot",Direction="EGPD_Output",PinType.PinCategory="object",PinType.PinSubCategory="",PinType.PinSubCategoryObject=Class'/Script/Engine.SceneComponent',PinType.PinSubCategoryMemberReference=(),PinType.PinValueType=(),PinType.ContainerType=None,PinType.bIsMap=False,PinType.bIsSet=False,PinType.bIsArray=False,PinType.bIsReference=False,PinType.bIsConst=False,PinType.bIsWeakPointer=False,LinkedTo=(K2Node_CallFunction_52 0811E84B4E91F1030D8FE3BAC770A247,),PersistentGuid=00000000000000000000000000000000,bHidden=False,bNotConnectable=False,bDefaultValueIsReadOnly=False,bDefaultValueIsIgnored=False,bAdvancedView=False,bOrphanedPin=False,)
   CustomProperties Pin (PinId=E2C335C44D268CDCA73404AA7E7D9ABD,PinName="self",PinFriendlyName=NSLOCTEXT("K2Node", "Target", "Target"),PinType.PinCategory="object",PinType.PinSubCategory="",PinType.PinSubCategoryObject=BlueprintGeneratedClass'/Game/GoogleVR_Pawn/GoogleVR_Pawn_MotionController.GoogleVR_Pawn_MotionController_C',PinType.PinSubCategoryMemberReference=(),PinType.PinValueType=(),PinType.ContainerType=None,PinType.bIsMap=False,PinType.bIsSet=False,PinType.bIsArray=False,PinType.bIsReference=False,PinType.bIsConst=False,PinType.bIsWeakPointer=False,PersistentGuid=00000000000000000000000000000000,bHidden=True,bNotConnectable=False,bDefaultValueIsReadOnly=False,bDefaultValueIsIgnored=False,bAdvancedView=False,bOrphanedPin=False,)
End Object
Begin Object Class=/Script/BlueprintGraph.K2Node_VariableGet Name="K2Node_VariableGet_24"
   VariableReference=(MemberName="CameraHeight",MemberGuid=ACC6F49F42C088E811CC9BB892E6F87B,bSelfContext=True)
   NodePosX=288
   NodePosY=432
   NodeGuid=BBF93606403186ED65F98F907C091CC5
   CustomProperties Pin (PinId=7FE7B76D4888DB151FF54EAB9D25F826,PinName="CameraHeight",Direction="EGPD_Output",PinType.PinCategory="struct",PinType.PinSubCategory="",PinType.PinSubCategoryObject=ScriptStruct'/Script/CoreUObject.Vector',PinType.PinSubCategoryMemberReference=(),PinType.PinValueType=(),PinType.ContainerType=None,PinType.bIsMap=False,PinType.bIsSet=False,PinType.bIsArray=False,PinType.bIsReference=False,PinType.bIsConst=False,PinType.bIsWeakPointer=False,DefaultValue="0, 0, 0",AutogeneratedDefaultValue="0, 0, 0",LinkedTo=(K2Node_CallFunction_52 C2D0A283497566CAFA793CB992D07158,),PersistentGuid=00000000000000000000000000000000,bHidden=False,bNotConnectable=False,bDefaultValueIsReadOnly=False,bDefaultValueIsIgnored=False,bAdvancedView=False,bOrphanedPin=False,)
   CustomProperties Pin (PinId=DA87D3494F0E12714F4126B699524EAA,PinName="self",PinFriendlyName=NSLOCTEXT("K2Node", "Target", "Target"),PinType.PinCategory="object",PinType.PinSubCategory="",PinType.PinSubCategoryObject=BlueprintGeneratedClass'/Game/GoogleVR_Pawn/GoogleVR_Pawn_MotionController.GoogleVR_Pawn_MotionController_C',PinType.PinSubCategoryMemberReference=(),PinType.PinValueType=(),PinType.ContainerType=None,PinType.bIsMap=False,PinType.bIsSet=False,PinType.bIsArray=False,PinType.bIsReference=False,PinType.bIsConst=False,PinType.bIsWeakPointer=False,PersistentGuid=00000000000000000000000000000000,bHidden=True,bNotConnectable=False,bDefaultValueIsReadOnly=False,bDefaultValueIsIgnored=False,bAdvancedView=False,bOrphanedPin=False,)
End Object
Begin Object Class=/Script/BlueprintGraph.K2Node_VariableGet Name="K2Node_VariableGet_64"
   VariableReference=(MemberName="GoogleVRMotionController",bSelfContext=True)
   NodePosX=976
   NodePosY=448
   NodeGuid=88EDA60D4D8504FB70E7AFB655E048C7
   CustomProperties Pin (PinId=9F6C35184E2D14C2FBC81680FE94E15C,PinName="GoogleVRMotionController",Direction="EGPD_Output",PinType.PinCategory="object",PinType.PinSubCategory="",PinType.PinSubCategoryObject=Class'/Script/GoogleVRController.GoogleVRMotionControllerComponent',PinType.PinSubCategoryMemberReference=(),PinType.PinValueType=(),PinType.ContainerType=None,PinType.bIsMap=False,PinType.bIsSet=False,PinType.bIsArray=False,PinType.bIsReference=False,PinType.bIsConst=False,PinType.bIsWeakPointer=False,LinkedTo=(K2Node_CallFunction_49 53D2D36A43FC3D303A5AEC908C719807,),PersistentGuid=00000000000000000000000000000000,bHidden=False,bNotConnectable=False,bDefaultValueIsReadOnly=False,bDefaultValueIsIgnored=False,bAdvancedView=False,bOrphanedPin=False,)
   CustomProperties Pin (PinId=62B102CB4504DEE7014C27BBFF662B92,PinName="self",PinFriendlyName=NSLOCTEXT("K2Node", "Target", "Target"),PinType.PinCategory="object",PinType.PinSubCategory="",PinType.PinSubCategoryObject=BlueprintGeneratedClass'/Game/GoogleVR_Pawn/GoogleVR_Pawn_MotionController.GoogleVR_Pawn_MotionController_C',PinType.PinSubCategoryMemberReference=(),PinType.PinValueType=(),PinType.ContainerType=None,PinType.bIsMap=False,PinType.bIsSet=False,PinType.bIsArray=False,PinType.bIsReference=False,PinType.bIsConst=False,PinType.bIsWeakPointer=False,PersistentGuid=00000000000000000000000000000000,bHidden=True,bNotConnectable=False,bDefaultValueIsReadOnly=False,bDefaultValueIsIgnored=False,bAdvancedView=False,bOrphanedPin=False,)
End Object
Begin Object Class=/Script/BlueprintGraph.K2Node_CallFunction Name="K2Node_CallFunction_49"
   bIsPureFunc=True
   bIsConstFunc=True
   FunctionReference=(MemberParent=Class'/Script/GoogleVRController.GoogleVRMotionControllerComponent',MemberName="GetMotionController")
   NodePosX=896
   NodePosY=352
   NodeGuid=A3A3F3D54784ED6BC88AC8B59DD2B0D2
   CustomProperties Pin (PinId=53D2D36A43FC3D303A5AEC908C719807,PinName="self",PinFriendlyName=NSLOCTEXT("K2Node", "Target", "Target"),PinToolTip="Target\nGoogleVRMotion Controller Component Object Reference",PinType.PinCategory="object",PinType.PinSubCategory="",PinType.PinSubCategoryObject=Class'/Script/GoogleVRController.GoogleVRMotionControllerComponent',PinType.PinSubCategoryMemberReference=(),PinType.PinValueType=(),PinType.ContainerType=None,PinType.bIsMap=False,PinType.bIsSet=False,PinType.bIsArray=False,PinType.bIsReference=False,PinType.bIsConst=False,PinType.bIsWeakPointer=False,LinkedTo=(K2Node_VariableGet_64 9F6C35184E2D14C2FBC81680FE94E15C,),PersistentGuid=00000000000000000000000000000000,bHidden=False,bNotConnectable=False,bDefaultValueIsReadOnly=False,bDefaultValueIsIgnored=False,bAdvancedView=False,bOrphanedPin=False,)
   CustomProperties Pin (PinId=90076FFD458A1867BB0123A08EE7E4F7,PinName="ReturnValue",PinToolTip="Return Value\nMotion Controller Component Object Reference\n\nmotion controller component",Direction="EGPD_Output",PinType.PinCategory="object",PinType.PinSubCategory="",PinType.PinSubCategoryObject=Class'/Script/HeadMountedDisplay.MotionControllerComponent',PinType.PinSubCategoryMemberReference=(),PinType.PinValueType=(),PinType.ContainerType=None,PinType.bIsMap=False,PinType.bIsSet=False,PinType.bIsArray=False,PinType.bIsReference=False,PinType.bIsConst=False,PinType.bIsWeakPointer=False,LinkedTo=(K2Node_CallFunction_4529 97A00656447992549C625D8A329A3F4A,),PersistentGuid=00000000000000000000000000000000,bHidden=False,bNotConnectable=False,bDefaultValueIsReadOnly=False,bDefaultValueIsIgnored=False,bAdvancedView=False,bOrphanedPin=False,)
End Object
Begin Object Class=/Script/UnrealEd.EdGraphNode_Comment Name="EdGraphNode_Comment_1"
   NodePosX=128
   NodePosY=144
   NodeWidth=710
   NodeHeight=373
   NodeComment="Set Tracking Origin & Camera Height"
   NodeGuid=580465434B840315B6890D82FF2D5E1C
End Object
Begin Object Class=/Script/UnrealEd.EdGraphNode_Comment Name="EdGraphNode_Comment_2"
   NodePosX=864
   NodePosY=144
   NodeWidth=848
   NodeHeight=416
   NodeComment="Attach Text Actors to GoogleVR Motion Controller"
   NodeGuid=3EAED41E435013CA9D1D26A2B20F28A3
End Object
Begin Object Class=/Script/BlueprintGraph.K2Node_CallFunction Name="K2Node_CallFunction_4529"
   FunctionReference=(MemberParent=Class'/Script/Engine.SceneComponent',MemberName="K2_AttachToComponent")
   NodePosX=1296
   NodePosY=192
   NodeGuid=3B26FB9F4B5655041012D284FD92A44C
   CustomProperties Pin (PinId=B4D1BA9A4BD505C307FAD1BEFF3AE98B,PinName="execute",PinToolTip="\nExec",PinType.PinCategory="exec",PinType.PinSubCategory="",PinType.PinSubCategoryObject=None,PinType.PinSubCategoryMemberReference=(),PinType.PinValueType=(),PinType.ContainerType=None,PinType.bIsMap=False,PinType.bIsSet=False,PinType.bIsArray=False,PinType.bIsReference=False,PinType.bIsConst=False,PinType.bIsWeakPointer=False,LinkedTo=(K2Node_CallFunction_52 1C7A9A54494AE23B7164B7B8725F5D52,),PersistentGuid=00000000000000000000000000000000,bHidden=False,bNotConnectable=False,bDefaultValueIsReadOnly=False,bDefaultValueIsIgnored=False,bAdvancedView=False,bOrphanedPin=False,)
   CustomProperties Pin (PinId=6B68B1A84F8A6B50AE94619E1A451C58,PinName="then",PinToolTip="\nExec",Direction="EGPD_Output",PinType.PinCategory="exec",PinType.PinSubCategory="",PinType.PinSubCategoryObject=None,PinType.PinSubCategoryMemberReference=(),PinType.PinValueType=(),PinType.ContainerType=None,PinType.bIsMap=False,PinType.bIsSet=False,PinType.bIsArray=False,PinType.bIsReference=False,PinType.bIsConst=False,PinType.bIsWeakPointer=False,PersistentGuid=00000000000000000000000000000000,bHidden=False,bNotConnectable=False,bDefaultValueIsReadOnly=False,bDefaultValueIsIgnored=False,bAdvancedView=False,bOrphanedPin=False,)
   CustomProperties Pin (PinId=A51266524E3616F18CD05297E638EB73,PinName="self",PinFriendlyName=NSLOCTEXT("K2Node", "Target", "Target"),PinToolTip="Target\nScene Component Object Reference",PinType.PinCategory="object",PinType.PinSubCategory="",PinType.PinSubCategoryObject=Class'/Script/Engine.SceneComponent',PinType.PinSubCategoryMemberReference=(),PinType.PinValueType=(),PinType.ContainerType=None,PinType.bIsMap=False,PinType.bIsSet=False,PinType.bIsArray=False,PinType.bIsReference=False,PinType.bIsConst=False,PinType.bIsWeakPointer=False,LinkedTo=(K2Node_VariableGet_1686 B91CF2C744FD5A41936C63B50B2B4030,),PersistentGuid=00000000000000000000000000000000,bHidden=False,bNotConnectable=False,bDefaultValueIsReadOnly=False,bDefaultValueIsIgnored=False,bAdvancedView=False,bOrphanedPin=False,)
   CustomProperties Pin (PinId=97A00656447992549C625D8A329A3F4A,PinName="Parent",PinToolTip="Parent\nScene Component Object Reference\n\nParent to attach to.",PinType.PinCategory="object",PinType.PinSubCategory="",PinType.PinSubCategoryObject=Class'/Script/Engine.SceneComponent',PinType.PinSubCategoryMemberReference=(),PinType.PinValueType=(),PinType.ContainerType=None,PinType.bIsMap=False,PinType.bIsSet=False,PinType.bIsArray=False,PinType.bIsReference=False,PinType.bIsConst=False,PinType.bIsWeakPointer=False,LinkedTo=(K2Node_CallFunction_49 90076FFD458A1867BB0123A08EE7E4F7,),PersistentGuid=00000000000000000000000000000000,bHidden=False,bNotConnectable=False,bDefaultValueIsReadOnly=False,bDefaultValueIsIgnored=False,bAdvancedView=False,bOrphanedPin=False,)
   CustomProperties Pin (PinId=8A4EEC7548C27CCD7AD68EB7BEA0207B,PinName="SocketName",PinToolTip="Socket Name\nName\n\nOptional socket to attach to on the parent.",PinType.PinCategory="name",PinType.PinSubCategory="",PinType.PinSubCategoryObject=None,PinType.PinSubCategoryMemberReference=(),PinType.PinValueType=(),PinType.ContainerType=None,PinType.bIsMap=False,PinType.bIsSet=False,PinType.bIsArray=False,PinType.bIsReference=False,PinType.bIsConst=False,PinType.bIsWeakPointer=False,DefaultValue="None",AutogeneratedDefaultValue="None",PersistentGuid=00000000000000000000000000000000,bHidden=False,bNotConnectable=False,bDefaultValueIsReadOnly=False,bDefaultValueIsIgnored=False,bAdvancedView=False,bOrphanedPin=False,)
   CustomProperties Pin (PinId=47E6D9D84CFA309F9146E58F1E11C293,PinName="LocationRule",PinToolTip="Location Rule\nEAttachmentRule Enum\n\nHow to handle translation when attaching.",PinType.PinCategory="byte",PinType.PinSubCategory="",PinType.PinSubCategoryObject=Enum'/Script/Engine.EAttachmentRule',PinType.PinSubCategoryMemberReference=(),PinType.PinValueType=(),PinType.ContainerType=None,PinType.bIsMap=False,PinType.bIsSet=False,PinType.bIsArray=False,PinType.bIsReference=False,PinType.bIsConst=False,PinType.bIsWeakPointer=False,DefaultValue="KeepRelative",PersistentGuid=00000000000000000000000000000000,bHidden=False,bNotConnectable=False,bDefaultValueIsReadOnly=False,bDefaultValueIsIgnored=False,bAdvancedView=False,bOrphanedPin=False,)
   CustomProperties Pin (PinId=2000092C4C5823695455F1AE3A732738,PinName="RotationRule",PinToolTip="Rotation Rule\nEAttachmentRule Enum\n\nHow to handle rotation when attaching.",PinType.PinCategory="byte",PinType.PinSubCategory="",PinType.PinSubCategoryObject=Enum'/Script/Engine.EAttachmentRule',PinType.PinSubCategoryMemberReference=(),PinType.PinValueType=(),PinType.ContainerType=None,PinType.bIsMap=False,PinType.bIsSet=False,PinType.bIsArray=False,PinType.bIsReference=False,PinType.bIsConst=False,PinType.bIsWeakPointer=False,DefaultValue="KeepRelative",PersistentGuid=00000000000000000000000000000000,bHidden=False,bNotConnectable=False,bDefaultValueIsReadOnly=False,bDefaultValueIsIgnored=False,bAdvancedView=False,bOrphanedPin=False,)
   CustomProperties Pin (PinId=4800E30C401F5CA1845164A3AEC0E937,PinName="ScaleRule",PinToolTip="Scale Rule\nEAttachmentRule Enum\n\nHow to handle scale when attaching.",PinType.PinCategory="byte",PinType.PinSubCategory="",PinType.PinSubCategoryObject=Enum'/Script/Engine.EAttachmentRule',PinType.PinSubCategoryMemberReference=(),PinType.PinValueType=(),PinType.ContainerType=None,PinType.bIsMap=False,PinType.bIsSet=False,PinType.bIsArray=False,PinType.bIsReference=False,PinType.bIsConst=False,PinType.bIsWeakPointer=False,DefaultValue="KeepRelative",PersistentGuid=00000000000000000000000000000000,bHidden=False,bNotConnectable=False,bDefaultValueIsReadOnly=False,bDefaultValueIsIgnored=False,bAdvancedView=False,bOrphanedPin=False,)
   CustomProperties Pin (PinId=9B3F41E349C08971AB84FA8606E41B3E,PinName="bWeldSimulatedBodies",PinToolTip="Weld Simulated Bodies\nBoolean\n\nWhether to weld together simulated physics bodies.",PinType.PinCategory="bool",PinType.PinSubCategory="",PinType.PinSubCategoryObject=None,PinType.PinSubCategoryMemberReference=(),PinType.PinValueType=(),PinType.ContainerType=None,PinType.bIsMap=False,PinType.bIsSet=False,PinType.bIsArray=False,PinType.bIsReference=False,PinType.bIsConst=False,PinType.bIsWeakPointer=False,DefaultValue="TRUE",AutogeneratedDefaultValue="TRUE",PersistentGuid=00000000000000000000000000000000,bHidden=False,bNotConnectable=False,bDefaultValueIsReadOnly=False,bDefaultValueIsIgnored=False,bAdvancedView=False,bOrphanedPin=False,)
   CustomProperties Pin (PinId=2B1F8E364A594415D3ACF4822110EB2C,PinName="ReturnValue",PinToolTip="Return Value\nBoolean\n\nTrue if attachment is successful (or already attached to requested parent/socket), false if attachment is rejected and there is no change in AttachParent.",Direction="EGPD_Output",PinType.PinCategory="bool",PinType.PinSubCategory="",PinType.PinSubCategoryObject=None,PinType.PinSubCategoryMemberReference=(),PinType.PinValueType=(),PinType.ContainerType=None,PinType.bIsMap=False,PinType.bIsSet=False,PinType.bIsArray=False,PinType.bIsReference=False,PinType.bIsConst=False,PinType.bIsWeakPointer=False,DefaultValue="false",AutogeneratedDefaultValue="false",PersistentGuid=00000000000000000000000000000000,bHidden=False,bNotConnectable=False,bDefaultValueIsReadOnly=False,bDefaultValueIsIgnored=False,bAdvancedView=False,bOrphanedPin=False,)
End Object
Begin Object Class=/Script/BlueprintGraph.K2Node_VariableGet Name="K2Node_VariableGet_1686"
   VariableReference=(MemberName="FaceButtonPressed",bSelfContext=True)
   NodePosX=912
   NodePosY=256
   NodeGuid=257909824E12C0F47846F1A18DDEEAC1
   CustomProperties Pin (PinId=B91CF2C744FD5A41936C63B50B2B4030,PinName="FaceButtonPressed",Direction="EGPD_Output",PinType.PinCategory="object",PinType.PinSubCategory="",PinType.PinSubCategoryObject=Class'/Script/Engine.TextRenderComponent',PinType.PinSubCategoryMemberReference=(),PinType.PinValueType=(),PinType.ContainerType=None,PinType.bIsMap=False,PinType.bIsSet=False,PinType.bIsArray=False,PinType.bIsReference=False,PinType.bIsConst=False,PinType.bIsWeakPointer=False,LinkedTo=(K2Node_CallFunction_4529 A51266524E3616F18CD05297E638EB73,),PersistentGuid=00000000000000000000000000000000,bHidden=False,bNotConnectable=False,bDefaultValueIsReadOnly=False,bDefaultValueIsIgnored=False,bAdvancedView=False,bOrphanedPin=False,)
   CustomProperties Pin (PinId=891F49554C7E6A948D45E2B0A4A50697,PinName="self",PinFriendlyName=NSLOCTEXT("K2Node", "Target", "Target"),PinType.PinCategory="object",PinType.PinSubCategory="",PinType.PinSubCategoryObject=BlueprintGeneratedClass'/Game/GoogleVR_Pawn/GoogleVR_Pawn_MotionController.GoogleVR_Pawn_MotionController_C',PinType.PinSubCategoryMemberReference=(),PinType.PinValueType=(),PinType.ContainerType=None,PinType.bIsMap=False,PinType.bIsSet=False,PinType.bIsArray=False,PinType.bIsReference=False,PinType.bIsConst=False,PinType.bIsWeakPointer=False,PersistentGuid=00000000000000000000000000000000,bHidden=True,bNotConnectable=False,bDefaultValueIsReadOnly=False,bDefaultValueIsIgnored=False,bAdvancedView=False,bOrphanedPin=False,)
End Object

END OBJECT
Click for full image.

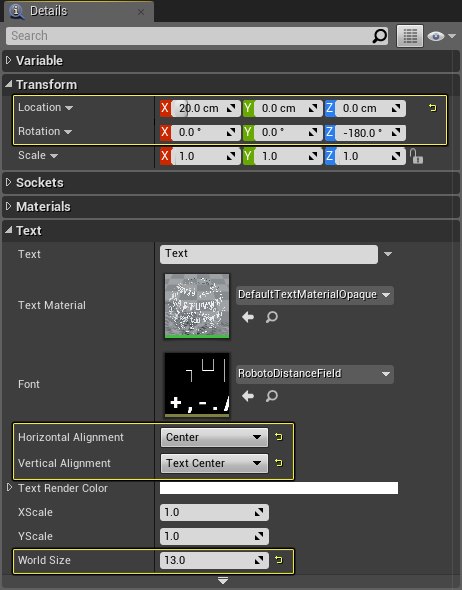

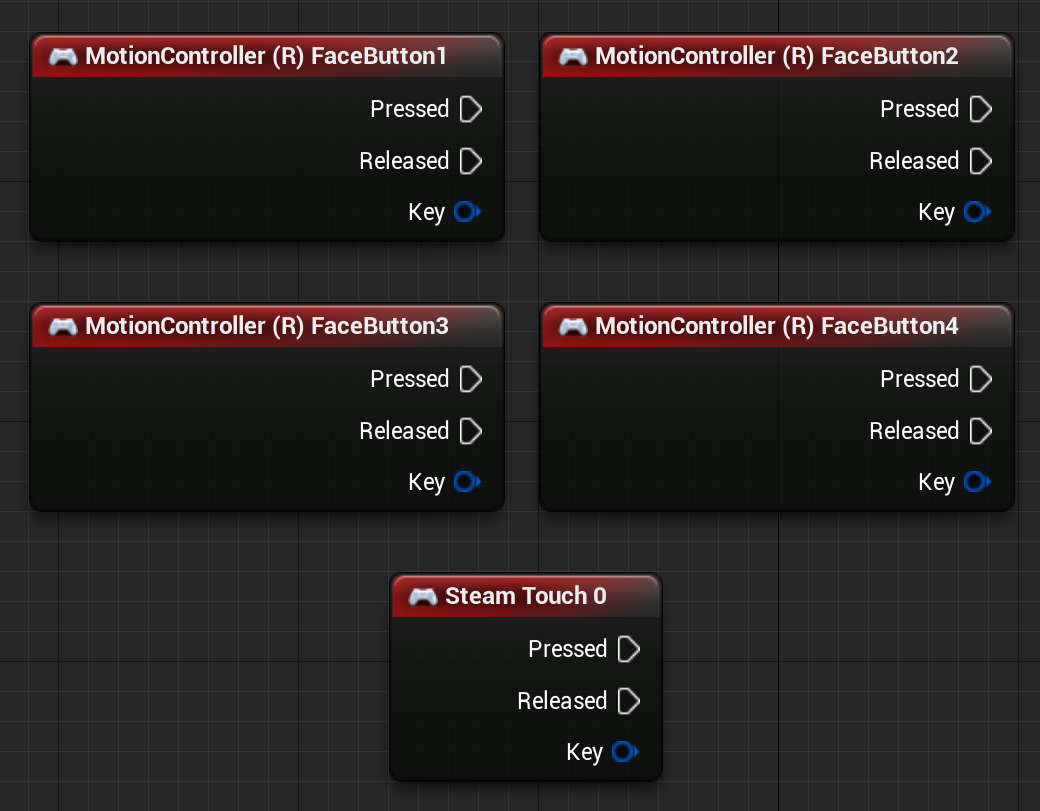
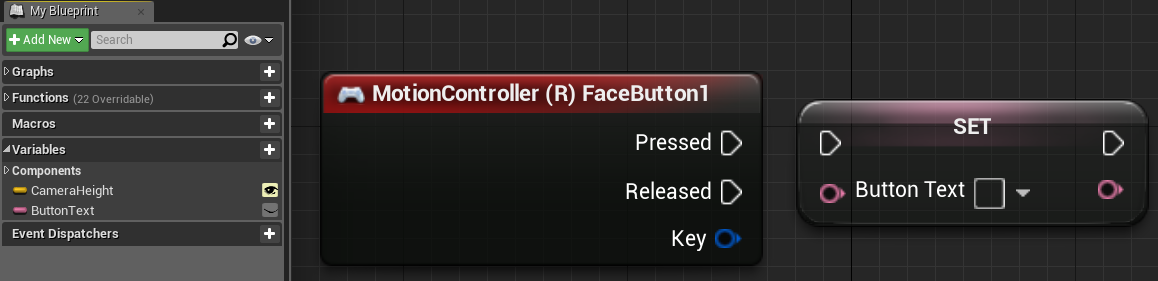

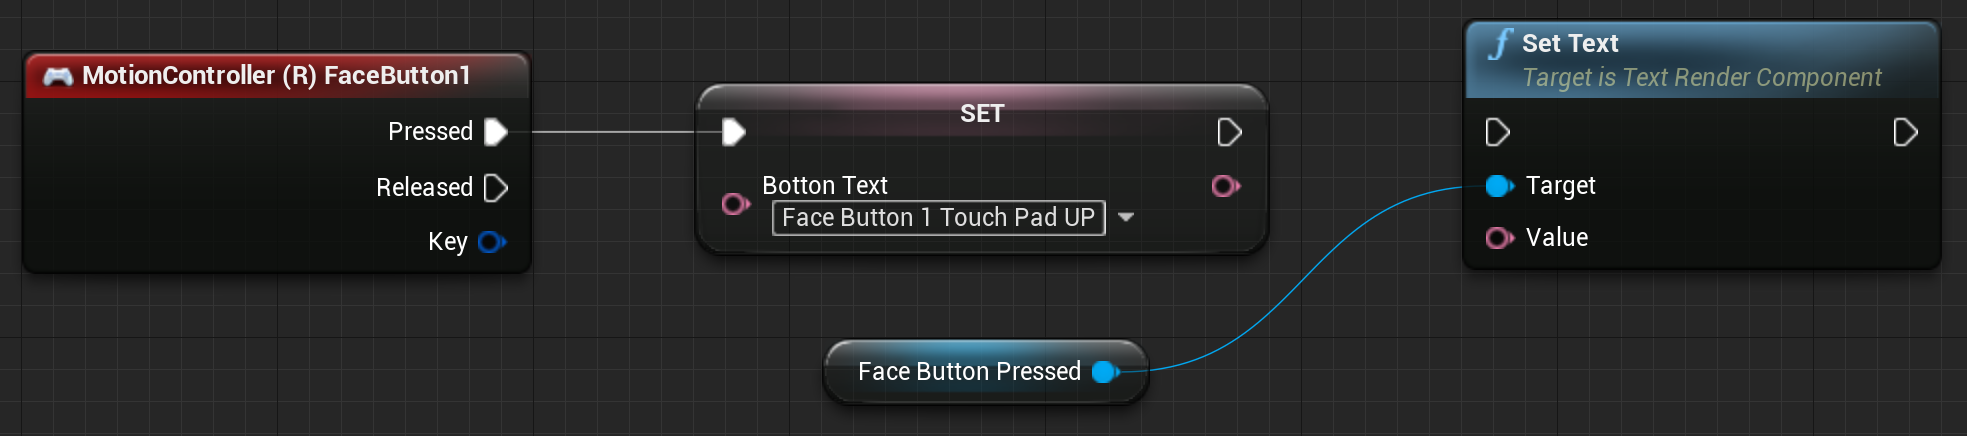
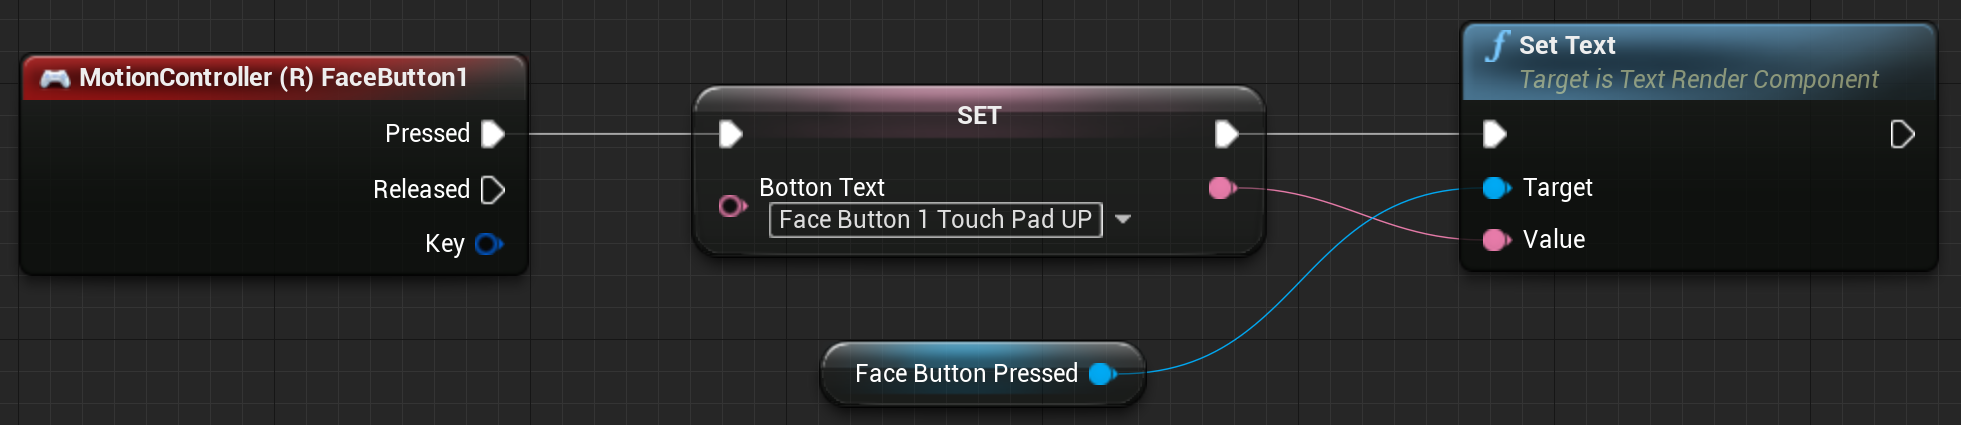
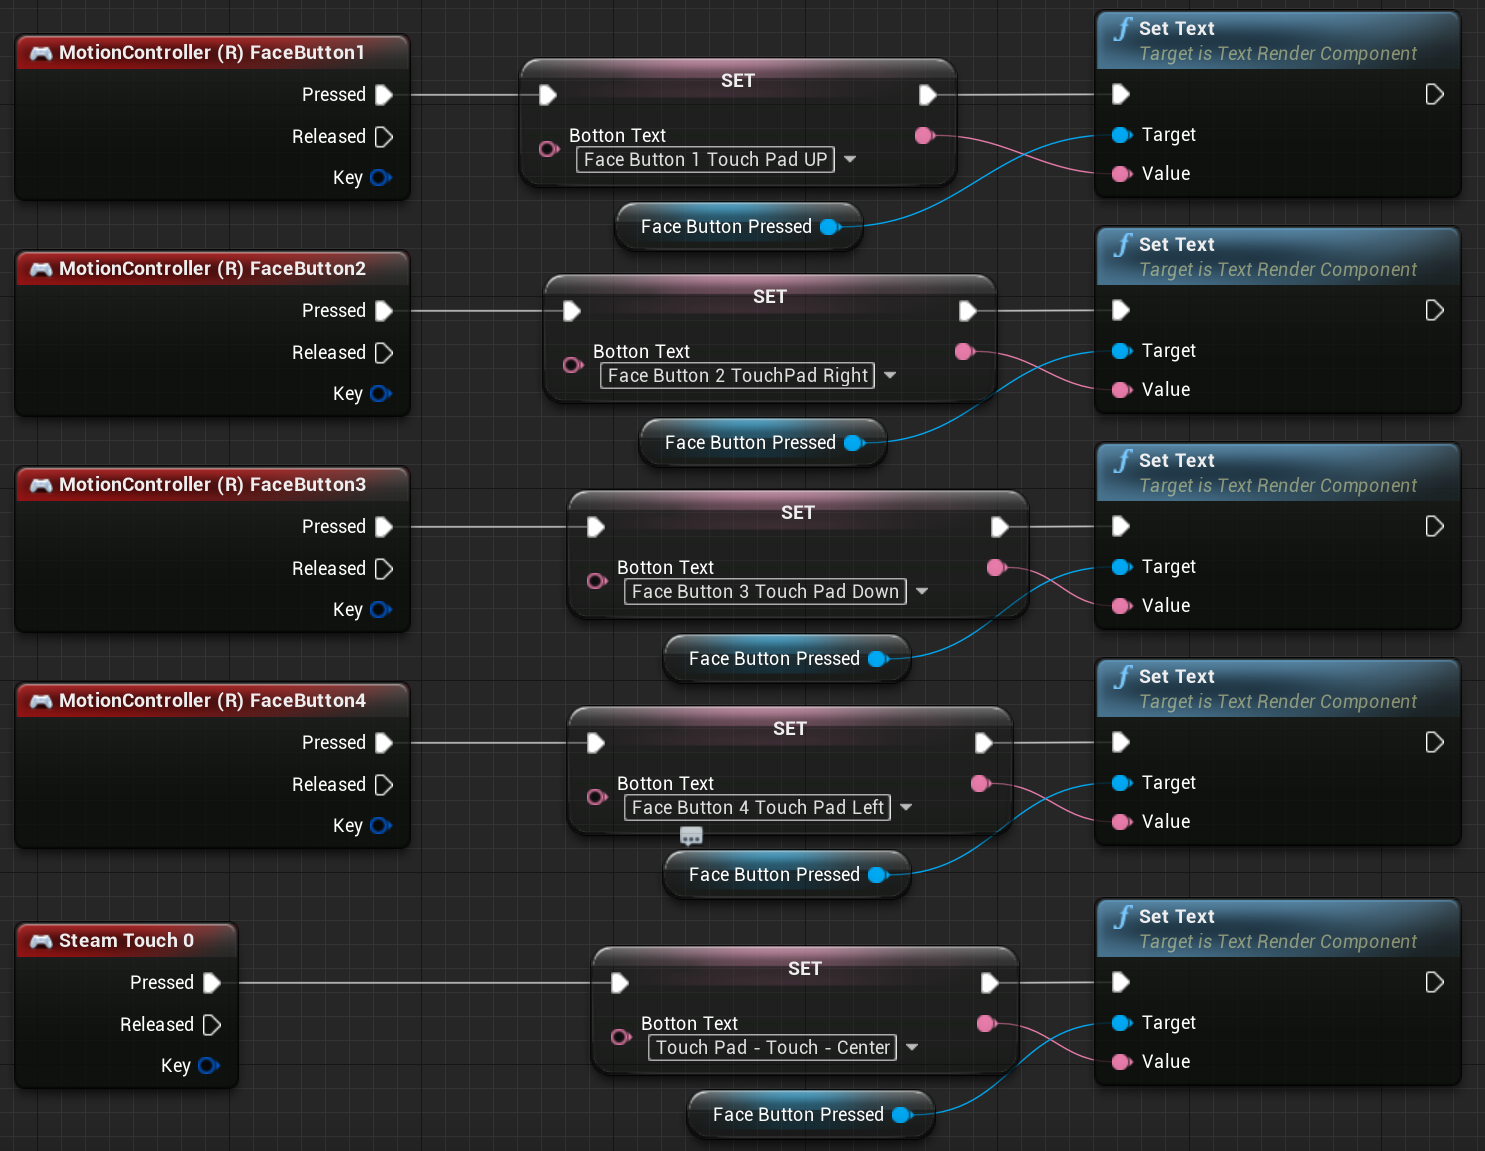
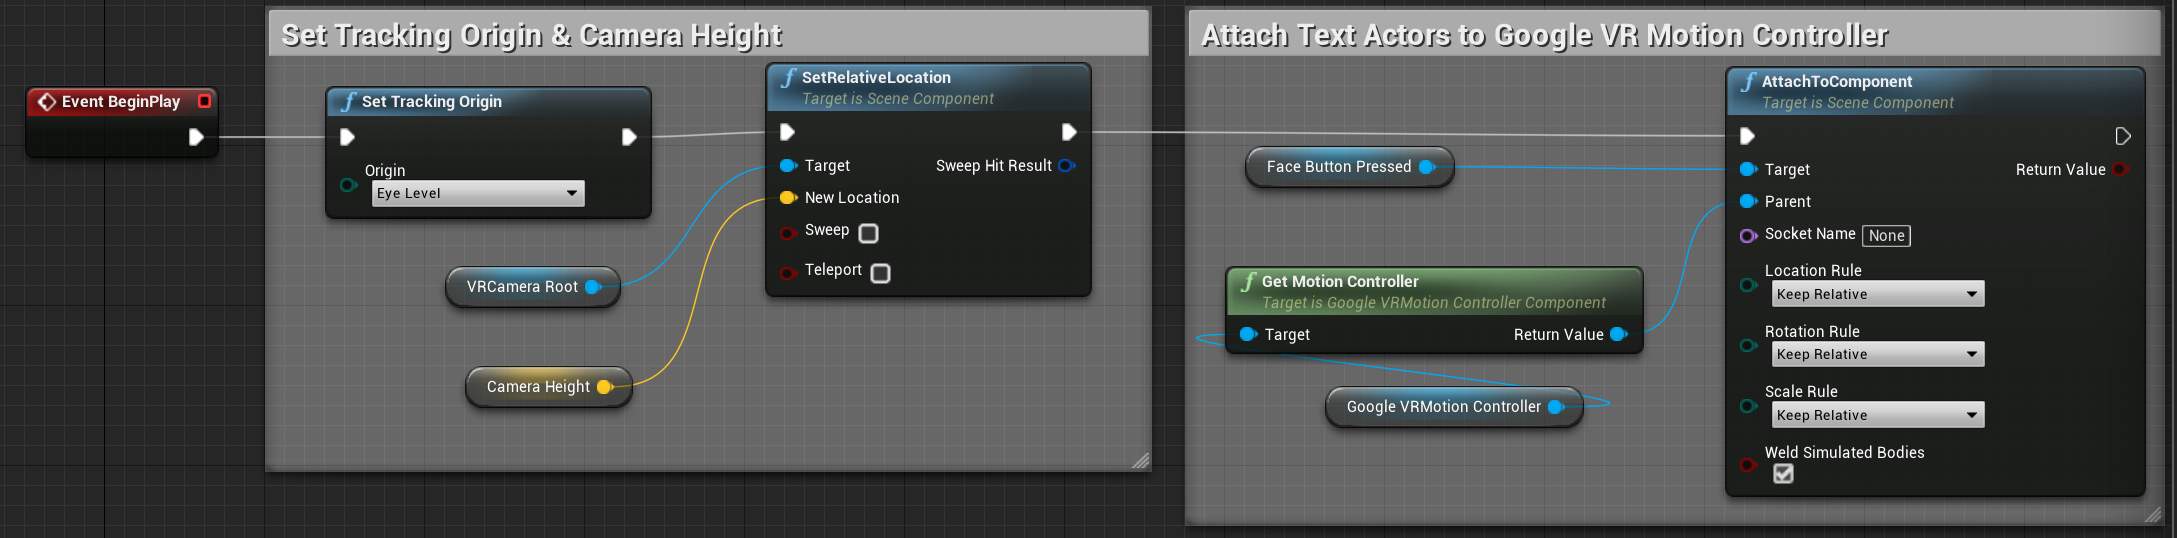
End Result
Compile and save your Blueprint and then use the Launch On button to deploy and launch the project to your smartphone. When the project is deployed to your phone, put your phone in the GoogleVR HMD and pick up the Daydream Motion Controller. Now when you press in any of the cardinal directions on the Touchpad, the button you pressed should be displayed, like in the following video:
Unreal Engine Project Downloads
Below, you will find a link to where you can download the Unreal Engine project that was used to create this example.