Choose your operating system:
Windows
macOS
Linux

Goals
This Quick Start guide shows you how to set up a Unreal Engine 4 (UE4) project to work with Google VR.
Objectives
-
Create a new UE4 project that is targeted towards Google VR development.
-
Setting the required project settings so your project can be used with Google VR.
-
Deploying and viewing your UE4 project with the Google VR HMD of your choice.
1 - Google VR Project Creation
In this part of the Google VR Quick Start, we will go over how to create a new UE4 project that has the best settings for Google VR development.
Steps
-
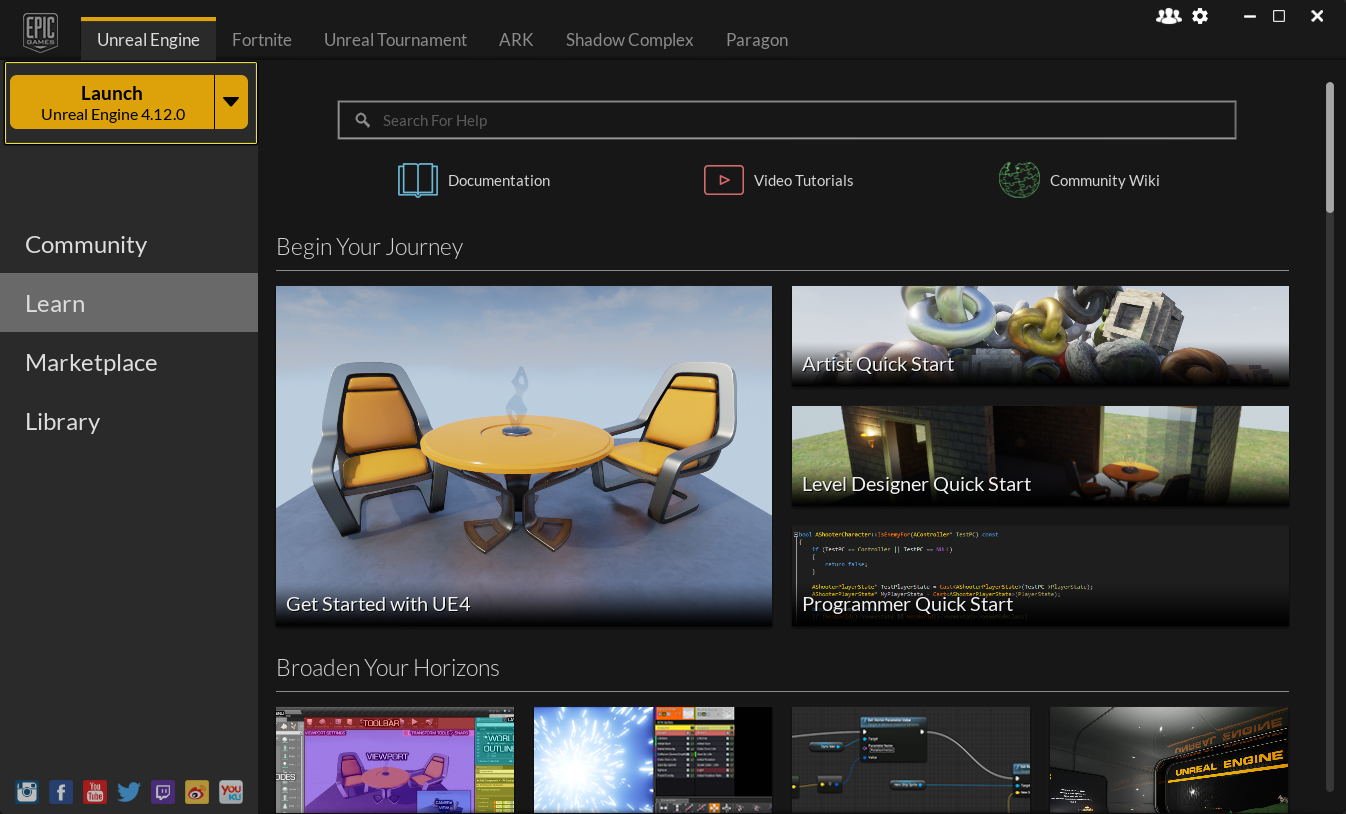
From the Epic Games launcher make sure that you have downloaded and installed UE4 version 4.12 or later. Once that is completed, press the Launch button to open the Project Browser .
![GVRQS_Launcher_00.png]()
Click for full image.
-
In the Project Browser , go to the New Project section and select the Games category, and the Blank template.
-
Due to the demanding rendering requirements of VR in general, it is best to start out any new UE4 VR project with the following settings to ensure that your project will run at the correct frame rate right from the start.
-
Blueprint enabled
-
Mobile / Tablet enabled
-
Scalable 3D / 2D enabled
-
No Starter Content enabled
-
Set the location where the project will be created and also give the project a name.
-
For this example the project name will be GVR_QS .
-
Finally, press the Create Project button that is located in the lower right-hand corner to create the project.
![GVRQS_New_Project_Options_03.png]()
Click for full image.

End Result
In the next section of the Google VR Quick Start, we will go over all the needed project settings to ensure that your UE4 project will work with Google VR.
2 - Google VR Project Setup
In this part of the Google VR Quick Start, we will go over setting up your Unreal Engine 4 project so that it can be used with Google VR.
Steps
-
Once the Editor has loaded, from the Main Toolbar , open the Edit tab and select the Plugins menu item.
![GVRQS_Save_Level_00.png]()
-
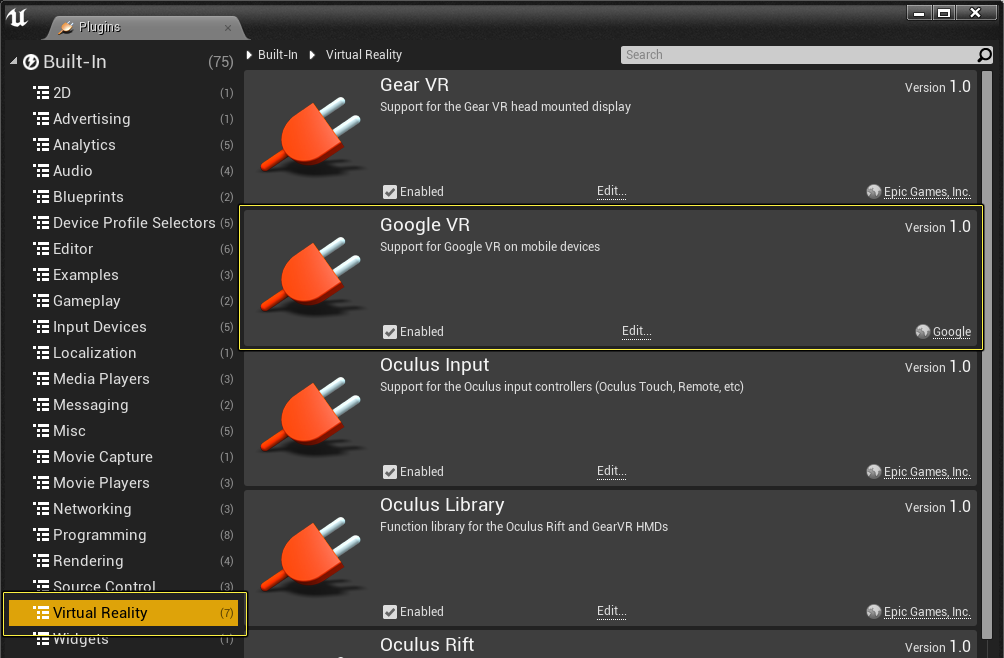
Inside of the Plugins menu, go the Virtual Reality section and make sure that Google VR is enabled.
![GVRQS_Pligin_GVR_Enabled_00.png]()
Click for full image.
The Google VR Plugin should be enabled by default. It can be enabled by clicking on the checkmark box next to Enabled . When you do this will be prompted to restart the Editor so that the changes can be applied. Failing to re-start the Editor after enabling the Google VR Plugin could result in the Plugin not working correctly.
-
From the Main Toolbar, select the File option and then click on the Save option to bring up the Save Level As window.
![GVRQS_Save_Level_01.png]()
-
From the Save Level As window under the Name section, name the level EntryLevel and then press the Save button.
![GVRQS_Save_Level_01.png]()
-
Back on the Main Toolbar , select the Edit menu option and then select the Project Settings menu option.
![GVRQS_Project_Settings_00.png]()
-
From the Project Settings menu, go to the Maps & Modes section. Under the Default Maps section, change the Editor Startup Map and Game Default Map to EntryLevel to make sure that EntryLevel will be loaded when the project is run.
![GVRQS_Select_Level_00.png]()
-
Back in the Project Settings , under the Target Hardware section, make sure that Target Hardware class has been set to Mobile / Tablet and the graphics level has been set to Scalable 3D or 2D .
![GVRQS_Target_Hardware_00.png]()
If you see the Restart Editor button under the Pending Changes section, make sure to press it to restart the editor, so the changes that are made will be applied. Failing to do this could result in your project not working with Google VR.
![GVRQS_Target_Hardware_01.png]()
-
In the Rendering section, make sure that Mobile HDR is disabled. This is necessary for correct stereoscopic rendering.
![GVRQS_Moile_HDR_Off_00.png]()
-
Under the Input section in the Mobile category, remove the DefaultVirtualJoysticks from the Default Touch Interface by clicking on the small white triangle next to DefaultVirtualJoysticks and selecting the Clear option from the drop-down list.
![GVRQS_Remove_Virtual_JoySticks.png]()
-
Under the Android section (in the Platforms heading), press the Configure Now button in both the APKPackaging and Google Play Services categories to ensure that our project can package correctly.
![GVRQS_Config_Now_00.jpg]()
-
In the APKPackaging category, make sure you have the following options set:
![GVRQS_SDK_Version_00.png]()
Property Name
Value
Minimum SDK Version and Target SDK Version
24
Disable verify OBB on first start/update
Checked
Enable FullScreen Immersive on KitKat and above devices
Checked
-
Locate the Build category and then set the following properties:
![GVRQS_Build_arm64_Support_00.png]()
Property Name
Value
Support armv7 (aka armeabi-v7a)
UnChecked
Support arm64 (aka arm64-v8a)
Checked
Support OpenGL ES2
Checked
-
Next, in the Advanced APKPackaging category, enable the following options:
![GVRQS_GoogleVR_Options_01.png]()
Property Name
Value
Configure Google VR to support specific hardware configurations
0: Cardboard
1: Daydream (6.6 DoF)Configure Google VR for sustained-performance mode
Checked
The Configure Google VR Deployment Mode has several options that when selected will do the following:
Property Name
Description
Cardboard
Configure Google VR to run in Cardboard-only mode.
Daydream (3.3 DoF)
Configure Google VR to run in Daydream-only mode. In this mode, the app won't be able to run on Non Daydream-ready phones.
A 3DOF headset and 3DOF controllers, commonly referred to as "3.3". We can track rotational motion but not translational motion. For the headset, that means we can track whether the user has turned their head left or right, tilted it up or down, or pivoted left and right.Daydream (6.3 DoF)
Configure Google VR to run in Daydream-only mode. In this mode, the app won't be able to run on non-Daydream-ready phones.
A 6DOF headset and 3DOF controllers, commonly referred to as "6.3". We can track both rotational motion and translational motion. For the headset, that means we can track whether the user has moved forward, backward, laterally, or vertically.Daydream (6.6 DoF)
Configure Google VR to run in Daydream-only mode. In this mode, the app won't be able to run on non-Daydream-ready phones.
A 6DOF headset and 6DOF controllers, commonly referred to as "6.6". We can track both rotational motion and translational motion. For the headset, that means we can track whether the user has moved forward, backward, laterally, or vertically. The 6DoF controllers provide access to both positional and orientation data - which means that they can manipulate a VR scene and the objects it contains with movement and rotation.For more information about Daydream and Degrees of Freedom (DoF), see Degrees of Freedom .
-
In the Android SDK section, under the SDKConfig category, set SDK API Level to latest and set the NDK API Level to android-19 to ensure that your project will be compiled against the most recent Android SDK.
![GVRQS_Android_SDK_Options_00.jpg]()
For your Unreal Engine 4 Daydream projects to properly deploy to a Daydream device, you need to make sure that CodeWorks has installed the following components.
-
Android SDK Platform 24
-
Android NDK 12b
-
JDK 1.8
To see how to install additional Android SDK's check out Installing Additional Android SDK's for more information.
-


End Results
In the next section of the Google VR Quick Start, we will go over what you have to do to package your project so that it will run on a Google VR device.
3 - Google VR Project Packaging & Deployment
In this section of the Google VR Quick Start, we will go over what you have to do to package your UE4 project so that it will work with a Google VR device.
Before going any further make sure that the Smartphone you are using is plugged into your development PC via a USB cable. Then make sure that ADB can see your phone as an authorized device. If you are unsure how to do or are having problems getting ADB to see your device, check out the following page for more information Setting Up Your Android Device For Development .
Steps
-
To start the packing process, go to the Main Toolbar and from the File menu go to Package Project > Android > Android (ASTC) .
![GVRQS_Package_Project_00.png]()
-
Once Android (ASTC) format has been selected, you will be presented with a Windows dialog box. Click the Make New Folder button and name the folder Android_Builds . Once the folder is created, click OK to begin the packaging process.
![GVRQS_Package_Project_Location_00.png]()
-
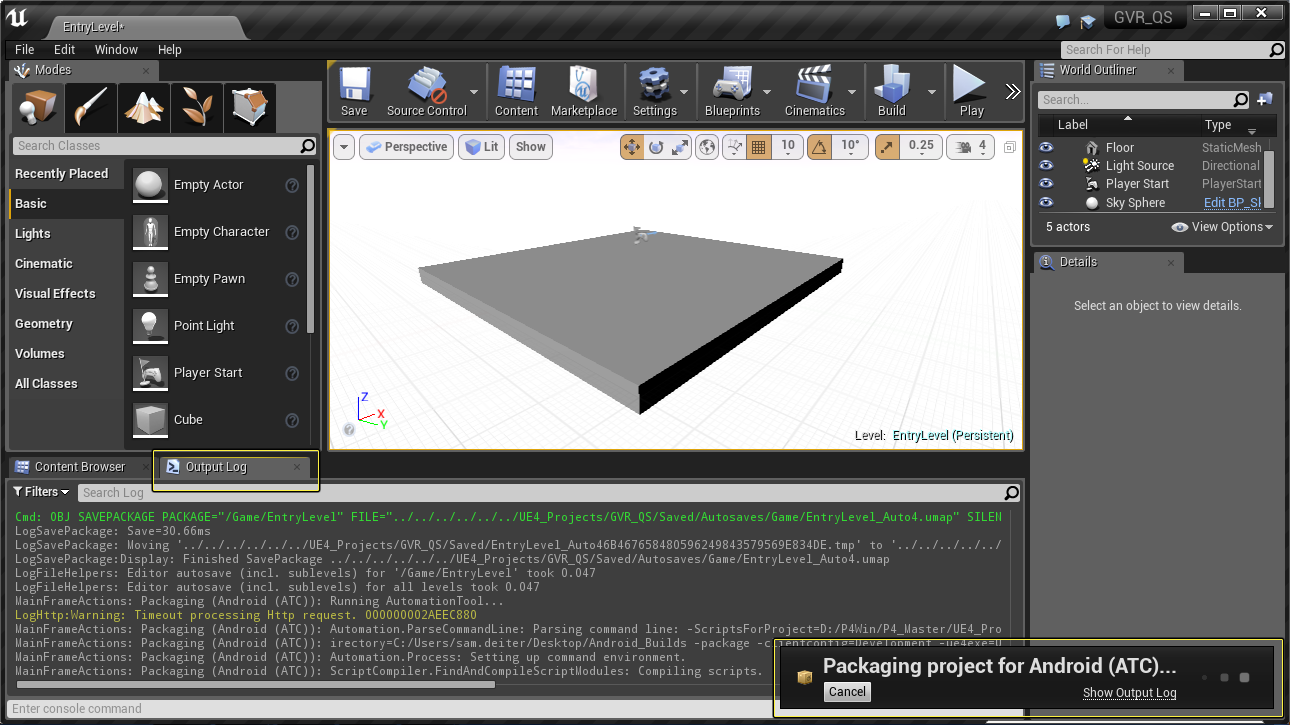
While the project is being packaged, a status window is displayed in the lower right-hand corner of the Unreal Editor.
For a more detailed look on what happens during packaging, click the Output Log window.
![GVRQS_Package_Progress_00.png]()
Click for full image.
-
Once the project is packaged, open the Android_Builds folder and double-click the Install_GVR_QS_Development-armv7-es2.bat file to install the project to your Android Smartphone.
For this to work, you must make sure that your Android Smartphone is connected to your development PC with a USB cable. If you don't connect your smartphone to your development PC with a USB cable, the project is not installed on the device.
![GVRQS_Android_Build_Files_00.png]()
-
Once the .BAT file has been run, a command line window will be displayed showing you the progress of the install. When the install is complete, the command line window will automatically close.
![GVRQS_Installing_To_Phone_00.png]()
-
Now on your Smartphone look for an Application called GVR_QS. When located, tap on the GVR_QS Application icon to launch the project.
![GVRQS_App_Location_00.png]()
-
When the GVR_QS project is viewed through a VR Headset, you should see something that looks similar to the following image.
![GVRQS_HMD_View_00.png]()
Click for full image.
To make sure that your phone and UE4 are properly configured for the VR device you are using, click on the Gear icon that is displayed while the app is running. From the displayed menu, you can scan the QR code that is on the side of your VR HMD, and that will make sure UE4 outputs an image that is compatible with your VR HMD.
![GVRQS_HMD_Options_00.png]()


End Result
When completed you will be able to view the UE4 project using Google VR like in the following video.
4 - On Your Own!
Now that you can deploy a UE4 project to your Android based smartphone and view it with your Google VR HMD try adding the following items.
-
Use the Migrate Tool to move content from one of the mobile content examples into your project for use.
-
Adjust the settings of the Default Device Profiles to ensure that your project will run as fast as possible when deployed to your Android based smartphone.
-
Use the GPU Profiler to help track your projects performance while you are building it.
As for specifics covered in this quick start:
-
For more information on setting up the Android SDK, see: Install the Android SDK
-
For more information on setting up your Android Device for UE4 Development, see: Set Up Your Android Device
-
For more information on what features Android devices support, see: Android Device Compatibility
-
For more information on reducing the packaged size of your project, see: Reducing APK Package Size