Choose your operating system:
Windows
macOS
Linux
In Unreal Engine (UE4), a Sound Cue is an audio object that encapsulates complex sound design tasks in a node graph. Sound cues provide audio designers freedom to dynamically change parts of a sound effect's design by arranging and modifying sound nodes, creating complex and interesting audio output.
The sound nodes appear in the Palette panel when the Sound Cue Editor is open. When you add a node to the Sound Cue and select it, the properties for that node display in the Details panel.

For more about Sound Cues, see Sound Cue Editor and Sound Cue Editor UI .
Named Parameters
In some sound nodes, you can declare a parameter by entering a new parameter name. When you enter a parameter name in a node, It will create a parameter with that name.

You can name the parameter whatever you want. However, when you use an audio component function to set that param, its in name field must exactly match the Parameter Name you gave it.
You cannot set the values for a named parameter from within a Sound Cue. A recommended workflow would be:
-
Add a Sound Cue node.
-
Enter a name in the node Parameter Name field.
-
Call the relevant audio component function from within a Blueprint, or in code, using the Set [Name] Parameter function.
-
Add the same name to the In Name category. This will get the Sound Cue to respond as expected.
The table below shows the nodes that can use parameters, and the corresponding audio components.
|
Node |
Corresponding Audio Component Class |
|---|---|
|
Branch |
Set Boolean Parameter |
|
Continuous Modulator |
Set Float Parameter |
|
Crossfade by Param |
Set Float Parameter |
|
SoundClass |
Set Wave Parameter |
|
Switch |
Set Integer Parameter |
|
WaveParam |
Set Wave Parameter |
For more on how audio components interact with other Assets, see Audio Components .
Attenuation Node Properties
The Attenuation node controls volume for a sound based on the distance of the sound source from the listener.
To use the Attenuation node to override your Sound Cue's attenuation settings, enable the Attenuation node's Override Attenuation checkbox in the Sound Cue Editor.
For an overview on attenuation and how it works, see Sound Attenuation .

|
Property |
Description |
|
|---|---|---|
|
Attenuation Distance |
||
|
Enable Volume Attenuation |
Enables or disables attenuation. |
|
|
Attenuation Function |
The type of attenuation— Linear , Logarithmic , Inverse , LogReverse , NaturalSound , or Custom . |
|
|
Attenuation Shape |
The shape for a non-custom attenuation method— Sphere , Capsule , Box , or Cone . |
|
|
Inner Radius |
The radius that defines where sound attenuation begins (or where a custom attenuation curve begins). Sounds played at a distance less than this radius will not attenuate. |
|
|
Falloff Distance |
The distance over which the volume attenuates. |
|
|
Attenuation |
||
|
Attenuation Settings |
The attenuation settings copied from a Sound Attenuation Asset . Select this property to use pre-existing attenuation settings. |
|
|
Override Attenuation |
If enabled, this overrides the existing attenuation settings. |
|
|
Attenuation Spatialization |
||
|
Enable Spatialization |
When enabled, positions the input sound in 3D space. |
|
|
Spatialization Method |
The method used to spatialize the sound:
|
|
|
Non-Spatialized Radius |
The distance from the origin of the sound below which the sound is non-spatialized (2D only). |
|
|
3D Stereo Spread |
The world-space distance between left and right stereo channels when stereo Assets are 3D-spatialized. |
|
|
Normalize 3D Stereo Sounds |
When enabled, applies a -6 dB attenuation to stereo Assets that are 3D-spatialized. This avoids clipping when Assets have a spread of 0.0 due to channel summing. |
|
|
Attenuation Air Absorption |
||
|
Enable Air Absorption |
Simulates air absorption by applying a filter with a cutoff frequency as a function of distance. |
|
|
Min Distance Range |
The minimum distance to apply an absorption LPF filter. |
|
|
Max Distance Range |
The maximum distance to apply an absorption LPF filter. Absorption frequency cutoff interpolates filter frequency ranges between these distance values. |
|
|
Low Pass Cutoff Frequency Min |
The range of the cutoff frequency (in Hz) for the lowpass absorption filter. |
|
|
Low Pass Cutoff Frequency Max |
The range of the cutoff frequency (in Hz) for the lowpass absorption filter. |
|
|
Enable Log Frequency Scaling |
When enabled, applies a log scale to frequency values so frequency sweeping is perceptually linear. |
|
|
Absorption Method |
The method used to map distance values to frequency absorption values:
|
|
|
Attenuation Listener Focus |
||
|
Enable Listener Focus |
Enables listener-focus-based adjustments. |
|
|
Focus Azimuth |
Azimuth angle (in degrees) relative to the forward vector of the listener, which defines the focus region of sounds. Sounds playing inside this area will be in focus. |
|
|
Non Focus Azimuth |
Azimuth angle (in degrees) relative to the forward vector of the listener, which defines the non-focus region of sounds. Sounds playing outside of this area will be out of focus. |
|
|
Focus Distance Scale |
Scale amount for the distance calculation of in-focus sounds. Can be used to make these sounds appear to be closer or further away than they actually are. |
|
|
Non Focus Distance Scale |
Amount to scale for the distance calculation of sounds that are not in focus. Can be used to make in-focus sounds appear to be closer or further away than they actually are. |
|
|
Focus Priority Scale |
Amount to scale the priority of sounds that are in focus. Can be used to boost the priority of in-focus sounds. |
|
|
Non Focus Priority Scale |
Amount to scale the priority of sounds that are not in focus. Can be used to reduce the priority of sounds not in focus. |
|
|
Focus Volume Attenuation |
Amount to attenuate sounds that are in focus. Can be overridden at the sound level. |
|
|
Non Focus Volume Attenuation |
Amount to attenuate sounds that are not in focus. Can be overridden at the sound level. |
|
|
Enable Focus Interpolation |
Enables focus interpolation to a smooth transition in and out of focus. |
|
|
Focus Attack Interp Speed |
The scalar value used to increase interpolation speed upward to the target focus value. |
|
|
Focus Release Interp Speed |
The scalar value used to increase interpolation speed downward to the target focus value. |
|
|
Attenuation Reverb Send |
||
|
Enable Reverb Send |
Enables reverb-send adjustments based on distance. |
|
|
Reverb Send Method |
The method used to control master reverb sends:
|
|
|
Manual Reverb Send Level |
Only appears if Manual is selected as the Reverb Send Method. The send level entered here does not change with distance. |
|
|
Reverb Min Send Level |
The amount to send to master reverb when the distance of the sound is equal to value specified in the Reverb Min Send Distance. |
|
|
Reverb Max Send Level |
The amount to send to master reverb when the distance of the sound is equal to value specified in the Reverb Max Send Distance. |
|
|
Reverb Min Send Distance |
The minimum distance used when sending to the master reverb. |
|
|
Reverb Max Send Distance |
The maximum distance to send to the master reverb. |
|
|
Attenuation Occlusion |
||
|
Enable Occlusion |
Enables real-time occlusion tracing. |
|
|
Occlusion Trace Channel |
Determines which trace channel to use for audio occlusion checks:
|
|
|
Occlusion Low Pass Filter Frequency |
The low-pass filter frequency (in Hz) to apply if the sound playing in this audio component is occluded. This will override the frequency set in
|
|
|
Occlusion Volume Attenuation |
The amount of volume attenuation to apply to occluded sounds. |
|
|
Occlusion Interpolation Time |
The amount of time in seconds to interpolate to the target
|
|
|
Use Complex Collision for Occlusion |
Enables tracing against complex collisions when doing occlusion traces. |
|
|
Attenuation Priority |
||
|
Enable Priority Attenuation |
Enables attenuation of sound priority based on distance. |
|
|
Priority Attenuation Method |
The method used to control priority attenuation:
|
|
|
Attenuation Priority |
Only appears if Manual is selected as the Priority Attenuation Method. The priority level entered is static, and does not change with distance. |
|
|
Attenuation Submix Send |
||
|
Enables Submix Send |
Enables submix sends based on distance. |
|
|
Submix Send Settings |
When this feature is enabled, the Submix Send Settings expand into a full set of parameters. |
|
|
|
||
|
Attenuation Plugin Settings |
||
|
Plugin Settings |
Select the sound attenuation plugin settings to use with sounds that apply this attenuation setting. This is an array, so multiple plugins can be applied. Not all plugins use all of these features.
|
|

Stereo files play evenly on the left and right channels, and attenuate to allow volume fades between the Radius Min and Radius Max values, but they are not spatialized.
Sound Cues that do not contain an Attenuation node are not localized, and play consistently at the Sound Cue volume setting.
Branch Node Properties
The Branch node selects a child node based on the value of a Boolean parameter of True , False or Parameter Unset .
Parameter Unset is the output that plays when the value of a named parameter has not been set. For example, if the parameter is saved as
Name
in the Branch node, but the user hasn't called
SetBooleanParam(Name, [true or false])
, the Sound Cue will use the Parameter Unset input pin, not the True or False pin.

|
Property |
Description |
|---|---|
|
Bool Parameter Name |
The name of the Boolean parameter that determines which child node is used. |
Concatenator Node Properties
The Concatenator node is used to play sounds sequentially (for example, creating a simple BGM playlist that plays through a series of specified tracks). While this node handles sequential playback, it will also add a small delay between each Asset.
The node initially has two input pins. Add more by clicking Add input .

|
Property |
Description |
|---|---|
|
Input Volume |
Provides volume settings for each sound Asset attached to the Concatenator. |
Continuous Modulator Node Properties
The Continuous Modulator node provides a way to control gameplay parameters for volume and pitch modulation in real time. A typical example would be using the velocity of a vehicle to correspond to the pitch of an engine sound. This modulator needs to be hooked up in code to work, and does not function on its own within the Sound Cue Editor. However, you can change pitch and volume from within the Sound Cue Editor.
By setting maximum and minimum values, you can determine the range of randomization.
The pitch and volume of the input sound will default to a uniform distribution, but you can change them in the Sound Cue Editor to any other type.

|
Property |
Description |
|
|---|---|---|
|
Pitch Modulation Params |
||
|
Parameter Name |
The parameter being used to manipulate pitch. |
|
|
Default |
The default value used if no parameter is found. |
|
|
Min Input |
The minimum input value. Values will be clamped to the
|
|
|
Max Input |
The maximum input value. Values will be clamped to the
|
|
|
Min Output |
The minimum output value. This value is scaled from the
|
|
|
Max Output |
The maximum output value. This value is scaled from the
|
|
|
Param Mode |
The mode with which the parameter is applied:
|
|
|
Volume Modulation Params |
||
|
Parameter Name |
The parameter being used to manipulate volume. |
|
|
Default |
The default level of volume modulation. |
|
|
Min Input |
The minimum volume for the input sound. |
|
|
Max Input |
The maximum volume for the input sound. |
|
|
Min Output |
The minimum volume for the output sound. |
|
|
Max Output |
The maximum volume for the output sound. |
|
|
Param Mode |
The mode with which the parameter is applied:
|
|
Crossfade by Distance Node Properties
The
Crossfade by Distance
node provides the ability to fade between two or more input sounds based on the distance from the Sound Cue's origin to the listener.
For example, a gunshot heard at a distance will sound different from a gunshot up close. This node can calculate the distance the listener is from the shot and play the sound based on a short or long distance, or a mix of the two.
This node differs from the Attenuation node in that the sound will only play if it is within the minimum and maximum distance settings.
Sound nodes can be connected directly to the Crossfade by Distance node inputs, but you can also add nodes between them for independent control per layer.
By default, the node initially has two input pins. Add more pins by clicking Add input .
The top input in the node is 0 in the Details panel.

|
Property |
Description |
|
|---|---|---|
|
Cross Fade > Cross Fade Input |
||
|
Fade in Distance Start |
The distance from the listener's position at which the sound begins to be audible. |
|
|
Fade in Distance End |
The distance from the listener's position at which the sound has reached full volume. |
|
|
Fade Out Distance Start |
The distance from the listener's position at which the sound begins to fade out. |
|
|
Fade Out Distance End |
The distance from the listener's position at which the sound is no longer audible. |
|
These values can be set independently for each attached sound.
Crossfade by Param Node Properties
The Crossfade by Param node works similarly to the Crossfade by Distance node, except that the Crossfade by Param node provides a way for you to manipulate the value of the parameter that controls the crossfade programmatically (with code or Blueprints).
You can save the parameter settings by naming them.

|
Property |
Description |
|
|---|---|---|
|
Param Name |
The name of the parameter used to control the crossfade. |
|
|
Cross Fade Input |
||
|
Fade in Param Value Start |
The parameter value at which the input will start to fade in. |
|
|
Fade in Param Value End |
The parameter value at which the input will end the fade in. |
|
|
Fade Out Param Value Start |
The parameter value at which the input will start to fade out. |
|
|
Fade Out Param Value End |
The parameter value at which the input will end the fade out. |
|
|
Volume |
The volume at which the input should be played. |
|
Delay Node Properties
The Delay node inserts a delay into the audio node chain to cause a pause before the input sound is passed to the output. The amount of the delay is a random value between the Delay Min and Delay Max values specified in the Details panel.

|
Property |
Description |
|---|---|
|
Delay Min |
Sets the lower bound of time in seconds for the pause. |
|
Delay Max |
Sets the upper bound in seconds. |
Dialogue Player Node Properties
The Dialogue Player node is a way to set up a Dialogue Wave sound Asset to be played under specific conditions.
Since Dialogue Waves are expected to be used purely for spoken dialogue, the Dialogue Player node requires that you specify both the speaker and the targets of the dialogue being played. This allows the Dialogue Wave to play the correct audio Asset according to the speaker's voice, along with any gender/plural/honorific handling that needs to occur for localization purposes.


|
Property |
Description |
|---|---|
|
Dialogue Wave |
The Dialogue Wave that the node will play. Click the dropdown to browse for the Asset you want to use. |
|
Context |
Who is speaking, and to whom. Note that this can only be used once a valid Dialogue Wave is entered. |
|
Looping |
When enabled, will play the dialogue on a loop. |
Doppler Node Properties
The Doppler node simulates a Doppler effect, in which sounds increase in pitch as the distance lessens, then decrease as it lengthens. A real world example is the sound of a siren as it approaches then drives past.

|
Property |
Description |
|---|---|
|
Doppler Intensity |
A multiplier value for how strongly the Doppler effect is heard. Increase the value to make the effect more pronounced. |
|
Use Smoothing |
When enabled, the node performs a smooth interp on the Doppler effect. |
|
Smoothing Interp Speed |
The speed at which the pitch scale is interped. |
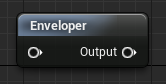
Enveloper Node Properties
The Enveloper node is a way to create an envelope with optional looping ability that can control the volume and pitch of a sound over time via distribution curves. These curves can be edited using the embedded Curve Editors , or can be based on curves defined in an existing Float Curve Asset already in the Content Browser .
You can use the properties in the Modulation category to randomize predefined values across all defined points on the envelope.

|
Property |
Description |
|
|---|---|---|
|
Looping |
||
|
Loop Start |
The time in seconds where the envelope's loop begins. |
|
|
Loop End |
The time in seconds where the envelope's loop ends. |
|
|
Duration After Loop |
The time in seconds it takes the envelope to fade out after the last loop is completed. |
|
|
Loop Count |
The number of times the envelope should loop if looping is enabled and the envelope is not set to loop indefinitely. |
|
|
Loop Indefinitely |
If enabled, the envelope will continue to loop indefinitely regardless of Loop Count value. |
|
|
Loop |
If enabled, the envelope will loop using the settings entered in this node. |
|
|
Envelope |
||
|
Volume Curve |
The distribution defining the volume envelope. Also see the note below. |
|
|
Pitch Curve |
The distribution defining the pitch envelope. Also see the note below. |
|
|
Modulation |
||
|
Pitch Min |
The minimum pitch for the input sound. |
|
|
Pitch Max |
The maximum pitch for the input sound. |
|
|
Volume Min |
The minimum volume for the input sound. |
|
|
Volume Max |
The maximum volume for the input sound. |
|
The Details panel of the Enveloper node contains various options for creating envelope curves:

-
Volume Curve: The distribution that defines the volume envelope.
-
Pitch Curve: The distribution that defines the pitch envelope.
-
Create External Curve button: Create your own curve manually, then save it as a Float Curve Asset to be reused elsewhere. This option is available for both volume and pitch curves. For more on using curves, see
[Curve Editor](Basics/ToolsAndEditors/CurveEditor).
Group Control Node Properties
The Group Control node determines which Sound Wave to play based on what sounds in the defined groups are already playing, and their proximity to the listener.
When a new sound plays, the first group with an available slot will be chosen.

|
Property |
Description |
|---|---|
|
Group Sizes |
The number of Sound Wave nodes in the group, minus 1 (the first Sound Wave Node is node 0 ). |
Looping Node Properties
The Looping node is used to loop a Sound Wave.
You can loop multiple audio files independently when used in conjunction with the Mixer node.

|
Property |
Description |
|---|---|
|
Loop Count |
The number of times to loop a specific sound. This can only be edited if the Loop Indefinitely option is disabled. |
|
Loop Indefinitely |
When enabled, loop indefinitely regardless of the Loop Count value. |
A Looping node should only be used for logical or procedural looping such as introducing a delay because these sounds will not play seamlessly. If you want a sound to loop seamlessly and indefinitely, use the Looping flag on the Wave Player node (see below) for the sound.
Mature Node Properties
With the Mature node, you can label a specific node or Sound Cue for content that would be labeled Mature by the ESRB (Entertainment Software Rating Board) rating system. When you use this node on a Sound Wave in a Sound Cue, it will filter out the M-rated content in any versions of your game that have restrictions programmed in.

Mixer Node Properties
The Mixer node defines how concurrent sounds in a Sound Cue are mixed together. This is not a downmix—there is no reduction in the number of individual Sound Waves in the Sound Cue. The volume for each input can be set independently.
Sound nodes can be connected directly to the Mixer node inputs, but you can also add nodes between them for independent control per layer.

|
Property |
Description |
|---|---|
|
Input Volume |
The list of volumes to use for each of the input sounds, allowing normalization for sounds with different source volumes. The top input in the node is 0 in the Details panel. |
Modulator Node Properties
The Modulator node is used to add random volume and pitch modulation. You can set maximum and minimum values to determine the range of randomization. When the Sound Cue is triggered, it randomly selects a value within that range.
To set a consistent level for volume or pitch, set the Min and Max values the same.
This node can also be used to adjust relative volumes of multiple Sound Wave nodes contained within a Sound Cue.
If the Modulator node is used in conjunction with the Looping node, it will randomly select based on Sound Cue retrigger, not per-loop revolution.

|
Property |
Description |
|---|---|
|
Pitch Min |
Sets the minimum pitch for the input sound. |
|
Pitch Max |
Sets the maximum pitch for the input sound. |
|
Volume Min |
Sets the minimum volume for the input sound. |
|
Volume Max |
Sets the maximum volume for the input sound. |
Oscillator Node Properties
The Oscillator node is used to add continuous pitch and volume oscillation over time. This is useful when looping sounds to create a greater degree of ongoing movement.
By setting maximum and minimum values, you can determine the range of randomization.

|
Property |
Description |
|---|---|
|
Modulate Volume |
Check to enable volume modulation. |
|
Modulate Pitch |
Check to enable pitch modulation. |
|
Amplitude Min |
The minimum amplitude of the sine wave's modulation, centered around the value set by Center Min and Center Max. These both default to 0. |
|
Amplitude Max |
The maximum amplitude of the sine wave's modulation, centered around the value set by Center Min and Center Max. These both default to 0. |
|
Frequency Min |
The minimum frequency of the sine wave's modulation, with the value divided by two to equal to the hertz rate. For example, a frequency of 2.0 would oscillate at 10Hz. |
|
Frequency Max |
The maximum frequency of the sine wave's modulation, with the value divided by two to equal to the hertz rate. |
|
Offset Min |
The minimum offset value into the sine wave, commonly called phase . Any value entered here will be multiplied by 2*Pi. |
|
Offset Max |
The maximum offset value into the sine wave, commonly called phase . Any value entered here will be multiplied by 2*Pi. |
|
Center Min |
Both Center Min and Center Max default to 0. Because the default is 0 (not 1), if the amplitude is .2, the sample will be multiplied between -.2 and .2 (instead of .8 and 1.2). |
|
Center Max |
See Center Min. |
Quality Level Node Properties
By default, there are no quality levels; the designer must add them to the Project Settings for the node inputs to populate. Once populated, node branching can be used to switch between various levels of SoundCue graph complexity. This provides a way for designers to use simpler SoundCue graphs for lower-powered platforms.

The
Quality Level
node uses
GameUserSettings AudioQualityLevel
(or the editor override) to choose which branch to play.
At runtime, this node will only load into memory the Sound Waves connected to the branch that is selected.
Random Node Properties
The Random node is used to randomly trigger a Sound Wave node from within a group of possible Sound Wave nodes. Weight values control the probability of a Sound Wave node being triggered relative to the other nodes connected to the Random node.
Each trigger is its own data flow. This means that if the Random Output pin is connected to more than one node (such as an Oscillator node and a Delay node), then each of these will play independently.
When enabled, the checkbox RandomWithoutReplacement will exhaust the entire list of possible sound nodes before repeating a sound.
Sound Wave nodes can be connected directly to a Random node, but you can also add other nodes between the Sound Waves and this node for additional control.
By default, the node initially has two input pins. Add more pins by clicking Add input .

|
Property |
Description |
|---|---|
|
Weights |
The list of weights for each input sound that determines the odds that a particular sound will be chosen. Each item in the Array can be assigned its own weight value. |
|
Preselect at Level Load |
A random Sound Wave node, selected when the level is loaded, that is always used during that play session. Note that this setting does not apply during Play In Editor or Simulate; it applies only in game builds outside of Unreal Editor. |
|
Randomize Without Replacement |
If enabled, prevents an input Sound Wave node from being played again until all input Sound Wave nodes have been played. This ensures that all sounds are played before any are repeated. |
SoundClass Node Properties
The SoundClass node provides a way to remap which Sound Class Asset used with the Sound Wave input node.

|
Property |
Description |
|---|---|
|
Sound Class Override |
The Sound Class Asset that will override the current Sound Class for the Sound Wave input node. |
Switch Node Properties
The Switch node selects an input node based on the value of an integer parameter.

|
Property |
Description |
|
|---|---|---|
|
Switch |
||
|
Int Parameter Name |
The name of the integer parameter that determines which input is used. |
|
Wave Param Node Properties
The Wave Param node uses a runtime parameter to determine whether to play a different Sound Wave than the one feeding into the input pin. If the specified parameter name is set to a valid Sound Wave Asset, that Asset is played instead of the Sound Wave input node.
A simple example would be using this node for dialogue. You could have a radio sound where, on the beginning of the Sound Cue playback, you hear a little static blip, the dialogue plays, then you hear the static blip again on the end. In this way, you could dynamically feed in different dialogue lines while using the same Sound Cue.
You can set the parameter in code or in Blueprint.

|
Property |
Description |
|---|---|
|
Wave Parameter Name |
The parameter used to determine which Sound Wave to play. If the parameter does not exist, or if it points at an invalid Sound Wave, then the Sound Wave specified by the tree connected to the input node is evaluated to determine which Sound Wave to play instead. |
Wave Player Node Properties
The
Wave Player
node contains a reference to the raw
.wav
file to be played.

|
Property |
Description |
|---|---|
|
Sound Wave |
The Sound Wave Asset to use in this node. |
|
Looping |
When enabled, the Sound Wave will play on a loop. |
Add Comment
Comments can be added anywhere on the Sound Cue. They do not affect the output, but instead are used to call attention to or explain details in the node arrangements or uses.
The comment appears in the top bar. There is no limit to the length of the comment, but they should be as brief as possible.

The comment frame can be adjusted. Wherever positioned in the Sound Cue, it will appear behind the nodes.
Examples
Below are examples of more complex Sound Cue arrangements.
This Sound Cue plays one sound if a parameter is set to
True
, and another if it is set to
False
.
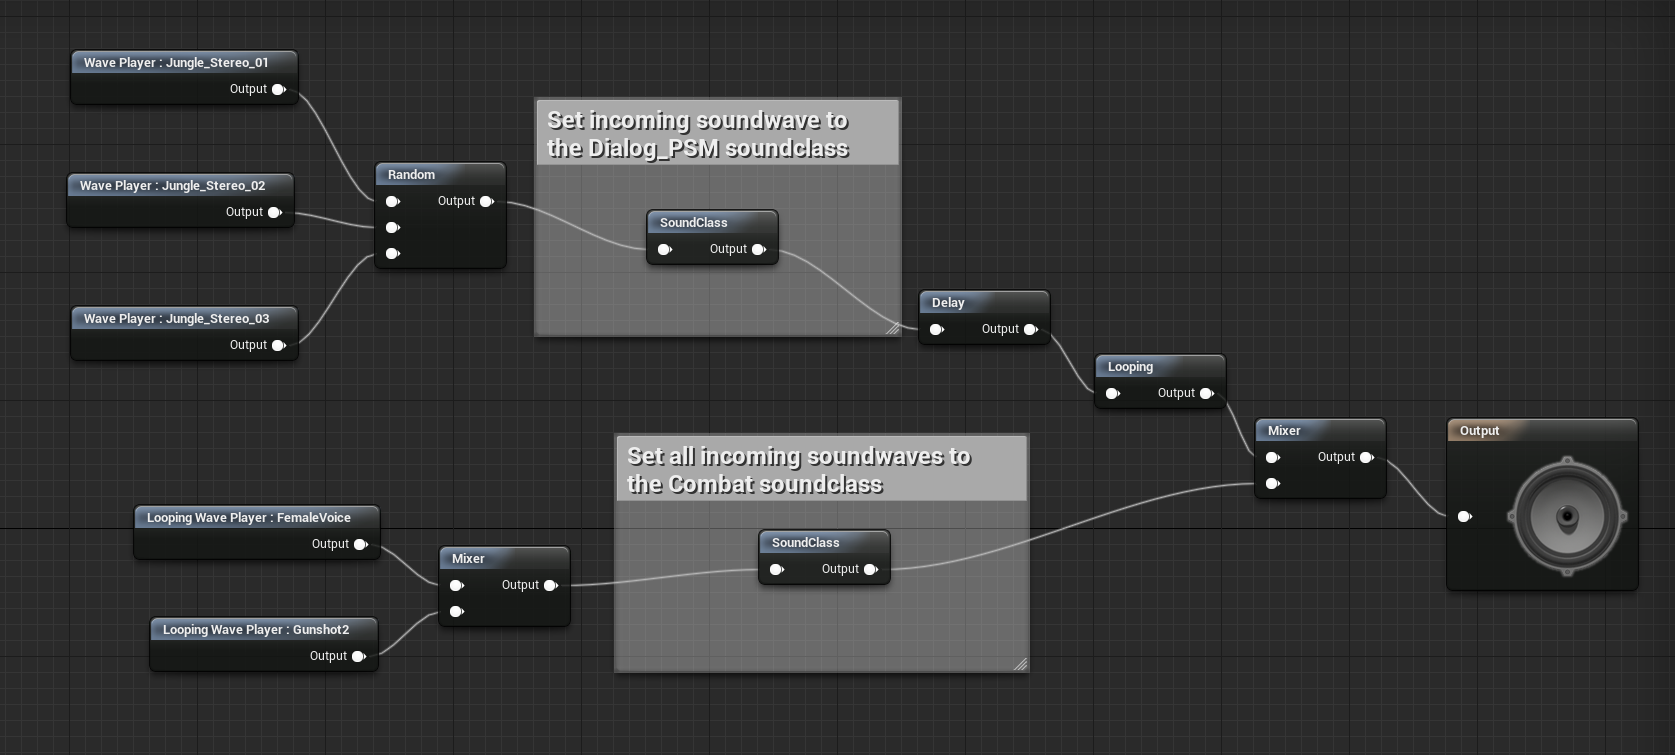
This Sound Cue changes the Sound Classes of the Sound Waves.

This Sound Cue mixes together Sound Waves with a variety of properties, including attenuation, randomization, looping, and delays.