Choose your operating system:
Windows
macOS
Linux
What is Datasmith Runtime
Datasmith Runtime
is a collection of Datasmith features that are available at runtime (as opposed to an in-editor workflow) in an Unreal Engine-based application. You can use these features to create applications that can import
.udatasmith
files and manipulate them using Blueprints.

Datasmith Direct Link is accessible in a cooked Unreal Engine-based application using Datasmith Runtime and Blueprints.
With Datasmith Runtime, you can create custom applications that take advantage of Datasmith Direct Link or visualize Datasmith data on demand as part of an iterative 3D workflow.
Enable the following plugins in your project to work with Datasmith Runtime:
-
Datasmith Content
-
Datasmith Importer
-
Datasmith Runtime
Datasmith Runtime is officially supported in Unreal Engine 4 and Unreal Engine 5 using Windows and MacOS. While Datasmith Runtime will work with Linux, this is experimental and you may experience instability and performance issues.
Using Datasmith Runtime with Blueprints
Datasmith Runtime exposes a variety of Datasmith features and import options using several Blueprint nodes. Listed below are the most common:

The most common Datasmith Runtime Blueprint nodes.
Make Datasmith Runtime Import Options
Exposes several import parameters and converts them to a data structure:

|
Inputs |
Description |
|---|---|
|
Build Hierarchy |
Determines whether the hierarchy of Actors is built. Choosing a more detailed hierarchy increases loading and rendering time.
|
|
Build Collision |
Determines the type of collision used for components.
|
|
Collision Type |
Determines the type of collision used for Static Meshes.
|
|
Import Metadata |
Reads and imports metadata for Actors. Increases load time. |
The Tesselation Options input is currently not used.
Set Import Options
Sets the value of the selected import options for Datasmith content using a Datasmith Runtime Actor . Uses a Datasmith Runtime Actor as the Target and Datasmith Runtime Import Options as its value.

Load File
Loads the
.udatasmith
file located at the specified file path. Requires a
File Path
and
Datasmith Runtime Actor
as inputs.

Load File from Explorer
Opens a File Browser window so you can browse to a location and select a
.udatasmith
file. Requires a
Datasmith Runtime Actor
as input. A
Default File Path
is optional.

Though it works with both Windows and Mac operating systems in Play In Editor (PIE), Load File from Explorer works only with Windows at runtime.
Get Direct Link Proxy
Returns an interface to a Direct Link connection called a Direct Link Proxy. This is the first step in creating a Datasmith Direct Link connection.

Get List of Sources
Gets a list of Datasmith Direct Link Sources. Requires a Direct Link Proxy as input.

Open Connection with Index
Opens a Direct Link connection with the source located at the specified index value. Requires a Datasmith Runtime Actor and a Source Index as input.

Close Connection
Closes an open Direct Link connection associated with a specified Datasmith Runtime Actor .

Loading Datasmith Content at Runtime
Using Datasmith Runtime, you can load Datasmith content inside a cooked application while having access to the hierarchy and Actor properties.

Click for full image.
To load Datasmith content using Blueprints:
-
Create a new Actor Blueprint to contain the anchor point for the Datasmith content. You can do this by right-clicking in the Content Browser and selecting Blueprint Class from the context menu. In the Pick Parent Class window, select Actor and name the new Blueprint class DatasmithActor . Double-click the new Blueprint to open the editor.

This anchor will serve as the origin point for the imported Datasmith content. If your content is offset from the origin in your source application, then Unreal Engine will maintain that offset from the anchor when the content is imported.
-
Select the Event Graph tab and remove every event except Event BeginPlay . Drag a connection from Event BeginPlay and add the Spawn Actor From Class node. Open the Class dropdown menu and select DatasmithRuntimeActor . Promote the Return Value to a variable and name it Anchor .

-
Spawn Actor requires a Transform to spawn the Anchor. Right-click to the left of Spawn Actor and add a Make Transform node. Connect the output from Make Transform to the Spawn Transform pin on Spawn Actor.

-
To finish the Blueprint, click and drag from the execute pin of the Set node and add a Load File from Explorer node. Connect a reference to the Anchor variable to the Datasmith Runtime Actor input.

-
Save and Compile the Blueprint. Add a copy of your Anchor Blueprint to the level and press Play to test.


Unreal Engine will open a File Explorer window and ask you to select a file.
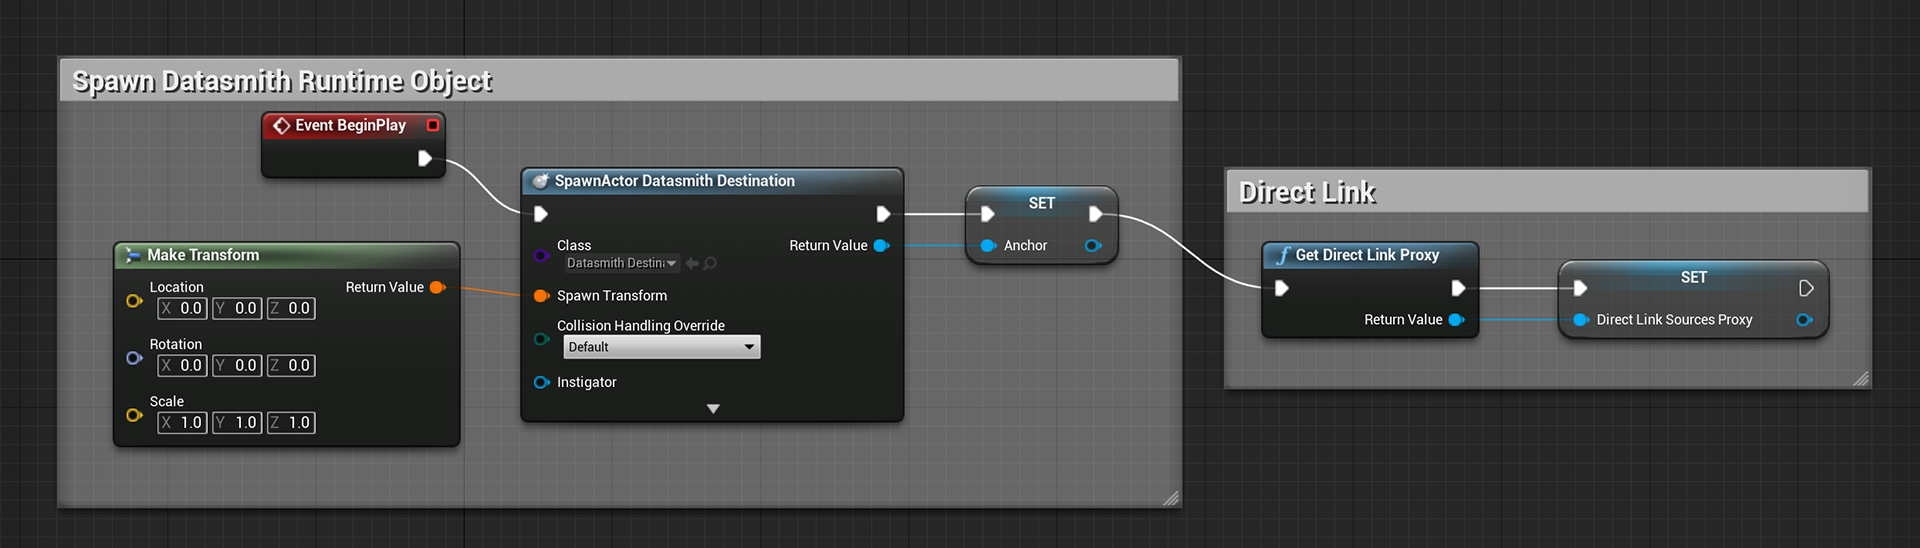
Creating a Datasmith Direct Link with Blueprints
You can also open a Datasmith Direct Link between one or more source applications and your Unreal Engine project at runtime using Datasmith Runtime.
-
Start by creating a new Actor Blueprint to contain the anchor point for your Datasmith content. Double-click the new Blueprint to open the editor.
-
Similar to the previous example, select the tab for the Event Graph and remove every event except for Event BeginPlay . Drag a connection off Event BeginPlay and add the Spawn Actor From Class node. Open the Class dropdown menu and select DatasmithRuntimeActor .
-
A Transform is required to spawn the Anchor. Right-click to the left of Spawn Actor and add a Make Transform node. Connect the output from Make Transform to the Spawn Transform pin on Spawn Actor.

-
Next, you need a Direct Link Proxy to act as a connection point between your application and your source application. Drag a connection from the Set node and create a Get Direct Link Proxy . Promote the output to a variable and name it Direct Link Sources Proxy . Set it to be Public.

-
Click the + button in the Functions section of the My Blueprints panel to create a new function. Name it DirectLinkUpdate . You will use this new function to trigger the Direct Link connection during runtime.

-
Start by getting a copy of your Direct Link Proxy variable. Drag a line from the variable and create a Get List of Sources node. Promote the output to a variable to hold the list of Direct Link sources and make this variable public.

-
Drag a line from Set and create a Set Import Options node. Use this node to set some import options before connecting to the Direct Link source. It requires Datasmith Runtime Import Options and an anchor as inputs.

-
Get a copy of your Anchor variable and connect it to the Target input on Set Input Options.
-
Right-click and create a Make Datasmith Runtime Import Options node, and then drag a connection from the output to the Import Options input.

-
Finish the function by dragging a line from Set Import Options and creating an Open Connection with Index node. This takes in an anchor and a Source Index as input. Connect the reference to the Anchor to the Target input.

-
Create a new integer variable to hold your source index. Name it Source Index and connect it to the Source Index input on Open Connection with Index. An index value of 0 will connect to the first source in the list.

-
Finally, click on the DirectLinkUpdate function in My Blueprints and enable Call In Editor in the Details panel. This option makes the function available at runtime in the Details of the Anchor object.

-
Save and Compile . The finished Blueprint should look similar to the example below:


Start your source application and run the project by clicking the Play button. Select your Anchor in the World Outliner and click the Direct Link Update button in the Details panel. Then, click the Synchronize with Direct Link button in your source application. You will see your Datasmith content appear in your Level using the import options specified in the Blueprint.

Disabling the Use Less CPU when in Background option enables the engine to update the 3D viewport when the Unreal Engine window is not focused and when a Pawn in the level is not possessed. This option is found in the Editor Preferences under General > Performance .