Choose your operating system:
Windows
macOS
Linux
When you use the Datasmith importer to bring a scene into the Unreal Editor from a supported CAD file that contains surfaces defined by parametric curves, Datasmith tessellates the surfaces of those scene objects into triangular meshes. At the time you import your file, you provide settings that control the fidelity of the resulting triangular meshes to the original parametric surfaces. You can read more about these settings under Using Datasmith with CAD File Formats . Datasmith uses the import settings you provide at the time you import your CAD file to tessellate all geometry in the scene.
In addition, after your initial import, you can override the values of the tessellation quality settings for individual Static Mesh Assets that you select. This allows you to import your overall scene at one level of detail—typically a low level of detail that tessellates all the objects in the scene relatively quickly. Then, after importing, you can retessellate selected Assets with different quality settings—typically higher levels of detail that provide better visual results for important scene objects. This helps you achieve a balance between import speed, model complexity, and visual quality that fits the unique needs of each Project's content.
The effect is very similar to the ability to reimport individual Static Mesh Assets in a Datasmith Scene, as described in About the Datasmith Reimport Process . However, the difference is that when you reimport a scene element, Datasmith opens the original CAD scene file, re-reads the geometry data for the selected object from the file, then tessellates that newly imported geometry. When you retessellate the geometry instead, Datasmith does not reopen the original scene file at all. It applies the new tessellation settings to the last imported geometry for the selected Static Mesh Asset. Therefore, retessellating tends to be faster than reimporting, and you can do it even when the original CAD source file is unavailable.
To retessellate individual Static Mesh Assets:
-
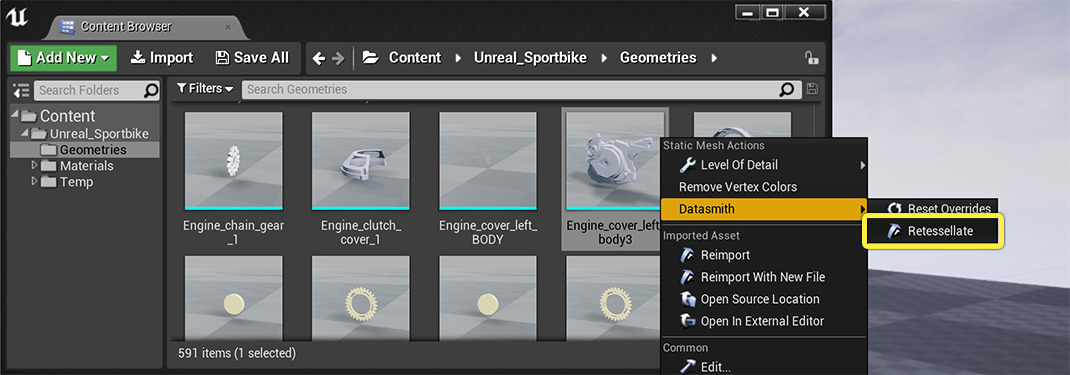
Select the Static Mesh Assets that you want to retessellate in the Content Browser , in the Geometries folder next to your Datasmith Scene Asset.
-
Right-click any Asset that you have selected, and choose the Datasmith > Retessellate option from the context menu.
-
Set new values for the tessellation settings described on the Using Datasmith with CAD File Formats page.
![Retessellation options Retessellation options]()
This window only contains the settings that control geometry tessellation, not any other settings that you usually set when you import a Datasmith file. If you need to change other import settings, use the Reimport option to reimport the selected Asset from its original CAD scene file.
-
Click Import .
The retessellation process uses the new values to recompute the triangular mesh for the selected Static Mesh Asset or Assets, but leaves all other Assets in the Datasmith Scene unchanged.
If you don't see the Retessellate option in the context menu, one or more of the Assets you selected were not tessellated at the time they were originally imported. This typically means that the CAD file already contained a triangular mesh for the Asset, rather than a parametric surface. The Datasmith importer simply brought in that existing triangular mesh, and has no original parametric surface data to use as a basis for retessellation.
If this is the case, and if you need to simplify the geometry of the Static Mesh, you can do so using other tools provided by the Unreal Editor: the Proxy Geometry Tool , Levels of Detail , Defeaturing , and so on. However, you won't be able to increase the detail of the Static Mesh geometry.
Retessellation Rule
After modeling operations, a NURBS surface can be:
-
Intact , which means no triangles were removed from the surface after tessellation.
-
Altered , which means several triangles were removed.
-
Deleted , which means all triangles were removed.
With that in mind, you can use the Retessellation Rule option controls which surfaces need to be retessellated. You can select one of the following options:
-
All selects all surfaces for retessellation.
-
Skip Deleted Surfaces excludes surfaces that had all of their triangles removed.


