Choose your operating system:
Windows
macOS
Linux
Target Audience for this Guide
This guide is aimed at 3D application developers who want to export scenes from third-party design applications into Unreal Engine using the Datasmith framework.
This guide makes the following assumptions:
-
You are an experienced C++ programmer.
-
You are familiar with the development of 3D applications.
-
You are developing functionality to export models from a third-party 3D application to Unreal Engine or Twinmotion.
-
You are not familiar with how Unreal Engine works, but you are willing to learn about it.
What You Will Learn
This page outlines a series of guidelines and best practices for exporting 3D models from other design applications to Unreal Engine using the Datasmith SDK. Broadly speaking, it outlines:
-
Datasmith's design philosophy.
-
Data models and structures in Unreal Engine.
-
UX guidelines for Datasmith exporters, with separate checklists for each major part of the export process.
-
Useful API calls and code examples for different scenarios.
Downloads and Prerequisites
This section contains:
-
A list of required downloads and where to find them.
-
An overview of the required Datasmith and Unreal Engine knowledge to get you started, and links to resources for further learning.
Downloading Unreal Engine and the Datasmith SDK
If you download and build Unreal Engine from the Unreal Engine GitHub repository , the Datasmith SDK is included with it.
To download the Unreal Engine source code from GitHub, you must first follow the steps outlined in this guide to request access to the repository. If you haven't been granted access, you will receive a 404 error.
After you download the Unreal Engine source code, you will find the Datasmith SDK under:
\Engine\Source\Programs\Enterprise\Datasmith\DatasmithSDK\
The
Documentation
folder contains a sample project, as well as instructions on how to get your development environment configured.
If you download and install Unreal Engine from the Epic Games launcher , you must download the Datasmith SDK separately from this folder in the Unreal Engine GitHub repository.
Epic Games have developed Datasmith export plugins for a few design applications, such as Revit, SketchUp, and 3ds Max. You can refer to these plugins as examples for your own work.
You can access the source code for these Datasmith export plugins in the Epic Games GitHub repository, under:
\Engine\Source\Programs\Enterprise\Datasmith\
Understanding Datasmith
Datasmith is a collection of tools and plugins that brings pre-constructed scenes created in a variety of design applications into Unreal Engine. It was designed to overcome limitations of other generic file formats, such as FBX or OBJ.
Datasmith is able to:
-
Handle large meshes.
-
Store data that Unreal Engine uses, such as:
-
LODs
-
Collision
-
Lights
-
Object hierarchy
-
Metadata
-
-
Reformat texture files (to the power of 2, into formats handled by Unreal).
To learn more about Datasmith features and functionality, refer to the Datasmith Overview page.
Exporting data happens in two steps:
-
Parse the design application and construct a DatasmithScene with the DatasmithCore API.
-
Export the scene to disk using the DatasmithExporter API.
To learn how to use these APIs, refer to the following documentation:
Unreal Engine Data Model
Before you start writing your Datasmith exporter, familiarize yourself with how Unreal Engine stores and structures information.
Unreal Engine works with projects. An Unreal project contains at least one Level , which contains one or more Actors . Actors have a position, rotation, and scale. They can exist on different layers, be shown or hidden, have animations, and so on.
Each Actor has one or more Components , which can be:
-
Geometric Assets, such as Static Meshes .
-
Lights .
-
Cameras , and so on.
Static Meshes reference Master Materials or Material Instances . In turns, Material Assets reference Texture Assets.
A single Static Mesh can be referenced by multiple Actors. This is called geometry instantiation.
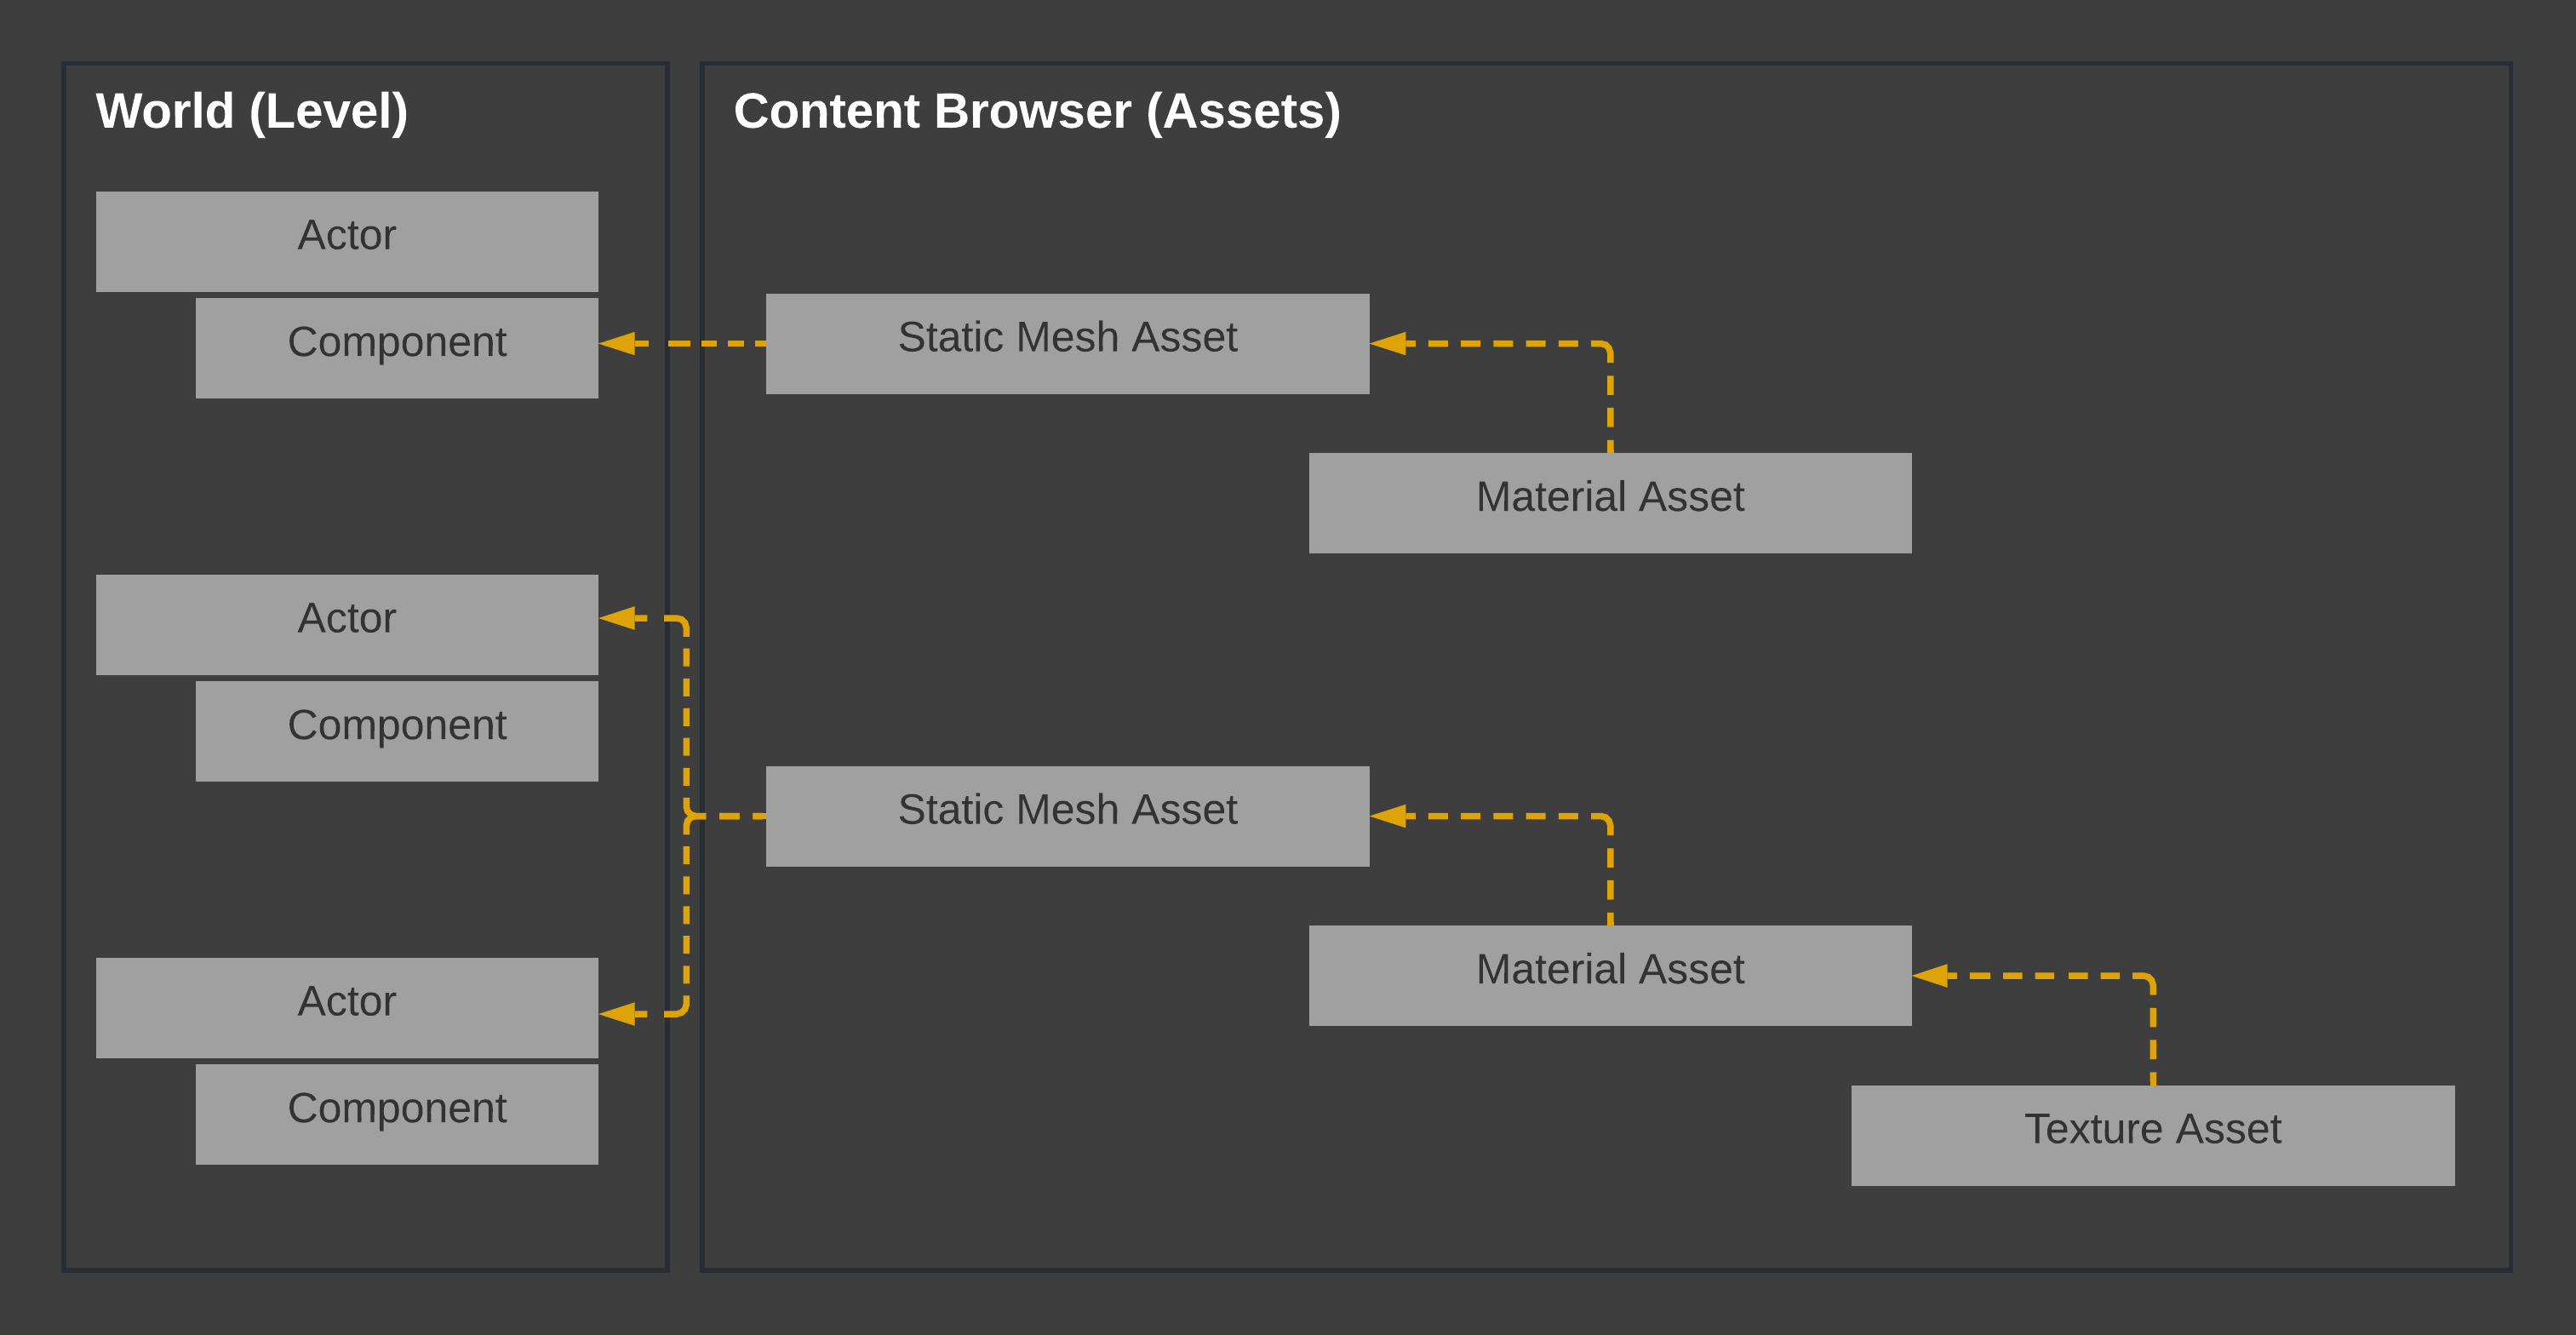
This diagram illustrates the relationship between Actors, Components, and various types of Assets in Unreal Engine. Click the image for full size.
Datasmith Design Principles
As a plugin developer, you should strive to ensure a consistent user experience, regardless of which software the data is being exported from. As such, it is important to understand and adhere to the Datasmith design principles outlined below. These are the principles that we (the Datasmith developer team) use when developing our own plugins.
Datasmith Plugin Types
All Datasmith plugins use one of the following two schemes:
-
Exporter / Importer combination. For example, 3ds Max, Revit, and Sketchup use:
-
A Datasmith exporter plugin on the software side.
-
The Datasmith File Importer plugin on the Unreal Engine side.
-
-
Direct importer. For example, Unreal Engine can import some file formats native to Rhino, Solidworks, and Cinema4D.
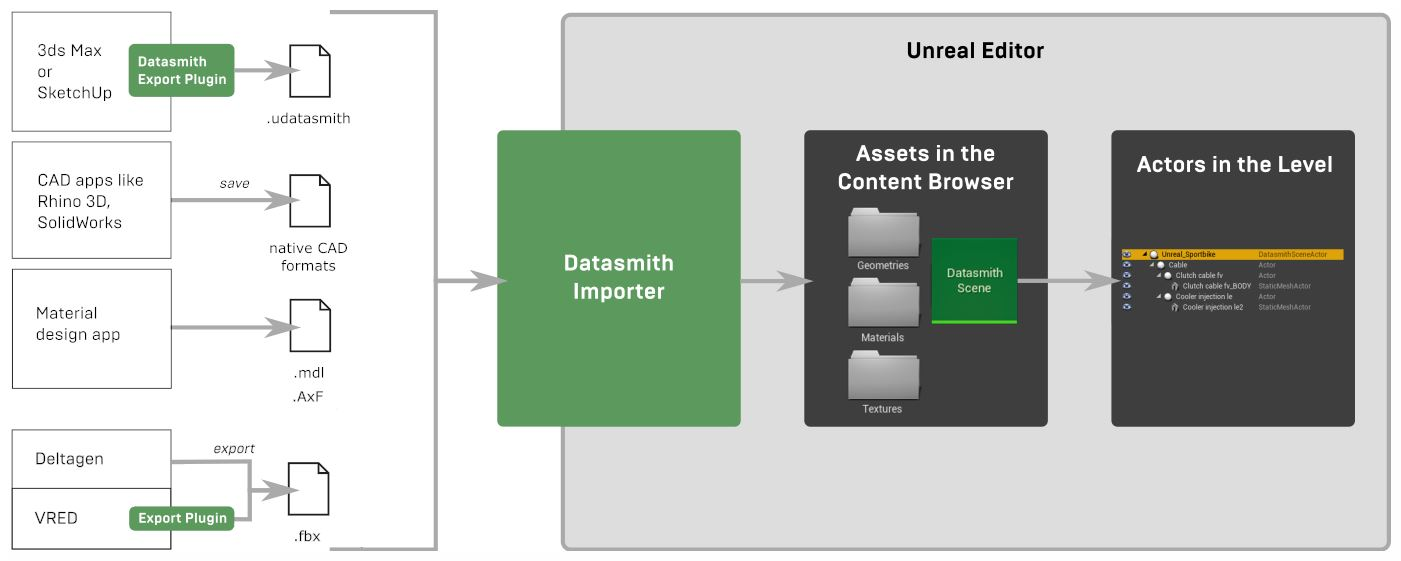
This diagram illustrates the various Datasmith import workflows available. Click the image for full size.
The choice of which workflow to use varies on a case-by-case basis.
Export and Import Logic
One of the challenges with exchanging data between different applications is understanding where to put some of the logic. When we translate data from one application to another, we may ask ourselves:
-
Should we export everything or provide options to exclude some entities?
-
Should we exclude small objects when exporting? How do we define "small"?
-
Should we reduce polygon count when exporting? Should we reduce texture resolutions?
-
Where do we rescale entities to match units and scale?, and so on.
Generally speaking, our approach is to export everything in a granular fashion (that is, object by object), and deal with object merging, polygon reduction and other data preparation operations when the data is later imported into Unreal Engine or Twinmotion.
To learn more about data optimization on import, refer to the Visual Dataprep documentation.
While there's no strict rule, our general approach is that it's best to have the least amount of options (or none at all) exposed in the Datasmith exporter, and let the Unreal Engine user make most of the decisions during the import.
With this approach, it is up to the Unreal or Twinmotion user to decide how granular his data may be, or how optimized it may be. Unreal Engine's Dataprep is a great tool for making those decisions.

Example division between internal and user-selected operations over the course of the Datasmith export / import process. Click the image for full size.
Reimporting Data After Source Changes
Datasmith brings design data from a variety of source applications into Unreal Engine, typically for the purpose of building real-time visualizations and experiences around that data. Often, while you are working on building those visualizations and experiences in Unreal Engine, the scene or design data that your work incorporates needs to change in order to meet new requirements or incorporate feedback from stakeholders.
To avoid painful and costly re-work, you need to be able to incorporate those upstream changes without losing all the work you've done in the Unreal Editor. To this end, Datasmith offers a re-import workflow that preserves all of your changes within the Unreal project.
From a Datasmith SDK perspective, re-importing data implies two things:
-
Entities must have a persistent unique identifier. Relying on an object's name is not a good strategy because multiple objects can have the same name.
-
Entities must be saved with a hash value that permits data re-importing at the highest possible performance.
When a Datasmith entity is created, a unique number is generated based on the object's data. For example, to quickly determine if two meshes are identical, you could either compare them face-to-face using a time-consuming algorithm, or you could compute a numerical value based on the number of vertices, faces, and UVs. Comparing these two values would then be a much faster way to tell if the meshes are identical or not.
Examples are described further down on this page.
Environment and Lighting
Although you may be tempted to perceive Unreal as a rendering engine and expect to export a model with all of its environment settings (cameras, environments, backgrounds, etc.), we find that generally, those artistic decisions are best made by Unreal Engine or Twinmotion users, after the data has been imported into the engine.
The most important aspect is to import model elements (geometry, materials, lights, metadata). Once the data has been imported into Unreal Engine or Twinmotion, users can change materials, tweak lighting, and perform other artistic tasks.
UX Guidelines for Datasmith Exporters
If you made it to this point, you have most likely compiled Unreal and created your first Datasmith file with a small application. Congratulations!
Now it's time to look at UX considerations related to how the data should be structured for end users.
Exporter UI
As we described in the Datasmith Design Principles section above, we want to offer the least amount of options when exporting to Datasmith. Here are some examples:
|
|
|
|---|---|
|
Datasmith exporter from Revit |
Export Options dialog in Unreal Engine |


Guidelines
-
Favor WYSIWYG (What You See Is What You Get) exports by relying on the application's viewing and filtering capabilities. For example, Revit only exports what is visible in the active View, and SketchUp only exports what is visible on-screen. There is no reason to invent a whole new UX to select and filter entities to be exported.
-
Favor no options at all when exporting.
-
If you must expose options, keep them as simple as possible. Refer to the 3ds Max exporter above as an example.
To Be Avoided
Options related to data preparation and optimizations, such as geometry detail, object type filtering, UV channels, etc. These should be decisions made by the Unreal Engine user, in Unreal Engine.
Progress Information and Error Messages
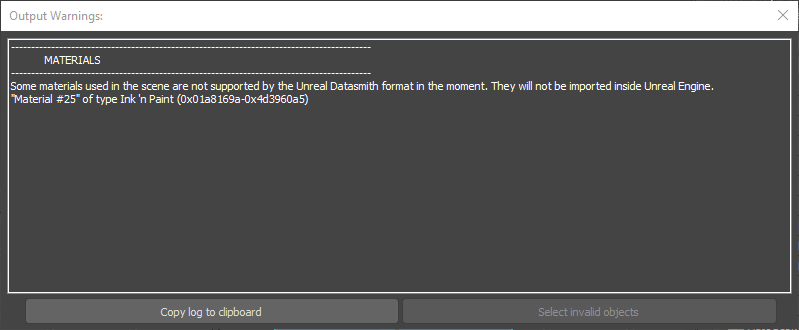
Datasmith exporters collect all entities relevant to transferring and reconstructing the scene in Unreal Engine. It is possible that some entities cannot be exported. You should inform users if one or more entities cannot be exported..
In addition, some projects are very large, which can make the export take a long time. Users should be able to see progress information.
Here are some examples. Click any image below to see it in full size.

Progress information in 3ds Max.

Output warnings in the Revit Datasmith Exporter.
Output warnings in the 3ds Max Datasmith Exporter.
Guidelines
-
Progress information needs to be presented to the user during export.
-
Users need to be able to cancel the Datasmith export process.
-
An error message log should be displayed to inform users about unsupported objects, missing textures, and other issues.
Useful to Have
Certain users often demand batch processing and scripting. For example, with SketchUp, 3ds Max or Revit, users can batch export to Datasmith using the native application scripting language.
To Be Avoided
Do not implement successive modal dialogs (OK / Cancel windows) that interrupt the export process each time an error or a warning occurs.
Useful API Calls
Code Example
For an example implementation, refer to the following file in the Unreal Engine repository:
/Engine/Source/Programs/Enterprise/Datasmith/DatasmithSketchUpRubyExporter/Private/DatasmithSketchUpExporter.cpp
Exported Files and Folders Structure
A Datasmith "file" consists of two parts:
-
A
.udatasmithfile that uses an XML data structure. -
A "sidecar folder" (an associated folder) that contains all Assets associated with the
.udatasmithfile.

Example export file with its associated folder.
Must Have
-
A single
[filename].udatasmithfile and a single associated [filename]_Assets folder. -
All related Assets are stored in the [filename]_Assets folder.
-
Assets are referenced in the
.udatasmithfile's XML structure using relative paths.
To Be Avoided
-
Do not reference Assets by absolute paths.
-
Do not create additional folders and subfolders that contain Assets. Here is an example of an incorrect export:
![Incorrect file structure]()
Note that the
Texturesfolder is outside the Datasmith project files. This is incorrect.

Datasmith File Header
We (Epic Games) use header information to understand where data comes from. Our telemetry only collects statistics about what types of files are imported and from which source.
Below is an example header of a Datasmith file:
<DatasmithUnrealScene>
    <Version>0.24</Version>
    <SDKVersion>4.25</SDKVersion>
    <Host>Revit</Host>
    <Application Vendor="Autodesk Inc." ProductName="Revit" ProductVersion="2018"/>
    <User ID="1e8adca84ffe2d4d625d54b63fba876d" OS="Windows 10 (Release 1709)"/>
Must Have
Datasmith information must be properly set, similar to the example above.
Useful API Calls
Code Example
For an example implementation, refer to the following file in the Unreal Engine repository:
/Engine/Source/Programs/Enterprise/Datasmith/DatasmithSketchUpRubyExporter/Private/DatasmithSketchUpExporter.cpp
Static Mesh Assets
Static Mesh Assets (
IDatasmithMeshElement
) define actual geometry, but won't appear in the Unreal or Twinmotion viewport until they are referenced by Actors (
IDatasmithMeshActorElement
). Multiple instances of
IDatasmithMeshActorElement
in a scene can also point to the same Static Mesh asset.
A Static Mesh Asset holds data for:
-
Faces, vertices, normals and smoothing masks
-
UVs
-
Collisions
-
LODs
-
Vertex colors
-
Material IDs and assignments, etc.
Below is an example data structure for a Static Mesh Asset in a .udatasmith file:
<StaticMesh name="c96130816d3eee95f82a6c00e553f491" label="Walls_Basic_Wall_Exterior_-_Insulation_on_Masonry">
  <file path="rac_advanced_sample_project-3DView-{3D}_Assets/c96130816d3eee95f82a6c00e553f491.udsmesh"/>
  <Size a="5922000.0" x="855.299927" y="30.300011" z="1139.999878"/>
  <LightmapCoordinateIndex value="-1"/>
  <LightmapUV value="-1"/>
  <Hash value="c0e8334d671cf30ef8ff8a67aa4da25b"/>
  <Material id="9" name="e72f7720bfd15817d3789377231c9646"/>
  <Material id="10" name="5d261e4bd619e79ebea1cfcc1d1a8d8e"/>
  <Material id="11" name="13b3765549b7832c6bc26e8922497ced"/>
</StaticMesh>
Must Have
-
Static Mesh names must be unique and they must not change between successive exports. This is required to track entities for subsequent re-imports. 3D applications usually provide GUIDs that are well-suited for this purpose.
-
Static Mesh labels must be sanitized, user-readable, and representative of what that object may be.
|
|
|
|---|---|
|
Unique names for mesh Assets |
User-readable labels in Unreal Engine |


-
Static Mesh Assets (
IDatasmithMeshElement) must be reused across Actors where applicable (they must be instanced). -
Unreal Engine uses left-handed Z-up coordinates and measures dimensions in centimeters, therefore:
-
Conversion must be done on the exporter side.
-
UV texture coordinates must be flipped vertically (on the Y axis) so we don't use a negative scale in material tiling to counteract images being flipped in Unreal Engine.
-
Scale conversion and coordinate transformation must be baked into the Static Mesh rather than applied to the Actor transforms.
![Scale baked into scene geometry]()
![Scale baked into scene geometry]()
Scale is baked in the geometry, resulting in Actor transforms set to a scale of 1.0 (as opposed to 2.54 or 0.333)
-
Mesh pivots must be calculated in the mesh so they don't all end up at 0, 0, 0.
![A correctly aligned mesh pivot]()
![An incorrectly aligned mesh pivot]()
Left: mesh pivot aligned with object (correct). Right: pivot at 0, 0, 0 (incorrect)
-
Triangles must be welded so that smoothing masks and shading work correctly.
![Smoothing, Normals, etc. are correctly set on the geometry]()
![Smoothing, Normals, etc. are correctly set on the geometry]()
Smoothing, Normals, etc. are correctly set on the geometry.
-


Useful to Have
-
Specify additional LODs.
-
Specify collision meshes.
-
Specify Lightmap UV Channel (Unwrap).
To Be Avoided
-
Static Mesh names which aren't guaranteed to be unique and repeatable across exports. Do not use object names that are user-specified.
-
Do not store units rescaling within Actor transforms.
-
Do not leave pivots at 0, 0, 0.
-
Do not export thousands of Static Mesh Actors that should be welded together. For example, a Box is typically a single mesh with 6 faces, not 6 individual meshes with a single face each.
Useful API Calls
Code Example
For an example implementation, refer to the following file in the Unreal Engine repository:
/Engine/Source/Programs/Enterprise/Datasmith/DatasmithSketchUpRubyExporter/Private/DatasmithSketchUpExporter.cpp
Static Mesh Actors
Static Mesh Actors (
IDatasmithMeshActorElement
) don't define the actual geometry. They point to Static Mesh Assets (
IDatasmithMeshElement
). Note that several instances of
IDatasmithMeshActorElement
can reference the same Static Mesh.
Below is an example data structure of a Static Mesh Actor in a
.udatasmith
file.
<ActorMesh name="1" label="Teapot001" layer="0">
    <mesh name="1"/>
    <Transform tx="16.825752" ty="-18.789846" tz="0.0" sx="1.0" sy="1.0" sz="1.0" qx="0.0" qy="0.0" qz="0.0" qw="1.0" qhex="0000008000000000000000800000803F"/>
    <tag value="Max.superclassof: GeometryClass" />
    <tag value="Max.classof: Teapot" />
    <tag value="Max.handle: 1" />
    <tag value="Max.isGroupHead: false" />
    <tag value="Max.isGroupMember: false" />
    <tag value="Max.parent.handle: 0" />
</ActorMesh>

<ActorMesh name="2" label="Teapot002" layer="0">
    <mesh name="1"/>
    <Transform tx="16.825752" ty="35.718727" tz="0.0" sx="1.0" sy="1.0" sz="1.0" qx="0.0" qy="0.0" qz="0.0" qw="1.0" qhex="0000008000000000000000800000803F"/>
    <tag value="Max.superclassof: GeometryClass" />
    <tag value="Max.classof: Teapot" />
    <tag value="Max.handle: 2" />
    <tag value="Max.isGroupHead: false" />
    <tag value="Max.isGroupMember: false" />
    <tag value="Max.parent.handle: 0" />
</ActorMesh>

Two Static Mesh Actors referencing the same Static Mesh Asset (instancing) imported from 3ds Max.
Must Have
-
Mesh Actor names must be unique and they must not change between successive exports. This is required to track entities for subsequent re-imports.
-
Mesh Actor labels must be sanitized (that is, they must not contain invalid characters) and user-readable.
-
Static Mesh Assets (
IDatasmithMeshElement) must be reused across Actors where applicable (they must be instanced). -
Scale and coordinate conversions, as well as coordinate transformations, must be baked into the Static Mesh rather than applied to the Actor transforms.
Useful to Have
-
Layer specification.
-
Support for tags and metadata.
Useful API Calls
Code Example
For an example implementation, refer to the following file in the Unreal Engine repository:
/Engine/Source/Programs/Enterprise/Datasmith/DatasmithSketchUpRubyExporter/Private/DatasmithSketchUpComponent.cpp
Empty Actors
Empty Actors are Actors that have no Components or Static Meshes attached to them. They are useful to hold metadata or act as a way to represent parts of a hierarchy. There are no strict rules about how or when you should use them. The guidelines below cover some common use examples.
Guidelines
Use empty Actors for:
-
Representing null objects (for example, 3ds Max helper objects).
-
Representing custom origin points (for example, Revit site locations).
-
Representing other elements that make the hierarchy more readable (for example, Layers from Rhino, Block origins from Rhino, or Levels from Revit).
-
Representing the head of a compound object that has no geometry of its own (for example, Revit curtain walls).
Examples

3ds Max Helper objects translated as Empty Actors.

Empty Actors used to represent invisible elements from Revit.
Useful API Calls
Code Example
For an example implementation, refer to the following file in the Unreal Engine repository:
/Engine/Source/Programs/Enterprise/Datasmith/DatasmithSketchUpRubyExporter/Private/DatasmithSketchUpComponent.cpp
Actor Hierarchy
Like many other 3D applications, Unreal Engine supports parent / child hierarchies.
Below is an example parent / child relationship in a
.udatasmith
file.
<ActorMesh name="3" label="Box001" layer="0">
        <mesh name="3"/>
        <Transform .../>
        <children visible="true"  selector="false" selection="-1">
            <ActorMesh name="5" label="Box002" layer="0">
                <mesh name="5"/>
                <Transform ..."/>
                <children visible="true"  selector="false" selection="-1">
Guidelines
-
Use Actor hierarchies to reflect the data model of your application.
![3ds Max hierarchy translated as-is to Unreal Engine]()
3ds Max hierarchy translated as-is to Unreal Engine.
-
Insert additional empty Actors if necessary to store information relevant to your application's data model (for example, Revit Levels are exported as an extra parent Actor).
![Revit Levels added to the hierarchy become a useful way to orient end users]()
Revit Levels added to the hierarchy become a useful way to orient end users.

To Be Avoided
To make sure your hierarchy is easy to navigate for end users, use empty Actors as parents of Static Mesh Actors only where necessary. Too many empty Actors clutter the hierarchy and make it more difficult to read and use inside both Twinmotion and Unreal Engine.
|
|
|
|---|---|
|
Too many empty Actors. |
Empty Actors used only when necessary. |


Useful API Calls
Code Example
For an example implementation, refer to the following file in the Unreal Engine repository:
/Engine/Source/Programs/Enterprise/Datasmith/DatasmithSketchUpRubyExporter/Private/DatasmithSketchUpComponent.cpp
Actors as Components
In applications such as Revit or Archicad, it is typical to have objects that have several sub-elements. For example, a Curtain Wall is typically built with panels and mullions and a Railing is typically built with rails and balusters:

In Revit, Curtain Walls and Railings are special objects that contain sub elements (panels, mullions, balusters, handrails).
While it is possible to export each element as an individual Static Mesh Actor, this ends up exporting too many objects and the World Outliner in Unreal Engine becomes overly crowded, as shown below.
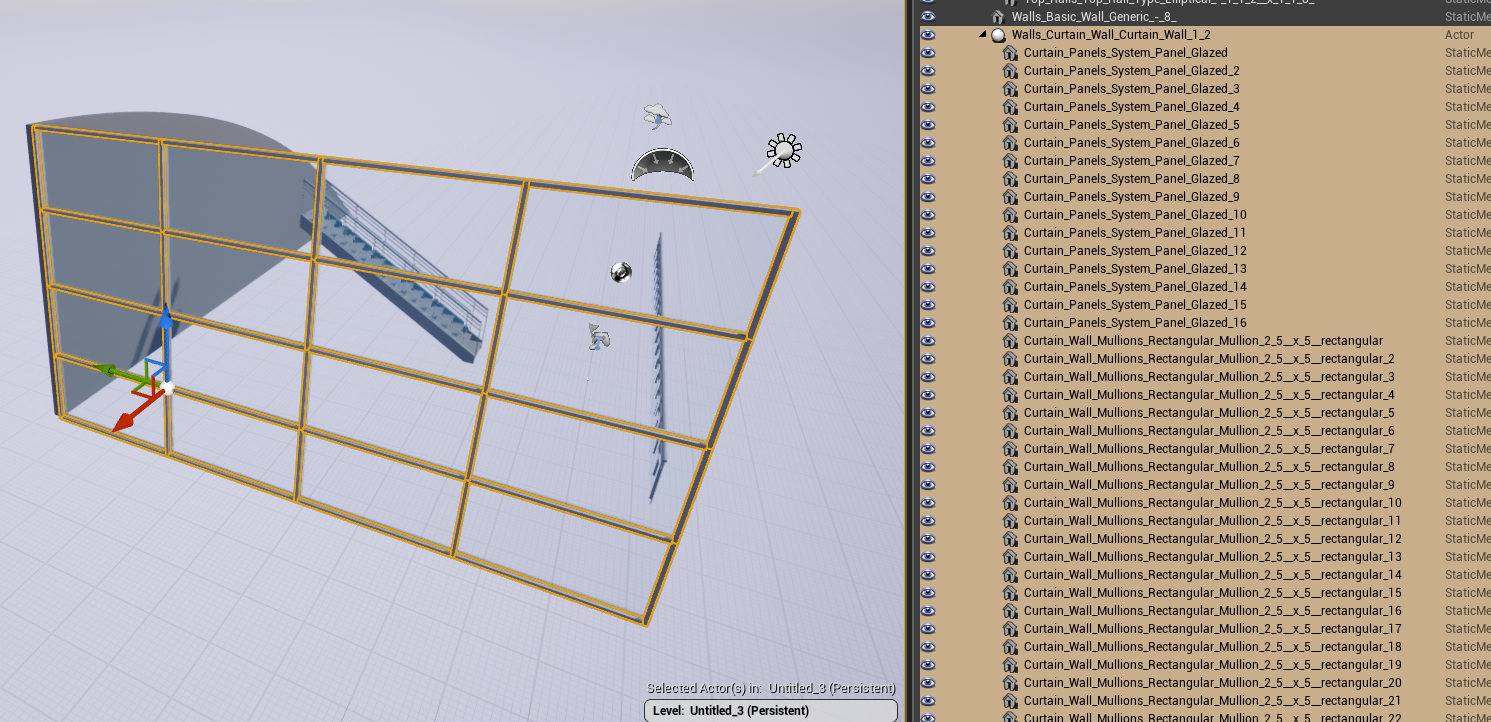
Curtain Wall exported as one StaticMesh Actor per panel and mullion = lots of actors in the World Outliner! Click the image for full size.
If applicable, consider exporting sub-elements as Actor Components. For example, a Curtain Wall object can be exported using the following Actor and Component hierarchy:
-
Curtain Wall Object → empty Actor.
-
Panel → Static Mesh Actor Component
-
Panel → Static Mesh Actor Component
-
Mullion → Static Mesh Actor Component
-
Mullion → Static Mesh Actor Component
-

Curtain Wall exported as an Empty Actor with each panel and mullion as a StaticMesh Actor Component results in considerably less clutter in the World View hierarchy.
In the
.udatasmith
file, the hierarchy looks like this:
<Actor name="..." label="Walls_Curtain_Wall_Exterior_Curtain_Wall" layer="Walls">
    <Transform .../>
    <children visible="true"  selector="false" selection="-1">
        <ActorMesh name="..." label="Curtain_Panels" layer="Curtain Panels" component="true">
            <mesh name="..."/>
            <Transform .../>
        </ActorMesh>
        <ActorMesh name="..." label="Curtain_Panels" layer="Curtain Panels" component="true">
            <mesh name=">
            <Transform .../>
        </ActorMesh>
        <ActorMesh name="label="Curtain_Panels" layer="Curtain Panels" component="true">
            <mesh name="..."/>
            <Transform .../>
        </ActorMesh>
Guidelines
-
Use Static Mesh Actor Components to represent child objects such as curtain wall panels, balusters, or similar compound objects.
-
You must set both the hierarchy ( IDatasmithActorElement::AddChild ) and component flag ( IDatasmithActorElement::SetIsAComponent ) in order for this to work correctly.
Useful API Calls
Code Example
For an example implementation, refer to the following file in the Unreal Engine repository:
/Engine/Source/Programs/Enterprise/Datasmith/DatasmithSketchUpRubyExporter/Private/DatasmithSketchUpComponent.cpp
Actor Layers
Like many other 3D applications, Unreal Engine supports the concept of Layers. A Layer is an Actor property that indicates where the Actor sits in a scene's visual hierarchy.
The example below shows a possible use of layers in a
.udatasmith
file.
<ActorMesh name="2" label="Sphere001" layer="Layer002">
...
</ActorMesh>
<ActorMesh name="3" label="Box001" layer="Layer004">
...
</ActorMesh>
Guidelines
-
If your source application uses Layers, you should translate them to Layers in Unreal Engine.
-
If your source application doesn't use Layers, consider if there is any other data you can translate into Unreal Engine Layers. For example, Revit doesn't use Layers, but classifies entities into Categories.
![Revit entities imported on Layers derived from Revit categories]()
Revit entities imported on Layers derived from Revit categories.

Limitations
-
Layer names must be unique.
-
Unreal Engine doesn't support nested layers.
|
|
|
|---|---|
|
Nested Layers in 3ds Max. |
The same layers imported in Unreal Engine. Observe the flat Layer hierarchy. |


Useful API Calls
Code Example
For an example implementation, refer to the following file in the Unreal Engine repository:
/Engine/Source/Programs/Enterprise/Datasmith/DatasmithMaxExporter/Private/DatasmithMaxSceneExporter.cpp
Actor Tags
Unreal Engine supports user-defined tags for Actors. Datasmith uses Actor Tags to hold technical information that describes how data is structured in the source application. Unreal Engine users can then use these Actor tags to perform scripting operations, for example with Python, Blueprint Utilities, or Visual Dataprep.
Below is an example use of tags on Static Mesh Actors in a
.udatasmith
file exported from 3ds Max:
<ActorMesh ...>
    <mesh name="a8f655367fcc240a8c9eb8d847d58463"/>
    <Transform .../>
    <tag value="Revit.Element.Id.186551" />
    <tag value="Revit.Element.UniqueId.07ae6064-8e02-489e-896d-f7554545ebb2-0002d8b7" />
    <tag value="Revit.DB.FamilyInstance.Mirrored.True" />
    <tag value="Revit.DB.FamilyInstance.HandFlipped.False" />
    <tag value="Revit.DB.FamilyInstance.FaceFlipped.True" />
    <tag value="Revit.Host.Id.156316" />
    <tag value="Revit.Host.UniqueId.9e597f98-694d-4ada-b8ef-0e7459e0b930-0002629c" />
</ActorMesh>
<ActorMesh name="1" label="Teapot001" layer="0">
    <mesh name="1"/>
    <Transform .../>
    <tag value="Max.superclassof: GeometryClass" />
    <tag value="Max.classof: Teapot" />
    <tag value="Max.handle: 1" />
    <tag value="Max.isGroupHead: false" />
    <tag value="Max.isGroupMember: false" />
    <tag value="Max.parent.handle: 0" />
</ActorMesh>
Although there aren't strict rules as to what to put in an Actor's tags, we adopted the methodology of using tags for holding information that is specific to the source application.
For example, in the case of 3ds Max, we decided to use the tags to hold information about the type of object (in 3ds Max), whether or not it's part of a group, and so on.
For Revit, we have adopted a similar approach where we store information that describes the internal structure of Revit entities.
|
|
|
|---|---|
|
Actor Tags on Actor Components from Revit. |
The same layers imported in Unreal Engine. Observe the flat Layer hierarchy. |


Guidelines
-
Prefix your tags with the name of the application you're importing from (for example: Revit.TagName or Max.TagName).
-
Use tags to represent technical information about how data is structured in the source application. To store other user-defined data, use metadata instead.
Useful API Calls
Code Example
For an example implementation, refer to the following file in the Unreal Engine repository:
/Engine/Source/Programs/Enterprise/Datasmith/DatasmithSketchUpRubyExporter/Private/DatasmithSketchUpComponent.cpp
Metadata
Datasmith carries Key / Value pairs that can be used to store BIM information (or any other custom data) on entities.

Metadata from 3ds Max (left) translated into Unreal Engine (right).
Limitations
-
Key / Value pairs can only carry strings. This means that floats, units, etc. will need to be contained ("baked") into the string (for example, "10 mm").
-
Hierarchical properties are not supported, so you'll need to flatten the hierarchy using an underscore ( _ ) separator. Refer to the Revit example below where Element and Type properties are handled by concatenating text strings to keep things grouped.

A simulated flattened hierarchy using metadata from Revit.
Useful API Calls
Code Example
For an example implementation, refer to the following file in the Unreal Engine repository:
/Engine/Source/Programs/Enterprise/Datasmith/DatasmithMaxExporter/Private/DatasmithMaxSceneExporter.cpp
Camera Actors
Datasmith can create Cameras in Unreal Engine, but, depending on your use case, you may or may not want to export cameras from the 3D application. Sometimes, users set cameras explicitly (for example, 3ds Max Physical Cameras). Other times, Cameras are derived from other application concepts (for example, Views from Revit, or Bookmarks from SketchUp).
One key element to consider with regards to Unreal Engine Cameras is that they have physically based characteristics that you will need to set at export time, such as:
-
Sensor width
-
Aspect ratio
-
Exposure value
-
White point
-
Depth of Field, and so on.
Below is an example implementation of a Camera with tags and characteristics in a
.udatasmith
file.
<Camera name="1856" label="PhysCamera001" layer="0">
        <LookAt Actor="1857"/>
        <Transform tx="706.201538" ty="468.560883" tz="0.0" sx="1.0" sy="1.0" sz="1.0" qx="0.0"     qy="0.0" qz="-0.758784" qw="0.651344" qhex="0000000000000000A33F42BF79BE263F"/>
        <SensorWidth value="36.0"/>
        <SensorAspectRatio value="1.333333"/>
        <DepthOfField enabled="0"/>
        <FocusDistance value="850.27594"/>
        <FStop value="8.0"/>
        <FocalLength value="40.0"/>
        <LookAtRollAllowed enabled="0"/>
        <Post>
            <CameraISO value="5999.997559"/>
            <ShutterSpeed value="59.999973"/>
            <FStop value="8.0"/>
        </Post>
        <tag value="Max.superclassof: camera" />
        <tag value="Max.classof: Physical" />
        <tag value="Max.handle: 1856" />
        <tag value="Max.isGroupHead: false" />
        <tag value="Max.isGroupMember: false" />
        <tag value="Max.parent.handle: 0" />
        <tag value="Max.Target.handle: 1857" />
</Camera>

Unreal Engine CineCameraActor.
Guidelines
Depth of Field, Exposure, and other photographic effects defined by post-processing settings are also optional. These require a close relationship between lighting and cameras in the source application which may not be defined in the context of your own Datasmith export.
Limitations
-
Unreal Engine Cameras don't support skewed cameras (2-point perspective). For example, Revit can have "cropped" views that will shift the Camera perspective, but Datasmith (and, by extension, Unreal Engine) doesn't support this type of Camera transformation.
Useful API Calls
Code Example
For an example implementation, refer to the following files in the Unreal Engine repository:
-
/Engine/Source/Programs/Enterprise/Datasmith/DatasmithMaxExporter/Private/DatasmithMaxCameraExporter.cpp -
/Engine/Source/Programs/Enterprise/Datasmith/DatasmithSketchUpRubyExporter/Private/DatasmithSketchUpCamera.cpp
Texture Assets
In Unreal Engine, textures represent more than just color information. In order to be sampled and affect lighting and shading correctly, you must indicate the intended use for the texture (texturemode). Possible uses include:
-
Diffuse
-
Specular
-
Normal
-
NormalGreenInv
-
Displace
-
Other
-
Bump
-
Ies
We also need to specify its color space (typically Gamma correction or sRGB) as this has a direct impact on how light will work with materials (sRGB and RGB curve).
Below is an example implementation of a texture Asset in a
.udatasmith
file:
<Texture name="sitework_planting_gravel_mixed_0" texturemode="0" texturefilter="3" textureaddressx="0" textureaddressy="0" rgbcurve="-1.000000" srgb="0" file="rac_advanced_sample_project-3DView-{3D}_Assets/sitework.planting.gravel.mixed.png">

    <Hash value="b10e41741cfee286a5fcf3b288de78f5"/>

</Texture>
Guidelines
-
You must set your color space (Gamma / sRGB) correctly, based on the texture's intended use:
-
sRGB color space is typically used for Albedo textures.
-
Linear color space is typically used for normal, height, or bump maps.
-
-
The texture's name (not filename) must be sanitized (that is, it must not include any invalid characters).
-
You must place textures in the same folder as the rest of the Assets.
![Textures should be exported in the same folder as the other Assets]()
Textures should be exported in the same folder as the other Assets.

To Be Avoided
-
Do not use absolute paths.
-
Do not place textures in a different folder than the rest of the Assets.
-
While exporting, you don't need to transform textures. The Datasmith importer will handle transforms.
-
There is no need to convert textures to .uasset files with the DatasmithCore API.
-
There is no need to reformat, resize, or convert textures to different formats.
-

This image shows an incorrect use of ``.uasset` files to represent textures.
Useful API Calls
Code Example
For an example implementation, refer to the following file in the Unreal Engine repository:
/Engine/Source/Programs/Enterprise/Datasmith/DatasmithSketchUpRubyExporter/Private/DatasmithSketchUpMaterial.cpp
Materials
Simple PBR Export
The following example demonstrates how textures can be exported to a Datasmith file to create a basic PBR material containing an albedo map and a height map.
Original Material in Rhino
This example uses the following Material in Rhino:

The Material's settings are as follows:
|
|
|
|---|---|
|
Albedo map |
Height map |


Resulting Datasmith file
The resulting Datasmith file will look like this:
<Texture name="c02622dee4b6e6e08265ed1a8ed947e3" label="ColorChecker_sRGB_from_Lab_D50" texturemode="0" texturefilter="3" textureaddressx="0" textureaddressy="0" rgbcurve="1.000000" srgb="1" file="rhino_diffuse_and_bump_Assets/ColorChecker_sRGB_from_Lab_D50.bmp">
        <Hash value="2eac7dc7c873963f39791a4c7e9a6f74"/>
</Texture>
<Texture name="82c22916309f2f098d35b2856b2caf5c" label="Heightmap_normal" texturemode="6" texturefilter="3" textureaddressx="0" textureaddressy="0" rgbcurve="1.000000" srgb="0" file="rhino_diffuse_and_bump_Assets/Heightmap.png">
        <Hash value="cafca7197e3f5a46480b09f329f9eabd"/>
</Texture>

<UEPbrMaterial name="90589c47f06eb971d548591f23c285af" label="Custom">
        <Expressions>
            <Texture Name="Diffuse_Map" PathName="c02622dee4b6e6e08265ed1a8ed947e3">
            </Texture>
            <Texture Name="Bump_Map" PathName="82c22916309f2f098d35b2856b2caf5c">
            </Texture>
        </Expressions>
        <Input Name="BaseColor" expression="0" OutputIndex="0"/>
        <Input Name="Normal" expression="1" OutputIndex="0"/>
        <OpacityMaskClipValue value="0.3333"/>
</UEPbrMaterial>
Observe that the two Textures above have different values for
texturemode
and
srgb
:
-
texturemode="0"andsrgb="1"for the first Texture -
texturemode="6"andsrgb="0"for the second Texture
Imported in Unreal Editor
In Unreal Engine, the importer Material's PBR graph will look like this:
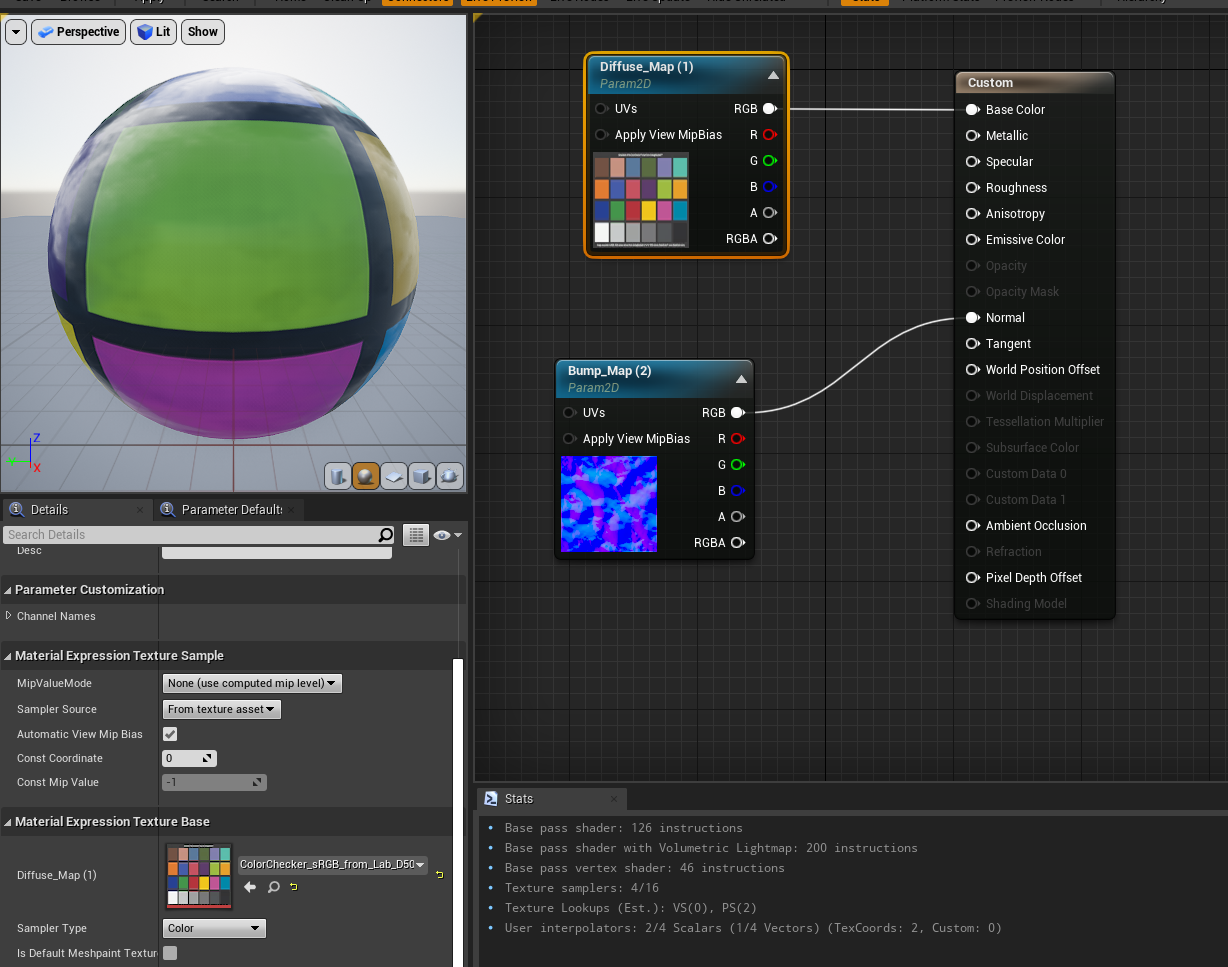
Click the image for full size.
Note that the albedo map is set to
SRGB=1
and the sampler type is set to
Color
. This is automatically set up by the Datasmith importer and is the result of setting the exported albedo map as:
The height map, which was greyscale in Rhino, has been converted to a normal map by the Datasmith importer, which is the result of setting the texture as:
texturemode="6" srgb="0"
Useful API Calls
-
-
SetSRGB - EDatasmithColorSpace
-
SetTextureMode - EDatasmithTextureMode
-