Choose your operating system:
Windows
macOS
Linux
The process of compositing imagery together in Unreal Engine 4 (UE4) is handled by using our real-time compositing plugin Composure . It enables you to combine visual elements from different sources, such as computer generated (CG) or real-world sources to layer together into a single, seamlessly blended image while working in-Editor or in-game. For Film and Television, the visual effects (VFX) industry, compositing a single frame has primarily been an offline process, up to this point, with each frame taking some time to render.
When you start compositing with previsualization in mind, it's especially helpful in enabling directors—or other creatives working on set—get a sense of what the final render will look like, even helping alter performances or how a shot it set up. For compositors, previsualization can be used as a guide for completing their work in other third-party industry standard software, like Nuke or Fusion.
Enabling the Composure Plugin
To access the Composure compositing tools, go to the Edit menu and open the Plugins browser. Under the Compositing category, enable Composure and restart the Editor for the changes to take effect.

Compositing Tree Panel
Once the Composure plugin is enabled, access the Composure Compositing panel from the Window menu.

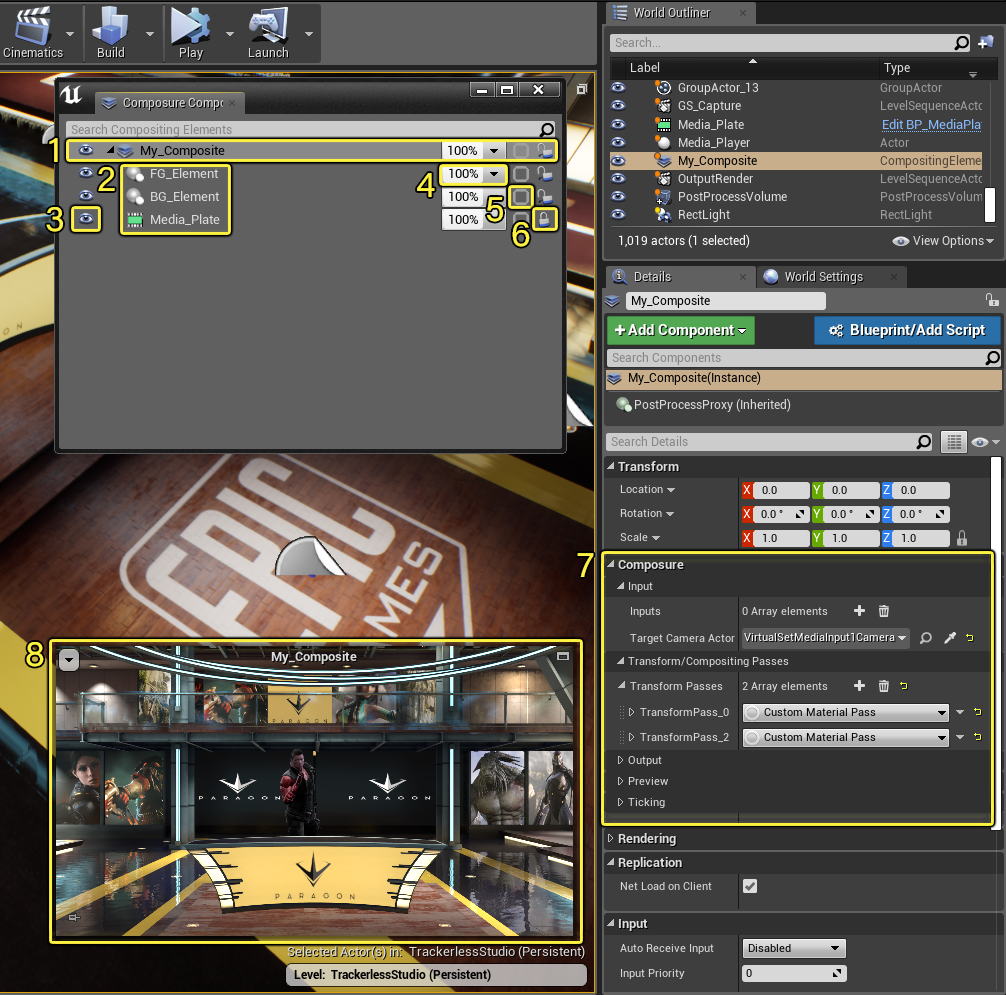
Use the panel to build a hierarchy of compositing Elements . These elements are objects responsible for rendering a piece of your composite scene. For example, the hierarchy above is made up of a Composition named "My_Composite." It has three Elements named "FG_Element," "BG_Element," and "Media_Plate." Each element contains a different part of the scene that is composited together. FG_Element and BG_Element are CG Layer elements that contain both foreground and background objects from the scene. Media_Plate is a Media Plate layer that is used for video input into the compositing pipeline.
When right-clicking in the Composure Compositing panel, add your own composite by selecting "New Comp Shot .mp Shot .

When right-clicking on the Composition Shot, new elements are added by selecting Add Layer Element and selecting the type of element you want to add from the Pick an Element Type selection window.

Elements can be nested under one another in a hierarchical structure to determine which Elements are available for cross-Element use in ones found higher in the hierarchy tree. Keep in mind that Elements are just Actors within the Level and can be added like any other Actor. The panel provides a way to nest these Elements for organization and exposes some controls to make them easier to use.
For portability and ease of use within the scene, be sure that your Elements are added to their own sub-Level. Since they are Level Actors, it lets you load your compositing tree in other Levels that you would potentially open.
Anatomy of the Composure Compositing Panel
-
The Element Row is made up of a Composition Shot composed of Elements composited within the scene. It has a row representing each layer in the currently loaded map.
-
The Element Name is a unique name given to each added Layer Element and is used to reference the specific Element found in the Compositing Material Graphs.
-
Each Composition Shot or Layer Element can be toggled on or off using the Eye button.
-
The Alpha box controls how opaque the selected Composition Shot or Layer Element is. Enter a value in the text box or click the drop-down and use the slider to control its visibility.
-
The Lock toggles freeze framing the Element. For animations or video streaming in, it lets you pause the Element's rendering, freezing its position.
-
The Media Output toggle lets you turn on/off the selected Composition Shot or Layer Element render result. Toggling this on for the first time prompts you to pick (or create) a Media Output Definition Asset. Provide the Asset details of your Target Output (such as a card or port).
-
When selecting a Composition Shot or Layer Element, the properties and attributes of the Element will be available from the Level Details panel. Compositing specific settings are found under the Composure category.
-
When selecting a Composition Shot or Layer Element, the Element Preview Pane appears in the Level Viewport, like a Camera Actors preview pane would. It displays the render for the selected Element and also shows error messages when the Element is in a bad state. For example, it displays "Empty" if there is no information to display.
Elements are processed in linear color space. By default, the preview is displayed with a linear to sRGB conversion and displays the images without tonemapping, which consequently makes them appear blown out. However, you have the option to change how Elements are previewed, such as adding your own tonemapping through a custom Material.
Compositing Elements
Elements are the individual building blocks used to construct a composited image which can be the Composition Shot or the individual Layer Elements. Each one makes up the composited image made up of layers or Level Actors that are individually responsible for rendering a piece of the composite scene. Layer Actors are individually responsible for rendering a piece of the composited scene.
Internal Passes
Each Element has a set of internal passes it performs. These are a sequential set of steps unique to that Element type. Each pass is a distinct step in rendering the Element in the composite. An Element without any passes does nothing. There are many different kinds of passes available and there are certain Element archetypes that come with their own predefined passes. For example, the Media Plate Element comes with Chroma Key and Despill passes already built in.
Anatomy of an Element
When selecting an Element in the Composure Compositing Tree window, the Details panel in the Level will display information and properties for this selected Element.

-
The Inputs attribute enables some elements to access a resource outside of the compositing system, such as using a Media texture for video input. They provide a way to route dependencies to the Element and act as a special kind of pass that can be referenced by other subsequent passes and some Element types that come with predefined inputs.
-
The Target Camera Actor enables some Element types that need a point of view for reference to use a Camera Actor in the Level. If left undefined, the Element searches the Level for the first Camera Actor it can find and assigns it. This can be overridden for individual elements, or let it inherit from the root Element.
-
Transforms are passes that take an input of some kind and alters it or uses it to generate something new. For example, color transforms take an image from one color space and puts it in another. The last transform in this list produces the Elements final render result.
-
There are many types of Passes , such as chroma key, despill, or even custom ones that can be added. They all share some properties but may also contain ones unique to that pass.
-
The Enabled flag toggles a pass on and off. When disabled, the pass behaves as though the pass were not there.
-
The Pass Name feeds in name that can be referenced by subsequent passes.
A pass must be uniquely named if it's to be referenced in a Material.
-
The Intermediate flag controls whether subsequent passes use it. By default, it is assumed that you only need it for the next pass. After that, its render target is released so that it can be used by another pass. If you need the pass result to be accessible longer, disable this flag.
Rendering for Elements and passes uses a shared render target pool. Each frame all targets are returned to the pool and redistributed. Unused targets in the pool get flushed.
-
-
Outputs are another form of pass, they don't contribute to the Element's render result. Instead, they route the result of the pass somewhere else, such as a video capture card or to the player viewport.
-
The Render Resolution defines the resolution output of the Element. It can be overridden or inherited from a parent and some passes have the option to override or scale this setting.
-
In the Preview Transforms , elements are processed in their linear color space. By default, they are previewed without any kind of tonemapping, which can cause their color to appear blown out. The optional transform on the Element enables you to adjust how the image is previewed in the Editor.
-
The Auto Run flag toggles the Element, preventing it from running (or rendering). The flag state is reflected by the eye icon in the Composure Compositing panel's tree view as well.
Compositing Material
The following sections detail how parts of the compositing pipeline work and come together in UE4.
For a step-by-step guide to creating a basic composition with composure, see the Composure Quick Start .
Nesting Elements
Elements can be nested under one another and while any kind of Element can be placed in the hierarchy, you should put the final composition at the top with its layer elements listed below it. To add a new nested Element, right click on the desired parent element and select Add Layer Element from the context menu. Then, choose the type of Element you want to add from the window.
Nesting elements determines the render order of the Elements used in the composition. The parent element is rendered last and everything under is rendered beforehand. Parent elements can use the render result from their children in their own render passes.
Custom Material Pass
The Custom Material Pass is a transform pass that lets you add a user authored Material to the compositing pipeline. In the Material you can reference sub-elements by name.

Referencing Elements in Your Material
In your Material, create a Texture Parameter and have it auto-filled with a child Element's render result. Name the parameter the same as the sub-Element found in the compositing tree.

Since only a single color is needed for output, Post Process Materials are used for compositing these materials. Enable the Output Alpha for Post Process Materials, if needed.
Use the Details panel to plug this Material into the Material slot. If everything is set up correctly, it should start working in the viewport preview.

If you're not seeing the preview show the child Element, double-check that the name match exactly. Typos or extra spaces can cause this to fail.
If the sub-Element is disabled and not rendering, the Texture Parameter is filled with a transparent black texture. If the named Element cannot be found, the texture will use the default texture from the Material.
Making Materials Portable
Referencing your Element by name in the Material is easy enough, but it makes your Material very specialized; it will only work with Element having specific names. Alternatively, give your Material Texture Parameter a generic name and set it to reference a sub-Element in the Pass's properties.

Once a Material is set on the pass, it will have a property section called Input Elements . It lists all of the Texture Parameters in the Material and let's you set them to reference a specific child Element.
Referencing Other Passes in Your Material
Like Elements, Materials can reference other passes that have already run and is how you would do progressive transforms within a single Element. For example, with the Media Plate, we do a chroma keying pass and a despill pass that used the keyed result.

If you need to reference a pass other than the one that comes right before the current pass, the other pass needs to have its Intermediate flad unchecked.
PrePass Special Parameter Name
PrePass is a special parameter name that can be interpreted as reference whichever pass was run right before this . Using it in your Material makes it more portable without requiring you to set the parameter mapping in the Details panel.

Compositing Two Elements Together
By default, projects are setup to send alpha data through the post process pipeline. For CG Layers to work properly, the Project Setting Enable alpha channel support in post processing needs to be set to Linear color space only . This setting can be found under the Rendering > PostProcessing category.
To make compositing Elements together simpler in your Material, the following functions are available:
The Over node takes the input A and overlays its with input B using A's opacity to blend the two together. The node takes a flaot4 RGBA vector and expects the RGB channels to be pre-multiplied with their alpha value.

In this example below, the Over material expression is blending the the
FG_Element
with the
BG_Element
. The alpha of
FG_Element
is used to blend the foreground objects with the background plate.

Exposing Material Parameters
Scalar and Vector material parameters are automatically exposed to the pass Details panel under the Material Parameters category. It makes adjusting, tweaking, and experimenting with your composition simpler to do.

In this example material, the Blend scalar parameter is automatically exposed to the Element's Details panel. Adjusting it's value can be used here to make quick edits or experiment with settings while working in the Editor.


Outputting Your Composite
An Output pass is responsible for routing the different Elements' final result to some external consumer. Each Element has a place for you to add Output passes.
Clicking the add ( + ) button next to Outputs gives you the following selectable options:

-
Media Capture
-
Image Sequence (exr)
-
Player Viewport
-
Render Target Asset
The most common (or primary) output is to a capture card using the Media Capture pass. To quickly, or conveniently, add a Media Capture pass to your Element, use the tree panel button:

Exporting Composition with Sequencer
An alternative workflow is to render out composites and other layers or passes through Sequencer .

For further reading, see Real-Time Compositing with Sequencer .