Choose your operating system:
Windows
macOS
Linux
Every nDisplay setup has a single master computer, and any number of additional computers.
-
Each computer in the network runs one or more instances of your Project's packaged executable file.
-
Each Unreal Engine instance handles rendering to one or more display devices, such as screens or projectors.
-
For each of the devices an instance of Unreal Engine handles, it renders a single viewpoint on the same 3D scene. By setting up these viewpoints so that their location in the 3D world matches the physical locations of the screens or projected surfaces in the real world, you give viewers the illusion of being present in the virtual world.
-
The master node is also responsible for accepting input from spatial trackers and controllers through connections to Virtual-Reality Peripheral Networks (VRPNs), and replicating that input to all other connected computers.

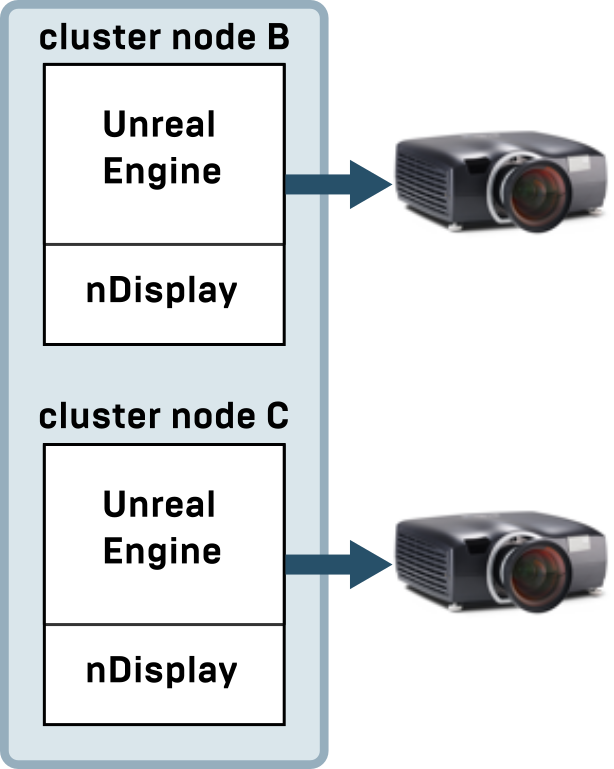
The image above shows a possible nDisplay network. Like all nDisplay networks, one of its PCs acts as the master node. This master node accepts input into the system from a VRPN server, which relays signals that come from spatial tracking devices and other controller devices. The network also contains several other PCs that run other instances of the Unreal Engine Project. Each of these cluster nodes drives one or more display projectors.
|
|
One application instance that renders to one display device.
|
|
|
Multiple application instances that each renders to one display device.
|
|
|
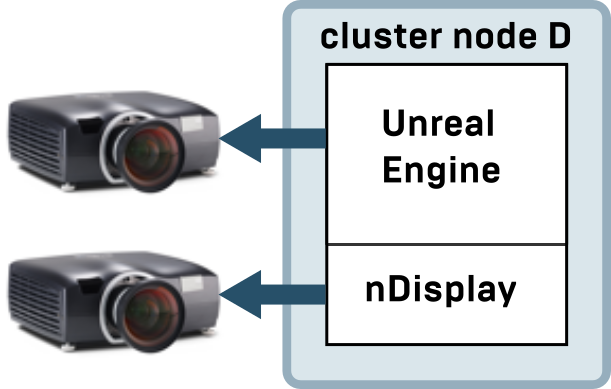
One application instance that renders to multiple display devices.
|

nDisplay Components
nDisplay adds several components to the usual Unreal system architecture:
-
A Plugin that works inside the Unreal Engine. It communicates and synchronizes information between all the application instances that make up the cluster, ensures all instances render the same frame at the same time, ensures each display device renders the correct frustum of the game world, and more.
-
A shared configuration asset that contains all the settings nDisplay needs to start up the correct number of instances on the correct computers, each rendering the right points of view on the game's 3D world to produce the illusion of a seamless rendering across all display screens or projectors. See the nDisplay 3D Config Editor for more information.
Workflow
You need to tell nDisplay about the different computers you want to use in your network, the size and resolution of the screens or projectors those computers will render to, the spatial relationships between those screens in 3D space, and more. To do this, you create a configuration asset that expresses all of this information in a series of settings.
Typically, once your configuration asset is set up, you only have to modify it when the topology of your network changes: for example, when you need to change the computers you are rendering to, or if you change the physical arrangement of your screens and displays in the real world.
The general workflow for setting up your nDisplay cluster:
-
Create a new nDisplay Config Asset in the Unreal Editor.
-
Configure your nDisplay Config Asset in the nDisplay 3D Config Editor:
-
Components : Add your displays, cameras, and transforms to the root component.
-
Cluster : Create a representation of your cluster PC configuration, assign Viewports and GPU ID. Essentially adding PC's and Viewports.
-
Output Mapping : Effectively map Viewports to UE Application Windows. Assign Projection Policies and bind Viewports to Display, Screen, or Mesh Components.
![Create the nDisplay Config Asset]()
-
-
Drag the nDisplay Config Asset into the level viewport to create an nDisplay Root Actor and preview your project's content from the cluster's perspective.
![Create the nDisplay Root Actor]()
-
Launch your project onto your physical nDisplay setup with Switchboard .


To get started with a sample nDisplay configuration on your computer, follow the steps in the nDisplay Quick Start .
The nDisplay Root Actor is not required to be in the level to launch the nDisplay cluster. If the nDisplay plugin is enabled for the project, you can specify the location of the nDisplay Configuration Asset (
.uasset
or
.ndisplay
file) in Switchboard or the nDisplay Configuration File (
.cfg
or
.ndisplay
) as a command-line argument. This method works in -game and Packaged modes.
If a config asset is already present as an Actor in your project, it will be ignored when you specify one externally using Switchboard or command line arguments.
Multi-GPU Support
nDisplay supports multi-GPU (mGPU) for viewport rendering, so you can specify one GPU device to render a specific viewport and copy the frame to another GPU to display. For example, in virtual production and in-camera VFX scenarios, the inner frustum can be entirely rendered on a second GPU thereby improving performance and hardware usage.
On NVIDIA GPUs with NVLink, you can bypass the CPU and transfer memory directly from GPU to GPU. Without NVLink, any memory transfer will still be peer-to-peer (P2P) but might be slower as it has to go through the CPU over PCIe.
To enable mGPU in your nDisplay setup:
-
Open your nDisplay Config Asset in the nDisplay 3D Config Editor.
-
In the Components panel, select the Config Asset to open the Details panel and set Configuration > Render Frame Settings > Multi GPU Mode to Enabled .
-
For viewport renders: In the nDisplay 3D Config Editor, select the viewport and in its Details panel set the GPUIndex field to the index of your GPU.
![enable-mGPU-viewpoint.png]()
For inner frustum renders: In the nDisplay 3D Config Editor, select the ICVFX camera and in its Details panel set the GPUIndex field to the index of your GPU.
![enable-mGPU-ICVFX.png]()
Typically, the first GPU installed and enabled in your computer is referenced as 0 , while the others are incrementally assigned 1, 2, ... , n . You can find the GPU device number provided by your OS in your computer's settings. For example on Windows, you can find your GPU device numbers in Task Manager:
-
Open Task Manager.
-
Switch to the Performance tab.
-
The left side of the window shows every GPU you have in your machine and their device number.
![gpu-0.jpg]()
GPU 0
-
-
Add MaxGPUCount=2 to the custom command line arguments when you launch nDisplay through Switchboard .


Runtime Camera Control
Internally, nDisplay maintains a hierarchy of scene objects in virtual 3D space that you set up in the configuration file. For example, this scene hierarchy typically defines the position of a camera , and the positions of a set of screens —rectangles of 3D space that represent the real-world display screens or projection surfaces in the virtual world. The positions of these nDisplay scene objects are defined relative to a single root position that is always located at the origin (0,0,0) in virtual space.
When you run a Project with nDisplay enabled, the root of this virtual space is based on the position and rotation of a DisplayClusterRoot Component that is attached to a camera in your Level. Every frame, nDisplay uses the position and rotation of this root component as the starting point for the hierarchy of scene nodes that you set up in your configuration file.
By default, nDisplay creates a DisplayClusterRoot Component at startup and attach it to the default camera. The effect is that all devices and projectors in the whole nDisplay cluster automatically render the scene from the point of view of the active camera.
Blueprint API
You can control the behavior of the nDisplay system in your game's runtime logic using its Blueprint APIs.
To get to the functions exposed in these APIs:
-
For most nDisplay Blueprint functions related to cluster management, querying input devices, nDisplay rendering, and more, create a new N Display > DisplayCluster Module API node in your Blueprint.
-
Drag from the Out API pin of your node, and look under the Display Cluster category:
![bp_apis.png]()
Click for full image.

Extending nDisplay
nDisplay offers many features out of the box for controlling real-time, synchronized rendering across multiple computers and output devices. However, there are a wide variety of projection systems and display surfaces, and you may need to extend the nDisplay rendering system to support your own choice of technologies. If you are comfortable programming in C++, and you understand how nDisplay works in typical use cases, you can extend nDisplay to support additional display and calibration technologies by building on top of its extendable rendering API.
The nDisplay API breaks the rendering pipeline into a few major concepts:
-
The DisplayClusterRenderingDevice , which is essentially an extension of the native
IStereoRenderingInterface. -
The DisplayClusterPostProcess is a group of six callbacks that you can use to apply post-processing to specific viewports.
-
The DisplayClusterProjectionPolicy is responsible for custom projection methods, such as supporting Scalable Display or MPCDI to render to curved surfaces, or doing a simple planar projection.
-
The DisplayClusterRenderSyncPolicy is used for a variety of synchronization methods, like nvSwapLock , vSync or custom skip-frame sync for 24hz displays.
By creating your own specializations of the elements described above, you can customize the images produced by the nDisplay system to suit whatever projection or display technologies you work with, while still getting all the key benefits of the nDisplay clustering system, all without needing to modify the shipped Unreal Engine source code.
For a working model of how to set up implementations of these elements, see the source code for the
PicpProjection
and
PicpMPCDI
modules. You'll find these modules in the Unreal Engine source code, under
Engine/Plugins/Runtime/nDisplay/Source
.
You can provide your own custom key-value pairs to your nDisplay cluster. You can include as many parameters and values as you need in the Custom Parameters field located in the Config Asset's Details panel. You can then retrieve these configuration values at runtime from the nDisplay Blueprint or C++ APIs.
To add Custom Parameters:
-
In the 3D Config Editor , select self in the Components panel to open its Details panel.
-
In the Details panel, expand the Configuration section and add elements to the Custom Parameters field.
![Adding Custom Parameters to your nDisplay cluster]()

Supported Operating Systems
Windows
All nDisplay tools and features are fully functional on Windows 10, 8.1, 8, and 7.
Linux
nDisplay and its tools ecosystem now includes preliminary Linux support. This will benefit users running UE under various flavors of Linux distros, especially those in training and simulation, in a clustered setup environment.
Known Limitations on Linux
-
Custom Sync policies will exhibit some limitations due to existing graphics card drivers support.
-
Some Projection policies relying on other vendors will have to be validated.
-
Some rendering features, for example ray tracing, are not supported at the moment.