Choose your operating system:
Windows
macOS
Linux
Synchronization across multiple nDisplay cluster nodes (PCs) is essential to avoid tearing between LED seams and to ensure the camera does not capture different rendered frames presented on the LED wall. This page describes how to set up synchronization in nDisplay with NVIDIA GPUs. Refer to Synchronization in nDisplay for more details on how synchronization works in nDisplay.
At present, obtaining correct synchronization across nDisplay nodes can require some troubleshooting. We recommend that you spend time preparing your nDisplay cluster nodes with synchronization before a Virtual Production shoot.
Prerequisites
You must have the following set up to complete the steps below.
-
An NVIDIA Quadro Sync II card per nDisplay node.
-
(mGPU setup only) NVIDIA SLI or NVLINK .
-
Compatible Quadro GPUs . Cards must have the same specification for each nDisplay node.
-
Cat-5 or Cat-6 RJ45 cables.
-
Tri-level or Bi-level sync generator.
-
BNC cables.
-
PCs running Windows with identical specifications for each nDisplay node.
-
If your Quadro card only has a DisplayPort output but the LED processor only accepts HDMI input, then you must convert the signal. One way you can convert the signal is with an adapter .
Refer to In-Camera VFX Recommended Hardware for recommendations on hardware to use for your set up.
Step 1 - NVIDIA Drivers
Install the latest drivers from NVIDIA, version R470 or later.
You can find the recommended driver for Virtual Production on NVIDIA's Download Drivers page . Select your card type and OS and set Download Type to Production Branch / Studio to find the recommended driver.
Step 2 - Machine Configuration
Configure the system with daisy-chain connections that uses both genlock and framelock :
-
An external sync source comes into the master sync card via a BNC cable for genlock
-
RJ45 cables daisy chain the remaining sync cards in the remaining nDisplay nodes for framelock.
-
Configure the NVIDIA Control Panel for sync. Specifically, ensure the vertical sync (vsync) global setting is set to Use the 3D application setting . Refer to NVIDIA's Quadro Sync II User Guide for more details on these steps
Once configured, NVIDIA sync should remain in place unless a machine crashes or locks out to the Windows login screen. We recommend monitoring the sync LED indicators on the Quadro Sync II card and with the NVIDIA Control Panel settings to ensure that synchronization is maintained throughout production.
Connect the cables for this setup in such a way so that you can easily restart the nDisplay nodes in the reverse order of the NVIDIA sync daisy chain. Refer to NVIDIA's Quadro Sync II User Guide for more details on these steps.
Step 3 - NVIDIA Mosaic
nDisplay should only output to the primary display, and if more than one video output is necessary configure them as one large desktop with NVIDIA Mosaic.
Every display must be connected and share a common resolution, refresh rate, and color management:
-
Open NVIDIA Control Panel .
-
Navigate to Manage 3D settings :
-
Set Global Presets to Workstation App - Dynamic Streaming .
-
Under Settings , set Power management mode to Prefer maximum performance .
-
-
(mGPU using SLI only) Navigate to SLI and PhysX Configuration , and select Maximize 3D performance .
-
Navigate to View system topology , and click EDID to export and load an EDID on any used output ports to ensure the display information is locked and not queried again.
Alternatively, you can manage EDIDs through an external hardware device such as a matrix or switcher. For more on EDIDs and what they are, refer to the EDIDs section .
-
Navigate to Set up Mosaic , and choose Create new Configuration to open the NVIDIA Mosaic set up window.
-
In the NVIDIA Mosaic set up window on the Select topology tab, select Maximum GPU Topology .
-
On the Select displays tab, match the resolution for each display you have and set the overall refresh rate for the Mosaic.
-
On the Arrange Displays tab, match the position of the displays to what you have and click Apply .
Refer to the NVIDIA Mosaic Technology User Guide for more details on these steps.
Step 4 - NVIDIA Driver Utility
Download NVIDIA's Configure Driver Utility and run the application as an administrator through the Windows command prompt to set a specific configuration on the NVIDIA drivers.
After you launch the executable, type 11 and press Enter on your keyboard to enable the prePresentWait setting and improve performance without compromising sync.
You can verify it is running in the correct mode by enabling option 8, Enable the SwapGroupPresentIndicator for Direct x . This will enable a HUD in the lower left area that will appear when running nDisplay with NVIDIA sync policy, will indicate that prePresentWait is enabled, and also if the swap group has been joined and is not pending.
Step 5 - nDisplay Configured for NVIDIA Synchronization
In order for nDisplay to lock to the synchronization from NVIDIA sync it must run as a fullscreen foreground windows application (windowed should also work if the resolution exactly matches the desktop) because presentation mode needs to be independent flip. This means that no other application window can be in front of the nDisplay instance while it is running.
Follow these steps to set up the nDisplay nodes for NVIDIA synchronization:
-
Open your nDisplay Configuration Asset in the nDisplay Config Editor .
-
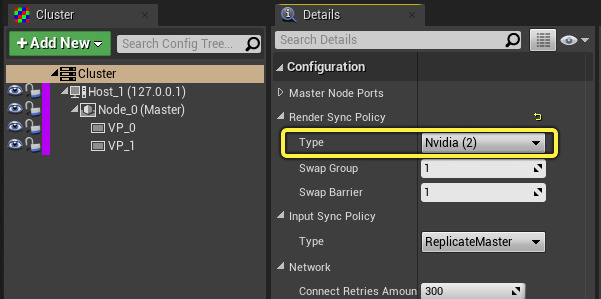
In the Cluster panel, select Cluster to open its Details panel.
-
In the Details panel under Render Sync Policy , set Type to Nvidia (2) .
![Render Sync Policy Type set to NVIDIA (2)]()
-
For each node in your cluster, either enable Fullscreen or set the Window dimensions to be the full desktop resolution. Refer to the Windows Resolution Example for how to set your dimensions.
-
Close the NVIDIA Control Panel if it is open.
-
Close any virtual desktops. Applications like TeamViewer and Zoom use these.
-
Disable desktop notifications and pop ups, such as desktop notifications from the Epic Games Launcher.
-
Set Windows desktop resolution scaling to 100%.
-
Disable the fullscreen optimization for Unreal Engine on each node by using Fix ExeFlags from Switchboard . You can also do this by right-clicking the Unreal Engine executable > Properties > Compatibility > Disable Fullscreen Optimizations .
-
If launching nDisplay on the same PC as Switchboard, enable Minimize Before Launch in the nDisplay section of the Switchboard settings.
Windows Resolution Example
The node's window should cover the entire desktop resolution, but the viewport need only cover the resolution required by the LEDs. This example shows how to set the node's window resolution and your viewport's resolution.
A square 2k section of LED wall is being rendered to from an Ultra HD desktop resolution, where the unused space will remain black:
-
Windows resolution is set to 3840 x 2160
-
Viewport resolution is set to 2048 x 2048
In the nDisplay Configuration Editor, this would be set as:
-
The node's Window parameter: X is 0px, Y is 0px, W is 3840px, and H is 2160px.
-
The viewport's Region parameter: X is 0px, Y is 0px, W is 2048 px, and H is 2048px.


Step 6 - EDID
Extended Display Identification Data (EDID) is a standard format for display devices defined by the Video Electronics Standards Association (VESA). EDIDs contain metadata about the display device for video sources.
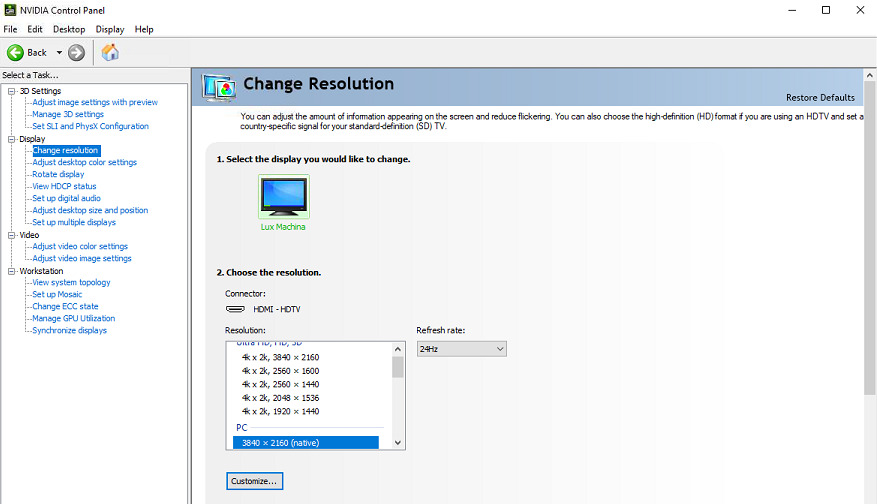
Once you have everything setup in the NVIDIA Control Panel, it is useful to export the current EDID and then load it from a file to ensure display information is locked and not queried again if a display signal is lost. You may also prefer to manage the EDID through an external hardware device such as a matrix or switcher. Refer to NVIDIA's Managing a Display EDID on windows for more details on these steps.
Incorrectly configured EDIDs can halve the performance of nDisplay when using render sync policy 2. To avoid this, there are two options:
-
Ensure you have an EDID which allows you to select a PC resolution at the frequency you wish to shoot at and is marked as (native) .
-
Create a custom resolution based on the standard 3840 x 2160 60hz PC resolution and then set it to the appropriate frequency.

Step 7 - Validating Sync and Troubleshooting
Refer to Synchronization Testing for how to verify whether you have obtained a successful sync in nDisplay.
Pay attention to Switchboard as this shows the NVIDIA driver and sync status of the nDisplay nodes. For successful sync, the PresentMode column in Switchboard should indicate that each node is in Hardware Composed: Independent Flip . If a node reports Composed: Flip , then check that nothing is in front of nDisplay on the node (including Windows Taskbar or Switchboard Listener).
If you are still not able to obtain successful sync, you may want to swap the GPU and Quadro Sync cards in the nDisplay cluster nodes, or consider whether there is a hardware fault.
