Choose your operating system:
Windows
macOS
Linux
OpenColorIO , or OCIO, is a color management system used primarily in film and virtual production. OCIO guarantees that the colors of captured video remain consistent through the entire film pipeline. This pipeline includes from initial camera capture, through all the compositing applications that need to work with the captured media, all the way to the final render.
Unreal Engine (UE) offers built-in support for using OCIO to convert the colors of linear media in several ways:
-
When you use media sources like captured clips or live feeds in your Project, you can apply color conversion to make those media sources match your computer-generated elements in UE.
-
While you're working in Unreal Editor, you can apply color conversions to your Viewport. This is helpful so that the reference frames you see as you're working in the Editor will be consistent with your chosen color space.
-
You can re-apply another color conversion to the composited feed you output from Composure. This helps make your CG elements and live frames blend more convincingly, while preserving the colors of the original shots faithfully.
-
Finally, when you export a video through the Movie Render Queue, you can choose to apply a color space transformation to your output video.
All of these uses of OCIO rely on a new kind of Asset, called an OpenColor Configuration Asset, which you'll use to manage the color profiles that you want to work with. When you're ready to get started, follow the instructions under Setting up OCIO below.
Setting up OCIO
In this procedure, you'll enable the OpenColorIO Plugin in UE and create an OpenColor Configuration Asset from your OCIO configuration file.
Prerequisite: You'll need an OCIO configuration file for this step. This file contains detailed specifications about multiple color profiles, and how to transform between them. If you're already using OCIO in your production, you may have already set up a config file with the color profiles you need. If not, you can download example files here .
Steps
-
Put your OCIO config file anywhere in your Project's
Contentfolder.UE may display a warning (For example, that it does not recognize the .ocio file extension) when copying your config file directly into the Content folder. If this happens, just copy your OCIO config file into your Project's Content folder in Windows Explorer.
-
From the main menu in the Unreal Editor, select Edit > Plugins .
![OCIO_EditPlugins.png]()
-
In the Plugins window, find the OpenColorIO plugin and click Enable .
![OCIO_PluginSearchOpen.png]()
Depending on your version of UE, the OpenColorIO Plugin may be enabled by default.
-
When prompted, click Yes .
![OCIO_PluginBetaOptIn.png]()
-
Click Restart Now to close the Editor and restart with your new Plugin activated.
![OCIO_PluginReset_RAW.PNG]()
-
Back in the Editor, navigate in the Content Browser to the folder where you want to create your configuration Asset. Right-click in the Content Browser and select Miscellaneous > Open Color IO Configuration .
![OCIO_CreateConfigFile_RAW.PNG]()
-
Rename your new Asset with a descriptive name for the configuration file you want to use.
![OCIO_NamedAsset_RAW.PNG]()
-
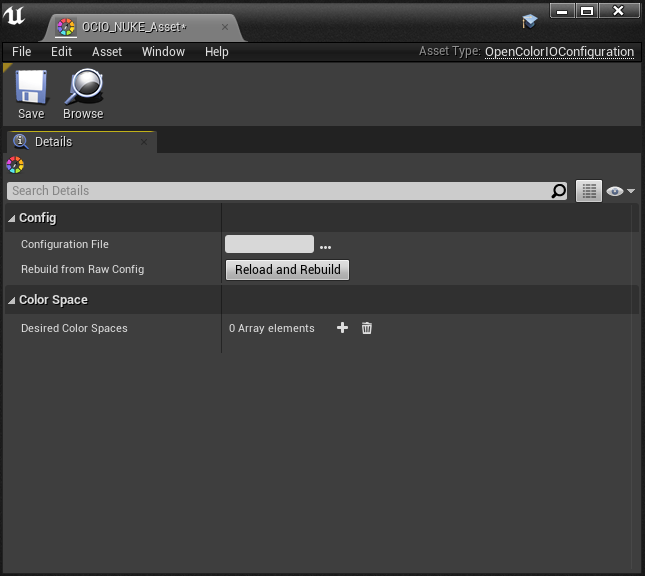
Double-click your new Asset to edit its settings.
![OCIO_EditAsset_RAW.PNG]()
Click image for full size.
-
In the Configuration File setting, click the button to browse to and select the OCIO configuration file that you placed in your Project's Content folder.
![OCIO_PointAssetToConfig.png]()
Click image for full size.
-
In the Desired Color Spaces setting, click the Add (+) button to add a new entry to the list.
![OCIO_AddColorSpaceToAsset.png]()
-
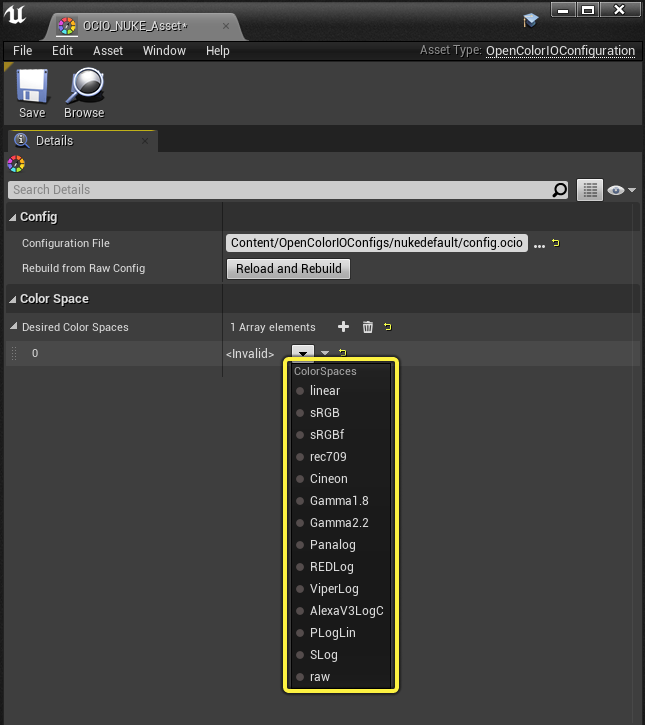
In the new entry, open the drop-down list and select one of the color spaces defined in this config that you want to use in UE.
![OCIO_SelectColorSpace.png]()
Click image for full size.
-
Repeat the last two steps for each color profile that you want to use, then Save your Asset.
![OCIO_SaveOCIOAsset_RAW.png]()
Only set up the color profiles that you actually need to use in UE. This helps your configuration Asset remain as lightweight as possible.


End Result
Now that you have the OCIO Plugin enabled and your configuration Asset created, you're ready to convert colors in the Viewport, in Composure, in Blueprint, or in the Movie Render Queue. See the following sections for details.
Converting a Media Element in Composure
This procedure shows how to create a new Transform Pass for a Composure Element, and set up that Transform Pass to convert the color space of the element's media source from one color profile to another.
Prerequisite: You need to have a Composure Element already set up with a valid Media Source, such as a video file or live SDI feed. For more on that, check out the Real-Time Compositing Quick Start page.
Steps
-
Select your Composure Element, and add a new TransformPass for your Composure Element. In its Transform/Compositing Passes setting, click the Add (+) button to add a new pass to the end of the list.
![OCIO_AddTransformPass.png]()
-
In the settings for your new Transform Pass, select Compositing Open Color IOPass from the drop-down list.
![OCIO_SelectTransformPassType.png]()
-
Expand the settings for your Transform Pass, then expand its Color Conversion Settings .
![OCIO_ExpandConversionSettings.png]()
-
Set the Configuration Source setting to point to the OCIO Configuration Asset you created from your OCIO config file.
![OCIO_ColorConversionSelectOCIO.png]()
-
Set the Source Color Space setting to the color profile you want to convert from. This is typically the color space that the media source was originally captured in.
![OCIO_SetSourceColorSpace.png]()
-
Set the Destination color Space setting to the color profile you want to convert to. You'll typically use Linear here to make your media match the linear color space in the UE.
![OCIO_SetDestinationSolorSpace.png]()


End Result
As soon as you set up the source and destination color spaces for your Transform Pass, you should immediately see the colors in your Media Source change in the Composure Element's preview, and in the Level Viewport.
Converting the Media Output in Composure
In this process, you'll set up an output from Composure with a new Color Correction pass that converts the colors of the composited media from one OCIO color profile to another.
Prerequisite: You should have Composure already set up with an output.
Steps
-
In the World Outliner select the Compositing Element.
![OCIO_SelectLayerElement_RAW.PNG]()
-
In the Details section, expand the Output category under Composure.
![OCIO_ExpandOutput.png]()
-
Next to Outputs, click the Add (+) button to add a new Element.
![OCIO_NewOutput.png]()
-
Expand the new Element and next to Capture Output expand the dropdown to select the desired Output.
![OCIO_SelectOutput.png]()
At this point you may want to click Preview next to your new Output Element. This will open a preview window, allowing you to preview your Output before saving it.
![OCIO_OpenPreview.png]()
-
Expand Color Conversion, and select Compositing Open Color IOPass from the dropdown.
![OCIO_SelectColorConversion.png]()
-
Expand the Color Conversion Settings, then in the Configuration Source dropdown select your OCIO Asset.
![OCIO_SelectOCIOAssetinOutput.png]()
-
Set the Source Color Space setting to the color profile you want to convert from. You'll typically use Linear here to make your media match the linear color space in UE.
![OCIO_OutputSelectSourceColorSpace.png]()
-
Set the Destination color Space setting to the color profile you want to convert to. This will typically be set to match the monitor that is used to display the result, or another destination color space that you want.
![OCIO_OutputSelectDestinationColorSpace.png]()


Converting Colors in Blueprints
You don't have to convert colors only in Composure: you can use a Blueprint node to convert the colors in any input texture -- including a MediaTexture that plays back a video source -- and get the converted results in a RenderTarget.
Steps
-
Create a new Blueprint Class within your Content Browser.
![OCIO_NewBlueprintClass_RAW.PNG]()
-
Expand the All Classes menu, and use the search bar to locate and select the EditorUtilityActor Actor Class.
![OCIO_BlueprintClassSelection.png]()
For this process, you can use any BP Actor that ticks. We've just decided to use EditorUtilityActor for this example.
-
Rename your new Blueprint Class accordingly.
![OCIO_BlueprintRename_RAW.png]()
-
Double-click your Blueprint Class to open it, and then navigate to the Event Graph.
![OCIO_BlueprintOpenEventGraph.png]()
Click image for full size.
-
Under My Blueprint, navigate to Variables > Components.
![OCIO_MyBlueprintVariables_RAW.PNG]()
-
Click the + Variable button next to Variables to create a new Variable, and rename it to InputTexture.
![OCIO_RenameVariableInputTexture.png]()
-
Once renamed, click the "eye" button to the right of your new Variable to make it visible in all spaces.
![OCIO_InputTexture_MakePublic.png]()
-
In the Details panel, set the Variable Type for your new Variable to Object Types > Texture > Object Reference.
![OCIO_ChangeVariableType.png]()
-
Create two more Variables, OutputTexture (with the Variable Type: Texture Render Target 2D > Object Reference ) and ColorConversionSettings (with the Variable Type: Open Color IOColor Conversion Settings ). After creating them, make sure to mark them as Public (Click the "eye" icon). Once done, your Variables list should look like this:
![OCIO_VariablesRecap.png]()
-
Drag the InputTexture Variable into the Event Graph, and choose Get InputTexture (this will create a new InputTexture node).
![OCIO_GetInputTexture.png]()
-
Repeat the process for the OutputTexture and ColorConversionSettings nodes. Your Event Graph should look like this:
![OCIO_VariablesInEventGraph_RAW.PNG]()
-
Right-click within the Event Graph, and add a new Apply Color Space Transform node.
![OCIO_AddApplyColorSpaceNode_RAW.PNG]()
-
Connect the output pin from the pre-supplied Event Tick node to the input pin of the Apply Color Space Transform node.
![OCIO_ConnectEventTickToApplyColor_RAW.png]()
-
Connect the Input Texture node to the Input Texture pin on the Apply Color Space Transform node. Connect the Output Texture node to the Output Render Target pin. Finally, connect the Color Conversion Settings node to the Conversion Settings pin. When you're done, your event graph should look like this:
![OCIO_ConnectedNodesRecap_RAW.png]()
-
Compile and save the Blueprint.
-
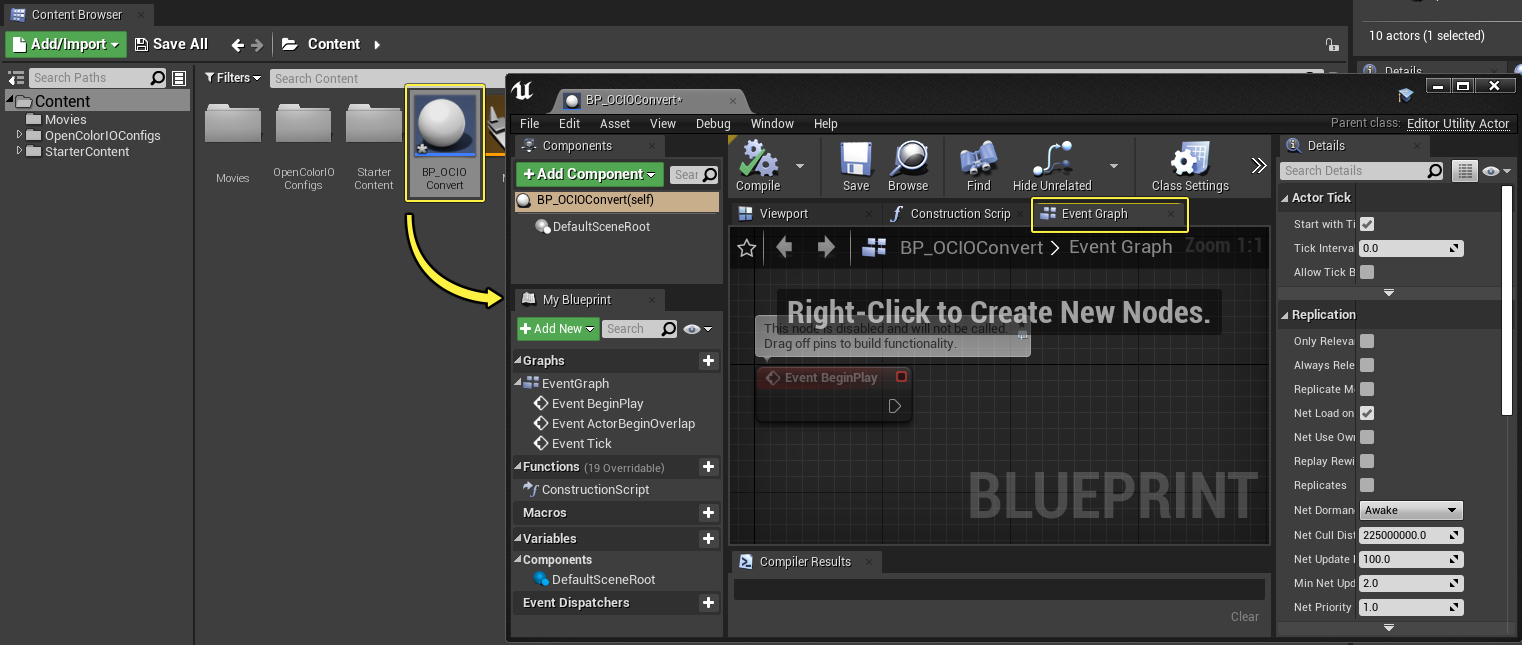
Once back in the main Editor view, drag your Blueprint Class Asset into your level.
![OCIO_DragBPIntoWorld.png]()
Click image for full size.
-
Select your Blueprint Class Asset in the World Outliner. In the Details panel, expand the Default section, and select your desired input file from the Input Texture dropdown.
![OCIO_SelectInputTexture.png]()
-
Create a new Render Target Asset within the Content Browser.
![OCIO_NewRenderTarget_RAW.PNG]()
-
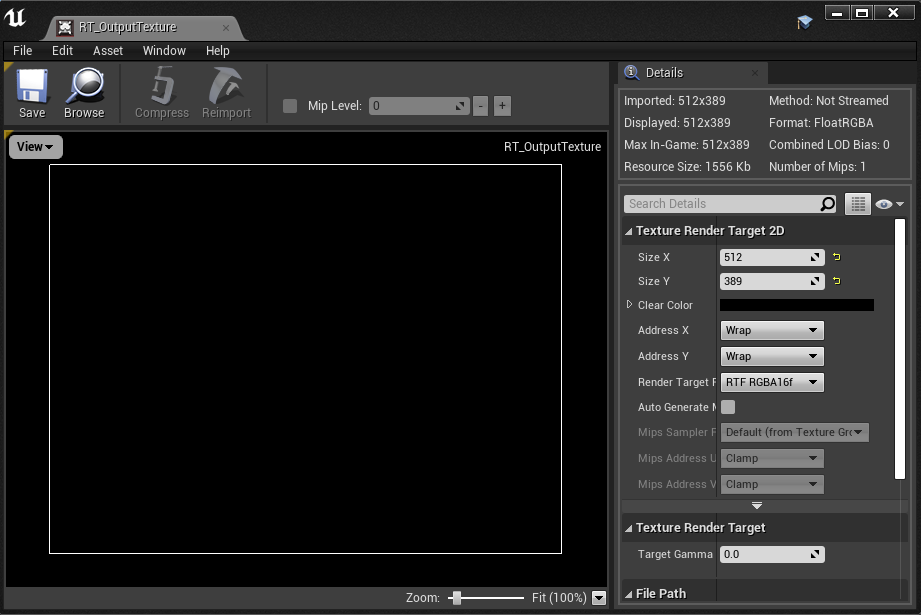
Open your new Render Target Asset, and using the Size X and Size Y sliders under Texture Render Target 2D, resize your Asset accordingly (here we've gone with 512 x 389). Save and close the Asset.
![OCIO_ResizeRenderTarget_RAW.PNG]()
Click image for full size.
-
Apply your new Render Texture Asset to the Output Texture field of your Blueprint Class Asset. You can either do this by using the Use Selected Asset from Content Browser button, or selecting it from the dropdown.
![OCIO_SelectingOutputTexture.png]()
-
Then in the Details panel, expand the Color Conversion Settings section. Select your OCIO Configuration File from the dropdown next to Configuration Source.
![OCIO_SelectingOCIOConfig.png]()
-
Adjust the Source Color Space and Destination Color Space to match your desired outcome.
![OCIO_SetColorSpaceAndDestinationColor.png]()
-
From there you can drag your Render Target Asset into your Level, and apply it to an Actor (such as a Plane) to preview your media. You can continue to adjust the Source Color Space and Destination Color Space settings to preview different outputs.


Converting Colors in the Viewport
By enabling the OCIO plugin, you gain the ability to apply OCIO configurations directly within the Viewport. After enabling the plugin, you'll notice a new Color Management section under the Viewport View Modes.

After expanding the OCIO Display section, you'll notice there are four settings that you can adjust.
|
Setting Name |
Purpose |
|---|---|
|
Enable Display |
Toggles display color conversion. |
|
Select an OCIO Asset |
Select the asset UE will use to fetch color spaces. |
|
Invalid (Source color profile) |
Color profile you wish to convert from. |
|
Invalid (Output color profile) |
Color profile you wish to convert to. |
Once you've adjusted these settings, the Viewport will disable Tone Curve and insert color conversion into the post processing stage of rendering. It does this right after UE applies the Tone map but before everything else.
OCIO with nDisplay
This page provides an overview of OCIO and how to apply OCIO profiles to the Editor. You can also apply OCIO profiles to nDisplay renders for either the entire cluster or individual cluster nodes. This can be useful for managing the color spaces of specific displays. For more information on using OCIO with nDisplay, see Color Management in nDisplay .
Using OCIO within the Movie Render Queue
The Movie Render Queue (MRQ) is a powerful tool for creating quality renders that can be viewed offline. With such a focus on high-quality visuals, it's only natural that you may want to use OCIO configurations to ensure consistency with your MRQ projects.
For more on the MRQ, check out our How to Use the Movie Render Queue for High-Quality Renders document.
You can allow OCIO functionality from within the MRQ, by expanding the Settings menu and selecting Color Output.
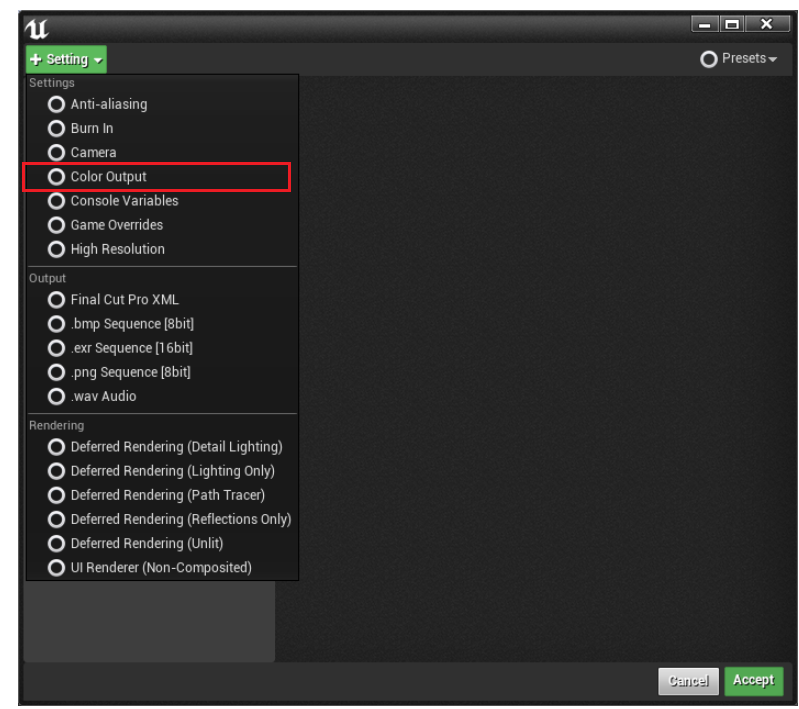
Click image for full size.
After adjusting the rendering settings, you will be able to adjust the color output.
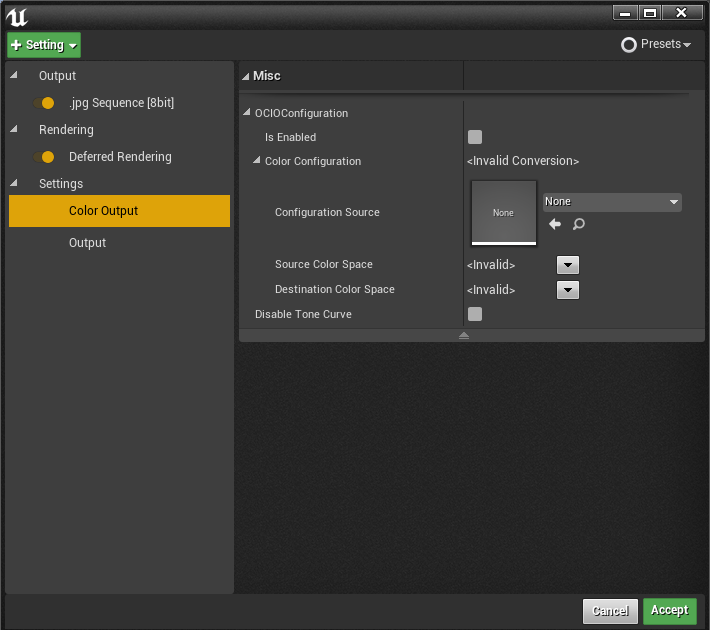
Click image for full size.
After enabling OCIO Configurations, you can adjust the settings to suit your needs. Reference the table below for more information on OCIO settings within the MRQ.
|
Setting Name |
Purpose |
|---|---|
|
IsEnabled |
Enables OCIO Color conversion. Tone Curve will be disabled and the option below will be grayed out. |
|
Configuration Source |
OCIO Config Miscellaneous Blueprint created via the content browser. |
|
Source Color Space |
Color profile you wish to convert from. |
|
Destination Color Space |
Color profile you wish to convert to. |