Choose your operating system:
Windows
macOS
Linux
このチュートリアルでは、レベルに オーバーラップ ボリューム と カメラ アクタ を作成するために「 静的カメラを使用する 」ガイドで作成したロジックを拡張し、プレイヤー キャラクターを各ボリュームにナビゲートさせてカメラ ビューの切り替えを行います。
オーバーラップ ボリュームを変更する
新しいカメラ トランジション機能に対応するために、以前の オーバーラップ ボリューム ロジックを少し調整する必要があります。
実装方法を選んでください。
C++
-
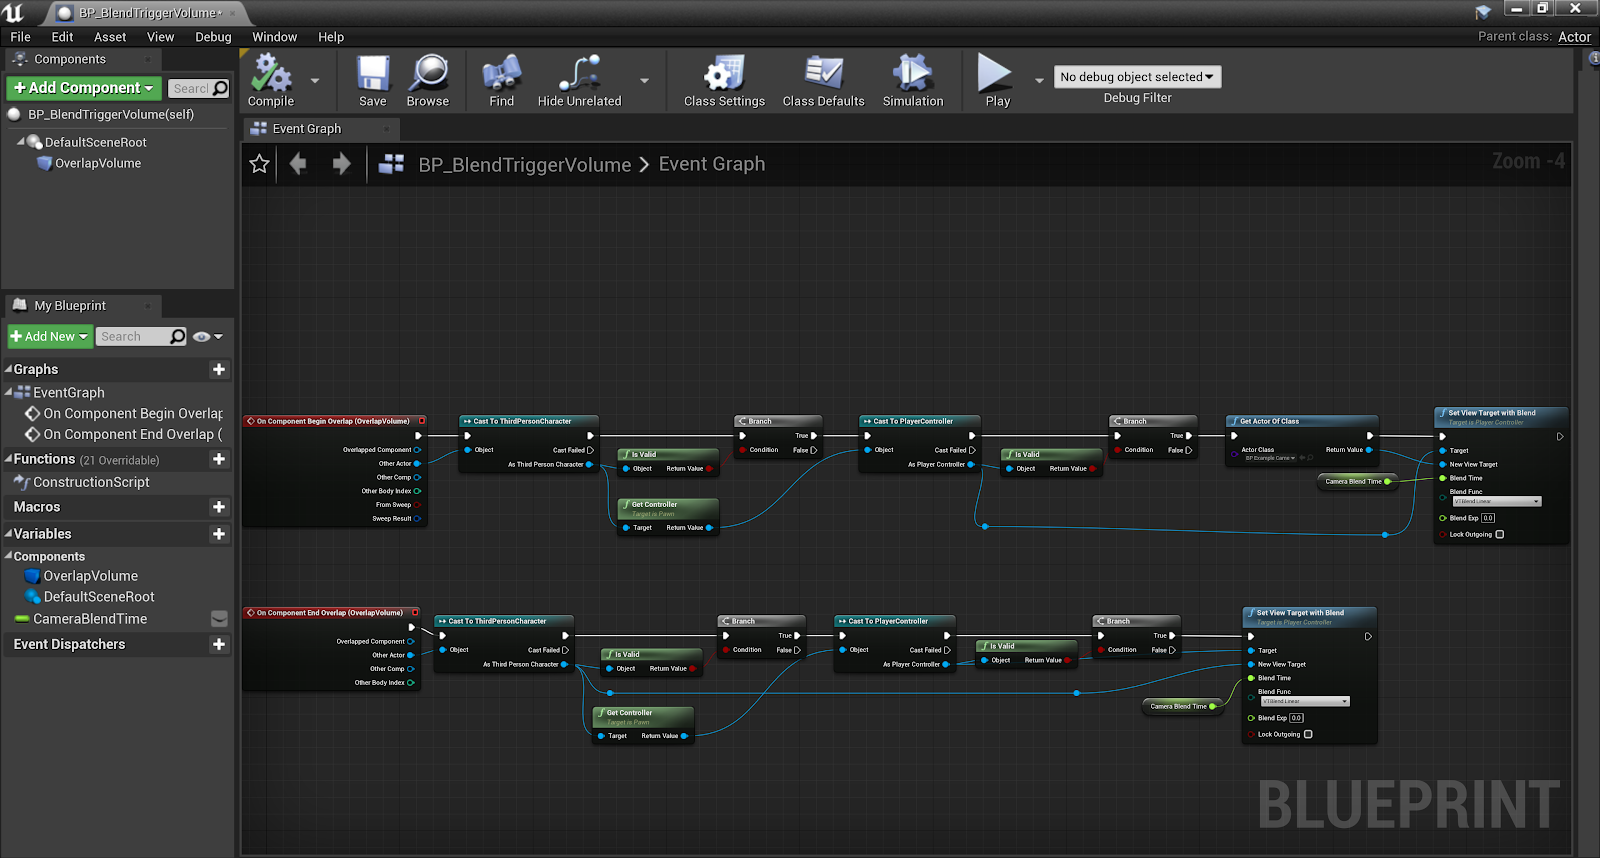
コンテンツ ブラウザで BP_BlendTriggerVolume をダブルクリックして Class Defaults を開きます。
![BlendTriggerVolume Blueprint]()
画像をクリックして拡大表示。
-
[My Blueprint] タブの Variables カテゴリで + 記号をクリックして新しい変数を作成します。新しく作成した変数に「 CameraToFind 」と名前を付けて CameraActor に指定して [Compile (コンパイル)] をクリックします。
![CameraToFind variable]()
-
CameraToFind 変数の横にある 目 のアイコンをクリックして、可視性をパブリックにします。こうすることでブループリントの各インスタンスに対してこの変数を編集できるようになります。
![Eye icon to set the variable as public]()
-
イベント グラフ に移動し、 On Overlap Begin イベント ロジックから Get Actor Of Class ノードを削除します。
![Delete Get Actor Of Class node]()
画像をクリックして拡大表示。
-
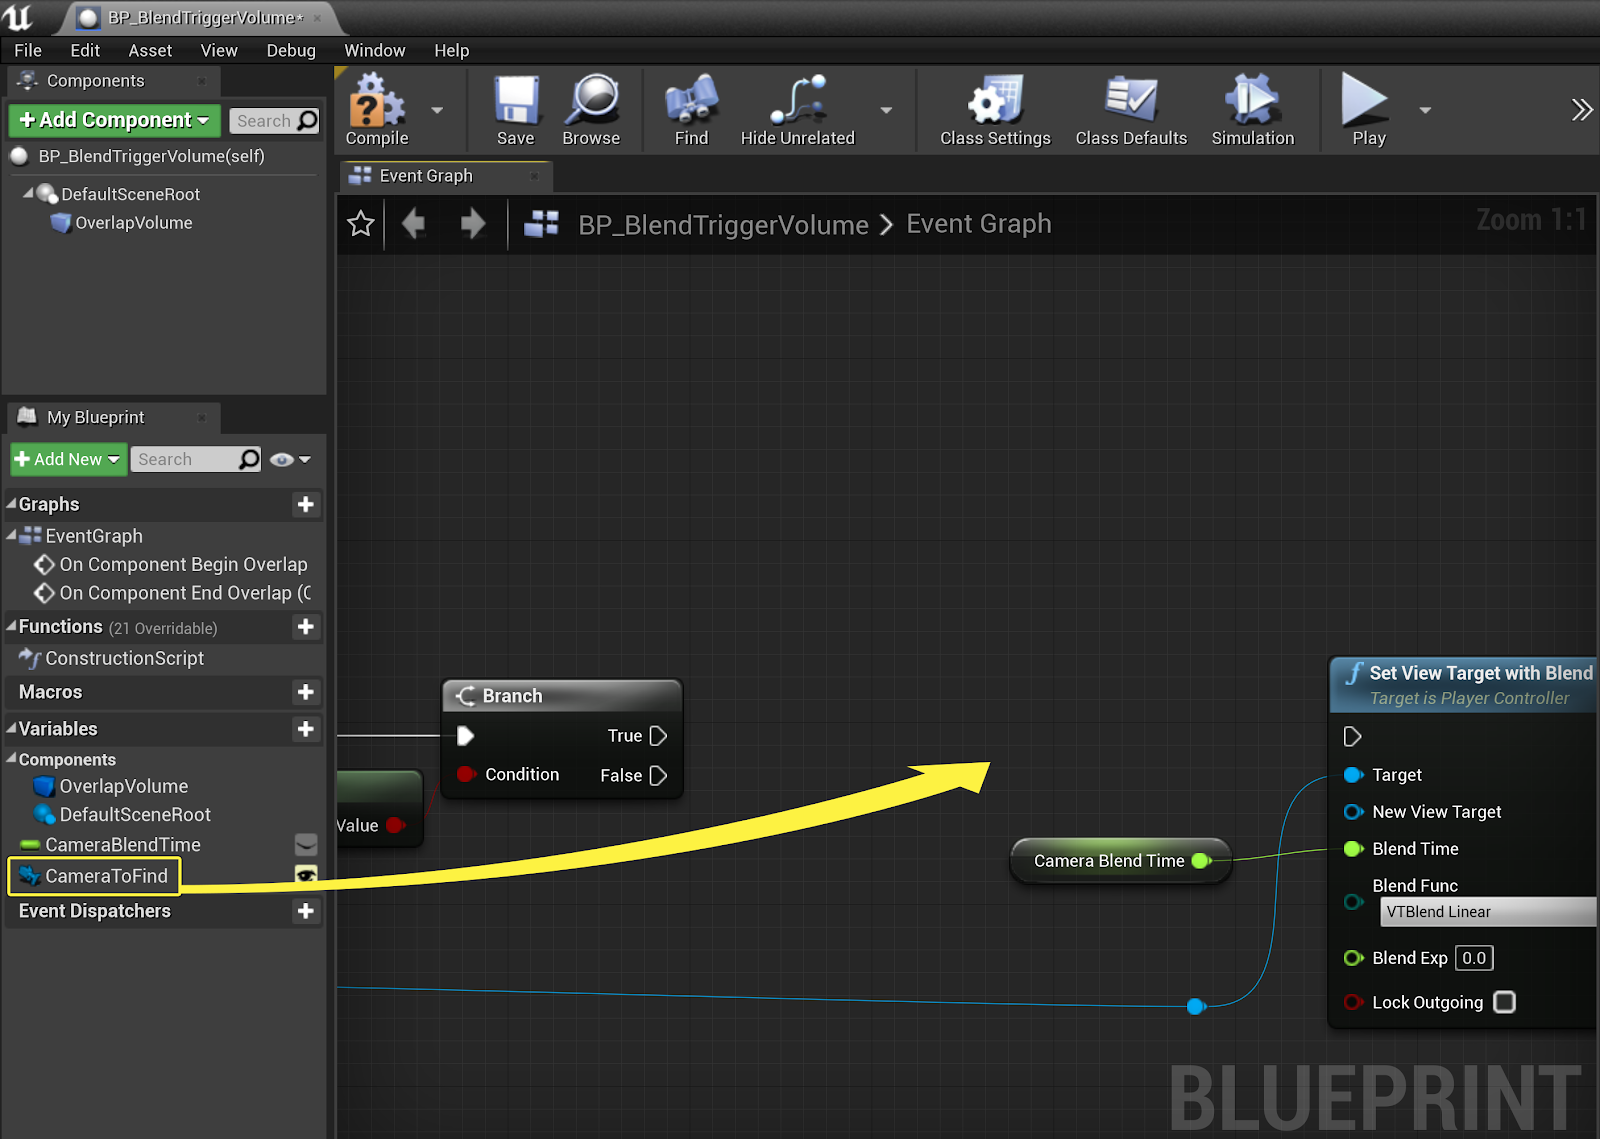
[My Blueprint] タブから CameraToFind 変数のコピーをクリックして イベント グラフ にドラッグします。
![Add variable to Event Graph]()
画像をクリックして拡大表示。
-
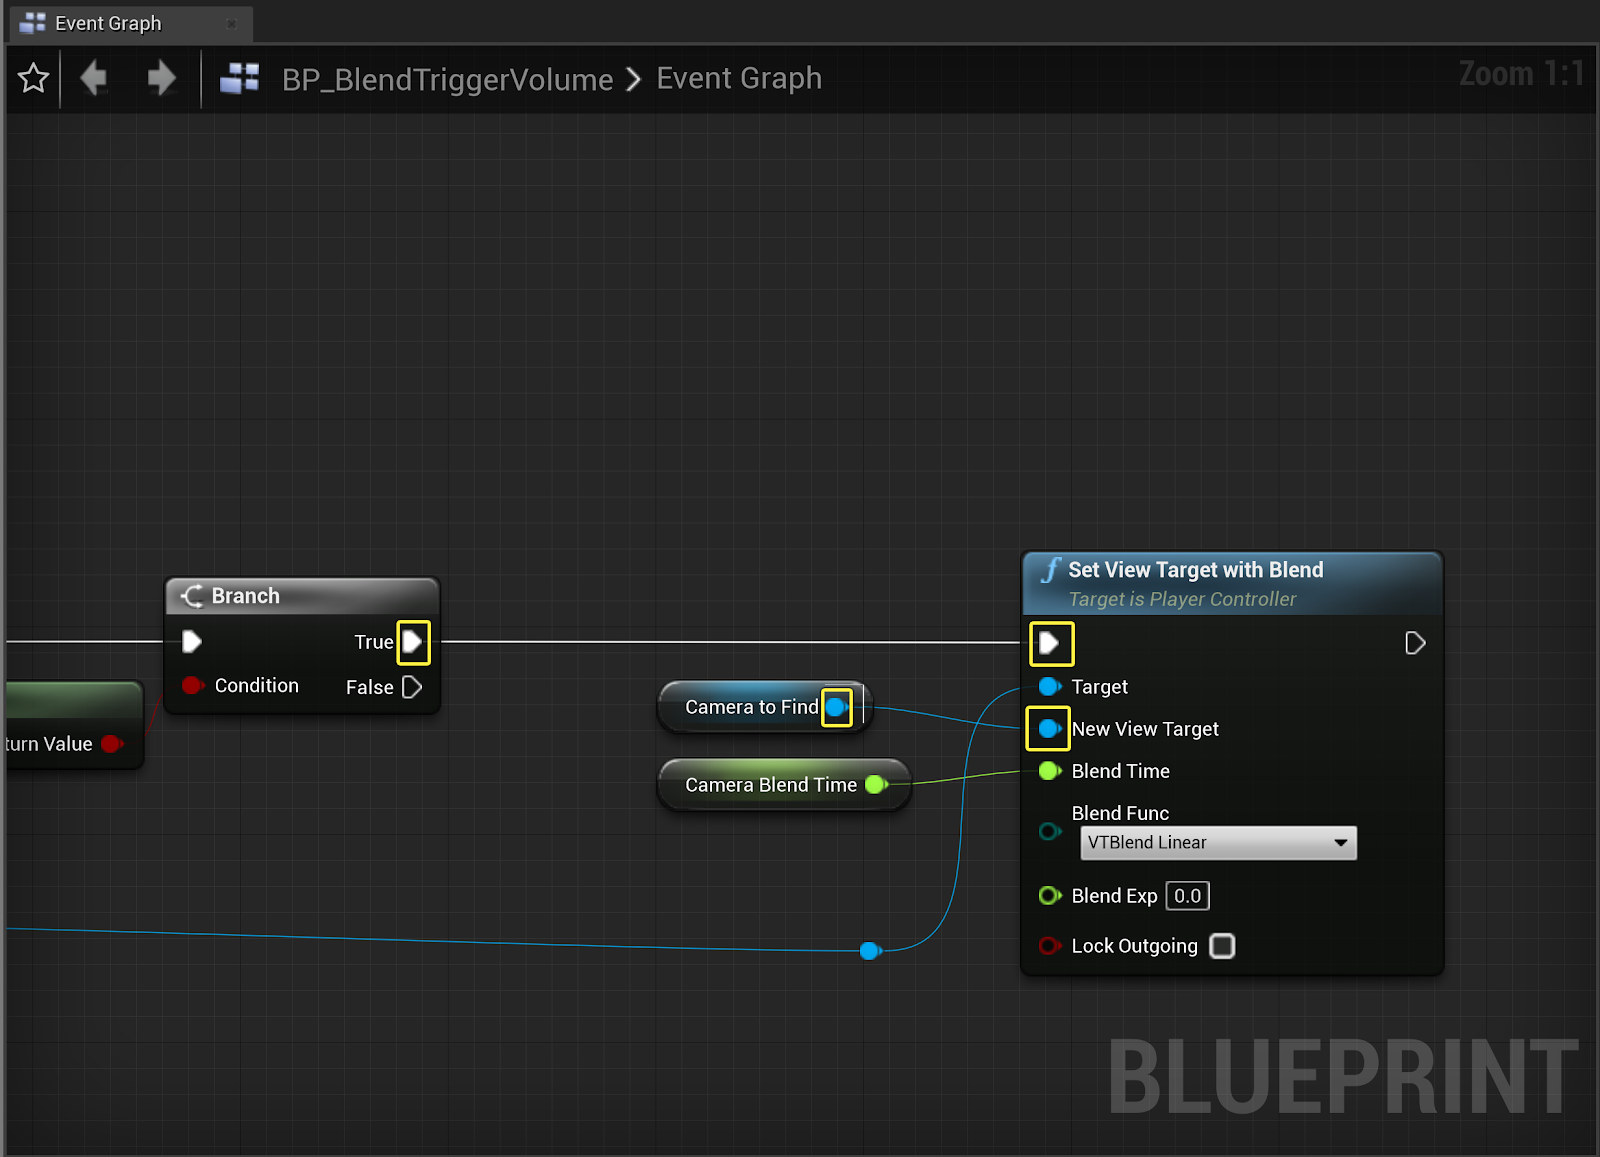
出力ピン を Set View Target with Blend ノードの新しいビュー ターゲットの入力ピンに接続します。 If Branch ノードの True 実行ピンを引き出して Set View Target with Blend ノードに接続します。
![Connect pins]()
画像をクリックして拡大表示。
-
コンパイルして保存します。


完成したブループリント
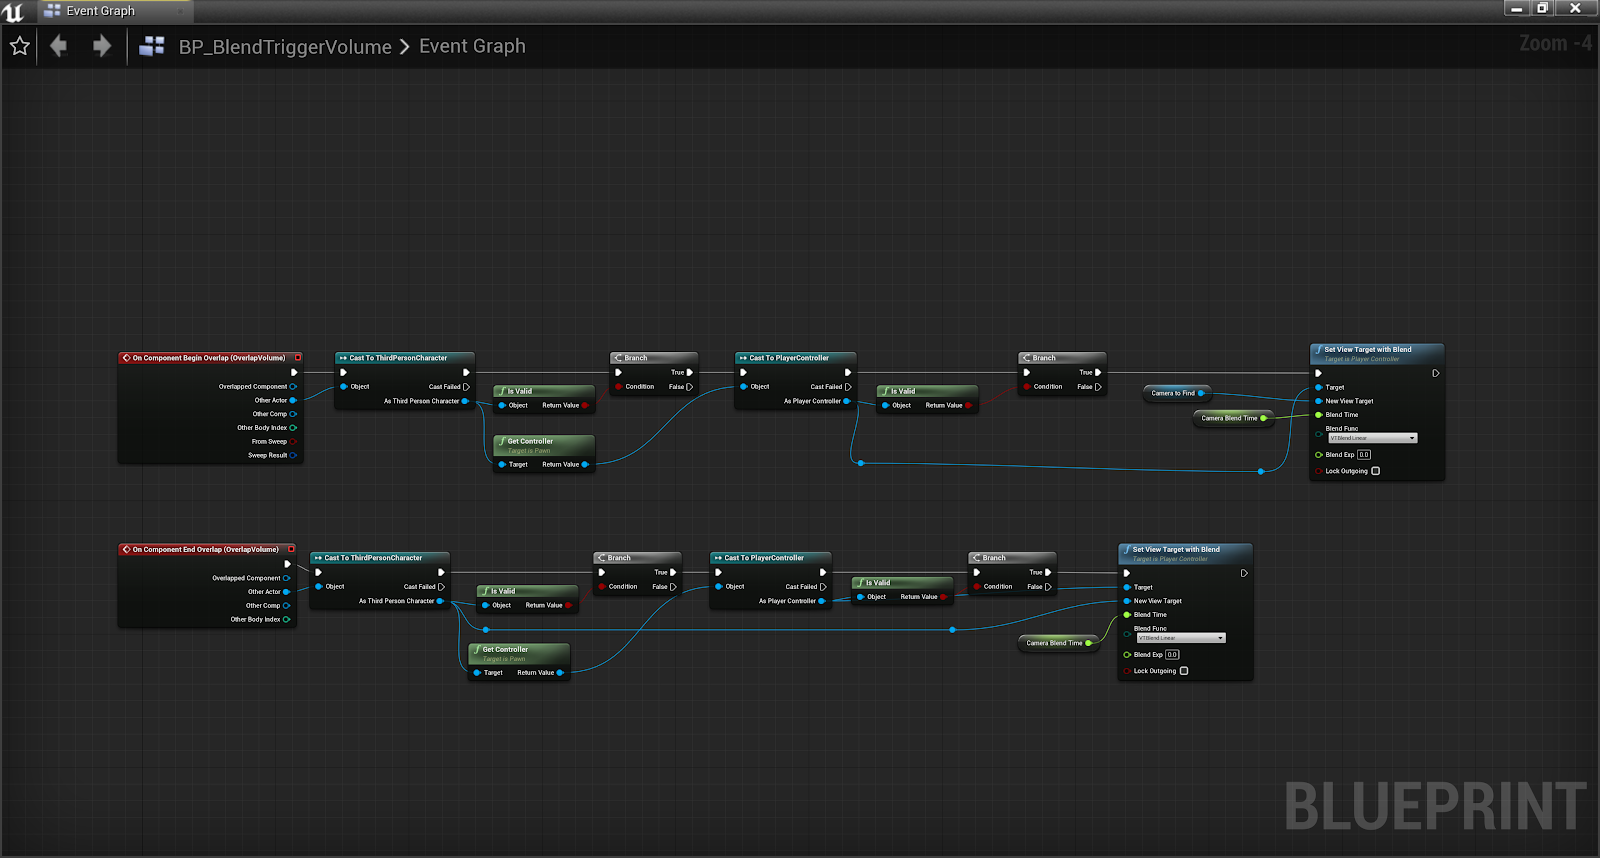
画像をクリックして拡大表示。
-
コンテンツ ブラウザで C++ クラス フォルダへナビゲートし、
BlendTriggerVolume.hクラス デフォルトを開きます。![C++ Classes in the Content Browswer]()
-
クラス デフォルトで、既存の TSubClassOfAActor 宣言を削除し以下で置き換えます。
protected: UPROPERTY(EditAnywhere, BlueprintReadWrite) ACameraActor* CameraToFind; -
次に「
BlendTriggerVolume.cpp」ファイルへナビゲートし、コンストラクタ ABlendTriggerVolume::ABlendTriggerVolume で以下を宣言します。// Sets default values ABlendTriggerVolume::ABlendTriggerVolume() { // Set this actor to call Tick() every frame.You can turn this off to improve performance if you don't need it. PrimaryActorTick.bCanEverTick = true; OverlapVolume = CreateDefaultSubobject<UBoxComponent>(TEXT("CameraProximityVolume")); OverlapVolume->SetupAttachment(RootComponent); CameraToFind = CreateDefaultSubobject<ACameraActor>(TEXT("CameraToFind")); } -
ABlendTriggerVolume::NotifyActorBeginOverlap メソッドで、コードの次の行を削除します。
//Array to contain found Camera Actors TArray<AActor*> FoundActors; //Utility function to populate array with all Camera Actors in the level UGameplayStatics::GetAllActorsOfClass(GetWorld(), CameraToFind, FoundActors); //Sets Player Controller view to the first CameraActor found PlayerCharacterController->SetViewTargetWithBlend(FoundActors[0], CameraBlendTime, EViewTargetBlendFunction::VTBlend_Linear);削除したコードを以下で置き換えます。
//Sets Player Controller view to the CameraActorToFind variable. PlayerCharacterController->SetViewTargetWithBlend(CameraToFind, CameraBlendTime, EViewTargetBlendFunction::VTBlend_Linear); } } }上記の宣言では、プレイヤー キャラクターがボリュームと重なると、クラスのコンストラクタでインスタンス化された カメラアクタ 変数にトランジションするようにロジックを置き換えました。

完成コード
BlendTriggerVolume.h
//Copyright 1998-2021 Epic Games, Inc.無断複写・転載を禁じます。
pragma once
#include "CoreMinimal.h"
#include "GameFramework/Actor.h"
#include "BlendTriggerVolume.generated.h"
UCLASS()
class STATICCAMERAS_API ABlendTriggerVolume : public AActor
{
GENERATED_BODY()
public:
// Sets default values for this actor's properties
ABlendTriggerVolume();
protected:
// Called when the game starts or when spawned
virtual void BeginPlay() override;
UPROPERTY(EditAnywhere, BlueprintReadWrite)
class UBoxComponent* OverlapVolume;
UPROPERTY(EditAnywhere, BlueprintReadWrite)
ACameraActor* CameraToFind;
UPROPERTY(EditDefaultsOnly, meta =(ClampMin = 0.0f))
float CameraBlendTime;
virtual void NotifyActorBeginOverlap(AActor* OtherActor);
virtual void NotifyActorEndOverlap(AActor* OtherActor);
public:
// Called every frame
virtual void Tick(float DeltaTime) override;
};BlendTriggerVolume.cpp
//Copyright 1998-2021 Epic Games, Inc.無断複写・転載を禁じます。
#include "BlendTriggerVolume.h"
#include "Components/BoxComponent.h"
#include "StaticCamerasCharacter.h"
#include "Camera/CameraActor.h"
#include "Runtime/Engine/Classes/Kismet/GameplayStatics.h"
// Sets default values
ABlendTriggerVolume::ABlendTriggerVolume()
{
     // Set this actor to call Tick() every frame.You can turn this off to improve performance if you don't need it.
    PrimaryActorTick.bCanEverTick = true;

    OverlapVolume = CreateDefaultSubobject<UBoxComponent>(TEXT("CameraProximityVolume"));
    OverlapVolume->SetupAttachment(RootComponent);

    CameraToFind = CreateDefaultSubobject<ACameraActor>(TEXT("CameraToFind"));
}
// Called when the game starts or when spawned
void ABlendTriggerVolume::BeginPlay()
{
Super::BeginPlay();
}
void ABlendTriggerVolume::NotifyActorBeginOverlap(AActor* OtherActor)
{
if (AStaticCamerasCharacter* PlayerCharacterCheck = Cast<AStaticCamerasCharacter>(OtherActor))
{
if (APlayerController* PlayerCharacterController = Cast<APlayerController>(PlayerCharacterCheck->GetController()))
{
PlayerCharacterController->SetViewTargetWithBlend(CameraToFind, CameraBlendTime, EViewTargetBlendFunction::VTBlend_Linear);
}
}
}
void ABlendTriggerVolume::NotifyActorEndOverlap(AActor* OtherActor)
{
if (AStaticCamerasCharacter* PlayerCharacterCheck = Cast<AStaticCamerasCharacter>(OtherActor))
{
if (APlayerController* PlayerCharacterController = Cast<APlayerController>(PlayerCharacterCheck->GetController()))
{
PlayerCharacterController->SetViewTargetWithBlend(PlayerCharacterController->GetPawn(), CameraBlendTime, EViewTargetBlendFunction::VTBlend_Linear);
}
}
}
// Called every frame
void ABlendTriggerVolume::Tick(float DeltaTime)
{
Super::Tick(DeltaTime);
}レベル設定
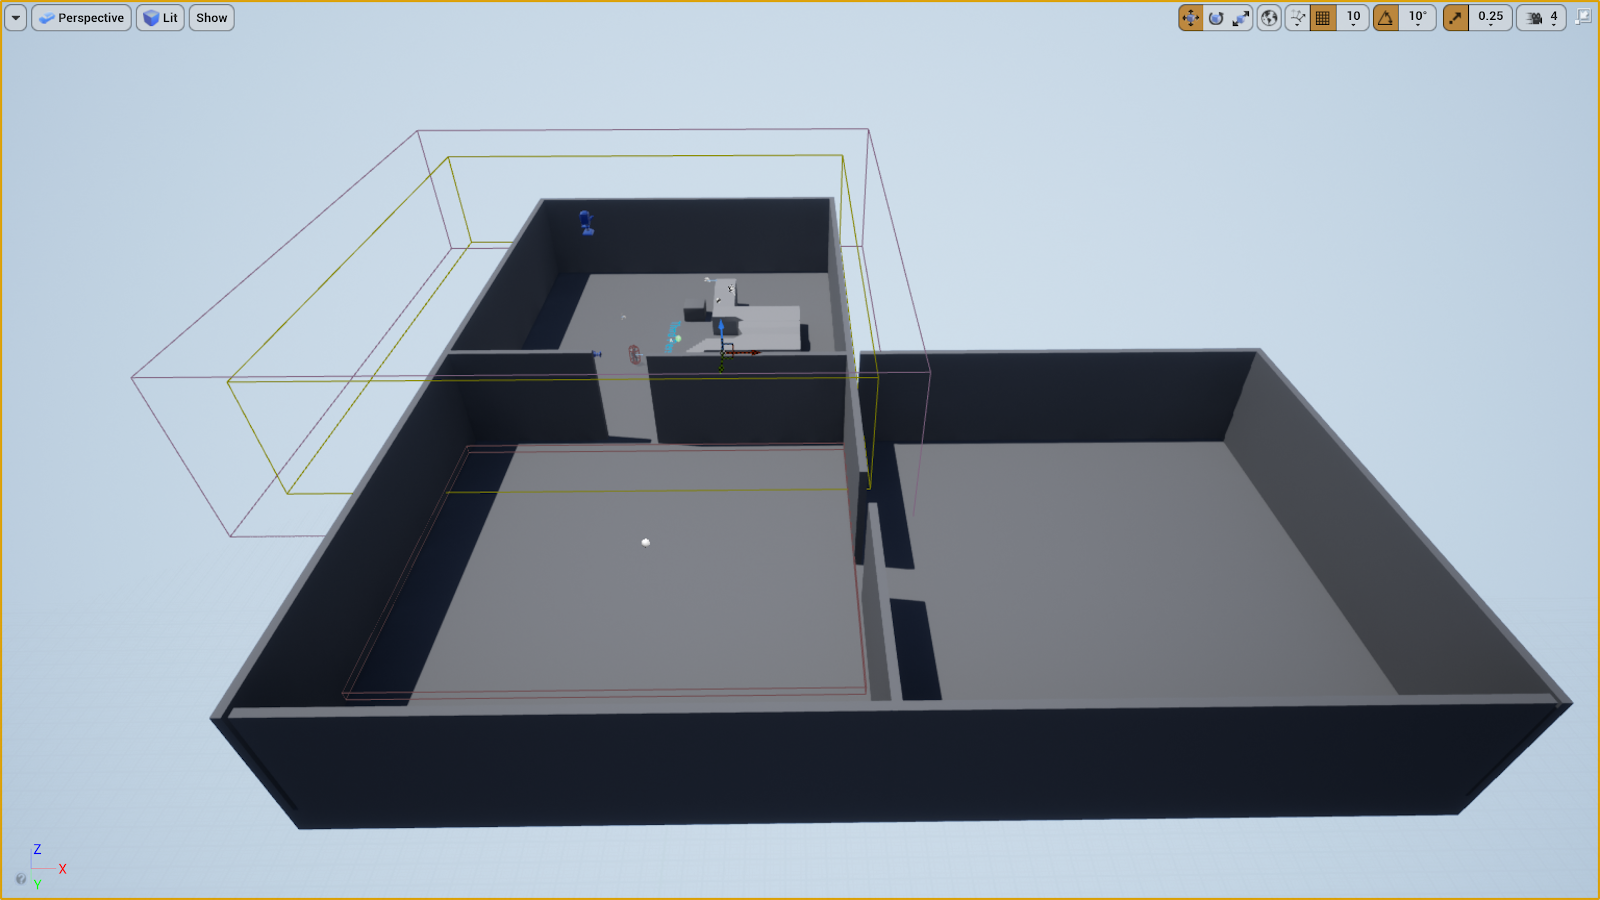
新しく実装されたロジックを示すには、レベルに追加の部屋、カメラ、オーバーラップ ボリュームを設定する必要があります。
-
「 静的カメラを使用する 」操作ガイドで既に作成したマップを使って、追加の部屋を作成します。
![Additional rooms]()
画像をクリックして拡大表示。サードパーソン サンプル マップを複製して修正して、追加の部屋を 2 つ作成しました。
-
ワールド アウトライナーで、 BP_BlendTriggerVolume を選択し、 [Details (詳細)] パネルで、 [Defaults] カテゴリに移動します。 Camera To Find 変数の隣にある ドロップダウン メニュー を開きます。
![Camera To Find variable dropdown menu]()
BP_ExampleCameraActor を選択します。
![Select Camera Actor]()
-
コンテンツ ブラウザから BP_CameraActor (BP_CameraActor2) のインスタンスをワールドへドラッグして、トランスフォーム座標を新しく作成した部屋の中の好きな視点に合わせます。
![New Camera Actor]()
画像をクリックして拡大表示。BP_Camera Actor2 は部屋の角に移動します。
-
コンテンツ ブラウザ から BP_BlendTriggerVolume アクタのもう 1 つのインスタンスをワールドへ ( BP_BlendTriggerVolume2 ) ドラッグし、 [Details] パネルへ移動して Box Extent の X、Y、Z の値を新しく追加した部屋のサイズに合うように変更します。
![New Blend Trigger Volume]()
画像をクリックして拡大表示。
-
[Details] パネルの [Defaults] カテゴリで Camera To Find 変数の隣にあるドロップダウン メニューを開きます。
![Camera To Find variable dropdown menu 2]()
BP_ExampleCameraActor2 を選択します。
![Select new Camera Actor]()
-
ツールバーに戻って [Play(PIE)] ボタンをクリックします。
![Play In Editor button]()


最終結果
ゲームが開始すると、プレイヤーは WASD を使ってキャラクターの移動を制御します。レベルで複数の BP_BlendTriggerVolumes がオーバーラップすると、カメラ ビューは作成および配置した BP_CameraActors へトランジションします。
