Choose your operating system:
Windows
macOS
Linux
この操作ガイドでは、サードパーソンのサンプルマップで、ゲームプレイ中にプレーヤーの視点に使用される静的 (または固定) のカメラ アングルを作成します。その後、キャラクターがボリュームに侵入すると視点を新しいスタティック カメラに移行するトリガー ボリュームを作成します。このガイドを理解すると、同じプロセスを自分のゲームにも行うことで、プレイヤー用の固定視点を設定できるようになります。
スタティック カメラ アクタを作成する
実装方法を選んでください。
C++
-
最初に、 [New] > [Games] > [Third Person] > [Blueprint] プロジェクトへ進み、 StaticCameras という名前のプロジェクトを作成します。
-
[Add/Import] > [Blueprints] > [Blueprint Class] をクリックすると [Pick Parent Class (親クラスを選択)] メニューが開きます。矢印をクリックしてすべてのクラスを展開し、 CameraActor を探し選択して、 BP_ExampleCameraActor という名前の Blueprint CameraActor を新規作成します。
![Pick Parent Class menu select CameraActor]()
-
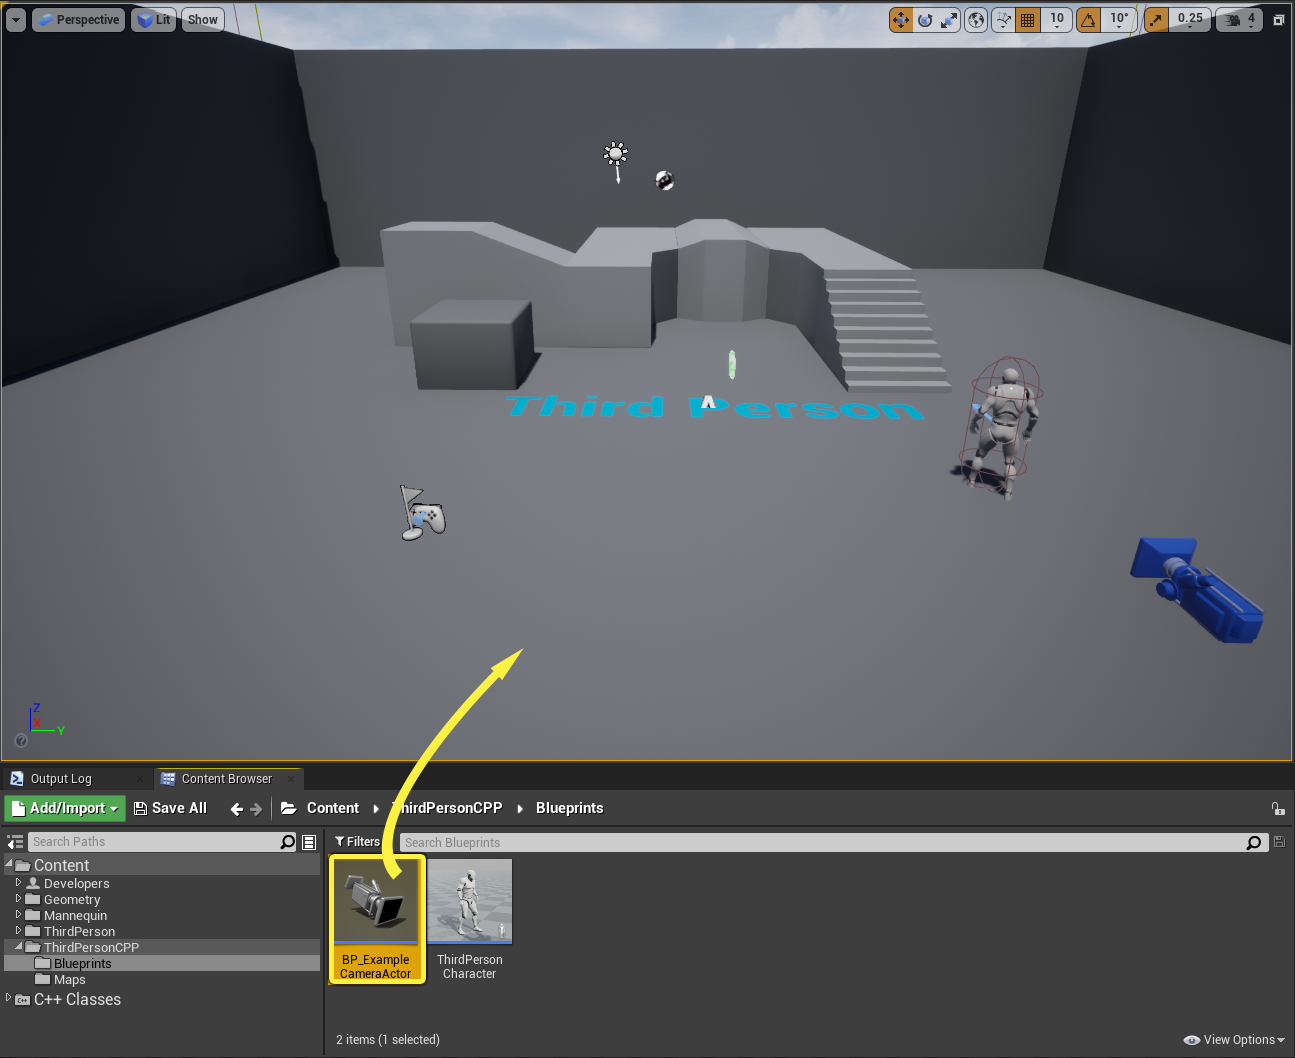
コンテンツ ブラウザ から BP_ExampleCameraActor を選択してレベルにドラッグします。
![Drag camera actor into level]()


-
まず [New (新規)] > [Games (ゲーム)] > [Third Person (サードパーソン)] > [C++] の順に選択して、 StaticCameras という名前のプロジェクトを作成します。
-
C++ クラスウィザード を起動し、 [All Classes (すべてのクラス)] のチェックボックスを有効にしてから、検索フィールドに「 CameraActor 」と入力して、 Camera Actor クラスを選択して ExampleCameraActor という名前で新しく作成します。
![New C++ Camera Actor class]()
-
[C++ Class (C++ クラス)] パネルで、 ExampleCamera を右クリックし、 [C++ Class] アクション メニューのドロップダウンから、 [Create a Blueprint class based on ExampleCameraActor (ExampleCameraActor に基づいてブループリントクラスを作成)] を選択します。次に、 BP_ExampleCameraActor のインスタンスをレベルにドラッグします。
![Place Actor in level]()
拡大表示するには、画像をクリック。

レベル設定
プレイヤーのカメラとスタティック カメラ アクタの間の視点の移動を示すために、シーンを設定する必要があります。これは、サードパーソン テンプレート レベルからスタティック メッシュジオメトリの一部を変更することで作成できます。
-
[World Outliner (アウトライナ)] パネルに移動し、 「ArenaGeometry」>「Arena」 フォルダにある「 Floor 」と「 Wall 」スタティックメッシュを 4 つ選択します。
![Selecting floors and walls in the World Outliner]()
上の例の画像では、 4 つの Wall スタティックメッシュは「 Wall6 」、「 Wall7 」、「 Wall8 」、「 Wall9 」とリスト化されています。
-
Alt キーを押しながら トランスフォーム ギズモをクリックしてドラッグし、床と壁のセットアップを複製します。
![Drag duplicating floors and walls using the Transform gizmo]()
-
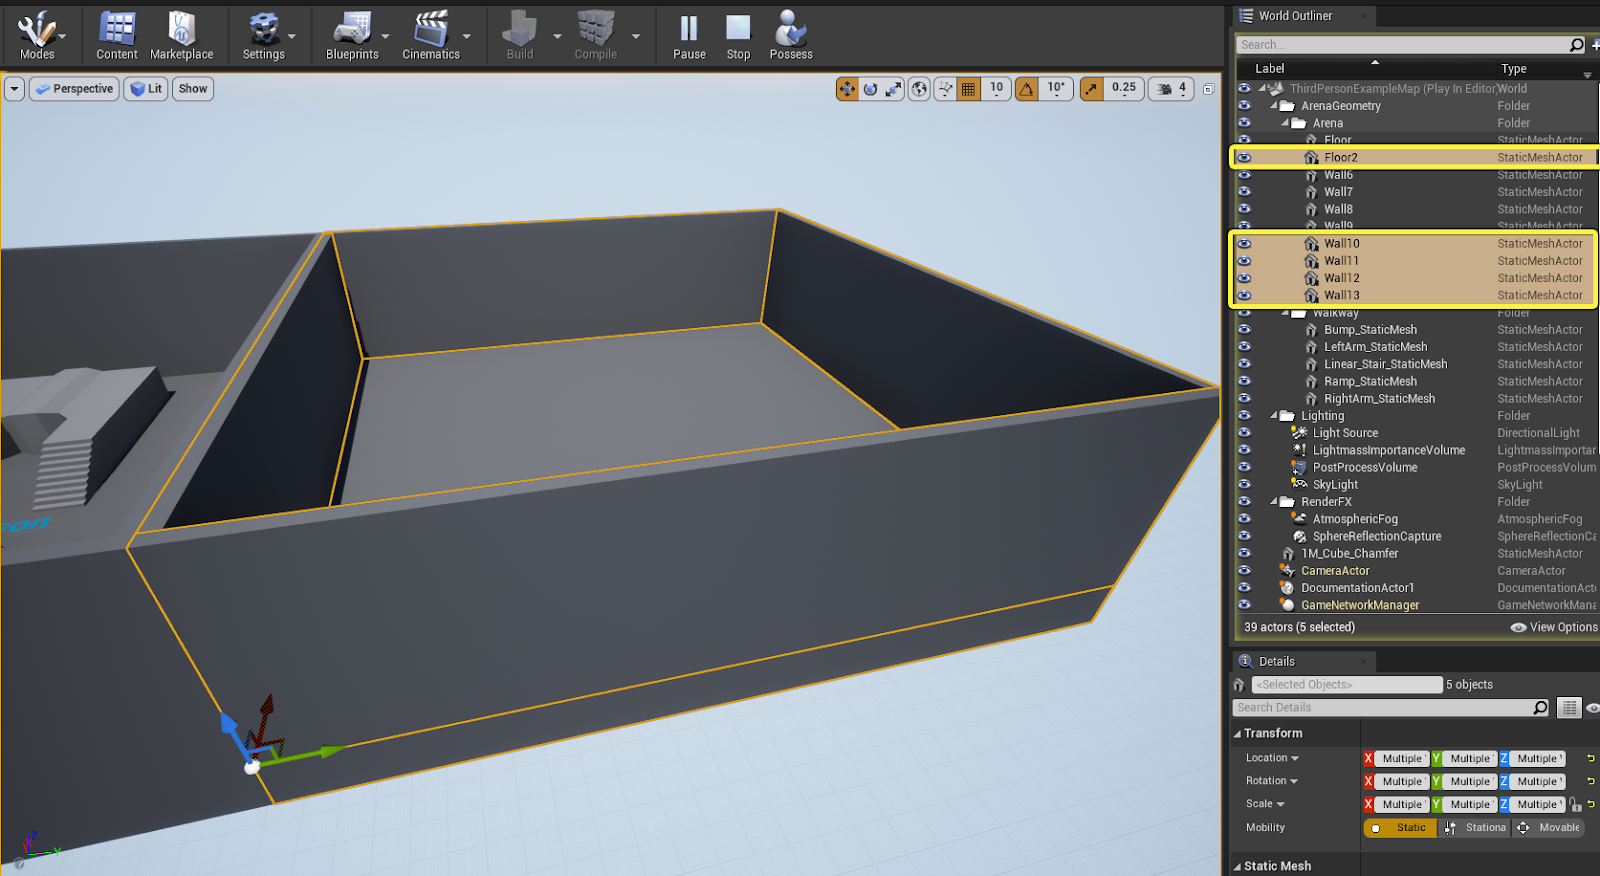
これにより、2 つめの Floor と 4 つの Wall スタティックメッシュが作成されます。
![Duplicated walls and floors]()
上の例の画像では、複製されたフロアは「Floor2」、複製された壁は「 Wall10 」、「 Wall11 」、「 Wall12 」、「 Wall13 」という名前です。
-
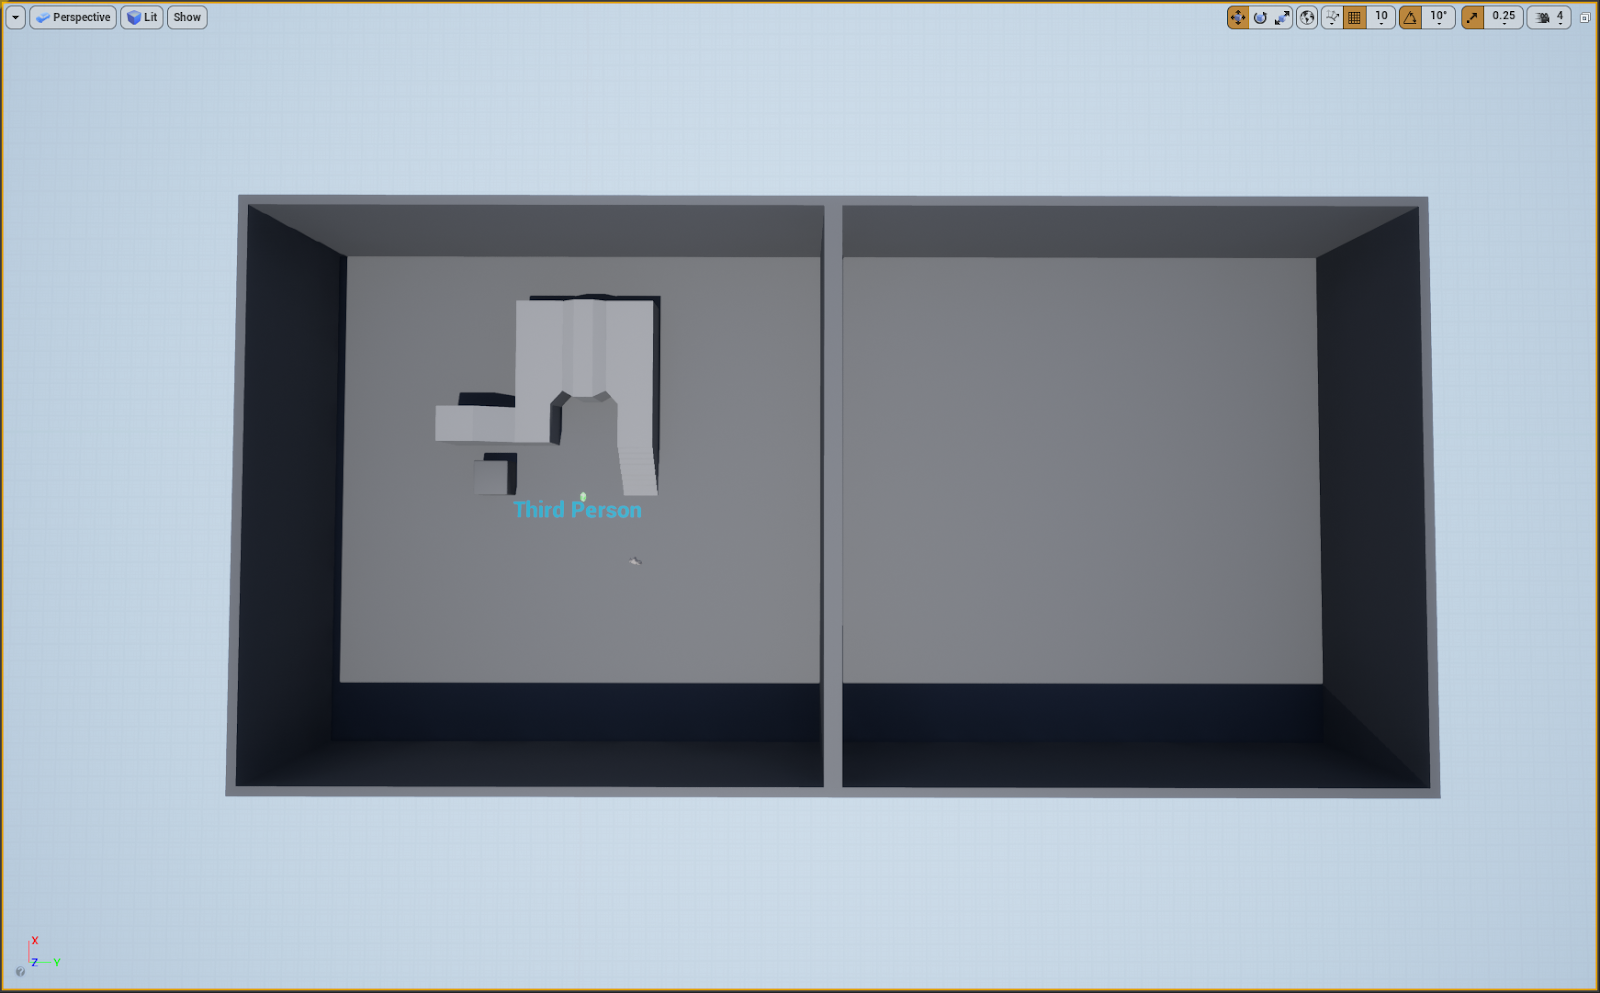
新しく複製されたスタティック メッシュを下のレイアウトのように移動します。新しい部屋は最初のメッシュのみ複製し、コンテンツは何もありません。
![Overhead view of new room]()
拡大表示するには、画像をクリック。


-
[World Outliner] から、2 つの部屋につながる 2 つの壁を選択し、それらの X Scale 値を 14 に設定します。
この例では、2 つの壁は Wall9 と Wall12 と名前が付いています。
![X Scale value in Details panel]()
-
つながっている壁を両方選択し、 トランスフォーム ギズモを使用してそれらを移動します。それにより、以下に示すように部屋にある隙間にパーティションを作成します。
この例では、2 つの壁は Wall9 と Wall10 と名前が付いています/
![Move walls to create partition]()
-
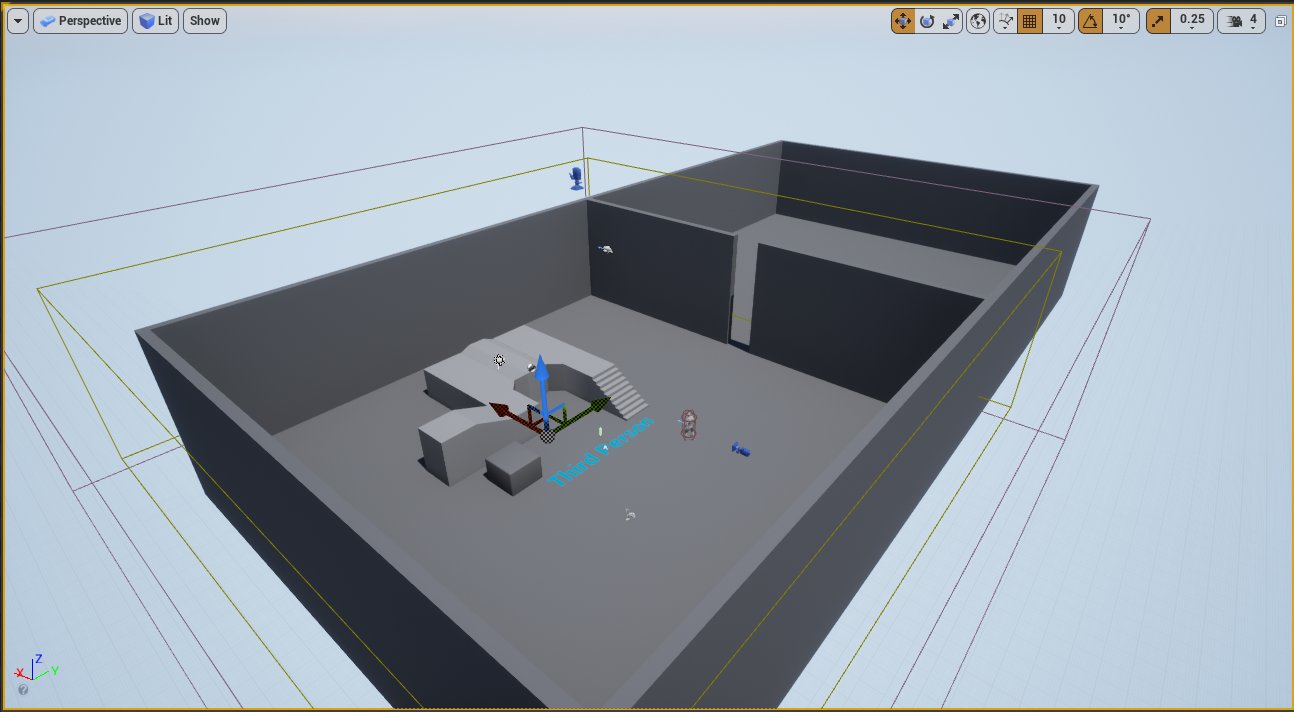
完成したレベル設定は、下の画像のようになります。壁の開口部によって最初の部屋と二つ目の部屋がつながっています。
![Connected rooms]()
拡大表示するには、画像をクリック。


カメラのパースペクティブを設定する
レベルの設定が完了しました。次は、トリガー ボリュームと重なったときにプレイヤーの視点となる「 BP_ExampleCameraActor 」をレベルに配置します。 [Viewport (ビューポート)] をカメラ アクタにロックして**パイロット** モードに入ると、カメラ視点から一人称視点に切り替えできるようになります。
-
レベルでカメラを選択した状態でカメラを右クリックし、コンテキスト メニューから [Pilot (パイロット) カメラ アクタ] を選択します。
![Context menu Pilot CameraActor]()
-
マウスの 左ボタン または 右ボタン を押したまま WASD キーを使用することで、ビューポート内を移動できるようになりました。これで、レベル内を移動している間、カメラの位置は動きに合わせて移動するため、ゲームプレイ中にカメラがとる視点を把握できます。
-
カメラのロックを解除するには、 [Unlock (ロック解除)] ボタンをクリックします。
![Unlock button]()
ロックを解除すると、カメラは配置された場所に残ります。また、[Unlock] ボタンの横にあるアイコンは、ゲーム内のカメラ ビューとレベルエディタ ビューのどちらを表示するかを切り替えることができます。
-
下の gif のように、2 つ目の部屋を見下ろす位置にカメラを移動します。
![Pilot Camera into position looking down]()
-
完成したカメラシーンのセットアップは、下の画像のようになります。スタティック カメラが新しい部屋を見下ろし、元のカメラがサードパーソン アクタを追従します。
![Completed Camera setup]()
拡大表示するには、画像をクリック。


Overlap Trigger Actor を作成する
この例では、トリガー アクターは、プレーヤーのカメラ視点と静的カメラの視点の間のトランジション マネージャーとして機能します。プレーヤーがボックス コンポーネントのボリューム境界とオーバーラップすると、視点間においてトランジショナル ブレンドが発生します。
-
[Add/Import] > [Blueprints] > [Blueprint Class] を選択して BP_BlendTriggerVolume という名前の Blueprint Actor クラスを新規作成します。
-
BP_BlendTriggerVolume をダブルクリックしてクラスのデフォルトを開き、 [Components] タブから [Add Component (コンポーネントを追加)] ボタンをクリックし [Box Collision] を選択して OverlapVolume という名前の Box Component を追加します。
![Adding new Box Collision Component]()
-
[My Blueprint] タブの Variables カテゴリで + 記号をクリックして新しい変数を選択し、[Details] パネルで変数タイプを float に変更し CameraBlendTime と名付けます。
![CameraBlendTime variable]()
-
ブループリントをコンパイルして保存します。
![Compile button]()
-
CameraBlendTime 変数を再度選択し、float 値を 1.0f に設定します。
![Set variable float value]()


On Component Begin Overlap イベントを作成する
-
[Components] タブで OverlapVolume を選択し、 [Details] パネルの Events カテゴリを下にスクロールし、 On Component Begin Overlap イベントの横にある [+] アイコンをクリックします。
![Select On Component Begin Overlap Event]()
-
On Component Begin Overlap(OverlapVolume) ノードをクリックし、実行ピンをイベントグラフに引き出します。 Executable アクション ドロップダウン メニューが表示されます。 Cast To ThirdPersonCharacter を探して選択します。
![Executable actions dropdown menu]()
-
On Component Begin Overlap ノードで Other Actor ピンをクリックして引き出して、 Cast To Third PersonCharacter ノードの Object ピンにつなぎます。
![Drag off Other Actor pin]()
-
Cast To ThirdPersonCharacter ノードで As Third Person Character 参照ピンを選択して引き出して、アクション ドロップダウン メニューで Is Valid を選択します。
![Actions dropd down menu Is Valid]()
-
Is Valid ノードのブーリアンの Return Value (戻り値) を選択し引き出して、アクション メニューから Branch ノードを検索して選択し、 Cast to ThirdPersonCharacter ノードの実行ピンを Branch ノードにつなぎます。
![Is Valid connect to Branch]()
-
Branch ノードから True ピンをクリックして引き出して、アクション メニューから Cast to PlayerController を検索して選択します。
![Executable actions Cast to PlayerController]()
-
Cast To ThirdPerson Character ノードから As Third Person Character ピンをクリックして引き出して、アクション メニューから Get Controller を検索して選択します。
![Actions menu Get Controller]()
-
Get Controller Node で Return Value をクリックして引き出して、 Cast To PlayerController ノードの Object ピンにつなぎます。
![Get Controller Return Value]()
-
CastToPlayerController ノードから As Player Controller ピンをひきだして、ステップ 4 と 5 で説明した Is Valid と Branch のチェックを繰り返します。
![Repeat Is Valid and Branch]()
-
Branch ノードから True ピンをクリックしてイベント グラフに引き出して、アクション メニューから Get Actor Of Class を検索して選択します。
![Actions menu Get Actor Of Class]()
-
Actor Class ピンの Select Class ドロップダウン メニューで BP_ExampleCameraActor クラスを検索して選択します。
![Select your Actor class]()
-
Cast To PlayerController ノードへ進み、 As Player Controller ピンをクリックして引き出し、アクション メニューから Set View Target With Blend を検索して選択します。
![Actions menu Set View Target With Blend]()
-
Get Actor of Class ノードから Return Value ピンをクリックして引き出し、 Set View Target ノードの New View Target 入力ピンにつなぎ、実行ピンを接続します。
![Connect nodes]()
-
My Blueprint タブに移動し、 Variables カテゴリで CameraBlendTime フロート変数をクリックしてイベントグラフにドラッグし、ドロップダウン メニューで Get CameraBlendTime を選択して変数の参照を取得します。
![CameraBlendTime variable added to graph]()
-
Camera Blend Time 変数ピンを Set View Target ノードの Blend Time につなぎます。
![Connect nodes]()
-
VolumeTrigger On Component Begin Overlap は以下の画像のようになります。
![Full VolumeTrigger On Component Begin Overlap logic]()
拡大表示するには、画像をクリック。


On Component End Overlap イベントを作成する
On Component End Overlap
イベントは
OverlapVolume
を終了するときにプレイヤー キャラクターのカメラに視点を戻します。
-
[Components] タブへ移動して Box コンポーネントを選択します。[Details] パネルの Events カテゴリを下にスクロールし、 On Component End Overlap イベントの横にある [+] アイコンをクリックします。
![Add On Component End Overlap event to Box component]()
-
On Component Begin Overlap Event に対して作成した前のロジックを複製してから Get All Actors Of Class ノードを削除します。
![Delete Get All Actors Of Class node]()
-
Cast to ThirdPersonCharacter ノードで As ThirdPersonCharacter 出力ピンを引き出します。
![As ThirdPersonCharacter output pin]()
-
Set View Target with Blend ノードの New View Target 入力ピンに接続します。
![Connect nodes]()
-
このロジックにより、カメラがサードパーソン キャラクターの視点に戻ります。
![Full VolumeTrigger On Component End Overlap logic]()
拡大表示するには、画像をクリック。


完成したブループリント
BP_BlendTriggerVolume
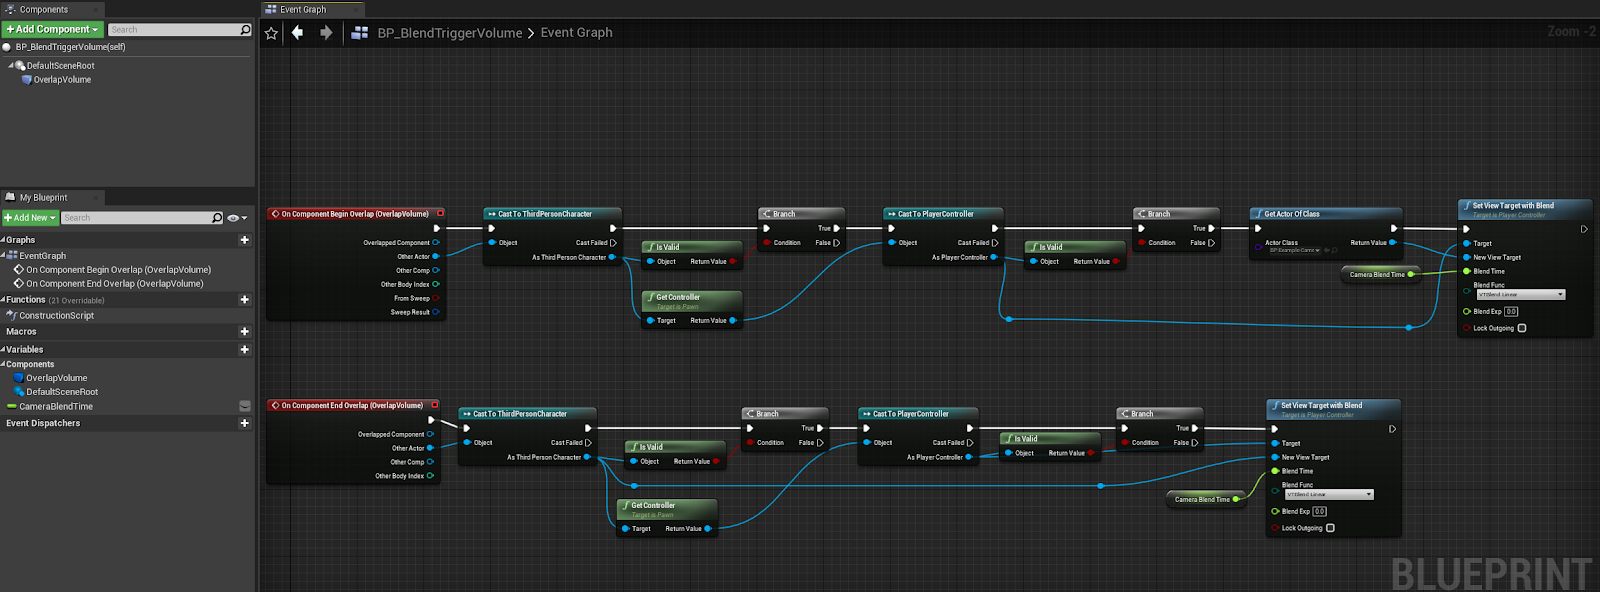
拡大表示するには、画像をクリック。
Overlap Trigger Actor を設定する
オーバーラップ アクタを作成したので、それをレベルに配置して結合を設定する必要があります。
-
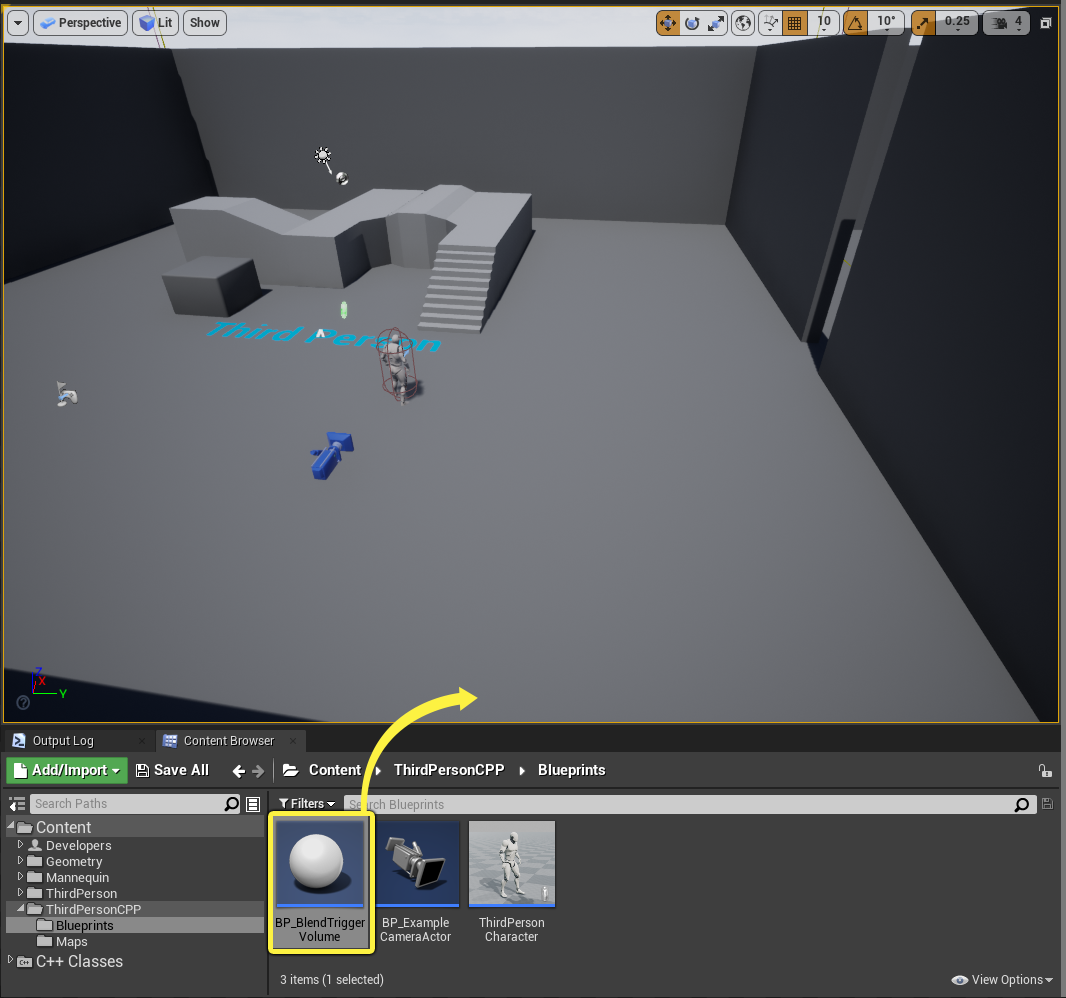
コンテンツ ブラウザ から BP_BlendTriggerVolume のインスタンスをレベルにドラッグします。
![Place Volume Actor instance]()
-
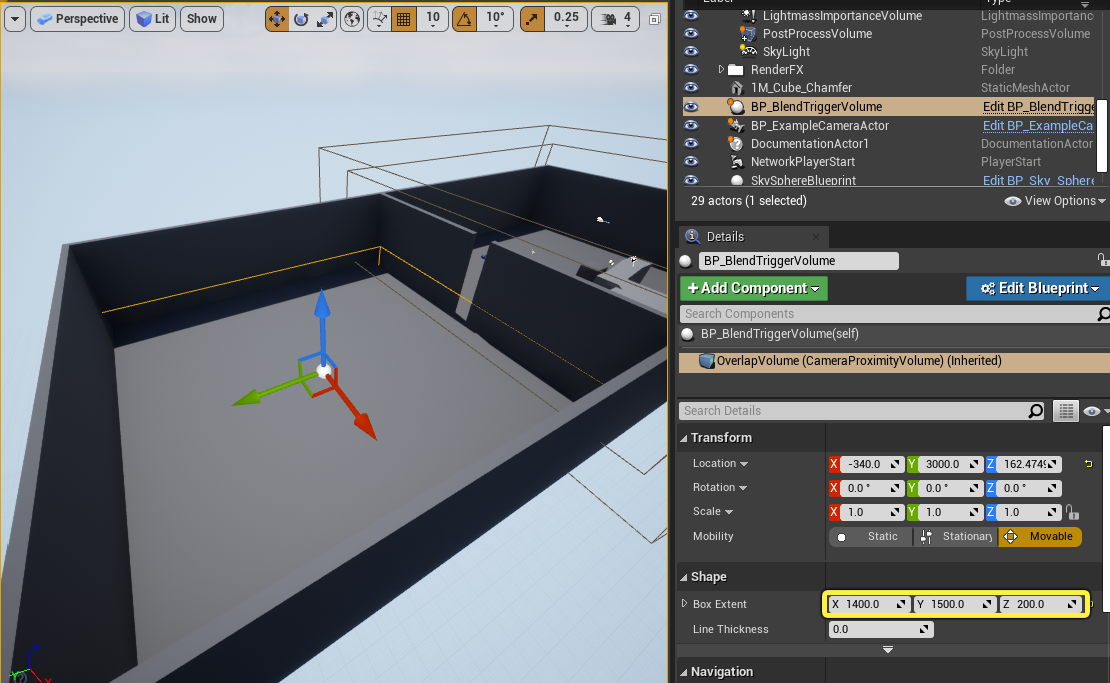
BP_ExampleCameraActor を使って BP_BlendTriggerVolume を部屋に移動し、[Details] パネルから Box コンポーネントを選択します。 Shape カテゴリへ移動し、ボリュームが部屋にぴったり合うように Box Extent の X 値、Y 値、Z 値を修正します。
![Modify Box Extent values]()
-
メイン エディタ ビュー で、 [Play (プレイ)] ボタンをクリックしてエディタで再生します。


-
C++ クラス ウィザード で、新規アクタ クラスを BlendTriggerVolume という名前で作成します。
![New C++ Blend Trigger Volume class]()
-
「
BlendTriggerVolume.h」ファイルに移動し、 クラス定義 で次のコードを宣言します。protected: //Collision Bounds of the Actor Volume UPROPERTY(EditAnywhere, BlueprintReadWrite) class UBoxComponent* OverlapVolume; //Camera Actor which the Actor Volume blends to UPROPERTY(EditAnywhere, BlueprintReadWrite) TSubclassOf<ACameraActor> CameraToFind; //Blend time for camera transition UPROPERTY(EditAnywhere, BlueprintReadWrite) float CameraBlendTime; //Begin and End Overlap methods for our OverlapVolume Actor virtual void NotifyActorBeginOverlap(AActor* OtherActor); virtual void NotifyActorEndOverlap(AActor* OtherActor);

-
次に、「
BlendTriggerVolume.cpp」ファイルに移動して、コンストラクタとボックス コンポーネントのオーバーラップ メソッドを設定します。次のインクルード クラス ライブラリを宣言します。#include "Components/BoxComponent.h"#include "StaticCamerasCharacter.h"#include "Camera/CameraActor.h"#include "Runtime/Engine/Classes/Kismet/GameplayStatics.h" -
コンストラクタ ABlendTriggerVolume::ABlendTriggerVolume で、次のコードを宣言します。
ABlendTriggerVolume::ABlendTriggerVolume() { //Create box component default components OverlapVolume = CreateDefaultSubobject<UBoxComponent>(TEXT("CameraProximityVolume")); //Set the box component attachment to the root component. OverlapVolume->SetupAttachment(RootComponent); } -
次に、
NotifyActorBeginOverlapとNotifyActorEndOverlapクラス メソッドを実装します。void ABlendTriggerVolume::NotifyActorBeginOverlap(AActor* OtherActor){ //Cast check to see if overlapped Actor is Third Person Player Character if (AStaticCamerasCharacter* PlayerCharacterCheck = Cast<AStaticCamerasCharacter>(OtherActor)) { //Cast to Player Character's PlayerController if (APlayerController* PlayerCharacterController = Cast<APlayerController>(PlayerCharacterCheck->GetController())) { //Array to contain found Camera Actors TArray<AActor*> FoundActors; //Utility function to populate array with all Camera Actors in the level UGameplayStatics::GetAllActorsOfClass(GetWorld(), CameraToFind, FoundActors); //Sets Player Controller view to the first CameraActor found PlayerCharacterController->SetViewTargetWithBlend(FoundActors[0], CameraBlendTime, EViewTargetBlendFunction::VTBlend_Linear); } } } void ABlendTriggerVolume::NotifyActorEndOverlap(AActor* OtherActor){ if (AStaticCamerasCharacter* PlayerCharacterCheck = Cast<AStaticCamerasCharacter>(OtherActor)) { if (APlayerController* PlayerCharacterController = Cast<APlayerController>(PlayerCharacterCheck->GetController())) { //Blend to Player Character's Camera Component. PlayerCharacterController->SetViewTargetWithBlend(PlayerCharacterController->GetPawn(), CameraBlendTime, EViewTargetBlendFunction::VTBlend_Linear); } } } -
コードを コンパイル します。
完成コード
BlendTriggerVolume.h
#pragma once

#include "CoreMinimal.h"
#include "GameFramework/Actor.h"
#include "BlendTriggerVolume.generated.h"

UCLASS()
class STATICCAMERAS_API ABlendTriggerVolume : public AActor
{
    GENERATED_BODY()

public:
    // Sets default values for this actor's properties
    ABlendTriggerVolume();

protected:
    //Collision Bounds of the Actor Volume
UPROPERTY(EditAnywhere, BlueprintReadWrite)
    class UBoxComponent* OverlapVolume;

    //Camera Actor which the Actor Volume blends to
    UPROPERTY(EditAnywhere, BlueprintReadWrite)
    TSubclassOf<ACameraActor> CameraToFind;

    //Blend time for camera transition
UPROPERTY(EditAnywhere, BlueprintReadWrite, meta =(ClampMin = 0.0f ))
float CameraBlendTime;

//Begin and End Overlap Actor methods for our OverlapVolume Actor.

    //Begin and End Overlap methods for our OverlapVolume Actor
    virtual void NotifyActorBeginOverlap(AActor* OtherActor);

    virtual void NotifyActorEndOverlap(AActor* OtherActor);
};
BlendTriggerVolume.cpp
#include "BlendTriggerVolume.h"
#include "Components/BoxComponent.h"
#include "StaticCamerasCharacter.h"
#include "Camera/CameraActor.h"
#include "Runtime/Engine/Classes/Kismet/GameplayStatics.h"

// Sets default values
ABlendTriggerVolume::ABlendTriggerVolume()
{

//Create box component default components
OverlapVolume = CreateDefaultSubobject<UBoxComponent>(TEXT("CameraProximityVolume"));

//Set the box component attachment to the root component.OverlapVolume->SetupAttachment(RootComponent);

//Set the CameraBlendTime
CameraBlendTime = 1.0f;

}
// Called when the game starts or when spawned

void ABlendTriggerVolume::BeginPlay()
{
Super::BeginPlay();
}

void ABlendTriggerVolume::NotifyActorBeginOverlap(AActor * OtherActor)
{

//Cast check to see if overlapped Actor is Third Person Player Character

if (AStaticCamerasCharacter* PlayerCharacterCheck = Cast<AStaticCamerasCharacter>(OtherActor))
{
//Cast to Player Character's PlayerController

if (APlayerController* PlayerCharacterController = Cast<APlayerController>(PlayerCharacterCheck->GetController()))
    {
//Array to contain found Camera Actors
TArray<AActor*> FoundActors;

 //Utility function to populate array with all Camera Actors in the level
UGameplayStatics::GetAllActorsOfClass(GetWorld(), CameraToFind, FoundActors);

//Sets Player Controller view to the first CameraActor found PlayerCharacterController->SetViewTargetWithBlend(FoundActors[0], CameraBlendTime, EViewTargetBlendFunction::VTBlend_Linear);
}
}

}
void ABlendTriggerVolume::NotifyActorEndOverlap(AActor* OtherActor)
{
    if (AStaticCamerasCharacter* PlayerCharacterCheck = Cast<AStaticCamerasCharacter>(OtherActor))
{
  if (APlayerController* PlayerCharacterController = Cast<APlayerController>(PlayerCharacterCheck->GetController()))
{

//Blend to Player Character's Camera Component.
PlayerCharacterController->SetViewTargetWithBlend(PlayerCharacterController->GetPawn(), CameraBlendTime, EViewTargetBlendFunction::VTBlend_Linear);
     }
 }

 }
// Called every frame
void ABlendTriggerVolume::Tick(float DeltaTime)
{
Super::Tick(DeltaTime);
}
オーバーラップ トリガー アクタを設定する
オーバーラップ アクタを作成したので、それをレベルに配置し、境界を設定する必要があります。
-
まず、「 C++ Classes 」フォルダに移動し、 BlendTriggerVolume クラスを右クリックして、 [Create Blueprint Class based on BlendTriggerVolume ] を選択し、 ブループリント アクタ に「 BP_BlendTriggerVolume 」という名前を付けます。
![Create Blueprint class]()
-
[Class Defaults (クラスのデフォルト)] から、 [Details (詳細)] パネルの [Camera To Find (検索するカメラ)] に移動し、ドロップダウン メニューを開いて、 BP_ExampleCameraActor を選択します。
![FInding the camera]()
-
この際、ソースコードに戻ることなく、または同じ継承された親クラスを持つ他のブループリントに影響を与えることなく、このブループリントのデフォルトのブレンド時間を変更することもできます。
![Change default Blend time]()
-
コンパイル して 保存 します。
![Compile button]()
-
コンテンツブラウザ から、 BP_BlendTriggerVolume のインスタンスをレベルにドラッグします。
![Place Volume actor]()
拡大表示するには、画像をクリック。
-
BP_BlendTriggerVolume を BP_ExampleCameraActor のある部屋に移動し、 [Details] パネルからボックス コンポーネントを選択します。 Shape カテゴリへ移動し、ボリュームが部屋にぴったり合うように Box Extent の X 値、Y 値、Z 値を修正します。
![Adjust Volume actor to fit room]()
拡大表示するには、画像をクリック。
-
メイン エディタ ビュー で、 [Play (プレイ)] ボタンをクリックしてエディタで再生します。


最終結果
ゲームが始まると、プレイヤーは WASD を使用してキャラクターを動かします。キャラクターが BP_BlendTriggerVolume に侵入すると、カメラ ビューは先ほど作成してレベルに配置した カメラ アクタ に割り当てられ、視点がプレイヤーが制御するキャラクターの頭上に切り替わります。

ビューがワイドスクリーンであることに気が付くかもしれません。これは無効にするには、カメラ アクタの [Details] パネルの [Constrain Aspect Ratio] オプションを無効にします。
