Choose your operating system:
Windows
macOS
Linux
実装方法を選んでください。
C++
概要
キャスティングとは、アクタへの参照を取得して、それを別のクラスに変換しようとする際、一般的に使用される通信方法です。変換が成功すると、直接アクタ通信を使って情報や関数にアクセスすることができるようになります。
この方法では、 Cast ノードを使用して特定のクラスに変換しようとするため、レベル内のアクタへの参照が必要になります。この通信方法では、作業アクタとターゲット アクタ間で 1 対 1 の関係を使用します。
目標
このクイック スタート ガイドでは、キャスティングを使用してターゲット アクタから情報にアクセスする方法を学習します。
目的
-
変数の値に基づいて回転するアクタを作成する。
-
ThirdPersonCharacter ブループリントを変更してオーバーラップ上の回転アクタにキャスティングする。
-
回転アクタから複数の子アクタを作成し、同じ親を持つ多数のアクタでキャスティングがどのように動作するか確認する。
1 - 必要な設定
-
メニューの [New Project Categories] セクションで [Games] を選択して [Next] をクリックします。
![image alt text]()
-
Third Person (サードパーソン) テンプレートを選択して [Next] をクリックします。
![image alt text]()
-
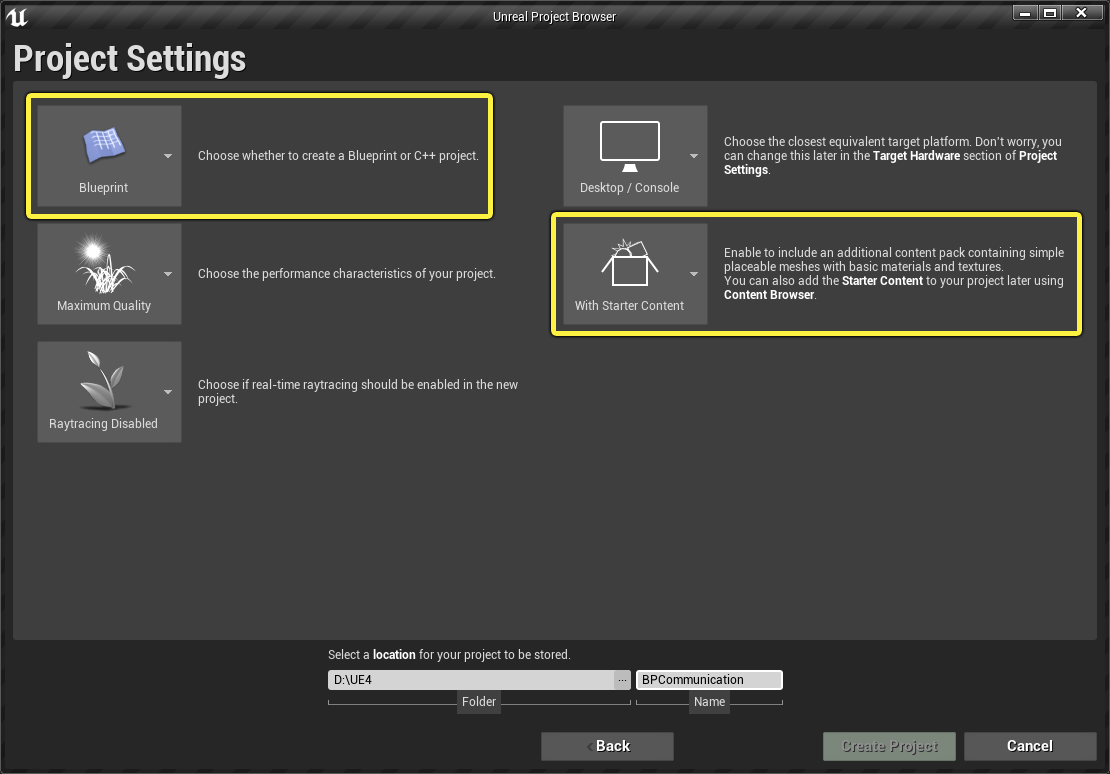
Blueprint と With Starter Content (スターターコンテンツ有り) オプションを選択して Create Project をクリックします。
![image alt text]()


このセクションの結果
新規のサードパーソン プロジェクトが作成され、キャスティングについて学ぶ準備ができました。
2 - 回転アクタの作成
この例では、プレイヤーが近くにいるときにスタティック メッシュの回転を開始するアクタを作成します。
-
コンテンツ ブラウザ を右クリックして、 [Create Basic Asset (基本アセットの作成)] セクション内の [Blueprint Class (ブループリント クラス)] をクリックします。
![image alt text]()
-
[Actor (アクタ)] を親クラスとして選択し、ブループリントに「 BP_RotateObject 」という名前を付けます。
![image alt text]()
![image alt text]()
-
コンテンツ ブラウザ 内のブループリントをダブルクリックして開きます。ブループリント エディタ ウィンドウの [Components (コンポーネント)] パネルで [Add Component (コンポーネントを追加)] ボタンをクリックします。 Static Mesh を検索して選択します。ブループリントに、Static Mesh コンポーネントが追加されます。
![image alt text]()
-
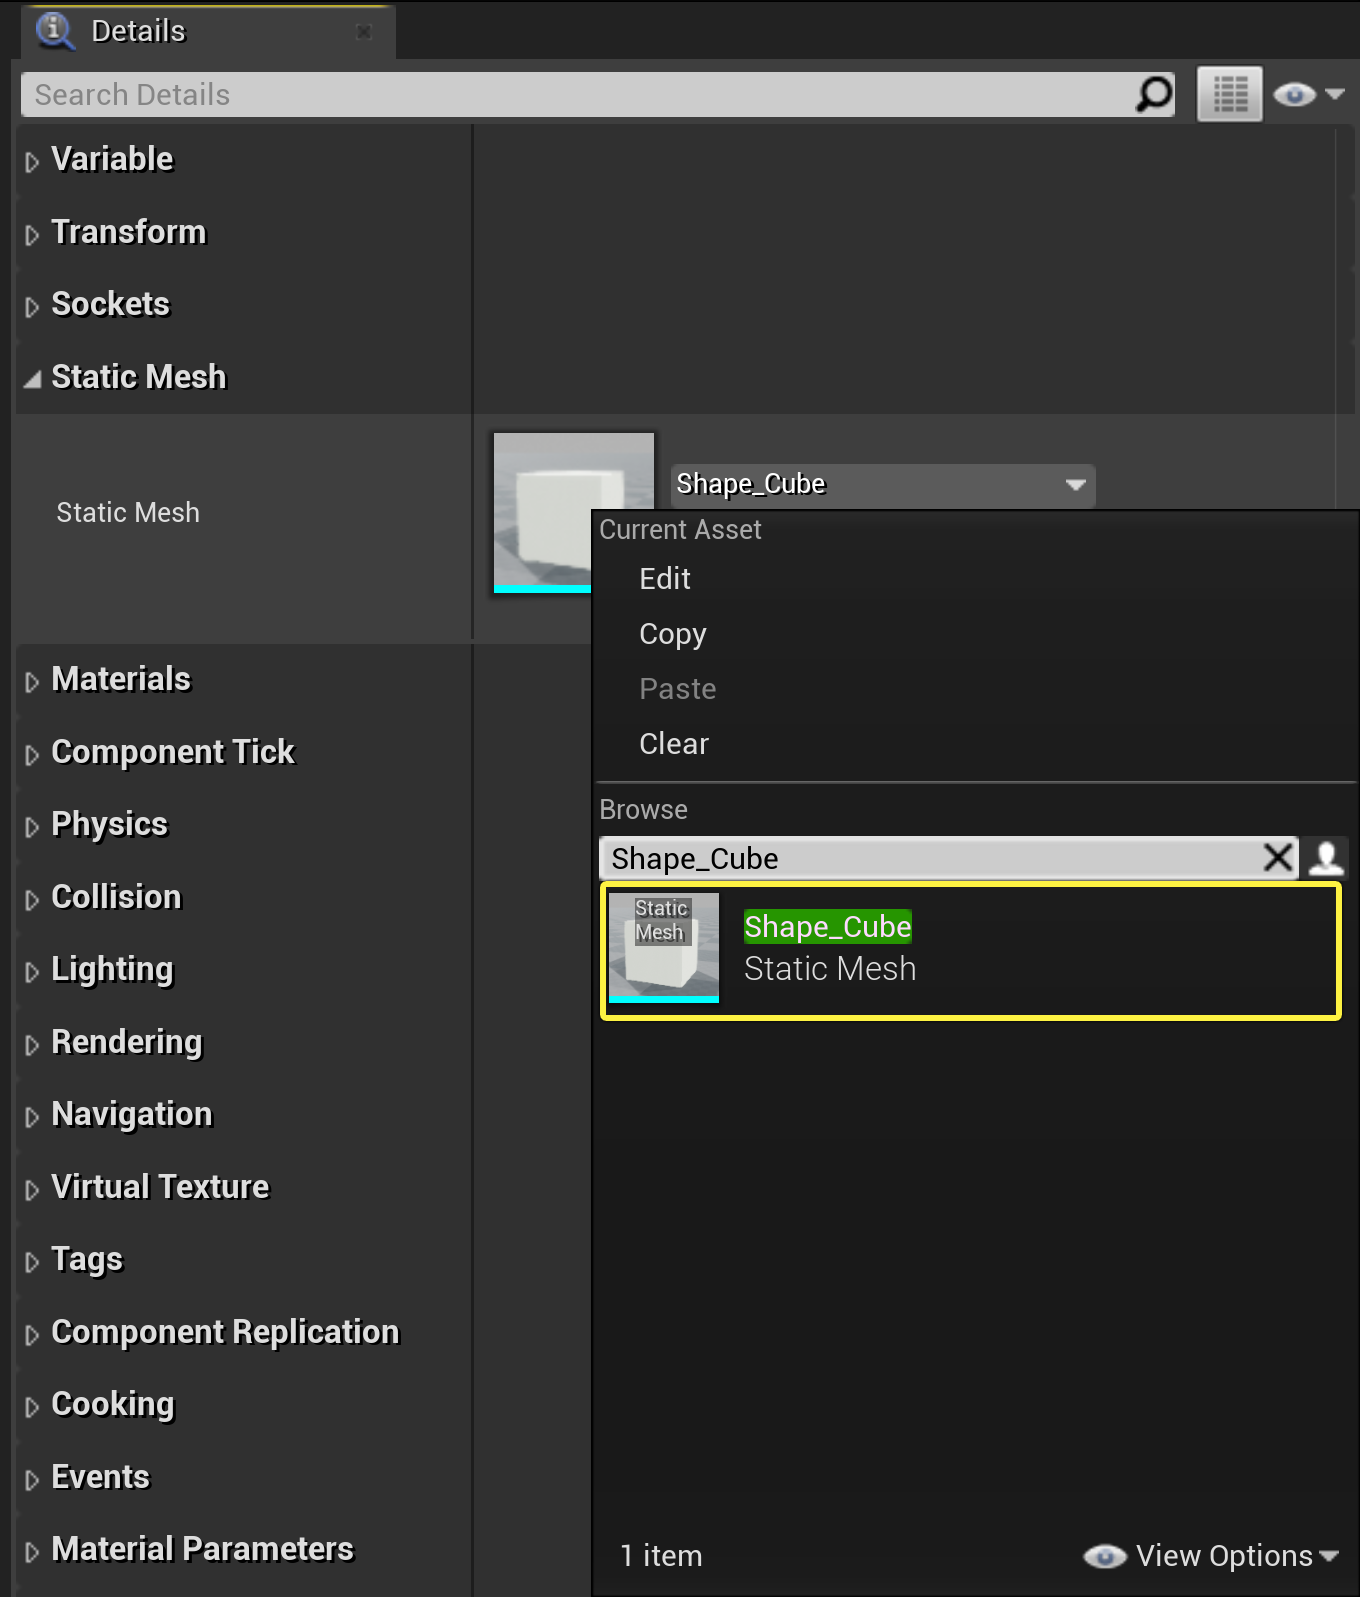
Static Mesh コンポーネントを選択した状態で [Details (詳細)] パネルに移動し、ドロップダウンの [Static Mesh (スタティック メッシュ)] をクリックします。 Shape_Cube を検索して選択します。
![image alt text]()
-
[Event Graph (イベント グラフ)] 内で右クリックして状況依存検索ウィンドウを開き、 AddActorLocalRotation を検索、選択して、このノードをグラフに追加します。
![image alt text]()
-
AddActorLocalRotation ノードを [Event Tick (イベント ティック)] に接続します。 Z の値を「 2.0 」に設定します。
![image alt text]()
-
ブループリントを コンパイル して、 保存 します。
-
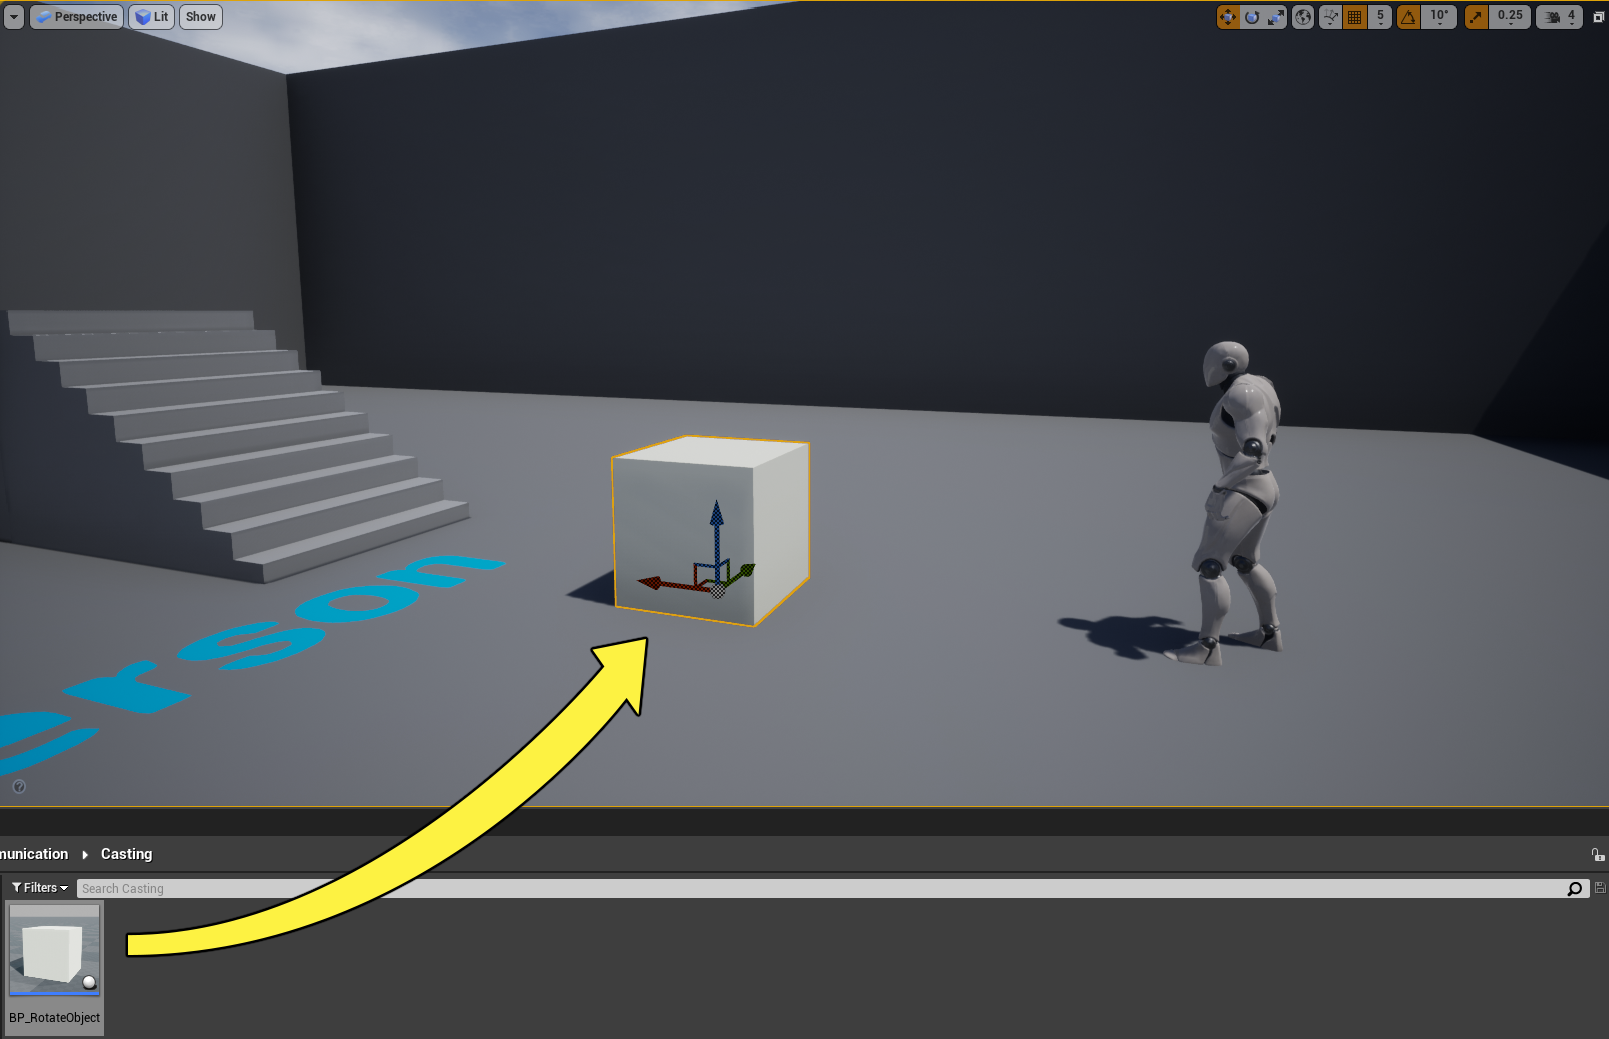
BP_RotateObject アクタをレベル内にドラッグして [Play (プレイ)] を押します。すると回転し続ける立方体が表示されるはずです。
![image alt text]()
![image alt text]()
-
それでは、プレイヤーが近くにいるときだけオブジェクトが回転するような条件を追加しましょう。 イベント グラフ を右クリックして Branch ノードを追加します。 Event Tick の出力ピンと AddActorLocalRotation ノードの入力ピンの間にノードを接続します。
![image alt text]()
-
Can Rotate という名前のブーリアン変数タイプを作成し、下に示すような Branch ノードの Condition ピンに接続します。


-
ブループリントを コンパイル し、 CanRotate のデフォルト値を False にします。
![image alt text]()
-
[My Blueprint (マイ ブループリント)] タブに移動し、 [+ Function] ボタンをクリックして新しい関数を作成します。 関数名を OverlappedPlayer** にします。
![image alt text]()
-
その関数を選択した状態で [Details] パネルに移動し、 [+ New Parameter] ボタンをクリックします。新しいブーリアン パラメータ名を Begin Overlap にします。
![image alt text]()
-
[CanRotate] 変数を関数の中にドラッグして [Set CanRotate] を選択します。 Overlapped Player ノードを Set Can Rotate ノードに接続します。 Overlapped Player ノードの Begin Overlap ピンを、下のように Set Can Rotate ノードの Can Rotate ピンに接続します。
![image alt text]()
-
ブループリントを コンパイル して、 保存 します。


このセクションの結果
このセクションでは、 CanRotate 変数を True に設定した場合にスタティック メッシュを回転させるアクタを作成しました。
3 - プレイヤー ブループリントの変更
このセクションでは、 ThirdPersonCharacter ブループリントを変更して BP_RotateObject アクタにキャスティングし、プレイヤーが近くにいるときに Rotate 変数を True に設定します。
-
ThirdPersonCharacter ブループリントを選択した状態で、 [World Outliner (ワールド アウトライナ)] に移動し、 [Edit ThirdPersonCharacter] をクリックしてブループリントを開きます。
![image alt text]()
-
ブループリント エディタ ウィンドウの [Components (コンポーネント)] パネルで [Add Component (コンポーネントを追加)] ボタンをクリックします。 Sphere Collision を検索して選択します。ブループリントに、Sphere Collision コンポーネントが追加されます。
![image alt text]()
-
Sphere Collision コンポーネントが選択された状態で [Details (詳細)] パネルに移動し、 [Radius (半径)] の値を 200 に設定します。
![image alt text]()
-
Sphere Collision コンポーネントを右クリックして OnComponentBeginOverlap イベントと OnComponentEndOverlap イベントを選択し、これらを イベント グラフ に追加します。
![image alt text]()
![image alt text]()
-
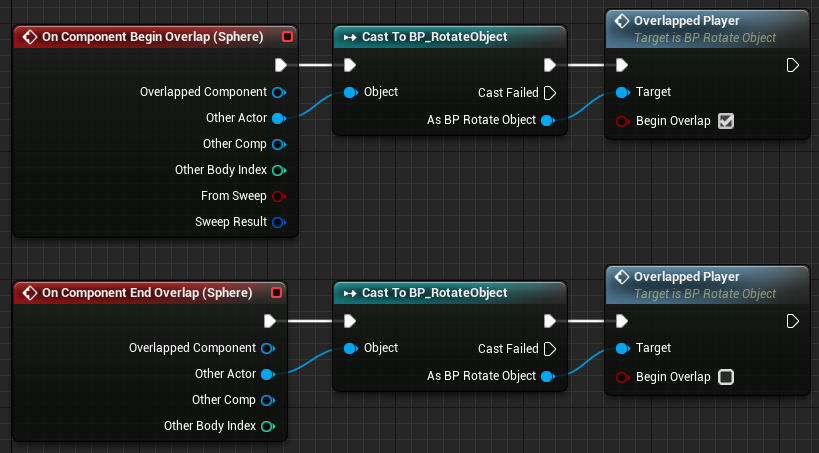
On Component Begin Overlap ノードの [Other Actor (その他のアクタ)] ピンからドラッグし、 cast to BP Rotate Object を検索して選択します。
![image alt text]()
-
As BP Rotate Object ピンからドラッグして、 Overlapped Player を検索、選択します。 Overlapped Player ノードの Begin Overlap ピンを有効化します。
![image alt text]()
![image alt text]()
-
手順 5 と 6 を繰り返して、同じノードを On Component End Overlap ノードにアタッチします。 Overlapped Player ノードの Begin Overlap ピンを無効化します。
![image alt text]()
-
ブループリントを コンパイル して、 保存 します。
-
[Play (プレイ)] を押して BP_RotateObject アクタに近づいたときのみ、それが回転するかどうか確認します。
![image alt text]()


このセクションの結果
このセクションでは、オーバーラップするアクタ上で Cast ノードを使用する ThirdPersonCharacter ブループリントをスフェア オーバーラップ コンポーネントに追加しました。
ThirdPersonCharacter ブループリントは、オーバーラップしたアクタ参照を使用して BP_RotateObject にキャスティングし、近づいたときに CanRotate 変数を True に設定します。オーバーラップしたアクタが BP_RotateObject クラスのインスタンスではない場合、ノードは失敗し、変数は設定されません。
4 - さまざまな回転形状を追加する
クラスから複数の子アクタを作成し、プレイヤーに反応するさまざまな形状を追加します。これにより、共通の親クラスへのキャスティング機能を維持したまま、子アクタを使って機能の変更や追加を行う方法を学びます。
-
コンテンツ ブラウザ**で BP_RotateObject を右クリックし、 [Create Child Blueprint Class (子ブループリント クラスの作成)] を選択します。ブループリントに「 BP_RotateObject_Cone**」という名前を付けます。
![image alt text]()
-
上の手順を 2 回繰り返し、 BP_RotateObject_Pyramid と BP_RotateObject_Torus を作成します。
![image alt text]()
-
*[Components (コンポーネント)]** ウィンドウで **BP_RotateObject_Cone** を開き、**Static Mesh** コンポーネントを選択します。**[Details (詳細)]** パネルから、**[Static Mesh (スタティック メッシュ)]**のドロップダウンをクリックし、 **Shape_Cone** を検索し、選択します。
![image alt text]()
-
Y 軸の [Rotation (回転)] を 90 度に設定します。
![image alt text]()
-
ブループリントを コンパイル して、 保存 します。
-
BP_RotateObject_Pyramid に対しても上の手順を繰り返し、スタティック メッシュとして Shape_Quad_Pyramid を選択します。
-
BP_RotateObject_Torus に対しても上の手順を繰り返し、スタティック メッシュとして Shape_Torus を選択します。メッシュを Y 方向に 90 度回転します。
-
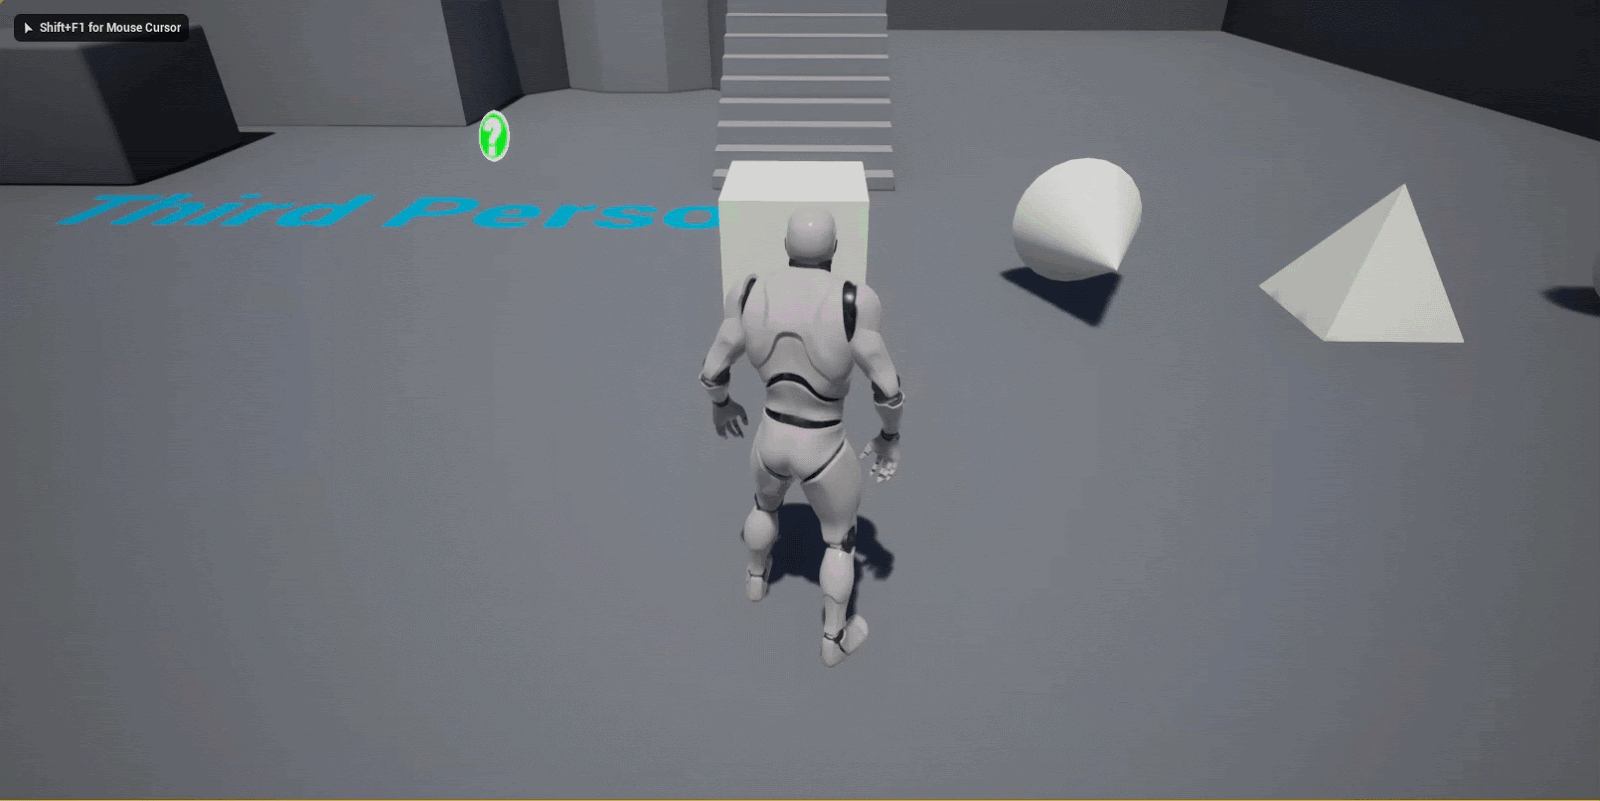
それぞれの形状をレベル内にドラッグして [Play (プレイ)] を押し、プレイヤーが近づいたときにすべての形状が回転するか確認します。
![image alt text]()
![image alt text]()


このセクションの結果
このセクションでは、 BP_RotateObject アクタから複数の子アクタを作成し、それぞれに異なる スタティック メッシュ を割り当てました。
また、アクタの親クラスにキャスティングすることで共通の関数にアクセスできることも学びました。この場合は、別々の子アクタをオーバーラップさせて親クラスにキャスティングし、回転をトリガーしています。
次のステップ
キャスティングの使い方が分かったところで、今度は「 アクタ通信 」ドキュメント ページで参照されている他の通信手段を見てみましょう。
概要
ブループリント クラスのキャスティングは、アクタ クラス ブループリントへの参照を使用して、それを別のクラスに変換する際、一般的に使用される通信方法です。変換が成功すると、直接ブループリント通信を使って情報や関数にアクセスすることができるようになります。
この方法では、 Cast ノードを使用して特定のクラスに変換しようとするため、レベル内のアクタ クラス ブループリントへの参照が必要になります。この通信方法では、作業アクタ クラス ブループリントとターゲット アクタ クラス ブループリント間で 1 対 1 の関係を使用します。
目標
このクイック スタート ガイドでは、ターゲット ブループリントから情報にアクセスするために使用するブループリント キャスティング機能を備えたアクタを C++ で作成する方法を学習します。
目的
-
変数の値に基づいて回転するブループリントを作成する。
-
ThirdPersonCharacter ブループリントを変更してオーバーラップ上の回転ブループリントにキャスティングする。
-
回転ブループリントから複数の子ブループリントを作成し、同じ親を持つ多数のブループリント クラスでブループリント キャスティングがどのように動作するか確認する。
1 - 必要な設定
-
メニューの [New Project Categories] セクションで [Games] を選択して [Next] をクリックします。
![image alt text]()
-
Third Person (サードパーソン) テンプレートを選択して [Next] をクリックします。
![image alt text]()
-
[C++] と [With Starter Content (スターター コンテンツあり)] オプションを選択し、 [Create Project (プロジェクトの作成)] をクリックします。
![image alt text]()


このセクションの結果
新規のサードパーソン プロジェクトが作成され、アクタ クラス ブループリントを使用したキャスティングについて学ぶ準備ができました。
2 - 回転アクタの作成
この例では、プレイヤーが近くにいるときにスタティック メッシュ コンポーネントの回転を開始する関数を備えたアクタ クラス ブループリントを作成します。
-
C++ Class Wizard から、新規アクタクラスを「 RotatingActor 」という名前で作成します。
![image alt text]()
-
「 RotatingActor.h 」のクラス デフォルトで、以下のコードを実装します。
public: void SetbCanRotate(bool value); protected: // Called when the game starts or when spawned virtual void BeginPlay() override; void RotateActor(); bool bCanRotate; UPROPERTY(EditAnywhere, BlueprintReadWrite) UStaticMeshComponent* MeshComp; -
「 RotatingActor.cpp 」に移動し、コンストラクタの ARotatingActor::ARotatingActor 内で次のコードを宣言します。
RootComponent = CreateDefaultSubobject<USceneComponent>(TEXT("SceneComponent")); MeshComp = CreateDefaultSubobject<UStaticMeshComponent>(TEXT("StaticMesh")); MeshComp->SetupAttachment(RootComponent, FAttachmentTransformRules::KeepRelativeTransform); bCanRotate = false; -
ARotatingActor::RotateActor メソッドで次のコードを実装します。
AddActorLocalRotation(ActorRotation); -
Navigate to the ARotatingActor::Tick method and implement the following code.
void ARotatingActor::Tick(float DeltaTime)
{
    Super::Tick(DeltaTime);

    if (bCanRotate)
    {
        RotateActor();
    }
}

完成コード
#pragma once
#include "CoreMinimal.h"
#include "GameFramework/Actor.h"
#include "RotatingActor.generated.h"

UCLASS()
class BPCOMMUNICATION_API ARotatingActor : public AActor
{
GENERATED_BODY()

public:
    // Sets default values for this actor's properties
    ARotatingActor();
    void SetbCanRotate(bool value);

protected:
    // Called when the game starts or when spawned
    virtual void BeginPlay() override;
    void RotateActor();
    bool bCanRotate;

    UPROPERTY(EditAnywhere, BlueprintReadWrite)
    UStaticMeshComponent* MeshComp;

    //Rotation Rate for our Actor.
    const FQuat ActorRotationRate =(FQuat(FRotator(0,2,0));

public:
    // Called every frame
    virtual void Tick(float DeltaTime) override;
};#include "RotatingActor.h"
// Sets default values
ARotatingActor::ARotatingActor()
{
// Set this actor to call Tick() every frame. You can turn this off to improve performance if you don't need it.
PrimaryActorTick.bCanEverTick = true;
RootComponent = CreateDefaultSubobject<USceneComponent>(TEXT("SceneComponent"));
MeshComp = CreateDefaultSubobject<UStaticMeshComponent>(TEXT("MeshComp"));
MeshComp->SetupAttachment(RootComponent, FAttachmentTransformRules::KeepRelativeTransform);
bCanRotate = false;
}
void ARotatingActor::SetbCanRotate(bool value)
{
bCanRotate = value;
}
// Called when the game starts or when spawned
void ARotatingActor::BeginPlay()
{
Super::BeginPlay();
}
void ARotatingActor::RotateActor()
{
AddActorLocalRotation(ActorRotation);
}
// Called every frame
void ARotatingActor::Tick(float DeltaTime)
{
Super::Tick(DeltaTime);
if (bCanRotate)
{
RotateActor();
}
}-
コードを コンパイル します。
-
エディタで、「 C++ Classes」 フォルダに移動し、 [C++ class actions (C++ クラス アクション)] ドロップダウンメニューから RotatingActor を右クリックし、「 BP_RotatingActor 」という名前の [Create Blueprint class based on RotatingActor] を選択します。
![image alt text]()
-
BP_RotatingActor ブループリントの [Class Defaults (クラスのデフォルト)] で [Components] タブに移動し、 MeshComp Static Mesh Component を選択します。次に、 [Static Mesh] カテゴリから [Details (詳細)] パネルに移動し、 Static Mesh 変数の隣にある矢印を選択します。最後に、ドロップダウン メニューから Shape_Cube** スタティック メッシュを選択します。
![image alt text]()
-
ブループリントを コンパイル して 保存 します。
-
コンテンツ ブラウザ から、 Bp_RotatingActor のインスタンスをレベルにドラッグします。
![image alt text]()


このセクションの結果
このセクションでは、 bCanRotate 変数を True に設定したティック時にスタティック メッシュを回転させる関数を含む回転アクタ クラス ブループリントを作成しました。
3 - サードパーソン キャラクター クラスを変更する
このセクションでは、 BPCommunicationCharacter クラスを変更して Rotating Actor クラスにキャスティングし、プレイヤーが近くにいるときに bCanRotate 変数を True に設定します
-
「 BPCommunicationCharacter.h 」を開き、以下を実装します。
protected: virtual void NotifyActorBeginOverlap(AActor* OtherActor); virtual void NotifyActorEndOverlap(AActor* OtherActor); class USphereComponent* SphereComp; -
「 BPCommunicationCharacter.cpp 」で、以下のクラス ライブラリを含めます。
#include "RotatingActor.h" #include "Components/SphereComponent.h" -
コンストラクタの ABPCommunicaionCharacter::BPCommunicationCharacter から、以下のコードを宣言します。
SphereComp = CreateDefaultSubobject<USphereComponent>(TEXT("SphereComp")); SphereComp->AttachToComponent(GetMesh(), FAttachmentTransformRules::KeepRelativeTransform); SphereComp->SetSphereRadius(200); -
次に、 ABPCommunicationCharacter::NotifyActorBeginOverlap と ABPCommunicationCharacter::NotifyActorEndOverlap を実装します。
void ABPCommunicationCharacter::NotifyActorBeginOverlap(AActor* OtherActor) { if (ARotatingActor* RotatingActorCheck =Cast<ARotatingActor>(OtherActor)) { ActorCheck->SetbCanRotate(true); } } void ABPCommunicationCharacter::NotifyActorEndOverlap(AActor* OtherActor) { if (ARotatingActor* RotatingActorCheck = Cast<ARotatingActor>(OtherActor)) { ActorCheck->SetbCanRotate(false); } } -
コードを コンパイル します。
完成コード
// Copyright Epic Games, Inc. All Rights Reserved.
#pragma once
#include "CoreMinimal.h"
#include "GameFramework/Character.h"
#include "BPCommunicationCharacter.generated.h"

UCLASS(config=Game)
class ABPCommunicationCharacter : public ACharacter
{
    GENERATED_BODY()

    /** Camera boom positioning the camera behind the character */
    UPROPERTY(VisibleAnywhere, BlueprintReadOnly, Category = Camera, meta = (AllowPrivateAccess = "true"))
    class USpringArmComponent* CameraBoom;

    /** Follow camera */
    UPROPERTY(VisibleAnywhere, BlueprintReadOnly, Category = Camera, meta = (AllowPrivateAccess = "true"))
    class UCameraComponent* FollowCamera;

    public:
        ABPCommunicationCharacter();

        /** Base turn rate, in deg/sec. Other scaling may affect final turn rate. */
        UPROPERTY(VisibleAnywhere, BlueprintReadOnly, Category=Camera)
        float BaseTurnRate;

        /** Base look up/down rate, in deg/sec. Other scaling may affect final rate. */
        UPROPERTY(VisibleAnywhere, BlueprintReadOnly, Category=Camera)
        float BaseLookUpRate;

    protected:
        virtual void NotifyActorBeginOverlap(AActor* OtherActor);
        virtual void NotifyActorEndOverlap(AActor* OtherActor);

    UPROPERTY(EditAnywhere, BlueprintReadWrite)

        class USphereComponent* SphereComp;

        /** Resets HMD orientation in VR. */
        void OnResetVR();

        /** Called for forwards/backward input */
        void MoveForward(float Value);

        /** Called for side to side input */
        void MoveRight(float Value);

        /**
         * Called via input to turn at a given rate.
         * @param Rate  This is a normalized rate, i.e. 1.0 means 100% of desired turn rate
         */
        void TurnAtRate(float Rate);

        /**
         * Called via input to turn look up/down at a given rate.
         * @param Rate  This is a normalized rate, i.e. 1.0 means 100% of desired turn rate
         */
        void LookUpAtRate(float Rate);

        /** Handler for when a touch input begins. */
        void TouchStarted(ETouchIndex::Type FingerIndex, FVector Location);

        /** Handler for when a touch input stops. */
        void TouchStopped(ETouchIndex::Type FingerIndex, FVector Location);

    protected:
        // APawn interface
        virtual void SetupPlayerInputComponent(class UInputComponent* PlayerInputComponent) override;
        // End of APawn interface

    public:
        /** Returns CameraBoom subobject **/
        FORCEINLINE class USpringArmComponent* GetCameraBoom() const { return CameraBoom; }

        /** Returns FollowCamera subobject **/
        FORCEINLINE class UCameraComponent* GetFollowCamera() const { return FollowCamera; }
};// Copyright Epic Games, Inc. All Rights Reserved.
#include "BPCommunicationCharacter.h"
#include "HeadMountedDisplayFunctionLibrary.h"
#include "Camera/CameraComponent.h"
#include "Components/CapsuleComponent.h"
#include "Components/InputComponent.h"
#include "GameFramework/CharacterMovementComponent.h"
#include "GameFramework/Controller.h"
#include "GameFramework/SpringArmComponent.h"
#include "CeilingLight.h"
#include "RotatingActor.h"
#include "Components/SphereComponent.h"
//////////////////////////////////////////////////////////////////////////
// ABPCommunicationCharacter
ABPCommunicationCharacter::ABPCommunicationCharacter()
{
// Set size for collision capsule
GetCapsuleComponent()->InitCapsuleSize(42.f, 96.0f);
// set our turn rates for input
BaseTurnRate = 45.f;
BaseLookUpRate = 45.f;
// Don't rotate when the controller rotates. Let that just affect the camera.
bUseControllerRotationPitch = false;
bUseControllerRotationYaw = false;
bUseControllerRotationRoll = false;
// Configure character movement
GetCharacterMovement()->bOrientRotationToMovement = true; // Character moves in the direction of input...
GetCharacterMovement()->RotationRate = FRotator(0.0f, 540.0f, 0.0f); // ...at this rotation rate
GetCharacterMovement()->JumpZVelocity = 600.f;
GetCharacterMovement()->AirControl = 0.2f;
// Create a camera boom (pulls in towards the player if there is a collision)
CameraBoom = CreateDefaultSubobject<USpringArmComponent>(TEXT("CameraBoom"));
CameraBoom->SetupAttachment(RootComponent);
CameraBoom->TargetArmLength = 300.0f; // The camera follows at this distance behind the character
CameraBoom->bUsePawnControlRotation = true; // Rotate the arm based on the controller
// Create a follow camera
FollowCamera = CreateDefaultSubobject<UCameraComponent>(TEXT("FollowCamera"));
FollowCamera->SetupAttachment(CameraBoom, USpringArmComponent::SocketName); // Attach the camera to the end of the boom and let the boom adjust to match the controller orientation
FollowCamera->bUsePawnControlRotation = false; // Camera does not rotate relative to arm
SphereComp = CreateDefaultSubobject<USphereComponent>(TEXT("SphereComp"));
SphereComp->SetupAttachment(GetMesh(), FAttachmentTransformRules::KeepRelativeTransform);
SphereComp->SetSphereRadius(200);
// Note: The skeletal mesh and anim blueprint references on the Mesh component (inherited from Character)
// are set in the derived blueprint asset named MyCharacter (to avoid direct content references in C++)
}
//////////////////////////////////////////////////////////////////////////
// Input
void ABPCommunicationCharacter::SetupPlayerInputComponent(class UInputComponent* PlayerInputComponent)
{
// Set up gameplay key bindings
check(PlayerInputComponent);
PlayerInputComponent->BindAction("Jump", IE_Pressed, this, &ACharacter::Jump);
PlayerInputComponent->BindAction("Jump", IE_Released, this, &ACharacter::StopJumping);
PlayerInputComponent->BindAction("Use", IE_Pressed, this, &ABPCommunicationCharacter::ToggleCeilingLight);
PlayerInputComponent->BindAxis("MoveForward", this, &ABPCommunicationCharacter::MoveForward);
PlayerInputComponent->BindAxis("MoveRight", this, &ABPCommunicationCharacter::MoveRight);
// We have 2 versions of the rotation bindings to handle different kinds of devices differently
// "turn" handles devices that provide an absolute delta, such as a mouse.
// "turnrate" is for devices that we choose to treat as a rate of change, such as an analog joystick
PlayerInputComponent->BindAxis("Turn", this, &APawn::AddControllerYawInput);
PlayerInputComponent->BindAxis("TurnRate", this, &ABPCommunicationCharacter::TurnAtRate);
PlayerInputComponent->BindAxis("LookUp", this, &APawn::AddControllerPitchInput);
PlayerInputComponent->BindAxis("LookUpRate", this, &ABPCommunicationCharacter::LookUpAtRate);
// handle touch devices
PlayerInputComponent->BindTouch(IE_Pressed, this, &ABPCommunicationCharacter::TouchStarted);
PlayerInputComponent->BindTouch(IE_Released, this, &ABPCommunicationCharacter::TouchStopped);
// VR headset functionality
PlayerInputComponent->BindAction("ResetVR", IE_Pressed, this, &ABPCommunicationCharacter::OnResetVR);
}
void ABPCommunicationCharacter::NotifyActorBeginOverlap(AActor* OtherActor)
{
if (ARotatingActor* RotatingActorCheck =Cast<ARotatingActor>(OtherActor))
{
ActorCheck->SetbCanRotate(true);
}
}
void ABPCommunicationCharacter::NotifyActorEndOverlap(AActor* OtherActor)
{
if (ARotatingActor* RotatingActorCheck = Cast<ARotatingActor>(OtherActor))
{
ActorCheck->SetbCanRotate(false);
}
}
void ABPCommunicationCharacter::OnResetVR()
{
// If BPCommunication is added to a project via 'Add Feature' in the Unreal Editor the dependency on HeadMountedDisplay in BPCommunication.Build.cs is not automatically propagated
// and a linker error will result.
// You will need to either:
// Add "HeadMountedDisplay" to [YourProject].Build.cs PublicDependencyModuleNames in order to build successfully (appropriate if supporting VR).
// or:
// Comment or delete the call to ResetOrientationAndPosition below (appropriate if not supporting VR)
UHeadMountedDisplayFunctionLibrary::ResetOrientationAndPosition();
}
void ABPCommunicationCharacter::TouchStarted(ETouchIndex::Type FingerIndex, FVector Location)
{
Jump();
}
void ABPCommunicationCharacter::TouchStopped(ETouchIndex::Type FingerIndex, FVector Location)
{
StopJumping();
}
void ABPCommunicationCharacter::TurnAtRate(float Rate)
{
// calculate delta for this frame from the rate information
AddControllerYawInput(Rate * BaseTurnRate * GetWorld()->GetDeltaSeconds());
}
void ABPCommunicationCharacter::LookUpAtRate(float Rate)
{
// calculate delta for this frame from the rate information
AddControllerPitchInput(Rate * BaseLookUpRate * GetWorld()->GetDeltaSeconds());
}
void ABPCommunicationCharacter::MoveForward(float Value)
{
if ((Controller != nullptr) && (Value != 0.0f))
{
// find out which way is forward
const FRotator Rotation = Controller->GetControlRotation();
const FRotator YawRotation(0, Rotation.Yaw, 0);
// get forward vector
const FVector Direction = FRotationMatrix(YawRotation).GetUnitAxis(EAxis::X);
AddMovementInput(Direction, Value);
}
}
void ABPCommunicationCharacter::MoveRight(float Value)
{
if ( (Controller != nullptr) && (Value != 0.0f) )
{
// find out which way is right
const FRotator Rotation = Controller->GetControlRotation();
const FRotator YawRotation(0, Rotation.Yaw, 0);
// get right vector
const FVector Direction = FRotationMatrix(YawRotation).GetUnitAxis(EAxis::Y);
// add movement in that direction
AddMovementInput(Direction, Value);
}
}-
[Play (プレイ)] を押して BP_RotateObject アクタに近づいたときのみ、それが回転するかどうか確認します。
![image alt text]()

このセクションの結果
このセクションでは、 Sphere コンポーネント を BPCommunicationCharacter に追加しました。
また、 RotatingActor クラスにキャスティングするのに必要なオーバーラップ ロジックを作成し、 SetbCanRotate 関数という名前を付けました。この関数は、プレイヤーのキャラクターが Sphere コンポーネントとオーバーラップしたときに bCanRotate 変数を True に設定します。
4 - さまざまな回転形状を追加する
次に、 BP_RotatingActor ブループリントから複数の子ブループリント クラスを作成し、プレイヤー キャラクターに反応するさまざまな形状を追加します。これにより、共通の親クラスへのキャスティング機能を維持したまま、子ブループリント クラスを使って機能の変更や追加を行う方法を学びます。
-
コンテンツ ブラウザ で BP_Rotating アクタ を右クリックして、 [Create Child Blueprint Class (子ブループリント クラスの作成)] を選択します。ブループリントに「 BP_RotateObject_Cone 」という名前を付けます。
![image alt text]()
-
1 の手順を 2 回繰り返し、 BP_RotateObject_Pyramid ブループリント クラスと BP_RotateObject_Torus ブループリント クラスを作成します。
![image alt text]()
-
ブループリント エディタで BP_RotateObject_Cone を開き、 [Components (コンポーネント)] タブから Static Mesh コンポーネントを選択します。 [Details (詳細)] パネルから、 [Static Mesh (スタティック メッシュ)] のドロップダウンをクリックし、 Shape_Cone を検索し、選択します。
![image alt text]()
-
Y 軸の [Rotation (回転)] を 90 度に設定します。
![image alt text]()
-
ブループリントを コンパイル して、 保存 します。
-
BP_RotatingActor_Pyramid に対して 3 ~ 5 の手順を繰り返し、スタティック メッシュとして Shape_Quad_Pyramid を選択します。
-
BP_RotatingActor_Torus に対しても 3 ~ 5 の手順を繰り返し、スタティック メッシュとして Shape_Torus を選択します。メッシュを Y 方向に 90 度回転します。
-
それぞれの形状をレベル内にドラッグして [Play (プレイ)] をクリックし、プレイヤーが近づいたときにすべての形状が回転するか確認します。
![image alt text]()
![image alt text]()


このセクションの結果
このセクションでは、 BP_RotateObject ブループリントから複数の子ブループリント クラスを作成し、それぞれに異なる スタティック メッシュ を割り当てました。
また、ブループリント アクタの親クラスにキャスティングすることで共通の関数にアクセスできることも学びました。この場合は、別々の子ブループリントをオーバーラップさせて親クラスにキャスティングし、回転をトリガーしています。
次のステップ
ブループリント キャスティングの使い方が分かったところで、今度は「 アクタ通信 」ドキュメント ページで参照されている他の通信手段を見てみましょう。