Choose your operating system:
Windows
macOS
Linux
このチュートリアルでは、Pawn クラスを拡張することでプレイヤー入力に反応する方法を学習します。
1 - ポーンをカスタマイズする
Unreal Engine 4 にまだ慣れていない場合は、最初に プログラミング クイック スタート ガイド tutorial
-
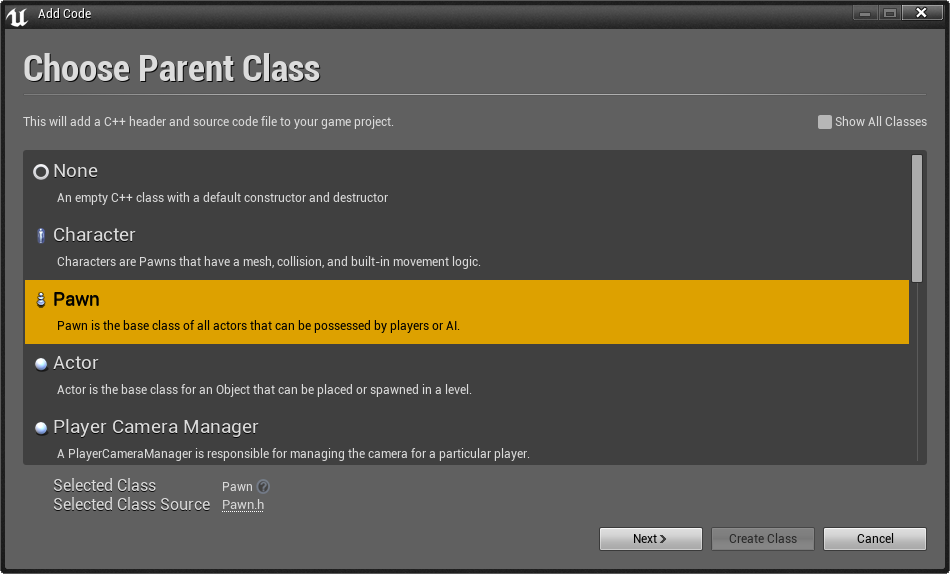
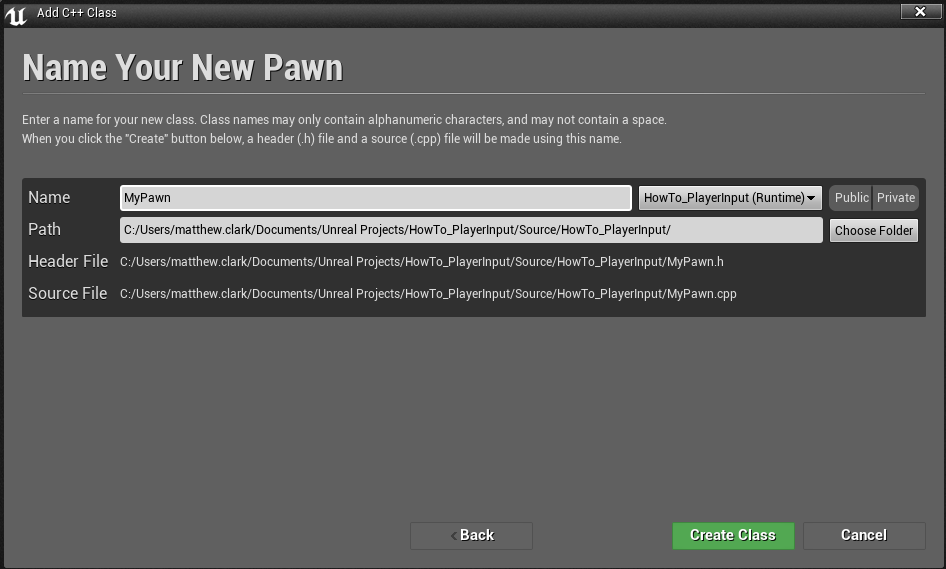
まずスターターコンテンツを有効にして「HowTo_PlayerInput」という名前の新規 Basic Code プロジェクトを作成するところから始めます。その後「MyPawn」と名前を付けたカスタマイズした Pawn クラスをプロジェクトに追加します。
アクタ
![AddPawn.png]()
![NameYourNewPawn.png]()
-
まず、ゲーム開始時に MyPawn がプレイヤー入力に対し自動的に反応するように設定します。Pawn クラスから初期化中に設定できる変数を得ることができます。この変数はプレイヤー入力の自動対応を処理します。「MyPawn.cpp」ファイルの AMyPawn::AMyPawn に以下のコードを追加します。
// Set this pawn to be controlled by the lowest-numbered player (このポーンが最小値のプレイヤーで制御されるように設定) AutoPossessPlayer = EAutoReceiveInput::Player0; -
次に基本的な コンポーネント をいくつか構成します。コードによるコンポーネントの追加や管理に加えて、コンポーネントの一般的な種類の詳細については、 コンポーネントとコリジョン を参照してください。作成するコンポーネントを追跡するには、クラス定義の下にある
MyPawn.hへ以下のコードを追加してください。UPROPERTY(EditAnywhere) USceneComponent* OurVisibleComponent;Unreal Engine で表示されるように UPROPERTY
「MyPawn.cpp」ファイルへ戻って、以下のコードをAMyPawn::AMyPawnに追加します。
// Create a dummy root component we can attach things to.(親子付け可能なダミーのルートコンポーネントを作成) RootComponent = CreateDefaultSubobject<USceneComponent>(TEXT("RootComponent")); // Create a camera and a visible object (カメラと可視オブジェクトを作成) UCameraComponent* OurCamera = CreateDefaultSubobject<UCameraComponent>(TEXT("OurCamera")); OurVisibleComponent = CreateDefaultSubobject<UStaticMeshComponent>(TEXT("OurVisibleComponent")); // Attach our camera and visible object to our root component. (カメラと可視オブジェクトをルートコンポーネントに親子付け) Offset and rotate the camera. (カメラが写す対象の位置に依存するように配置) OurCamera->SetupAttachment(RootComponent); OurCamera->SetRelativeLocation(FVector(-250.0f, 0.0f, 250.0f)); OurCamera->SetRelativeRotation(FRotator(-45.0f, 0.0f, 0.0f)); OurVisibleComponent->SetupAttachment(RootComponent); -
変更を保存してコンパイルできる状態になりました。 Visual Studio の Build コマンドか、 Unreal Engine Editor の [Compile (コンパイル)] ボタンでコンパイルを実行します。
ゲーム入力に対応するカスタマイズ ポーンを作成したので、入力規則を定義しなくてはいけません。入力は Unreal Editor の [Input Settings (入力設定)] で定義します。
Work-In-Progress Code
MyPawn.h
// Copyright 1998-2018 Epic Games, Inc.All Rights Reserved.
#pragma once
#include "GameFramework/Pawn.h"
#include "MyPawn.generated.h"
UCLASS()
class HOWTO_PLAYERINPUT_API AMyPawn : public APawn
{
GENERATED_BODY()
public:
// Sets default values
AMyPawn();
protected:
// Called when the game starts or when spawned
virtual void BeginPlay() override;
public:
// Called every frame
virtual void Tick( float DeltaSeconds ) override;
// Called to bind functionality to input
virtual void SetupPlayerInputComponent(class UInputComponent* InputComponent) override;
UPROPERTY(EditAnywhere)
USceneComponent* OurVisibleComponent;
};MyPawn.cpp
// Copyright 1998-2018 Epic Games, Inc.All Rights Reserved.
#include "HowTo_PlayerInput.h"
#include "MyPawn.h"
// Sets default values
AMyPawn::AMyPawn()
{
// Set this pawn to call Tick() every frame. (フレーム毎に Tick() を呼び出すには、このポーンを設定します)You can turn this off to improve performance if you don't need it. (必要がなければパフォーマンスを向上させるためにオフにすることができます)
PrimaryActorTick.bCanEverTick = true;
// Set this pawn to be controlled by the lowest-numbered player (このポーンが最小値のプレイヤーで制御されるように設定)
AutoPossessPlayer = EAutoReceiveInput::Player0;
// Create a dummy root component we can attach things to.(親子付け可能なダミーのルートコンポーネントを作成)
RootComponent = CreateDefaultSubobject<USceneComponent>(TEXT("RootComponent"));
// Create a camera and a visible object (カメラと可視オブジェクトを作成)
UCameraComponent* OurCamera = CreateDefaultSubobject<UCameraComponent>(TEXT("OurCamera"));
OurVisibleComponent = CreateDefaultSubobject<UStaticMeshComponent>(TEXT("OurVisibleComponent"));
// Attach our camera and visible object to our root component. (カメラと可視オブジェクトをルートコンポーネントに親子付け) Offset and rotate the camera. (カメラが写す対象の位置に依存するように配置)
OurCamera->SetupAttachment(RootComponent);
OurCamera->SetRelativeLocation(FVector(-250.0f, 0.0f, 250.0f));
OurCamera->SetRelativeRotation(FRotator(-45.0f, 0.0f, 0.0f));
OurVisibleComponent->SetupAttachment(RootComponent);
}
// Called when the game starts or when spawned (ゲーム開始時またはスポーン時に呼び出されます)
void AMyPawn::BeginPlay()
{
Super::BeginPlay();
}
// Called every frame (フレーム毎に呼び出されます)
void AMyPawn::Tick( float DeltaTime )
{
Super::Tick( DeltaTime );
}
// Called to bind functionality to input (機能を入力にバインドするために呼び出されます)
void AMyPawn::SetupPlayerInputComponent(class UInputComponent* InputComponent)
{
Super::SetupPlayerInputComponent(InputComponent);
}2 - ゲーム入力を設定する
入力マッピングにはアクション マッピングと軸マッピングのアクションと軸の 2 つのタイプがあります。
-
Action Mappings (アクション マッピング) は、例えばマウスやジョイスティックのボタンで入力する 「yes」 または 「no」 入力と考えるとわかりやすいです。ボタンが押下、リリース、ダブルクリック、または長押しされるとレポートします。ジャンプ動作、射撃動作、またはオブジェクトとのインタラクション動作などの個別のアクションがこのタイプのマッピングの有力候補です。
-
Axis Mappings (軸マッピング) は継続的な入力に使用します。ジョイスティック入力やマウスのカーソル位置など、「どれだけ」の値が入力されたか?と考えると分かりやすいです。移動してない場合でもフレームごとに値をレポートします。ウォーキング、周囲の見回しやビークルの操縦など、大きさや方向を伴う動作は通常はこの手法で処理されます。
入力マッピングはコードに直接定義することもできますが、一般的にはこのチュートリアルで紹介するように Unreal Engine Editor で定義します。
-
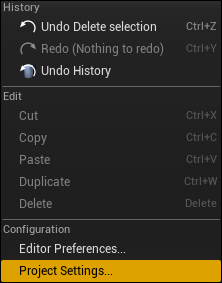
Unreal Engine Editor の [Edit (編集)] ドロップダウン メニューから [Project Settings (プロジェクト設定)] オプションをクリックします。
![EditProjectSettings.png]()
-
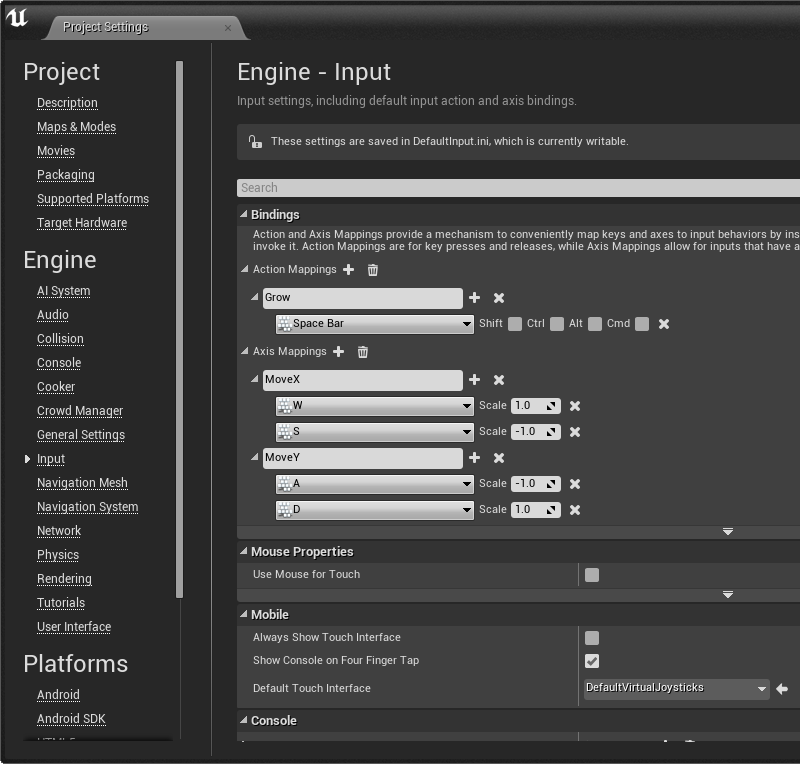
そして左側の [Engine (エンジン)] セクションから [Input (入力)] オプションを選択します。右側に表示される [Bindings (バインディング)] カテゴリを展開して、 [Action Mapping] を 1 つ、 [Axis Mappings] を 2 つ追加します。
[Action Mapping] または [Axis Mapping] セクション見出しの横にある [+] 記号で新しいマッピングを追加します。マッピングを表示または非表示にするには左側の矢印を使います。 マッピングに入力を追加するには、対象のマッピングの横に表示される [+] 記号をクリックします。必要なマッピングと入力は以下の通りです。"S" と A" の入力のマイナス値に留意してください。
Action Mapping
Grow
スペース バー
Axis Mapping
MoveX
W
1.0
S
-1.0
MoveY
A
-1.0
D
1.0
![ConfigureInput.png]()
-
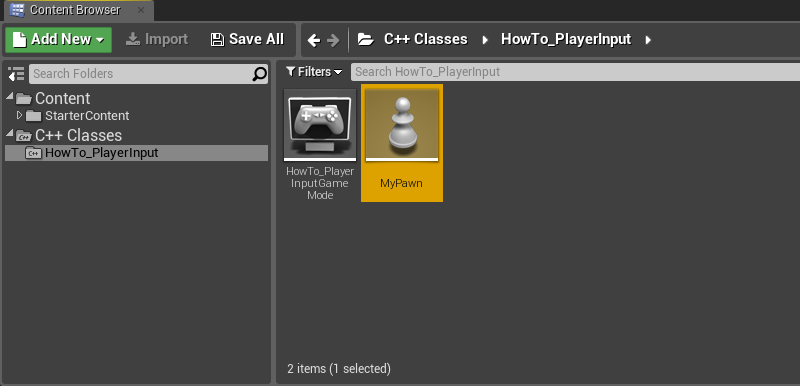
入力の設定が終わりました。次はレベルに MyPawn を設定しましょう。 コンテンツ ブラウザ に MyPawn クラスが表示されて、 レベル エディタ へのドラッグ操作が可能になります。
![ClassInContentBrowser.png]()
![PawnInSceneView.png]()
-
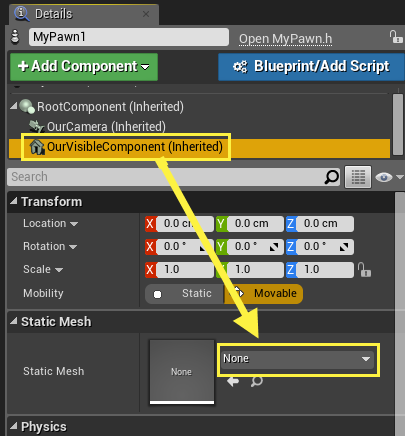
MyPawn の設定に必要な手順がもう 1 つあります。ゲームに表示されるように スタティックメッシュ を割り当てなければいけません。作成したばかりの MyPawn を選択します。そして [Details (詳細)] パネル で [OurVisibleComponent (Inherited)] を選択して、 Static Mesh カテゴリのドロップダウン ボックスからアセットを割り当てます。このチュートリアルでは Shape_Cylinder を使用します。
![StaticMesh.png]()
-
レベルを保存して、配置した MyPawn を定義した入力に対応させるコードを記述するために Visual Studio へ戻ります。

Visual Studio で MyPawn のコードを完成させます。
3 - ゲーム アクションをプログラムおよびバインドする
1. Visual Studio で「MyPawn.h」を開いて MyPawn のクラス定義の下部に以下のコードを追加します。
    //Input functions (入力関数)
    void Move_XAxis(float AxisValue);
    void Move_YAxis(float AxisValue);
    void StartGrowing();
    void StopGrowing();

    //Input variables (入力変数)
    FVector CurrentVelocity;
    bool bGrowing;

[REGION:note]4 つの入力関数は入力イベントとバインドされます。実行時に、新規の入力変数に格納した値を更新します。この値は MyPawn がインゲームの動作を判断するために使用します。[/REGION]-
"MyPawn.cpp" に切り替えて、宣言したばかりの 4 つの関数をプログラミングします。以下のコードを追加します。
void AMyPawn::Move_XAxis(float AxisValue)
{
    // Move at 100 units per second forward or backward (1 秒間に前後へ 100 単位移動)
    CurrentVelocity.X = FMath::Clamp(AxisValue, -1.0f, 1.0f) * 100.0f;
}

void AMyPawn::Move_YAxis(float AxisValue)
{
    // Move at 100 units per second right or left (1 秒間に左右へ 100 単位移動)
    CurrentVelocity.Y = FMath::Clamp(AxisValue, -1.0f, 1.0f) * 100.0f;
}

void AMyPawn::StartGrowing()
{
    bGrowing = true;
}

void AMyPawn::StopGrowing()
{
    bGrowing = false;
}
入力から受け取る値を「-1」から「+1」の範囲に制限するために FMath::Clamp を使用します。この例では問題になりませんが、ひとつの軸に同じように影響を与える複数のキーがあれば、プレイヤーがこうした入力を同時に押すと複数の値がまとめて追加されます。例えば「W」と上向き矢印が両方ともスケール値 1.0 で MoveX にマッピングされている場合は、両方のキーを同時に押すと AxisValue は値 2.0 になります。値の範囲を制限しなければ、結果的にプレイヤーが倍速で移動することになります。
2 つの "Move" 関数は軸値を浮動小数値で受け取る一方で、"Grow" 関数はそうでないことにお気づきかもしれません。これらは軸マッピングである MoveX と MoveY にマッピングされるため、浮動小数点のパラメータを持ちます。アクション マッピングにこのパラメータはありません。
-
入力関数を定義したので、バインドして適切な入力に反応できるようにする必要があります。 AMyPawn::SetupPlayerInputComponent に以下のコードを追加します。
// Respond when our "Grow" key is pressed or released. InputComponent->BindAction("Grow", IE_Pressed, this, &AMyPawn::StartGrowing); InputComponent->BindAction("Grow", IE_Released, this, &AMyPawn::StopGrowing); // Respond every frame to the values of our two movement axes, "MoveX" and "MoveY". InputComponent->BindAxis("MoveX", this, &AMyPawn::Move_XAxis); InputComponent->BindAxis("MoveY", this, &AMyPawn::Move_YAxis); -
これで設定した入力によって更新される変数が用意できました。あとは変数を使って何を行うかのコードを記述するだけです。次のコードを AMyPawn::Tick に追加しましょう。
// Handle growing and shrinking based on our "Grow" action (Grow アクションに基づいて拡大と縮小を処理) { float CurrentScale = OurVisibleComponent->GetComponentScale().X; if (bGrowing) { // Grow to double size over the course of one second (1 秒間に倍のサイズに成長) CurrentScale += DeltaTime; } else { // Shrink half as fast as we grow (拡大と同じ速さで半分に縮小) CurrentScale -= (DeltaTime * 0.5f); } // Make sure we never drop below our starting size, or increase past double size.(開始サイズ以下またはダブルサイズ以上にしない) CurrentScale = FMath::Clamp(CurrentScale, 1.0f, 2.0f); OurVisibleComponent->SetWorldScale3D(FVector(CurrentScale)); } // Handle movement based on our "MoveX" and "MoveY" axes (MoveX や MoveY 軸に基づいて移動を処理) { if (!CurrentVelocity.IsZero()) { FVector NewLocation = GetActorLocation() + (CurrentVelocity * DeltaTime); SetActorLocation(NewLocation); } } -
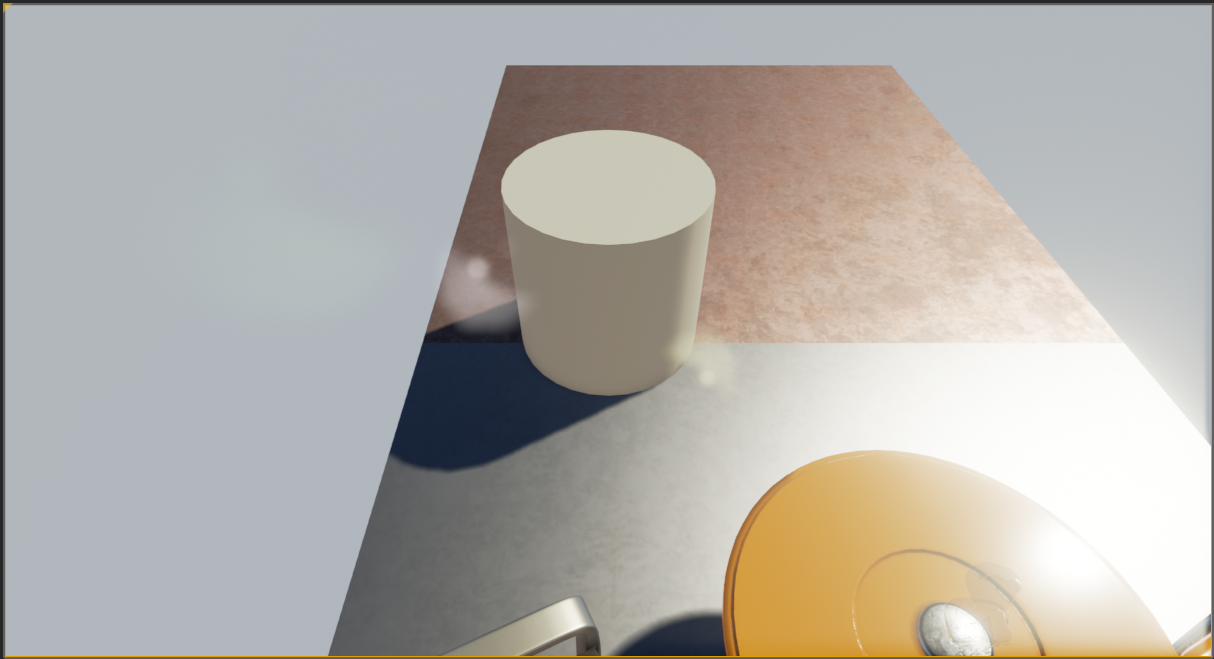
コードをコンパイルした後に Unreal Editor へ戻って Play (再生) を押します。WASD キーで操作可能な Pawn があります。このポーンは スペース バー を押すと拡大、バーをリリースすると縮小します。

完成コード
MyPawn.h
// Copyright 1998-2018 Epic Games, Inc.All Rights Reserved.

#pragma once

#include "GameFramework/Pawn.h"
#include "MyPawn.generated.h"

UCLASS()
class HOWTO_PLAYERINPUT_API AMyPawn : public APawn
{
    GENERATED_BODY()

public:
    // Sets default values
    AMyPawn();

protected:
    // Called when the game starts or when spawned (ゲーム開始時またはスポーン時に呼び出されます)
    virtual void BeginPlay() override;
        public:

    // Called every frame (フレーム毎に呼び出されます)
    virtual void Tick(float DeltaSeconds) override;

    // Called to bind functionality to input (機能を入力にバインドするために呼び出されます)
    virtual void SetupPlayerInputComponent(class UInputComponent* InputComponent) override;

    UPROPERTY(EditAnywhere)
    USceneComponent* OurVisibleComponent;

    //Input functions (入力関数)
    void Move_XAxis(float AxisValue);
    void Move_YAxis(float AxisValue);
    void StartGrowing();
    void StopGrowing();

    //Input variables (入力変数)
    FVector CurrentVelocity;
    bool bGrowing;
};
MyPawn.cpp
// Copyright 1998-2018 Epic Games, Inc.All Rights Reserved.

#include "HowTo_PlayerInput.h"
#include "MyPawn.h"

// Sets default values
AMyPawn::AMyPawn()
{
    // Set this pawn to call Tick() every frame. (フレーム毎に Tick() を呼び出すには、このポーンを設定します)You can turn this off to improve performance if you don't need it. (必要がなければパフォーマンスを向上させるためにオフにすることができます)
    PrimaryActorTick.bCanEverTick = true;

    // Set this pawn to be controlled by the lowest-numbered player (このポーンが最小値のプレイヤーで制御されるように設定)
    AutoPossessPlayer = EAutoReceiveInput::Player0;

    // Create a dummy root component we can attach things to.(親子付け可能なダミーのルートコンポーネントを作成)
    RootComponent = CreateDefaultSubobject<USceneComponent>(TEXT("RootComponent"));
    // Create a camera and a visible object (カメラと可視オブジェクトを作成)
    UCameraComponent* OurCamera = CreateDefaultSubobject<UCameraComponent>(TEXT("OurCamera"));
    OurVisibleComponent = CreateDefaultSubobject<UStaticMeshComponent>(TEXT("OurVisibleComponent"));
    // Attach our camera and visible object to our root component. (カメラと可視オブジェクトをルートコンポーネントに親子付け)Offset and rotate the camera. (カメラが写す対象の位置に依存するように配置)
    OurCamera->SetupAttachment(RootComponent);
    OurCamera->SetRelativeLocation(FVector(-250.0f, 0.0f, 250.0f));
    OurCamera->SetRelativeRotation(FRotator(-45.0f, 0.0f, 0.0f));
    OurVisibleComponent->SetupAttachment(RootComponent);
}

// Called when the game starts or when spawned (ゲーム開始時またはスポーン時に呼び出されます)
void AMyPawn::BeginPlay()
{
    Super::BeginPlay();

}

// Called every frame (フレーム毎に呼び出されます)
void AMyPawn::Tick(float DeltaTime)
{
    Super::Tick(DeltaTime);

    // Handle growing and shrinking based on our "Grow" action (Grow アクションに基づいて拡大と縮小を処理)
    {
        float CurrentScale = OurVisibleComponent->GetComponentScale().X;
        if (bGrowing)
        {
            // Grow to double size over the course of one second (1 秒間に倍のサイズに成長)
            CurrentScale += DeltaTime;
        }
        else
        {
            // Shrink half as fast as we grow (拡大と同じ速さで半分に縮小)
            CurrentScale -= (DeltaTime * 0.5f);
        }
        // Make sure we never drop below our starting size, or increase past double size.(開始サイズ以下またはダブルサイズ以上にしない)
        CurrentScale = FMath::Clamp(CurrentScale, 1.0f, 2.0f);
        OurVisibleComponent->SetWorldScale3D(FVector(CurrentScale));
    }

    // Handle movement based on our "MoveX" and "MoveY" axes (MoveX や MoveY 軸に基づいて移動を処理)
    {
        if (!CurrentVelocity.IsZero())
        {
            FVector NewLocation = GetActorLocation() + (CurrentVelocity * DeltaTime);
            SetActorLocation(NewLocation);
        }
    }
}

// Called to bind functionality to input (機能を入力にバインドするために呼び出されます)
void AMyPawn::SetupPlayerInputComponent(class UInputComponent* InputComponent)
{
    Super::SetupPlayerInputComponent(InputComponent);

    // Respond when our "Grow" key is pressed or released. (Grow キーが押された時またはリリースされた時に反応)
    InputComponent->BindAction("Grow", IE_Pressed, this, &AMyPawn::StartGrowing);
    InputComponent->BindAction("Grow", IE_Released, this, &AMyPawn::StopGrowing);
InputComponent->BindAxis("MoveX", this, &AMyPawn::Move_XAxis);
InputComponent->BindAxis("MoveY", this, &AMyPawn::Move_YAxis);
}
void AMyPawn::Move_XAxis(float AxisValue)
{
// Move at 100 units per second forward or backward (1 秒間に前後へ 100 単位移動)
CurrentVelocity.X = FMath::Clamp(AxisValue, -1.0f, 1.0f) * 100.0f;
}
void AMyPawn::Move_YAxis(float AxisValue)
{
// Move at 100 units per second right or left (1 秒間に左右へ 100 単位移動)
CurrentVelocity.Y = FMath::Clamp(AxisValue, -1.0f, 1.0f) * 100.0f;
}
void AMyPawn::StartGrowing()
{
bGrowing = true;
}
void AMyPawn::StopGrowing()
{
bGrowing = false;
}4 - 応用編
ここまでで学んだ知識を活かして、以下を行ってみましょう。
-
一定の時間、押すと速度が増す方向の制御を実装します。
-
Axis Mapping をクリックし始めた直後に Action Mapping を押すと、オブジェクトを即時にフルスケールへ拡大する特別な入力シーケンスを作成します。
以下はこのチュートリアルの内容の詳しい情報のリンク先です。
-
入力 に関する詳細は 入力値 ページも参照してください。
-
詳しいチュートリアルは「 C++ プログラミングのチュートリアル 」を参照してください。