
Choose your operating system:
Windows
macOS
Linux
The Animation track applies animation to your Skeletal Mesh Actors using Animation Sequence assets in Sequencer. This guide provides an overview of the usage of this track and its properties.
Prerequisites
-
Your project has a Skeletal Mesh actor and can play 애니메이션 시퀀스 in it.
Creation
By default, the Animation track is automatically created under your Actor's track when a Skeletal Mesh Actor class is added to Sequencer. If you have added a different Actor class that supports animation, or have deleted the track, then you can add the track manually by clicking + Track > Animation on the Actor's track, and selecting an Animation Sequence .

Doing this will create the Animation track with an Animation Sequence section at your current playhead time.

Usage
Animation Mode
When a Skeletal Mesh is being animated in Sequencer, its Animation Mode property will switch to Use Custom Mode . This is done to ensure Sequencer drives the Actor's animation using a special Animation Blueprint . This Blueprint enables certain Sequencer behavior on the Animation track, such as animation blending.

Adding Animations
Once an Animation track is created, you can add additional animations to it. There are two ways to do this.
Click the + Animation button on the Animation track and select an Animation Sequence. The animations listed here are filtered to only display compatible animations for the Skeletal Mesh.

You can also drag Animation Sequences from the 콘텐츠 브라우저 into the timeline area of Sequencer. This operation will preview the clip's length and drop points as you drag along the Animation track.

Dragging onto another clip will create a separate track layer for the animation.
Layers and Blending
The Animation track supports multiple track layers, animations, and allows animations to be blended together in various ways.
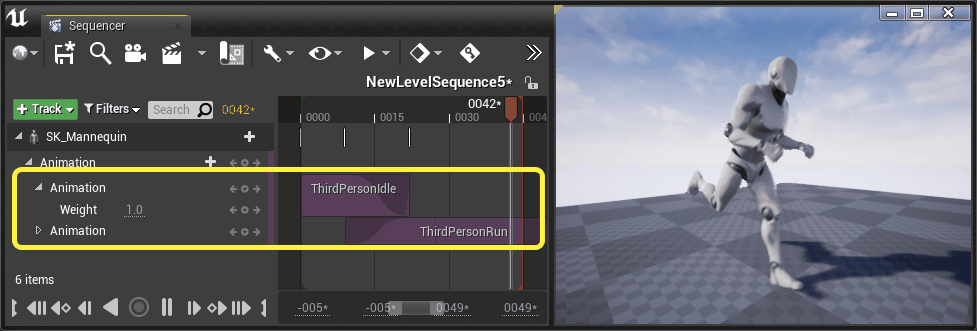
You can add a second animation by clicking on the + Animation button and selecting another Animation Sequence asset. This will add the new sequence to your current playhead time. If your playhead is placed over an animation, then it will create a new track layer for the animation.

You can expand the Animation track to reveal the Weight attribute for the layer, which has a value range of 0-1. Weights can be keyframed to allow for dynamic weighting of animation layers.

Animations can be moved between layers by dragging them up and down the layer stack.

Intersecting two animation sections will create an automatic blend curve between them, and will blend the animations over the duration of the intersection.

You can adjust the Start and End blend curves by selecting and moving the blend curve handle located on the upper portion of the animation section's edge. A curve symbol will appear above the cursor to aid your selection accuracy.

Right-clicking a blend curve will reveal the additional context menu commands.

|
Name |
Description |
|---|---|
|
Easing Length |
The length of the blend curve. Enabling Auto will cause the blend curve to return to the default behavior and support automatic length calculation when intersecting animation sections.
|
|
Method |
Method controls the type of curves to apply to the blend, and enables custom external blends based on functions. |
|
Options |
The Options menu will display a list of curve shapes that you can apply to your blend curve. Selecting one of these will replace your current curve shape with the selected curve.
|


Trim, Loop, and Play Rate
There are various ways you can edit your clips by looping, trimming, and time-scaling them.
Selecting either edge of the section and dragging inward will trim the section.

You can also split a selected animation section at the current playhead time by pressing Ctrl + / .

Trim and split commands are located in the Edit menu when right-clicking a section.

Sections can be looped by dragging the right-side edge outward. Loop segments are indicated by notches in the section.

Holding Ctrl when hovering on a section edge will engage the Play Rate modifier.

Once the Play Rate modifier is engaged, dragging the clip edge will scale the clip's playback rate instead of looping or trimming.

If you have trimmed or looped a sequence and want to restore it to its original length, you can right-click it and select Edit > Auto Size .

Properties
Animation tracks display the following properties when right-clicking them and navigating to the Properties menu.

|
Name |
Description |
|---|---|
|
Section Range Start |
The start time of the animation section. |
|
Section Range End |
The end time of the animation section. |
|
When Finished |
Determines what the Actor should do when the animation section finishes.
|
|
Timecode Source |
The timecode information for the clip, if timecode is being used. You can also specify delta frames here to control offset information. |
|
Is Active |
Activates the selected section. This is similar to Muting Tracks , but is used for sections instead of tracks.
|
|
Is Locked |
Locks the selected section. This is similar to Locking Tracks , but for sections instead of tracks.
|
|
Pre/Post Roll Frames |
Specifies the extra padding to apply to the start and end regions of your animation track. This padding causes the first and last frame of the animation to be held for the specified duration. The roll visual can be enabled or disabled in Sequencer's Editor Preferences to preview this padding in the timeline.
|
|
Animation |
The Animation Sequence asset being referenced. |
|
First Loop Start Frame Offset |
When the sequence is being looped, this property controls the amount of start trim to apply to the first loop of the sequence. Subsequent loops will be full length. When holding the Shift key, you can also change this value directly by dragging your mouse left and right.
|
|
Start/End Frame Offsets |
The frame offset properties control the amount of offset to apply to the start and end of a section. The result is an effect similar to trimming, but looping will now respect these trimmed regions as the new loop segments. |
|
Play Rate |
The playback speed of the section. A value of 1.0 will result in normal-speed playback, lower values will playback more slowly, and higher numbers will playback more quickly. |
|
Reverse |
Enabling this will cause the sequence to play backwards, reversing the animation. |
|
Slot Name |
Specifies the Anim Slot to play animation from. Anim Slots are containers that can be used in 애니메이션 블루프린트 to allow for Sequencer to utilize Animation Blueprint logic in addition to the playback of Animation Sequences. In order to use Slot Name you must also set the Animation Mode of your Skeletal Mesh to use the appropriate Animation Blueprint .
|
|
Skip Anim Notifiers |
When enabled, any Animation Notifies for this animation will be ignored, and will not be triggered. |
|
Force Custom Mode |
When enabled, the Skeletal Mesh's Animation Mode will be forced into using Custom Mode for the duration of this animation. |
|
Start Location Offset |
Specifies the location offset to apply to the Actor at the beginning of its animation when using root motion. |
|
Start Rotation Offset |
Specifies the rotation offset to apply to the Actor at the beginning of its animation when using root motion. |
|
Show Skeleton |
Draws a skeleton in the viewport for this animation sequence. Multiple animation sequence skeletons can also be enabled at once, allowing for the display of multiple skeletons per animation on the same character. This is useful when using Sequencer's 비선형 애니메이션 .
|


Blending Tools
The Animation Track also supports aligning bones in order to better support dynamic blending. Visit the 비선형 애니메이션 page to learn more about this feature.