Choose your operating system:
Windows
macOS
Linux
-
앞으로 생성할 메뉴는 User Widget (유저 위젯)으로 만듭니다. 유저 위젯 을 새로 만들어 표시하는 함수를 작성한 뒤, 게임이 시작되면 그 함수를 호출하겠습니다. 나중에 제거할 수 있도록 만든 것들을 기록할 필요도 있습니다. 각 프로젝트에는 커스텀 Game Mode (게임 모드) 클래스가 딸려오므로, 그냥
HowTo_UMGGameMode.h에 정의된 것을 열면 됩니다. 클래스 하단에 다음 함수와 프로퍼티를 추가해 줘야 합니다:public: /** Remove the current menu widget and create a new one from the specified class, if provided. */ UFUNCTION(BlueprintCallable, Category = "UMG Game") void ChangeMenuWidget(TSubclassOf<UUserWidget> NewWidgetClass); protected: /** Called when the game starts. */ virtual void BeginPlay() override; /** The widget class we will use as our menu when the game starts. */ UPROPERTY(EditAnywhere, BlueprintReadOnly, Category = "UMG Game") TSubclassOf<UUserWidget> StartingWidgetClass; /** The widget instance that we are using as our menu. */ UPROPERTY() UUserWidget* CurrentWidget; -
코드에 유저 위젯 을 사용하기 위해서, "#include" 섹션 상단에 다음 줄을 추가합니다:
#include "Blueprint/UserWidget.h" -
이제
HowTo_UMGGameMode.cpp로 가서, 선언한 두 함수의 본문을 채워줘야 합니다. BeginPlay() 를 덮어쓰는 것으로 시작하겠습니다:void AHowTo_UMGGameMode::BeginPlay() { Super::BeginPlay(); ChangeMenuWidget(StartingWidgetClass); }[REGION:note](Super 라는 단어로 참조되는)부모 클래스에서의 함수를 덮어쓸 때는, 여기 BeginPlay 에서 하듯이, 종종 해당 함수의 부모 클래스 버전을 호출하는 것이 중요합니다. 함수 우리 버전은 그저 기존 절차의 끝에 한 단계를 추가하기 위한 것이므로, 함수 첫 줄에 Super::BeginPlay -
다음으로 계속
HowTo_UMGGameMode.cpp에서, 메뉴간의 전환 방식을 정의해 줘야 합니다. 뷰포트에 활성화된 유저 위젯 이 있다면 제거해 줘야 합니다. 그 후 유저 위젯 을 새로 만들어 뷰포트에 추가해 주면 됩니다.void AHowTo_UMGGameMode::ChangeMenuWidget(TSubclassOf<UUserWidget> NewWidgetClass) { if (CurrentWidget != nullptr) { CurrentWidget->RemoveFromViewport(); CurrentWidget = nullptr; } if (NewWidgetClass != nullptr) { CurrentWidget = CreateWidget<UUserWidget>(GetWorld(), NewWidgetClass); if (CurrentWidget != nullptr) { CurrentWidget->AddToViewport(); } } }위젯 인스턴스를 만들어 화면에 넣습니다. 언리얼 엔진 은 한 번에 다수의 위젯 표시 및 상호작용 처리가 가능하기는 하지만, 한 번에 하나만 활성화되도록 제거를 하기도 합니다. 위젯 을 직접 소멸시킬 필요는 절대 없는데, 뷰포트에서의 제거 및 참조하는 모든 변수 소거( 또는 변경) 작업은 언리얼 엔진
-
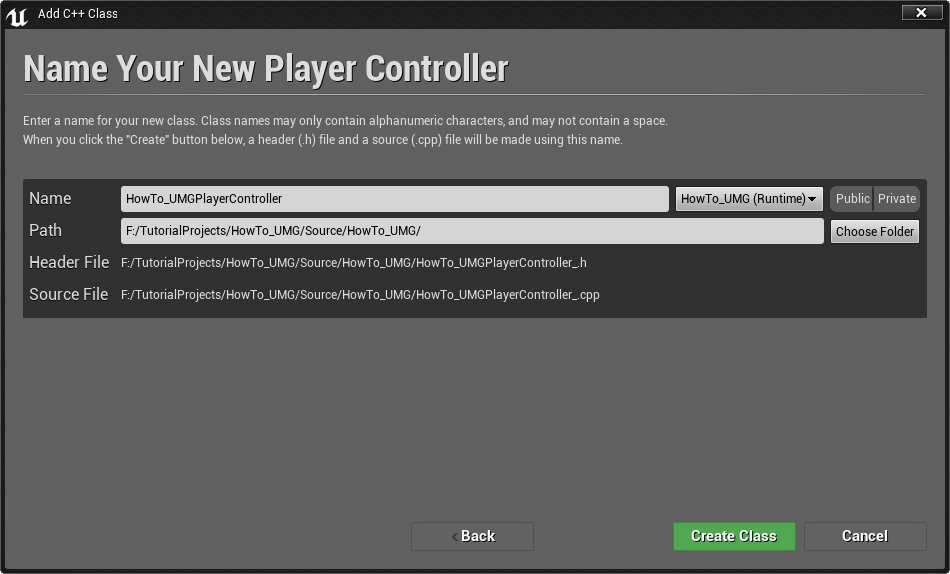
마지막으로, Player Controller 클래스에 입력 모드를 설정해 줘야 합니다. 그러기 위해 Player Controller 를 기반으로 프로젝트에 새로운 C++ 클래스를 추가하겠습니다. 이 클래스 안에서, 게임이 시작될 때 다른 함수 하나 추가로 호출해 주기만 하면 UI 요소와의 상호작용이 가능한지 확인할 수 있습니다.
![NewClass.png]()
![PlayerController.png]()
HowTo_UMGPlayerController.h 에서, 클래스에 다음 오버라이드를 추가합니다:
public: virtual void BeginPlay() override;In HowTo_UMGPlayerController.cpp, we will add our overridden function:
void AHowTo_UMGPlayerController::BeginPlay() { Super::BeginPlay(); SetInputMode(FInputModeGameAndUI()); }

메뉴 생성 및 표시, 더이상 필요치 않게 되면 제거를 위한 코드 프레임워크를 만들었습니다. 이제 언리얼 에디터 로 돌아가 메뉴 애셋을 디자인할 준비가 되었습니다!
완성 코드
HowTo_UMG.Build.cs
// Copyright 1998-2018 Epic Games, Inc. All Rights Reserved.
using UnrealBuildTool;
public class HowTo_UMG : ModuleRules
{
public HowTo_UMG(TargetInfo Target)
{
PublicDependencyModuleNames.AddRange(new string[] { "Core", "CoreUObject", "Engine", "InputCore", "UMG" });
//PrivateDependencyModuleNames.AddRange(new string[] { });
// Uncomment if you are using Slate UI
PrivateDependencyModuleNames.AddRange(new string[] { "Slate", "SlateCore" });
// Uncomment if you are using online features
// PrivateDependencyModuleNames.Add("OnlineSubsystem");
// if ((Target.Platform == UnrealTargetPlatform.Win32) || (Target.Platform == UnrealTargetPlatform.Win64))
// {
// if (UEBuildConfiguration.bCompileSteamOSS == true)
// {
// DynamicallyLoadedModuleNames.Add("OnlineSubsystemSteam");
// }
// }
}
}HowTo_UMGGameMode.h
// Copyright 1998-2018 Epic Games, Inc. All Rights Reserved.
#pragma once
#include "Blueprint/UserWidget.h"
#include "GameFramework/GameModeBase.h"
#include "HowTo_UMGGameMode.generated.h"
/**
*
*/
UCLASS()
class HOWTO_UMG_API AHowTo_UMGGameMode : public AGameModeBase
{
GENERATED_BODY()
public:
    /** Remove the current menu widget and create a new one from the specified class, if provided. */
    UFUNCTION(BlueprintCallable, Category = "UMG Game")
    void ChangeMenuWidget(TSubclassOf<UUserWidget> NewWidgetClass);

protected:
    /** Called when the game starts. */
    virtual void BeginPlay() override;

    /** The widget class we will use as our menu when the game starts. */
    UPROPERTY(EditAnywhere, BlueprintReadOnly, Category = "UMG Game")
    TSubclassOf<UUserWidget> StartingWidgetClass;

    /** The widget instance that we are using as our menu. */
    UPROPERTY()
    UUserWidget* CurrentWidget;
};HowTo_UMGGameMode.cpp
// Copyright 1998-2018 Epic Games, Inc. All Rights Reserved.
#include "HowTo_UMG.h"
#include "HowTo_UMGGameMode.h"
void AHowTo_UMGGameMode::BeginPlay()
{
    Super::BeginPlay();
    ChangeMenuWidget(StartingWidgetClass);
}
void AHowTo_UMGGameMode::ChangeMenuWidget(TSubclassOf<UUserWidget> NewWidgetClass)
{
    if (CurrentWidget != nullptr)
    {
        CurrentWidget->RemoveFromViewport();
        CurrentWidget = nullptr;
    }
    if (NewWidgetClass != nullptr)
    {
        CurrentWidget = CreateWidget<UUserWidget>(GetWorld(), NewWidgetClass);
        if (CurrentWidget != nullptr)
        {
            CurrentWidget->AddToViewport();
        }
    }
}HowTo_UMGPlayerController.h
// Copyright 1998-2018 Epic Games, Inc. All Rights Reserved.
#pragma once
#include "GameFramework/PlayerController.h"
#include "HowTo_UMGPlayerController.generated.h"
/**
*
*/
UCLASS()
class HOWTO_UMG_API AHowTo_UMGPlayerController : public APlayerController
{
GENERATED_BODY()
public:
    virtual void BeginPlay() override;
};HowTo_UMGPlayerController.cpp
// Copyright 1998-2018 Epic Games, Inc. All Rights Reserved.
#include "HowTo_UMG.h"
#include "HowTo_UMGPlayerController.h"
void AHowTo_UMGPlayerController::BeginPlay()
{
    Super::BeginPlay();
    SetInputMode(FInputModeGameAndUI());
}